Magic Chef MCWC50DBT, MCBC580DBT User Manual

Wine Cooler
Beverage Cooler
Wine Cooler Model No. MCWC50DBT
Beverage Cooler Model No. MCBC580DBT
. Before Putting Into Use . . . . . . . . . . . . . . . . . |
2 |
. Important . . . . . . . . . . . . . . . . . . . . . . . . |
2 |
. Installation . . . . . . . . . . . . . . . . . |
3 |
. Description of the Appliance . . . . . . . . . . . . . . . |
4 |
. Temperature Control . . . . . . . . . . . . . . . . . . . |
5 |
. Maintenance and Cleaning . . . . . . . . . . . . . . . . |
6 |
. Trouble Shooting Guide . . . . . . . . . . . . . . . . . |
7 |
. Changing The Reversible Door . . . . . . . . . . . . . . . . . . |
9 |
. Appliance Warranty . . . . . . . . . . . . . . . . . . |
10 |
To ensure proper use of this appliance and your safety, please read the following instructions completely before operating this appliance.

Wine Cooler, Beverage Cooler
Thank you for purchasing this appliance.
We hope it will successfully serve your requirements for many years.
SAVE THESE INSTRUCTIONS
Before Putting Into Use . . . . . . . . . . . . . |
2 |
Important . . . . . . . . . . . . . . . . . . . . . |
2 |
Disposing of Worn Out Appliances |
|
Tips for Energy Savings |
|
Installation . . . . . . . . . . . . . . . . . . . |
3 |
Built-in Installation |
|
Free Standing Installation |
|
Description of the Appliance . . . . . . . . . . . . 4 |
|
Wine Cooler MCWC50DBT |
|
Beverage Cooler MCBC580DBT |
|
Temperature Control and Display . . . . . . . . . |
5 |
Wine Cooler MCWC50DBT |
|
Beverage Cooler MCBC580DBT |
|
Maintenance and Cleaning . . . . . . . . . . . . . |
6 |
Automatic Defrosting of the appliance |
|
Cleaning of the Appliance |
|
Replacing the Bulb |
|
Switch Off the Appliance When Not In Use |
|
Trouble-Shooting Guide . . . . . . . . . . . . . . . 7 |
|
Changing The Reversible Door . . . . . . . . . . |
9 |
Appliance Warranty . . . . . . . . . . . . . . . . |
10 |
1

Before Putting Into Use
·Before connecting the appliance to electrical power supply, leave it to stand for about 4 hours, which will reduce the possibility of malfunctions in the cooling system due to transport handling.
·Clean the appliance thoroughly, especially in the interior (See Cleaning and Maintenance).
·In case the interior accessories are not correctly placed, rearrange them as described in chapter "Description of the Appliance".
·These instructions for use are intended for the user. They describe the appliance and correct operating procedures for safe use .
SAVE THESE INSTRUCTIONS:
Important
·If you have bought this appliance to replace an old one equipped with a door lock that cannot be opened from the inside (lock, bolt), make sure that the lock is removed, disabled or destroyed before discarding. This will make it impossible for children to accidentally lock themselves inside the appliance and suffocate.
·To avoid risk of child entrapment, leave the shelves in place so children can not easily climb inside even when the appliance is in routine use or not in use at home.
·The appliance must be properly connected to an electrical power supply. (See: Connection to Power Supply) .
·Do not use an extension cord.
·Always disconnect the appliance from the power supply before cleaning the appliance, or attempting repairs.
WARNING:
. Repairs should be performed by qualified service personnel only.
·Do not defrost the appliance with other electric appliances (for example a hair dryer) and never attempt to scrape/remove ice/frost with sharp objects.
·The cooling system of the appliance is filled with refrigerant and oil ,so when the appliance is damaged, handle it with care and dispose of it in compliance with environmental protection safeguards.
·The rating plate containing Model No and other technical data specific to this unit, is located either inside the appliance or outside on the rear wall.
Disposing of Worn Out Appliances
·DANGER OR WARNING: Risk of child entrapment. Before you throw away your old appliance:
-Take off the doors
-Leave the shelves in place so children may not easily climb inside.
·Refrigerant: All refrigeration products contain refrigerants, which under the guidelines of federal law must be removed before disposal of product. It is consumer's responsibility to comply with federal and local regulations when disposing of this product.
Be careful not to damage the tubes on the rear wall of the appliance (danger of pollution).
Tips for Energy Saving
·Try not to open the door too often, especially when the weather is hot and humid. Once you open the door , close it as soon as possible. This is especially important if you have an upright model .
·Every now and then check if the appliance is sufficiently ventilated ( adequate air circulation behind the appliance ).
·Set the thermostat from higher to lower settings as soon as possible (depends on how loaded the appliance is, ambient temperatures etc.).
·If the gasket is damaged or the door seal is poor, energy consumption is substantially higher. To restore efficiency, replace the gasket.
2

Installation
BUILT-IN INSTALLATION |
FREE STANDING INSTALLATION |
|
Choose the location |
|
. Be sure the front of the appliance is unobstructed |
|
for air circulation and proper access to the door. |
|
. Do not install the appliance where the temperature |
|
will go below 55°F or above 90°F. |
|
. Do not install where it will be subject to direct |
|
sunlight, heat or moisture. |
|
. Allow sufficient space for door swing. |
|
. This unit is not designed for use in garage or any |
|
other outside installation. |
|
Adjustable Feet |
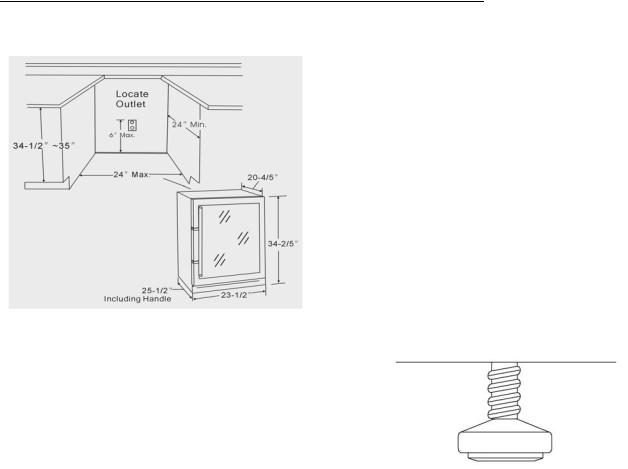
The cutout depth must be 24". |
Some appliances have adjustable feet on the front |
side; use them to level the appliance. |
|
The cutout dimensions shown allows for a full door |
|
swing and access to the pull-out racks when installed |
|
as a built-in. |
|
. The appliance can be installed freestanding. |
|
. If installing between frameless cabinets, a 1/2" wide |
|
filler strip or side panel may be needed on hinge |
|
side. The filler strip will act as a spacer between the |
|
appliance case and adjacent cabinet door swing. |
Note: If you want to change door swing, change it |
The width of the opening must include the filler |
|
panels. Note: The door should protrude 1" beyond |
before installation. |
the surrounding cabinets. |
|
Additional Specifications |
|
. A 120 volt 60Hz., 15 or 20 amp power supply is |
|
required. An individual properly grounded branch |
|
circuit or circuit breaker is recommended. Install a |
|
properly grounded 3-prong electrical receptacle |
|
recessed into the back wall as shown. Electrical must |
|
be located on rear wall as shown. Note: GFI (ground |
|
fault interrupter) is not recommended. |
|
Consult a qualified electrician or serviceman if the |
|
wiring instruction are not clearly understood, or if |
|
doubt exists as to whether the appliance is properly |
|
grounded. |
|
3
 Loading...