


 Loading...
macromedia®
FIREWORKS®2
Using Fireworks
™
macromedia
Licenses and Trademarks
Fireworks was created by Macromedia, Inc. © 1999. All rights reserved. Apple, the Apple Logo, Macintosh, Power Macintosh, Mac OS, and LaserWriter are registered trademarks of Apple Computer, Inc. Java and all Java-based trademarks and logos are trademarks or registered trademarks of Sun Microsystems, Inc. in the U.S. and other countries. GIF-LZW licensed under U.S. Patent No. 4,558,302 and foreign counterparts. This software is based in part on the work of the Independent JPEG Group. The Graphics Interchange Format is Copyright © CompuServe Incorporated. GIF is a Service Mark and the property of CompuServe Incorporated. Portions Copyright © 1988–1992 Sam Leffler. Portions Copyright © 1991, 1992 Silicon Graphics. Photographs used in “Optimizing JPEGs” and “Creating Slices” tutorials are Copyright © 1994 PhotoDisc, Inc.
Fireworks and Microsoft Windows
FIREWORKS OPERATES IN A GRAPHICS ENVIRONMENT CALLED MICROSOFT WINDOWS, CREATED BY MICROSOFT CORPORATION. AN EXTENSION OF THE MS-DOS OPERATING SYSTEM, MICROSOFT WINDOWS GIVES A STANDARD LOOK AND FEEL TO FIREWORKS AND ALL OTHER WINDOWS APPLICATIONS. TO RUN FIREWORKS UNDER MICROSOFT WINDOWS, YOU NEED TO LICENSE AND INSTALL MICROSOFT WINDOWS.
Fireworks and the Apple Macintosh
SYSTEM UTILITIES AND TOOLS ARE COPYRIGHTED PROGRAMS OF APPLE COMPUTER, INC., LICENSED TO MACROMEDIA, INC. TO DISTRIBUTE FOR USE ONLY IN COMBINATION WITH FIREWORKS. APPLE SOFTWARE SHALL NOT BE COPIED ONTO ANOTHER DISK (EXCEPT FOR ARCHIVAL PURPOSES) OR INTO MEMORY UNLESS AS PART OF THE EXECUTION OF FIREWORKS. WHEN FIREWORKS HAS COMPLETED EXECUTION, APPLE SOFTWARE SHALL NOT BE USED BY ANY OTHER PROGRAM. APPLE COMPUTER, INC., MAKES NO WARRANTIES, EITHER EXPRESS OR IMPLIED, REGARDING THE ENCLOSED COMPUTER SOFTWARE PACKAGE, ITS MERCHANTABILITY, OR ITS FITNESS FOR ANY PARTICULAR PURPOSE. THE EXCLUSION OF IMPLIED WARRANTIES IS NOT PERMITTED BY SOME STATES. THE ABOVE EXCLUSION MAY NOT APPLY TO YOU. THIS WARRANTY PROVIDES YOU WITH SPECIFIC LEGAL RIGHTS. THERE MAY BE OTHER RIGHTS THAT YOU HAVE WHICH VARY FROM STATE TO STATE.
U.S. Patents 5,353,396, 5,361,333, 5,434,959, 5,467,443, 5,500,927, 5,594,855 and 5,623,593. Other patents pending.
Macromedia, the Macromedia logo, Authorware, Director, Dreamweaver, Fireworks, Flash, Fontographer, FreeHand, FreeHand Graphics Studio, Macromedia xRes, Shockwave, and Xtra are trademarks or registered trademarks of Macromedia, Inc. Other product names mentioned within this publication may be trademarks of Macromedia, Inc. or other entities.
Copyright © 1999 Macromedia, Inc. All rights reserved. This manual may not be copied, photocopied, reproduced, translated, or converted to any electronic or machine-readable form in whole or in part without prior written approval of Macromedia, Inc.
Macromedia, Inc.
600 Townsend St.
San Francisco, CA 94103
Acknowledgments
Written by Randy Varnell and Rocky Angelucci.
Edited by Monte Williams and Stuart Manning.
Project management by Monte Williams.
Production by Stuart Manning and Rocky Angelucci.
Special thanks to Doug Benson, Dennis Griffin, David Morris, and Mark Haynes.
2

CONTENTS
CHAPTER 1
Getting Your Bearings. . . . . . . . . . . . . . . . . . . . . . . . . . . 9
What’s in this package. . . . . . . . . . . . . . . . . . . . . . . . . . . . . . . . . . . . . . . . . . . . . . . . . . . . . . . . . . . 10 System requirements . . . . . . . . . . . . . . . . . . . . . . . . . . . . . . . . . . . . . . . . . . . . . . . . . . . . . . . . . . . . 10 Windows: . . . . . . . . . . . . . . . . . . . . . . . . . . . . . . . . . . . . . . . . . . . . . . . . . . . . . . . . . . . . . . . . . 10 Macintosh:. . . . . . . . . . . . . . . . . . . . . . . . . . . . . . . . . . . . . . . . . . . . . . . . . . . . . . . . . . . . . . . . . 10 Installing and starting Fireworks . . . . . . . . . . . . . . . . . . . . . . . . . . . . . . . . . . . . . . . . . . . . . . . . 11 Uninstalling Fireworks. . . . . . . . . . . . . . . . . . . . . . . . . . . . . . . . . . . . . . . . . . . . . . . . . . . . . . . . . . 12 Resources for learning Fireworks . . . . . . . . . . . . . . . . . . . . . . . . . . . . . . . . . . . . . . . . . . . . . . . . 12 What’s unique about Fireworks? . . . . . . . . . . . . . . . . . . . . . . . . . . . . . . . . . . . . . . . . . . . . . . . . 13 Welcome to Fireworks . . . . . . . . . . . . . . . . . . . . . . . . . . . . . . . . . . . . . . . . . . . . . . . . . . . . . . . . . . 14 What is Fireworks? . . . . . . . . . . . . . . . . . . . . . . . . . . . . . . . . . . . . . . . . . . . . . . . . . . . . . . . . 14 Using the document window. . . . . . . . . . . . . . . . . . . . . . . . . . . . . . . . . . . . . . . . . . . . . . . . . . . . 15 View Controls toolbar . . . . . . . . . . . . . . . . . . . . . . . . . . . . . . . . . . . . . . . . . . . . . . . . . . . . . 21 Using the toolbars. . . . . . . . . . . . . . . . . . . . . . . . . . . . . . . . . . . . . . . . . . . . . . . . . . . . . . . . . . 21 Navigating and viewing the document . . . . . . . . . . . . . . . . . . . . . . . . . . . . . . . . . . . . . . . . . .32 Setting document magnification . . . . . . . . . . . . . . . . . . . . . . . . . . . . . . . . . . . . . . . . . . .32 Shortcut menus . . . . . . . . . . . . . . . . . . . . . . . . . . . . . . . . . . . . . . . . . . . . . . . . . . . . . . . . . . . .33 Multiple document views . . . . . . . . . . . . . . . . . . . . . . . . . . . . . . . . . . . . . . . . . . . . . . . . . .33 Optimizing document redraw. . . . . . . . . . . . . . . . . . . . . . . . . . . . . . . . . . . . . . . . . . . . . .34 A Case Study: With and Without Fireworks . . . . . . . . . . . . . . . . . . . . . . . . . . . . . . . . . . .34 The Fireworks way. . . . . . . . . . . . . . . . . . . . . . . . . . . . . . . . . . . . . . . . . . . . . . . . . . . . . . . . .35
Setting up your document. . . . . . . . . . . . . . . . . . . . . . . . . . . . . . . . . . . . . . . . . . . . . . . . . . . . . . .37 Importing and Exporting. . . . . . . . . . . . . . . . . . . . . . . . . . . . . . . . . . . . . . . . . . . . . . . . . . . . . . . 40 Importing bitmap images . . . . . . . . . . . . . . . . . . . . . . . . . . . . . . . . . . . . . . . . . . . . . . . . . 40 Importing vector art. . . . . . . . . . . . . . . . . . . . . . . . . . . . . . . . . . . . . . . . . . . . . . . . . . . . . . . 40 Exporting . . . . . . . . . . . . . . . . . . . . . . . . . . . . . . . . . . . . . . . . . . . . . . . . . . . . . . . . . . . . . . . . . .41
Contents 3

CHAPTER 2
Creating and Editing a Graphic . . . . . . . . . . . . . . . . . .43
Object mode and image edit mode. . . . . . . . . . . . . . . . . . . . . . . . . . . . . . . . . . . . . . . . . . . . . . 44 Fireworks drawing and editing tools. . . . . . . . . . . . . . . . . . . . . . . . . . . . . . . . . . . . . . . 44 Editing path objects . . . . . . . . . . . . . . . . . . . . . . . . . . . . . . . . . . . . . . . . . . . . . . . . . . . . . . . . . . . . .45 Using path operations to reshape paths . . . . . . . . . . . . . . . . . . . . . . . . . . . . . . . . . . . . 48 Drawing in object mode . . . . . . . . . . . . . . . . . . . . . . . . . . . . . . . . . . . . . . . . . . . . . . . . . . 48 Editing in object mode . . . . . . . . . . . . . . . . . . . . . . . . . . . . . . . . . . . . . . . . . . . . . . . . . . . . .50 Image edit mode basics . . . . . . . . . . . . . . . . . . . . . . . . . . . . . . . . . . . . . . . . . . . . . . . . . . . . . . . . . .52 Switching to image edit mode . . . . . . . . . . . . . . . . . . . . . . . . . . . . . . . . . . . . . . . . . . . . . .52 Converting an object to an image. . . . . . . . . . . . . . . . . . . . . . . . . . . . . . . . . . . . . . . . . . .54 Using Xtras . . . . . . . . . . . . . . . . . . . . . . . . . . . . . . . . . . . . . . . . . . . . . . . . . . . . . . . . . . . . . . . .54 Transforming and distorting objects . . . . . . . . . . . . . . . . . . . . . . . . . . . . . . . . . . . . . . . .54 Using color. . . . . . . . . . . . . . . . . . . . . . . . . . . . . . . . . . . . . . . . . . . . . . . . . . . . . . . . . . . . . . . . . . . . . .55 Using the Color Mixer . . . . . . . . . . . . . . . . . . . . . . . . . . . . . . . . . . . . . . . . . . . . . . . . . . . . 56 Using the Swatches panel . . . . . . . . . . . . . . . . . . . . . . . . . . . . . . . . . . . . . . . . . . . . . . . . . .57 System color pickers. . . . . . . . . . . . . . . . . . . . . . . . . . . . . . . . . . . . . . . . . . . . . . . . . . . . . . . .58 Using color wells . . . . . . . . . . . . . . . . . . . . . . . . . . . . . . . . . . . . . . . . . . . . . . . . . . . . . . . . . . .58 Applying strokes and fills . . . . . . . . . . . . . . . . . . . . . . . . . . . . . . . . . . . . . . . . . . . . . . . . . . . . . . . .59 The Stroke panel . . . . . . . . . . . . . . . . . . . . . . . . . . . . . . . . . . . . . . . . . . . . . . . . . . . . . . . . . . 60 The Fill panel . . . . . . . . . . . . . . . . . . . . . . . . . . . . . . . . . . . . . . . . . . . . . . . . . . . . . . . . . . . . . .61 Using styles . . . . . . . . . . . . . . . . . . . . . . . . . . . . . . . . . . . . . . . . . . . . . . . . . . . . . . . . . . . . . . . .63 Adding texture. . . . . . . . . . . . . . . . . . . . . . . . . . . . . . . . . . . . . . . . . . . . . . . . . . . . . . . . . . . . 64 Applying effects to objects . . . . . . . . . . . . . . . . . . . . . . . . . . . . . . . . . . . . . . . . . . . . . . . . . . . . . . .65 Live Effects . . . . . . . . . . . . . . . . . . . . . . . . . . . . . . . . . . . . . . . . . . . . . . . . . . . . . . . . . . . . . . . .65 Using Xtras . . . . . . . . . . . . . . . . . . . . . . . . . . . . . . . . . . . . . . . . . . . . . . . . . . . . . . . . . . . . . . . 67 Using text . . . . . . . . . . . . . . . . . . . . . . . . . . . . . . . . . . . . . . . . . . . . . . . . . . . . . . . . . . . . . . . . . . . . . . 67 Using the Text Editor . . . . . . . . . . . . . . . . . . . . . . . . . . . . . . . . . . . . . . . . . . . . . . . . . . . . . 68 Attaching text to a path . . . . . . . . . . . . . . . . . . . . . . . . . . . . . . . . . . . . . . . . . . . . . . . . . . . 69 Controlling document size and resolution . . . . . . . . . . . . . . . . . . . . . . . . . . . . . . . . . .70 Resampling . . . . . . . . . . . . . . . . . . . . . . . . . . . . . . . . . . . . . . . . . . . . . . . . . . . . . . . . . . . . . . . .70 Organizing your document. . . . . . . . . . . . . . . . . . . . . . . . . . . . . . . . . . . . . . . . . . . . . . . . . . . . . . 71 Grouping objects. . . . . . . . . . . . . . . . . . . . . . . . . . . . . . . . . . . . . . . . . . . . . . . . . . . . . . . . . . . 71 Arranging objects on a layer . . . . . . . . . . . . . . . . . . . . . . . . . . . . . . . . . . . . . . . . . . . . . . . .72 Using layers . . . . . . . . . . . . . . . . . . . . . . . . . . . . . . . . . . . . . . . . . . . . . . . . . . . . . . . . . . . . . . . .72 Using frames. . . . . . . . . . . . . . . . . . . . . . . . . . . . . . . . . . . . . . . . . . . . . . . . . . . . . . . . . . . . . . . 74
4Contents

Find and Replace. . . . . . . . . . . . . . . . . . . . . . . . . . . . . . . . . . . . . . . . . . . . . . . . . . . . . . . . . . . . . . . . 74 Finding and replacing text. . . . . . . . . . . . . . . . . . . . . . . . . . . . . . . . . . . . . . . . . . . . . . . . . .76 Finding and replacing fonts . . . . . . . . . . . . . . . . . . . . . . . . . . . . . . . . . . . . . . . . . . . . . . . .77 Finding and Replacing colors. . . . . . . . . . . . . . . . . . . . . . . . . . . . . . . . . . . . . . . . . . . . . . .77 Finding and Replacing URLs. . . . . . . . . . . . . . . . . . . . . . . . . . . . . . . . . . . . . . . . . . . . . .78
Symbols and instances. . . . . . . . . . . . . . . . . . . . . . . . . . . . . . . . . . . . . . . . . . . . . . . . . . . . . . . . . . .78 Creating a symbol. . . . . . . . . . . . . . . . . . . . . . . . . . . . . . . . . . . . . . . . . . . . . . . . . . . . . . . . . .78 Creating an instance . . . . . . . . . . . . . . . . . . . . . . . . . . . . . . . . . . . . . . . . . . . . . . . . . . . . . . .79 Modifying a symbol. . . . . . . . . . . . . . . . . . . . . . . . . . . . . . . . . . . . . . . . . . . . . . . . . . . . . . . .79 Modifying an instance . . . . . . . . . . . . . . . . . . . . . . . . . . . . . . . . . . . . . . . . . . . . . . . . . . . . .79 Working with symbols and instances . . . . . . . . . . . . . . . . . . . . . . . . . . . . . . . . . . . . . .79 Tweening . . . . . . . . . . . . . . . . . . . . . . . . . . . . . . . . . . . . . . . . . . . . . . . . . . . . . . . . . . . . . . . . . .80
Compositing . . . . . . . . . . . . . . . . . . . . . . . . . . . . . . . . . . . . . . . . . . . . . . . . . . . . . . . . . . . . . . . . . . . . 81 Using the Object inspector . . . . . . . . . . . . . . . . . . . . . . . . . . . . . . . . . . . . . . . . . . . . . . . . . 81 Using blending modes . . . . . . . . . . . . . . . . . . . . . . . . . . . . . . . . . . . . . . . . . . . . . . . . . . . . . 81 Masking . . . . . . . . . . . . . . . . . . . . . . . . . . . . . . . . . . . . . . . . . . . . . . . . . . . . . . . . . . . . . . . . . . .83
CHAPTER 3
Importing and Exporting . . . . . . . . . . . . . . . . . . . . . . . .85
Fireworks in the workflow . . . . . . . . . . . . . . . . . . . . . . . . . . . . . . . . . . . . . . . . . . . . . . . . . . . . . 86 Importing . . . . . . . . . . . . . . . . . . . . . . . . . . . . . . . . . . . . . . . . . . . . . . . . . . . . . . . . . . . . . . . . . . . . . . 86 Import File dialog box. . . . . . . . . . . . . . . . . . . . . . . . . . . . . . . . . . . . . . . . . . . . . . . . . . . . . 86 Drag and drop . . . . . . . . . . . . . . . . . . . . . . . . . . . . . . . . . . . . . . . . . . . . . . . . . . . . . . . . . . . . .87 Copy and paste. . . . . . . . . . . . . . . . . . . . . . . . . . . . . . . . . . . . . . . . . . . . . . . . . . . . . . . . . . . . .87 Importing text . . . . . . . . . . . . . . . . . . . . . . . . . . . . . . . . . . . . . . . . . . . . . . . . . . . . . . . . . . . . .88 Importing Fireworks files . . . . . . . . . . . . . . . . . . . . . . . . . . . . . . . . . . . . . . . . . . . . . . . . . .88 Importing FreeHand, Illustrator, or CorelDRAW files . . . . . . . . . . . . . . . . . . . . 89 Importing animated GIFs. . . . . . . . . . . . . . . . . . . . . . . . . . . . . . . . . . . . . . . . . . . . . . . . . 90 Importing from a scanner or digital camera. . . . . . . . . . . . . . . . . . . . . . . . . . . . . . . . 90 Exporting . . . . . . . . . . . . . . . . . . . . . . . . . . . . . . . . . . . . . . . . . . . . . . . . . . . . . . . . . . . . . . . . . . . . . . .91 Using Export Preview . . . . . . . . . . . . . . . . . . . . . . . . . . . . . . . . . . . . . . . . . . . . . . . . . . . . . . . . . . .93 Preview area . . . . . . . . . . . . . . . . . . . . . . . . . . . . . . . . . . . . . . . . . . . . . . . . . . . . . . . . . . . . . . 94 Options panel. . . . . . . . . . . . . . . . . . . . . . . . . . . . . . . . . . . . . . . . . . . . . . . . . . . . . . . . . . . . . .95
Contents 5

Working with color palettes . . . . . . . . . . . . . . . . . . . . . . . . . . . . . . . . . . . . . . . . . . . . . . . . . . . . 96 Using palettes for drawing and creating. . . . . . . . . . . . . . . . . . . . . . . . . . . . . . . . . . . . 96 Using palettes for exporting . . . . . . . . . . . . . . . . . . . . . . . . . . . . . . . . . . . . . . . . . . . . . . . .97 Setting the number of colors in the palette. . . . . . . . . . . . . . . . . . . . . . . . . . . . . . . . . .97 Editing colors in a palette . . . . . . . . . . . . . . . . . . . . . . . . . . . . . . . . . . . . . . . . . . . . . . . . . 98 Saving a palette. . . . . . . . . . . . . . . . . . . . . . . . . . . . . . . . . . . . . . . . . . . . . . . . . . . . . . . . . . . .100 Using Dithering . . . . . . . . . . . . . . . . . . . . . . . . . . . . . . . . . . . . . . . . . . . . . . . . . . . . . . . . . .100 Adjusting transparency . . . . . . . . . . . . . . . . . . . . . . . . . . . . . . . . . . . . . . . . . . . . . . . . . . . 101 Optimize . . . . . . . . . . . . . . . . . . . . . . . . . . . . . . . . . . . . . . . . . . . . . . . . . . . . . . . . . . . . . . . . .102 Interlacing . . . . . . . . . . . . . . . . . . . . . . . . . . . . . . . . . . . . . . . . . . . . . . . . . . . . . . . . . . . . . . . .102 File panel . . . . . . . . . . . . . . . . . . . . . . . . . . . . . . . . . . . . . . . . . . . . . . . . . . . . . . . . . . . . . . . . .102 Animation panel. . . . . . . . . . . . . . . . . . . . . . . . . . . . . . . . . . . . . . . . . . . . . . . . . . . . . . . . . .102
Export Area . . . . . . . . . . . . . . . . . . . . . . . . . . . . . . . . . . . . . . . . . . . . . . . . . . . . . . . . . . . . . . . . . . . .103 Web export formats . . . . . . . . . . . . . . . . . . . . . . . . . . . . . . . . . . . . . . . . . . . . . . . . . . . . . . . . . . . .103 GIF. . . . . . . . . . . . . . . . . . . . . . . . . . . . . . . . . . . . . . . . . . . . . . . . . . . . . . . . . . . . . . . . . . . . . . .103 JPEG . . . . . . . . . . . . . . . . . . . . . . . . . . . . . . . . . . . . . . . . . . . . . . . . . . . . . . . . . . . . . . . . . . . . 104 PNG . . . . . . . . . . . . . . . . . . . . . . . . . . . . . . . . . . . . . . . . . . . . . . . . . . . . . . . . . . . . . . . . . . . . .105 Web format comparison . . . . . . . . . . . . . . . . . . . . . . . . . . . . . . . . . . . . . . . . . . . . . . . . . .105 Other export formats . . . . . . . . . . . . . . . . . . . . . . . . . . . . . . . . . . . . . . . . . . . . . . . . . . . . . . . . . . 106 TIFF . . . . . . . . . . . . . . . . . . . . . . . . . . . . . . . . . . . . . . . . . . . . . . . . . . . . . . . . . . . . . . . . . . . . 106 PICT . . . . . . . . . . . . . . . . . . . . . . . . . . . . . . . . . . . . . . . . . . . . . . . . . . . . . . . . . . . . . . . . . . . . 106 BMP . . . . . . . . . . . . . . . . . . . . . . . . . . . . . . . . . . . . . . . . . . . . . . . . . . . . . . . . . . . . . . . . . . . . 106 xRes LRG. . . . . . . . . . . . . . . . . . . . . . . . . . . . . . . . . . . . . . . . . . . . . . . . . . . . . . . . . . . . . . . . 106 Batch processing . . . . . . . . . . . . . . . . . . . . . . . . . . . . . . . . . . . . . . . . . . . . . . . . . . . . . . . . . . . . . . 106 Finding and Replacing during a batch process . . . . . . . . . . . . . . . . . . . . . . . . . . . . .107 Changing file settings with a batch process . . . . . . . . . . . . . . . . . . . . . . . . . . . . . . . .107 Backing up batch processed files. . . . . . . . . . . . . . . . . . . . . . . . . . . . . . . . . . . . . . . . . . 109 Using batch Scriptlets . . . . . . . . . . . . . . . . . . . . . . . . . . . . . . . . . . . . . . . . . . . . . . . . . . . . 109 Using the Project Log . . . . . . . . . . . . . . . . . . . . . . . . . . . . . . . . . . . . . . . . . . . . . . . . . . . . 109 Working with Dreamweaver . . . . . . . . . . . . . . . . . . . . . . . . . . . . . . . . . . . . . . . . . . . . . . . . . . . 110 Fireworks images in Dreamweaver . . . . . . . . . . . . . . . . . . . . . . . . . . . . . . . . . . . . . . . . 110 Editing Fireworks images in other image editors. . . . . . . . . . . . . . . . . . . . . . . . . . . 112
6Contents

CHAPTER 4
Web Design Features . . . . . . . . . . . . . . . . . . . . . . . . . .113
Producing web components . . . . . . . . . . . . . . . . . . . . . . . . . . . . . . . . . . . . . . . . . . . . . . . . . . . . 114 Features for web production. . . . . . . . . . . . . . . . . . . . . . . . . . . . . . . . . . . . . . . . . . . . . . . 114 Web objects: The basics of web production . . . . . . . . . . . . . . . . . . . . . . . . . . . . . . . . . . . . . 114 Creating web objects . . . . . . . . . . . . . . . . . . . . . . . . . . . . . . . . . . . . . . . . . . . . . . . . . . . . . . 115 Setting web object properties . . . . . . . . . . . . . . . . . . . . . . . . . . . . . . . . . . . . . . . . . . . . . . 115 Creating an image map . . . . . . . . . . . . . . . . . . . . . . . . . . . . . . . . . . . . . . . . . . . . . . . . . . . . . . . . .116 Choosing an image map source graphic . . . . . . . . . . . . . . . . . . . . . . . . . . . . . . . . . . .116 Creating a hotspot . . . . . . . . . . . . . . . . . . . . . . . . . . . . . . . . . . . . . . . . . . . . . . . . . . . . . . . .116 Setting image map options . . . . . . . . . . . . . . . . . . . . . . . . . . . . . . . . . . . . . . . . . . . . . . . .116 Exporting image maps . . . . . . . . . . . . . . . . . . . . . . . . . . . . . . . . . . . . . . . . . . . . . . . . . . . . 117 Slicing images when exporting. . . . . . . . . . . . . . . . . . . . . . . . . . . . . . . . . . . . . . . . . . . . . . . . . . 117 Slice objects as event areas . . . . . . . . . . . . . . . . . . . . . . . . . . . . . . . . . . . . . . . . . . . . . . . . . 117 Creating a sliced image . . . . . . . . . . . . . . . . . . . . . . . . . . . . . . . . . . . . . . . . . . . . . . . . . . . . 117 Exporting an image in multiple slices. . . . . . . . . . . . . . . . . . . . . . . . . . . . . . . . . . . . . . 118 Specifying export settings for slice objects . . . . . . . . . . . . . . . . . . . . . . . . . . . . . . . . . . 119 Naming slices. . . . . . . . . . . . . . . . . . . . . . . . . . . . . . . . . . . . . . . . . . . . . . . . . . . . . . . . . . . . . 119 JavaScript rollovers . . . . . . . . . . . . . . . . . . . . . . . . . . . . . . . . . . . . . . . . . . . . . . . . . . . . . . . . . . . . .120 Button rollovers . . . . . . . . . . . . . . . . . . . . . . . . . . . . . . . . . . . . . . . . . . . . . . . . . . . . . . . . . . .120 The Down state. . . . . . . . . . . . . . . . . . . . . . . . . . . . . . . . . . . . . . . . . . . . . . . . . . . . . . . . . . . 121 Swapping parts of the image. . . . . . . . . . . . . . . . . . . . . . . . . . . . . . . . . . . . . . . . . . . . . . . 121 Using irregularly shaped rollovers. . . . . . . . . . . . . . . . . . . . . . . . . . . . . . . . . . . . . . . . . .122 Creating toggle group rollovers . . . . . . . . . . . . . . . . . . . . . . . . . . . . . . . . . . . . . . . . . . . .123 Exported JavaScript code . . . . . . . . . . . . . . . . . . . . . . . . . . . . . . . . . . . . . . . . . . . . . . . . . .123 Creating animation. . . . . . . . . . . . . . . . . . . . . . . . . . . . . . . . . . . . . . . . . . . . . . . . . . . . . . . . . . . . .124 Fireworks animation features . . . . . . . . . . . . . . . . . . . . . . . . . . . . . . . . . . . . . . . . . . . . .124 Opening an animation . . . . . . . . . . . . . . . . . . . . . . . . . . . . . . . . . . . . . . . . . . . . . . . . . . . .124 Drawing an animation. . . . . . . . . . . . . . . . . . . . . . . . . . . . . . . . . . . . . . . . . . . . . . . . . . . .125 Optimizing and controlling the animation . . . . . . . . . . . . . . . . . . . . . . . . . . . . . . . .127 Previewing an animation. . . . . . . . . . . . . . . . . . . . . . . . . . . . . . . . . . . . . . . . . . . . . . . . . .128 Exporting an animation. . . . . . . . . . . . . . . . . . . . . . . . . . . . . . . . . . . . . . . . . . . . . . . . . . .129
Contents 7

Transparency . . . . . . . . . . . . . . . . . . . . . . . . . . . . . . . . . . . . . . . . . . . . . . . . . . . . . . . . . . . . . . . . . . .129 GIF transparency . . . . . . . . . . . . . . . . . . . . . . . . . . . . . . . . . . . . . . . . . . . . . . . . . . . . . . . . .129 PNG alpha transparency . . . . . . . . . . . . . . . . . . . . . . . . . . . . . . . . . . . . . . . . . . . . . . . . .129 Using Fireworks HTML . . . . . . . . . . . . . . . . . . . . . . . . . . . . . . . . . . . . . . . . . . . . . . . . . . . . . .130 Exporting HTML with a Fireworks file . . . . . . . . . . . . . . . . . . . . . . . . . . . . . . . . . .130 Some HTML basics . . . . . . . . . . . . . . . . . . . . . . . . . . . . . . . . . . . . . . . . . . . . . . . . . . . . . .132 Common HTML tags . . . . . . . . . . . . . . . . . . . . . . . . . . . . . . . . . . . . . . . . . . . . . . . . . . .132 Copying and pasting from a Fireworks HTML file . . . . . . . . . . . . . . . . . . . . . . .133 JavaScript . . . . . . . . . . . . . . . . . . . . . . . . . . . . . . . . . . . . . . . . . . . . . . . . . . . . . . . . . . . . . . . . .133 Client-side image maps. . . . . . . . . . . . . . . . . . . . . . . . . . . . . . . . . . . . . . . . . . . . . . . . . . . .133 Sliced images. . . . . . . . . . . . . . . . . . . . . . . . . . . . . . . . . . . . . . . . . . . . . . . . . . . . . . . . . . . . . .133
8Contents

1
CHAPTER 1
Getting Your Bearings
. . . . . . . . . . . . . . . . . . . . . . . . . . . . . . . . . . . . . . . . . . . . . . . . . . . . . . . .
9

What’s in this package
The Fireworks package contains:
A CD-ROM containing the Fireworks installer and the sample artwork.
Using Fireworks, the manual you are now reading.
System requirements
Fireworks runs on either the Windows or Macintosh operating systems. Before you install Fireworks, you need the following equipment:
Windows:
Windows 95, Windows 98, or Windows NT 4 (with Service Pack 3) or later
Intel Pentium 120 MHz processor required (Pentium II recommended) 32 MB of system RAM on Windows 95 or Windows 98 (40 MB or more recommended for Windows NT)
60 MB of available hard disk space (100 MB or more recommended)
CD-ROM drive
Mouse or digitizing tablet
640x480 resolution, 256-color monitor required
(1024x768 resolution, millions of colors recommended)
Macintosh:
System 7.5.5 or higher
Adobe Type Manager 4 or higher to use Type 1 fonts
Power Macintosh processor required (G3 recommended)
24MB of application RAM with virtual memory on (32 MB or more with virtual memory off recommended)
60 MB of available hard disk space (100 MB or more recommended)
CD-ROM drive
Mouse or digitizing tablet
640x480 resolution, 256-color monitor required
(1024x768 resolution, millions of colors recommended)
10 Chapter 1
Installing and starting |
To install and start Fireworks on a Macintosh: |
||
Fireworks |
1 |
Disable virus-protection extensions and restart |
|
|
|||
|
|
your computer. |
|
Before installing Fireworks, make sure your computer |
2 |
Insert the Fireworks CD-ROM in your CD- |
|
meets the system requirements listed in “System |
|
ROM drive. |
|
requirements” on page 10. Read the ReadMe document |
3 |
Double-click to launch the Fireworks Installer. |
|
on the Fireworks CD-ROM for late-breaking |
|||
4 |
Follow the instructions that appear on screen. |
||
information. |
|||
To install and start Fireworks on Windows NT 4 or |
5 |
Double-click the Fireworks icon to launch |
|
|
Fireworks from the Finder. |
||
Windows 95 or 98: |
|
|
|
1 Insert the Fireworks CD-ROM in your CD-ROM drive.
2 Follow the instructions that appear on screen.
The installer application prompts you to enter required information.
3 When Fireworks is installed, launch Fireworks from the Start menu.
Windows NT 4 and Windows 95 or 98 have four alternative ways to install Fireworks:
Double-click the installation application Setup.exe.
Click the Install button in the Add/Remove Programs module in the Control Panel and navigate to the Setup.exe application in the Fireworks folder.
Use the Run command in the Start menu and navigate to the Setup.exe application in the Fireworks folder.
Select the CD-ROM icon in the Windows Explorer or My Computer, right-click to display the menu, and choose AutoPlay.
Note: To disable AutoPlay, hold down the Shift key while inserting the Fireworks CD-ROM.
Getting Your Bearings |
11 |

Uninstalling Fireworks
Use the uninstaller to ensure that all Fireworks files are removed from the computer.
To uninstall Fireworks on Windows NT 4, Windows 95, or Windows 98:
1Choose Start > Settings > Control Panel.
2Double-click Add/Remove Programs.
3Select Macromedia Fireworks 2 in the list box. Click the Add/Remove button.
4Follow the instructions that appear on screen.
The uninstaller removes all Fireworks 2 program files from your system.
On Windows, manual uninstallation may fail to remove several DLLs and registry database entries.
To uninstall Fireworks on the Macintosh:
1Run the Fireworks 2 installer and choose Remove from the Options pop-up.
2Follow the instructions that appear on screen.
The uninstaller removes all Fireworks application files from your computer.
On the Macintosh, manually removing Fireworks can fail to remove several preference files in the System folder.
If you used Custom installation to install Fireworks in a different folder than the default location, you must specify the same location when uninstalling.
Resources for learning Fireworks
Use these resources to learn Fireworks quickly:
Fireworks Help
Fireworks Help, available whenever the Fireworks application is active, includes information on every Fireworks tool, panel, dialog box, and preference.
Fireworks Tutorials
Fireworks tutorials, available from the Help menu whenever the Fireworks application is active, contain step-by-step lessons for the most common Fireworks tasks, such as optimizing GIFs and JPEGs, and creating animations, image maps, and rollovers.
Fireworks Application
The Fireworks application contains many dialog boxes and ToolTips designed to assist you in using the program. ToolTips appear when your cursor pauses over a user interface element. Instructional dialog boxes appear when you attempt to use certain tools incorrectly.
Using Fireworks manual
The Using Fireworks manual includes information about basic and advanced Fireworks features.
www.macromedia.com
Macromedia’s award-winning web site contains Fireworks tutorials, sample art, and updates.
TechNotes
Navigate to http://www.macromedia.com/support/ Fireworks/ to search for frequently updated technical information on Fireworks.
Fireworks Discussion Group
For discussion on Fireworks topics with Fireworks users, technical support representatives, and the Fireworks development team, use a news group reader to go to news://forums.macromedia.com/ macromedia.fireworks.
12 Chapter 1

What’s unique about
Fireworks?
The premier production tool for creating web graphics, Fireworks has features that can save hours by simplifying the web-graphic creation workflow. Fireworks was created from the ground up specifically for the web.
Live effects—Create drop shadows, bevels, glows, and embosses that are fully editable. Watch them update automatically!
Vector tool flexibility with an organic bitmap look—Bézier paths and shapes have bitmap brush strokes and textured fills. Apply customizable Live Effects to objects.
Total text control—Retain the precise text control of an illustration tool in an image-editing application. Control kerning, leading, text effects, alignment, and more. Apply Live Effects to text. Text is always editable, all the time. Change text after applying a Live Effect and watch the effect update automatically.
Export Preview—Directly view the graphic after each adjustment of export settings without switching to your web browser. Compare up to four alternative files simultaneously to choose the best mix of quality and file-size reduction.
Export optimization—Simplify file format, palette settings, dithering, and more to optimize your web graphics. Or, use the Export Wizard to optimize automatically.
Batch processing—Choose export settings, and find and replace graphics and text when batch processing custom groups of images or an entire site.
Image maps—Create editable, color-coded hotspots on an overlay above the image. Enter a URL link and browser status bar message for each hotspot.
JavaScript rollovers—Automatically generate code for interactive rollovers and other graphics.
Slice images—Slice images on export. Automatically generate HTML table code to reassemble images and add links.
Compatibility with Macromedia Dreamweaver—
Export JavaScript rollovers that can be edited and changed in Dreamweaver. Or, export complex graphics as Dreamweaver library objects, easily placing and reusing navigation bars and complex rollovers. With Dreamweaver 2, launch Fireworks from within Dreamweaver to easily and quickly make changes to a graphic.
Getting Your Bearings |
13 |

Welcome to Fireworks
What is Fireworks?
Fireworks creates the smallest, highest-quality JPEG and GIF graphics in the fewest number of steps. It is a total solution for creating and producing web graphics. Fireworks simplifies and streamlines the process of making web and screen graphics, while providing the ultimate in flexibility and editability.
Fireworks also makes it easy to minimize file size without sacrificing quality, which results in faster web sites and higher satisfaction among web site visitors.
Without Fireworks, for example, a web designer creates an image in a vector-based drawing program such as FreeHand, then imports the vector art into a bitmap graphics program to rasterize and apply filters.
Continuing the creative process, the designer exports the graphic for import into a color palette-conversion utility and then optimizes the palette and image format for either webor screen-based delivery. The designer might also use an animation tool or image map utility to create a dynamic image.
To test the graphic, the designer must view it in a web browser application. Revising the graphic at this point may force the designer to start from the beginning and repeat every step.
With Fireworks, the designer’s creativity is no longer complicated by switching from tool to tool, and valuable time is saved by avoiding repetitive procedures. Fireworks is a single tool that handles all the
necessary steps.
By creating editable paths with bitmap attributes, Fireworks ensures that your work is fully editable throughout every stage of the design process. Fireworks’ powerful export preview capabilities integrated with color palette and graphic formatting offer the designer control over exporting.
Fireworks is a solution to the challenges faced by web designers. Accordingly, Fireworks is not optimal for creating or modifying images intended for traditional commercial printing. The Fireworks environment is based on the RGB color model, ideally suited for images rendered at screen, rather than print, resolutions.
The advantages to using Fireworks over other tools include efficiency, convenience, and adaptability. With Fireworks, the designer is free to focus on design and creation without the distraction of switching from tool to tool.
This efficient workflow is even more convenient with Fireworks’ incredible power over color palettes and file formats. Advanced preview capabilities allow the designer to see the effect of palette and color depth changes without the time-consuming step of viewing graphics in a browser.
Amazingly, both text and objects in a Fireworks graphic are fully editable at any time. This means that graphics can be easily modified without recreating them.
14 Chapter 1

Using the document window
Fireworks is both a vector graphics and a bitmap graphics application. Vector objects are composed of paths, and bitmap objects are composed of individual pixels. Fireworks combines the organic look of bitmap objects with the flexibility, control, and editability of Bézier paths.
Launching Fireworks displays the document window, your interface to the illustration. A Fireworks canvas can be up to 6000 pixels wide by 6000 pixels tall. Move, resize, or hide the panels, Toolbox, and toolbars to customize your environment.
Main toolbar (Windows only) Object inspector |
Layers panel |
Toolbox
|
|
|
|
|
|
|
|
|
|
|
|
|
|
|
|
|
|
|
|
|
|
|
|
|
|
|
|
|
|
|
|
|
|
|
|
|
|
|
|
|
|
|
|
|
|
|
|
|
|
Status bar |
Modify toolbar |
View Controls |
VCR Animation |
Styles panel |
|||||
(Windows only) |
(Windows only) |
toolbar |
Controls |
|
|||||
|
|
|
|
|
(Windows only) |
|
|
|
|
|
|
|
|
|
|
|
|
|
|
|
|
|
|
|
|
|
Behaviors inspector |
|
|
Fireworks on Windows
Getting Your Bearings |
15 |
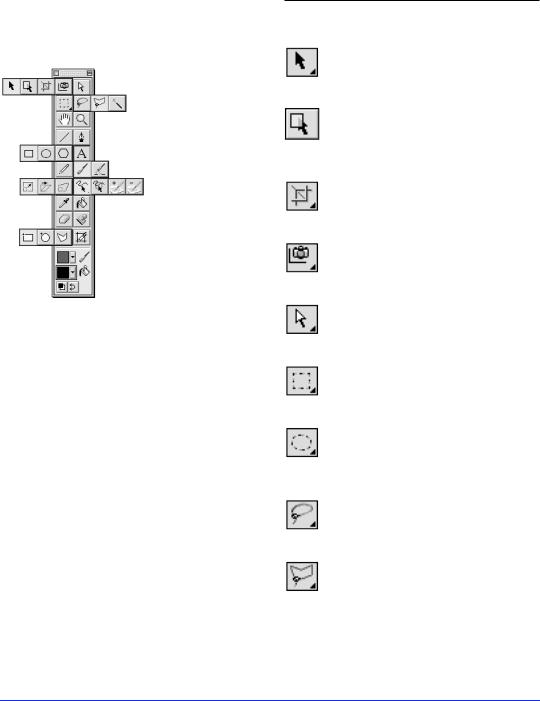
Toolbox
The Toolbox contains 35 tools, some of which are contained in tool groups, as shown. To display a tool group, click and hold any tool with a triangle in the lower-right corner.
Press and hold a tool to reveal tool groups.
Click an alternate tool to choose it from the tool group.
Pressing letter keys switches quickly between tools. Press the letter key shown in the following chart to choose a tool.
Fireworks documents contain four types of objects– vector objects, which are path based; image objects, which are pixel-based; text; and web objects, which are special objects used to define areas of interactivity or image slicing.
Use this tool To |
Activate by |
|
pressing |
|
|
Select and drag |
v |
objects. |
or |
|
|
Pointer |
0 (zero) |
|
|
Select objects behind |
v |
other objects. |
or |
|
|
Select |
0 (zero) |
|
|
Behind |
|
Discard or add canvas |
c |
area. |
|
Crop |
|
Export a portion of a |
j |
document. |
|
Export Area |
|
Select an object within |
a or 1 |
a group or points on a |
|
path. |
|
Subselect |
|
Select a rectangular |
m |
pixel area in image edit |
|
mode. |
|
Marquee |
|
Select an elliptical pixel |
m |
area in image edit |
|
mode. |
|
Ellipse |
|
Marquee |
|
Select a freeform pixel |
l |
area in image edit |
|
mode. |
|
Lasso |
|
Select a polygonal pixel |
l |
area in image edit |
|
mode. |
|
Polygon |
|
Lasso |
|
16 Chapter 1
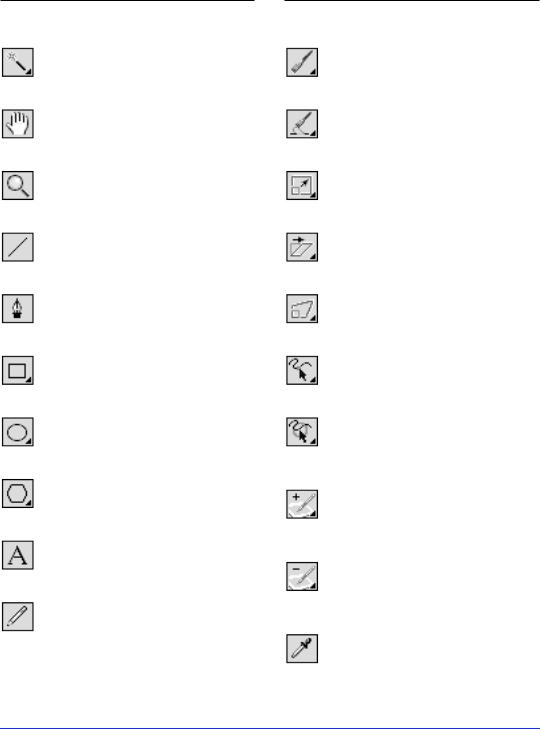
Use this tool To |
Activate by |
|
pressing |
|
|
Select pixel areas of |
w |
similar color in image |
|
edit mode. |
|
Magic Wand |
|
Pan the view of the |
spacebar |
document. |
or |
|
|
Hand |
h |
|
|
Change view |
z |
magnification (zoom in |
|
or zoom out). |
|
Magnify |
|
Draw straight lines. |
n |
Line |
|
Draw paths by |
p |
anchoring points. |
|
Pen |
|
Draw rectangles, |
r |
rounded rectangles, |
|
and squares. |
|
Rectangle |
|
Draw ellipses and |
r |
circles. |
|
Ellipse |
|
Draw polygons and |
g |
stars. |
|
Polygon |
|
Create text blocks. |
t |
Text |
|
Draw one-pixel pencil |
y |
strokes. |
|
Pencil |
|
Use this tool To |
Activate by |
|
|
|
pressing |
|
|
|
|
Draw brush strokes |
b |
|
using Stroke panel |
|
|
settings. |
|
Brush |
|
|
|
Redraw portions of a |
b |
|
selected path. |
|
Redraw Path |
|
|
|
Resize and rotate |
q |
|
objects. |
|
Scale |
|
|
|
Slant and rotate |
q |
|
objects, and change |
|
|
perspective. |
|
Skew |
|
|
|
Distort and rotate |
q |
|
objects. |
|
Distort |
|
|
|
Pull a path segment or |
f |
|
push a path segment |
|
|
using a resizable |
|
Freeform |
cursor. |
|
|
|
|
|
Reshape a selected |
f |
|
path within the area of |
|
|
the resizable cursor. |
|
Reshape |
|
|
Area |
|
|
|
Increase stroke |
u |
|
characteristics |
|
|
controlled by pressure |
|
Path |
or speed. |
|
|
|
|
Scrubber (+) |
|
|
|
Decrease stroke |
u |
|
characteristics |
|
|
controlled by pressure |
|
Path |
or speed. |
|
|
|
|
Scrubber (–) |
|
|
|
Sample a color and |
I |
|
apply it to the active |
|
|
color well. |
|
Eyedropper
Getting Your Bearings |
17 |
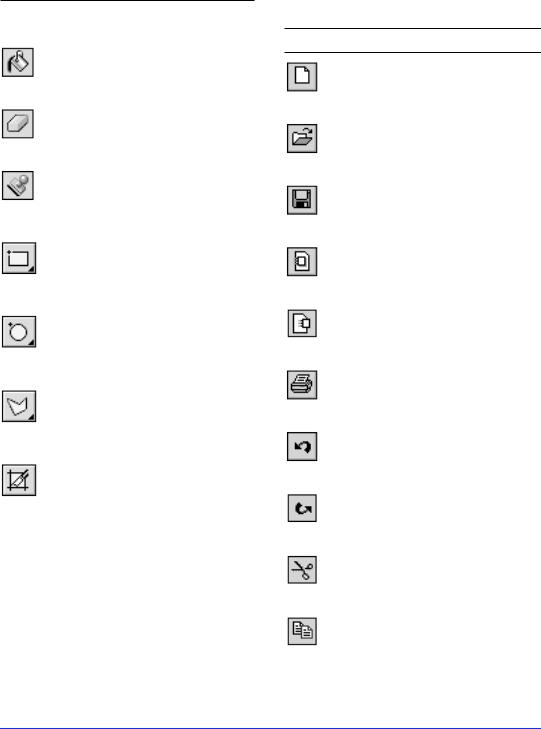
Use this tool |
To |
Activate by |
|
|
pressing |
|
|
|
|
Fill objects with color, |
k |
|
gradients, or patterns |
|
|
and adjust fills with |
|
Paint Bucket |
Paint Bucket handles. |
|
|
Remove or replace |
e |
|
portions of image |
|
|
objects and cut paths. |
|
Eraser |
|
|
|
Clone portions of an |
s |
|
image object. |
|
Rubber |
|
|
Stamp |
|
|
|
Draw URL hotspots in |
|
|
the shape of rectangles |
|
|
or squares. |
|
Rectangle |
|
|
Hotspot |
|
|
|
Draw URL hotspots in |
|
|
the shape of circles. |
|
Circle |
|
|
Hotspot |
|
|
|
Draw URL hotspots in |
|
|
the shape of irregular |
|
|
polygons. |
|
Polygon |
|
|
Hotspot |
|
|
|
Create rectangular slice |
|
|
objects. |
|
Slice |
|
|
|
|
|
Main toolbar (Windows only)
Use To
Create a new document.
New
Open an existing document.
Open
Save the active document.
Save
Import a file.
Import
Export a file.
Export
Print the active document.
Undo the last action.
Undo
Redo the last action.
Redo
Cut selected objects to the Clipboard.
Cut
Copy selected objects to the
Clipboard.
Copy
18 Chapter 1
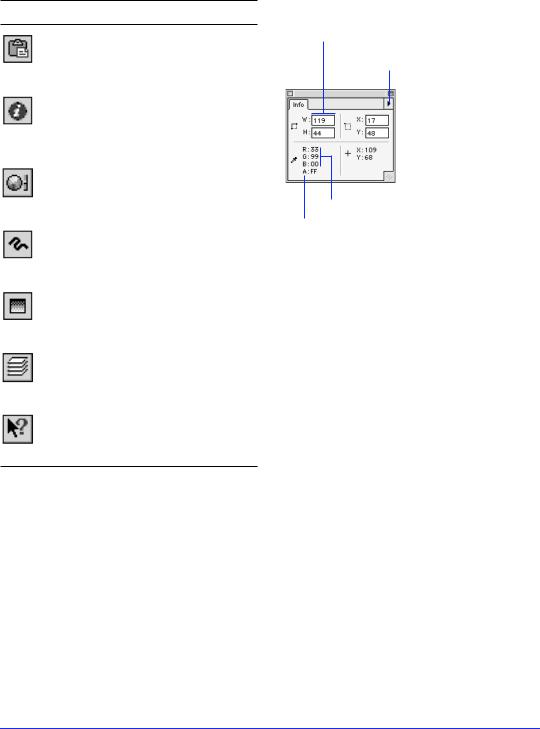
Use To
Paste the Clipboard’s contents into the active document.
Paste
Open the Object inspector to view properties for the selected object.
Object
Inspector
Open the Color Mixer.
Color Mixer
Open the Stroke panel.
Stroke
Open the Fill panel.
Fill
Open the Layers panel.
Layers
Access Fireworks Help.
Help
ToolTips name or describe each button's function as well as other user-interface features throughout Fireworks. Pause the cursor over a button on a toolbar to display a small label, which disappears when you move the cursor away from the item.
Info panel
Dimensions of selected object
Options for choosing a color model and document unit of measurement
Position of bounding box’s upper-left corner
 point
point
 Cursor position
Color of pixel beneath cursor
Alpha opacity measured in increments from 0 to 255
The Info panel provides feedback for selected objects, depending on object type and current action. Feedback includes the color of the pixel beneath the cursor in the current color model values, the position of the cursor, the location of the selected object's bounding box, and the selected object's dimensions. Choose Window > Info to show or hide the Info panel.
The Info panel's Options pop-up contains settings for your document's color model and unit of measurement.
Getting Your Bearings |
19 |
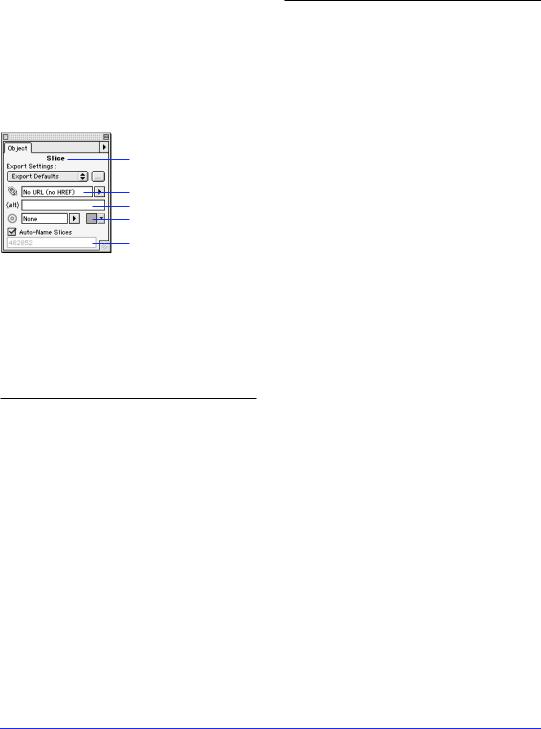
Object inspector
Use the Object inspector to set characteristics such as opacity, blending mode, and placement of the brush stroke in relation to a path. The Object inspector contains status information for selected objects. The Object inspector operates in one of eight different modes, depending on the object type selected.
Object type
Link to URL
Alt tag
Color well
Slice name
Components of the Object inspector
The different iterations of the Object inspector share common elements, as shown in the table below. These elements will become familiar as you work with various object types.
Use |
To |
When |
|
|
selecting |
|
|
|
Object Opacity |
Set the opacity of a |
Anything |
|
single object |
except |
|
|
hotspot or |
|
|
slice objects. |
Blending Mode |
Set an object's |
Anything |
|
blending mode |
except |
|
|
hotspot or |
|
|
slice objects. |
Stroke Settings |
Control the |
Any text or |
|
interaction of an |
path object. |
|
object's stroke and |
|
|
fill |
|
Transformation |
Transform text as |
Text. |
Method |
pixels or as paths |
|
Group Type |
Define object |
Grouped |
|
group as mask or |
objects. |
|
traditional group |
|
Use |
To |
When |
|
|
selecting |
|
|
|
Clipping path |
Define how the |
A mask |
setting |
mask group |
group. |
|
appears |
|
Export Settings |
Assign export |
Slice objects. |
|
presets to exported |
|
|
slice objects |
|
Link to URL |
Assign URLs |
Slice objects |
|
|
and hotspot |
|
|
objects. |
Alt tag |
Assign alternative |
Slice objects |
|
tag to be used |
and hotspot |
|
when the image is |
objects. |
|
unavailable |
|
Link target |
Specify the |
Slice objects |
|
window or frame |
and hotspot |
|
in which the link is |
objects. |
|
displayed |
|
Color well |
Set color |
Slice objects |
|
|
and hotspot |
|
|
objects. |
Hotspot shape |
Choose to change |
Hotspot |
|
the shape of a |
objects. |
|
hotspot object |
|
Auto-name |
Choose default or |
Slice objects. |
|
custom slice names |
|
|
|
|
20 Chapter 1
Opacity and blending mode in detail
Use the Object inspector to set opacity and blending mode. Opacity and blending modes are important in the process of compositing. Compositing is the process of varying the transparency of two or more overlapping objects to create a variety of graphic elements. An opacity setting of 100 renders an object completely opaque. Conversely, an opacity setting of 0 renders an object completely transparent.
To |
Do this |
|
|
Set the opacity of a |
Set the value using the opacity |
single object |
slider. |
Apply the same |
Group the objects and alter |
opacity changes to |
the group's opacity using the |
multiple objects |
opacity slider. |
Return individual |
Ungroup the objects. |
objects to the |
|
previous opacity |
|
before grouping |
|
Set the blending |
Choose from the blending |
mode of a single |
mode pop-up. |
object |
|
Apply the same |
Group the objects and alter |
blending mode to |
the group's blending mode |
multiple objects |
using the blending mode pop- |
|
up. |
Return individual |
Ungroup the objects. |
objects to the |
|
previous blending |
|
mode before |
|
grouping |
|
|
|
View Controls toolbar
Use the View Controls toolbar to change document magnification and display mode. Click the Preview Page button to view document dimensions and pixel resolution.
Note: On the Macintosh, the View controls are located at the lower-left corner of the document window.
Using the toolbars
Fireworks on Windows has several toolbars:
Toolbox
Main toolbar
Modify toolbar
View Controls toolbar
Each toolbar is moveable and dockable. This section describes the default location and configuration of the toolbars.
To show or hide the Toolbox, choose Window > Toolbox.
On Macintosh, use the menu to duplicate functions found on the Windows Main toolbar and Modify toolbar.
On Windows, choose Window > Toolbars and choose a toolbar to show or hide individual toolbars.
Tool Options panel
Options related to the active tool appear on the Tool Options panel.
Options related to the active tool appear on the Tool Options panel.
The Tool Options panel contains settings for all Fireworks tools. For example, the Pointer tool options, shown above, include Mouse Highlight and Preview Drag. Double-click a tool in the Toolbox to open and close the Tool Options panel.
Getting Your Bearings |
21 |
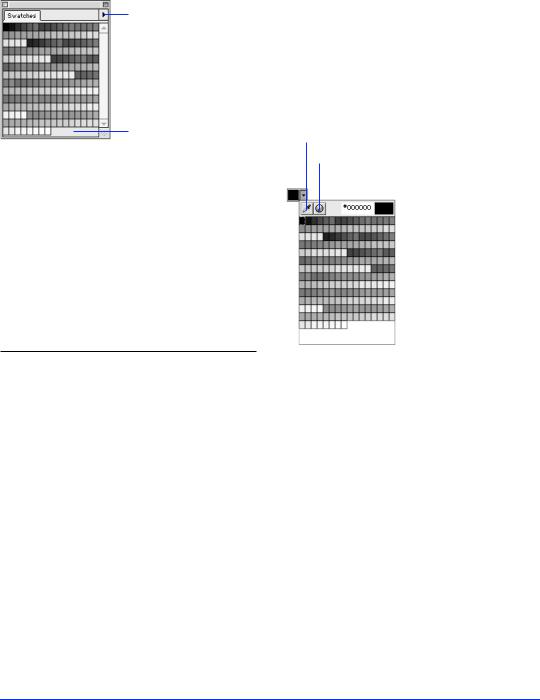
Swatches panel
Use the Options pop-up to add, replace, delete, save, and sort swatches, and choose a color palette.
Add a color to the palette by clicking in an empty area.
When moving the cursor over the Swatches panel, the cursor becomes an Eyedropper tool. Click a color to apply it automatically to selected objects and color wells.
To choose a color, you need not access the Swatches panel or Color Mixer. Just click any color well in Fireworks, such as in the Toolbox, Fill panel, or Color Mixer, to access all the swatches in the current color palette. Then click to pick a color from the pop-up set of color swatches.
Eyedropper tool
Color picker tool
The Swatches panel shows Fireworks’ current color palette. Choose from this palette when designing graphics. Select a preset palette or import a palette using the Options pop-up. Use the Save Swatches command to save custom palettes for later import. Extract the color table from a GIF image using the Add Swatches command.
To |
Choose this from the |
|
Options pop-up |
|
|
Add swatches to the |
Add Swatches. |
panel |
|
Replace all swatches with |
Replace Swatches. |
an external set |
|
Save swatches to an |
Save Swatches. |
external set |
|
Delete all swatches from |
Clear Swatches. |
the panel |
|
Change to Macintosh, |
A palette. |
Windows, Web 216, or |
|
Grayscale palette |
|
Sort the swatches by |
Sort by Color. |
color |
|
Use the custom color |
Current Export Palette. |
palette from the Export |
|
Preview |
|
|
|
Pop-up color swatches
22 Chapter 1
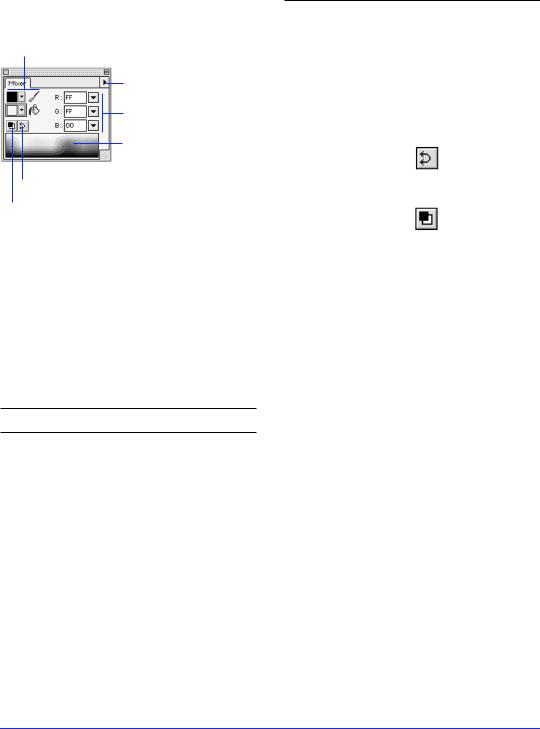
Color Mixer
Select stroke
or Fill color.
Choose a color mode from the Options popup.
Pick a color from the color bar.
Set color values.
Swap stroke and fill colors.
Use default colors.
Create colors using the Color Mixer, then apply colors to strokes, fills, effects, and text. Use the Options pop-up to select a color mode: RGB, Hexadecimal, CMY, HSB, or grayscale. The Color Mixer automatically responds to the type of object selected. For example, select an object with a fill and no stroke and the Color Mixer automatically selects the Fill color well. Conversely, select an object with a stroke and no fill and the Color Mixer automatically selects the Stroke color well.
To |
Do this |
Apply color changes to the selected object’s brush stroke
Apply color changes to the selected object’s fill
Apply color changes to an object having only a brush stroke
Apply color changes to an object having only a fill
Apply color changes to the selected object’s effect
Click the Stroke color well before choosing a new color.
Click the Fill color well before choosing a new color.
Choose a new color. The Stroke color well is selected automatically.
Choose a new color. The Fill color well is selected automatically.
Click the Effect color well in the Effect panel before choosing a new color.
To |
Do this |
|
|
Apply color to selected |
Choose a new color. The |
text |
Fill color well is selected |
|
automatically. |
Switch color modes |
Choose the desired color |
|
mode from the Color |
|
Mixer Options pop-up. |
Switch brush and fill color Click the Swap Colors |
|
|
button. |
Revert to default colors |
Click the Default Colors |
|
button. |
Define colors using the |
Double-click color well. |
system color picker |
|
Change color models in |
Point to the color bar |
the color bar only |
and use Shift-click |
|
(Windows) or Option- |
|
click (Macintosh). |
|
|
Getting Your Bearings 23
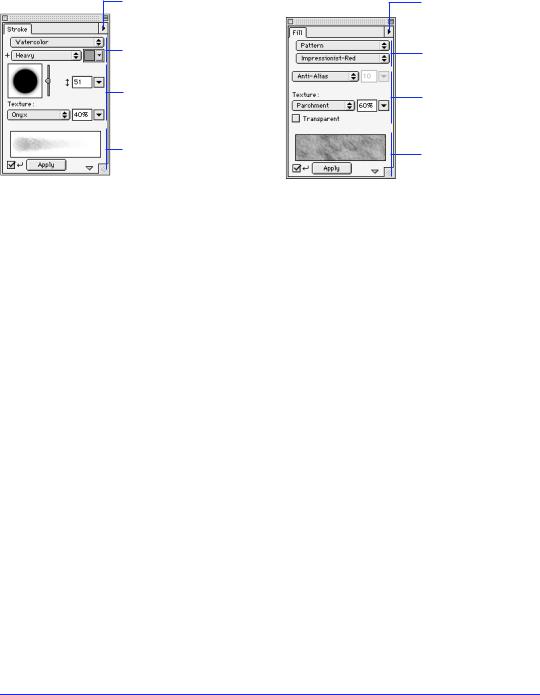
Stroke panel |
Fill panel |
Save, edit, name, and delete strokes using the Options pop-up.
Choose a brush stroke.
Choose stroke-specific settings.
Preview and apply the brush stroke.
Save, edit, name, and delete gradients using the Options pop-up.
Choose a fill.
Choose fill-specific settings.
Preview and apply a fill.
Use the Stroke panel to design and modify strokes, as well as alter the appearance of paths that have already been drawn. Changing stroke settings affects selected paths and paths drawn after the settings are changed.
To choose a color in the Stroke panel, you need not access the Swatches panel. Just click the pop-up to the right of the color well to access all the swatches in the current color palette. Then click to pick a color from the pop-up set of color swatches.
Choose Edit Stroke from the Options pop-up to open the Edit Stroke dialog box. The Options, Shape, and Sensitivity panels within the Edit Stroke dialog box control current stroke attributes. Save, delete, and rename custom strokes using the Options pop-up.
Click the show/hide triangle at the bottom of the Stroke panel to show and hide the Stroke preview.
Checking Auto-Apply automatically updates selected path and text objects as you change stroke settings. If the preview is hidden, Auto-Apply is automatically turned on. If the preview is visible and Auto-Apply is turned off, click Apply to manually apply changes to selected paths.
Use the Fill panel to control how objects are filled. Choose from the available fill categories, and then choose one of the many fill types from within each category.
To choose a color in the Fill panel, you need not access the Swatches panel. Just click the pop-up to the right of the color well to access all the swatches in the current color palette. Then click to pick a color from the pop-up set of color swatches.
Modify any fill by choosing a texture and intensity, fill color, anti-aliasing, feather, or hard edge. Check Transparent for a transparent fill texture and enter a texture amount greater than zero. Use the Fill Options pop-up to save, name, and delete Gradient fills.
Click the show/hide triangle at the bottom of the Fill panel to show and hide the Fill preview.
Check Auto-Apply to automatically update the fill of selected objects as you change fill settings. If the preview is hidden, Auto-Apply is automatically turned on. If the preview is visible and Auto-Apply is turned off, click Apply to manually apply fill changes to selected objects.
24 Chapter 1
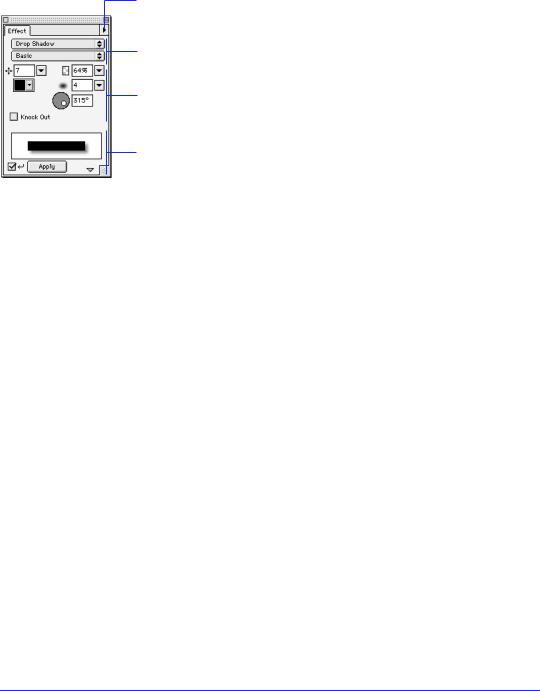
Effect panel
Save, edit, name, and delete effects using the Options pop-up.
Choose an effect.
Choose effectspecific settings.
Preview and apply an effect.
Use the Effect panel to apply and modify Live Effects in your document. Effects applied using the Effect panel are maintained and updated when the affected object is altered. For example, if you apply an edge bevel to a rectangular object and then make the object circular, the beveled edge adjusts accordingly. Modify effects after applying them to an object by changing settings in the Effect panel. Effects that can be altered in this way are known as Live Effects.
To choose a color in the Effect panel, you need not access the Swatches panel. Just click the pop-up to the right of the color well to access all the swatches in the current color palette. Then click to pick a color from the pop-up set of color swatches.
Like the Stroke and Fill panels, the Effect panel has controls for selecting effect type and name. Use the Options pop-up to save, name, and delete custom effect settings.
Choose a single effect from the Effect Category pop-up, or choose Multiple to apply more than one effect.
Click the show/hide triangle at the bottom of the Effect panel to show and hide the Effect preview.
Check Auto-Apply to automatically update the effect of selected objects as you change effect settings. If the preview is hidden, Auto-Apply is automatically turned on. If the preview is visible and Auto-Apply is turned off, click Apply to manually apply effect changes to selected objects.
Getting Your Bearings 25
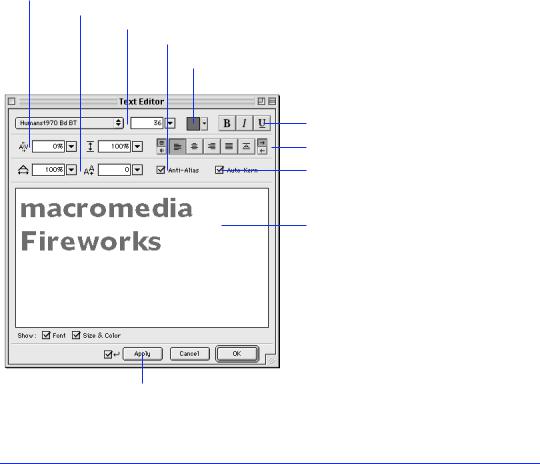
Text Editor
Use the Text Editor to create and edit text. Unlike text in many other applications, Fireworks text is always editable all the time. Edit text quickly and easily after custom effects have been applied.
To choose a color in the Text Editor, you need not access the Swatches panel. Just click the pop-up to the right of the color well to access all the swatches in the current color palette. Then click to pick a color from the pop-up set of color swatches.
Open the Text Editor by clicking on a document with the Text tool, drawing a rectangular text block with the Text tool, double-clicking a text container, or selecting a text block and choosing Text > Editor.
After closing the Text Editor, resize the text block by pulling or pushing handles. Move selected text blocks with the Pointer tool.
Set horizontal scaling and baseline shift.
Adjust kerning and leading.
Set font, size, and style.
Check to anti-alias text.
Add color to text.
Apply an underline to text.
Set orientation, alignment, and flow.
Check to automatically kern text.
Type or edit text.
Apply changes to the document without closing the text editor.
26 Chapter 1
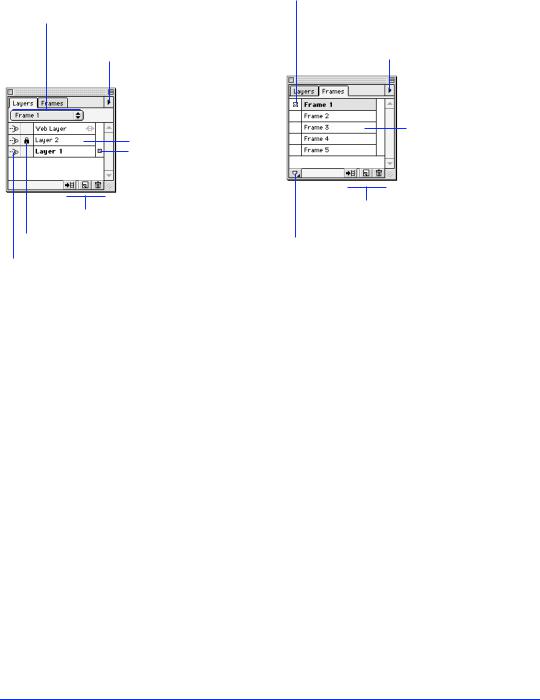
Layers panel and Frames panel
Navigate quickly to a specific frame.
Change global view and lock settings; create, delete, and rename layers using the Options pop-up.
Drag to rearrange layers. Double-click to rename a layer.
Drag to assign selected objects to another layer.
See “Icon buttons” on page 28.
Lock and unlock individual layers.
Show or hide individual layers.
Share objects across frames.
Create, delete, and duplicate frames. Distribute items across frames. Copy selected items to specific frames.
Drag to rearrange frames.
See “Icon buttons” on page 28.
Activate and control onion skinning.
Use the Layers and Frames panels to organize and animate your illustration. Layers divide an illustration into discrete planes, as though the components of the illustration were drawn on separate tracing paper overlays.
Use the Layers panel to manage multilayered documents. The Options pop-up includes commands for creating, deleting, and renaming layers and commands for viewing and locking all layers. Choose Share Layer to share the selected layer across all frames in the document. Choose Single-Layer Editing to prevent accidental changes to layers other than the selected layer.
The Web Layer, reserved for web objects such as hotspots and slices, and cannot be renamed or deleted.
To show or hide individual layers, click the Show/Hide icon at the left of the layer name. When the icon is visible, the layer is also visible. Similarly, clicking the Lock/Unlock icon locks and unlocks individual layers. When a layer is locked, items on that layer may not be moved or deleted.
To move a selected object to another layer, drag the “Selected Objects” icon.
Use the Frame pop-up to quickly choose a different frame in your document without switching to the Frames panel.
Getting Your Bearings 27
The Frames panel is the key to Fireworks animation and rollovers. Use the Frames panel and the Animation panel in the Export Preview to create animated GIFs. The Frames panel lists each frame of an animation and has controls for adding and deleting frames. Use the Options pop-up to add, delete, duplicate, and copy objects to specific frames.
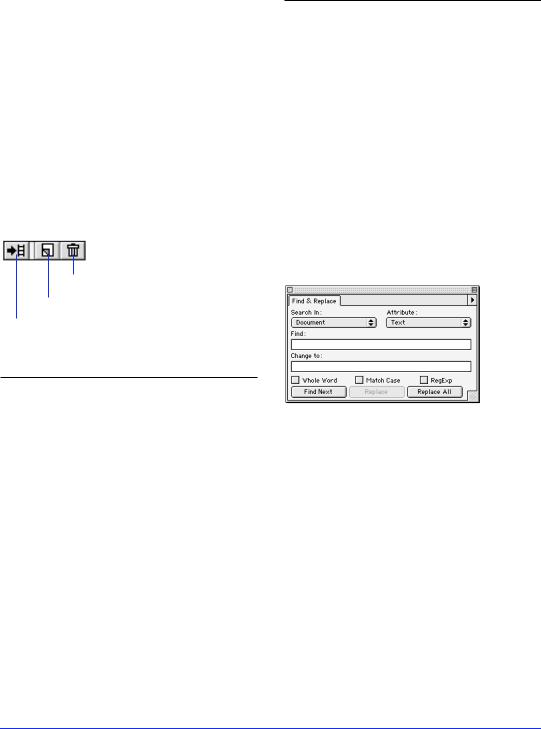
Icon buttons
Use the buttons at the bottom right of the Layers and Frames panels as shortcuts to create, distribute, duplicate, or delete layers or frames. Select a frame or layer and then click a button, or drag and drop a frame or layer onto a button.
Delete
New/Duplicate
Distribute to Frames
To |
Do this |
|
|
Distribute a selected |
Click the Distribute button |
group of objects |
after selecting objects |
across frames |
or |
|
|
|
Drag the square “Selected |
|
Objects” icon from the right |
|
column of the Layers or |
|
Frames panel to the Distribute |
|
button. |
Distribute an entire |
Drag a layer name to the |
layer's objects to |
Distribute button. |
specific frames |
|
Create a new blank |
Click the New/Duplicate |
layer or frame |
button. |
Duplicate a current |
Drag the current layer or |
layer or frame |
frame name to the New/ |
|
Duplicate button. |
To |
Do this |
|
|
Duplicate selected |
Drag the square “Selected |
objects onto a new |
Objects” icon from the right |
layer or frame |
column of the Layers or |
|
Frames panel to the New/ |
|
Duplicate button. |
Delete a current |
Click the Delete icon |
layer or frame |
or |
|
|
|
Drag the current layer or |
|
frame name to the Delete |
|
button. |
Delete currently |
Drag the square “Selected |
selected objects |
Objects” icon from the right |
|
column of the Layers or |
|
Frames panel to the Delete |
|
button. |
|
|
Find & Replace panel
Use Find & Replace to search for and replace various elements of a document, such as text, URLs, fonts, and colors. Find & Replace can search the current document or multiple files. Also, Fireworks can track changes made during a Find & Replace operation and store a log of the changes in the Project Log panel.
28 Chapter 1
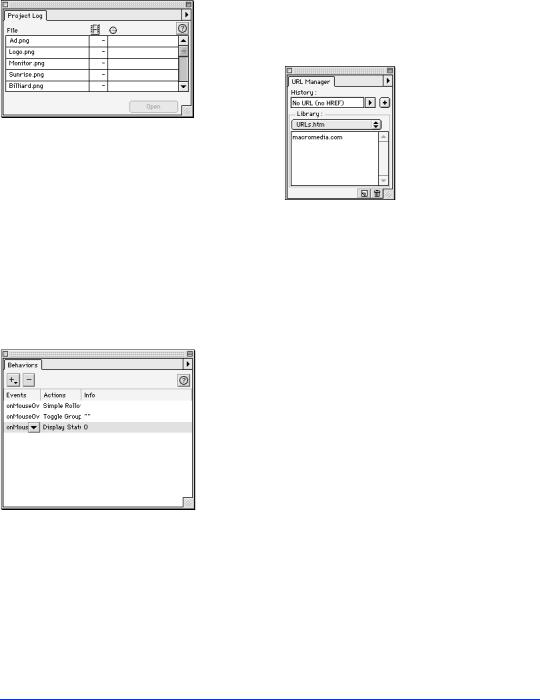
Project Log panel
The Project Log panel stores a log of changes made during Find & Replace operations when searching multiple files.
Any documents changed during a Find & Replace are automatically recorded in the Project Log. Use the Project Log to navigate through selected files, export selected files using their last export settings, or select files to be batch processed. Add files to the Project Log to search them during a batch process or find and replace.
Behaviors inspector
Use the Behaviors inspector to add actions to specific user events, which are called behaviors. Behaviors are assigned to web objects, either hotspots or slices. A typical behavior is a pop-up status message assigned to a hotspot region so that the message is displayed (action) when the user points to it with the mouse cursor (event).
The Behaviors inspector lists all behaviors assigned to the currently selected web object. Use the Behaviors inspector to edit or remove existing behaviors.
URL Manager
Add, load, and save URLs using the URL Manager.
URL stands for Uniform Resource Locator, which is an address of a specific page or file on the Internet. Fireworks can import URLs from any HTML file. Fireworks can read bookmark files saved with Netscape Navigator (typically stored in a file named Bookmarks.htm) or favorites files saved with Microsoft Internet Explorer.
When a document is first opened, Fireworks adds all URLs in the document to the URL Manager's History pop-up. Assign URLs to selected objects using the History pop-up or by clicking a URL in the Library window. URLs in the History pop-up are not retained when the application is closed. To save the active History URL into the URL Library, click the Add to Library Button next to the History pop-up.
Getting Your Bearings 29
Working with the URL Manager
To |
Do this |
|
|
Add a Fireworks |
Open the file. All URLs are |
file's URLs to the |
automatically added to the |
URL Manager |
History pop-up. |
Determine what URL |
Select the object and note the |
is assigned to an |
URL’s name in the History |
object |
field. |
Assign a URL to an |
Select the object and choose a |
object |
URL from the History pop-up |
|
or |
|
Select the object and click a |
|
URL in the Library window. |
Add a URL to the |
1. Enter or select the URL in |
URL Library |
the History pop-up. |
|
2. Click the Add to Library |
|
button (+) to the right of |
|
the History pop-up |
|
or |
|
1. Choose Add URL from the |
|
Options pop-up |
|
2. Enter a URL in the New URL |
|
dialog box |
|
or |
|
Choose Add History to Library |
|
from the Options pop-up |
Edit URL in the URL |
1. Select the URL in the URL |
Library |
Library. |
|
2. Choose Edit URL from the |
|
Options pop-up. |
Delete a URL in the |
1. Select the URL in the URL |
URL Library |
Library. |
|
2. Choose Delete URL from the |
|
Options pop-up. |
Export current URL |
1. Choose Export URLs from |
Library |
the Options pop-up. |
|
2. Name the exported library |
|
and choose a destination. |
To |
Do this |
Import a URL Library 1. Choose Import URLs from the Options pop-up.
2.Select desired library, HTML, or bookmark file.
Create a new URL |
1. Choose New URL Library |
Library |
from the Options pop-up. |
|
2. Name the new URL Library |
|
in the New URL Library |
|
dialog box. |
|
or |
|
Place an HTML bookmark file |
|
in the Fireworks 2/Settings/ |
|
URL Libraries folder. |
|
|
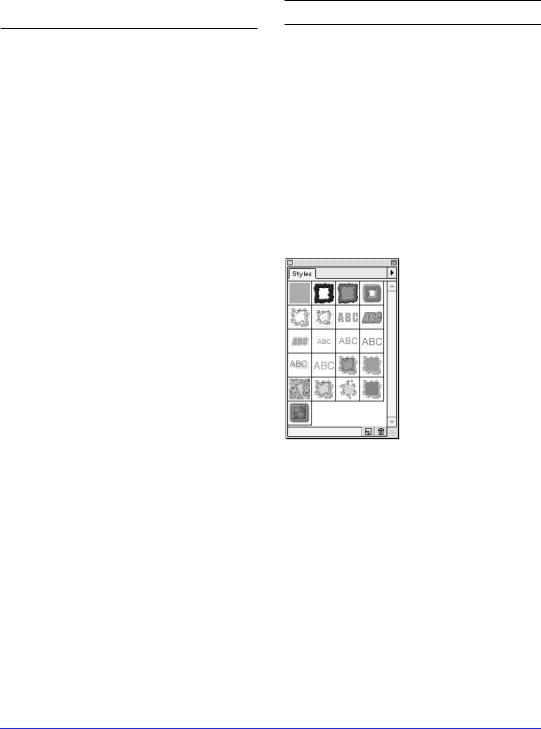
Styles panel
The Styles panel provides a library of built-in styles for text and graphics, which are viewed as large or small graphical icons. A style can include any attribute such as font, point size, color, fill, stroke, or effect. More than one style can be applied to any individual object.
Use the Styles panel to create new styles, or edit or delete existing styles. Style libraries are stored in Fireworks Styles files. Import or export styles to or from a Fireworks document.
30 Chapter 1
Loading...