


 Loading...
Adobe® After Effects® CC Help
June 2014
Legal notices
For legal notices, see http://help.adobe.com/en_US/legalnotices/index.html.
Last updated 6/14/2014

iii
Contents |
|
Chapter 1: What's new |
|
New features summary . . . . . . . . . . . . . . . . . . . . . . . . . . . . . . . . . . . . . . . . . . . . . . . . . . . . . . . . . . . . . . . . . . . . . . . . . . . . . . . . . . . . . . . . . . . . . . |
. . .1 |
Chapter 2: Workspace and workflow |
|
Planning and setup . . . . . . . . . . . . . . . . . . . . . . . . . . . . . . . . . . . . . . . . . . . . . . . . . . . . . . . . . . . . . . . . . . . . . . . . . . . . . . . . . . . . . . . . . . . . . . . . . . . |
. .6 |
Setup and installation . . . . . . . . . . . . . . . . . . . . . . . . . . . . . . . . . . . . . . . . . . . . . . . . . . . . . . . . . . . . . . . . . . . . . . . . . . . . . . . . . . . . . . . . . . . . . . . . |
10 |
General user interface items . . . . . . . . . . . . . . . . . . . . . . . . . . . . . . . . . . . . . . . . . . . . . . . . . . . . . . . . . . . . . . . . . . . . . . . . . . . . . . . . . . . . . . . . . . |
11 |
Workflows . . . . . . . . . . . . . . . . . . . . . . . . . . . . . . . . . . . . . . . . . . . . . . . . . . . . . . . . . . . . . . . . . . . . . . . . . . . . . . . . . . . . . . . . . . . . . . . . . . . . . . . . . . . . |
15 |
Dynamic Link and After Effects . . . . . . . . . . . . . . . . . . . . . . . . . . . . . . . . . . . . . . . . . . . . . . . . . . . . . . . . . . . . . . . . . . . . . . . . . . . . . . . . . . . . . . . . |
17 |
Working with After Effects and other applications . . . . . . . . . . . . . . . . . . . . . . . . . . . . . . . . . . . . . . . . . . . . . . . . . . . . . . . . . . . . . . . . . . . . . |
20 |
Keyboard shortcuts reference . . . . . . . . . . . . . . . . . . . . . . . . . . . . . . . . . . . . . . . . . . . . . . . . . . . . . . . . . . . . . . . . . . . . . . . . . . . . . . . . . . . . . . . . . |
25 |
Workspaces, panels, and viewers . . . . . . . . . . . . . . . . . . . . . . . . . . . . . . . . . . . . . . . . . . . . . . . . . . . . . . . . . . . . . . . . . . . . . . . . . . . . . . . . . . . . . . |
43 |
Modify keyboard shortcuts . . . . . . . . . . . . . . . . . . . . . . . . . . . . . . . . . . . . . . . . . . . . . . . . . . . . . . . . . . . . . . . . . . . . . . . . . . . . . . . . . . . . . . . . . . . |
49 |
Preferences . . . . . . . . . . . . . . . . . . . . . . . . . . . . . . . . . . . . . . . . . . . . . . . . . . . . . . . . . . . . . . . . . . . . . . . . . . . . . . . . . . . . . . . . . . . . . . . . . . . . . . . . . . |
49 |
Sync Settings . . . . . . . . . . . . . . . . . . . . . . . . . . . . . . . . . . . . . . . . . . . . . . . . . . . . . . . . . . . . . . . . . . . . . . . . . . . . . . . . . . . . . . . . . . . . . . . . . . . . . . . . . |
52 |
After Effects keyboard shortcuts . . . . . . . . . . . . . . . . . . . . . . . . . . . . . . . . . . . . . . . . . . . . . . . . . . . . . . . . . . . . . . . . . . . . . . . . . . . . . . . . . . . . . . |
55 |
Chapter 3: Projects and compositions |
|
Projects . . . . . . . . . . . . . . . . . . . . . . . . . . . . . . . . . . . . . . . . . . . . . . . . . . . . . . . . . . . . . . . . . . . . . . . . . . . . . . . . . . . . . . . . . . . . . . . . . . . . . . . . . . . . . . |
56 |
Precomposing, nesting, and pre-rendering . . . . . . . . . . . . . . . . . . . . . . . . . . . . . . . . . . . . . . . . . . . . . . . . . . . . . . . . . . . . . . . . . . . . . . . . . . . . |
59 |
Composition basics . . . . . . . . . . . . . . . . . . . . . . . . . . . . . . . . . . . . . . . . . . . . . . . . . . . . . . . . . . . . . . . . . . . . . . . . . . . . . . . . . . . . . . . . . . . . . . . . . . . |
65 |
Timecode and time display units . . . . . . . . . . . . . . . . . . . . . . . . . . . . . . . . . . . . . . . . . . . . . . . . . . . . . . . . . . . . . . . . . . . . . . . . . . . . . . . . . . . . . . |
71 |
Chapter 4: Importing footage |
|
Importing and interpreting footage items . . . . . . . . . . . . . . . . . . . . . . . . . . . . . . . . . . . . . . . . . . . . . . . . . . . . . . . . . . . . . . . . . . . . . . . . . . . . . |
74 |
Importing and interpreting video and audio . . . . . . . . . . . . . . . . . . . . . . . . . . . . . . . . . . . . . . . . . . . . . . . . . . . . . . . . . . . . . . . . . . . . . . . . . . |
88 |
Preparing and importing 3D imagefiles . . . . . . . . . . . . . . . . . . . . . . . . . . . . . . . . . . . . . . . . . . . . . . . . . . . . . . . . . . . . . . . . . . . . . . . . . . . . . . . |
94 |
Working with footage items . . . . . . . . . . . . . . . . . . . . . . . . . . . . . . . . . . . . . . . . . . . . . . . . . . . . . . . . . . . . . . . . . . . . . . . . . . . . . . . . . . . . . . . . . . |
97 |
CINEMA 4D and Cineware . . . . . . . . . . . . . . . . . . . . . . . . . . . . . . . . . . . . . . . . . . . . . . . . . . . . . . . . . . . . . . . . . . . . . . . . . . . . . . . . . . . . . . . . . . . |
103 |
Importing from After Effects and Adobe Premiere Pro . . . . . . . . . . . . . . . . . . . . . . . . . . . . . . . . . . . . . . . . . . . . . . . . . . . . . . . . . . . . . . . . |
109 |
Preparing and importing still images . . . . . . . . . . . . . . . . . . . . . . . . . . . . . . . . . . . . . . . . . . . . . . . . . . . . . . . . . . . . . . . . . . . . . . . . . . . . . . . . . |
113 |
Chapter 5: Layers and properties |
|
Creating layers . . . . . . . . . . . . . . . . . . . . . . . . . . . . . . . . . . . . . . . . . . . . . . . . . . . . . . . . . . . . . . . . . . . . . . . . . . . . . . . . . . . . . . . . . . . . . . . . . . . . . . |
123 |
Selecting and arranging layers . . . . . . . . . . . . . . . . . . . . . . . . . . . . . . . . . . . . . . . . . . . . . . . . . . . . . . . . . . . . . . . . . . . . . . . . . . . . . . . . . . . . . . . |
128 |
Managing layers . . . . . . . . . . . . . . . . . . . . . . . . . . . . . . . . . . . . . . . . . . . . . . . . . . . . . . . . . . . . . . . . . . . . . . . . . . . . . . . . . . . . . . . . . . . . . . . . . . . . . |
138 |
Layer properties . . . . . . . . . . . . . . . . . . . . . . . . . . . . . . . . . . . . . . . . . . . . . . . . . . . . . . . . . . . . . . . . . . . . . . . . . . . . . . . . . . . . . . . . . . . . . . . . . . . . . |
143 |
Blending modes and layer styles . . . . . . . . . . . . . . . . . . . . . . . . . . . . . . . . . . . . . . . . . . . . . . . . . . . . . . . . . . . . . . . . . . . . . . . . . . . . . . . . . . . . . |
154 |
3D layers . . . . . . . . . . . . . . . . . . . . . . . . . . . . . . . . . . . . . . . . . . . . . . . . . . . . . . . . . . . . . . . . . . . . . . . . . . . . . . . . . . . . . . . . . . . . . . . . . . . . . . . . . . . . |
162 |
Cameras, lights, and points of interest . . . . . . . . . . . . . . . . . . . . . . . . . . . . . . . . . . . . . . . . . . . . . . . . . . . . . . . . . . . . . . . . . . . . . . . . . . . . . . . . |
167 |
Last updated 6/14/2014

AFTER EFFECTS |
iv |
Contents |
|
Chapter 6: Views and previews |
|
Previewing . . . . . . . . . . . . . . . . . . . . . . . . . . . . . . . . . . . . . . . . . . . . . . . . . . . . . . . . . . . . . . . . . . . . . . . . . . . . . . . . . . . . . . . . . . . . . . . . . . . . . . . . . . |
179 |
Modifying and using views . . . . . . . . . . . . . . . . . . . . . . . . . . . . . . . . . . . . . . . . . . . . . . . . . . . . . . . . . . . . . . . . . . . . . . . . . . . . . . . . . . . . . . . . . . |
189 |
Video preview with Mercury Transmit . . . . . . . . . . . . . . . . . . . . . . . . . . . . . . . . . . . . . . . . . . . . . . . . . . . . . . . . . . . . . . . . . . . . . . . . . . . . . . . . |
194 |
Chapter 7: Animation and Keyframes |
|
Animation basics . . . . . . . . . . . . . . . . . . . . . . . . . . . . . . . . . . . . . . . . . . . . . . . . . . . . . . . . . . . . . . . . . . . . . . . . . . . . . . . . . . . . . . . . . . . . . . . . . . . . |
197 |
Setting, selecting, and deleting keyframes . . . . . . . . . . . . . . . . . . . . . . . . . . . . . . . . . . . . . . . . . . . . . . . . . . . . . . . . . . . . . . . . . . . . . . . . . . . |
201 |
Editing, moving, and copying keyframes . . . . . . . . . . . . . . . . . . . . . . . . . . . . . . . . . . . . . . . . . . . . . . . . . . . . . . . . . . . . . . . . . . . . . . . . . . . . . |
204 |
Assorted animation tools . . . . . . . . . . . . . . . . . . . . . . . . . . . . . . . . . . . . . . . . . . . . . . . . . . . . . . . . . . . . . . . . . . . . . . . . . . . . . . . . . . . . . . . . . . . . |
209 |
Tracking and stabilizing motion . . . . . . . . . . . . . . . . . . . . . . . . . . . . . . . . . . . . . . . . . . . . . . . . . . . . . . . . . . . . . . . . . . . . . . . . . . . . . . . . . . . . . . |
217 |
Speed . . . . . . . . . . . . . . . . . . . . . . . . . . . . . . . . . . . . . . . . . . . . . . . . . . . . . . . . . . . . . . . . . . . . . . . . . . . . . . . . . . . . . . . . . . . . . . . . . . . . . . . . . . . . . . . |
234 |
Keyframe interpolation . . . . . . . . . . . . . . . . . . . . . . . . . . . . . . . . . . . . . . . . . . . . . . . . . . . . . . . . . . . . . . . . . . . . . . . . . . . . . . . . . . . . . . . . . . . . . . |
242 |
Time-stretching and time-remapping . . . . . . . . . . . . . . . . . . . . . . . . . . . . . . . . . . . . . . . . . . . . . . . . . . . . . . . . . . . . . . . . . . . . . . . . . . . . . . . . |
248 |
Animating with Puppet tools . . . . . . . . . . . . . . . . . . . . . . . . . . . . . . . . . . . . . . . . . . . . . . . . . . . . . . . . . . . . . . . . . . . . . . . . . . . . . . . . . . . . . . . . |
257 |
Tracking 3D camera movement . . . . . . . . . . . . . . . . . . . . . . . . . . . . . . . . . . . . . . . . . . . . . . . . . . . . . . . . . . . . . . . . . . . . . . . . . . . . . . . . . . . . . . |
264 |
Chapter 8: Color |
|
Color basics . . . . . . . . . . . . . . . . . . . . . . . . . . . . . . . . . . . . . . . . . . . . . . . . . . . . . . . . . . . . . . . . . . . . . . . . . . . . . . . . . . . . . . . . . . . . . . . . . . . . . . . . . |
268 |
Color management . . . . . . . . . . . . . . . . . . . . . . . . . . . . . . . . . . . . . . . . . . . . . . . . . . . . . . . . . . . . . . . . . . . . . . . . . . . . . . . . . . . . . . . . . . . . . . . . . . |
278 |
Chapter 9: Drawing, painting, and paths |
|
Paint tools: Brush, Clone Stamp, and Eraser . . . . . . . . . . . . . . . . . . . . . . . . . . . . . . . . . . . . . . . . . . . . . . . . . . . . . . . . . . . . . . . . . . . . . . . . . . . |
290 |
Overview of shape layers, paths, and vector graphics . . . . . . . . . . . . . . . . . . . . . . . . . . . . . . . . . . . . . . . . . . . . . . . . . . . . . . . . . . . . . . . . . |
299 |
Creating shapes and masks . . . . . . . . . . . . . . . . . . . . . . . . . . . . . . . . . . . . . . . . . . . . . . . . . . . . . . . . . . . . . . . . . . . . . . . . . . . . . . . . . . . . . . . . . . |
305 |
Managing and animating shape paths and masks . . . . . . . . . . . . . . . . . . . . . . . . . . . . . . . . . . . . . . . . . . . . . . . . . . . . . . . . . . . . . . . . . . . . |
316 |
Shape attributes, paint operations, and path operations for shape layers . . . . . . . . . . . . . . . . . . . . . . . . . . . . . . . . . . . . . . . . . . . . . . |
327 |
Mask Tracking . . . . . . . . . . . . . . . . . . . . . . . . . . . . . . . . . . . . . . . . . . . . . . . . . . . . . . . . . . . . . . . . . . . . . . . . . . . . . . . . . . . . . . . . . . . . . . . . . . . . . . . |
334 |
Compositing Options and Mask Reference . . . . . . . . . . . . . . . . . . . . . . . . . . . . . . . . . . . . . . . . . . . . . . . . . . . . . . . . . . . . . . . . . . . . . . . . . . . |
335 |
Chapter 10: Text |
|
Live Text Templates . . . . . . . . . . . . . . . . . . . . . . . . . . . . . . . . . . . . . . . . . . . . . . . . . . . . . . . . . . . . . . . . . . . . . . . . . . . . . . . . . . . . . . . . . . . . . . . . . . |
338 |
Creating and editing text layers . . . . . . . . . . . . . . . . . . . . . . . . . . . . . . . . . . . . . . . . . . . . . . . . . . . . . . . . . . . . . . . . . . . . . . . . . . . . . . . . . . . . . . |
339 |
Formatting characters and the Character panel . . . . . . . . . . . . . . . . . . . . . . . . . . . . . . . . . . . . . . . . . . . . . . . . . . . . . . . . . . . . . . . . . . . . . . . |
345 |
Examples and resources for text animation . . . . . . . . . . . . . . . . . . . . . . . . . . . . . . . . . . . . . . . . . . . . . . . . . . . . . . . . . . . . . . . . . . . . . . . . . . . |
351 |
Animating text . . . . . . . . . . . . . . . . . . . . . . . . . . . . . . . . . . . . . . . . . . . . . . . . . . . . . . . . . . . . . . . . . . . . . . . . . . . . . . . . . . . . . . . . . . . . . . . . . . . . . . |
358 |
Extruding text and shape layers . . . . . . . . . . . . . . . . . . . . . . . . . . . . . . . . . . . . . . . . . . . . . . . . . . . . . . . . . . . . . . . . . . . . . . . . . . . . . . . . . . . . . . |
369 |
Formatting paragraphs and the Paragraph panel . . . . . . . . . . . . . . . . . . . . . . . . . . . . . . . . . . . . . . . . . . . . . . . . . . . . . . . . . . . . . . . . . . . . . |
374 |
Chapter 11: Transparency and compositing |
|
Roto Brush, Refine Edge, and Refine Matte effects | CC . . . . . . . . . . . . . . . . . . . . . . . . . . . . . . . . . . . . . . . . . . . . . . . . . . . . . . . . . . . . . . . . |
377 |
Alpha channels, masks, and mattes . . . . . . . . . . . . . . . . . . . . . . . . . . . . . . . . . . . . . . . . . . . . . . . . . . . . . . . . . . . . . . . . . . . . . . . . . . . . . . . . . . |
388 |
Compositing and transparency overview and resources . . . . . . . . . . . . . . . . . . . . . . . . . . . . . . . . . . . . . . . . . . . . . . . . . . . . . . . . . . . . . . |
399 |
Keying . . . . . . . . . . . . . . . . . . . . . . . . . . . . . . . . . . . . . . . . . . . . . . . . . . . . . . . . . . . . . . . . . . . . . . . . . . . . . . . . . . . . . . . . . . . . . . . . . . . . . . . . . . . . . . |
401 |
Chapter 12: Effects and animation presets |
|
Effects and animation presets overview . . . . . . . . . . . . . . . . . . . . . . . . . . . . . . . . . . . . . . . . . . . . . . . . . . . . . . . . . . . . . . . . . . . . . . . . . . . . . . |
405 |
Detail-preserving Upscale effect . . . . . . . . . . . . . . . . . . . . . . . . . . . . . . . . . . . . . . . . . . . . . . . . . . . . . . . . . . . . . . . . . . . . . . . . . . . . . . . . . . . . . |
433 |
Last updated 6/14/2014

AFTER EFFECTS |
v |
Contents |
|
Effect list . . . . . . . . . . . . . . . . . . . . . . . . . . . . . . . . . . . . . . . . . . . . . . . . . . . . . . . . . . . . . . . . . . . . . . . . . . . . . . . . . . . . . . . . . . . . . . . . . . . . . . . . . . . . |
433 |
Audio effects . . . . . . . . . . . . . . . . . . . . . . . . . . . . . . . . . . . . . . . . . . . . . . . . . . . . . . . . . . . . . . . . . . . . . . . . . . . . . . . . . . . . . . . . . . . . . . . . . . . . . . . . |
442 |
Blur and Sharpen effects . . . . . . . . . . . . . . . . . . . . . . . . . . . . . . . . . . . . . . . . . . . . . . . . . . . . . . . . . . . . . . . . . . . . . . . . . . . . . . . . . . . . . . . . . . . . . |
446 |
Channel effects . . . . . . . . . . . . . . . . . . . . . . . . . . . . . . . . . . . . . . . . . . . . . . . . . . . . . . . . . . . . . . . . . . . . . . . . . . . . . . . . . . . . . . . . . . . . . . . . . . . . . . |
453 |
Generate effects . . . . . . . . . . . . . . . . . . . . . . . . . . . . . . . . . . . . . . . . . . . . . . . . . . . . . . . . . . . . . . . . . . . . . . . . . . . . . . . . . . . . . . . . . . . . . . . . . . . . . |
459 |
Simulation effects . . . . . . . . . . . . . . . . . . . . . . . . . . . . . . . . . . . . . . . . . . . . . . . . . . . . . . . . . . . . . . . . . . . . . . . . . . . . . . . . . . . . . . . . . . . . . . . . . . . |
476 |
Text effects . . . . . . . . . . . . . . . . . . . . . . . . . . . . . . . . . . . . . . . . . . . . . . . . . . . . . . . . . . . . . . . . . . . . . . . . . . . . . . . . . . . . . . . . . . . . . . . . . . . . . . . . . . |
508 |
Perspective effects . . . . . . . . . . . . . . . . . . . . . . . . . . . . . . . . . . . . . . . . . . . . . . . . . . . . . . . . . . . . . . . . . . . . . . . . . . . . . . . . . . . . . . . . . . . . . . . . . . |
510 |
3D Channel effects . . . . . . . . . . . . . . . . . . . . . . . . . . . . . . . . . . . . . . . . . . . . . . . . . . . . . . . . . . . . . . . . . . . . . . . . . . . . . . . . . . . . . . . . . . . . . . . . . . |
514 |
Stylize effects . . . . . . . . . . . . . . . . . . . . . . . . . . . . . . . . . . . . . . . . . . . . . . . . . . . . . . . . . . . . . . . . . . . . . . . . . . . . . . . . . . . . . . . . . . . . . . . . . . . . . . . |
520 |
Distort effects . . . . . . . . . . . . . . . . . . . . . . . . . . . . . . . . . . . . . . . . . . . . . . . . . . . . . . . . . . . . . . . . . . . . . . . . . . . . . . . . . . . . . . . . . . . . . . . . . . . . . . . |
531 |
Noise and Grain effects . . . . . . . . . . . . . . . . . . . . . . . . . . . . . . . . . . . . . . . . . . . . . . . . . . . . . . . . . . . . . . . . . . . . . . . . . . . . . . . . . . . . . . . . . . . . . . |
548 |
Matte effects . . . . . . . . . . . . . . . . . . . . . . . . . . . . . . . . . . . . . . . . . . . . . . . . . . . . . . . . . . . . . . . . . . . . . . . . . . . . . . . . . . . . . . . . . . . . . . . . . . . . . . . . |
569 |
Color Correction effects . . . . . . . . . . . . . . . . . . . . . . . . . . . . . . . . . . . . . . . . . . . . . . . . . . . . . . . . . . . . . . . . . . . . . . . . . . . . . . . . . . . . . . . . . . . . . . |
570 |
Obsolete effects . . . . . . . . . . . . . . . . . . . . . . . . . . . . . . . . . . . . . . . . . . . . . . . . . . . . . . . . . . . . . . . . . . . . . . . . . . . . . . . . . . . . . . . . . . . . . . . . . . . . . |
587 |
The Rolling Shutter Repair effect . . . . . . . . . . . . . . . . . . . . . . . . . . . . . . . . . . . . . . . . . . . . . . . . . . . . . . . . . . . . . . . . . . . . . . . . . . . . . . . . . . . . . |
594 |
Keying effects . . . . . . . . . . . . . . . . . . . . . . . . . . . . . . . . . . . . . . . . . . . . . . . . . . . . . . . . . . . . . . . . . . . . . . . . . . . . . . . . . . . . . . . . . . . . . . . . . . . . . . . |
594 |
Utility effects . . . . . . . . . . . . . . . . . . . . . . . . . . . . . . . . . . . . . . . . . . . . . . . . . . . . . . . . . . . . . . . . . . . . . . . . . . . . . . . . . . . . . . . . . . . . . . . . . . . . . . . . |
606 |
Transition effects . . . . . . . . . . . . . . . . . . . . . . . . . . . . . . . . . . . . . . . . . . . . . . . . . . . . . . . . . . . . . . . . . . . . . . . . . . . . . . . . . . . . . . . . . . . . . . . . . . . . |
611 |
Chapter 13: Markers |
|
Layer markers and composition markers . . . . . . . . . . . . . . . . . . . . . . . . . . . . . . . . . . . . . . . . . . . . . . . . . . . . . . . . . . . . . . . . . . . . . . . . . . . . . |
618 |
XMP metadata . . . . . . . . . . . . . . . . . . . . . . . . . . . . . . . . . . . . . . . . . . . . . . . . . . . . . . . . . . . . . . . . . . . . . . . . . . . . . . . . . . . . . . . . . . . . . . . . . . . . . . |
622 |
Chapter 14: Memory, storage, performance |
|
Improve performance . . . . . . . . . . . . . . . . . . . . . . . . . . . . . . . . . . . . . . . . . . . . . . . . . . . . . . . . . . . . . . . . . . . . . . . . . . . . . . . . . . . . . . . . . . . . . . . |
628 |
GPU (CUDA, OpenGL) features . . . . . . . . . . . . . . . . . . . . . . . . . . . . . . . . . . . . . . . . . . . . . . . . . . . . . . . . . . . . . . . . . . . . . . . . . . . . . . . . . . . . . . . |
631 |
Memory and storage . . . . . . . . . . . . . . . . . . . . . . . . . . . . . . . . . . . . . . . . . . . . . . . . . . . . . . . . . . . . . . . . . . . . . . . . . . . . . . . . . . . . . . . . . . . . . . . . |
633 |
Chapter 15: Expressions and automation |
|
Plug-ins . . . . . . . . . . . . . . . . . . . . . . . . . . . . . . . . . . . . . . . . . . . . . . . . . . . . . . . . . . . . . . . . . . . . . . . . . . . . . . . . . . . . . . . . . . . . . . . . . . . . . . . . . . . . . |
644 |
Automation . . . . . . . . . . . . . . . . . . . . . . . . . . . . . . . . . . . . . . . . . . . . . . . . . . . . . . . . . . . . . . . . . . . . . . . . . . . . . . . . . . . . . . . . . . . . . . . . . . . . . . . . . |
646 |
Expression basics . . . . . . . . . . . . . . . . . . . . . . . . . . . . . . . . . . . . . . . . . . . . . . . . . . . . . . . . . . . . . . . . . . . . . . . . . . . . . . . . . . . . . . . . . . . . . . . . . . . . |
646 |
Expression language reference . . . . . . . . . . . . . . . . . . . . . . . . . . . . . . . . . . . . . . . . . . . . . . . . . . . . . . . . . . . . . . . . . . . . . . . . . . . . . . . . . . . . . . . |
660 |
Expression examples . . . . . . . . . . . . . . . . . . . . . . . . . . . . . . . . . . . . . . . . . . . . . . . . . . . . . . . . . . . . . . . . . . . . . . . . . . . . . . . . . . . . . . . . . . . . . . . . |
683 |
Scripts . . . . . . . . . . . . . . . . . . . . . . . . . . . . . . . . . . . . . . . . . . . . . . . . . . . . . . . . . . . . . . . . . . . . . . . . . . . . . . . . . . . . . . . . . . . . . . . . . . . . . . . . . . . . . . |
688 |
Chapter 16: Rendering and Exporting |
|
Basics of rendering and exporting . . . . . . . . . . . . . . . . . . . . . . . . . . . . . . . . . . . . . . . . . . . . . . . . . . . . . . . . . . . . . . . . . . . . . . . . . . . . . . . . . . . |
691 |
Converting movies . . . . . . . . . . . . . . . . . . . . . . . . . . . . . . . . . . . . . . . . . . . . . . . . . . . . . . . . . . . . . . . . . . . . . . . . . . . . . . . . . . . . . . . . . . . . . . . . . . |
708 |
Export an After Effects project as an Adobe Premiere Pro project . . . . . . . . . . . . . . . . . . . . . . . . . . . . . . . . . . . . . . . . . . . . . . . . . . . . . . |
713 |
Rendering and exporting still images and still-image sequences . . . . . . . . . . . . . . . . . . . . . . . . . . . . . . . . . . . . . . . . . . . . . . . . . . . . . . |
713 |
Automated rendering and network rendering . . . . . . . . . . . . . . . . . . . . . . . . . . . . . . . . . . . . . . . . . . . . . . . . . . . . . . . . . . . . . . . . . . . . . . . . |
715 |
Rendering and exporting for Flash Professional and Flash Player . . . . . . . . . . . . . . . . . . . . . . . . . . . . . . . . . . . . . . . . . . . . . . . . . . . . . . |
722 |
Chapter 17: System Requirements |
|
System requirements for After Effects . . . . . . . . . . . . . . . . . . . . . . . . . . . . . . . . . . . . . . . . . . . . . . . . . . . . . . . . . . . . . . . . . . . . . . . . . . . . . . . . |
730 |
Last updated 6/14/2014
1
Chapter 1: What's new
New features summary
This document describes the new and updated features in the June 2014 release of After Effects CC.
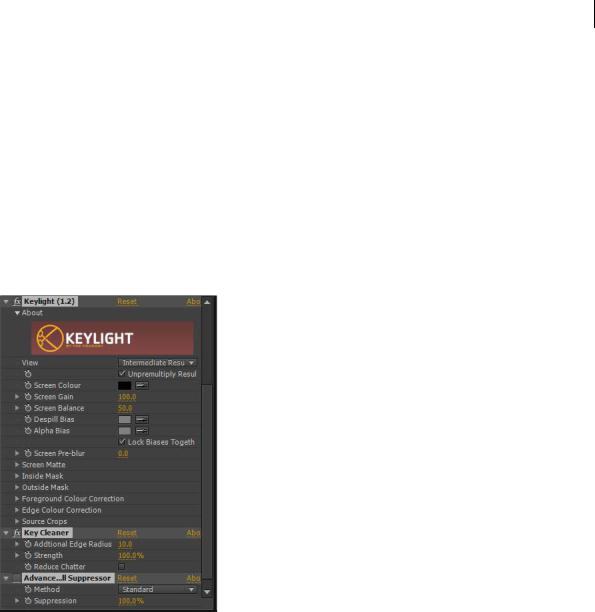
Key Cleaner effect and Advanced Spill Suppressor effect
The Key Cleaner effect recovers alpha-channel detail from a scene keyed by a typical keying effect, including recovering detail lost due to compression artifacts.
The Advanced Spill Suppressor effect removes color spill on a foreground subject from a colored background used for color keying. It has two methods for spill suppression:
1Standard - The Standard method is simpler, automatically detects the dominant key color, and requires less user input.
2Ultra - The Ultra method is based on the spill suppression in the Ultra Key effect in Premiere Pro. See the Ultra Key section in Premiere Pro for details about the Ultra Key.
Starting with the 2014 version of After Effects, the Spill Suppressor effect has been moved to the Obsolete effects category. Users are recommended to use the Advanced Spill Suppressor effect instead.
An easy way of applying these effects is by using the Keylight + Key Cleaner + Spill Suppressor animation preset. See the Key Cleaner and Advanced Spill Suppressor effectfor details on using these effects.
Note: Use the new Key Cleaner and Advanced Spill Suppressor effects with any keying effect that can provide the original RGB data as input. The new effects are found under the Effects > Keying menu.
Last updated 6/14/2014

2
What's new
Compositing Options (including effect masks)
The Compositing Options property group for each effect includes a new Effect Opacity property, which provides similar functionality as the Blend With Original compositing to every effect. The Effect Opacity allows you to blend between the effect results and the image without applying the effect. You can precisely apply any effect to a particular area of an image by masking and matting the desired area.
You can also restrict the area of effects applied to a layer using a new mask. The Mask Reference option is found under the Compositing Options under each effect in the Timeline panel. Click the plus sign next to the Compositing Options heading and choose a mask listed under the Mask Reference menu.
See the Compositing Options and Mask Referencearticle for detailed information.
Importing masks from Premiere Pro
When you import a clip from Premiere Pro that includes masks, the masks from Premiere Pro are preserved and converted to After Effects masks. This works for all methods of importing clips from Premiere Pro including:
•Using the Replace With After Effects Composition command in Premiere Pro
•Copying and pasting the sequence from Premiere Pro to After Effects
•Importing a Premiere Pro project into After Effects.
The mask shape, feather, opacity, expansion, and inversion properties are all preserved and the keyframes on those properties are also included.
However some After Effects mask attributes, such as variable-width mask feathering, will not get imported into Premiere Pro.
Masks are either effect masks or layer masks and the mask mode is always set to Add when the mask is imported from  Premiere Pro into After Effects.
Live text templates - Edit After Effects text templates in Premiere Pro
You can create text template compositions in After Effects wherein the source text can be edited in Premiere Pro. Any composition with text layers can be used as a text template, and any unlocked text layers in that composition can be edited in Premiere Pro.
See the Live Text Templatesfor more information.
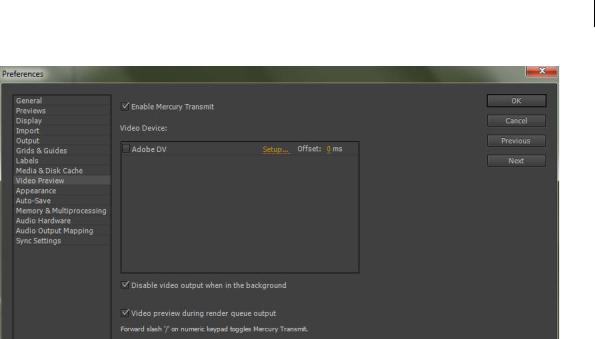
Video preview on external monitor using Mercury Transmit
In the latest release of After Effects, the video preview system for external monitors has been replaced with the Mercury Transmit-based system.
Last updated 6/14/2014
3
What's new
The Mercury Transmit system for video previews sends the contents of the Composition, Layer, or Footage panel to an external monitor. The external monitor can be one of the following:
•A video monitor connected through third-party video hardware such as AJA, Blackmagic, and Matrox I/O devices
•A DV device connected over FireWire
•A computer monitor connected to your video display card via such as HDMI, DVI, VGA, or DisplayPort.
For detailed information, see the Video preview with Mercury Transmitarticle.
Add fonts from Typekit in After Effects
You can download and install hundreds of fonts from within After Effects through the integration of Typekit with After Effects. Click File > Add Fonts from Typekit.. to launch the Typekit website.
For more information about using Typekit with Creative Cloud, see the Typekit Help Center.
Integration of Kuler panel into After Effects
The Kuler panel integrated into After Effects is one of the first instances of an HTML5 CEP panel built for After Effects. Using the Kuler panel, you can :
•Browse color themes that other users have shared through Creative Cloud
•Load color themes from your own library on Creative Cloud
•Create color themes on your iPhone or in your browser using various color models. You can use the color swatches within each color theme as a source from which to sample colors for any purpose within After Effects. (This replaces the old workflow of creating a document in Illustrator that held your color swatches and then importing that file into After Effects as a a source from which to sample when matching colors in a logo or other other branded item.)
See the Adobe Kuler site at https://kuler.adobe.com and www.adobe.com/in/products/kuler.html
HTML5 panels using CEP infrastructure
After Effects now includes the CEP (Common Extensibility Platform) infrastructure for loading and using HTML5 panels. These panels have access to the entire After Effects scripting object model in addition to being able to use HTML, CSS, and JavaScript. Hence a very wide variety of extensions can be created using this system.
Last updated 6/14/2014
4
What's new
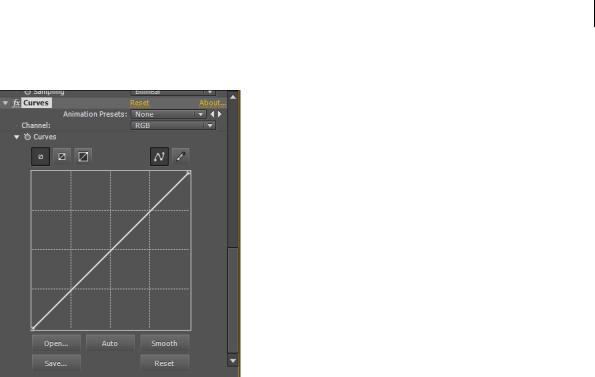
Improvements to Curves effect user interface
The primary user interface element in the Curves effect (the curves themselves) is now resizable using buttons immediately above the curves. The icon-based buttons for Open, Save, Smooth, and Reset have been replaced with word-based buttons that make their functionality more discoverable and the interface has been changed to increase the size of the default window.
The new improvements have the following advantages:
•Click one of the three sizing icons at the top of the effect to adjust screen sizes.
•Channels will show separately and concurrently in White, Red Green Blue, and Gray(alpha).
•Channel selection is automatic when a curve or vertex is clicked to add or move a point.
•The curves are drawn more smoothly.
Auto Adjustment in Curves effect
To adjust the curves in the Curves effect automatically, click the Auto button beneath the curves in the Effect Controls panel. This automatic adjustment is based on a database of curve adjustments performed by color and photography experts on a broad range of input images. This will enable users to get a good starting point for their color adjustments.
The adjustment made to an image is based on the adjustments made to reference input images with similar color distributions.
Miscellaneous updates
•Use File > Save As > Save A Copy As CC (12) to save a project as a copy for the previous version. To open a project created in the latest version of After Effects in After Effects CS6, you have to save back from After Effects CC (12). See Project links embedded in QuickTime, Video for Windows filesfor detailed information.
•You can now import raw files from Sony F5, F55, and F65 cameras into After Effects. As with ARRIRAW files, the source settings are not carried over when transferring a clip from Premiere Pro to After Effects.
•After Effects CC now installs mocha-AE version 3.2.1. Previous versions of After Effects CC installed mocha-AE v3.1.0. See the release notes (pdf) on the Imagineer Systems website for details of what's new in mocha-AE v3.2.
Last updated 6/14/2014

5
What's new
•You cannot export to the following formats in the 2014 version of After Effects CC:
•FLV/F4V
•MPEG-2
•H.264
•WMV
•SWF
Note: You can still import files in the above formats into After Effects.
Last updated 6/14/2014
6
Chapter 2: Workspace and workflow
Planning and setup
Planning your work
Correct project settings, preparation of footage, and initial composition settings can help you to avoid errors and unexpected results when rendering your final output movie. Before you begin, think about what kind of work you’ll be doing in After Effects and what kind of output you intend to create. After you have planned your project and made some basic decisions about project settings, you’ll be ready to start importing footage and assembling compositions from layers based on that footage.
The best way to ensure that your movie is suitable for a specific medium is to render a test movie and view it using the same type of equipment that your audience will use to view it. It’s best to do such tests before you have completed the difficult and time-consuming parts of your work, to uncover problems early.
Aharon Rabinowitz provides an article on the Creative COW website about planning your project with the final delivery specifications in mind.
For more information about encoding and compression options, see this FAQ entry: “FAQ: What is the best format for rendering and exporting from After Effects?”
Storyboards and scripts (screenplays)
Before you begin shooting footage or creating animations, it is often best to start by planning your movie with storyboards and a script (screenplay).
You can use Adobe Photoshop and Adobe Illustrator to create storyboards. You can use Adobe Story to collaboratively write and manage screenplays. Adobe Story also converts information from a screenplay into XMP metadata that can automate the creation of shooting scripts, shot lists, and more.
Acquiring, choosing, and preparing footage
Before importing footage, first decide which media and formats you'll use for your finished movies, and then determine the best settings for your source material. Often, it’s best to prepare footage before importing it into After Effects.
For example, if you want an image to fill your composition frame, configure the image in Adobe Photoshop so that the image size and pixel aspect ratio match the composition size and pixel aspect ratio. If the image is too large when you import it into After Effects, you’ll increase the memory and processor requirements of the compositions that use it. If the image is too small, you’ll lose image quality when you scale it to the desired size. See Pixel aspect ratio and frame aspect ratio.
If you can shoot footage with consistent lighting and colors—and otherwise prevent the need to do a lot of tedious utility work in post-production—then you’ll have more time for creative work.
Last updated 6/14/2014

7
Workspace and workflow
If possible, use uncompressed footage or footage encoded with lossless compression. Lossless compression means better results for many operations, such as keying and motion tracking. Certain kinds of compression—such as the compression used in DV encoding—are especially bad for color keying, because they discard the subtle differences in color that you depend on for good bluescreen or greenscreen keying. It’s often best to wait until the final rendering phase to use compression other than lossless compression. See Keying introduction and resources.
If possible, use footage with a frame rate that matches that of your output, so that After Effects doesn’t have to use frame blending or similar methods to fill in missing frames. See Frame rate.
The kind of work that you’ll be doing in After Effects and the kind of output movie that you want to create can even influence how you shoot and acquire your footage. For example, if you know that you want to animate using motion tracking, consider shooting your scene in a manner that optimizes for motion tracking—for example, using tracking markers. See Motion tracking workflow.
Also consider shooting at a larger frame size than what you need for final delivery if you want "head-room" for postproduction, whether for fake pans and zooms, or for stabilization.
Project settings
Project settings fall into three basic categories: how time is displayed in the project, how color data is treated in the project, and what sampling rate to use for audio. Of these settings, the color settings are the ones that you need to think about before you do much work in your project, because they determine how color data is interpreted as you import footage files, how color calculations are performed as you work, and how color data is converted for final output. See Color managementand Timecode and time display units .
If you enable color management for your project, the colors that you see are the same colors that your audience will see when they view the movie that you create.
Note: Click the color depth indicator at the bottom of the Project panel to open the Project Settings dialog box. Alt-click (Windows) or Option-click (Mac OS) to cycle through color bit depths: 8 bpc, 16 bpc, and 32 bpc. See Color depth and high dynamic range color.
Composition settings
After you prepare and import footage items, you use these footage items to create layers in a composition, where you animate and apply effects. When you create a composition, specify composition settings such as resolution, frame size, and pixel aspect ratio for your final rendered output. Although you can change composition settings at any time, it’s best to set them correctly as you create each new composition to avoid unexpected results in your final rendered output. For example, the composition frame size should be the image size in the playback medium. See Composition settings.
If you’ll be rendering and exporting a composition to more than one media format, always match the pixel dimensions  for your composition to the largest pixel dimensions used for your output. Later, you can use output modules in the Render Queue panel to encode and export a separate version of the composition for each format. See Output modules and output module settings.
Performance, memory, and storage considerations
If you work with large compositions, make sure that you configure After Effects and your computer to maximize performance. Complex compositions can require a large amount of memory to render, and the rendered movies can take a large amount of disk space to store. Before you attempt to render a three-hour movie, make sure that you have the disk space available to store it. See Storage requirements for output files .
If your source footage files are on a slow disk drive (or across a slow network connection), then performance will be poor. When possible, keep the source footage files for your project on a fast local disk drive. Ideally, you’ll have three drives: one for source footage files, one from which the application runs, and one for rendered output.
Last updated 6/14/2014

8
Workspace and workflow
For more information, see Improve performanceand Memory & Multiprocessing preferences .
Planning for playback on computer monitors and mobile devices
When you create a movie for playback on a personal computer—whether downloaded from the Web or played from a CD-ROM—specify composition settings, render settings, and output module settings that keep file size low. Consider that a movie with a high data rate may not play well from an older CD-ROM drive that cannot read data from the disc fast enough. Similarly, a large movie may take a long time to download over a dial-up network connection.
When rendering your final movie, choose a file type and encoder appropriate for the final media. The corresponding decoder must be available on the system used by your intended audience; otherwise they will not be able to play the movie. Common codecs (encoders/decoders) include the codecs installed with media players such as Flash Player, Windows Media Player, and QuickTime Player.
Aharon Rabinowitz provides an article on the Creative COW website about planning your project with the final delivery specifications in mind.
Trish and Chris Meyer provide an article on the Artbeats website that describes some of the considerations for creating video for the Web.
For more information about encoding and compression options for After Effects, see this FAQ entry: “FAQ: What is the best format for rendering and exporting from After Effects?”
Mobile devices
Many of the considerations for creating movies for playback on mobile devices, such as mobile phones and the Apple iPod, are similar to the considerations for creating movies for playback on personal computers—but the limitations are even more extreme. Because the amount of storage (disk space) and processor power are less for mobile phones than for personal computers, file size and data rate for movies must be even more tightly controlled.
Screen dimensions, video frame rates, and color gamuts vary greatly from one mobile device to another.
 Use these tips when shooting video for mobile devices:
•Tight shots are better. It’s hard to see a face on a tiny screen unless it’s shot in relative close-up.
•Light your subjects well, and keep them separated from the background; the colors and brightness values between background and subject should not be too similar.
•Avoid excessive zooming and rolling, which hinder temporal compression schemes.
•Because stable (non-shaky) video is easier to compress, shoot video with a tripod to minimize the shaking of the camera.
•Avoid using auto-focus and auto-exposure features. When these features engage, they change the appearance of all of the pixels in an image from one frame to the next, making compression using interframe encoding schemes less efficient.
 Use these tips when working in After Effects (for mobile devices):
•Use a lower frame rate (12-24 fps) for mobile devices.
•Use motion-stabilization tools and noise-reduction or blur effects before rendering to final output, to aid the compressor in reducing file size.
•Match the color palette to the mobile devices that you are targeting. Mobile devices, in general, have a limited color gamut.
•Consider using cuts and other fast transitions instead of zooming in and out or using fades and dissolves. Fast cuts also make compression easier.
Last updated 6/14/2014

9
Workspace and workflow
Cross-platform project considerations
After Effects project files are compatible with Mac OS and Windows operating systems, but some factors—mostly regarding the locations and naming of footage files and support files—can affect the ease of working with the same project across platforms.
Project file paths
When you move a project file to a different computer and open it, After Effects attempts to locate the project’s footage files as follows: After Effects first searches the folder in which the project file is located; second, it searches the file’s original path or folder location; finally, it searches the root of the directory where the project is located.
If you are building cross-platform projects, it’s best if the full paths have the same names on Mac OS and Windows systems. If the footage and the project are on different volumes, make sure that the appropriate volume is mounted before opening the project and that network volume names are the same on both systems.
It’s best to store footage in the same folder as the project file or in another folder within that folder. Here’s a sample hierarchy:
/newproject/project_file.aep
/newproject/source/footage1.psd
/newproject/source/footage2.avi
You can then copy the newproject folder in its entirety across platforms, and After Effects will properly locate all of the footage.
Use the Collect Files feature to gather copies of all the files in a project into a single folder. You can then move the folder  containing the copied project to the other platform. See Collect files in one location.
File-naming conventions
Name your footage and project files with the appropriate filename extensions, such as .mov for QuickTime movies and
.aep for After Effects projects. If files will be used on the Web, be sure that filenames adhere to applicable conventions for extensions and paths.
Note: For After Effects CS6 and earlier versions, do not use high-ASCII or other extended characters in filenames that will be used cross-platform.
Supported file types
Some file types are supported on one platform but not others. See Supported import formatsand Supported output formats.
Resources
Ensure that all fonts, effects, codecs, and other resources are available on both systems. Such resources are often plugins.
If you use a native After Effects effect in a project on one operating system, the effect will still work on the other operating system to which you’ve transferred your project. However, some third-party effects and other third-party plug-ins may not continue to operate, even if you have versions of these plug-ins on the target system. In such cases, you may need to reapply some third-party effects.
Last updated 6/14/2014

10
Workspace and workflow
More Help topics
Adobe Story workflow
Composition settings
Output modules and output module settings
Render settings
Plug-ins
Fonts
Setup and installation
To submit a feature request or bug report about After Effects, choose Help > Send Feedback.
Installing the software
Before installing Adobe After Effects software, review complete system requirements and recommendations in the Read Me file. The Read Me file is included in the Release Notes document available through the After Effects support section of the Adobe website.
In addition to the full version of Adobe After Effects, you can also install additional copies on additional computers to use as After Effects render engines to assist with network rendering. You install render engines in the same manner as the full version of the application. You run the render engine using the Adobe After Effects Render Engine shortcut in the Adobe After Effects folder.
Limitations of the trial version
The trial version of After Effects includes all of the codecs that are included with the full version of After Effects. This means that you can import and export to all of the supported file formats using the trial version. The free trial version of Adobe After Effects software does not include some features that depend upon software licensed from parties other than Adobe. For example, Cycore (CC) effects, mocha-AE, mocha Shape, FreeForm, and Color Finesse are available only with the full version of Adobe After Effects software. (Keylight is included, however.) If your installation of After Effects is missing some third-party components, contact your system administrator to ensure that all licensed components have been installed correctly.
Activate the software
Activation is a simple, anonymous process. After installation, your Adobe software attempts to contact Adobe to complete the license activation process. No personal data is transmitted.
A single-user retail license activation supports two computers. For example, you can install the software on a desktop computer at work and on a laptop computer at home.
For more information on product licensing and activation, see the Read Me file or go to the Adobe website.
Note: Before transferring an activation to a different computer, deactivate the software by choosing Help > Deactivate or Help > Sign Out.
Last updated 6/14/2014

11
Workspace and workflow
More Help topics
Network rendering with watch folders and render engines
Plug-ins
General user interface items
Activate a tool
The Tools panel can be displayed as a toolbar across the top of the application window or as a normal, dockable panel.
Note: Controls related to some tools appear only when the tool is selected in the Tools panel.
•Click the button for the tool. If the button has a small triangle at its lower-right corner, hold down the mouse button to view the hidden tools. Then, click the tool you want to activate.
•Press the keyboard shortcut for the tool. (Placing the pointer over a tool button displays a tool tip with the name and keyboard shortcut for the tool.)
•To cycle through hidden tools within a tool category, repeatedly press the keyboard shortcut for the tool category. (For example, press the Q key repeatedly to cycle through the pen tools.)
•To momentarily activate a tool, hold down the key for the desired tool; release the key to return to the previously active tool. (This technique does not work with all tools.)
•To momentarily activate the Hand tool, hold down the spacebar, the H key, or the middle mouse button. (The middle mouse button does not activate the Hand tool under a few circumstances, including when the Unified Camera tool is active.)
 To pan around in the Composition, Layer, or Footage panel, drag with the Hand tool. Hold Shift, too, to pan faster.
To show or hide panels most relevant to the active tool, click the panel button  if available. For example, clicking this button when a paint tool is active opens or closes the Paint and Brushes panels. Select the Auto-Open Panels option in the Tools panel to automatically open the relevant panels when certain tools are activated.
Open panel, viewer, and context menus
Panel menus provide commands relative to the active panel or frame. Viewer menus provide lists of compositions, layers, or footage items that can be shown in the viewer, as well as commands for closing items and locking the viewer. Context menus provide commands relative to the item that is context-clicked. Many items in the After Effects user interface have associated context menus. Using context menus can make your work faster and easier.
• To open a panel menu, click the button |
in the upper-right corner of the panel. |
•To open a viewer menu, click the name of the active composition, layer, or footage item in the viewer tab.
•To open a context menu, right-click (Windows or Mac OS) or Control-click (Mac OS). This action is sometimes referred to as context-clicking.
Last updated 6/14/2014

12
Workspace and workflow
Columns
The Project, Timeline, and Render Queue panels contain columns.
•To show or hide columns, right-click (Windows) or Control-click (Mac OS) a column heading (or choose Columns from the panel menu), and select the columns that you want to show or hide. A check mark indicates that the column is shown.
Note: In general, the search and filter functions in the Project and Timeline panels only operate on the content of columns that are shown.
•To reorder columns, select a column name and drag it to a new location.
•To resize columns, drag the bar next to a column name. Some columns cannot be resized.
•To sort footage items in the Project panel, click the column heading. Click once more to sort them in reverse order.
Search and filter in the Timeline, Project, and Effects & Presets panels
The Project, Timeline, and Effects & Presets panels each contain search fields that you can use to filter items in the panel.
•To place the insertion point in a search field, click in the search field.
•To place the insertion point in the search field for the active panel, choose File > Find or press Ctrl+F (Windows) or Command+F (Mac OS).
•To clear the search field, click the  button that appears to the right of the text in the search field.
When you type in the search field, the list of items in the panel is filtered, showing some items and hiding others. Only items with entries that match the search query that you’ve typed are shown. The folders, layers, categories, or property groups that contain the matched items are also shown, to provide context.
In general, only text in columns that are shown is searched for this filtering operation. For example, you may need to show the Comments column to search and filter by the contents of comments. (See Columns .)
If one or more layers are selected in a composition, the filtering operation in the Timeline panel only affects selected layers. In this case, unselected layers are not filtered out (hidden) if they don’t match the search query. However, if no layers are selected in the composition, the filtering operation applies to all layers in the composition. This behavior matches that for showing and hiding of layer properties by pressing their property shortcut keys. (See Show or hide properties in the Timeline panel.)
Clearing the search field and ending the search causes expanded folders and property groups to collapse (close).  Therefore, it’s easier to work with the items that are found by the filter operation if you operate on them before you clear
the search field and end the search.
If the text that you type in the search field in the Project or Timeline panel contains spaces, the spaces are treated as and-based operators. For example, typing dark solid matches footage items or layers named Dark Red Solid and Dark Gray Solid. In the Effects & Presets panel, spaces are treated as space characters in the search field. For example, typing change color matches the Change Color effect, but not the Change To Color effect.
Project, Timeline, and Effects & Presets panels accept or-based searching. In an or-based search, a comma denotes an or, with and-based operators taking precedence over or-based ones. For example, sometimes the name of the property that determines the amount for a blur effect is Amount, sometimes it is Blurriness, and sometimes it is Blur Radius. If you search for Amount, Blurriness, Radius, then you will see the equivalent values for all of your blur effects.
When you type in a search field, recent search strings that match your input appear.
Last updated 6/14/2014

13
Workspace and workflow
This search method also allows a way to save items you use often via a menu that opens when you click the search icon in the search field. The search menu consists of two lists, separated by a divider. The top list contains the six most recent searches, with the most recent one at the top. The bottom list contains saved search items. As you type, the top list filters to show matching terms.
•To save a search item, Shift-click it in the top list of the search menu. Up to ten items may be saved.
•To delete a saved search item from either list, hover the mouse over the the item to highlight it, and then press Delete or Backspace.
See this video on the Video2Brain website to learn about the new features for searching and filtering in panels.
Examples of searches in the Project panel
•To show only footage items for which the name or comment contains a specific string, start typing the string.
•To show only footage items for which the source file is missing, type the entire word missing. (This search works whether or not the File Path column is shown, which is an exception to the general rule that only shown columns are searched.)
•To show only unused footage items, type the entire word unused.
•To show only used footage items, type the entire word used.
•To show only Cineon footage items, type Cineon with the Type column shown.
Examples of searches in the Timeline panel
•To show only layers and properties for which the name or comment contains a specific string, type the string. For example, type starch to show pins created by the Puppet Starch tool.
•To show only properties that have an expression that uses a specific method, type the method name.
•To show only layers with a specific label, type the label name. (See Color labels for layers, compositions, and footage items.)
Click the swatch for a label to see the context menu that lists the label names. Alternatively, drag the right edge of the  Label column heading to expand the column to read the label names.
Scroll or zoom with the mouse wheel
You can use the mouse wheel to zoom in the Timeline, Composition, Layer, and Footage panels. You can use the mouse wheel to scroll in the Timeline, Project, Render Queue, Flowchart, Effect Controls, Metadata, and Effects & Presets panels.
•To zoom into the center of the panel, or into the feature region when tracking, roll the mouse wheel forward.
•To zoom out of the center of the panel, or out of the feature region when tracking, roll the mouse wheel backward.
•To zoom into the area under the pointer, hold down Alt (Windows) or Option (Mac OS) as you roll the mouse wheel forward. In the Timeline, Footage, and Layer panels, this action zooms in time when the pointer is over the time navigator or time ruler.
•To zoom out of the area under the pointer, hold down Alt (Windows) or Option (Mac OS) as you roll the mouse wheel backward. In the Timeline, Footage, and Layer panels, this action zooms in time when the pointer is over the time navigator or time ruler.
•To scroll vertically, roll the mouse wheel forward or backward.
•To scroll horizontally, hold down Shift as you roll the mouse wheel backward or forward. In the Timeline, Footage, and Layer panels, Shift-rolling backward moves forward in time and vice versa when the pointer is over the time navigator or time ruler.
Last updated 6/14/2014

14
Workspace and workflow
 You can scroll or zoom with the mouse wheel in a panel even if it is not currently active, as long as the pointer is over it.
Undo changes
You can undo only those actions that alter the project data. For example, you can undo a change to a property value, but you cannot undo the scrolling of a panel or the activation of a tool.
You can sequentially undo as many as 99 of the most recent changes made to the project.
To avoid wasting time undoing accidental modifications, lock a layer when you want to see it but do not want to modify  it.
it.
•To undo the most recent change, choose Edit > Undo [action] or Ctrl-Z
•To undo a change and all changes after it, choose Edit > History, and select the first change that you want to undo.
•To revert to the last saved version of the project, choose File > Revert. All changes made and footage items imported since you last saved are lost. You cannot undo this action.
After Effects user interface tips
•Use ClearType text anti-aliasing on Windows. ClearType makes the outlines of system text, such as menus and dialog boxes, easier to read. See Windows Help for information on how to enable ClearType text anti-aliasing.
•To show tool tips, select the Show Tool Tips preference (Edit > > General (Windows) or After Effects > Preferences > General (Mac OS)).
•Use a workspace that contains the Info panel, and leave that panel in front of other panels in its panel group whenever possible. The Info panel shows messages about what After Effects is doing, information about items under the pointer, and much more.
•In Windows, disable the Aero compositing mode. Hardware acceleration of panels and OpenGL features perform better in After Effects when Windows is operating in Basic mode. For information, see the Microsoft website.
•Use context menus.
•Use keyboard shortcuts.
More Help topics
Activating tools (keyboard shortcuts)
Effects and Presets panel
Organize, view, manage, and trim footage items
Select layers
Zoom an image for preview
Zoom in or out in time for a composition
Move or adjust a camera or working 3D view with the Camera tools
Lock or unlock a layer
Last updated 6/14/2014

15
Workspace and workflow
Workflows
General workflow in After Effects
Overview of general workflow in After Effects
Whether you use Adobe After Effects to animate a simple title, create complex motion graphics, or composite realistic visual effects, you generally follow the same basic workflow, though you may repeat or skip some steps. For example, you may repeat the cycle of modifying layer properties, animating, and previewing until everything looks right. You may skip the step of importing footage if you intend to create graphical elements entirely in After Effects.
1. Import and organize footage
After you create a project, import your footage into the project in the Project panel. After Effects automatically interprets many common media formats, but you can also specify how you want After Effects to interpret attributes such as frame rate and pixel aspect ratio. You can view each item in a Footage panel and set its start and end times to fit your composition. For more information, see Importing and interpreting footage items .
2. Create, arrange, and composite layers in a composition
Create one or more compositions. Any footage item can be the source for one or more layers in a composition. You can arrange the layers spatially in the Composition panel or arrange them in time using the Timeline panel. You can stack layers in two dimensions or arrange them in three dimensions. You can use masks, blending modes, and keying tools to composite (combine), the images of multiple layers. You can even use shape layers, text layers, and paint tools to create your own visual elements. For more information, see Composition basics, Creating layers, Compositing and transparency overview and resources, Overview of shape layers, paths, and vector graphics , and Creating and editing text layers .
3. Modify and animate layer properties
You can modify any property of a layer, such as size, position, and opacity. You can make any combination of layer properties change over time, using keyframes and expressions. Use motion tracking to stabilize motion or to animate one layer so that it follows the motion in another layer. For more information, see Animation basics, Expression basics, and Tracking and stabilizing motion (CS5) .
4. Add effects and modify effect properties
You can add any combination of effects to alter the appearance or sound of a layer, and even generate visual elements from scratch. You can apply any of the hundreds of effects, animation presets, and layer styles. You can even create and save your own animation presets. You can animate effect properties, too, which are simply layer properties within an effect property group. For more information, see Effects and animation presets overview .
5. Preview
Previewing compositions on your computer monitor or an external video monitor is fast and convenient, even for complex projects. You can change the speed and quality of previews by specifying their resolution and frame rate, and by limiting the area and duration of the composition that you preview. You can use color management features to preview how your movie will look on another output device. For more information, see Previewingand Color management.
6. Render and export
Last updated 6/14/2014
16
Workspace and workflow
Add one or more compositions to the render queue to render them at the quality settings you choose and to create movies in the formats that you specify. You can use File > Export or Composition > Add to Render Queue.
For more information, see Basics of rendering and exporting and the encoding quick start section in Adobe Media Encoder.
Online resources for general workflow in After Effects
Read a basic step-by-step introduction to the general workflow in an excerpt from After Effects Classroom in a Book.
Read Trish and Chris Meyer’s step-by-step introduction to creating a basic animation in a PDF excerpt from their book, The After Effects Apprentice.
For an overview of After Effects project navigtion, see the video tutorial, “Walking Through A Mini Project,” by Jeff Sengstack and Infinite Skills.
Basic workflow tutorial: Create a simple movie
This tutorial assumes that you have already started After Effects and have not modified the empty default project. This example skips the step of importing footage and shows you instead how to create your own synthetic visual elements. After you have rendered a final movie, you can import it into After Effects to view it and use it as you would any other footage item.
Some people prefer to use the mouse and menus to interact with After Effects, whereas others prefer to use keyboard shortcuts for common tasks. For several steps in this example, two alternative commands are shown that produce the same result—the first demonstrating the discoverability of menu commands and the second demonstrating the speed and convenience of keyboard shortcuts. You’ll likely find that you use some combination of keyboard shortcuts and menu commands in your work.
1Create a new composition:
•Choose Composition > New Composition.
•Press Ctrl+N (Windows) or Command+N (Mac OS).
2Change the Duration value in the Composition Settings dialog box by entering 5.00 (5 seconds), choose Web Video from the Preset menu, and click OK.
3Create a new text layer:
•Choose Layer > New > Text.
•Press Ctrl+Alt+Shift+T (Windows) or Command+Option+Shift+T (Mac OS).
4Type your name. Press Enter on the numeric keypad or press Ctrl+Enter (Windows) or Command+Return (Mac OS) on the main keyboard to exit text-editing mode.
5Set an initial keyframe for the Position property:
•Click the triangle to the left of the layer name in the Timeline panel, click the triangle to the left of the Transform group name, and then click the stopwatch button  to the left of the Position property name.
•Press Alt+Shift+P (Windows) or Option+Shift+P (Mac OS).
6Activate the Selection tool:
•Click the Selection Tool button in the Tools panel.
•Press V.
7 Using the Selection tool, drag your text to the bottom-left corner of the frame in the Composition panel.
Last updated 6/14/2014

17
Workspace and workflow
8Move the current-time indicator to the last frame of the composition:
•Drag the current-time indicator in the Timeline panel to the far right of the timeline.
•Press End.
9Using the Selection tool, drag your text to the top-right corner of the frame in the Composition panel.
A new keyframe is created at this time for the Position property. Motion is interpolated between keyframe values.
10Preview your animation using standard preview:
•Click the Play button  in the Preview panel. Click Play again to stop the preview.
•Press the spacebar. Press the spacebar again to stop the preview.
11Apply the Glow effect:
•Choose Effect > Stylize > Glow.
•Type glow in the search field at the top of the Effects & Presets panel to find the Glow effect. Double-click the effect name.
12In the Render Queue panel, click the underlined text to the right of Output To. In the Output Movie To dialog box, choose a name and location for the output movie file, and then click Save. For the location, choose something easy to find, like your desktop.
13Click the Render button to process all items in the render queue. The Render Queue panel shows the progress of the rendering operation. A sound is generated when rendering is complete.
You’ve created, rendered, and exported a movie.
You can import the movie that you’ve created and preview it in After Effects, or you can navigate to the movie and play it using a movie player such as QuickTime Player or Windows Media Player.
More Help topics
Activating tools (keyboard shortcuts)
Import footage items
Dynamic Link and After Effects
Dynamic Link features work only between applications of the same major version, such as After Effects CC 2014 with Premiere Pro CC 2014. Dynamic Link features do not work between applications that are not of the same major version, such as After Effects CC and Premiere Pro CS6. For CS6 versions of the applications, Dynamic Link features are only available with the Creative Suite Production Premium and Creative Suite Master Collection editions; Dynamic Link features do not work between CS6 applications that have been installed and activated as separate applications.
About Dynamic Link
In the past, sharing media assets among post-production applications required you to render and export your work from one application before importing it into another. This workflow was inefficient and time-consuming. If you wanted to change the original asset, you rendered and exported the asset again. Multiple rendered and exported versions of an asset consume disk space, and they can lead to file-management challenges.
Last updated 6/14/2014

18
Workspace and workflow
Dynamic Link offers an alternative to this workflow. You can create dynamic links between After Effects and Adobe Premiere Pro. Creating a dynamic link is as simple as importing any other type of asset. Dynamically linked assets appear with unique icons and label colors to help you identify them. Dynamic links are saved in projects generated by these applications.
Create and link to After Effects compositions with Dynamic Link
You can create new After Effects compositions, and dynamically link to them from Adobe Premiere Pro. You can also dynamically link to existing After Effects compositions from Adobe Premiere Pro.
Create a composition from clips in Adobe Premiere Pro
You can replace selected clips in Adobe Premiere Pro with a dynamically linked After Effects composition based on those clips. The new composition inherits the sequence settings from Adobe Premiere Pro.
1 Open Premiere Pro and select the clips you want to replace.
2 Right-click any of the selected clips.
3Select Replace With After Effects Composition.
After Effects opens (if it is not already open) and a new linked composition is created.
Create a dynamically linked composition from Adobe Premiere Pro
Creating a new dynamically linked composition from Adobe Premiere Pro launches After Effects. After Effects then creates a project and composition with the dimensions, pixel aspect ratio, frame rate, and audio sample rate of the originating project. (If After Effects is already running, it creates a composition in the current project.) The new composition name is based on the Adobe Premiere Pro project name, followed by Linked Comp [x].
1In Adobe Premiere Pro, choose File > Adobe Dynamic Link > New After Effects Composition. In the 2014 version of Premiere Pro, you can import compositions using Media Browser. See the following sections in Premiere Pro for more information:
•Import files with Media Browser
•Adobe Dynamic Link
2 If the After Effects Save As dialog box appears, enter a name and location for the After Effects project, and click Save.
When you create a dynamically linked After Effects composition, the composition duration is set to 30 seconds. To  change the duration, select the composition in After Effects, choose Composition > Composition Settings. Click the Basic tab, and specify a new value for Duration.
Link to an existing composition
For best results, match composition settings (such as dimensions, pixel aspect ratio, and frame rate) to the settings in the Adobe Premiere Pro.
Do one of the following:
•In Adobe Premiere Pro, choose File > Adobe Dynamic Link > ImportAfter Effects Composition. Choose an After Effects project file (.aep), and then choose one or more compositions.
•In Adobe Premiere Pro, choose an After Effects project file and click Open. Then choose a composition in the displayed dialog box and click OK.
•Drag one or more compositions from the After Effects Project panel to the Adobe Premiere Pro Project panel.
Last updated 6/14/2014

19
Workspace and workflow
•Drag an After Effects project file into the Premiere Pro Project panel. If the After Effects project file contains multiple compositions, the Import Composition dialog box opens.
Note: You can link to a single After Effects composition multiple times in a single Adobe Premiere Pro project.
Dynamically linked <span class="uicontrol">After Effects</span> compositions
Modify a dynamically linked composition in After Effects
Use the Edit Original command in Adobe Premiere Pro to modify a linked After Effects composition. Once the composition is open in After Effects, you can change the composition without having to use the Edit Original command again.
1Select the After Effects composition in Adobe Premiere Pro, or choose a linked clip in the Timeline, and choose Edit > Edit Original.
2 Change the composition in After Effects. Then, switch back to Adobe Premiere Pro to view your changes.
The changes made in After Effects appear in Adobe Premiere Pro. Adobe Premiere Pro stops using any preview files rendered for the clip before the changes.
Note: You can change the name of the composition in After Effects after creating a dynamic link to it from Adobe Premiere Pro. Adobe Premiere Pro does not update the linked composition name in the Project panel. Adobe Premiere Pro does retain the dynamic link, however.
Delete a dynamically linked composition or clip
You can delete a linked composition from an Adobe Premiere Pro project at any time, even if the composition is used in a project.
You can delete linked clips from the timeline of an Adobe Premiere Pro sequence or timeline at any time.
In Adobe Premiere Pro, select the linked composition or clip and press the Delete key.
Create a linked sequence in Adobe Premiere Pro with Dynamic Link
Link to a new sequence
Creating an Adobe Premiere Pro sequence from After Effects launches Adobe Premiere Pro. Adobe Premiere Pro then creates a project and sequence with the dimensions, pixel aspect ratio, frame rate, and audio sample rate of the originating project. (If Adobe Premiere Pro is already running, it creates a sequence in the current project.)
In After Effects, choose File > Adobe Dynamic Link > New Premiere Pro Sequence.
Link to an existing sequence
For best results, match sequence settings and project settings in Adobe Premiere Pro (such as dimensions, pixel aspect ratio, and frame rate) to those settings in the After Effects project.
Last updated 6/14/2014

20
Workspace and workflow
Do one of the following:
•In After Effects, choose File > Adobe Dynamic Link > Import Premiere Pro Sequence. Choose an Adobe Premiere Proproject, and then choose one or more sequences.
•Drag one or more sequences from the Adobe Premiere Pro Project panel to the After Effects Project panel.
Dynamic Link performance
A linked clip can refer to a complex source composition. Actions you perform on the complex source composition require additional processing time. After Effects takes time to apply the actions and make the final data available to Adobe Premiere Pro. In some cases, the additional processing time delays preview or playback.
To reduce playback delays, do one of the following:
•take the linked composition offline
•disable a linked clip to temporarily stop referencing a composition
•render the composition and replace the dynamically linked composition with the rendered file If you commonly work with complex source compositions, try adding RAM or a faster processor.
Note: A linked After Effects composition will not support Render Multiple Frames Simultaneously multiprocessing. See Improve performance by optimizing memory, cache, and multiprocessing settings.
More Help topics
Working with Adobe Premiere Pro and After Effects
Importing from After Effects and Adobe Premiere Pro
Working with After Effects and other applications
Working with Adobe Bridge and After Effects
Adobe Bridge is the control center for Adobe Creative Suite software. Use Adobe Bridge to browse for project templates and animation presets; run cross-product workflow automation scripts; view and manage files and folders; organize your files by assigning keywords, labels, and ratings to them; search for files and folders; and view, edit, and add metadata.
•To open Adobe Bridge from After Effects, choose File > Browse In Bridge.
•To reveal a file in Adobe Bridge, select a file in the Project panel and choose File > Reveal In Bridge.
•To use Adobe Bridge to browse for animation presets, choose Animation > Browse Presets.
Adobe Bridge is part of the Creative Cloud suite of applications and can be downloaded and installed through Creative Cloud. See the help documentation and the Adobe Bridge CC product page for more information.
See this video to get an overview of Adobe Bridge CC.
After Effects includes template projects that include entire DVD menus for you to use as a basis for your own DVD  menus. To use Adobe Bridge to browse and import these template projects, choose File > Browse Template Projects. (See Template projects and example projects.)
Last updated 6/14/2014

21
Workspace and workflow
Working with Photoshop and After Effects
If you use Photoshop to create still images, you can use After Effects to bring those still images together and make them move and change. In After Effects, you can animate an entire Photoshop image or any of its layers. You can even animate individual properties of Photoshop images, such as the properties of a layer style. If you use After Effects to create movies, you can use Photoshop to refine the individual frames of those movies.
Comparative advantages for specific tasks
The strengths of After Effects are in its animation and automation features. This means that After Effects excels at tasks that can be automated from one frame to another. For example, you can use the motion tracking features of After Effects to track the motion of a microphone boom, and then automatically apply that same motion to a stroke made with the Clone Stamp tool. In this manner, you can remove the microphone from every frame of a shot, without having to paint the microphone out by hand on each frame.
In contrast, Photoshop has excellent tools for painting and drawing.
Deciding which application to use for painting depends on the task. Paint strokes in Photoshop directly affect the pixels of the layer. Paint strokes in After Effects are elements of an effect, each of which can be turned on or off or modified at any time. If you want to have complete control of each paint stroke after you’ve applied it, or if you want to animate the paint strokes themselves, use the After Effects paint tools. If the purpose of applying a paint stroke is to permanently modify a still image, use the Photoshop paint tools. If you are applying several paint strokes by hand to get rid of dust, consider using the Photoshop paint tools.
The animation and video features in Photoshop Extended include simple keyframe-based animation. After Effects uses a similar interface, though the breadth and flexibility of its animation features are far greater.
After Effects can also automatically create 3D layers to mimic the planes created by the Photoshop Vanishing Point feature.
Exchanging still images
After Effects can import and export still images in many formats, but you will usually want to use the native Photoshop PSD format when transferring individual frames or still image sequences between After Effects and Photoshop.
When importing or exporting a PSD file, After Effects can preserve individual layers, masks, layer styles, and most other attributes. When you import a PSD file into After Effects, you can choose whether to import it as a flattened image or as a composition with its layers separate and intact.
It is often a good idea to prepare a still image in Photoshop before importing it into After Effects. Examples of such preparation include correcting color, scaling, and cropping. It is often better for you to do something once to the source image in Photoshop than to have After Effects perform the same operation many times per second as it renders each frame for previews or final output.
By creating your new PSD document from the Photoshop New File dialog box with a Film & Video preset, you can start with a document that is set up correctly for a specific video output type. If you are already working in After Effects, you can create a new PSD document that matches your composition and project settings by choosing File > New > Adobe Photoshop File.
Exchanging movies
You can also exchange video files, such as QuickTime movies, between Photoshop and After Effects. When you open a movie in Photoshop, a video layer is created that refers to the source footage file. Video layers allow you to paint nondestructively on the movie’s frames, much as After Effects works with layers with movies as their sources. When you save a PSD file with a video layer, you save the edits that you made to the video layer, not edits to the source footage itself.
Last updated 6/14/2014

22
Workspace and workflow
You can also render a movie directly from Photoshop. For example, you can create a QuickTime movie from Photoshop that can then be imported into After Effects.
Color
After Effects works internally with colors in an RGB (red, green, blue) color space. Though After Effects can convert CMYK images to RGB, you should do video and animation work in Photoshop in RGB.
If relevant for your final output, it is better to ensure that the colors in your image are broadcast-safe in Photoshop before you import the image into After Effects. A good way to do this is to assign the appropriate destination color space—for example, SDTV (Rec. 601)—to the document in Photoshop. After Effects performs color management according to color profiles embedded in documents, including imported PSD files.
Working with Flash and After Effects
If you use Adobe® Flash® to create video or animation, you can use After Effects to edit and refine the video. For example, from Flash you can export animations and applications as QuickTime movies or Flash Video (FLV) files. You can then use After Effects to edit and refine the video.
If you use After Effects to edit and composite video, you can then use Flash to publish that video.
Flash and After Effects use separate terms for some concepts that they share in common. The following table lists the differences between the terms used in the two applications:
After Effects |
Flash Professional |
|
|
Composition |
Movie Clip |
|
|
Composition frame (Composition panel) |
Stage |
|
|
Project panel |
Library panel |
|
|
Project files |
FLA files |
|
|
Render and export a movie |
Publish SWF file |
|
|
Additional resources
The following articles provide additional information about using Flash and After Effects together:
•Richard Harrington and Marcus Geduld provide an excerpt, "Flash Essentials for After Effects Users", of their book After Effects for Flash | Flash for After Effects on the Peachpit website. In this chapter, Richard and Marcus explain Flash in terms that an After Effects user can understand. http://www.peachpit.com/articles/article.aspx?p=1350895
•Richard Harrington and Marcus Geduld also provide "After Effects Essentials for Flash Users", another excerpt from their book After Effects for Flash | Flash for After Effects. In this chapter, Richard and Marcus explain After Effects in terms that a Flash user can understand. http://www.peachpit.com/articles/article.aspx?p=1350894
•Robert Powers provides a video tutorial on the Slippery Rock NYC website that shows the basics of using After Effects from the perspective of someone who is familiar with Flash Professional.
Exporting QuickTime video from Flash
If you create animations or applications with Flash, you can export them as QuickTime movies using the File > Export > Export Movie command in Flash. For a Flash animation, you can optimize the video output for animation. For a Flash application, Flash renders video of the application as it runs, allowing the user to manipulate it. This lets you capture the branches or states of your application that you want to include in the video file.
Importing and publishing video in Flash
Last updated 6/14/2014

23
Workspace and workflow
When you import a movie file into Flash, you can use various techniques, such as scripting or Flash components, to control the visual interface that surrounds your video. For example, you might include playback controls or other graphics. You can also add graphic layers on top of the movie for composite results.
Composite graphics, animation, and video
Flash and After Effects each include many capabilities that allow you to perform complex compositing of video and graphics. Which application you choose to use will depend on your personal preferences and the type of final output you want to create.
Flash is the more web-oriented of the two applications, with its small final file size. Flash also allows for run-time control of animation. After Effects is oriented toward video and film production, provides a wide range of visual effects, and is generally used to create video files as final output.
Both applications can be used to create original graphics and animation. Both use a timeline and offer scripting capabilities for controlling animation programmatically. After Effects includes a larger set of effects.
Both applications allow you to place graphics on separate layers for compositing. These layers can be turned on and off as needed. Both also allow you to apply effects to the contents of individual layers.
In Flash, composites do not affect the video content directly; they affect only the appearance of the video during playback in Flash Player. In contrast, when you composite with imported video in After Effects, the video file you export actually incorporates the composited graphics and effects.
Because all drawing and painting in After Effects is done on layers separate from any imported video, it is always nondestructive. Flash has both destructive and nondestructive drawing modes.
Importing Flash SWF files into After Effects
Flash has a unique set of vector art tools that make it useful for a variety of drawing tasks not possible in After Effects or Adobe® Illustrator®. You can import SWF files into After Effects to composite them with other video or render them as video with additional creative effects. Interactive content and scripted animation are not retained. Animation defined by keyframes is retained.
Each SWF file imported into After Effects is flattened into a single continuously rasterized layer, with its alpha channel preserved. Continuous rasterization means that graphics stay sharp as they are scaled up. This import method allows you to use the root layer or object of your SWF files as a smoothly rendered element in After Effects, allowing the best capabilities of each tool to work together.
Working with Adobe Premiere Pro and After Effects
Adobe Premiere Pro is designed to capture, import, and edit movies. After Effects is designed to create motion graphics, apply visual effects, composite visual elements, perform color correction, and perform other post-production tasks for movies.
You can easily exchange projects, compositions, sequences, tracks, and layers between After Effects and Adobe Premiere Pro:
•You can import an Adobe Premiere Pro project into After Effects. (See Import an Adobe Premiere Pro project.)
•You can export an After Effects project as an Adobe Premiere Pro project. (See Export an After Effects project as an Adobe Premiere Pro project .)
•You can copy and paste layers and tracks between After Effects and Adobe Premiere Pro. (See Copy between After Effects and Adobe Premiere Pro.)
Last updated 6/14/2014

24
Workspace and workflow
If you have Adobe Premiere Pro, you can do the following:
•Use Adobe Dynamic Link to work with After Effects compositions in Adobe Premiere Pro. A dynamically linked composition appears as a clip in Adobe Premiere Pro.
•Use Adobe Dynamic Link to work with Adobe Premiere Pro sequences in After Effects. A dynamically linked sequence appears as a footage item in After Effects.
•Start After Effects from within Premiere Pro and create a new composition with settings that match the settings of your Premiere Pro project.
•Select a set of clips in Adobe Premiere Pro and convert them to a composition in After Effects.
For information on using Dynamic Link with After Effects and Premiere Pro, see Dynamic Link and After Effects and the relevant sections of Adobe Premiere Pro Help.
Working with Adobe Media Encoder and After Effects
You can use Adobe Media Encoder to export video from After Effects. Use Adobe Media Encoder to encode formats like H.264, MPEG-2, and WMV. Formats such as these are encoded at a higher quality than the Render Queue. Other formats, are available in Adobe Media Encoder, but not in After Effects. For example, the DNxHD format is available in Adobe Media Encoder CC, but not in After Effects CC.
For details about using Adobe Media Encoder with After Effects, see Adobe Media Encoder.
See this tutorial to learn how to export After Effects compositions using Adobe Media Encoder.
Edit in Adobe Audition
While working in After Effects, you can use the more comprehensive audio-editing capabilities of Adobe Audition to fine-tune your audio. You can use the Edit in Adobe Audition command to start Adobe Audition from within After Effects.
If you edit an audio-only file (for example, a WAV file) in Adobe Audition, you change the original file. If you edit a layer that contains both audio and video (for example, an AVI file), you edit a copy of the source audio file.
1Select the layer that contains the audio that you want to edit. The item must be of a type that is editable in Adobe Audition.
2 Choose Edit > Edit In Adobe Audition to open the clip in Edit view in Adobe Audition.
3Edit the file, and then do one of the following:
•If you’re editing an audio-only layer, choose File > Save to apply your edits to the original audio file. You can also choose File > Save As to apply your edits to a copy of the audio file. If you choose File > Save As, import the copy of the file into After Effects.
•If you’re editing a layer that contains both audio and video, choose File > Save As. After you save the file, import it into After Effects. Then, add it to the composition, and mute the original audio in the audio-video clip by deselecting the Audio switch in the Timeline panel.
Note: Any effects applied to audio in After Effects aren’t included in the copy that is sent to Adobe Audition.
Tutorials and resources about using Adobe Audition to modify audio from After Effects can be found on this post from the After Effects Region of Interest blog.
Last updated 6/14/2014

25
Workspace and workflow
More Help topics
Adobe Bridge
Template projects and example projects Animation presets overview and resources Preparing and importing Photoshop files 3D object layers from Photoshop
Video and animation overview 3D
Vanishing Point
Web links, chapter links, cue points, and markers
Importing from Adobe After Effects
Keyboard shortcuts reference
General (keyboard shortcuts)
Result |
Windows |
Mac OS |
|
|
|
Select all |
Ctrl+A |
Command+A |
|
|
|
Deselect all |
F2 or Ctrl+Shift+A |
F2 or Command+Shift+A |
|
|
|
Rename selected layer, composition, folder, |
Enter on main keyboard |
Return |
effect, group, or mask |
|
|
|
|
|
Open selected layer, composition, or footage |
Enter on numeric keypad |
Enter on numeric keypad |
item |
|
|
|
|
|
Move selected layers, masks, effects, or render |
Ctrl+Alt+Down Arrow or Ctrl+Alt+Up Arrow |
Command+Option+Down Arrow or |
items down (back) or up (forward) in stacking |
|
Command+Option+Up Arrow |
order |
|
|
|
|
|
Move selected layers, masks, effects, or render |
Ctrl+Alt+Shift+Down Arrow or |
Command+Option+Shift+Down Arrow or |
items to bottom (back) or top (front) of |
Ctrl+Alt+Shift+Up Arrow |
Command+Option+Shift+Up Arrow |
stacking order |
|
|
|
|
|
Extend selection to next item in Project panel, |
Shift+Down Arrow |
Shift+Down Arrow |
Render Queue panel, or Effect Controls panel |
|
|
|
|
|
Extend selection to previous item in Project |
Shift+Up Arrow |
Shift+Up Arrow |
panel, Render Queue panel, or Effect Controls |
|
|
panel |
|
|
|
|
|
Duplicate selected layers, masks, effects, text |
Ctrl+D |
Command+D |
selectors, animators, puppet meshes, shapes, |
|
|
render items, output modules, or |
|
|
compositions |
|
|
|
|
|
Quit |
Ctrl+Q |
Command+Q |
|
|
|
Last updated 6/14/2014
Loading...