


 Loading...
Oxygen Series
Oxygen 8 v2, Oxygen 49, Oxygen 61
User Guide

English |
Oxygen Keyboard Line User Guide |
1 › Introduction
Congratulations on purchasing an Oxygen keyboard from M-Audio. The Oxygen keyboards offer diverse controls and all the programming features and functions you will need to develop your MIDI studio.
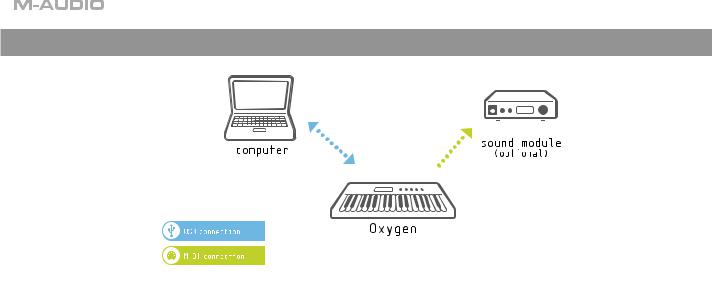
The Oxygen keyboards come with 25, 49, or 61 full-size, velocity-sensitive keys and eight fully assignable knobs, with 6 fully assignable Transport buttons. The 49and 61-note models also include 9 fully assignable buttons and 9 assignable sliders for performance and programming. One simple USB connection serves as both a MIDI interface and bus-power source. Class-compliancy with Windows XP and Mac OS X means that you can get down to business without even installing any drivers.
You can also expand on the functions of the Oxygen range by downloading the Enigma software editor and librarian. For more information, see the Enigma Software Editor (replace with section’s number) of this manual or visit www.m-audio.com to register and download the free software.
2 › What’s in the Box
Your Oxygen keyboard package contains the following:
<25-, 49-, or 61-note keyboard
<CD-ROM containing Driver Software and User Manual in PDF format
<Printed Quick Start Guide
<CD-ROM containing bundled software
<5-foot USB 1.1 Type B cable
3 › Features
Top Panel
The top panel has the following functional components:
<25-, 49-, and 61-note key bed: full-sized velocity-sensitive keys with synth action
<8 fully assignable MIDI controller knobs
<9 assignable sliders (49 and 61 only)
<9 assignable buttons (49 and 61 only)
<6 Transport buttons
<Assignable Pitch Bend and Modulation wheels
<Octave and Transpose up, down buttons
<10 non-volatile memories
<7 top-panel Function buttons (only 5 on 25-note model)
<3-segment LED screen
<Advanced programming functions on the keybed
Back Panel
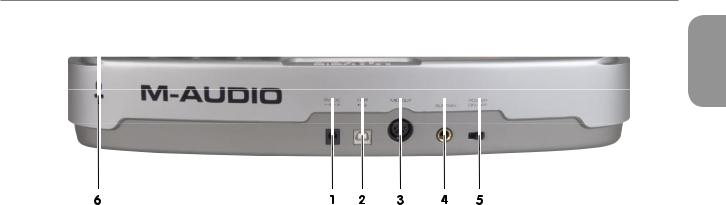
The back panel has the following functional components:
<USB 1.1 upstream (Type B) port
<Sustain pedal input
<MIDI Out port
<On/Off switch
<Power input for optional power supply
English
3

General
The product has the following general features:
<USB bus powered
<Compatible with Enigma librarian and parameter editor for storing and organizing setups
<MIDI Data from controllers
•MIDI control number
•RPN/NRPN
•Program, Bank LSB, Bank MSB
•Pitch Bend
•GM/GM2/XG SysEx Messages
<MIDI Data from buttons:
•Note on
•Note on/off toggle
•MIDI CC on/off toggle
•RPN/NRPN
•Program, Bank LSB, Bank MSB presets
•MIDI Machine Control functions
•GM/GM2/XG SysEx Messages
•Program increment/decrement
•MIDI CC value increment/decrement
<All controls fully programmable to MIDI controller number
<All controls fully programmable to MIDI channel
<Controller Mute function mutes controller output to avoid parameter jumps
<Memory Dump via SysEx
4 › Minimum System Requirements
IMPORTANT: The Oxygen keyboard controllers are supported under Windows XP; they are not supported under Windows 98, 98SE or Windows ME or 2000. You must be running Service Pack 1 (SP1) or later. Visit the Windows update web pages (http://windowsupdate. microsoft.com/) to make certain you have the most current updates and fixes supplied by Microsoft.
On the Macintosh, the Oxygen controllers are supported under Mac OS X version 10.3.8 or version 10.4 or later. Earlier versions of Mac operating systems are not supported.
Windows*
<Pentium 3 – 800 MHz or higher (CPU may be higher for laptops)
<256 MB RAM
<DirectX 9.0b or higher
<Windows XP (SP1) or higher
(Windows 98, Me, NT, or 2000 not supported)
Mac OS*
<Macintosh G3 800/G4 733 MHz or higher (CPU may be higher for laptops)
<OS X 10.2.8 with 256 MB RAM,
<OS X 10.3.4 or greater with 512 MB RAM
*M-Audio suggests you also check the minimum system requirements for your software, as they may be greater than the above.
Windows XP and Mac OS X Class-Compliancy
If you are using Windows XP or Mac OS X, you may simply connect your keyboard using the USB lead (supplied) and turn the power switch to “on.” Because the Oxygen keyboards are classcompliant, your unit will work without any further installation.
4

Oxygen Keyboard Line User Guide
5 › Driver Installation and Powering the Keyboard
Power and Connection via USB
You can power the keyboard via USB or an optional external power supply. Use only one method at a time.
1.Check that the on/off switch on the back of the unit is set to “off”
2.Plug in the USB cable provided with the Oxygen keyboard to a free USB port on your computer
3.Plug in the other end of the USB cable to the USB input on the Oxygen keyboard and turn the Oxygen keyboard on.
The single USB cable powers the Oxygen, and sends MIDI data to and from your computer.
You can also use a power adapter (not included) with the following specification: 12V DC output, 250-300mA, center positive.
Verify that you are not powering the Oxygen keyboard via USB, then simply plug in the power supply to the input labelled DC 12V and switch the power on.
Note: Do not leave the adapter plugged in for long periods if the unit is not in use.
6 › Controls and Connectors
Top Panel Descriptions
1. Pitch Bend Wheel:
The Pitch Bend wheel is used for modifying the pitch of sounds played on a given channel. Rolling the Pitch Bend wheel upward or downward will cause a raising or lowering of the pitch of a sound. The Pitch Bend wheel is an assignable controller, and can also be used to control other effects.
2. Modulation Wheel:
The Modulation wheel is used to change the intensity of effects, such as Vibrato (pitch change), Tremolo (change in volume), and Modulation (change in tone). Roll the Modulation upward to add modulation effect and roll downward to reduce modulation effect. The Modulation wheel is an assignable controller, and can also be used to control other effects.
English
5

3. Octave +/- and Transpose Buttons:
The Octave buttons allow you to shift the octave of the keyboard up or down to extend the range of the key bed.
The left button is for the Octave down function, and the right button is for the Octave up function. The top to bottom range available via the Octave up and down function is 11 octaves.
1.Press Octave + one time for each up octave shift on the keyboard
2.Press Octave – one time for each down octave shift on the keyboard
Transpose is a secondary function of the Octave buttons. The Transpose function allows a pitch transposition up or down 12 steps. To activate the Transpose function, press both Octave up and down buttons simultaneously and then use the up and down buttons to adjust transposition by one semitone.
1.Press Octave + and Octave – together.
2.Press Octave + one time for each semi tone you want to transpose up.
3.Press Octave – one time for each semi tone you want to transpose down.
4. LED Screen:
The LED is a standard 3-segment LED display. The display provides feedback while you are programming various MIDI functions.
5. Function Buttons:
There are 7 function buttons on the 49 and 61-Note and 5 on 25-Note. The Function buttons are used for on the fly programming. The Advanced button is used to access the advanced programming functions on the keybed.
6. 9 Assignable MIDI Sliders (49and 61Note Only):
The Oxygen 49 and 61 have 9 assignable sliders that are fully programmable. Additionally, each fader can be assigned to an individual MIDI channel.
7. 9 Assignable MIDI Buttons (49and 61Note Only):
The Oxygen 49 and 61 have 9 assignable buttons that are fully programmable. Additionally, each button can be assigned to an individual MIDI channel.
8. 8 Assignable MIDI Knobs:
The Oxygen keyboards have 8 assignable knobs that are fully programmable. Additionally, each knob can be assigned to an individual MIDI channel.
9. 6 Assignable Transport Buttons:
The Oxygen keyboards have 6 fully assignable Transport buttons that send MIDI controller data on any MIDI channel. Each Transport button is fully programmable. Additionally, each button can be assigned to an individual MIDI channel.
10.Velocity-sensitive Keyboard:
The product’s key bed is velocity sensitive.
6
Oxygen Keyboard Line User Guide
Back Panel Descriptions
English
1. DC Power Supply Port:
For connection of a 12V DC 250-300mA power supply. (The power supply is an optional accessory and is not included in the package.)
2. USB 1.1 Port:
USB 1.1 upstream (Type B) port
3. MIDI Output:
The external MIDI Out port is used to connect external MIDI devices such as sound modules, hardware sequencers, and synthesizers. The port will accept a standard 5 pin DIN-type connector.
4. Sustain Pedal Input:
The Sustain Pedal input accepts a 1⁄4” TR jack plug. It is located on the rear or back panel as shown in the illustration. The sustain pedal controls the hold length of any note played on the keyboard. However, the pedal is fully programmable and can be used to control other effects.
•The polarity of the sustain pedal is determined when you power up your Oxygen controller. The state at power up is assumed to be off. If the pedal is not pressed at power up, the pedal will be on when pressed, and off when released.
•The sustain pedal is an optional accessory and is not included in the package.
5.On/Off Switch:
The power switch on the rear of the product will function in a simple on or off mode. When the unit is on, it is powered by either the external supply or USB bus power.
6. Kensington Lock Hole:
This connector is compatible with Kensington® security cables to protect your device from theft.
7
7 › Introduction to MIDI Programming Functions
Introduction
Before you begin exploring the MIDI section of the manual, please refer to the beginning of this guide and read the installation information. It is necessary to install the Oxygen and ensure it is working properly before you begin to work with the MIDI functions.
Testing Your Oxygen keyboard with Your Computer Software
We recommend that you verify that your software application is properly communicating with the Oxygen keyboard. Most software applications have a MIDI Input indicator. To confirm data is received, press any key on the keyboard.
If you encounter any issues or if the software receives no data, please verify that you have selected the keyboard’s driver as the MIDI Input for your software. In addition, please read the troubleshooting section at the back of this manual and consult the manual that came with your software for proper configuration within the software application.
Edit Mode
This manual will frequently refer to the “Edit mode.” Edit mode defines the state of the Oxygen after pressing the Advanced Function button which is labeled “Advanced.”
In Edit mode, use the Oxygen keys for selecting programming functions. These functions are listed above each key on the key bed.
When entering numerical values in Edit mode, the LED display shows the value entered. This value will update as you enter numerical data.
Use the Enter key each time the numerical data entry keys are used to enter a value. This will save that value. To exit Edit mode, simply press the Edit button again, the LED will no longer be lit and you will have restored the keyboard.
8

Oxygen Keyboard Line User Guide
8 › Function Buttons Defined
Advanced
The Advanced Functions feature will put the keyboard into Edit mode, and the keys on the key bed will then call up the assigned programming function written on the panel above them.
When the Advanced Function button is pressed, and the keyboard enters edit mode, the LED screen will show three dots along the bottom of the display.
Mute
The Mute function mutes all MIDI output from the rotary dials, or faders on your Oxygen controller. This allows for adjustment of controller parameters without altering software settings– useful for preventing parameter jumps in your software. To activate Controller Mute, press the Mute button. The LED display will read “OFF” each time a controller is moved, in order to make it clear that the controller is not sending any MIDI data.
The Mute function does not affect the buttons, the sustain pedal, or the keys. Pressing any of these controllers on your Oxygen keyboard will cancel Mute mode automatically. To exit the Controller Mute mode, press the Controller Mute button again (the LED screen will read “On”).
Snap Shot
The Snap Shot function sends out the current settings for each knob and fader on their current MIDI channel. This feature lets you record the settings of the controllers into your sequencer, or update your software’s parameters to match the settings on your Oxygen.
Snap Shot can be used in conjunction with the Mute function to create interesting effects. For example, Mute can be used to adjust the position of the controllers on your Oxygen without affecting the software parameters, Then, Snap Shot can be used to immediately shift all parameters to the new levels you have changed while muted, all at once.
Select
The Select button is used to select the function of the 2 data buttons. Each time the Select button is pressed, a different dot will light along the bottom of the LED display to indicate which of the functions the Data buttons are currently assigned to.
The functions that can be assigned to the data buttons are Global Channel, Program and Preset Select (Preset is available from these buttons on the 25-note Oxygen 8 v2 only. On the 49and 61-note versions, there are separate dedicated buttons for Preset). On initial power up, the data buttons will alter the selected preset on the 25-note version. On the 49and 61-note versions, by default the data buttons will alter the Global Channel. The settings for the Data buttons will be remembered even when you power down your Oxygen.
If the Data buttons are assigned to ‘Prog’ then the buttons have the effect of sending a Program change. This is a useful setting if you want to change quickly between patches on a synthesizer and audition the sound. Program Changes are always sent on the Global MIDI Channel.
If the Data buttons are assigned to ‘Preset’ then the buttons are used to change between various presets of your Oxygen. This means that each time a Data button is pressed, a new preset will be recalled.
If the Data buttons are assigned to ‘Glob.’ the buttons will change the Global MIDI Channel that the Oxygen controller is transmitting on.
Data -/+ Buttons
The left Data button is ‘-‘ and will decrement the assigned function’s value. The right Data button is ‘+’ and will increment the assigned function’s value.
Preset -/+ and Dual Press Memory Recall (49and 61-note)
Note: the 25-note version does not have Preset – and + buttons. Simply press Preset - (down) or Preset + (up) to toggle through the preset memories. Alternately, you can press both Preset - and Preset + which will put the keyboard into Advanced Function mode, and then enter the memory number on the key bed to load one of the 10 presets from preset memory.
English
9

9 › Keybed Functions Defined
Control Assign
The Control Assign function assigns a MIDI controller message (MIDI CC) to a selected controller.
To assign a MIDI CC to a selected controller:
1.Press the Advanced Function button.
2.Press the Control Assign key.
3.Enter the MIDI CC value with the numeric keys.
4.Press the Enter key.
The controller that is affected by the Control Assign function is always the last used controller. By default, controller 1 is selected. However, it is possible to alter the selected controller during edit mode by moving a different controller. As you enter a new MIDI cc assignment using the data entry keys, the LED will update to give feedback on the number that has been entered.
Please see appendix A for a list of MIDI cc’s that are assignable. Note that we have expanded on the standard MIDI CC list. This is to include other useful MIDI messages such as NRPN messages, GM/GM2 Sys Ex and even some CC’s that define how the controller should operate. This simplifies programming such messages which are often complicated to program on other devices.
Global Channel
The Global Channel function changes the MIDI channel assigned to the keyboard. Your Oxygen controller will transmit on any of the standard 16 MIDI channels. The Global MIDI Channel will affect the channel on which program changes, bank changes, and any controllers set to respond to the global channel will transmit.
To set the Global Channel:
1.Press the Advanced Function button
2.Press the Global Channel key.
3 Enter the MIDI channel number on the key bed.
4Press the Enter key.
When engaging the Global Channel function, the LED screen will display the “c” symbol, and the last selected channel.
Note that it is also possible to set the Data keys to control the Global Channel. To do this:
1.Press the Select Function button until the dot above Glob Chan is lit.
2.Use the - and + Data buttons to decrement/increment the Global Channel.
Channel Assign
The Channel Assign function assigns a channel to an individual MIDI controller.
1.Press the Advanced button and then the Channel Assign key.
2.Enter the MIDI channel number using the data entry keys.
3.Then press the Enter key.
When assigned to channel 00, the controller will transmit on the Global Channel.
When engaging the Channel Assign function, the LED screen will display the “c” symbol, and the last selected channel.
Note: When a controller is assigned to send SysEx messages, the individual control channel number defines a Device ID and not a transmit channel. Please see Appendix A to find out which of the extra MIDI CC numbers determine that the control should send a SysEx message.
10
Loading...