


Louisiana Grills Lg1100us, Lg900eu, Lg900us, Lg700us, Lg700eu Owner's Manual
...
world class bbq
in your
own backyard
OwnersManual
You MUST read this manual before operating your grill!
LG700
LG900
LG1100
“Please read the entire manual before installation and use of this pellet fuel-burning appliance. Failure to follow these instructions could result in property damage, bodily injury or even death.”
Contact local building or fire officials about restrictions and installation inspections required in your area.
WWW.LOUISIANA-GRILLS.COM 1-877-303-3134
CUSTOMER SERVICE

Dangers & Warnings
“A MAJOR CAUSE OF FIRES IS FAILURE TO MAINTAIN REQUIRED CLEARANCES (AIR SPACES) TO COMBUSTIBLE MATERIALS. IT IS OF UTMOST IMPORTANCE THAT THIS PRODUCT BE INSTALLED ONLY IN ACCORDANCE WITH THESE INSTRUCTIONS.”
WARNING:
DO NOT touch any part of your “LG Series Smoker” while the smoker is HOT. Serious bodily injury could result.
•Keep the entire grill a minimum 12 inches, or a safe distance, from all combustibles.
•Do not install or operate grill under a combustible ceiling or overhang.
•Do not enlarge burn grate orifices, igniter holes or burn pots
•LG Smokers should be cleaned and maintained on a regular basis
•After a period of storage, and/or non-use, the Louisiana Grill Smoker should be checked for burn grate obstructions, foreign objects both inside the grill and the hopper, and air blockage, before use. See instructions in this manual for correct procedures
•Do not put a barbeque cover or anything flammable on, or in the storage space area under the barbeque.
•Children should never use your LG Smoker barbeque while unattended. Accessible parts of the barbeque may be very hot. Keep young children away while it is in use.
•Do not use lava rock, wood chucks or charcoal in your Smoker.
•Do not use accessories not specified for use with this appliance
•Never lean over open grill or place hands or fingers on the front edge of the cooking box or in the hopper.
•Should a grease fire occur, turn “Off” the control and leave lid closed until the fire is out. DO NOT unplug the power cord. DO NOT throw water on it. DO NOT try to smother the fire.
WARNING:
DO NOT transport your “LG Series Smoker” while operating or while the grill is HOT.
•DO NOT use your grill in the rain or around any water source.
•Always unplug the grill before performing any service or maintenance .
•If the LG Smoker is stored outside during the rainy season or seasons of high humidity, care should be taken to insure that water does not get into the pellet hopper. Wood pellets, when wet or exposed to high humidity, expand greatly, break apart, and could jam the feed system.
•Disposal of ashes— Ashes should be placed in a metal container with a tight-fitting lid. The closed container of ashes should be placed on a non-combustible floor or on the ground, well away from ALL combustible materials, pending final disposal. When ashes are disposed by burial in soil or otherwise locally dispersed, they should be retained in the closed container until all cinders have thoroughly cooled.
It is a highly recommended practice to always go through the basic SET-UP Procedures after every 1 to 2 cooking's. This will ensure proper ignition, heat output and many happy grilling
experiences.
2

Dangers & Warnings
WARNING:
DO NOT over-fire your “LG Series Smoker”. Improper Use Can Cause Uncontrolled Fire.
FUEL—WOOD PELLETS
•This pellet cooking appliance is designed and approved for pelletized, all natural, wood fuel only. Any other type of fuel burned in this appliance will void the warranty and safety listing.
•Use only all natural wood pellets, designed for burning in grills.
•Do not us fuel labeled as having additives.
•At this time of printing, there is no “Standard” for BBQ wood pellets, although most pellet mills do use the same standards used to make “Home Heating” wood pellets. Further information on this “Standard” can be found at www.pelletheat.org or the Pellet Fuel Institute.
•Check with your local dealer on the quality of pellets in your area and for information on what can be expected from various brands.
•NOTE: Since Dansons Inc. has no control over the quality of pellets, that you use, we assume no liability caused by the quality of fuel used.
CREOSOTE
•Do Not operate the appliance if the flame becomes dark and sooty or if the burngrate overfills with pellets. Push the OFF touch pad, let the appliance cool completely, and then inspect the unit. Soot or Creosote may accumulate in the main barrel and along any air leakage or exhaust areas when the appliance is operated under incorrect conditions, such as incorrect burn grate position, blockage of the combustion fan, failure to clean and maintain the burn area, etc.
•Soot or creosote is formed when pellets are burned without the correct amount of air to fuel. or incomplete combustion, thus producing a tar like substance and other organic vapours that combine with expelled moisture. The smoke will have a black color to it and the residue left behind on surfaces, will also be black in color.
•When ignited, this creosote makes an extremely hot and out of control fire, similar to a grease fire.
•If creosote has formed within the unit; allow the unit to warm up at a LOW temperature, turn OFF the appliance, then wipe out any formation with a hand towel. Creosote is similar to tar, when warmed it will begin to run, become like liquid, and is easier to clean in this state.
•Should a grease or creosote fire occurs, turn “Off” the control and leave lid closed until the fire is out. DO NOT unplug the power cord.
WARNING:
IF A UNCONTROLLED FIRE DOES OCCURE: CALL FIRE DEPARTMENT. DO NOT: try to move appliance, try to smother the fire, or put water on the fire.
CARBON MONOXIDE: “The Silent Killer”
FOLLOW THESE GUIDELINES TO PREVENT THIS COLORLESS, ODORLESS GAS FROM POISONING YOU, YOUR FAMILY OR OTHERS:
•Know the symptoms of carbon monoxide poisoning: Headaches, Dizziness, Weakness, Nausea, Vomiting, Sleepiness, and Confusion. Carbon Monoxide reduces the blood’s ability to carry oxygen. Low blood oxygen levels can result in loss of consciousness and death.
•See a doctor if you or others develop cold or flu-like symptoms while cooking or in the vicinity of the appliance Carbon monoxide poisoning, which can easily be mistaken for a cold or flu, it often detected to late.
•Alcohol consumption and drug use increase the effects of carbon monoxide poisoning.
•Carbon monoxide is especially toxic to mother and child during pregnancy, infants, the elderly, smokers, and people with blood or circulatory system problems, such as anemia, or heart disease.
3

Dear “Louisiana Grill” Wood Pellet Barbecue Owner:
Thank you for choosing to purchase a “Louisiana Grill Series” wood pellet smoking’ grill.
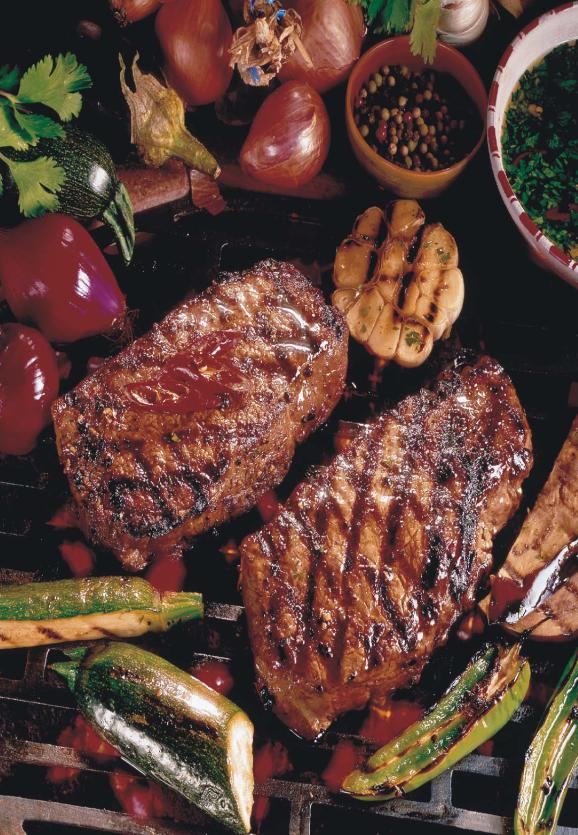
Cooking with your Louisiana Wood Pellet Grill is about to bring you full circle from the days of the caveman when cooking outdoors with wood was a necessity, to cooking indoors in your modern kitchen and now back to the great outdoors and that savory wood flavor.
Think of your “Louisiana Grill” as an extra stove available to bake, roast, grill, sear and smoke food. Anything that can be done in your indoor kitchen can be done on your grill.
Barbecuing is a culture all on its own. Barbecuing provides a form of entertainment, which is relaxed and casual. Your meals can be completely cooked outdoors and the chef is one of the crowd. Keep it simple, be creative, and have some fun.
We’d like to take this opportunity to pass on a few important tips concerning grilling with wood pellets.
•Initial set-up of your “Louisiana Grill” is the most important step to ensure the efficient and satisfactory operation of your barbecue for many years to come.
•Be diligent in your cleaning and maintenance program. Taking care of your grill will add years of life and keep it looking great.
•Use only all natural wood pellets designed to burn in pellet grills.
•Ensure your pellet fuel stays moisture free. Open bags of fuel should be stored in an airtight container and empty the hopper if you are not using the grill over longer periods.
Our loyal staff, valued customers, friends and our loving families have all contributed recipes to our cookbook. We have tried to include a broad range of cuisines and styles, starting with Mom’s Great Home Cooking and many, many, many, catering and entertaining experiences to current classics and new soon to be classics.
WE WANT YOU!
If you are interested in contributing a family favourite or competition winner, or any recipe, (especially if it contains bacon) please share it with us.
Fax: 1-877-303-3135, Web www.louisiana-grills.com, Email: sales@dansons.com or Snail Mail: to the address below.
Now go, fill up the hopper, light up that grill and get ready to enjoy
World Class BBQ In Your Own Backyard!
Again, we want to say THANK-YOU for your purchase
Staff and Management
Dansons Inc.
COPYRIGHT NOTICE
Copyright 2014, All rights reserved.
No part of this manual may be copied, transmitted, transcribed, stored in a retrieval system, in any form or by any means without the expressed written permission of,
Dansons Inc.
14608—134th Ave., Edmonton, AB, Canada T5L 4T4
4
|
Contents |
|
DANGERS & WARNINGS |
2 |
|
SAFETY TESTING |
6 |
|
UNPACKING YOUR LG SMOKER |
6 |
|
ASSEMBLY INSTRUCTIONS |
|
|
Leg Assembly & CASTERS |
8 |
|
SERIES 4C HOPPER ASSEMBLY |
10 |
|
BURN Grate, IGNITER |
12 |
|
FLAME BROILER, HANDLE, THERMOMETER |
13 |
|
GRIDS, BUCKET & POWER |
14 |
|
KNOWLEDGE IS POWER |
|
|
HOW YOUR LG SMOKER WORKS |
15 |
|
SPECS |
16 |
|
ARCHED FLAME BROILER |
17 |
|
IGNITER |
17 |
|
BURN POT & BURN GRATE |
17 |
|
AUGER FEED |
17 |
|
DIGITAL CONTROL CENTER |
18 |
|
HOPPER |
19 |
|
POWDER COAT FINISH |
19 |
|
COOKING GRIDS |
19 |
|
GREASE BUCKET |
19 |
|
ABOUT WOOD PELLETS |
20 |
|
OPERATION |
|
|
SET-UP PROCEDURE |
21 |
|
GETTING STARTED |
22 |
|
LIGHTING - AUTOMATIC / MANUAL |
23 |
|
PROGRAMMABLE MEAT PROBE |
24 |
|
SHUTTING OFF YOUR SMOKER |
26 |
|
MAINTENANCE |
28 |
|
GRILLING TIPS AND TECHNIQUES |
29 |
|
TROUBLE SHOOTING |
32 |
|
PARTS LIST |
35 |
|
LIMITED WARRANTY |
36 |
|
|
|
|
5
Unpacking Your LG Series Smoker
IMPORTANT NOTICE
*Be sure to inspect the entire grill after removing the protective shipping carton.
*Report any damage to your local dealer immediately.
*Shipping damage is not covered under warranty.
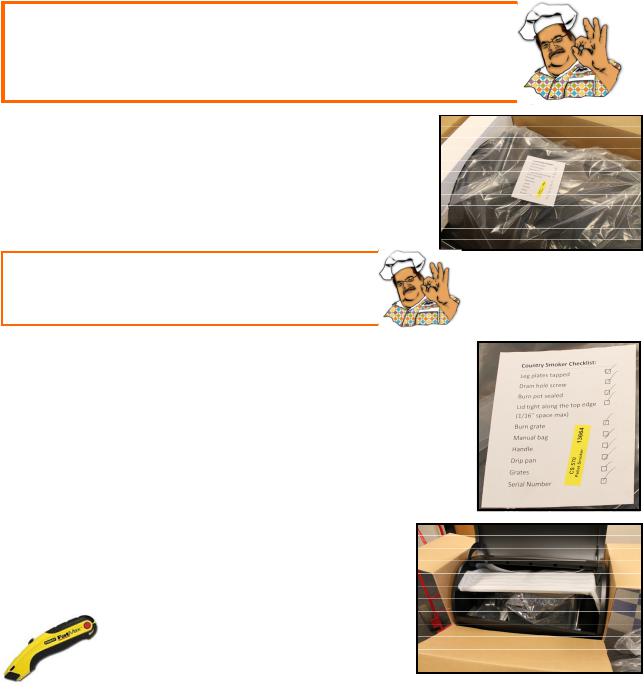
Opening the top of the shipping crate
When you opened the top of the protective shipping carton you found |
A |
the unit covered in a protective cover bag, 2 protective Styrofoam fillers |
|
and a “Quality Control Checklist”. |
|
WARNING! Please discard the plastic bag properly and in a timely |
|
matter, as it can be dangerous and can lead to suffocation. |
|
Tip !
Staple your “Quality Control Checklist” to the inside of this Owners Manual
Quality Control Checklist (diagram B)
The team at Louisiana Grills take pride in what we manufacture and sell. This checklist is our way of ensuring every Country Smoker we make is complete when you open it.
It also contains the Model and Serial Number you will need when you communicate with your local Authorizer Louisiana Grill Dealer or Dansons.
B
Removing the Country Smoker (diagram C)
The protective cardboard shipping crate makes the perfect protective material while assembling your Country Smoker.
Using a sharp utility knife, simply cut carefully down both sides of the front of the box, from the top to bottom. This will give you easy access to remove the contents from inside the barrel.
6
Unpacking Your LG Series Smoker
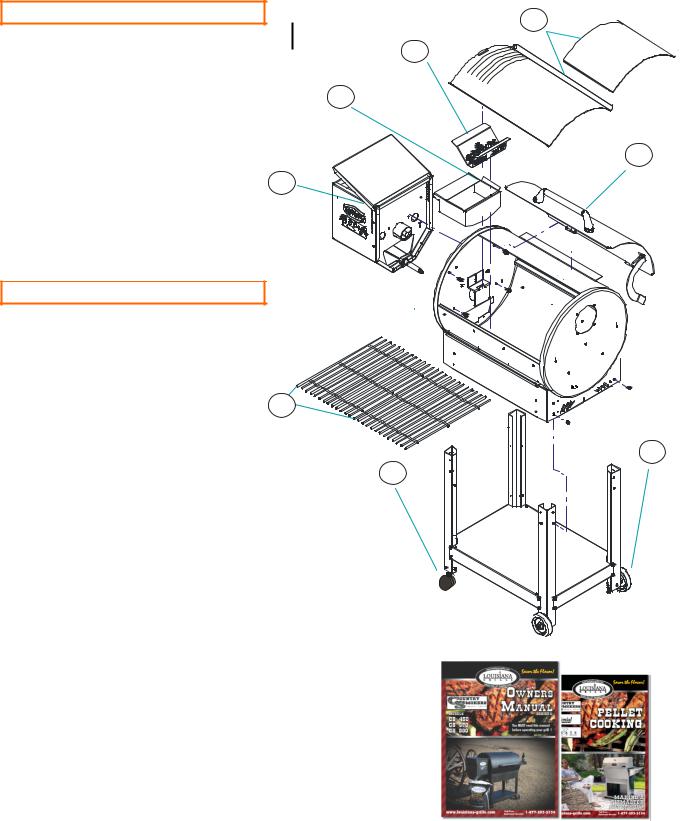
When you open your smoker/grill, please ensure you have and can identify all the following parts:
NOTE: Numbers following parts names throughout this manual refer to the component diagram below.
Items found in the box |
3 |
|
1. |
Burn Pot— Installed and sealed |
|
2. |
Burn Grate—Stainless Steel |
2 |
3. |
Arched “Flame Broiler” - 2 pc. |
|
4. |
Series 4 Hopper w/Digital Control Center |
1 |
|
A. Grill Probe (installed) |
|
|
B. Programmable Meat Probe |
|
5. |
Grease Bucket |
|
6. |
Stainless Steel Handle Assembly |
4 |
|
Washers, large and small X 2 |
|
|
#250 x 5/8" Threaded Multi-Head Screws X 2 |
|
7. |
Porcelain Cast Iron Cooking Grid (s) |
|
8. |
Porcelain Upper Cooking Grid |
|
Items found in the parts bag |
Series |
4C |
|||
Wheels and levelers |
|||||
|
|
||||
9. |
6” Diameter Wheels X 2 |
|
|
||
|
|
Wheel Axles X 2 |
|
|
|
|
|
#3 Hitch Pins X 2 |
|
|
|
|
|
Fender Washers X 2 |
7 |
|
|
|
|
|
|
||
10. |
3” Diameter Casters X 2 |
|
|
||
Mounting Hardware—Hopper to Barrel |
|
|
|||
6 |
|
x # 180 x 3/8" Black Multi-head Machine Srews |
10 |
||
- 4 |
for mounting hopper to barrel |
|
|||
|
|
||||
- 2 |
for mounting igniter to hopper |
|
|
||
26 x # 250 x 3/8" Multi-Head Machine Screws - 24 for Leg Assembly
Dome Thermometer
Large Finishing Washer
Large Felt Spacer
9 /16" Nut and Washer
6
9
Printed Material
Owners Manual
Cooking Guide—40 page
7
Assembly Instruction
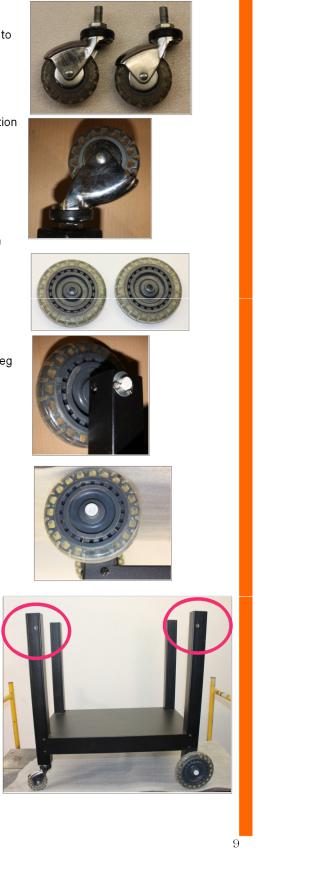
INSTALLING THE CART KIT
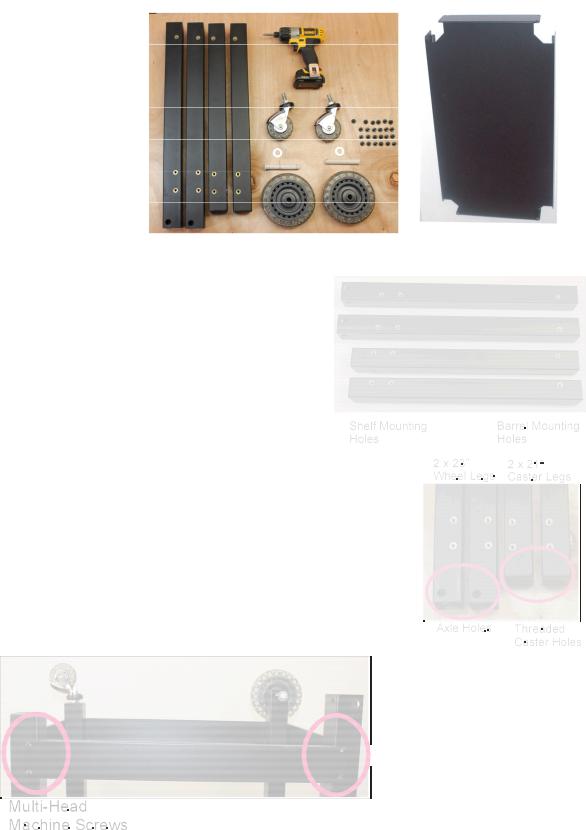
Parts Included:
2 x 21” long legs
2 x 23” long legs
2 x 6” Wheels
-2 axles
-2 cotter pins
-2 washers
2 x 3” Threaded Casters
24x Multi-head machine screws
Tools Required: |
1 Bottom Shelf |
Large Phillips Screwdriver or
Phillips Drive Bit and Drill
Installation:
Step 1 Attach legs to bottom shelf
The bottom portion of each of the 21” legs has a threaded plate installed to allow for 2 casters to be installed. The 2 x 23” legs have holes punched through to accept the wheel axles.
• To ease installation, assemble leg components and shelf upside down. The shelf mounting holes being on top.
•Ensure that the shelf is facing with the flat surface facing downwards toward your working surface.
•Using a Phillips head driver, install 4 of the supplied
screws into each leg, to secure each leg to the shelving unit.
NOTE: It is best to start each threaded screw by hand, to ensure the thread DOES NOT cross thread or strip.
•Ensure that ALL screws are firmly, hand-tight, secured.
8
Assembly Instruction
INSTALLING THE CART KIT ...CON’T
Step 2 Install the Casters:
The bottom portion of each of the 21” long legs has a threaded plate installed allow for the installation of a thread caster.
You will use both Threaded Casters.
•Hand install the casters on the 21” (shorter of the two) legs.
•Using your 1/2” wrench, turn each of the casters in a clockwise direction into the bottom leg plate. Turn ALL the way in.
C
Step 3 Install the Wheel Assemblies
Each 23” long leg has a solid bottom plate, as well as a hole punched through the leg to accept a wheel axle.
You will use both Wheels, 2 x Axels, 2 x Fender Washers and 2 Cotter Pins
•Install the wheel assemblies on the 23” (longer of the two) legs.
•Insert the axle through the wheel, the leg assembly and finally the fender washer.
The wheel should be on the outside edge of the assembly, next the and then finally the fender washer.
•Insert the hitch pin clip through the hole found at the end of the axel.
Final Step Attaching the Cart to the Barrel
•Ensure that when you install the Barrel Smoker onto the Leg Cart that the Caster Legs are on the hopper end of the grill. This will give stability to completed unit and allow for easy movement.
•Carefully lift the Barrel Smoker up and unto the Leg assembly. Note: This may require 2 people.
The Barrel Smoker will slide down and over the leg assembly .
•Starting at one leg:
Line up the pre-drilled and cinch nut installed holes on the leg, See diagram for location, and the punched hole on the side of the smoker. There is one on the front and one of the side of each leg.
•Using a Phillips head driver, install 2 of the supplied screws into each leg, to secure each leg to the Barrel.
NOTE: It is best to start each threaded screw by hand, to ensure the thread DOES NOT cross thread or strip.
•When one leg is complete, continue the same steps On the remaining 3 legs.
Assembly Instruction
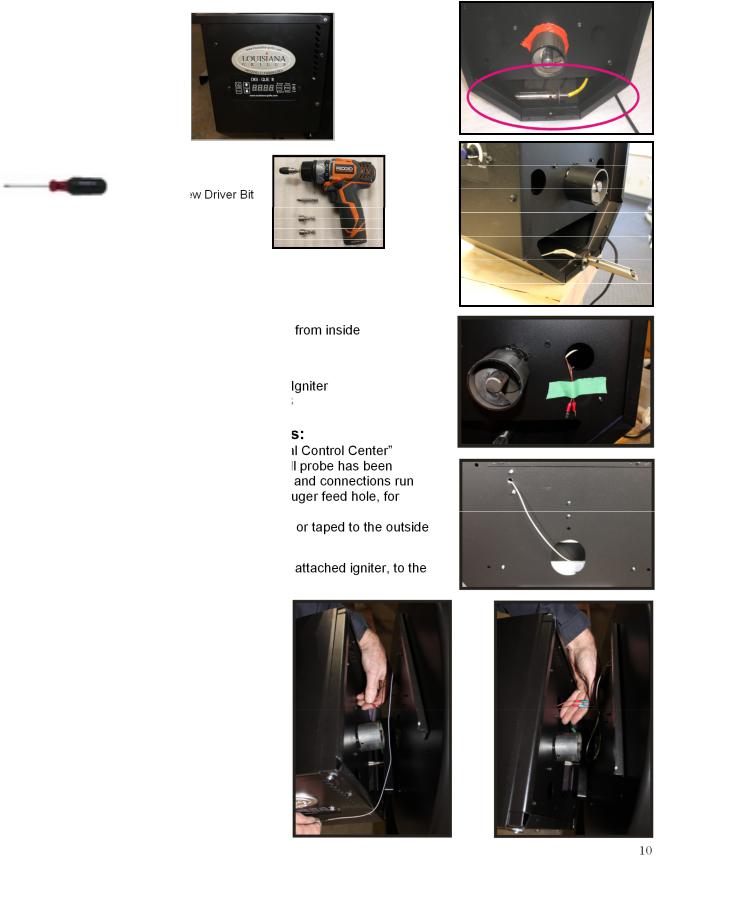
Installing the Hopper and Grill Probe
Parts Included:
Series 5C Hopper Assembly Mounting hardware
2 x #10 x 16 x1/2” screws,
4 x 1/4 x 20 x 1/2” screws
Tools Required:
|
Phillips Screw |
|
Phillips & Standard |
Cordless Drill |
|
Screwdrivers |
||
|
Installation:
Step 1 Attaching the Igniter to the Hopper:
•Carefully remove the igniter and its packaging the hopper. Diagram A
•Using your Phillips Srewdriver and the 2 (two) #180 x 3/8” screws, secure the Igniter to outside of the hopper. Diagram B
Step 2 Attaching the Grill Probe Wires:
Your Grill/Smoker comes complete with the “Digital complete with grill probe and meat probe. The grill factory installed in the barrel, with the excess wire out through the barrel end and threaded into the shipping reasons. Diagram C
The wire connections to the board can be found in of the hopper. Diagram D
•To connect, carefully lift the entire hopper and left handside of the main barrel.
•Begin by slightly inserting the igniter into the installed Burned Pot at the bottom side of the barrel. Support the hopper on your leg as
you connect the two spade connections.
Diagram E
E
•Carefully thread ALL excess wire, as well as the connections, back into the hopper. The wiring must not come in contact with either the fan blades, or the metal auger tube.
Diagram F
A
B
C
D
F
Assembly Instruction
INSTALLING THE HOPPER, IGNITER & PROBE WIRE
Step 3 Attaching the hopper to the barrel: |
A |
•The mounting bracket on the rear of the hopper (B) must be raised slightly higher then the receiving bracket on the barrel. (A)
Diagram A & B
•Begin by slightly inserting the igniter into the installed Burned Pot
at the bottom side of the barrel.
Next slightly insert the Auger Feed tube into the correct hole.
.It might be necessary to raise the hopper slightly to ensure the mounting bracket on the hopper will go over the receiving bracket on the barrel.
•Push Hopper tightly against the main barrel.
Next holding the hopper fairly level, press downward to clip the hopper onto the mounting bracket. Diagram C & A
•Using your 5/16” nut driver or standard screwdriver and the
4 1/4x20-1/2” hex screws, secure hopper to barrel through the holes provided, inside the barrel. Diagram D
NOTE: If the holes do not line up,
the hopper may need to B be fully clipped into place.
C
D
11
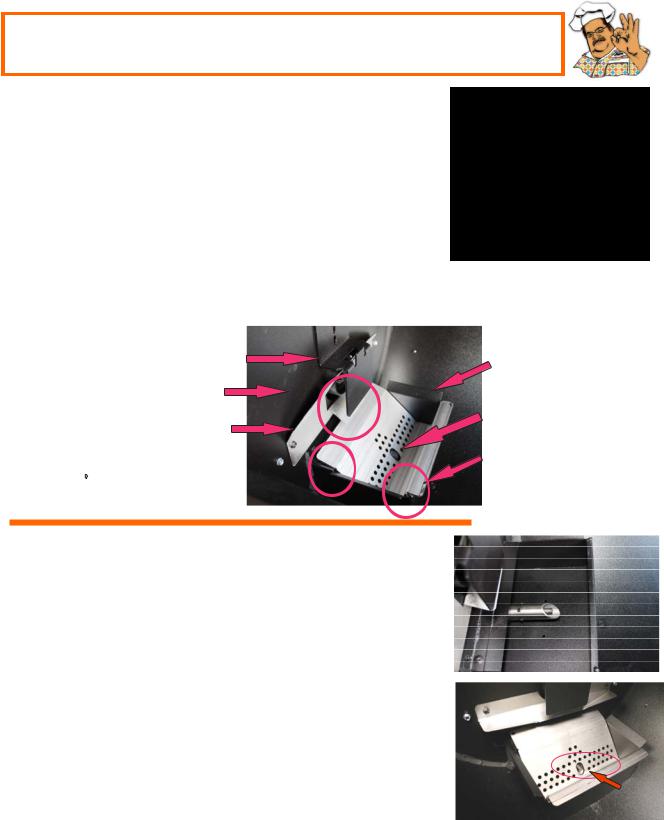
Assembly Instructions
POSITIONING THE BURN GRATE:
Tip ! The placement of the burn pot and burn grate is VITAL to a happy and full range cooking experience!
Confirm the positioning of the Burn Pot Diagram A
Confirm that the back of the burn pot has been pushed tight, into the hopper and against the end wall of the grill ( A & B).
Confirm that the burn pot has been sealed with high temp caulking around the inside of the barrel end.
A
Install the Burn Grate Diagram B
A
B 
|
The larger lip of the grate installs under the pellet fuel deflector (A) |
|
The front lip of the burn grate should be sitting flush along the top of the burn pot . (C) |
|
The bend at the rear of the grate should also being sitting tight to the back of the burn pot. (B) |
B |
Flame Broiler |
A |
|
|
Bracket |
Burn Pot |
|
|
Barrel End |
|
|
|
|
Igniter |
|
|
Fuel Deflector |
|
|
|
|
|
|
|
B |
|
Burn Grate |
|
C |
|
POSITIONING THE IGNITER:
Confirm the positioning of the Igniter Diagram C
It is extremely important to have the igniter and the igniter hole in the burn grate line-up.
The burn grate should not be sitting on top of the igniter or the hot rod.
It may be necessary to remove the burn grate, then gently |
|
holding onto the igniter assembly, gently lift or lower the |
|
Igniter until it lines up properly. |
C |
|
Igniter
12
 Loading...