


Getting started with
Logitech® Webcam C110 and C170

Logitech® Webcam C110/C170
Contents
English . . . . . . . . . . . . . . . . . . . 4 Deutsch . . . . . . . . . . . . . . . . . 15 Français . . . . . . . . . . . . . . . . . . 26 Español . . . . . . . . . . . . . . . . . . 37 Nederlands. . . . . . . . . . . . . . . . 48 Italiano . . . . . . . . . . . . . . . . . . 59 Svenska . . . . . . . . . . . . . . . . . . 70
www.logitech.com/support  . . . . . 159
Dansk . . . . . . . . . . . . . . . . . . |
. 81 |
Norsk. . . . . . . . . . . . . . . . . . . |
92 |
Suomi . . . . . . . . . . . . . . . . . . |
103 |
Português . . . . . . . . . . . . . . . . |
114 |
Ελληνικά . . . . . . . . . . . . . . . . . |
125 |
Türkçe . . . . . . . . . . . . . . . . . . |
136 |
. . . . . . . . . . . . . . . . |
157 |
|
3 |

Getting started with
2 |
1 |
3
4
Getting started with
Logitech® Webcam C110 and C170 
5
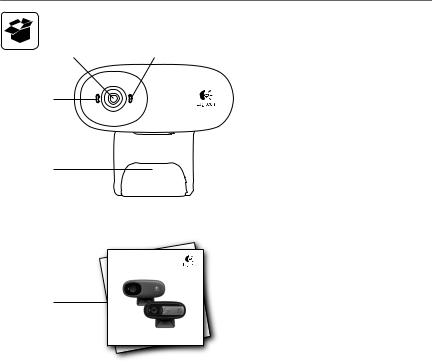
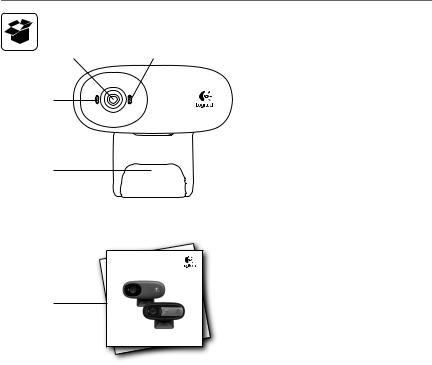
Features
1.Microphone
2.Lens
3.Activity light
4.Flexible clip/base
5.Product documentation
4 English |
|
Logitech® Webcam C110/C170
Thank you for buying a Logitech webcam!
Use this guide to set up your Logitech webcam and to begin making video calls.
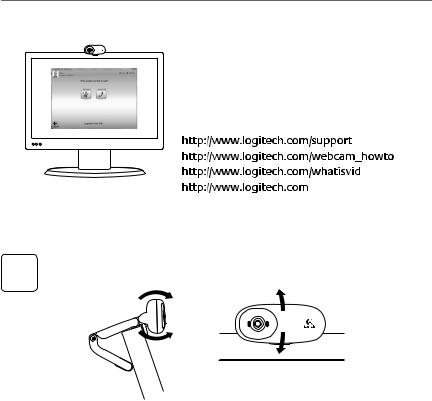
If you have questions before you start, please visit the websites listed below to learn more about Logitech webcams and video calling.
www.logitech.com/support
www.logitech.com/webcam_howto
www.logitech.com/whatisvid
www.logitech.com
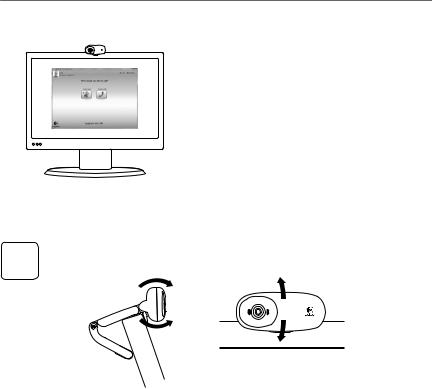
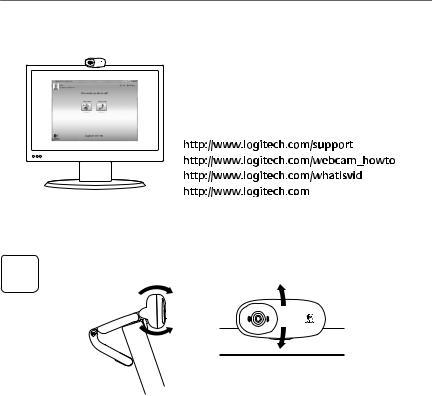
Setting up your webcam
1Place your webcam
|
English 5 |

Getting started with
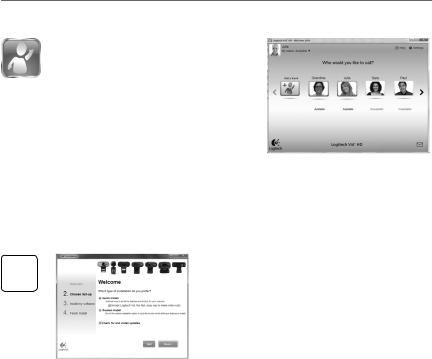
2Install software
www.logitech.com/downloads
To download and install your webcam software, visit www.logitech.com/downloads, double-click Webcams, choose your product from the list, select Software Downloads, and then follow the on-screen prompts.
3When prompted, connect your webcam
6 English |
|
Logitech® Webcam C110/C170
Getting started with video calling
Your webcam comes with Logitech Vid™ HD
With Logitech Vid HD, video calling live over the Internet takes only a few, easy steps:
•Install Logitech Vid HD
•Create an account
•Add a friend and make a video call
Learn more: http://www.logitech.com/whatisvid
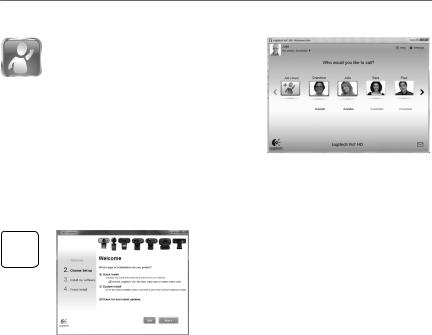
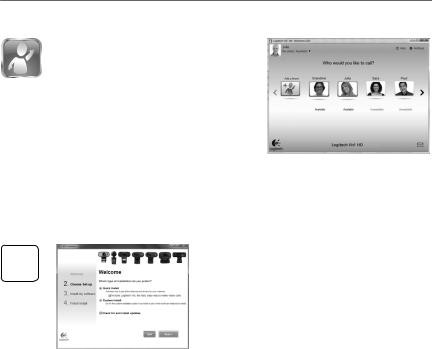
Setting up Logitech Vid HD
1
Install Logitech Vid HD
We recommend that you install both the Logitech Webcam and Logitech Vid HD software.
Tip: If you prefer another video-calling application, you will need to download and install third-party software.
Learn more: www.logitech.com/webcam_howto
|
English 7 |
Getting started with
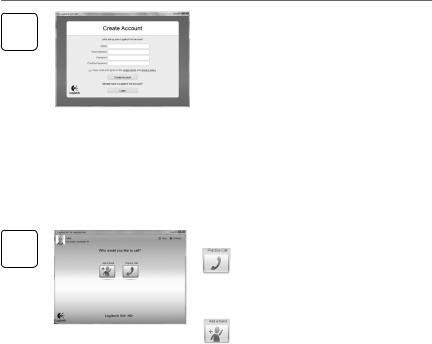
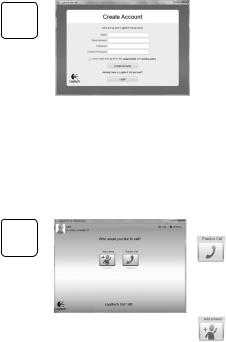
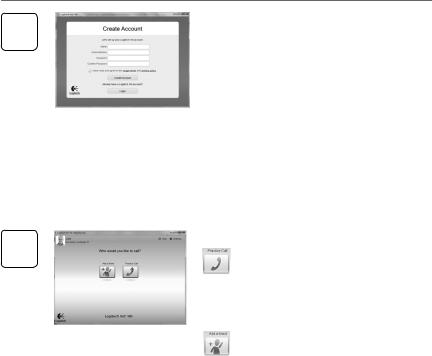
Create an account
2 Follow the on-screen instructions to create your Logitech Vid HD account and to set up your webcam for video calling.
To make video calls with any application, both you and the person you call must have:
|
• A webcam |
|
• A broadband Internet connection |
|
• A computer with speakers and |
|
(e.g., DSL, T1, or cable) |
|
|
|
|
|
a microphone (or a headset with |
|
• The same video-calling application |
|
a microphone; many Logitech webcams |
(e.g., Logitech Vid HD) |
|
|
have a built-in microphone) |
|
• Video calling accounts |
|
|
|
|
3 |
Add a friend or make a practice call |
||
|
Click on the Practice Call tile to test |
||
your settings.
Tip: The Practice Call tile is always available on your Contact List so you can test your settings.
To add a friend, click on the Add a Friend tile and enter your friend’s e-mail when prompted.
After your friend has accepted your invitation, click on your friend’s picture to make a call.
8 English |
|

Logitech® Webcam C110/C170
Accessing account settings and starting applications
Logitech automatically detects and adjusts the best settings for your webcam. If you would like to re-take your profile picture or update any of your settings, click the Settings icon.
Double-click the icons to launch your applications.
1.Logitech Webcam Software
2.Logitech Vid HD
Tip: The Logitech Vid HD icon is only present if you chose to install Logitech Vid HD. To learn about third-party video calling, please visit:
www.logitech.com/webcam_howto
|
English 9 |
Getting started with
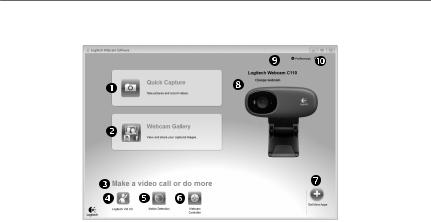
Navigating the Logitech Webcam Software
1.Capture pictures and videos
2.View captured images and share via e-mail, Facebook,® or YouTube®
3.An area for easy access to your installed webcamrelated applications
4.Launch Logitech Vid HD (if installed)
5. |
Capture videos triggered |
9. Open Logitech Webcam |
|
by detected motion |
Software settings |
6. |
Control your video effects |
10. Open help dashboard |
|
and webcam while on |
(manuals and how-to |
|
a video call |
videos) |
7.Download additional webcam applications
8.Change webcams (when you have more than one)
10 English |
|
Logitech® Webcam C110/C170
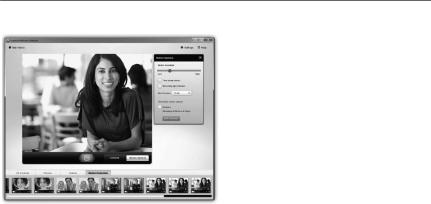
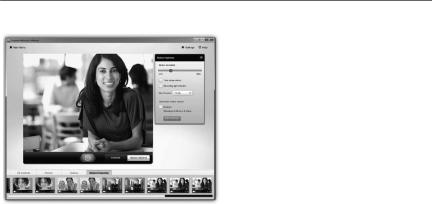
Capturing video and snapping pictures
Quick Capture allows you to take photos or record videos easily.
You have easy access to webcam controls and settings as well as video effects to personalize your images and recordings.
1. |
Preview window |
6. |
Photo thumbnails |
2. |
Capture mode: |
7. |
Video thumbnails |
3. |
photo/video |
8. |
Click a thumbnail |
Capture button |
|
to enter the gallery |
|
4. |
Webcam controls |
|
|
5. |
Video effects and fun |
|
|
|
filters (for webcams |
|
|
|
that support this |
|
|
|
feature) |
|
|
The gallery: viewing and sharing
Clicking on an image thumbnail in the gallery (1) opens the video or photo in the review window (2).
• Attach a video or picture file to an e-mail (3)
• Edit a photo or splice together video (4)
• Upload a picture or video to Facebook (5)
• Upload a video to Twitter (6)
• Upload a video to YouTube (7)
You may also drag and drop a gallery image onto one of the function tiles (items 3-7) to launch
an editing application or to attach or upload.
|
English 11 |
Getting started with
Using motion detection
• Set up your webcam to record video when it detects movement.
• Adjust captured video duration and detection sensitivity.
• Captured video is automatically saved to your computer.
• View content in the Gallery or upload it using the One-touch Upload window.
12 English |
|
Logitech® Webcam C110/C170
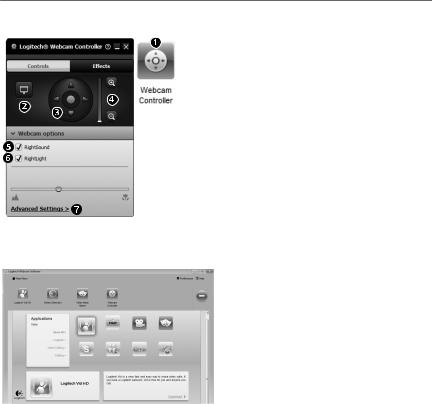
Fine tuning your webcam during a video call
1. Launch the webcam controller when on a video call.
2.Hide your video image with a photo while your webcam stays connected.
3.Use pan and tilt to find the best angle.
4. Zoom in or out to include/exclude your surroundings.
5.Enjoy clear conversations without annoying background noise.
6. Correct for poor lighting environments using RightLight.
7. Access advanced webcam settings.
Get more applications for your webcam
Download and install additional applications for your webcam, like video calling, photo and video editing, and other value-added programs.
|
English 13 |
Getting started with
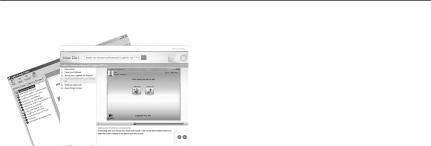
Getting help
Click on the help icon to access a complete user manual, or watch how-to videos that show you how to get the most out of your Logitech webcam and software.
Tip: If you are not sure about a feature,
click the help icon, and our manual will open to the right place.
14 English |
|
Logitech® Webcam C110/C170
2 |
1 |
3
4
Getting started with
Logitech® Webcam C110 and C170 
5
Funktionen
1.Mikrofon
2.Linse
3.Aktions-LED
4.Flexibler Clip/Standfläche
5.Bedienungsanleitung
Deutsch 15
Erste Schritte
Danke, dass Sie sich für eine Logitech-Webcam entschieden haben!
Mit dieser Anleitung konfigurieren Sie Ihre LogitechWebcam und führen nach ein paar einfachen Handgriffen Ihr erstes Videogespräch.
Wenn Sie vorher noch Fragen klären möchten, finden Sie Antworten zu Logitech-Webcams und Videogesprächen auf den nachstehend angeführten Websites.
Einrichten Ihrer Webcam
1Anbringen der Webcam
16 Deutsch

Logitech® Webcam C110/C170
2Installieren der Software
www.logitech.com/downloads
Um Ihre Webcam-Software herunterzuladen und zu installieren, besuchen Sie www.logitech.com/downloads, doppelklicken Sie auf „Webcams“, wählen Sie Ihr Produkt aus der Liste, wählen Sie „Download“ und folgen Sie den Anweisungen auf dem Bildschirm.
3Wenn Sie dazu aufgefordert werden, schließen Sie Ihre Webcam an.
Deutsch 17
Erste Schritte
Erste Schritte mit Videogesprächen
Im Lieferumfang Ihrer Webcam ist
die Software Logitech Vid™ HD enthalten
Mit Logitech Vid HD genügen ein paar einfache Schritte und schon führen Sie Ihre Videogespräche über Internet:
•Logitech Vid HD installieren
•Konto erstellen
•Freund hinzufügen und Gespräch führen
Weitere Informationen: http://www.logitech.com/whatisvid
Einrichten von Logitech Vid HD
Logitech Vid HD installieren
1 Wir empfehlen Ihnen, sowohl die Logitech Webcam als auch die Logitech Vid HD-Software zu installieren.
Tipp: Wenn Sie lieber eine andere Anwendung für Videogespräche nutzen möchten, müssen Sie die entsprechende Software herunterladen und installieren.
Weitere Informationen: http://www.logitech.com/webcam_howto
18 Deutsch
|
|
Logitech® Webcam C110/C170 |
|
|
|
|
|
2 |
Konto erstellen |
||
Befolgen Sie die Anweisungen auf dem Bildschirm, |
|||
|
um Ihr Logitech Vid HD-Konto zu erstellen und |
||
|
Ihre Webcam für Videogespräche einzurichten. |
||
|
Für ein Videogespräch müssen beim Anrufer wie |
||
|
beim Angerufenen folgende Voraussetzungen |
||
|
gegeben sein: |
||
|
• Eine Webcam |
• Eine Internet-Breitbandverbindung |
|
|
• Ein Computer mit Lautsprechern und |
(DSL, UMTS oder Kabel) |
|
|
|
|
|
|
Mikrofon (oder ein Kopfhörer mit |
• Dieselbe Videoanwendung |
|
|
Mikrofon - viele Logitech-Webcams |
(z. B. Logitech Vid HD) |
|
|
verfügen über ein eingebautes |
• Konten für Videogespräche |
|
|
Mikrofon) |
||
|
|
|
|
3 |
Freund hinzufügen oder Testanruf führen |
||
|
Klicken Sie auf „Testanruf“, um Ihre Einstellungen |
||
zu testen.
Tipp: Die Funktion „Testanruf“ ist in Ihrer Kontaktliste immer sichtbar, damit Sie Ihre Einstellungen jederzeit testen können.
Um einen Freund hinzuzufügen, klicken Sie auf „Freund hinzufügen“ und geben Sie die E-Mail- Adresse Ihres Freundes ein, sobald Sie dazu aufgefordert werden.
Wenn Ihr Freund Ihre Einladung akzeptiert hat, klicken Sie auf sein Foto, um ein Gespräch zu beginnen.
Deutsch 19

Erste Schritte
Einstellungen des Kontos abrufen und Anwendungen starten
Logitech erkennt automatisch Ihre Webcam und wählt die am besten geeigneten Einstellungen aus. Wenn Sie Ihr Profilfoto neu aufnehmen oder eine
Einstellung ändern möchten, klicken Sie auf das Symbol „Eigene Einstellungen“.
Doppelklicken Sie auf die Symbole, um Ihre Anwendungen zu starten.
1.Logitech Webcam-Software
2.Logitech Vid HD
Tipp: Das Logitech Vid HD-Symbol wird nur angezeigt, wenn Sie Logitech Vid HD installiert haben. Wenn Sie mehr über Videogespräche mit anderen Systemen erfahren möchten, finden Sie Hinweise unter:
www.logitech.com/webcam_howto
20 Deutsch
Logitech® Webcam C110/C170
Bedienung der Logitech Webcam-Software
1.Bilder und Videos aufnehmen
2.Aufgenommene Bilder ansehen und per E-Mail versenden bzw. auf Facebook® oder YouTube® hochladen
3.Hier gelangen Sie zu Ihren Webcam-Anwendungen
4.Logitech Vid HD starten (sofern installiert)
5.Videos aufzeichnen, nachdem der Bewegungsmelder eine Bewegung erkannt hat
6.Videoeffekte und Webkamera während eines Videogesprächs steuern
7.Zusätzliche Web- kamera-Anwendungen
herunterladen
8.Webcams austauschen (wenn Sie über mehrere verfügen)
9.Einstellungen der Logitech Webcam-Software öffnen
10.Hilfefunktionen (Bedienungsund Videoanleitungen) öffnen
Deutsch 21

Erste Schritte
Videoaufnahmen und Schnappschüsse
Die Galerie: Anzeige und Weiterleitung
22 Deutsch
Mit Quick Capture können Sie auf einfache Weise Fotos aufnehmen oder Videos aufzeichnen. Quick Capture bietet Ihnen einfachen Zugriff auf die Webcam-Funktionen und auf Videoeffekte,
mit denen Sie Ihre Bilder und Aufnahmen individuell gestalten können.
1.Vorschau
2.Aufnahme: Foto/Video
3.Aufnahme-Taste
4.Webcam-Steuerung
5.Video-Effekte und Fun Filter (für Webcams, die diese Funktion unterstützen)
6.Fotominiaturen
7.Videominiaturen
8.Klicken Sie auf eine Miniatur, um die Galerie aufzurufen
Klicken Sie auf eine Bildminiatur in der Galerie (1), um das Video oder Foto im Anzeigefenster (2) darzustellen.
•Hängen Sie ein Video oder ein Foto an eine E-Mail (3) an.
•Bearbeiten Sie ein Foto oder schneiden Sie einen Videoclip (4).
•Laden Sie ein Bild oder ein Video in Facebook (5) hoch.
•Laden Sie ein Video auf Twitter (6) hoch.
•Stellen Sie ein Video in YouTube (7) ein.
Sie können auch ein Bild in der Galerie auf eines der Funktionsfelder (Elemente 3-7) ziehen und ablegen, um eine Bearbeitungsfunktion aufzurufen, einen Anhang zu erstellen oder das Bild hochzuladen.
Logitech® Webcam C110/C170
Bewegungserkennung verwenden
• Konfigurieren Sie Ihre Webcam so, dass die Videoaufzeichnung startet, wenn sie eine Bewegung erkennt
• Stellen Sie die Dauer und der Empfindlichkeit für die Erkennung von Bewegungen ein.
• Das aufgezeichnete Video wird automatisch im Computer gespeichert.
• Sehen Sie sich die Inhalte in der Galerie
an oder laden Sie sie über das Fenster zum direkten Upload per Tastendruck
Deutsch 23

Erste Schritte
Feinabstimmung Ihrer Webcam während eines Videogesprächs
1.Webcam-Steuerung während eines Videogesprächs starten
2.Videobild mit einem Foto verbergen, während Ihre Webcam angeschlossen bleibt
3.Schwenken und Neigen, um den besten
Aufnahmewinkel zu finden
4. Vergrößern oder verkleinern, um weniger bzw. mehr von Ihrer Umgebung zu zeigen
5. Klare Gespräche ohne lästige Hintergrundgeräusche genießen
6.Schlechte Lichtverhältnisse mit RightLight verbessern
7.Funktionseigenschaften der Webcam einstellen
Zusätzliche Anwendungen für Ihre Webcam einrichten
Sie können zusätzliche Anwendungen für Ihre Webcam herunterladen und installieren, etwa Videogespräche und Videoschnitt sowie
andere Programme mit erweiterten Funktionen.
24 Deutsch

Logitech® Webcam C110/C170
Hilfe abrufen
Klicken Sie auf das Hilfesymbol, um die komplette Bedienungsanleitung anzusehen oder sehen Sie sich Videoanleitungen an, die Ihnen zeigen, wie Sie Ihre Logitech Webcam und Software am besten nutzen.
Tipp: Wenn Sie zu einer Funktion Fragen haben, klicken Sie auf das Hilfesymbol und die Bedienungsanleitung öffnet sich an der gewünschten Stelle.
Deutsch 25
Première utilisation
2 |
1 |
3
4
Getting started with
Logitech® Webcam C110 and C170 
5
Fonctions
1.Microphone
2.Objectif
3.Témoin d’activité
4.Clip/base flexible
5.Documentation sur le produit
26 Français
Logitech® Webcam C110/C170
Vous venez d'acheter une caméra Web Logitech et nous vous en félicitons!
Utilisez ce guide pour configurer votre caméra Web Logitech et commencer à passer des appels vidéo.
Avant de commencer, si vous avez des questions, veuillez consulter les sites Web répertoriés dans la liste ci-dessous afin d'en savoir plus sur les caméras Web Logitech et sur les appels vidéo.
Configuration de votre caméra Web
1Positionner votre caméra Web
Français 27

Première utilisation
2Installation du logiciel
www.logitech.com/downloads
Pour télécharger et installer le logiciel de la caméra Web, rendez-vous sur
www.logitech.com/downloads, cliquez deux fois sur Caméras Web, sélectionnez votre produit dans la liste, sélectionnez Téléchargements, puis suivez les instructions à l’écran.
3Branchez votre caméra Web lorsque vous y êtes invité.
28 Français
Logitech® Webcam C110/C170
Premiers pas avec les appels vidéo
Votre caméra Web est livrée avec Logitech Vid™ HD
Grâce à Logitech Vid HD, il suffit de suivre quelques étapes simples pour pouvoir passer des appels vidéo en direct par Internet:
•Installation de Logitech Vid HD
•Création d'un compte
•Ajout d'amis et réalisation d'un appel vidéo
Pour en savoir plus: http://www.logitech.com/whatisvid
Configuration de Logitech Vid HD
Installation de Logitech Vid HD
1 Il est recommandé d'installer à la fois le logiciel de caméra Web Logitech et Logitech Vid HD.
Conseil: Si vous souhaitez utiliser une autre application d'appels vidéo, vous devez télécharger et installer un logiciel tiers.
Pour en savoir plus: http://www.logitech.com/webcam_howto
Français 29
Première utilisation
Création d'un compte
2 Suivez les instructions à l'écran pour créer
votre compte Logitech Vid HD et pour configurer la fonction d'appel vidéo de votre caméra Web.
Pour passer des appels vidéo avec n'importe quelle application, vous et la personne qui reçoit votre appel doivent disposer des éléments suivants:
•une caméra Web
•un ordinateur équipé d'haut-parleurs et un microphone (ou un casque avec microphone; la plupart des caméras Web Logitech possèdent un microphone intégré)
•une connexion Internet haut débit (par exemple, ADSL, T1 ou câble);
•la même application d'appels vidéo (par exemple, Logitech Vid HD)
•des comptes pour appels vidéo
3 |
Ajout d'amis et test des appels |
Cliquer sur l'image d'appel d'essai pour tester |
vos paramètres.
Conseil: L'image d'appel d'essai apparaît toujours dans votre liste de contacts de sorte que vous puissiez tester vos paramètres.
Pour ajouter un ami, cliquez sur Ajouter
un ami, puis saisissez l'adresse électronique de votre ami.
Quand votre ami a accepté votre invitation, cliquez sur l'image de votre ami pour passer un appel.
30 Français
 Loading...