


Operating Manual
DVD
Centros 2102 HD
Centros 2172 HD
233–32485.020

Contents
Remote control RC3 – DVD operation Centros Front Panel
Centros Rear Panel & Display Welcome
Thank you Scope of delivery Set up
Disposal
Cleaning
For your safety
Advantages of connection to a Loewe TV set
Essential Information
Writable Discs
Playable Discs Disc-related Terms Types of Video CDs Symbols
DVD-R and DVD-RW discs DVD-R and DVD-RW Discs DVD+R and DVD+RW Discs DVD Recordings
Initial Remote Control Setup
Resetting the DVD Recorder
Initial Installation
Shipping the Unit Notes on Discs Connections - General Connecting to the Aerial
Connecting to the Television
Connecting to a Set Top Box / Satellite Receiver Connecting to an External Decoder Box Connecting to an Amplifi er
Connecting to Audio/Video (A/V) Accessories Connecting to a Digital Camcorder
Basic Settings Activating Digital Link
Activating Progressive Scan The General Menu Language Menu
Audio Menu
Lock Menu Recording Menu Disc Menu
Additional Screen Menus
HDMI mode
HDMI (DVI) connection HDMI operation
3 |
Using DVDs and Video CDs |
31 |
|
4 |
|||
Playing back a DVD or video CD (VCD, SVCD) |
31 |
||
5 |
|||
General functions |
31 |
||
6 |
|||
DVD-Audio Disks |
34 |
||
6 |
Storing the last disc settings |
34 |
|
6 |
PIP (Picture In Picture) |
34 |
|
6 |
Playing disks with mixed contents |
34 |
|
6 |
DivX mode |
35 |
|
7 |
|||
Playing DivX fi les |
35 |
||
7 |
|||
DivX subtitles |
35 |
||
7 |
|||
About DivX Video fi les |
35 |
||
8 |
|||
Operating the Audio CD and MP3/WMA |
36 |
||
8 |
|||
Copying fi les / folders from a CD to an audio/photo card |
37 |
||
8 |
|||
Programmed replay |
38 |
||
9 |
|||
Using the photo disc |
39 |
||
9 |
|||
Using the Music/Photo/Movie card reader |
40 |
||
9 |
|||
9 |
Overview |
40 |
|
10 |
RC3 remote control Music/Photo/Movie card reader functions |
41 |
|
10 |
Photo mode |
42 |
|
10 |
Movies operation |
42 |
|
12 |
Music mode |
42 |
|
12 |
Copying data to DVD |
43 |
|
12 |
Recording |
44 |
|
13 |
Manual recording |
44 |
|
13 |
Timer recording |
45 |
|
13 |
Timer recordings with the ShowView ® system |
46 |
|
13 |
Recording from external sources |
47 |
|
14 |
Title List and Chapter List |
49 |
|
14 |
The “Title List-Original” Menu VR |
49 |
|
15 |
The “Chapter List-Original” Menu VR |
49 |
|
15 |
The “Title List-Playlists” Menu VR |
50 |
|
16 |
The “Chapter List-Playlists” Menu VR |
50 |
|
16 |
|||
The “Title List“ Menu Video |
51 |
||
16 |
|||
The “Title List“ Menu VR +RW |
52 |
||
17 |
|||
The “Title List“ Menu VR +R |
53 |
||
17 |
|||
Title and Chapter Editing |
54 |
||
17 |
|||
21 |
What to do, if ... |
60 |
|
22 |
Technical Specifications |
62 |
|
22 |
Operating additional devices |
63 |
|
24 |
|||
Language Code List |
65 |
||
25 |
|||
List of country codes |
66 |
||
26 |
|||
30 |
Service Addresses |
67 |
|
30 |
Codelist RC3 |
68 |
|
30 |
|
|
 - 2
- 2
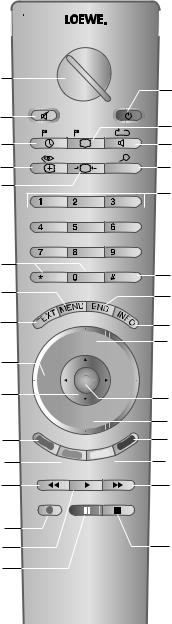
Remote control RC3 – DVD operation
Change-over switch for operation of TV , VCR, DVD or Set T op Box
Sound off/on
Set mark er / in menu: highlights title/chapter
Select camera position Timer recording menu / timer recording list menu on
Call AV selection (AV1-AV4,DV,TV)
Main menu on
User interface of loaded DVD on in menu: switch between original and playlist
V–/V+ volume quieter/louder
in menu: select / adjust
Insert a new chapter marker
DivX: select subtitles
ShowView menu on
Press short during playback: Start of current chapter /previous chapter Press short during pause: slow motion back Press long during playback: search back
Record
Playback
Pause /single frame
TV
DVD STB
VCR
|
|
-Set |
|
-List |
|
|
|
REC-MENU |
|
||
|
|
|
|
|
RADIO |
|
|
|
|
abc |
def |
|
|
ghi |
|
jkl |
mno |
|
|
pqrs |
|
tuv |
wxyz |
|
DVD-AV |
|
|
|
|
|
|
EPG |
|
AV |
PIP |
|
|
-M |
|
|
|
|
C |
|
|
|
|
IS |
|
|
|
|
|
D |
|
|
|
|
|
|
|
|
|
P+ |
|
|
|
V– |
|
OK |
V+ |
|
|
|
|
P– |
|
C- |
|
|
|
|
D |
S |
|
|
|
R |
|
|
E |
|
|
A |
|
|
|
T |
|
|
C |
|
|
S |
V |
LE |
|
|
|
|
TIT |
|
|
Switch DVD player on/off – in standby
Marker search menu on
Repeat
Zoom
in menu: enter digits /
in stop mode (menu off): select programme (TV)
Picture in picture (PIP) on/off
Close menu
Info / menu bar on/off
Next chapter /
in stop mode (menu off): next programme
Status display (TV, DVD-RW) /
in menu: cofirm the menu selection
Start of current chapter / previous chapter / in stop mode (menu off): previous programme
Audio/Foto Card Reader operation on/off
Enter a new title thumbnail /
switch between photo and MP3/WMA operation
Press short during playback: next chapter Press short during pause: slow motion forward Press long during playback: search forward
Stop Note: If you have a Loewe TV set with an RC3 remote control, we recommend you to only use the RC3 remote control enclosed with the Centros 2102 to operate both units because you could otherwise have problems operating the Centros 2102 (unit does not respond).
3 -
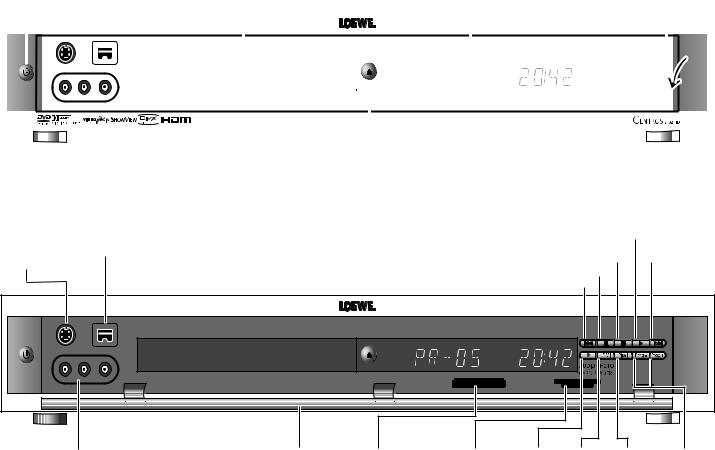
Centros Front Panel
Power button |
|
Disc tray |
|
Display |
|
Front flap |
|||||||||||||
Switch off in standby |
|
|
|
|
|
|
|
(closed) |
|||||||||||
|
|
|
|
|
|
|
|||||||||||||
|
|
|
|
|
|
|
|
|
|
|
|
|
|
|
|
|
|
|
|
|
|
|
|
|
|
|
|
|
|
|
|
|
|
|
|
|
|
|
|
|
|
|
|
|
|
|
|
|
|
|
|
|
|
|
|
|
|
|
|
|
|
|
|
|
|
|
|
|
|
|
|
|
|
|
|
|
|
|
|
|
|
|
|
|
|
|
|
|
|
|
|
|
|
|
|
|
|
|
|
|
|
|
|
|
|
|
|
|
|
|
|
|
|
|
|
|
|
|
|
|
|
|
|
|
|
|
|
|
|
|
|
|
|
|
|
|
|
|
|
|
|
|
|
|
|
|
|
|
|
|
|
|
|
|
|
|
|
|
|
|
|
|
|
|
|
|
|
|
|
|
|
|
|
|
|
|
|
|
|
|
|
|
|
|
|
|
|
|
|
|
|
|
|
|
|
|
|
|
|
|
|
|
|
|
|
|
|
|
|
|
|
|
|
|
|
|
|
|
|
|
|
|
|
|
|
|
|
|
|
|
|
|
|
|
|
|
|
|
|
|
|
|
|
|
|
|
|
|
|
|
|
|
|
|
|
|
|
|
|
Disc tray open/close
|
|
Beginning of chapter / previ- |
Stop |
Pause |
|
Play |
Next |
|||||
Input 4 / |
DV IN |
ous chapter |
|
|
|
|
|
|
|
|
chapter |
|
|
|
|
|
|
|
|
|
|||||
S-Video IN |
|
|
|
|
|
|
|
|
|
|
|
|
|
|
|
|
|
|
|
|
|
|
|
|
|
|
|
|
|
|
|
|
|
|
|
|
|
|
|
|
|
|
|
|
|
|
|
|
|
|
|
|
|
|
|
|
|
|
|
|
|
|
|
|
DVD |
- R W |
ST |
SQ |
VIDEO IN 4 / AUDIO IN 4 L/R
Front flap |
Memory Card |
Memory Card |
(open) |
slot left |
slot right |
|
||
|
CF / MD |
SD / MMC / MS / |
|
|
MS-Pro / XD / SMC |
|
|
|
|
|
|
Record HDMI |
Pixel |
Station |
|||
output |
(screen |
P- / P+ |
|||
on/off |
resolution) |
|
|
|
|
 - 4
- 4

Centros Rear Panel & Display
AERIAL
Aerial connection
EURO AV 2 DECODER
SCART connection for an external source (Decoder, Set-Top-Box, Video Recorder etc.).*
DIGITAL OUT
Digital, coaxial audio output
|
|
|
|
COMPONENT VIDEO |
|
VIDEO OUT/AUDIO OUT |
VIDEO IN 3/AUDIO IN 3 (L/R) |
|
||||||||||||||||||||||||||||||||||||||
|
|
|
|
OUT (Y Pb Pr) |
|
(L/R) |
Connection for an external source (Audio |
|
||||||||||||||||||||||||||||||||||||||
|
|
|
|
Connection for a TV |
|
Connection for a TV with |
System, TV/Monitor, VCR, Camcorder etc.) |
|
||||||||||||||||||||||||||||||||||||||
|
|
|
|
with component inputs |
|
video / audio inputs (Cinch) with video / audio inputs (Cinch). |
|
|||||||||||||||||||||||||||||||||||||||
|
|
|
|
(Cinch), * |
|
|
|
|
|
|
|
|
|
|
|
|
|
|
|
|
|
|
|
|
|
|
|
|
|
|
|
|
|
|
|
|
||||||||||
|
|
|
|
|
|
|
|
|
|
|
|
|
|
|
|
|
|
|
|
|
|
|
|
|
|
|
|
|
|
|
|
|
|
|
|
|
|
|
|
|
|
|
|
|
|
|
|
|
|
|
|
|
|
|
|
|
|
|
|
|
|
|
|
|
|
|
|
|
|
|
|
|
|
|
|
|
|
|
|
|
|
|
|
|
|
|
|
|
|
|
|
|
|
|
|
|
|
|
|
|
|
|
|
|
|
|
|
|
|
|
|
|
|
|
|
|
|
|
|
|
|
|
|
|
|
|
|
|
|
|
|
|
|
|
|
|
|
|
|
|
|
|
|
|
|
|
|
|
|
|
|
|
|
|
|
|
|
|
|
|
|
|
|
|
|
|
|
|
|
|
|
|
|
|
|
|
|
|
|
|
|
|
|
|
|
|
|
|
|
|
|
|
|
|
|
|
|
|
|
|
|
|
|
|
|
|
|
|
|
|
|
|
|
|
|
|
|
|
|
|
|
|
|
|
|
|
|
|
|
|
|
|
|
|
|
|
|
|
|
|
|
|
|
|
|
|
|
|
|
|
|
|
|
|
|
|
|
|
|
|
|
|
|
|
|
|
|
|
|
|
|
|
|
|
|
|
|
|
|
|
|
RF. OUT
Passes the aerial signal to the TV
|
|
|
|
|
|
|
|
|
|
|
|
|
|
|
|
|
|
|
|
|
|
|
|
|
|
|
|
|
|
|
|
|
|
|
|
|
|
|
|
|
|
|
|
|
|
|
|
|
|
|
|
|
|
|
|
|
|
|
|
|
|
|
|
|
|
|
|
|
|
|
|
|
|
|
|
|
|
|
|
|
|
|
|
|
|
|
|
|
|
|
|
|
|
|
|
|
|
|
|
|
|
|
|
|
|
|
|
|
|
|
|
|
|
|
|
|
|
|
|
|
|
|
|
|
|
|
|
|
|
|
|
|
|
|
|
|
|
|
|
|
|
|
|
|
|
|
|
|
|
|
|
|
|
|
|
|
|
|
|
|
|
|
|
|
|
|
|
|
|
|
|
|
|
|
|
|
|
|
|
|
|
|
|
|
|
|
|
|
EURO AV 1 |
|
AUDIO/ VIDEO OUTPUT switch |
|
|
||||||||||||||||||||||
|
OPTICAL |
|||||||||||||||||||||||||
VIDEO |
|
|
|
|
|
|
Position RGB: EURO AV1 socket gives out the RGB signal and COMPO- |
Digital, optical |
||||||||||||||||||
SCART connection for NENT VIDEO OUT socket does not supply a signal |
audio output |
|||||||||||||||||||||||||
TV set |
|
|
|
|
|
|
Position COMPONENT: COMPONENT VIDEO OUT socket gives out the RGB |
|
|
|||||||||||||||||
|
|
|
|
|
|
|
|
|
|
signal and EURO AV1 socket does not supply a signal |
|
|
||||||||||||||
|
|
|
|
|
|
|
|
|
|
* Please note the position of the switch here. |
|
|
||||||||||||||
S-VIDEO OUT
Connection for a TV with S-Video input.
|
|
|
|
HDMI OUT |
Mains |
|
cable |
|
connection of a TV with HDMI input
Caution: Do not touch the inner pins of connection sockets on the rear panel. Electrostatic discharge may cause permanent damage to the unit.
REC Indicates whether recording is in progress
REC
DVD
Indicates when the re- DVD disc is inserted in corder is in timer recording recorder
or a timer recording is programmed
Character indicators
Clock, total playback time, elapsed time, title number, chapter / track number, channel etc.
5 -

Welcome
Thank you
for choosing a Loewe product. We are happy to welcome you as our customer.
At Loewe we combine the highest standards of technology, design and user friendliness. This is equally true of TV, DVD, video, audio and accessories.
Neither technology nor design is an end in itself, but both are intended to provide our
customers with the best possible audio and visual experience.
Our design is not infl uenced by short-term, fashionable trends. You have, after all, purchased a high-quality piece of equipment which you do not want to get tired of looking at tomorrow or the day after.
Scope of delivery
•Loewe Centros DVD recorder
•RC3 remote control with 2 batteries
•Euro AV cable (Scart cable)
•Audio cinch cable
•Video cinch cable
•Antenna cable
•HDMI cable
•1x DVD-RW disc
•this operating manual
You can use the remote control to operate four units: as well as this DVD recorder, a Loewe television, a Loewe video recorder and a set-top box (STB).
Set up
•Place the DVD recorder on a fi rm, level base.
•Do not place the DVD recorder in the vicinity of sources of intense heat or in direct sunlight.
•When installing in a cabinet or enclosed shelf: Leave about 2.5cm free space around the DVD player for unhindered air circulation to prevent build-up of heat.
•There can be interference to the images and sound of any nearby television, video recorder or radio. If this is the case, do not position the unit in the direct vicinity of a TV set, video recorder or radio, or switch the unit off after removing the disc.
•Install the DVD recorder where there is nothing to obstruct the remote control‘s infrared signal from reaching the DVD recorder display.
•Do not place strong artifi cial light sources in front of the device. This may affect infrared reception.
•If there is an electrical storm, disconnect the antenna and mains plug. Power surges caused by lightning strikes can damage the unit through the antenna system or the mains.
•The antenna and mains should also be disconnected if the unit is to remain unsupervised for a long period of time.
•The mains plug must be easily accessible so that the unit can be disconnected at any time.
•Lay the cable in such a way that it cannot get damaged. The power cable should not be kinked or laid over sharp edges, not stood upon or exposed to chemicals - the latter also applies to the device as a whole. A mains cable with damaged insulation can cause electric shocks and is a fi re hazard.
•When removing the power plug, pull the body of the plug, and not the cable. Otherwise, the wires in the plug could get damaged and cause a short circuit the next time it is plugged in.
You should also read and follow the safety advice on the following pages.
Disposal
Cardboard box and packaging
You have opted for a durable and techni-
cally sophisticated product. In line with national regulations regarding the disposal of packaging materials, we pay a fee to authorised recyclers who collect packaging from dealers. However, we recommend that you keep the original cardboard box and the rest of the packaging materials so that the unit can, if necessary, be transported in the safest possible conditions.
The unit
Important: The EU Directive
2002/96/EG governs the proper re-acceptance, handling and recycling of used electronic ap-
pliances.
Old electronic appliances must therefore be disposed of separately. Never throw this set in the normal domestic waste. You can hand in your old set free of charge at identifi ed collection points or at your dealer if you buy a similar new set. Other details about re-acceptance (also for non-EU countries) are available from your local administration.
Remote control batteries
The batteries provided contain no harmful materials such as cadmium, lead or mercury. Regulations concerning used batteries mean
that batteries may no longer be thrown out with the household rubbish. You can dispose of used batteries free of charge at the collection points in commercial outlets. Your dealer will also have a collection point for used batteries.
 - 6
- 6
Welcome
Cleaning
•Only clean your DVD recorder with a damp, soft, clean cloth (with no aggressive cleaning agents).
•If DVD recorder fails to read the disc correctly, the reader unit in the device may be soiled. Use a commercially-available cleaning disc.
•Always keep the disc drawer closed to prevent dust getting into the drawer and onto the lens.
For your safety
For your own safety and to avoid unnecessary damage to your unit, please read and follow the safety advice below:
•This DVD recorder is only to be used for receiving, displaying and playing visual and sound signals.
•Switch off your DVD system (Centros, TV and any other audio components which may be connected) before connecting or disconnecting other devices or speakers.
•Do not open up the housing, or you could be directly exposed to the laser beam. The laser beam will be visible if the unit is open.
DO NOT LOOK INTO THE LASER BEAM.
Protect your DVD recorder from ...
•liquids and damp
•shock and mechanical stress
•magnetic and electrical fi elds
•cold, heat, direct sunlight and extreme fl uctuations in temperature
•dust
•anything which obstructs ventilation
•manual interference with the unit‘s interior
Your Centros has only been designed for use in a domestic environment. The warranty covers this normal use of the DVD recorder.
PLEASE NOTE: TO AVOID RISK OF ELECTRICAL SHOCK, DO NOT REMOVE THE COVER (OR THE REAR OF THE UNIT). THERE ARE NO PARTS INSIDE THE UNIT THAT CAN BE REPAIRED BY THE USER. REPAIRS SHOULD ONLY BE CARRIED OUT BY A LOEWE DEALER.
If you have moved the DVD recorder from a cold to a warm environment, leave it to stand for about an hour because of the risk of condensation building up. Do not switch it on until it has reached room temperature. This will avoid seriously damaging the components.
Read this operating manual, and experiment with your new equipment‘s features so that you are familiar with it.
Advantages of connection to a Loewe TV set
You can use Digital Link to install the DVD recorder e.g. in an enclosed rack or a wall unit, without there being direct visible contact with the DVD recorder. Using the DVD remote control, you can operate the DVD recorder via the Loewe television. To do this, Digital Link must be switched on at the DVD recorder (see page 17).
When you use the HDMI connection the TV switches over to this input automatically as long as it supports this function.
If you want to make timer recordings from the satellite tuner in the television, the recording is controlled by Digital Link Plus.
Digital Link Plus enables channel data to be transferred from the television‘s satellite and cable channels to the DVD recorder, so that the same channels appear in the same channel position. This means that timer recordings of satellite and cable channels can easily be programmed from the television using the EPG (Electronic Program Guide). The timer data is copied to the DVD recorder, which then, independently of the television, carries out the timer recording. With timer data for satellite stations, the television starts and stops the DVD recorder and sets it to the Euro AV 1 input.
If playback begins, this is immediately shown on the television, no matter which TV channel you are currently watching (if the television is switched off, it will automatically switched on).
7 -
Essential Information
Writable Discs
DVD-RW (Digital Video Disk
- ReWritable)
These discs can be written to several times. Recordings can be deleted and the disc can then be rewritten.
DVD-R (Digital Video Disk
- Recordable)
These discs can be written to only once. Following fi nalisation a DVD-R disc can no longer be written to or edited.
DVD+RW (Digital Video Disk +ReWritable)
These discs can be written to several times. Recordings can be deleted and the disc can then be rewritten.
DVD+R (Digital Video Disk +
Recordable)
These discs can be written to only once. Following fi nalisation a DVD-R disc can no longer be written to or edited.
DVD+R DL (Digital Versatile
Disk + Recordable; Double
Layer)
DVD+R DL
These discs can be written once. The storage capacity of 8.5 GB is almost double that of single-layer DVDs.
The disk dVD+R DL can no longer be written or changed once it has been fi nalised.
Notes:
•This recorder cannot write to CD-R or CD-RW discs.
•DVD-R/RW, DVD+R/RW and CD-R/RW discs written to using a PC or a DVD or CD recorder cannot be played if the disc is damaged or dirty or if there is condensation on the recorder‘s lens.
•If you record a disc using a PC, even if it is in a compatible format, the disc may not play depending on the settings of the application software used to create the disc. (Further
information can be obtained from the software provider.)
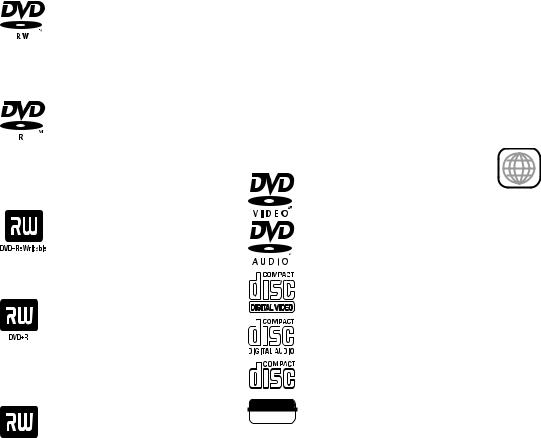
Playable Discs
Video-DVD
Audio-DVD
Video-CD (VCD, XVCD, SVCD,
XSCVD; 8 cm- / 12 cm disk)
Audio-CD
(8 cm- / 12 cm disk)
CD-R/RW
(8 cm- / 12 cm disk)
DIGITAL AUDIO
Recordable
ReWritable
DVD-R/DVD-RW disks, DVD+R/DVD+RW disks, CD- R/CD-RW disks with audio titles, DivX, MP3/WMA* or JPEG fi les, VCD/XVCD/SVCD/SXVCD and Kodak Picture-CDs (JPEG) can also be played on this unit. * including MP3 discs with ID3-Tag
Notes:
•Depending on the recording unit or the CD-R/RW (or DVD±R/±RW) disc itself, some CD-R/RW (or DVD±R/±RW) discs cannot be played with this unit.
•Do not attach any labels to either side (the labeled side or the written side) of a disc.
•Do not use any irregularly shaped CDs (e.g. heart-shaped or octagonal). If you use these discs malfunctions may occur.
Regional code of the DVD recorder and DVDs
This DVD recorder can only play
2Region “2“ or “all“ coded DVDs. The region code on the label of some
DVDs shows which type of DVD recorder can play those discs. If you
play other discs the error message “Incorrect country code. Playback not possible.“ will be displayed on the TV screen.
Some discs may not have the label with the region code even though they cannot be played in all regions.
Notes on DVDs and Video CDs: Some DVDs and Video CD playback functions can be programmed in a particular way by some software manufacturers. As this unit plays DVDs and Video CDs as they have been designed by the software manufacturer, some playback functions may not be available whilst other additional functions may be available. Further information can be found in the instructions supplied with the DVDs and Video CDs. The unit may not be able to play some DVDs made for specifi c business purposes.
 - 8
- 8
Essential Information
Disc-related Terms
Title (DVD only)
A title is the main fi lm content or the content of the accompanying feature or the music album. Each title has a title number enabling you to locate it easily.
Chapter (DVD only)
Chapters are sections of a fi lm or a piece of music that are smaller than a title. A title consists of one or several chapters. Each chapter has a chap-
ter number to enable you to locate the desired chapter. Depending on the disc, chapters may not be labeled.
Track (Video CD or Audio CD only)
Types of Video CDs
There are two types of Video CDs:
Video CDs equipped with PBC (Version 2.0)
PBC (Playback Control) functions enable you to interact with the system via menus, search functions or other typical computer operations. In addition high-resolution still pictures can be displayed if they are available on the disc.
Video CDs not equipped with PBC (Version 1.1)
These discs are operated in the same way as Audio CDs and allow playback of video pictures and sound. They are not however equipped with PBC.
Sections of a fi lm or a piece of music on a Video CD or an Audio CD. Each track has a track number to enable you to fi nd the desired track.
Scene
On a Video CD with PBC (Playback Control) functions, moving pictures and still pictures are divided into sections that are called “scenes“. Each scene is displayed in the scene menu and has a scene number to enable you to fi nd the scene quickly. A scene consists of one or more tracks.
Symbols
The  symbol on the screen
During operation “ ” may appear on the screen. This symbol means that the desired function is not currently available on this disc.
Disc symbols in the operating instructions
If part of the operating instructions contains one of the symbols listed below, the section is only applicable to the disc shown on the symbol.
Many functions of this recorder are dependent on the selected recording quality. One or more of the symbols (DVD, Video, +RW, MP3) are displayed for each function described in the manual so that you can immediately see whether the disc supports this function.
Video DVD-R/RW disc with Video mode
VR |
DVD-RW disc with VR mode |
+R |
DVD+R disc |
+RW |
DVD+RW disc |
DVD-V |
DVD-Video disc |
DVD-A |
DVD-Audio disc |
VCD |
Video CD |
CD |
Audio CD |
DivX |
DivX fi les |
MP3 |
MP3 fi les |
WMA |
WMA fi les |
JPEG |
JPEG fi les |
The fi nalized DVD disc is a DVD-Video disc.
DVD-R and DVD-RW discs
How are DVD-R and DVD-RW discs different?
The essential difference between a DVD-R and a DVD-RW disc is the fact that a DVD-R disc can only be written to once, whilst a DVD-RW disc can be written to several times. In addition, its content can be deleted. You can write to and delete a DVD-RW disc approx. 1000 times.
Playback of writable discs on normal DVD players
DVD-R discs and DVD-RW discs written to in Video mode can be played on some normal DVD players. They must however be fi nalized fi rst. This process fi xes the content of the disc so that it can be read by other DVD players as a DVD-Video disc.
9 -
Essential Information
What are “Recording Modes“?
This recorder offers three recording modes: VR mode, Video mode and Data mode. Recordings on DVD-R discs are always in Video mode. Recordings on DVD-RW discs can be in either VR or Video mode. Files of memory cards, e.g. MP3 can be recorded on discs in Data mode.
DVD-R and DVD-RW Discs
VR Mode Recording
•4 possible picture quality/recording time settings (EQ, LQ, SQ, HQ), see page 24.
•Cannot be played on normal DVD players.
•Recordings can be comprehensively edited.
•Use of original lists and playlists (see page 49 and 50).
Video Mode Recording
•4 possible picture quality/recording time settings (EQ, LQ, SQ, HQ), see page 24.
•Can be played on normal DVD players (after fi nalization)
•Limited editing functions.
Note: The “Video mode“ DVD-Video format is a new format for recording on DVD-R/RW discs that was approved by the DVD Forum in 2000. For this reason you may experience problems playing writable DVD discs on some players. Symptoms include video artifacts, audio and/or video dropout and playback stopping suddenly. Our company cannot take any responsibility for problems playing discs recorded on this recorder on other players.
Use of “Original“ and “Playlist“
Throughout this manual you will often see the words “Original“ and “Playlist“ used to describe the actual content and the edited version.
•Original: Content refers to what is actually recorded on the disc.
•Playlist: Content refers to the edited version of the disc, i.e. how the original content should be played.
DVD+R and DVD+RW Discs
Recording on DVD+RW Discs
•4 possible picture quality/recording time settings (EQ, LQ, SQ, HQ), see page 24.
•Can be played on many DVD players that support the +RW format (where appropriate, only after fi nalization).
•Titles/chapters of recordings can be edited.
•Edited content can only be played after fi nalization on some DVD players.
Recording on DVD+R / +R DL Discs
•4 possible picture quality/recording time settings (EQ, LQ, SQ, HQ), see page 24.
•Can be played on many DVD players that support the +R / +R DL format (where appropriate, only after fi nalization).
•Limited editing of titles/chapters.
•Edited content cannot be played on normal DVD players. (Hide, combined chapters, added chapter markers etc.).
DVD Recordings
Note: Fingerprints and scratches on the disc can affect playback and/or recording. Take proper care of your discs.
Disc Types and Recording Formats,
Modes and Settings
This recorder can play seven different types of DVD disc:
•DVD-Video disc
•DVD-Audio disc
•DVD-RW disc
•DVD-R- disc
•DVD+RW disc
•DVD+R- disc
•DVD+R DLdisc.
A DVD-R disc is always formatted in “Video Format“ - the same as prerecorded DVD-Video discs, i.e. after fi nalization you can play a DVD-R disc on a normal DVD player.
“Video Recording Format“ (VR) is the default format for a DVD-RW disc. If required, the disc can be changed to Videoor Data format through subsequent reformatting (“Disc - Formatting“ in the main menu) (Caution! The contents of the disc will be erased).
 - 10
- 10
Essential Information
If the disc format is Video Recording format, the recording mode for the disc is referred to as “VR mode“. However, the recording mode of a Video format disc is referred to as “Video mode“ (Exception: a prerecorded DVD-Video disc which is not recordable has no recording mode).
The recording modes determine the recording and editing options for the whole disc. Amongst other things they determine the picture quality and how much space the recording will take up on the disc.
Notes on Recording
•The displayed recording time is not exact as the recorder uses variable bit-rate video compression. This means that the exact recording
time will depend on the material that is being recorded.
•When recording a television broadcast the remaining recording time may be shorter if the reception is poor or the picture contains interference.
•If you record only still pictures or audio, the recording time may be longer.
•The displayed recording time and remaining time may not always add up to the total length of the disc.
•The available recording time may be shorter following intensive editing of the disc.
•If you use a DVD-RW disc, make sure you select
the recording format (Video mode or VR mode) before you start recording. See page 25 (Formatting) for more information.
•If you use a DVD-R disc you can continue recording until the disc is full or until you fi nalize it. Before you start recording check how much recording time is available on the disc.
•If you use a DVD-RW disc in Video mode, the available recording time will increase if you delete the last title recorded on the disc.
•The “Delete Title“ function in the “Title ListOriginal“ menu only hides the title, it does not however delete it from the disc and does not therefore increase the recording time (except if you delete the last recorded title on a DVD-RW disc in Video mode).
•Overwrite recording is only possible on DVD+RW discs.
Disc type |
Formatting |
Recording mode |
Functions |
|
|
|
|
DVD-Video |
Not possible |
Not applicable |
Playback only |
|
|
|
|
DVD-RW |
Video Recording format (Default) |
VR mode |
Playback, recording, |
|
|
|
original/playlist editing |
|
|
|
|
|
Video format |
Video mode |
Playback, limited recording, |
|
|
|
limited editing |
|
|
|
|
|
Data disk |
Data mode |
Recording of MP3/WMA, JPG, DivX fi les |
|
|
|
|
DVD-R |
Video format |
Video mode |
Playback, limited recording, |
|
|
|
limited editing |
|
|
|
|
|
Data disk |
Data mode |
Recording of MP3/WMA, JPG, DivX fi les |
|
|
|
|
DVD+RW |
Video format |
Video mode |
Playback, limited recording, |
|
|
|
editing of titles/chapters |
|
|
|
|
|
Data disk |
Data mode |
Recording of MP3/WMA, JPG, DivX fi les |
|
|
|
|
DVD+R / +R DL |
Video format |
Video mode |
Playback, limited recording, |
|
|
|
limited editing of titles/chapters |
|
|
|
|
11 -

Initial Installation
Recording TV-Audio Channels
This recorder can also record NICAM audio. If the NICAM setting (page 20) is set to “Auto“, NICAM audio will be recorded in the case of a NICAM transmission.
Restrictions on Video Recording
•You cannot record any copy-protected fi lm material with this recorder. Copy-protected video includes DVD-Video discs and some satellite transmissions. If copy-protected material is encountered during recording, recording is paused or stopped automatically and an error message appears on the screen.
•Video that can only be copied once can only be recorded using a DVD-RW disc in VR mode with CPRM (see below).
•NTSC format signals from analog or DV inputs cannot be recorded correctly with this recorder.
•SECAM format video signals (from an integrated TV tuner or from analog inputs) are recorded in PAL format.
CPRM
CPRM is a copy protection system (with scramble system) that only allows the recording of “copy once“ broadcasts. CPRM is the abbreviation for “Content Protection for Recordable Media”.
This recorder is CPRM compatible. You can therefore record copy-once broadcasts but cannot make copies of these recordings. CPRM recordings are only possible with VR mode formatted DVD-RW discs and can only be played on players with CPRM compatibility.
Copyright
•The recording equipment should only be used for lawful copying. You should fi nd out what constitutes lawful copying in the country in which you are making a copy. Copying of copyrighted material e.g. fi lms or music is only lawful if permitted by a legal exception or consented to by the rights owner.
•The product contains copyright protection technology that offers protection through certain US patents and other intellectual property rights and is the property of the Macrovision Corporation and other companies. Use of this copyright protection technology must be authorized by the Macrovision Corporation. It is only intended for private or other limited use unless otherwise authorized by the Macrovision Corporation. Reverse engineering and disassembly are prohibited.
Initial Remote Control
Setup
+
+
To insert or change the batteries, press on the imprinted arrow. Sldie off and remove the battery compartment cover. Insert alkaline-manganese LR 03 (AAA) type batteries and make sure the + and
– poles are aligned correctly. Then, replace the cover.
Resetting the DVD Recorder
If any of the following problems occur...
•The unit is plugged in but will not turn on or off.
•The display panel does not work.
•The DVD recorder is not functioning normally.
.., the DVD recorder can be reset in the following way:
•Hold the  button down for at least 5 seconds. The unit will switch off. Press the
  button again to switch the unit back on.
•or unplug the power cable, wait at least 20 seconds and plug the cable back in.
 - 12
- 12
Initial Installation
Shipping the Unit
The original shipping box and packaging materials should be used to ship the unit. To give the unit the best possible protection, repack it as it was originally packed by the manufacturer.
Notes on Discs
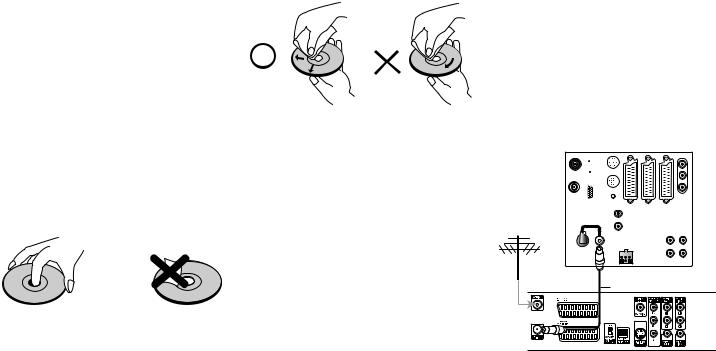
Handling Discs
Do not touch the prerecorded side of the disc. Hold the disc at the edges so as not to touch the surface with your fi ngers. Do not stick paper or tape to either side of the disc.
Storing Discs
After playing, store the disc in its case. Do not expose the disc to direct sunlight or a source of heat and never leave it in a parked car exposed to direct sunlight as there may be a considerable increase in temperature inside the car.
Cleaning Discs
Fingerprints and dust on the disc can affect the picture and sound quality. Clean the disc before playing it with a clean cloth. Wipe the disc from the center outwards.
Do not use any strong solvents such as alcohol, benzine, thinner, commercially available cleaners or anti-static sprays intended for vinyl records.
Connections - General
Notes:
•Depending on your television set and the other units you want to connect, there are several ways of connecting your recorder to your TV set. Only use the connection methods described below.
•Refer as necessary to the manuals for your television, DVD recorder, stereo system and other units in order to make the best possible connections.
Caution:
•The DVD recorder must be connected directly to the television. Tune the television to the correct video input channel.
•Do not connect the DVD recorder AUDIO OUT socket to the audio system Phono In socket.
Connecting to the Aerial
Remove the existing aerial cable plug (for terrestrial or cable televisions) from the television and plug it into the aerial socket on the back of the DVD recorder (“AERIAL” socket). Plug one end of the supplied aerial cable into the TV socket on the DVD recorder (“RF. OUT”) and the other end into the aerial socket on the television.
Back of the television
|
|
|
|
|
|
|
? ? ?? |
|
? ? ?? ? ? |
|
|
|
? |
||
|
|
|
|
|
|||
? ? |
???? ? |
?? |
?? |
? ?? ? |
|
|
? |
|
|
|
|
||||
?? |
|
|
|
|
|
|
|
|
|
?? ? |
|
|
|
|
|
|
|
|
|
|
|
|
|
? ? |
?? ? |
|
? ? |
|
|
|
? ? ??? ? |
|
|
|
? ? |
?? ?? |
? ? |
? ? ?? ? ? |
? ? |
|
|
|
|
|
|||
|
? ? |
?? ? |
|
|
|
|
|
Antenna

 ?? ? ? ? ???
? ? ?
R
Back of the DVD recorder
13 -
Initial Installation
Connecting to the
Television
Make one of the following connections depending on the functionality of your existing equipment.
Back of the television
SCART INPUT |
|
|
|
|
|
|
|
S-VIDEO |
COMPONENT VIDEO INPUT |
AUDIO INPUT |
VIDEO |
HDMI |
|||
INPUT |
|
|
INPUT |
INPUT |
|||
|
Y |
Pb |
Pr |
L |
R |
|
|
T S C A V H
Antenna/ cable television
wall socket
Back of the DVD recorder
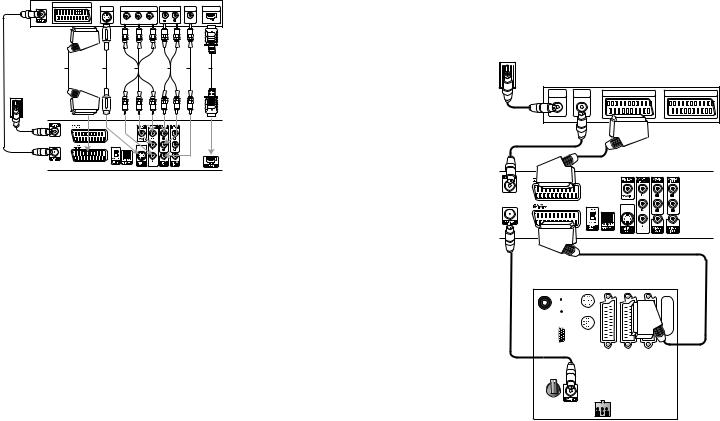
SCART Connection (e.g. Loewe TV)
Connect the EURO AV1 AUDIO/VIDEO Scart socket on the DVD recorder to the corresponding input socket on the television using Scart cable (T). Move the VIDEO OUTPUT switch to the “RGB” position.
HDMI-Verbindung (z.B. Loewe TV)
Verbinden Sie die HDMI-Buchse des DVD-Recorders mit Hilfe des mitgelieferten HDMI-Kabels (H) mit der entsprechenden Eingangsbuchse am TV-Gerät bzw. Monitor. Nehmen Sie dann die erforderlichen Einstellungen wie auf Seite 30 beschrieben vor.
Video Connection
Connect the VIDEO OUT socket on the DVD player to the Video input socket on the television using Video cable (V).
S-Video Connection
Connect the S-VIDEO OUT socket on the DVD player to the S-Video input socket on the television using S-Video cable (S).
Component Video Connection
Connect the COMPONENT VIDEO OUT socket on the DVD recorder to the corresponding input socket on the television using a Y Pb Pr cable (available in specialised trade) (C). Move the VIDEO OUTPUT switch to the “COMPONENT” position.
Audio Connection (Left/Right)
Connect the left and right AUDIO OUT sockets on the DVD recorder to the left and right IN sockets on the television using the audio cable (A).
Digital Audio output
If you have a digital surround amplifi er, you should connect this to the DVD recorder via Digital Audio. To do this, connect the DIGITAL-OUT socket of the DVD recorder to the DIGITAL-IN socket of the surround amplifi er.
Note: If you use the COMPONENT VUDEO OUT connections, switch the VIDEO OUTPUT switch to COMPONENT. If you use the SCART socket, switch the VIDEO OUTPUT switch to RGB.
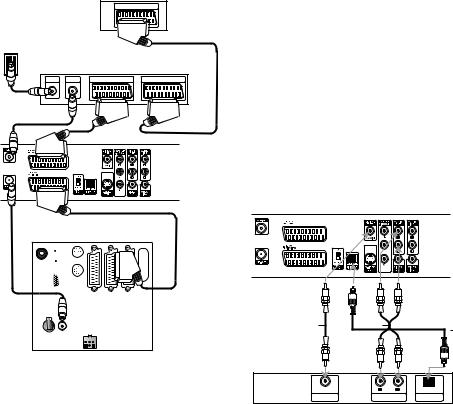
Connecting to a Set Top Box / Satellite Receiver
If you use a cable or satellite receiver with integrated decoder, connect it to your recorder and television set as described below. If you use a separate decoder box for your cable/satellite television, follow the instructions in the next section “Connecting to an External Decoder Box“.
1.Connect the aerial cable as shown. This enables you to watch and record TV channels.
2.Connect the EURO AV1 AUDIO/VIDEO socket to a EURO AV socket on your television using the SCART cable. This enables you to watch discs.
3.Connect the EURO AV2 DECODER socket to the EURO AV socket on your Set Top Box / satellite receiver using a SCART cable. This enables you to watch the TV channels.
Notes: This recorder is equipped with a “LoopThrough“ function. The function enables you to record a TV program from the integrated analog terrestrial TV tuner of this recorder while watching a satellite or Set-Top Box channel (see Decoder on AV1/2 on page 21/25). .
Do not connect the recorder “via“ your video recorder, satellite receiver or Set Top Box.
Antenna/ cable television wall socket
Set-Top Box or satellite receiver
AERIAL |
AERIAL |
SCART AV1 |
SCART AV2 |
INPUT |
OUTPUT |
|
|
Back of the DVD recorder
|
|
|
|
|
? ? ?? |
? ? ?? ? ? |
|
|
|
? |
|
|
|
|
|
||
?? |
?? |
? ?? ? |
|
|
? |
|
|
|
|
||
|
|
|
|
|
|
|
?? ? |
|
|
|
|
|
? ? |
|
|
|
? ? ??? ? |
|
? ? |
?? ?? |
? ? |
? ? ?? ? ? |
? ? |
|
|
|
|||
? ? ?? ?

 ?? ? ? ? ???
? ? ?
Back of the television
 - 14
- 14
Initial Installation
Connecting to an External Decoder Box
If you use an external decoder box for your satellite or cable TV system, follow the connection procedure described below.
1.Connect your aerial socket in the wall to the aerial input socket on your Set Top Box / satellite receiver using an aerial cable.
2.Connect the decoder to the EURO AV DECODER socket on the Set Top Box /satellite receiver using a SCART cable. Further instructions can be found in the manual for your decoder box.
3.Connect the EURO AV2 socket on the DVD recorder to a EURO AV socket on your Set Top Box / satellite receiver using a SCART cable.
4.Connect the EURO AV1 socket on the DVD recorder to a EURO AV socket on your television using the SCART cable.
Caution:
•Do not connect the Decoder-Box directly to the recorder but as shown in the fi gure below to the satellite/Set-Top Box.
•Information from the decoder (e.g. about Pay TV services) can only be viewed if the recorder is switched off (standby mode).
•For timer recordings to work properly on this recorder, the satellite / Set Top Box must also be switched on during recording.
•With this confi guration you cannot watch one television broadcast and record another at the same time.
Decoder
SCART AV
Antenna/ cable television wall socket
Set-Top Box or satellite receiver
AERIAL |
AERIAL |
SCART AV1 |
SCART AV2 |
INPUT |
OUTPUT |
|
|
Back of the DVD recorder
|
|
|
|
|
? ? ?? |
? ? ?? ? ? |
|
|
|
? |
|
|
|
|
|
||
?? |
?? |
? ?? ? |
|
|
? |
|
|
|
|
||
|
|
|
|
|
|
|
?? ? |
|
|
|
|
|
? ? |
|
|
|
? ? ??? ? |
|
? ? |
?? ?? |
? ? |
? ? ?? ? ? |
? ? |
|
|
|
|||
? ? ?? ?

 ?? ? ? ? ???
? ? ?
Back of the television
Connecting to an Amplifier
Connecting to an amplifier equipped with analog 2 channel stereo or Dolby Pro Logic II / Pro Logic
Connect the left and right AUDIO OUT sockets on the DVD recorder to the left and right AUDIO IN sockets on the amplifi er, receiver or stereo system using the audio cable (A).
Connecting to an amplifier equipped with two channel digital stereo (PCM) or to an Audio/Video receiver equipped with a multi-channel decoder (Dolby Digital™, MPEG 2 or DTS).
1.Connect one of the DIGITAL AUDIO OUT sockets (OPTICAL O or COAXIAL X) on the DVD recorder to the corresponding input socket on your amplifi er. Use the appropriate digital audio cable (Optical O or Coaxial X - available in specialised trade).
2.You must confi gure the digital output of the recorder (see “Audio“ on page 22).
Back of the DVD recorder
X |
A |
|
COAXIAL |
L |
R |
OPTICAL |
DIGITAL INPUT |
AUDIO INPUT |
DIGITAL INPUT |
|
Amplifier (Receiver)
Digital Multi-Channel Sound
A digital multi-channel connection offers the best sound quality. For this you need a multi-chan- nel Audio/Video receiver that supports one or more audio formats e.g. MPEG 2, Dolby Digital and DTS. More information can be found in the receiver manual and on the logos on the front of the receiver.
Caution: Due to the DTS licensing agreement the digital output will be to DTS Digital Out when a DTS audio stream is selected.
15 -
Initial Installation
Notes: |
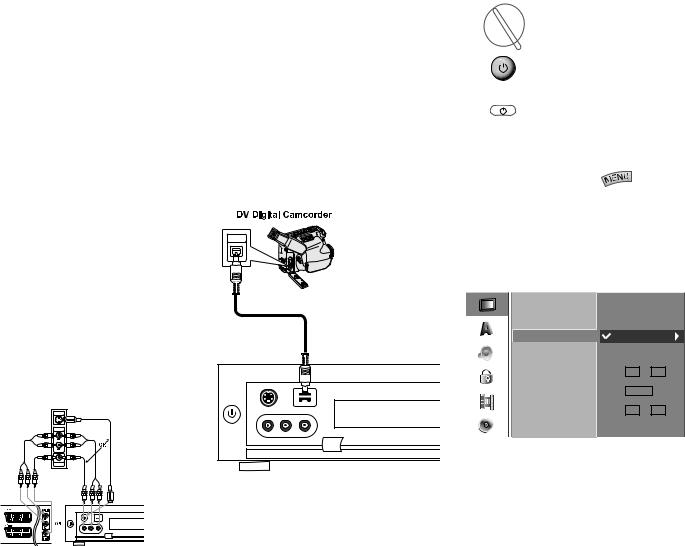
Connecting to a Digital |
Basic Settings |
|
||
• |
If the audio format of the digital output does not |
Camcorder |
|
|
|
|
correspond to the capabilities of your receiver, |
DVD |
STB |
|
|
|
|
|
TV |
|
|
|
the receiver will emit a strong distorted sound or |
You can connect a digital camcorder (DV) or a |
VCR |
Set the rotating switch on the |
|
|
no sound at all. |
||||
|
|
remote contol to DVD mode. |
|||
• 5.1 digital surround sound via the digital con- |
digital DVD-R/RW recorder to the DV IN socket on |
|
|||
|
|
|
|||
|
nection can only be obtained if your receiver is |
the front panel and digitally transfer the content of |
|
Push the On/Off button on the |
|
|
equipped with a digital multi-channel decoder. |
DV tapes or DVD-/RW discs onto DVD-R/RW discs. |
|
||
|
|
DVD recorder or ... |
|
||
• You can obtain information about the audio |
Use a DV cable (not supplied) to connect the DV |
|
|
||
|
format of the current DVD via the “Disc Info“ |
|
|
|
|
|
IN/OUT socket on your camcorder/video deck to the |
|
|
|
|
|
menu (see page 28 and 33). |
|
... the On/Off switch on the |
||
|
DV IN socket on the front panel of this recorder. |
|
|||
• |
This recorder does not perform internal (2-chan- |
|
remote control. |
|
|
|
|
|
|||
|
nel) decoding (downmix) of a DTS sound track. |
|
|
|
|
|
To enjoy DTS multi-channel surround sound, you |
Note: Only DV units can be connected to this |
The menu system offers several ways of changing |
||
|
must connect this recorder to a DTS compatible |
socket (The source signal must be in the DV-25 |
|||
|
settings. Most menus consist of three levels for |
||||
|
receiver via one of the recorder‘s digital audio |
format; see page 47 and 48). It is not compatible |
|||
|
setting up options. If you press |
, only the |
|||
|
outputs. |
with digital satellite tuners or S-VHS video decks. |
|||
|
fi rst and second levels of the menu system are |
||||
|
|
||||
|
|
|
|||
Connecting to Audio/Video |
|
displayed on the screen. You can display the third |
|||
|
level by pressing “ ”. When navigating in the |
||||
(A/V) Accessories |
|
||||
IN/OUT |
menus, “ |
” on the right side of the menu tab |
|||
|
|
DV |
|
|
|
shows you that the next level can be called up.
Connect the DVD recorder‘s input sockets (AV2, |
|
|
|
|
|
|
|
AV3 = AUDIO IN 3 / VIDEO IN 3 on the back of the |
|
|
Main Menu: |
|
|
|
|
unit or AV4 = input 4 on the front of the unit (see |
|
|
|
|
|
|
|
page 4)) to the audio/video out sockets on the ac- |
|
|
|
Auto Programming |
|
|
|
cessory component using audio/video cables. |
|
|
|
Program Edit |
|
|
|
|
|
|
|
Clock Set |
Automatic |
|
|
Note: If you use the S-VIDEO IN socket on the |
|
|
|
TV Aspect |
Manual |
|
|
front panel, the VIDEO IN socket on the front panel |
|
|
|
Display Mode |
Date |
- - / |
- - |
|
|
|
Decoder at AV1 |
||||
cannot be used. |
|
|
|
Year |
- - - - |
|
|
Connector block for an accessory component |
|
|
|
PBC |
|
||
|
|
|
|
|
|
||
|
|
|
|
|
|
|
|
(VCR, Camcorder, etc.) |
S-Video |
DV |
|
Factory Set |
Time |
- - : |
- - |
S-VIDEO |
|
||||||
OUTPUT |
|
|
|||||
AUDIO |
|
|
|
Power Save Mode |
|
|
|
OUTPUT |
|
|
|
|
|
|
|
R |
Video |
L-Audio-R |
1st Level |
2nd Level |
3rd Level |
|
|
L |
|
|
|
||||
VIDEO |
|
|
|
|
|
|
|
OUTPUT |
|
|
|
|
|
|
|
DV |
S-Video |
Video L-Audio-R
Back of the |
Front of the |
DVD recorder |
DVD recorder |
 - 16
- 16

Initial Installation
Navigating in Menus
In this operating manual the RC3 remote control arrow keys are represented as follows:
The arrows correspond to
““ in the text.
OK |
The OK function is represented as |
|
|
|
“OK“ in the text. |
1.Press  .
.
The menu is displayed.
2. |
Select the desired option with |
/ . |
|||
3. |
The desired entry is selected. Press |
to call up |
|||
|
the corresponding second level. |
|
|
||
4. |
Select the second option with |
/ . |
|
||
5. |
Press |
/ |
to call up the corresponding third |
||
|
level. |
|
|
|
|
6. |
Use |
to select the desired settings and confi rm |
|||
your selection with OK.
Some options required additional steps. 7. Press  to quit the menu.
Activating Digital Link
With Digital Link, Loewe TV sets pass on the remote control signals to Centros via the EuroAV connection. Digital Link is useful if you want to install Centros in a concealed place, e.g. in a closed rack.
•Switching on Digital Link.
Centros must be switched on. Press the  key on Centros for > 3 secs. “LINK“ appears briefl y in the Centros display.
•Switching off Digital Link.
Centros must be switched on. Press the  key on Centros for > 3 secs. “FRONT“ appears briefl y in the Centros display.
Activating Progressive Scan
With the “Progressive Scan” you get the highest possible picture quality without fl ickering in the “Component Video” mode (VIDEO OUTPUT switch on the back of Centros set to “COMPONENT”) in display units which support this operating mode. If Centros is switched on: Press the PIXEL button on the device short. “576P” appears in the unit display, Centros is switched to Progressive Scan. By pressing the PIXEL button on the unit again, you can switch Centros back to the “Interlaced” mode (unit display shows “576 I”).
The General Menu
Automatic Programming
This DVD recorder is fi tted with a tuner capable of receiving up to 88 channels.
Note: The channel is set automatically when using Digital Link Plus.
Preparation:
Connect the DVD recorder to the aerial system. See “Connecting to the Aerial“ on page 13.
1.Press  .
.
The menu is displayed.
2. |
Select the “General“ option with |
/ . |
|
3. |
Press |
to call up the second level. |
|
4.Select the “Auto Programming“ option with / .
5. |
Press |
to call up the third level. The country |
||
|
option is highlighted. |
|
|
|
6. |
Select a country with |
/ |
and press . |
|
|
The “Start Search“ symbol is highlighted. |
|||
7.Press OK to start the program search.
The tuner cycles automatically through all available channels and transfers all programs found to the tuner‘s memory.
|
|
|
|
|
|
|
|
|
|
|
|
|
|
|
Auto Programming |
|
|
|
Germany |
|
|
|
|
|
|
Program Edit |
|
|
|
|
|
|
|
|
|
|
|
|
|
Stop |
|
|
|
|
|
|
|
|
|
|
|
|
|
|
|
|
|
|
Clock Set |
|
|
|
|
|
|
|
|
|
|
TV Aspect |
|
|
|
|
|
|
|
|
|
|
Searching 11% |
||||||
|
|
|
|
Display Mode |
||||||
|
|
|
|
|
|
|
|
|
|
|
|
|
|
|
Decoder at AV1 |
|
|
|
|
|
|
|
|
|
|
PBC |
|
|
|
|
|
|
|
|
|
|
Factory Set |
|
|
|
|
|
|
|
|
|
|
|
|
|
|
|
|
|
|
|
|
|
Power Save Mode |
|
|
|
|
|
|
|
|
|
|
|
|
|
|
|
|
|
Digital Link Plus
If you have connected the DVD recorder to a Loewe TV set with Digital Link Plus or a comparable system from another manufacturer (e.g. EasyLink, Mega Logic, Project 50), the program list will be transferred from the television set to the DVD recorder. This takes place when you register the DVD recorder with the TV set, or when you make any changes to the programs on the TV set (re-sorting, deleting, adding). After a change of this sort, the TV set will ask you to start transferring the changed program list.
The DVD recorder detects a connected TV set with Digital Link Plus or a similar system from another manufacturer and adjusts the DVD recorder accordingly. This means that you cannot search for, delete or sort TV programs on the DVD recorder. The menu items are grayed out; during the automatic search it is only possible to transfer the program information from the TV set. Note that all programs that you receive via aerial or cable must be stored in program numbers 1 to 88 on the TV set.
If the TV set does not ask you to transfer the program information, then start the transfer on the DVD recorder. If your TV set is equipped with Digital Link Plus or with a comparable system from another manufacturer, only carry out program changes on the TV set.
If the TV set that you have connected to the DVD recorder does not have Digital Link Plus or a comparable system, then you should harmonize the DVD recorder and TV set program lists. This will help you to fi nd programs on the TV set and DVD recorder.
17 -
Initial Installation
Preparation
Connect the DVD recorder to the TV set with Digital Link Plus using a SCART connection. See “Connecting to the Television“ on page 14.
Activate Digital Link on the DVD recorder as described on page 17.
Note: If the DVD recorder has got the station from a Loewe television via Digital Link Plus (DLP), the “Edit programme“, “Move“ and “Delete“ functions are blocked and can only be used once more when the station is overwritten again by automatic programming.
Transfer program list
1.Press  .
.
The menu is displayed.
2. |
Select the “General“ option with |
/ . |
|
3. |
Press |
to call up the second level. |
|
4.Select the “Auto Programming“ option with / .
5. Press |
to call up the third level. The country |
||||||||||
|
option is highlighted. |
|
|
|
|
|
|
||||
6. Select a country with |
/ |
and press . |
|||||||||
|
The “Start DLP“ symbol is highlighted. |
||||||||||
|
|
|
|
|
|
|
|
|
|
|
|
|
|
|
|
|
|
|
|
|
|
|
|
|
|
|
|
|
Auto Programming |
|
|
Germany |
|
|
|
|
|
|
|
|
Program Edit |
|
|
|
|
|
|
|
|
|
|
|
|
|
|
|
Start Search |
|
|
|
|
|
|
|
Clock Set |
|
|
|
|
|
|
|
|
|
|
|
TV Aspect |
|
|
|
|
|
|
|
|
|
|
|
Display Mode |
|
|
|
|
|
|
|
|
|
|
|
Decoder at AV1 |
|
|
|
Start DLP |
||
|
|
|
|
|
|
|
|
|
|
|
|
|
|
|
|
|
PBC |
|
|
|
|
|
|
|
|
|
|
|
Factory Set |
|
|
|
|
|
|
|
|
|
|
|
|
|
|
|
|
|
|
|
|
|
|
|
Power Save Mode |
|
|
|
|
|
|
|
|
|
|
|
|
|
|
|
|
|
|
7.Press OK to start transferring the program list stored in the TV to the DVD recorder.
This may take a few seconds. During the transfer the DVD recorder display shows “DLP“.
Note: (Centros 2172). With Digital Link Plus, French stations are only broadcast in the correct standard if you have previously selected “France“ as the country (see Point 6 above).
Channel Setting
You can edit a channel manually (add, delete, rename, move etc.).
Auto Programming
 Program Edit
 Edit
Edit
Clock Set
TV Aspect
Display Mode
Decoder at AV1
PBC
Factory Set
Power Save Mode
1. Press  . The menu is displayed.
2. |
Select the “General“ option with |
/ . |
|
|||
3. |
The “GENERAL“ entry is selected. Press |
to call |
||||
|
up the second level. |
|
|
|
||
4. |
Use |
/ |
to select the “Channel Setting“ |
|||
|
option. Then press |
to move to the third level. |
||||
|
The “Change“ symbol is highlighted. |
|
||||
5. Press OK. The “Program List“ menu is displayed..
|
|
PR |
Ch. |
MFT |
Station |
|
|
|
01 |
C 12 |
0 |
ARD |
|
|
|
02 |
C 23 |
0 |
ZDF |
|
|
|
03 |
C 7 |
0 |
RTL |
|
PR-01 |
Decoder NICAM |
04 |
C 27 |
0 |
SAT1 |
|
05 |
C 17 |
0 |
PRO7 |
|
||
|
|
|
||||
|
|
06 |
C 33 |
0 |
BBC |
|
|
|
07 |
C 34 |
0 |
CNN |
|
|
|
08 |
C 47 |
0 |
ABC |
|
|
|
09 |
C 10 |
0 |
TV5 |
|
|
|
10 |
|
|
|
|
|
|
11 |
|
|
|
|
|
|
|
|
|
|
|
OK |
Select |
Move |
|
Page up/down END Close |
6. Use |
/ |
to select a PR number, and press |
||
OK. All available options that can be used on |
||||
the highlighted program are shown in the bot- |
||||
tom left fi eld. Use |
/ |
to select an option, |
||
and press OK to confi rm.
Program edit
Station Rename
Move
Delete
Decoder on/off
NICAM auto/off
Program edit: Search, channel entry, fi ne tuning.
Station Rename: Change name.
Move: Move a program in the progam list. Delete: Deleting programs from the program list Decoder on/off: Divert program via decoder (“on“).
NICAM auto/off: Switch off NICAM reception (“off“)
7.Press  or
or  , to quit the “Program List“ menu.
Program edit
Alongside automatic programming it is also possible to set and save programs manually.
1. Use |
/ |
to select a program in the “Program |
|||||||
|
List“ menu, and press OK. The options are |
||||||||
|
displayed on the left side of the “Program List“ |
||||||||
|
menu. |
|
|
|
|
|
|
|
|
2. Use |
/ |
to select the “Program Edit“ option |
|||||||
|
and press OK. The “Program Edit“ menu is |
||||||||
|
displayed. |
|
|
|
|
|
|
||
|
|
|
|
|
|
|
|
|
|
|
PR |
Seek |
Ch. |
MFT PAL/SECAM |
|||||
|
|
|
|
|
|
|
|
|
|
3. |
07 |
|
|
C 7 |
|
0 |
SECAM |
|
OK |
|
|
||||||||
|
|
|
|
|
|
|
|
|
|
/ |
|
(left/right): Moves the cursor to the |
|||||||
|
previous or next column. |
|
|
|
|||||
|
/ |
|
(up/down): Changes the settings of the |
||||||
|
current cursor position. |
|
|
|
|
||||
PR: Indicates the programm number (display only)
Seek: Automatically searches for station. Use
/to select the “Seek“ option and then press
 - 18
- 18

Initial Installation
/ . Searching stops when the DVD recorder receives a station.
Channel: Changes the channel number. Use
/to select the “Channel“ option and then
press / .
MFT: Changes the frequency to fi ne-tuning. Use / to select the “Fine“ option and then
press / .
PAL/SECAM (with Centros 2172): Changes the receiver standard. If there is interference with the image, use / to select the “PAL/SECAM“ option and then use / to select “SECAM“ for the SECAM-L standard.
4.Then press OK to confi rm the settings and return to the “Program list“ menu.
Renaming stations
You can give whatever name you like to a station. Names should have a maximum of fi ve characters.
1. Use / to select a programme in the “Programme list“ and press OK. The options are displayed on the left-hand side of the “Programme list“ menu.
2. Use |
/ |
|
to select the “Rename station“ |
|||||||||||||||||||
|
option, and press OK. The “Keypad“ menu is |
|||||||||||||||||||||
|
displayed. |
|
|
|
|
|
|
|
|
|
|
|
|
|
|
|
|
|
|
|||
|
|
|
|
|
|
|
|
|
|
|
|
|
|
|
|
|
|
|
|
|
|
|
|
|
|
|
|
|
|
|
|
|
|
|
|
|
|
|
|
|
|
|
|
|
|
|
|
ABC |
|
|
|
|
|
|
|
|
|
|
|
|
|
|
|
|
|
|
|
|
|
|
|
|
|
|
|
|
|
|
|
|
|
|
|
|
|
|
|||||
|
|
|
|
|
|
|
|
Upper case letter |
|
|
|
|
|
|
|
|
|
|||||
|
|
|
|
|
|
|
|
|
|
|
|
|
|
|
|
|
|
|
|
|
|
|
|
|
|
|
1 |
2 |
3 |
4 |
5 |
6 |
7 |
8 |
|
9 |
0 |
|
|
|
|||||
|
|
|
|
A |
B |
|
C |
D |
|
E |
F |
|
G |
H |
I |
|
J |
|
|
|||
|
|
|
|
K |
L |
|
M |
N |
|
O |
P |
|
Q |
R |
S |
|
T |
|
|
|||
|
|
|
|
U |
V |
|
W |
X |
|
Y |
Z |
|
|
|
|
|
|
|
|
|
|
|
|
|
|
|
|
|
|
|
|
|
|
|
|
|
|
|
|
|
|
|
|||
|
|
|
|
|
|
|
|
|
|
|
|
|
|
|
|
|
|
|
|
|||
|
|
|
|
OK |
|
Cancel |
|
Space |
|
Delete |
|
|
|
|
|
|
|
|||||
|
|
|
|
|
|
|
|
|
|
|
|
|
|
|
|
|
|
|
|
|
|
|
3. Enter a name for the station. Use |
|
|
|
|
to |
|||||||||||||||||
|
select a character and press OK. |
|
|
|
|
|
|
|||||||||||||||
•Upper case letter: Switches the keypad so that only upper case is used.
Lower case letter: Switches the keypad so that only lower case is used.
•Symbols: Switches the keypad to symbol characters.
•ABC...123: Inserts the corresponding character at the cursor position.
•OK: Select this option to end and save.
•Cancel: Select this option to close the menu. Any changes made will be discarded.
•Space: Inserts a space at the cursor position.
•Delete: Deletes the character to the left of the cursor position.
•/ : Moves the cursor to the left or right.
Note: Remote control buttons for keying in a name (all selections must be confi rmed using the remote control‘s OK button).


 : Inserts a space at the cursor position.
 : Deletes the character to the right of the cursor position.
 : Deletes the character to the left of the cursor position.
P+ / P-: Moves the cursor to the left or right. TEXT, INFO: Toggles the keypad between upper case, lower case and symbols.
4.Then press OK to confi rm the settings and return to the “Program list“ menu.
Moving programmes
You can sort the programme positions in the “Programme list“ menu.
1. Use |
/ |
to select a programme in the |
||
|
“Programme list“ and press OK. The options are |
|||
|
displayed on the left-hand side of the “Pro- |
|||
|
gramme list“ menu. |
|
||
2. |
Use |
/ |
to select the “Move“ option, and |
|
|
press OK. |
|
|
|
3. |
Use |
/ |
to select the position you require. |
|
|
Then press OK or |
again in the pro- |
||
|
gramme list to change. |
|
||
Deleting a programme
You can delete a programme from the “Programme list“ menu.
1. Use |
/ |
to select a programme in the “Pro- |
gramme list“ and press OK. |
||
2. Use |
/ |
to select the “Delete“ option, and |
press OK. The programme is deleted. |
||
Decoder on/off |
||
1. Use |
/ |
to select the programme that you |
wish to reroute via the decoder and press OK. The options are displayed on the left-hand side of the “Programme list“ menu.
2. Use / to select the “Decoder on/off“ option, and press OK. When you select “on“, “Decoder“ appears under the program shown in the small picture.
19 -
Initial Installation
NICAM auto/off
This DVD recorder can receive Hi-Fi sound transmissions in NICAM Stereo. Bad reception can however cause distortion. You can switch the function off (“off“).
1. Use |
/ |
to select a program in the “Program |
List“ menu, and press OK. The options are |
||
displayed on the left side of the “Program List“ |
||
menu. |
|
|
2. Use |
/ |
to select the “NICAM auto/off“ |
option from the program list and press OK. If you select “auto“, “NICAM“ appears under the program shown in the small picture.
Setting the Clock
If the automatic channel search is fi nished, the date and time will also be set automatically (depending on the broadcasting station), the same is true when the power supply returns after a power cut or after the mains cable has been unplugged. The “Automatic“ option must be set to enable this.
Auto Programming |
|
|
|
|
|
|
Program Edit |
|
|
|
|
|
|
|
|
|
|
|
|
|
Clock Set |
|
Automatic |
|
|
||
TV Aspect |
|
Manual |
|
|
|
|
Display Mode |
|
|
|
|
|
|
Decoder at AV1 |
Date |
- - |
/ |
- - |
|
|
Year |
|
|
|
|
||
|
|
|
|
|
||
PBC |
- - - - |
|
|
|||
|
|
|
|
|
|
|
Factory Set |
Time |
|
: |
|
|
|
- - |
- - |
|
||||
Power Save Mode |
|
|
|
|
|
|
|
|
|
|
|
|
|
1.Press  .
.
The menu is displayed.
2. |
Select the “General“ option with |
/ |
. |
|
3. |
Press |
to call up the second level. |
|
|
4. |
Select the “Clock“ option with |
/ |
. |
|
5. |
Press |
to call up the third level. |
|
|
6. Press / to select the “Automatic“ option and then press OK.
7. Press  , to quit the menu.
Note: Check whether the automatic year and date setting is correct. If necessary they must be set manually.
Manual Setting of the Date / Time
It is possible that the television station may broadcast incorrect date and / or time information or no information at all and that the DVD recorder sets the incorrect time. If this is the case we recommend that you set the clock manually.
1.Follow steps 1 - 5 as described above (Automatic Clock Setting).
2. Use |
/ |
to select the “Manual“ option and |
|||||||
then press OK. |
|
|
|
|
|
|
|||
|
|
|
|
|
|
|
|
|
|
|
|
|
Auto Programming |
|
|
|
|
|
|
|
|
|
|
|
|
|
|
|
|
|
|
|
Program Edit |
|
|
|
|
|
|
|
|
|
Clock Set |
|
Automatic |
|
|
||
|
|
|
TV Aspect |
|
|
|
|
|
|
|
|
|
|
Manual |
|
|
|||
|
|
|
Display Mode |
|
|
|
|
|
|
|
|
|
Decoder at AV1 |
Date |
- - |
/ |
- - |
|
|
|
|
|
Year |
|
|
|
|
||
|
|
|
PBC |
- - - - |
|
|
|||
|
|
|
Factory Set |
Time |
|
|
|
||
|
|
|
- - |
: |
- - |
|
|||
|
|
|
Power Save Mode |
|
|
|
|
|
|
|
|
|
|
|
|
|
|
|
|
3.Then enter the necessary date and time information.
/(left/right): Moves the cursor to the previous or next column/line.
/(up/down): Changes the setting at the current cursor position.
4.You can return to the 2nd level by pressing OK or you can close the menu with  .
.
TV Aspect
You can choose:
-4:3: Select this setting if a television set with 4:3 picture format is connected.
-16:9: Select this setting if a widescreen television set with 16:9 picture format is connected.
Auto Programming |
|
Program Edit |
|
Clock Set |
|
TV Aspect |
4:3 |
Display Mode |
|
16:9 |
|
Decoder at AV1 |
|
PBC
Factory Set
Power Save Mode
 - 20
- 20
Initial Installation
Screen Mode
The screen mode setting is only available if the TV aspect of the television is set to 4:3. You can choose:
- Letter Box:
- Pan Scan:
|
|
|
|
Auto Programming |
|
|
|
|
|
|
|
|
|
|
|
|
|
Program Edit |
|
|
|
|
|
|
|
|
|
|
|
|
|
Clock Set |
|
|
|
|
|
|
TV Aspect |
|
|
|
|
|
|
Display Mode |
|
Letter Box |
|
|
|
|
|
|
|
|
|
|
|
Decoder at AV1 |
|
Pan Scan |
|
|
|
|
PBC |
|
|
|
|
|
|
Factory Set |
|
|
|
|
|
|
|
|
|
|
|
|
|
Power Save Mode |
|
|
|
|
|
|
|
|
|
Decoder at AV1
We have already described how to connect a decoder on page 15. If you also want to use an analog decoder for you TV set (programs to be decoded are sent via the DVD recorder to the decoder) you must set “Decoder at AV1“ to “On“. If it is set to “Off“ the decoder is only available to the DVD recorder.
Auto Programming |
|
Program Edit |
|
Clock Set |
|
TV Aspect |
|
Display Mode |
|
Decoder at AV1 |
|
OFF |
|
PBC |
ON |
Factory Set |
|
Power Save Mode |
|
Playback Control - PBC
VCD, SVCD
If a VCD (or SVCD) contains playback control (PBC) features and if “PBC“ in the menu is set to “On“, then the disc playback is controlled via the menu contained on the disc. Otherwise the VCD is played in the same way as an audio CD.
Auto Programming |
|
Program Edit |
|
Clock Set |
|
TV Aspect |
|
Display Mode |
|
Decoder at AV1 |
|
PBC |
OFF |
Factory Set |
ON |
Power Save Mode |
|
Factory Settings
If required you can restore all the factory settings on the recorder. Select the “Execute“ symbol and press OK.
Note: Some options cannot be reset (security rating, password and country code, program list, timer list).
Auto Programming
Program Edit
Clock Set
TV Aspect
Display Mode
Decoder at AV1
PBC
 Factory Set Set
Power Save Mode
Power saving mode
You can set the recorder so that it consumes < 1 Watt on standby. In the “On” position the VPS Timer, the decoder signal transmission from AV2 to AV1 and “Digital Link Plus” is switched off (no recording from the TV possible).
Language Menu
Menu Language
Select a language for the menus and dialogs displayed by the DVD recorder.
|
|
|
|
Display Menu |
|
|
|
|
|
|
|
English |
|
|
|
|
|
Disc Menu |
|
Deutsch |
|
|
|
|
|
||
|
|
|
|
Disc Audio |
|
Français |
|
|
|
|
|||
|
|
|
|
Disc Subtitle |
|
Italiano |
|
|
|
|
|
|
Español |
|
|
|
|
|
|
Nederlands |
|
|
|
|
|
|
|
|
|
|
|
|
|
|
|
|
|
|
|
|
|
Disc Languages
Select a language for the disc‘s menu, audio and subtitles.
|
|
Display Menu |
Original |
|
|
Disc Menu |
English |
|
|
German |
|
|
|
Disc Audio |
|
|
|
||
|
|
French |
|
|
|
Disc Subtitle |
|
|
|
|
|
|
|
|
Italian |
|
|
|
Spanish |
|
|
|
Dutch |
|
|
|
Portuguese |
|
|
|
Swedish |
|
|
|
Others - - - - |
These are presettings and, if available, are set after inserting the disc. Otherwise the “Original“ version of the disc is used.
- Original: |
The original language of the disc |
|
is selected. |
- Others: |
To select another language, select |
|
“Other“ and press OK. Use the |
|
number keys and the OK button |
|
to enter the appropriate four-digit |
|
number in agreement with the |
|
language code on page 65. If you |
|
input the code incorrectly, press |
21 -
Initial Installation
repeatedly to delete the entry character by character and then correct it before you press OK.
Audio Menu
Each DVD disc offers a variety of audio
formats. Set the audio format for the recorder according to the type of audio system you are using.
Dolby Digital / DTS / MPEG
PCM: Select this option if the unit is connected to a digital two channel stereo amplifi er. The DVD
recorder‘s digital audio outputs emit sound in PCM 2 channel format if you play a DVD-Video disc with Dolby Digital audio format.
Bitstream: Select “Bitstream“ if you have a Dolby Digital decoder (or amplifi er, a Loewe TV with AC3 or DIS module or another unit with Dolby Digital decoder) connected to the DIGITAL OUT socket of the DVD recorder.
Off: If you select “Off“ the DTS signal is not emitted from the DIGITAL OUT socket.
|
|
|
|
Dolby Digital |
|
PCM |
|
|
|
|
DTS |
|
|
|
|
|
|
|
Bitstream |
|
|
|
|
|
MPEG |
|
|
|
|
|
|
|
|
|
|
|
|
|
Sampling Freq. |
|
|
|
|
|
|
DRC |
|
|
|
|
|
|
|
|
|
|
|
|
|
Vocal |
|
|
|
|
|
|
|
|
|
|
|
|
|
|
|
|
|
|
|
|
|
|
|
Sampling Frequency
If your receiver or amplifi er is NOT designed for 96 kHz signals, select 48 kHz. If you have made this selection, the unit automatically converts the 96 kHz signals to 48 kHz signals that the system can decode. If your receiver or amplifi er is designed for 96 kHz signals, select 96 kHz.
|
Dolby Digital |
|
|
DTS |
|
|
MPEG |
|
|
|
|
|
|
|
|
Sampling Freq. |
48KHz |
|
DRC |
96KHz |
|
Vocal |
|
Night Mode
Thanks to digital audio technology the DVD format enables you to hear soundtracks in the most accurate and realistic way possible. However, you may wish to limit the dynamics (i.e. the difference between the loudest and the quietest sounds). In this way you can play a fi lm with minimum volume differences. For this purpose switch “Night Mode“ to “On“.
Dolby Digital |
|
DTS |
|
MPEG |
|
Sampling Freq. |
|
DRC |
OFF |
Vocal |
ON |
Karaoke Audio
Switch the singing option (karaoke audio) on, if you want to play a multi-channel karaoke DVD. The karaoke channels on the disc are mixed into normal stereo sound.
Dolby Digital |
|
DTS |
|
MPEG |
|
Sampling Freq. |
|
DRC |
|
Vocal |
OFF |
|
ON |
Lock Menu
Films on DVD can contain scenes that are
not suitable for children. For this reason discs can contain child protection information that applies to the whole disc or only to certain scenes on the disc. The ratings are country-dependent.
The child lock function enables you to prevent your children watching certain discs or scenes.
Password
Changing the 4-digit code
|
|
|
|
Set Password |
Change |
|
|
|
|
|
|
|
New Password |
||||
|
|
|
|
Rating |
Delete |
|||
|
|
|
|
|
|
|
||
|
|
|
|
Country Code |
|
|
|
|
|
|
|
|
|
|
|
|
|
|
|
|
|
DivX(R) VOD |
|
|
|
|
|
|
|
|
|
|
|
|
|
|
|
|
|
|
|
|
|
|
|
|
|
|
|
|
|
|
|
|
|
|
|
|
|
|
|
|
|
|
|
|
|
|
|
|
|
|
|
|
|
|
|
|
|
|
1. |
Press |
. The menu is displayed. |
|
2. |
Select the lock option with |
/ . |
|
 - 22
- 22
 Loading...