


Bild 3.55
Loewe bild 3
TV
bild 3.55
bild 3.48
bild 3.40
Instruction manual

Loewe bild 3
Instruction Manual
Table of contents
Welcome! .......................................................................................3
Scope of delivery .......................................................................................... 3
Imprint ............................................................................................................ 3
About this instruction manual ....................................................................3
For your safety ..............................................................................4
Technical information .................................................................................. 5
Remote control button mapping ................................................6
english
Operating controls on the TV set ............................................... 7
Connections rear side of the device ..........................................8
Preparing the TV set ....................................................................9
Installing the TV set ...................................................................................... 9
Set covers ...................................................................................................... 9
Cable fixing .................................................................................................... 9
Connecting the TV set ................................................................................. 9
Switching the TV set ON/OFF .................................................................. 10
General information on the operation ...................................... 11
On-screen displays ..................................................................... 13
Explanation of keys ......................................................................................13
Explanation of symbols ..............................................................................13
Automatic menu info ..................................................................................13
Permanent clock display ............................................................................13
Initial installation ....................................................................... 14
Home view ................................................................................... 15
Home view - Favourites ..............................................................................15
Video ............................................................................................28
Video playback ............................................................................................ 29
Additional functions for DR+ archive playback ......................................30
Audio/Radio ............................................................................... 31
Audio playback ...........................................................................................32
Radio mode (DVB radio) ........................................................................... 33
Radio mode (Internet radio) ..................................................................... 34
Photo ...........................................................................................35
Photo display ............................................................................................... 36
Web ..............................................................................................37
Apps ............................................................................................................. 37
App Gallery ..................................................................................................37
Browser ........................................................................................................38
System settings ........................................................................ 39
Functions....................................................................................40
Timer ............................................................................................................40
Software update ..........................................................................................41
Miscellaneous ............................................................................ 42
Conditional Access module (CA module) ...............................................42
Asterisk key function .................................................................................. 42
Integrated features .....................................................................................43
Documentation ...........................................................................................43
Conformity / Manufacturer’s declaration ............................................... 43
VESA standard ............................................................................................43
Technical data ........................................................................... 44
TV ................................................................................................. 16
Setting the volume ......................................................................................16
Select station ...............................................................................................16
Status display ...............................................................................................18
Function list (TV mode) ..............................................................................19
Sources .........................................................................................................19
Electronic Programme Guide – EPG........................................................20
Picture in Picture (PIP) ................................................................................21
Teletext ......................................................................................................... 22
HbbTV / MediaText .................................................................................... 23
Recordings ................................................................................. 24
Digital Recorder ..........................................................................................24
TV viewing with time shift ....................................................................... 24
Archive recording ..................................................................................... 24
DR+ archive .............................................................................................. 26
DR+ Streaming ........................................................................................27
Follow-Me function .................................................................................. 27
Environment .............................................................................. 45
Legal information ...................................................................... 45
Index ........................................................................................... 46
Service .........................................................................................47
2

Loewe bild 3
Instruction Manual
Welcome!
Thank you,
for choosing a Loewe product and having placed your trust in us.
With Loewe you have not simply decided on a modern and technically
innovative TV set, but for timeless design, sharp picture quality, brilliant
sound for movies and music as well as intuitive operation with the
Loewe remote control unit, smart phone or tablet. In short, Loewe is
perfect for home entertainment – made in Germany.
This instruction manual gives you a short overview of all functions
and features of your new Loewe TV set. A detailed user manual file
can be downloaded via the support portal of the Loewe homepage:
www.loewe.tv/int/my-loewe.
We look forward to welcome you as our customer and hope that you
enjoy your Premium Home Entertainment Made by Loewe.
Many features, one result:
perfect Home Entertainment.
Just more entertainment.
The Loewe os user interface is intuitive and graphically
optimised. This is how you quickly find your desired content
– from TV set to online.
In the user guide refer to Home view.
About this instruction manual
For best results regarding safety and the longevity of the set, we
recommend you read the chapter For your safety before switching
it on for the first time.
Paragraphs which begin with the symbol
instructions, tips or conditions for the following settings. Terms which
you will find in the menus or printed on the remote control or TV set
are written in bold type.
The necessary control elements are shown in the descriptions to the
left of the text containing the instructions for action.
Depending on the connected accessory equipment the menus in the
TV set can differ from those described here.
All the station names, programme contents, the illustrated photos, titles, albums and album covers in this instruction manual are examples.
In addition to the remote control, a PC keyboard can be connected to
one of the USB ports on your TV and then used to control your TV set.
In the instruction manual, this symbol indicates places
in which the use of a keyboard is particularly advantageous.
The user guide and the user manual for your TV set are updated at
irregular intervals. We recommend an occasional examination on the
Support Portal of the Loewe homepage (see chapter Miscellaneous,
section Documentation).
indicate important
english
Perfectly networked.
Thanks to its numerous connections, your Loewe TV
becomes your entertainment centre. Connect it to the
Internet, DVD/Blu-ray player, external speakers, etc.
Hard disk for your TV archive.
Record the TV programme on an externally connected hard
disk or pause it and continue watching it at a later date.
With DR+ (Digital Recording), all this is no problem for your
Loewe TV set.
In the instruction manual refer to Recordings.
Customer
Your contact person.
Care
We are happy to help you with any questions regarding your
Center
TV set and other Loewe products.
In the user guide refer to Service.
Scope of delivery
LCD TV set
Mains cable
Antenna cable
Remote control Assist incl. two batteries
Adhesive cable tie
Instruction manual
Installation instructions for the setup solution
Table Stand bild 3
Tool kit for mounting the set-up solution
General information on the operation of the
TV set
For further information on the user interface and the general operation
of your TV set see chapter General information on the operation.
Interactive data services
In some countries the stations also broadcast interactive data services
with their programmes, leading to the functions of individual keys not
being available or only so to a limited extent. You can find out more
about this in chapter TV, section HbbTV / MediaText.
Important information
Loewe does not accept any liability for the nature and content of
receivable Internet services. This also applies to the Loewe MediaNet
portal. With its devices, Loewe provides the technical platform that
fundamentally enables such material to be received. Loewe cannot
make any guarantees regarding changes in scope and content,
particularly with regard to the future and after going to press. The
receivable online services are not included in the delivery and can vary
depending on the product and country.
Imprint
Loewe Technologies GmbH
Industriestraße 11
D-96317 Kronach
www.loewe.tv
The screen graphic displayed is only an example. Depending on the
device type, the available hardware/software components may be
different. All rights including translation, technical modifications and
errors reserved.
Printed in Germany
Editorial date 09/16-10.0 PS
©
Loewe Technologies GmbH, Kronach
ID: 4.0.38.0
3
Loewe bild 3
Instruction Manual
For your safety
For your safety, and to avoid unnecessary damage to your unit,
please read and follow the safety instructions below:
Intended use and ambient conditions
This TV set is intended exclusively for receiving and playing visual and
audio signals. The TV set is designed for dry rooms (living rooms and
offices). It must not be operated in rooms with high humidity (for
example bathroom, sauna).
Please note that our TV sets are sensitive to dust and sooty particles
in the ambient air.
english
Excessive environmental pollutions of this kind can lead to damage of
the device up to a malfunction.
Pay attention to a clean ambient air, so that your device is not damaged.
Behind the panel plate of the LCD TV set, soot and dust deposits may
appear without a soot generating source being visibly present. Such
soot and dust deposits are also referred to as „fogging“ or „magic
dust“. This phenomenon occurs sporadically, but in particular during
the heating period and after renovations and in new buildings. As a
cause for this, various factors are mentioned, see also reports on the
Internet.
The cleaning or replacement of the panel is excluded from the warranty
claims in such cases, because it is not a defect of the device, but an
external influence.
If the unit is used outdoors, make sure that it is protected from
moisture (rain, dripping water and splashing water or dew). High humidity and dust concentrations lead to leakage currents in the device. This
can result in a shock hazard when touching it or even fire.
If you have moved the unit out of the cold into a warm environment,
leave it switched off for about an hour to avoid the formation of condensation.
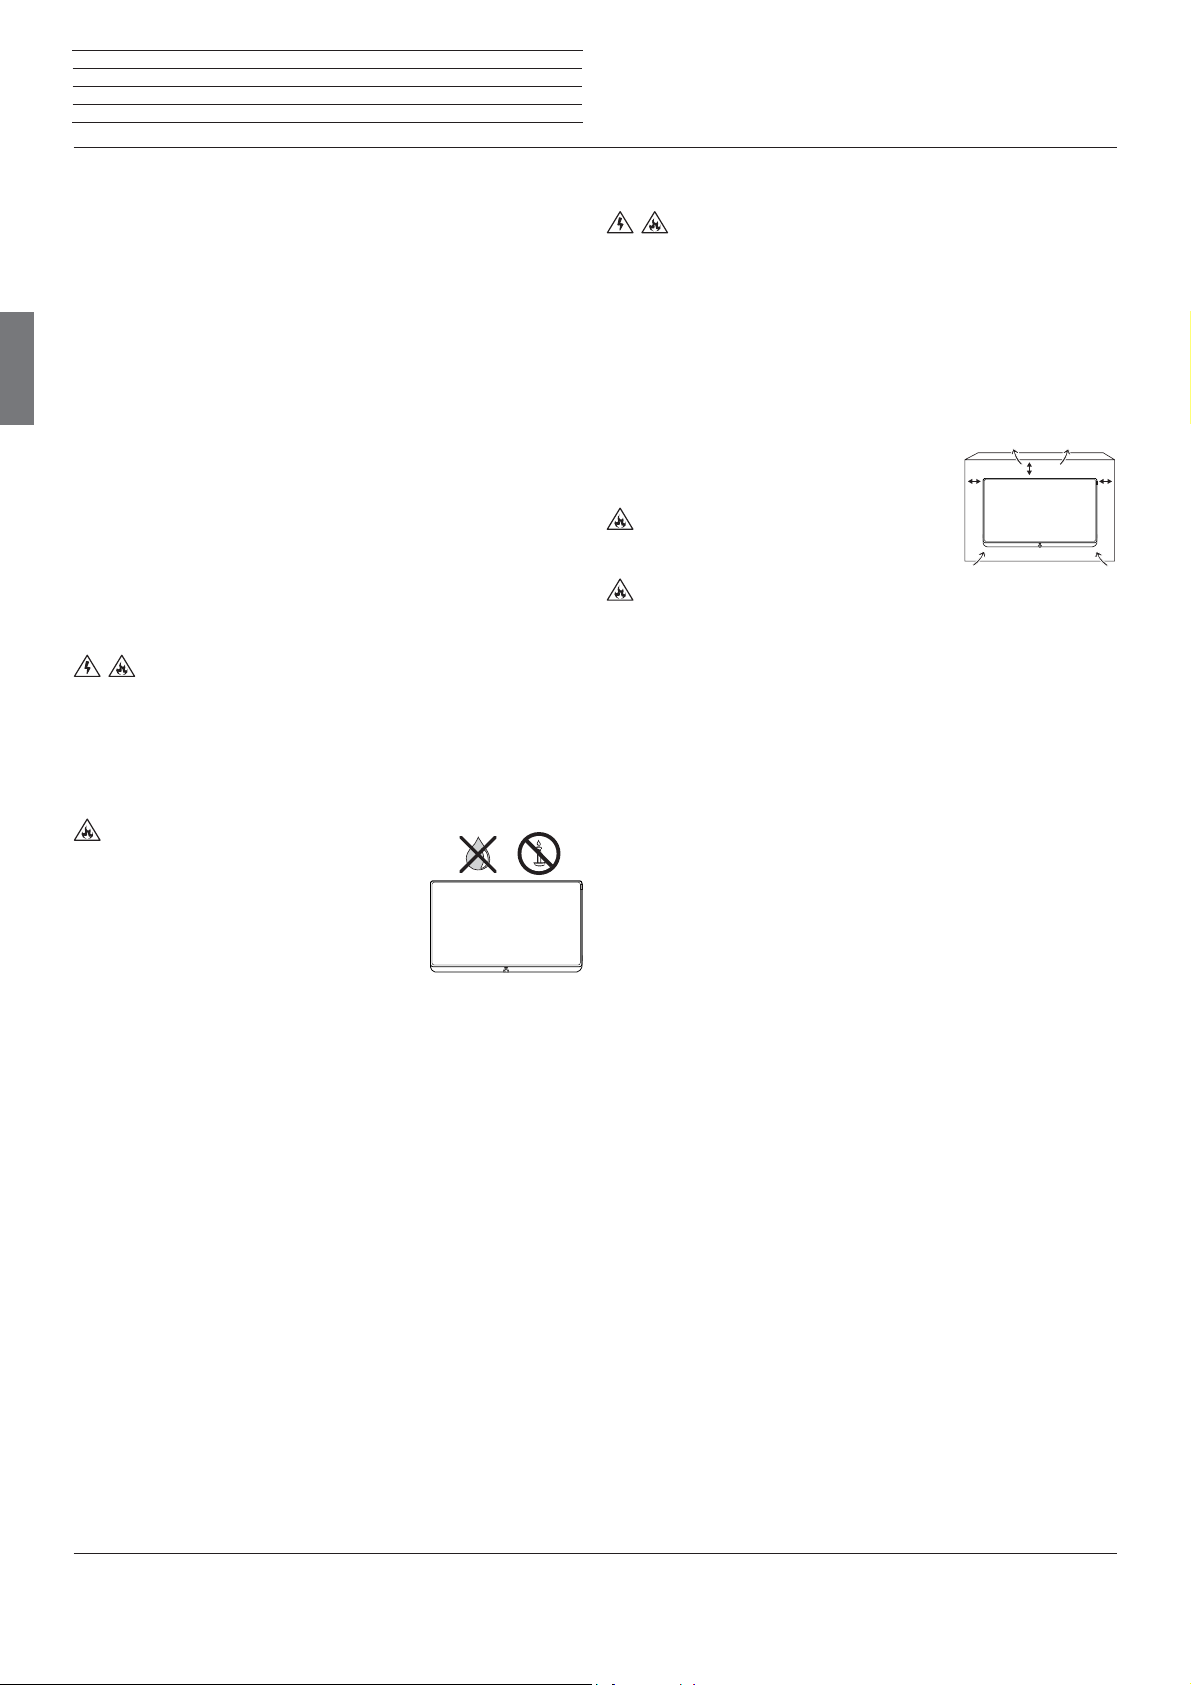
Do not place objects containing liquids on
top of the unit. Protect the appliance against
dripping and splashing water.
Candles or naked flames must be kept away from
the TV set at all times to prevent it from catching
fire.
Never place the TV set in a location where it is
exposed to vibrations. This may lead to damage.
Transporting
Move the device in vertical position only. Get hold of the device on the
upper and lower edges of the housing.
Do not stand it up on the bottom edge, so as to reduce the risk of
damage and soiling. If the set has to be put down during packing/
unpacking, place the TV set with its entire front surface lying flat on
soft material. Use a blanket or the fleece from the packing material as
an underlay.
The LCD screen is made of glass or plastic and can break if not handled
properly.
Always wear rubber gloves to carry the TV set if the LCD screen is
damaged and liquid crystal might be leaking out. In the case of skin
contact immediately rinse thoroughly with water.
Power supply
Incorrect voltages can damage the unit. This device may only be
connected to a power supply with the voltage and frequency indicated
on the type plate using the supplied mains cable. The mains plug of the
TV set must be easily accessible so that the device can be disconnected
from the mains at any time. When unplugging the unit from the mains,
pull at the connector body and not at the cable.
The cables in the mains plug could otherwise be damaged and could
cause a short-circuit when plugged in again.
Lay the mains cable so that it cannot be damaged. Do not
step on the mains cable. The mains cable may not be kinked or laid
over sharp edges nor be exposed to chemicals; the latter also applies
to the unit as a whole. A mains cable with damaged insulation can
cause electric shocks and poses a fire risk.
Air circulation and high temperatures
The vent slots on the rear panel of the set must always be kept
unobstructed. Please do not place newspapers or cloths on/over the
TV set.
Make sure that there is at least 10 cm free space
on the sides and above the set for air circulation,
10 cm
10 cm
10 cm
if the set is placed in a cabinet or on a shelf.
Like any electronic device, your TV set requires air for cooling. Obstruction of the air circulation can cause fires.
Prevent metal items, needles, paper clips, liquids, wax, or similar
items, from getting into the interior of the device through the vent slots
in the rear panel. Such objects can cause short circuits in the set,
which could possibly cause a fire.
If something should get into the interior of the set then immediately
unplug the mains plug of the device and contact the field service for
more information.
About the LCD screen
The TV set with LCD screen you have purchased satisfies the most
rigorous quality requirements and has been inspected with respect
to pixel errors. Despite of thorough care when manufacturing the
display, it cannot be 100% guaranteed that no subpixel defects will
occur due to technical reasons. Please understand that these types
of effects, as long as they are within the limits specified in the standard,
cannot be considered as a device defect in terms of the guarantee.
Avoid displaying still images for long periods of time. It is possible that
a copy of the image may remain visible.
TV sets with 3D function
(1
Read the following safety instructions before using the 3D function
of your TV set.
Please use the Loewe 3D TV sets only with the Loewe 3D glasses which
can be purchased as an accessory from your Loewe dealer.
People with a visual disorder may not be able to perceive 3D effects
or may only be able to perceive them to a limited extent. People who
are sensitive to flickering images (e.g. those with epilepsy) should only
use the 3D function after having consulted their doctor.
It might take some time for you to get used to the 3D glasses and
before you can perceive the 3D effects properly.
Stop using the 3D function immediately if you experience any feelings
of nausea, dizziness or malaise when viewing 3D content.
Supervise children whilst they are viewing 3D content, as they can be
particularly sensitive to it.
Allow more time for a break after having watched 3D movies, so that
you are able to relax. Failure to do so could result in headaches, fatigue,
dizziness or malaise.
Position yourself comfortably in front of the 3D TV set and ensure that
you are seated firmly. By doing this, you will avoid any injuries that may
occur due to reacting to extreme 3D content.
Switch off any artificial light sources (e.g., energy saving lamp)
between the TV set and the 3D glasses. These could impair the infrared
reception or the TV picture may flicker as a result.
(1
3D function available on selected models
4
.
Loewe bild 3
Instruction Manual
For your safety
Set-up
Loewe flatscreen TV sets are specified for Loewe accessories. The TV
set is suitable for mounting in many different ways. Note the assembly
instructions regarding the different possible mounting options.
When using accessories from other manufacturers take care that the
TV set can be easily inclined or rotated on the respective mounting
option.
For mounting options from other manufacturers with motor drive,
make sure that the TV set cannot be rotated manually. The use of
mounting options from other manufacturers with locks in certain
positions is generally discouraged.
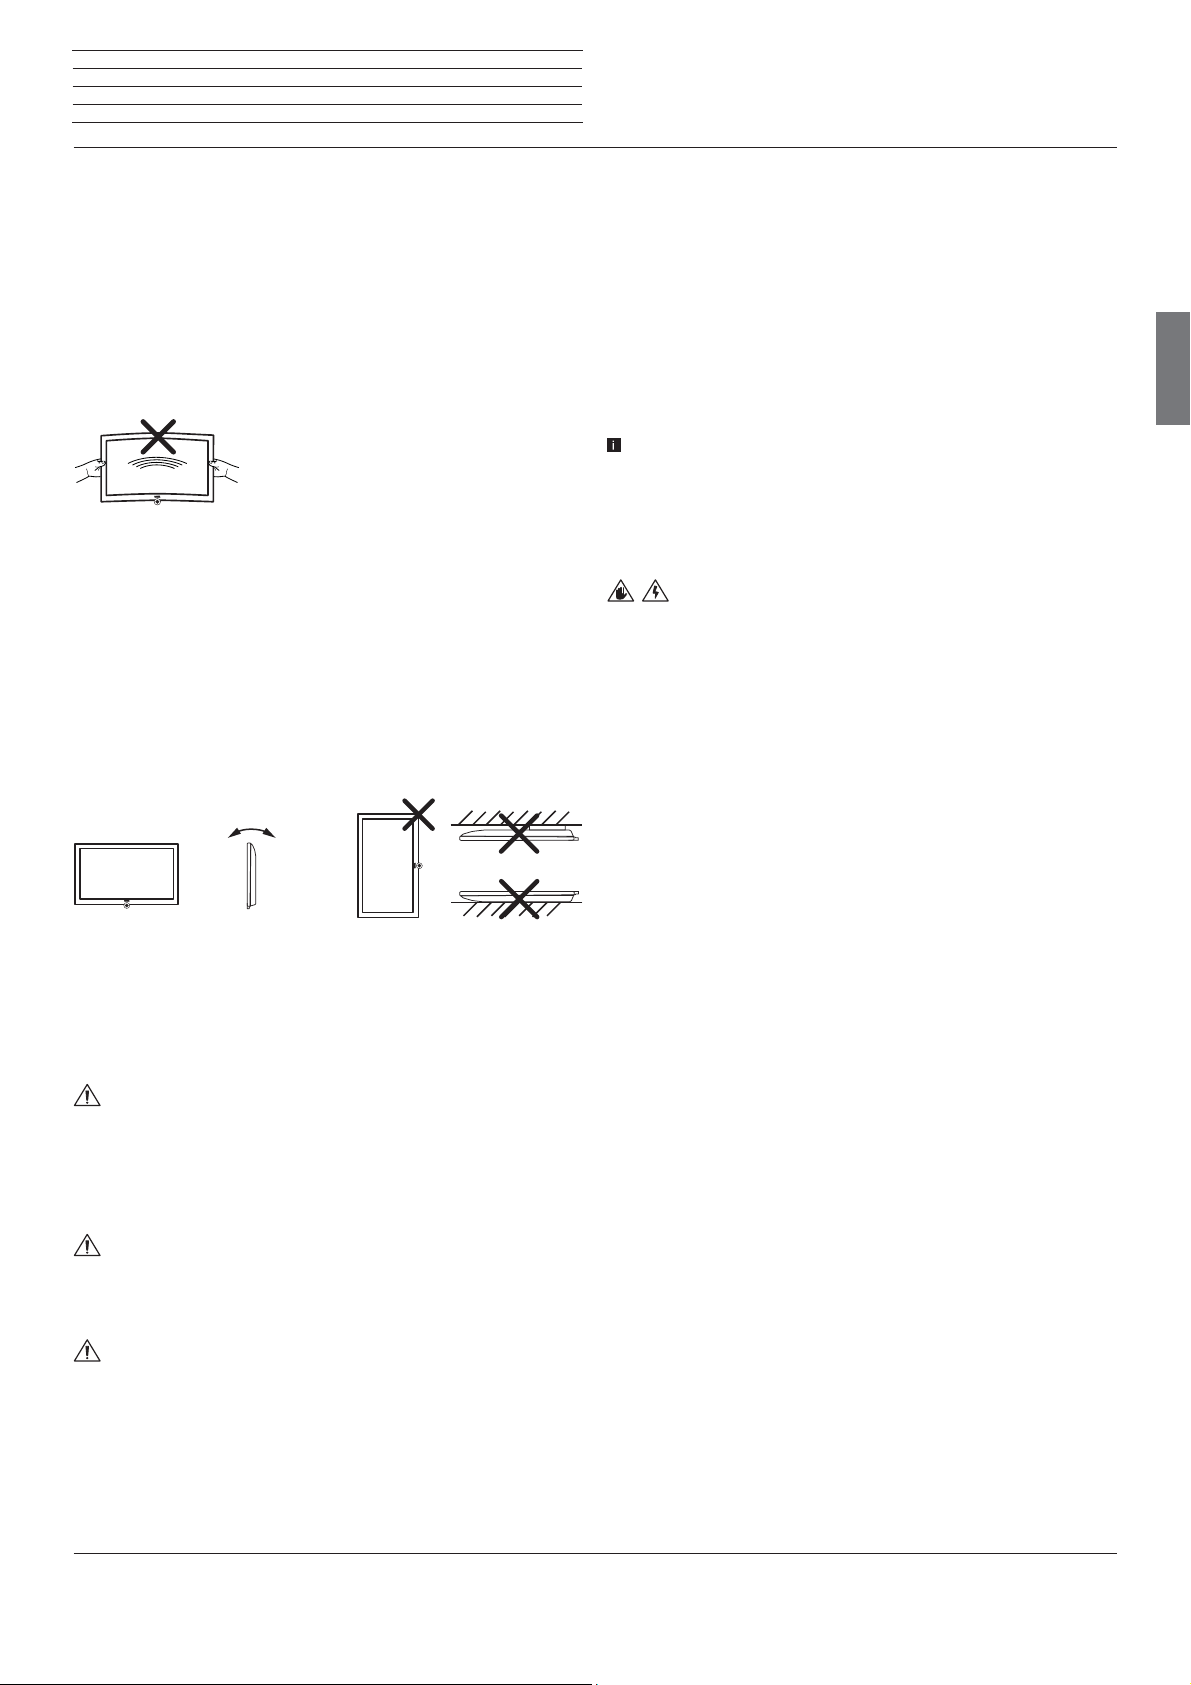
When rotating the TV set it is essential to ensure that the pressure exerted on the device
frame is not too large. Especially in case of
large-format displays there is a risk to damage
the screen.
Before setting up the device, please check that the final location is
suitable to bear the load of the device in terms of surface (sensitivity
to pressure) and stability (statics).
This is particularly the case for the high-gloss painted surfaces and
surfaces that are made from real wood / real wood veneer or plastic
surfaces.
Place the TV set with the table or floor stand only on a level, sturdy,
horizontal base. Particularly ensure that the set does not protrude to
the front when placed in or on pieces of furniture.
Place the TV set in a normal position for use. TV set may only be used
in an upright horizontal position. It may not be tilted by more than 10
degrees. The TV set must never be operated in portrait position, lying
flat or hanging overhead from the ceiling.
±10°
D
Set up the device where it is not exposed to direct sunlight and where
it is not exposed to additional heating by radiators
When using the VESA mounting points, please refer to the information
in chapter Miscellaneous, section VESA standard.
.
Automatic shutdown
If the TV is not operated for 4 hours (adjustment of volume, programme
change, etc.) the TV will automatically switch to stand-by mode to save
energy. A prompt to terminate this shutdown process appears one
minute before expiry of the 4 hours.
The automatic shutdown is active in the energy efficiency mode
Home Mode.
Automatic shutdown does not occur when using the radio without
screen display (screen off).
english
Cleaning and care
Switch off the TV set with the main switch prior to cleaning.
Clean the TV set, the screen, and the remote control unit with a soft,
moist, clean and colour-neutral cloth only, without any aggressive or
scouring cleaning agents.
Repairs and accessories
Never remove the back of the TV set yourself. Have your TV
set repaired or serviced by authorised television technicians only. Only
use original accessories such as Loewe stands, if possible.
Technical information
Switching off the TV set with the mains switch during operation or an
inadvertent disruption to the power supply (e.g. power failure) can
cause damage to the hard disk file system of an externally connected
hard disk and hence loss of the recorded broadcasts.
Before switching off the set with the mains switch, we recommend
you to switch it to standby mode.
However, if unexpected problems occur when operating the hard
disk, formatting the external hard disk may rectify this. You can find
the corresponding menu items under System settings ט Control
ט more...טHard disks.
Loewe are not liable for the loss of data on the hard disk externally
connected to your TV set. To avoid data loss, we recommend copying
important recordings to an additional external storage medium.
Supervision
Do not let children operate the TV set unsupervised and do not
let them loiter and play close to the set. The set could tip over, be
pushed off or pulled down from the stand surface and injure someone.
Do not allow the switched-on TV set to run unattended.
Volume
Loud music can lead to ear damage. Avoid extreme volume
especially over long periods and when using headphones.
Thunder storms
Pull out the mains plug and all connected antenna cables from
the TV set in a thunderstorm. Overvoltage caused by lightning strokes
can damage the set via the antenna system, as well as via the mains.
The mains plug and all connected antenna cables should also be pulled
out during long periods of absence.
5
Loewe bild 3
Instruction Manual
Remote control
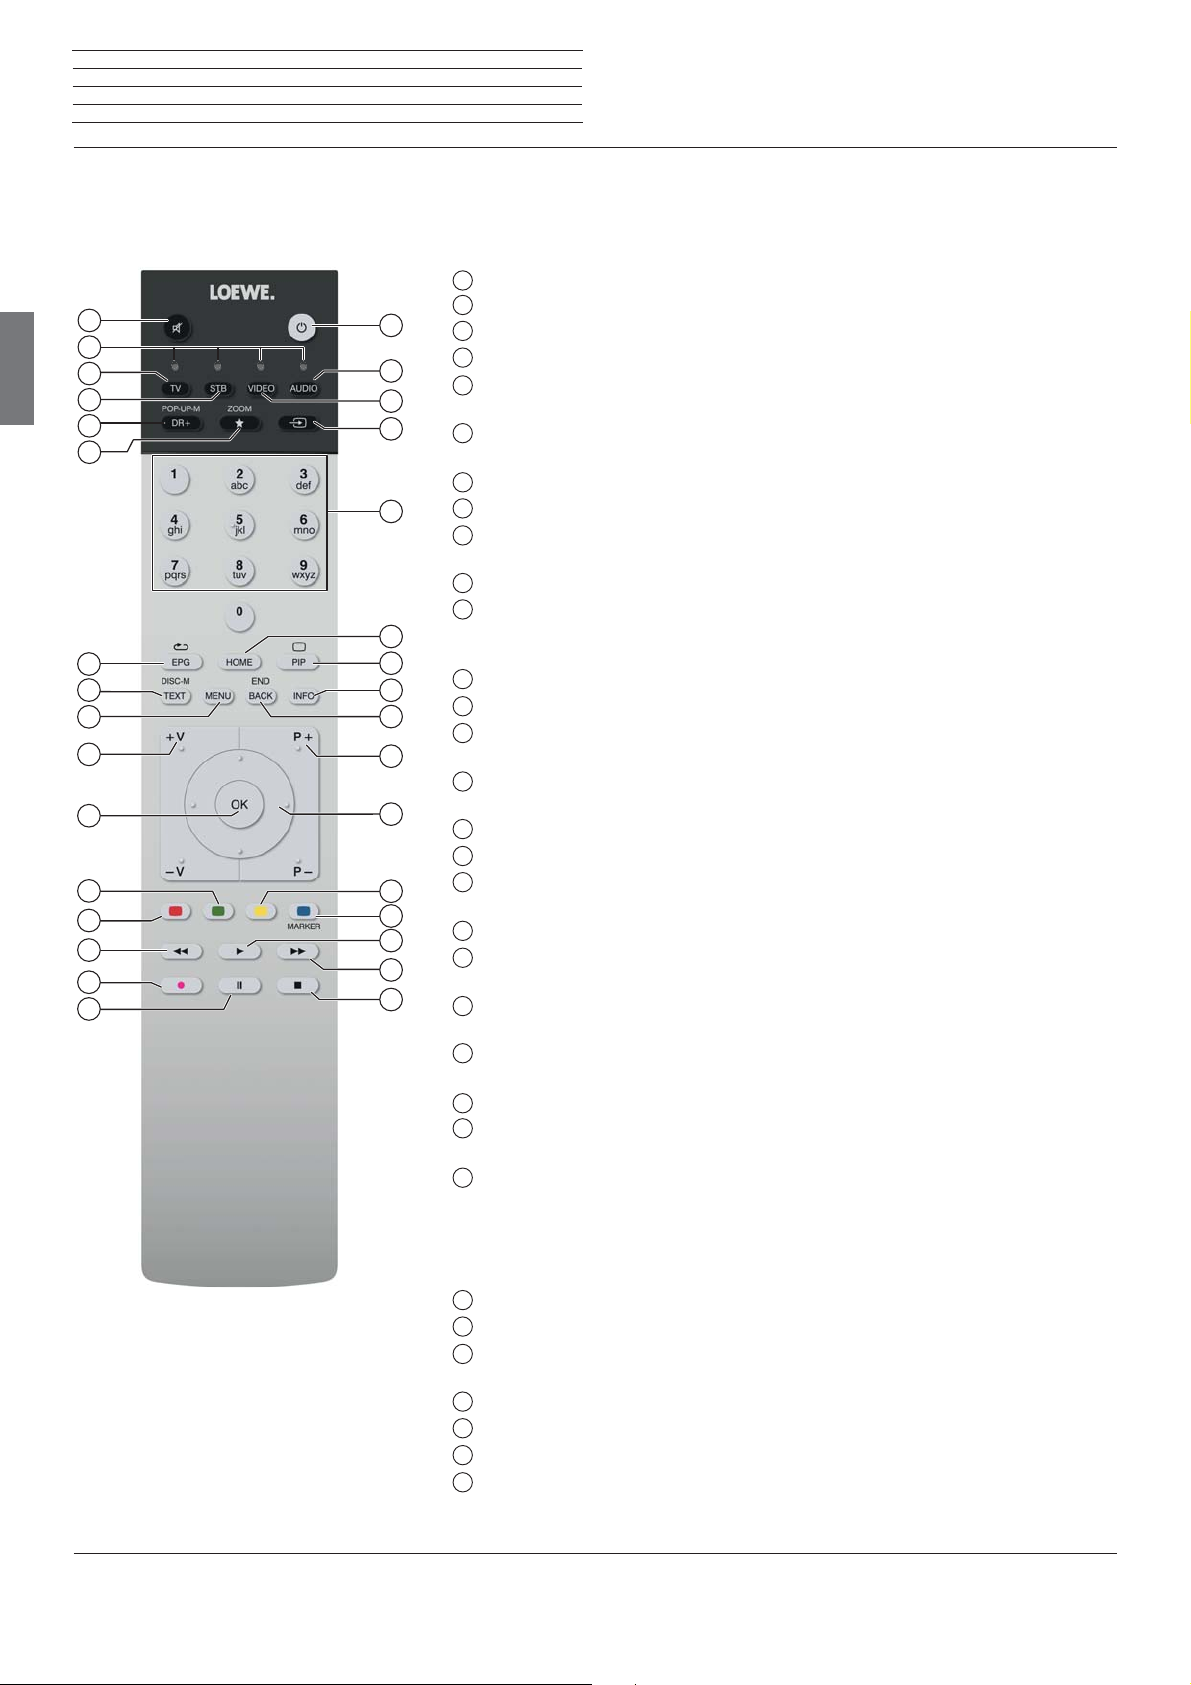
Remote control button mapping
Depending on the selected operating mode (TV/Video/Audio/Photo/Apps) and function (e.g. DR+, EPG, PIP, Teletext, HbbTV, etc.), the key assignment
may differ from the assignment described here (see the corresponding chapter in this user manual).
1
Sound mute/on.
2
LED display for currently operated device.
3
Call the TV mode.
4
Reassign remote control to SetTop-Box
5
Pressing briefly
ressing longer
P
6
Pressing briefly
P
ressing longer
EPG (Electronic Programme Guide) on/off.
7
8
Teletext/MediaText
9
Pressing briefly
P
ressing longer
10
V+/V- increase/reduce volume.
11
Pressing briefly: Call station list.
Pressing longer
: Open the DR+ archive.
: Call timer list.
: Add current object to Home favourites (standard assignment)
: Open App Gallery.
(2
on/off.
: Call function list for the active operating mode.
: Call System settings.
: Call
expanded station list.
(1
(presetting: Apple TV).
In the menu: confirm/call up.
12
Green coloured key: screen on/off in Audio/Radio mode.
13
Red coloured key: call preferred value-added network service, if available
14
Pressing briefly: skip backwards.
(
2
Pressing longer: winding backwards.
15
Pressing briefly: direct recording (with determination of recording duration)
Pressing longer: One Touch Recording
16
Pause / Start/pause the timeshift television
17
Stop / End timeshift (return to live image)
18
Pressing briefly: skip forwards.
(
3
.
(
3
.
(
3
.
Pressing longer: winding forwards.
(
19
Play / Start/continue timeshift television
20
Blue coloured key: call station function list
3
.
(selection of language/sound, subtitles or channel/video track).
21
Pressing briefly: Yellow coloured key: call history.
Pressing longer: Yellow coloured key: call last station.
22
Navigation on the user interface, select objects.
In the menu / lists: select/set.
P+/P– next/previous station.
23
24
Pressing briefly: step / level back.
Pressing long: close all displays.
25
Press briefly during an on-screen display: info display. Info text appropriate to the content
that can assist you further, should you have any questions about your TV set.
Press briefly, without on-screen display: access status display. With status display open
and repeatedly pressing the key call the detailed information on the broadcast.
Press longer: show Explanation of keys.
26
PIP (picture in picture) on/off.
27
Call up the Home view.
28
Select stations with numeric buttons directly.
In the menu: enter numbers or letters
29
Call Sources
30
Reassign remote control to video device
31
Call radio mode (standard assignment) (1.
32
Switches the TV set on (mains switch must be turned on) or switches to standby mode.
(standard assignment)
(1
.
(1
(presetting: BluTech Vision 3D).
Press briefly while TV set is switched on: TV set and all CEC-enabled devices connected to
the HDMI ports will be switched off to standby (System Standby).
english
10
11
12
13
14
15
16
1
32
2
3
4
5
31
30
29
6
28
27
7
8
9
26
25
24
23
22
21
20
19
18
17
(1
.
.
(
3
.
(1
The assignment of these keys can be changed. The description refers to the standard setting. The factory setting of the keys can vary depending on the firmware version of the
remote control.
(2
Depending on the settings HbbTV mode on/off, start behaviour of HbbTV station (System Settings
(3
Only with externally connected USB hard disk.
6
ט
Control
ט
more ... ט HbbTV).
Loewe bild 3
Instruction Manual
Operating controls on the TV set
Preparing the remote control unit
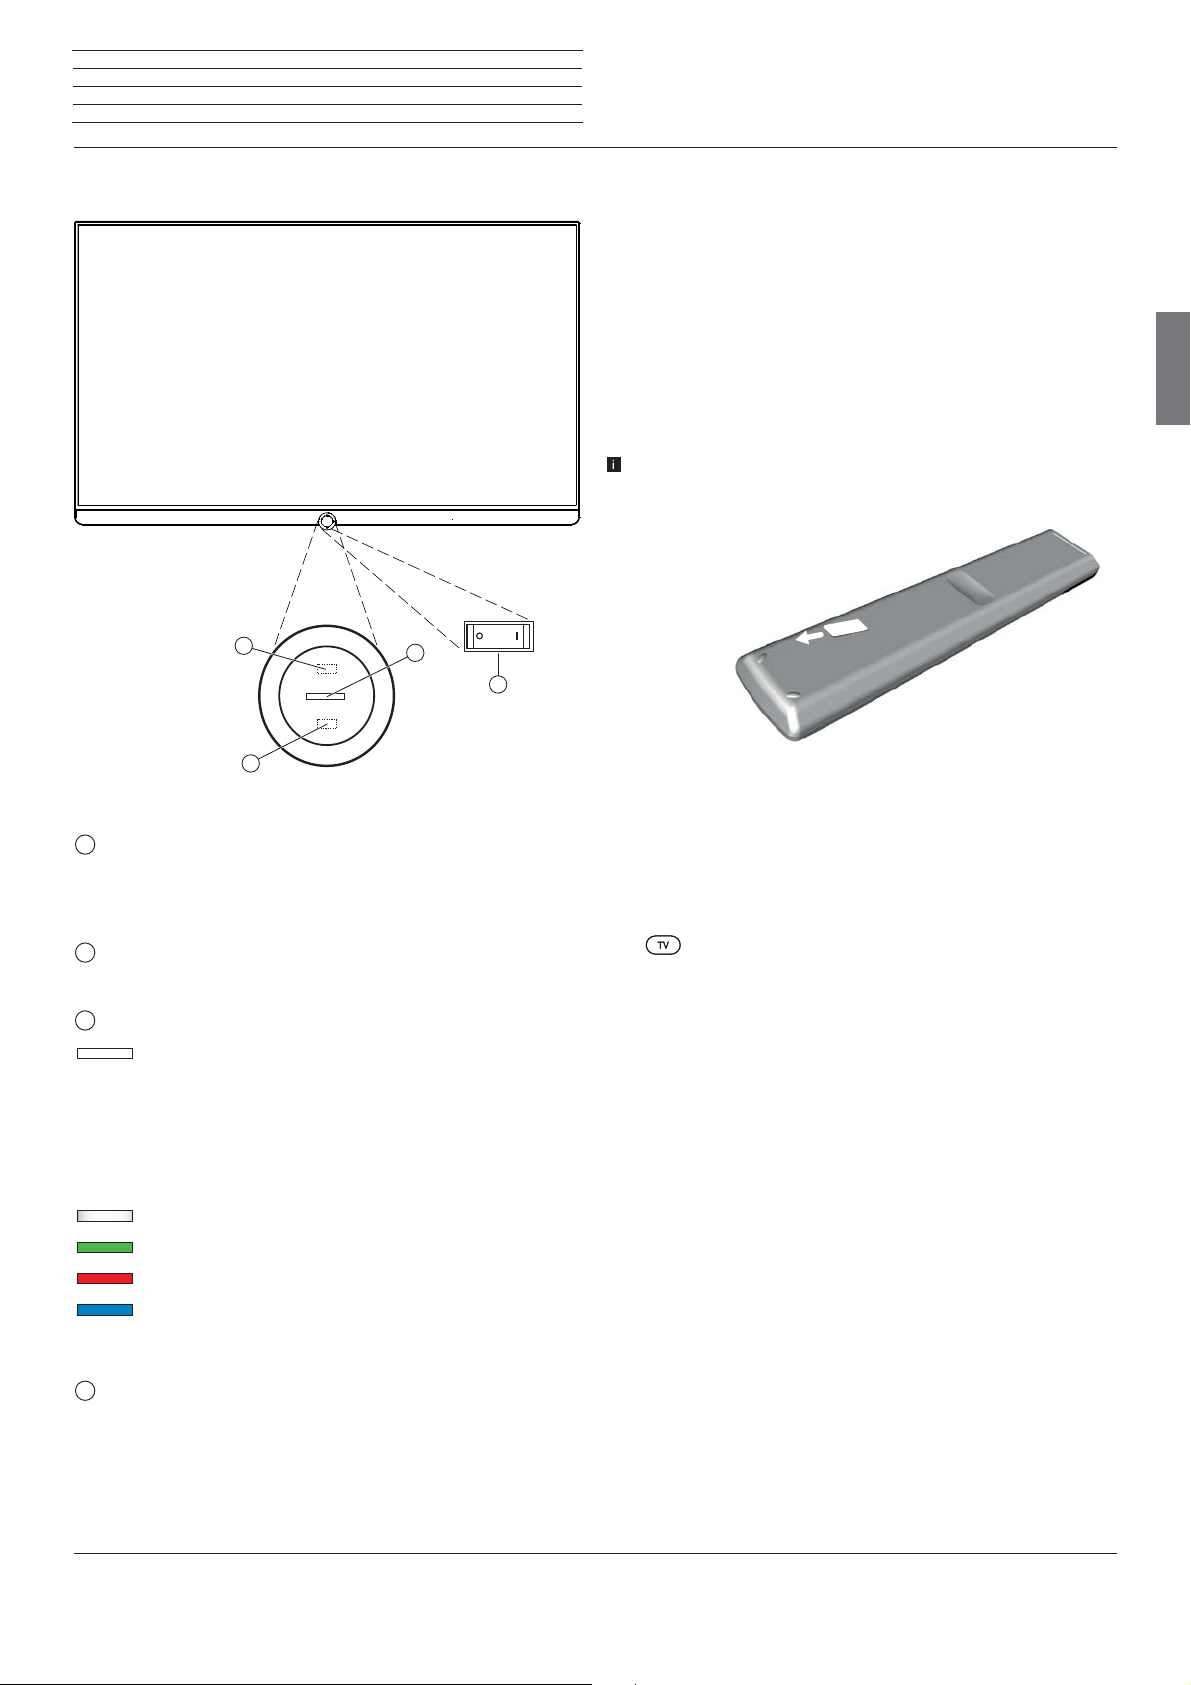
Functions of the operating controls
4
2
3
Preparing the remote control unit
Removing the battery protection
The remote control is supplied with batteries. To make them ready for
use, remove the plastic flag out as shown below.
Inserting or replacing batteries
Press on the embossed arrow whilst pushing the battery cover down.
Only use leak-proof micro-cells of the LR 03 (AAA) Alkali-Manganese
type. Do not use different types of batteries and old and new batteries
together.
The batteries used must not be exposed to excessive heat such as
sunlight, fire or similar!
The position of the batteries is indicated in the battery compartment
(in opposite directions). Pay attention to the correct polarity of +
and – when inserting the batteries.
1
english
1
Mains switch:
The mains switch is located on the bottom of the set.
Always return the TV set to Standby mode before switching it off
with the main switch.
2
IR receiver:
Infrared receiver for receiving the remote control commands.
3
Display:
white: TV set in standby.
Depending on the ambient brightness, the
white LED display is dimmed
(1
and lights
up with a different degree of brightness.
If the TV set is in quick start mode, the
white LED display is not dimmable and
starts with full brightness.
white, intermittent:
TV set starts.
green: TV set switched on.
red: timer recording active.
blue:
TV set in standby and background operation
active (EPG data updating, software
update).
If the batteries are too weak after longer use, the TV set prompts you to
change the batteries. Dispose of used batteries in an environmentally
friendly way (see chapter Environment / Legal information).
Push the cover back on from below after having inserted the batteries.
Adjusting the remote control unit for operating the TV set
Press the TV key.
4
Infrared transmitter:
When showing 3D content
(2
, the 3D glasses Loewe Active
Glasses 3D are controlled via the infrared sensor.
(1
Automatic dimming depending on the room brightness (OPC) must be activated (System settings טPicture טmore ... טAuto dimming).
(2
3D function available on selected models.
7

Loewe bild 3
12
13
11
Instruction Manual
Connections rear side of the device
Position and function of the connections (bild 3.55/48/40)
english
21
20
19
18
17
16
15
14
K
1
1
Slot for Kensington lock
2
AC IN - Mains connection
Mains socket – 220-240 V ~ 50 / 60 Hz
3
LAN - Network connection
RJ-45 – Ethernet / Fast Ethernet
4
HDMI 1 ARC - HDMI input 1 (with Audio Return Channel)
HDMI – Digital Video IN, Audio IN/OUT
HDMI – Digital Video IN (4K@60Hz; 4:2:0)/Audio IN/OUT
5
HDMI 2 - HDMI input 2
HDMI – Digital Video IN, Audio IN
HDMI – Digital Video IN (4K@60Hz; 4:2:0)/Audio IN
6
ANT TV - Antenna/cable analogue /
IEC socket – 75 Ohm / 5 V / 80mA
7
ANT SAT 1 - Satellite antenna (Sat tuner 1) DVB-S/S2
F socket – 75 Ohm / 13/18 V / 500mA
8
ANT SAT 2 - Satellite antenna (Sat tuner 2) DVB-S/S2
F socket – 75 Ohm / 13/18 V / 500mA
9
SPDIF OUT - Audio output (digital)
Cinch socket (orange)
10
USB 3.0 - USB connection
USB type A – USB 3.0 (max. 900mA)
11
DIGITAL AUDIO LINK - Surround audio outputs (digital) – (RJ45)
(1
In case of TV set types bild 3.40 (Full HD).
(2
In case of TV set types bild 3.55/48/40 (Ultra HD).
(3
In case of TV set types bild 3.55/48/40 (DAL). In case of TV set types bild 3.40 (Full HD): No planned DAL variant.
(4
The adaptor is available as an accessory from your dealer.
8
2
3
(1
(1
DVB-T/T2 / DVB-C
4
5
(2
(2
6
12
HEADPHONE - Headphone connection
Jack 3,5 mm – Headphones 32–200 Ohm
13
HDMI 3 - HDMI input 3
HDMI – Digital Video IN, Audio IN
HDMI – Digital Video IN (4K@60Hz; 4:2:0)/Audio IN
14
AUDIO OUT - Audio output (analogue) L/R – (
15
RS-232C - Serial interface (4 – (RJ12)
16
AV - Micro AV socket
Audio/Video IN with Scart adapter:
CVBS (VHS/8 mm)
RGB
Audio/Video IN with VGA adapter:
Component (YPbPr)
17
COMMON INTERFACE - CI slot 1 (standard V1.3)
18
COMMON INTERFACE - CI slot 2 (standard V1.3)
19
HDMI 4 UHD - HDMI input 4
HDMI – Digital Video IN (4K@60Hz; 4:2:0)/Audio IN
20
USB - USB connection
USB type A – USB 2.0 (max. 500mA)
(3
21
USB - USB connection
USB type A – USB 2.0 (max. 500mA)
8
7
9
10
(1
(2
Jack 3,5 mm)
(4
Y/C (S-VHS/Hi 8)
L/R
PC/STB video signal
L/R
(2

Loewe bild 3
Instruction Manual
Preparing the TV set
Installing the TV set
Mounting options / Installation notes
Mount the supplied mounting option. While doing so, look for the
corresponding directions in the installation instruction.
Your Loewe dealer can assist you in finding other mounting options
that suit your needs.
Choose a place for installing your TV set where no bright light or
sunlight shines directly onto the screen. This could cause reflections
which impair the picture.
3 times the screen diagonal can be taken as a guide value for the
viewing distance (e.g., for a 40-inch set approx. 3 m for SD signal). The
viewing distance can be reduced with an HD/UHD signal.
Set covers
Covers for rear and side connections
In order to remove the rear side cable covers simply pull them from
the device.
To fit the cover, insert the lugs at the top edge of the cover into the
corresponding cut-outs in the rear panel and push up the cover until
it snaps in.
The side cover of the TV set can also be completely removed. For this,
open it as far as it will go and gently pull on the open cover.
Connecting the TV set
Connecting to the mains supply
Remove the cover for the connections.
Connect the TV set to a 220-240V mains socket:
First plug the smaller plug (small connector) of the power cord into
the AC inlet (AC IN) on the TV set, and then the larger connector (Euro
plug) into a mains socket.
Connecting antennas
Cable (analogue) / DVB-C / DVB-T antenna:
Plug the cable of antenna, cable TV system or room antenna into the
ANT TV socket.
If you want to use analogue cables / DVB-C connection and a DVB-T
antenna together, use an external antenna switch (available from
your dealer).
english
The cover detaches from the holder and gives free access to the
connection area. To replace the cover, simply push it until it latches
back into place.
A cable bushing connects the lateral and posterior terminal region. In
this way you can pass the cables of the lateral connections through
and lay them out together with the rear connecting cables.
Cable fixing
Using the Velcro cable tie supplied, you can fix the rear cables.
For the bild 3 this is done by a fixation at the table stand (see installation instructions of the table stand).
Satellite antenna DVB-S:
Depending on the used satellite system, connect a connecting cable
from the multi-switch or directly from the LNC to the ANT-SAT and
ANT-SAT2 sockets of the TV set respectively.
When connecting the TV set to a single cable community antenna,
connect the ANT-SAT and ANT-SAT2 sockets directly to the
appropriate SAT antenna socket.
When connecting the TV set to a DiSEqC single cable community
antenna (in accordance with EN 50494), connect the ANT-SAT
socket directly to the appropriate SAT antenna socket.
In case of a DiSEqC one cable communal system you require only
one antenna cable. Further distribution of the signal to the two
reception routes is accomplished by the TV set’s satellite tuner.
It is possible, however, to continue using an existing SAT cabling
with two antenna cables in a DiSEqC one cable communal system.
If two transmission channels of the DiSEqC single cable community
exist, one system channel is used per satellite antenna cable.
Ask your dealer in this regard.
Cable
analogue /
DVB-C
R TV
DVB-T DVB-S
bild 3.55/48/40
9
Loewe bild 3
Instruction Manual
Preparing the TV set / Switching TV set on/off
Connecting the TV set to the Home network
You may link your TV set to the home network by a wired connection
(Ethernet, Powerline adapters separately available) or by a wireless
radio connection (WLAN). For wireless connections, the TV set has
an internal WLAN antenna.
In order to play back data from your home network your Loewe TV
supports the UPnP AV standard.
You call the network wizard to configure the network adaptor (System
settingsטMultimedia/NetworkטNetwork settingsטNet-
working).
english
Under no circumstances may the TV set be wired and at the same
time connected by a wireless connection to the same network, e.g.
router. This may cause severe operational faults!
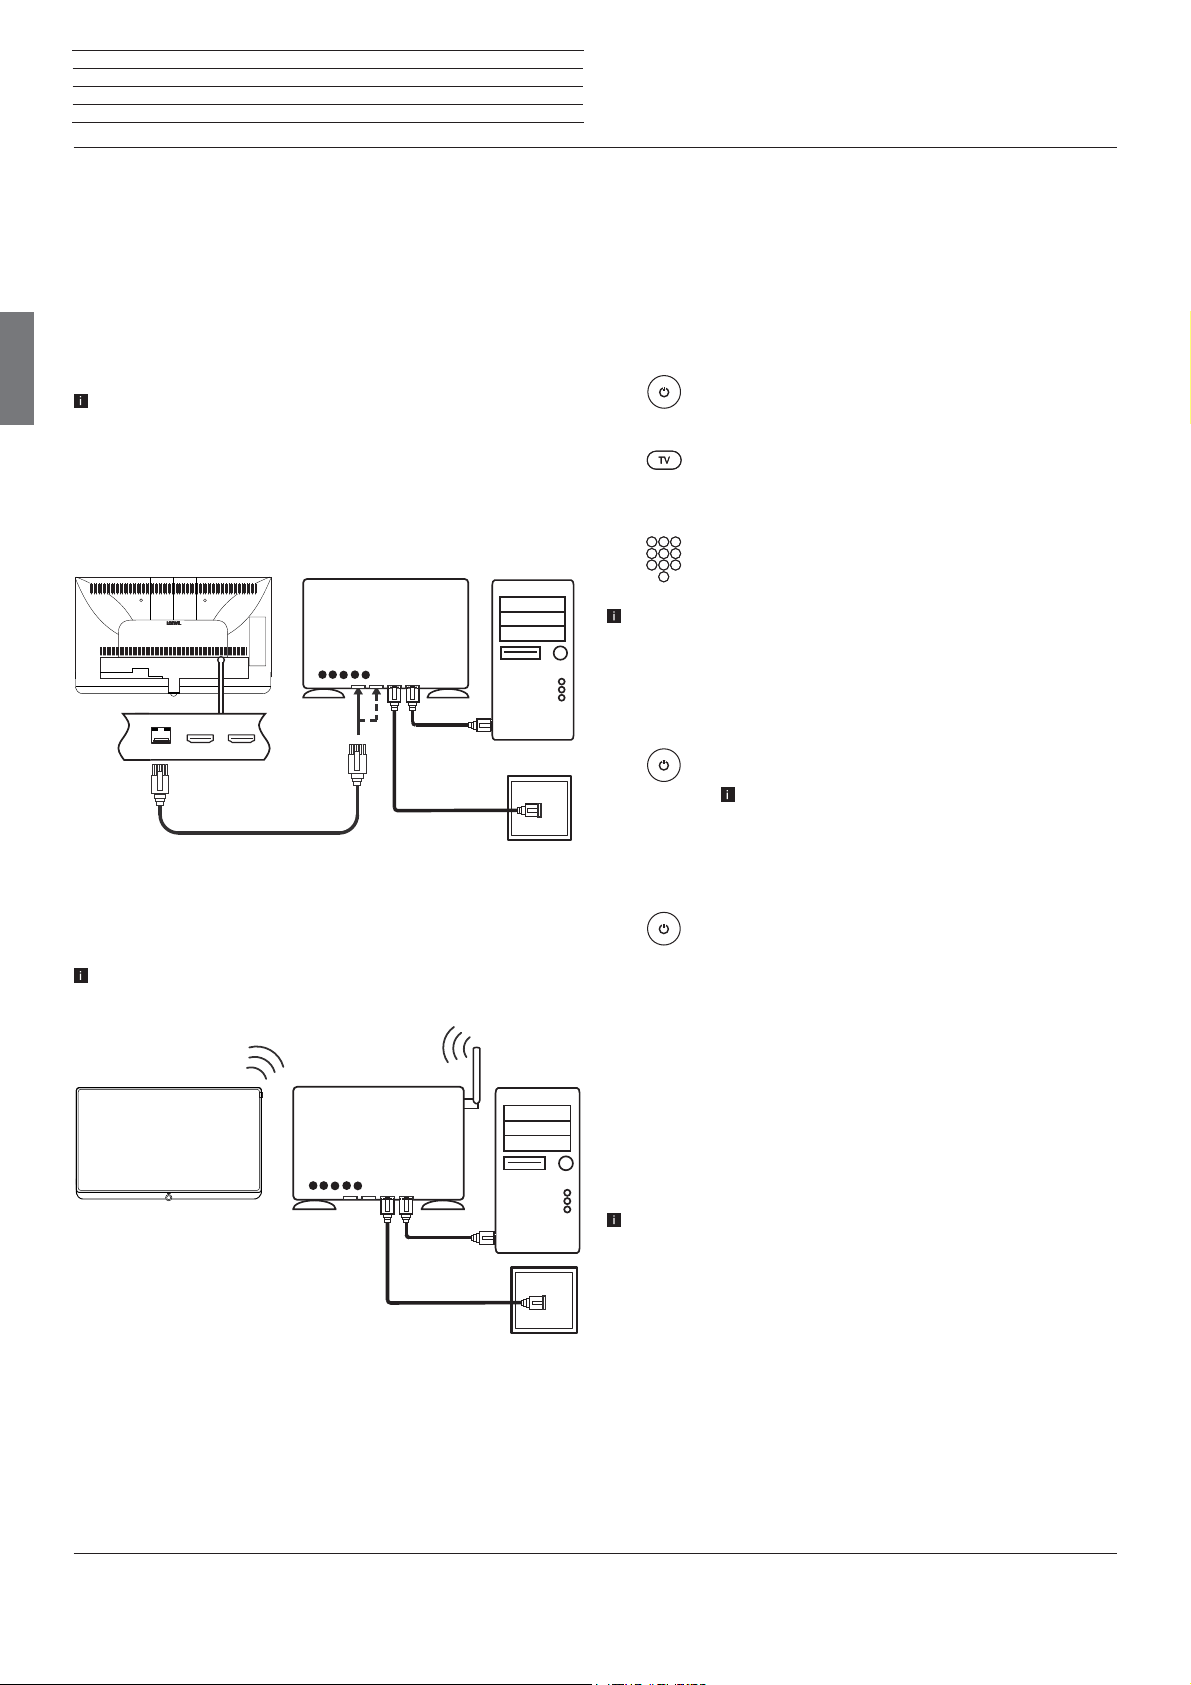
Example for a wired connection
Connect the LAN socket of your TV set to the LAN switch/router of
your home network with a network cable (available from your dealer).
TV set
LAN switch/router
PC
Switching the TV set ON/OFF
Switching TV set to the standby mode
Switch the mains switch on the bottom side of the device to position I.
The indicator in the control panel on the front side lights up white. The
set is now in standby mode.
Switching the TV set on by means of the Remote control
Press the on/off key.
Or:
Press the TV key.
The previously watched station will be called.
Or:
Press numerical keys 1-9.
The corresponding station will be called.
After switching on the TV set, it takes a few seconds for further
operating commands to be processed (Exception: Quick Start Mode,
see below). Your TV set is ready to operate as soon as the status
indicator in the control panel lights up in green.
Switching the set off with the remote control (Standby)
DSL
Example for a wireless connection
You can connect the TV set to your home network by a wireless radio
connection via the WLAN antenna inside the set.
Shadow effects of various materials, such as reinforced concrete,
metal surfaces, etc., attenuate the WIFI signal sometimes
significantly or completely.
TV set
WLAN router
PC
DSL
Press the on/off key.
Before switching off the set with the mains switch,
we recommend you to switch it to standby mode.
Switching TV set and connected additional devices off
(System Standby)
Press the On/Off key longer:
TV set and all CEC-enabled devices connected to the
HDMI ports will be switched off to standby (System
Standby).
Quick start mode
If you enable the Quick Start Mode and you switch on the TV set from
standby, the TV picture can be immediately seen without delay. You
can specify the times at which your device will be in the Quick Start
Mode. Please note that in this case you will have a higher energy
consumption.
You can find the Quick Start Mode under System settings ט Control
ט Quick start mode.
Default setting for the Quick Start Mode: off
.
Help for configuration problems
Loewe cannot provide any support for PC hardware and software or
network components owing to the diverse configuration options with
home networks.
Please contact the administrator of your home network and/or specialist
dealer for support when setting up and for maintenance of network
connections, storage media, media server software and network devices
such as routers.
10
Loewe bild 3
Instruction Manual
General information on the operation
General information on the operation
The most important keys for navigation will be explained in general.
The numbers in the text refer to the figure showing the remote control
in chapter Remote control.
The arrow keys
TV set and for selecting menu items. They are arranged in the middle
of the remote control in a circle around the OK key
user guide they will be represented as follows:
The OK key
menu item and for opening the station list. In this user guide, an
instruction for this key looks like the following:
Using the numerical keys of your remote control
programme channels and teletext pages directly. With key
you open the source menu. In this user guide, entering numbers with
numerical keys is shown as follows:
The numerical keys are also used to enter text (see chapter General
information on the operation, section Entry of characters by
remote control).
The Home view is the central overview page for all of your TV set‘s
operating modes. You reach Home view with the HOME key
22
help you to navigate in the menus and lists of the
11
. Later in this
Select the desired item.
11
is used to confirm a selection, for calling the highlighted
OKconfirm.
you enter
29
Entering programme channel directly.
HOME: Calling the Home view.
27
.
Structure of the Menu screen
Basically, the structure of the different menu screens is similar,
regardless of whether it is e.g. a wizard, rendering media content or
a setup menu. The structure is explained by means of three different
figures.
Screen structure: Wizard
A
B
C
(A) Title bar with name of the wizard and the current operating step.
(B) Selected items, whose number can be different according to the
operating step.
(C) Bottom line showing the available operating controls. If required,
instructions and information are inserted.
Screen structure: Rendering of media content (example: Audio
player)
A
C
english
B
Pressing the BACK key
Pressing the BACK key longer closes all opened displaying. An example
24
briefly brings you one level up in the wizard.
for the BACK key in this user guide:
BACK: Stop text entry and exit entry box.
Pressing longer on the NFO key
most important key functions of the current operating mode (e.g. TV
25
displays an explanation of the
mode, teletext, PIP, etc.).
D
E
(A) Title bar with selected album / subdirectory.
(B) Menu item Back to exit the menu or to go back to the previous
menu item.
(C) Selection of album or title.
(D) Time bar.
(E) Bottom line with the different symbols for controlling the playback
function.
continued on the next page ט
11
Loewe bild 3
Instruction Manual
General information on the operation
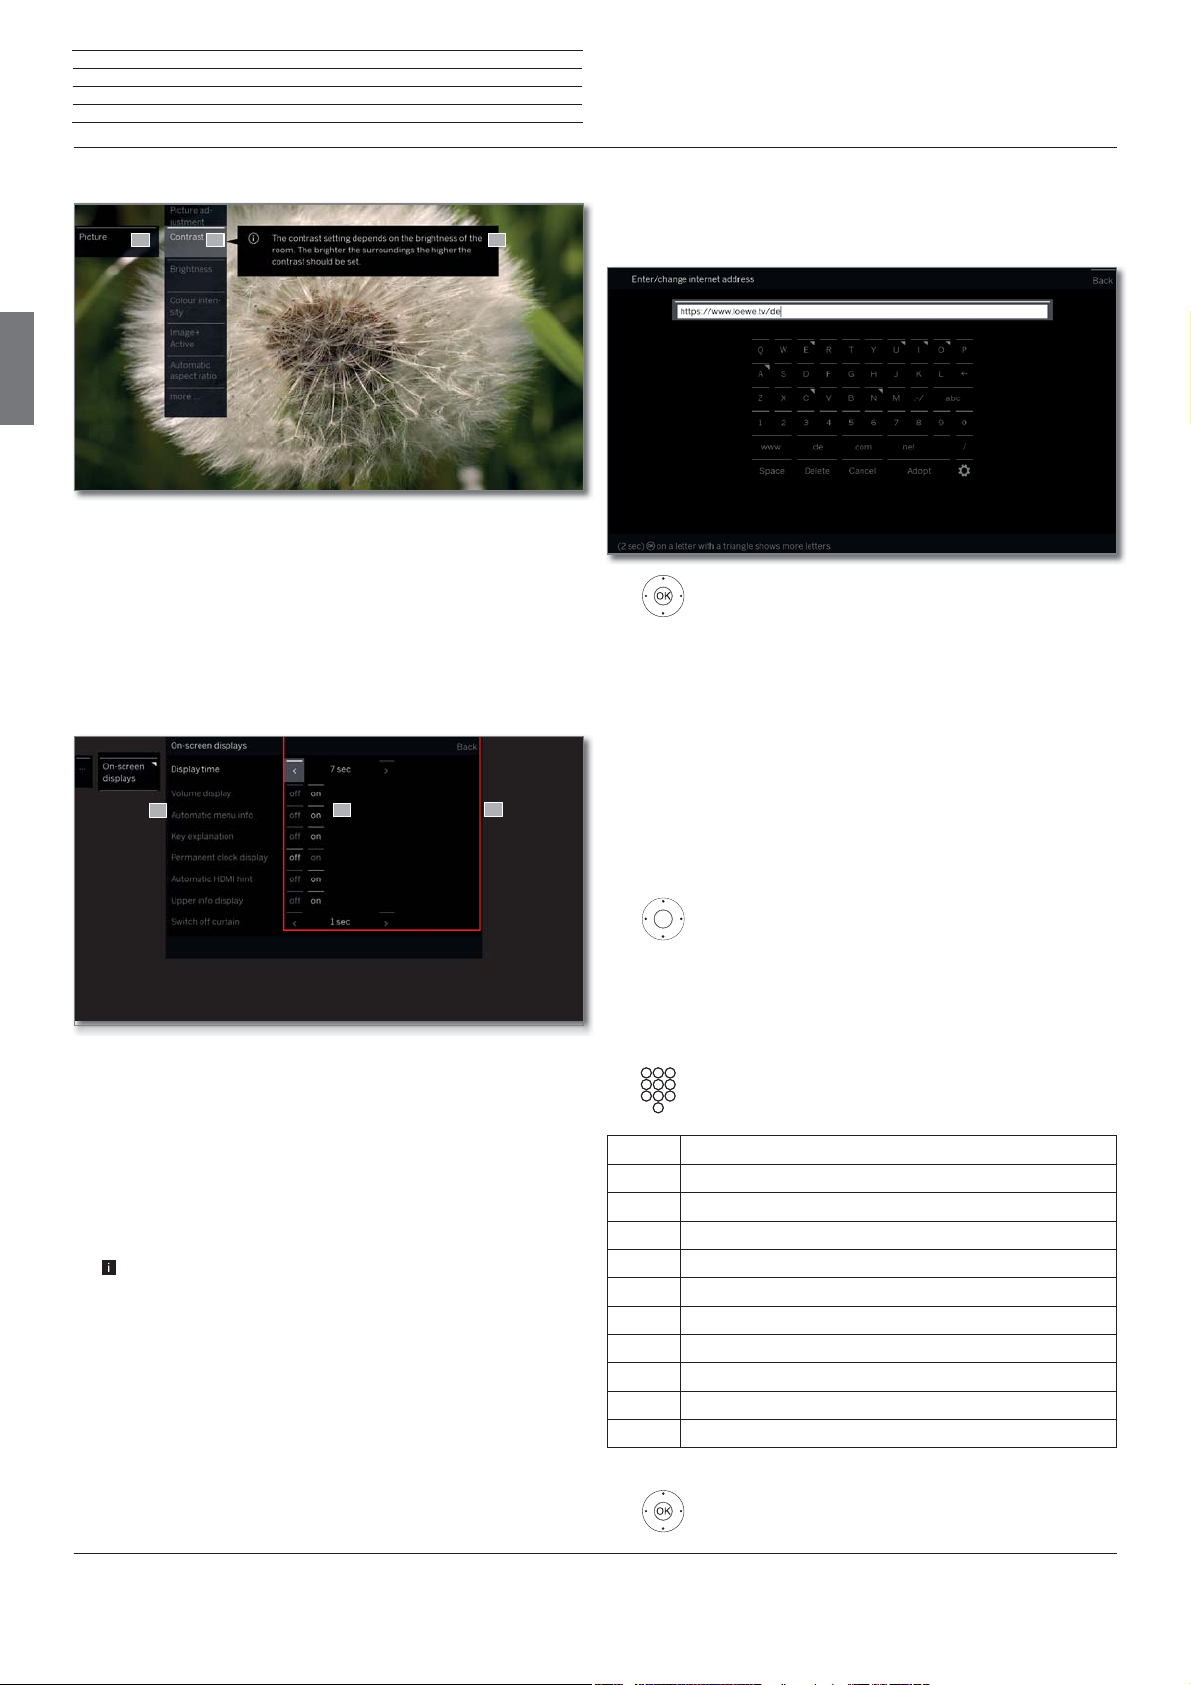
Screen structure: Setup (example: picture)
A CB
english
(A) Selected function in the Home overview (here: system settings).
(B) Home Menu System settings, with selected menu item Picture.
(C) Help text for the selected menu item Picture > Contrast.
Navigation: Selection of elements (example: On-screen displays)
Highlighting and thus selecting the symbols/elements or menu items
on the screen can be effected by the arrow keys on the remote control.
So you can see all the time where you are. As soon as there is a bar
above a symbol or text, this is a selected element.
Entering characters with on-screen keyboard
For cer tain functions, entering letters or characters is required, e.g., for
Web addresses (URLs) in the browser or for renaming archive entries.
An on-screen keyboard appears for entering text.
Highlight character / on-screen button,
OK accept character.
In the event of letters with a triangular, additional letters
are displayed when pressing the OK button longer (2
sec). For the selection of special characters use the
.-/ field.
To conclude the entry:
Select Adopt,
OK confirm.
B
C
A
(A) Selectable elements / menu items.
(B) The text in the line where the marker is currently located is white.
(C) Move the selection marking by means of the arrow keys
to the menu item to be set.
The position of the marking is to see by a grey rectangle.
In most cases, the marked menu item will be automatically
adopted. The font colour of the previously active item will change
to grey, that of the newly selected item to white.
In a few menus, to confirm a selected menu item is required by
pressing OK.
Entry of characters by remote control
Alternatively to the on-screen keyboard you can also enter the desired
characters by means of the remote control (as with the keypad of a
mobile phone).
Select text entry field.
Under the first letter of the name you will see a line
indicating the current input position.
Input position one character to the right (also for
blanks).
Input position one character to the left.
Enter the letters one after another. When usin g the remote
control, press the numerical keys just as on a mobile
phone keypad (0-9) until the desired symbol is displayed.
Key Characters (uppercase - lowercase)
1
2
3
4
5
6
7
8
9
0
[space] 1
A B C 2 Ä Æ Ã Å Ā À Á Ć Ç Č - a b c 2 ä æ ã å ā â à á ć ç č
D E F 3 Ė Ë Ē Ę Ê È É - d e f 3 ė ë ē ę ê è é
G H I 4 Ï Ī Į Î Ì Í - g h i 4 ï ī į î î ì í
J K L 5 - j k l 5
M N O 6 Ö O E Õ Ō Ô Ò Ó Ø - m n o 6 ń ñ ö o e õ ō ô ò ó ø
P Q R S 7 ß - p q r s 7 ß
T U V 8 Ü Ū Û Ù Ú - t u v 8 ü ū û ù ú
W X Y Z 9 - w x y z 9
. 0 - / _ : + , ; ? ! = & # % ~ @ $ * ’ ( ) ” § \ { } [ ] < > ´ ` ^ |
12
To conclude the entry:
Select Accept,
OK confirm.
Loewe bild 3
Instruction Manual
On-screen displays
Explanation of keys
An explanation of the main operating keys that can be used at the
moment, can be displayed.
The availability of the key explanation is dependent on the currently
active operating situation.
INFO press longer: show Explanation of keys.
INFO or BACK: hide Explanation of keys.
Explanation of symbols
On screen pages with operating symbols in the bottom line, an explanation
of the function appears as soon as the symbol is selected.
english
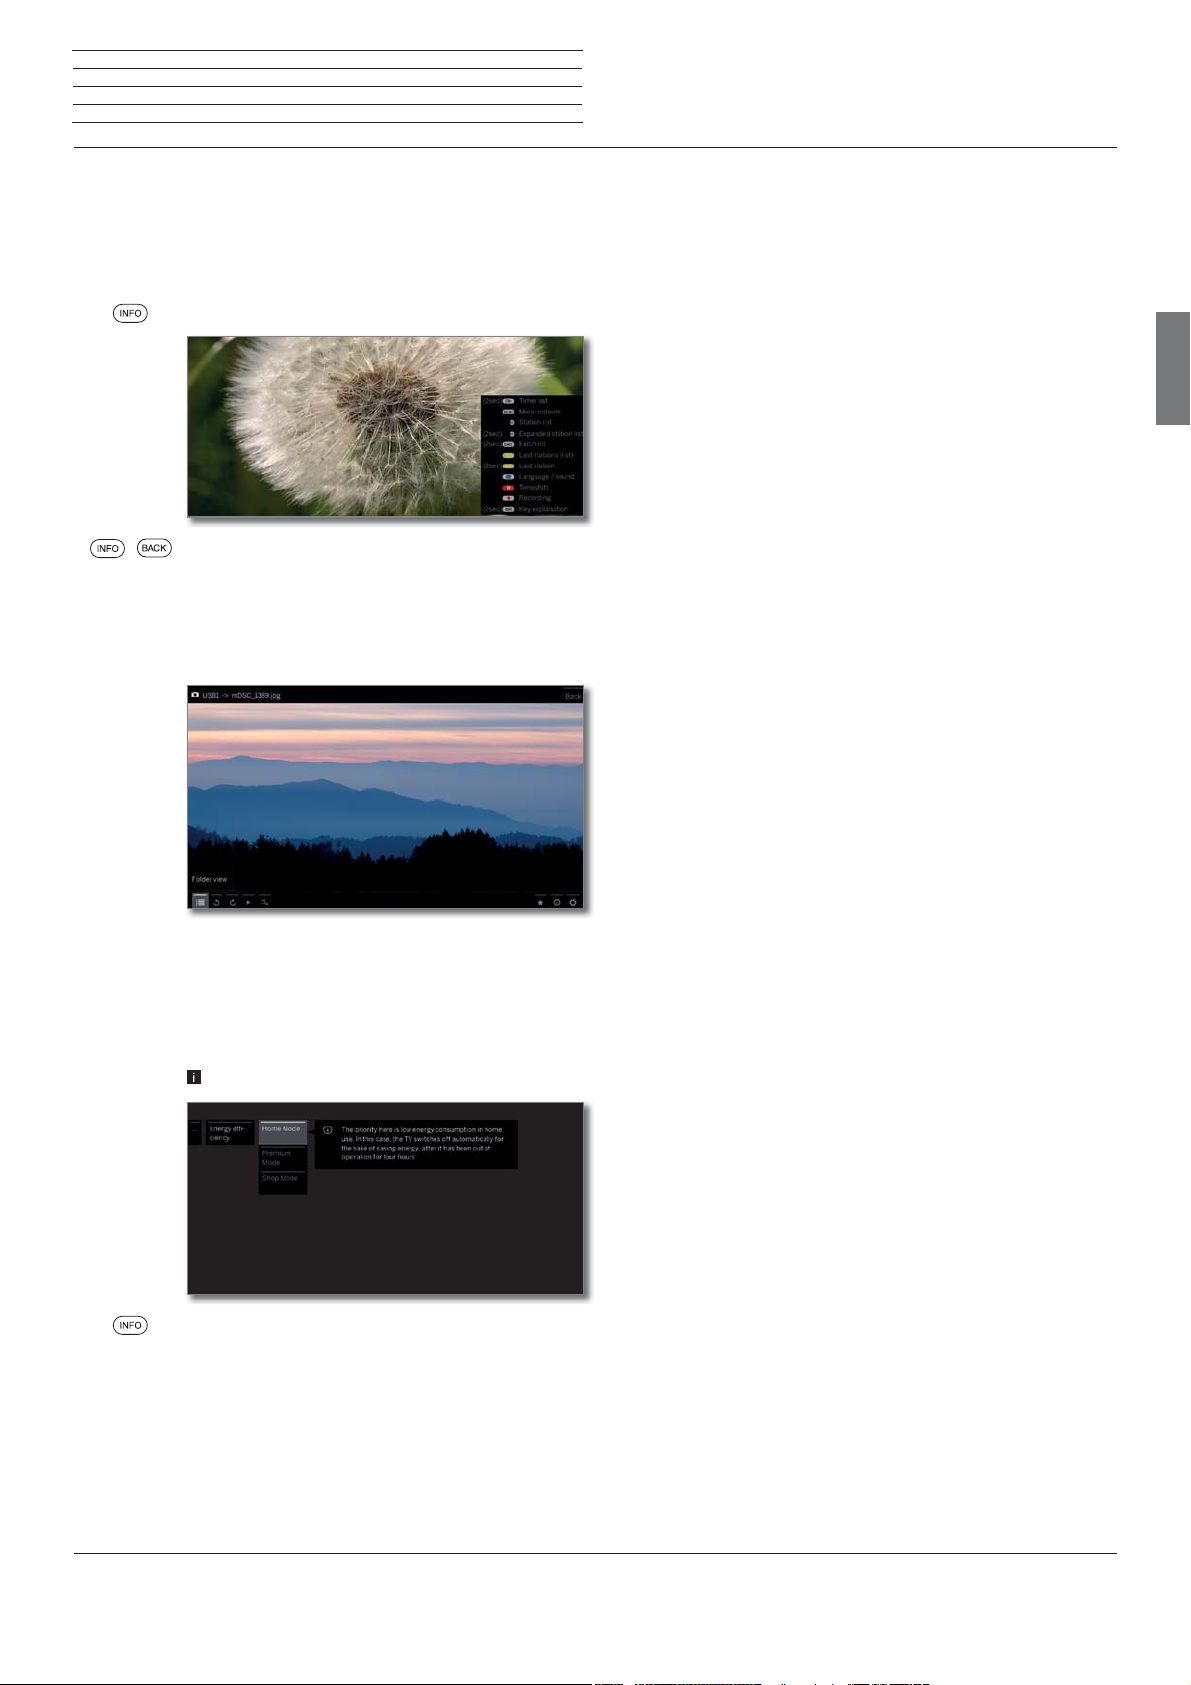
Automatic menu info
The automatic menu info provides an info text for the selected menu
item appropriate to the on-screen display that can assist you further
with the operation of your TV set.
An on-screen display is displayed.
The factory setting is that the info display is shown
automatically for each menu item. In this case you can
temporarily hide the info texts with the INFO key.
Permanent clock display
The clock display can be permanently shown. It is always visible as
long as no other display is made.
You can switch the permanent clock display on or off in Home view
under System Settingsט Controlטmore ...ט On-screen displays.
(1
3D function available on selected models.
13

Loewe bild 3
Instruction Manual
Initial installation
Initial installation wizard
Initial installation after switching on for the first time
The Initial installation wizard starts automatically with an initial installation. It may be called repeatedly again.
If a parental lock is activated, the access code must be entered
before repeating initial installation.
First installation wizard routine
The selected settings affect the routine of the Initial installation wizard.
english
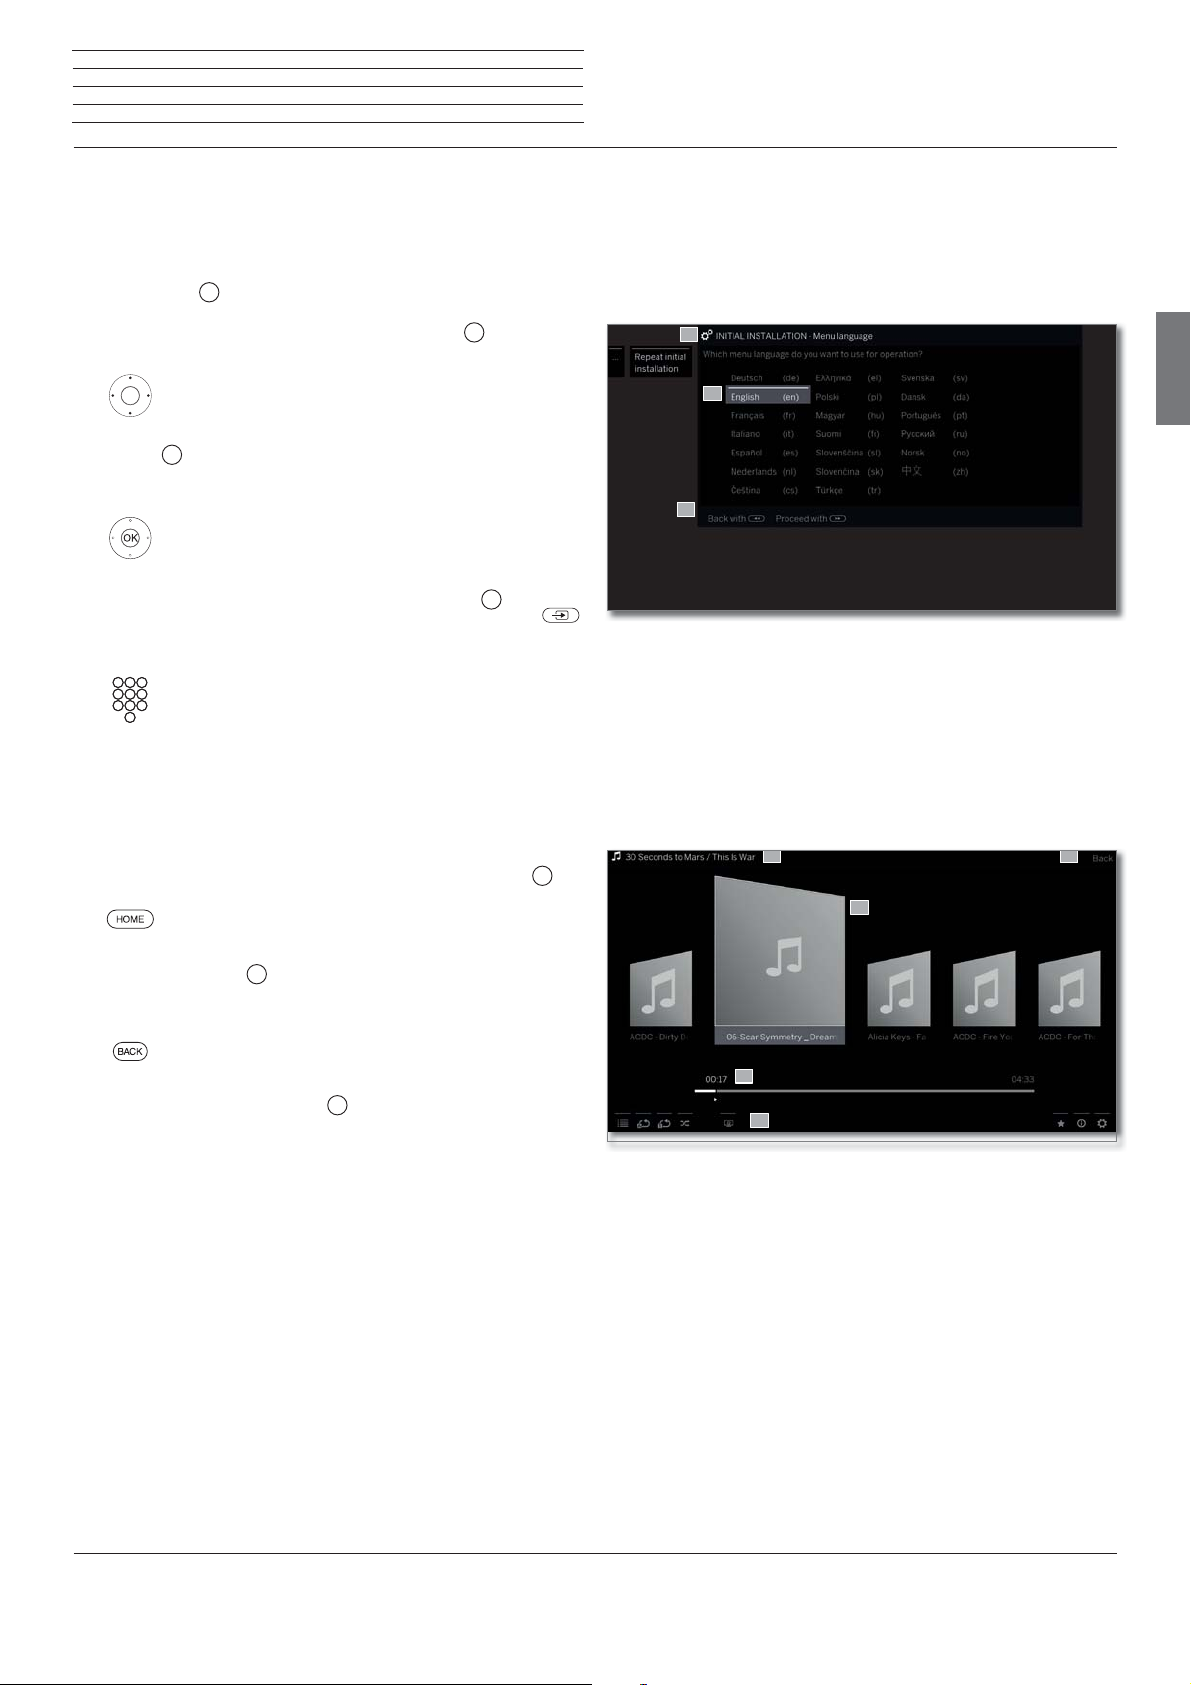
Menu
language
Select desired Menu language.
Selecting the language of the user guidance is the
wizard’s first step. Then you simply follow the instructions on your TV screen.
Energy
efficiency
(continued)
Location of
TV set
Home mode:
The emphasis for home use is on low energy
consumption. The automatic dimmer is activated.
Premium mode:
This mode optimises the settings to a brighter
environment at a higher energy consumption. The
automatic dimmer is activated.
The use of this energy efficiency setting must be
confirmed afterwards once again.
Shop mode:
The picture settings are aligned to operation in
the presentation room. The automatic dimmer is
deactivated. If the ambient brightness diminishes, the
energy consumption is not reduced.
The use of this energy efficiency setting must be
confirmed afterwards once again.
The presetting can be changed later in System
settings under Control ט Energy efficiency.
Proceed to next step.
Energy
efficiency
Proceed to next step.
A licence agreement will be displayed.
Scroll through the licence agreement.
OK Confirm the licence agreement and proceed to
the next step.
Select Energy efficiency.
Determine how energy efficient your TV set shall
be. The value for the contrast (and thus the
brightness of the background lighting) is adapted
and the automatic dimmer activated or
deactivated depending on the presetting.
Select Location of TV set.
For certain locations (e.g., Australia), there
is finally a selection screen where you can
indicate in which state/territory the device
is being operated.
Proceed to next step.
Follow the instructions on the screen for the following
steps.
With the selection of the TV set location the countryspecific presettings are adopted.
In most cases, the predetermined parameters can
be adopted.
14
Loewe bild 3
Instruction Manual
Home view
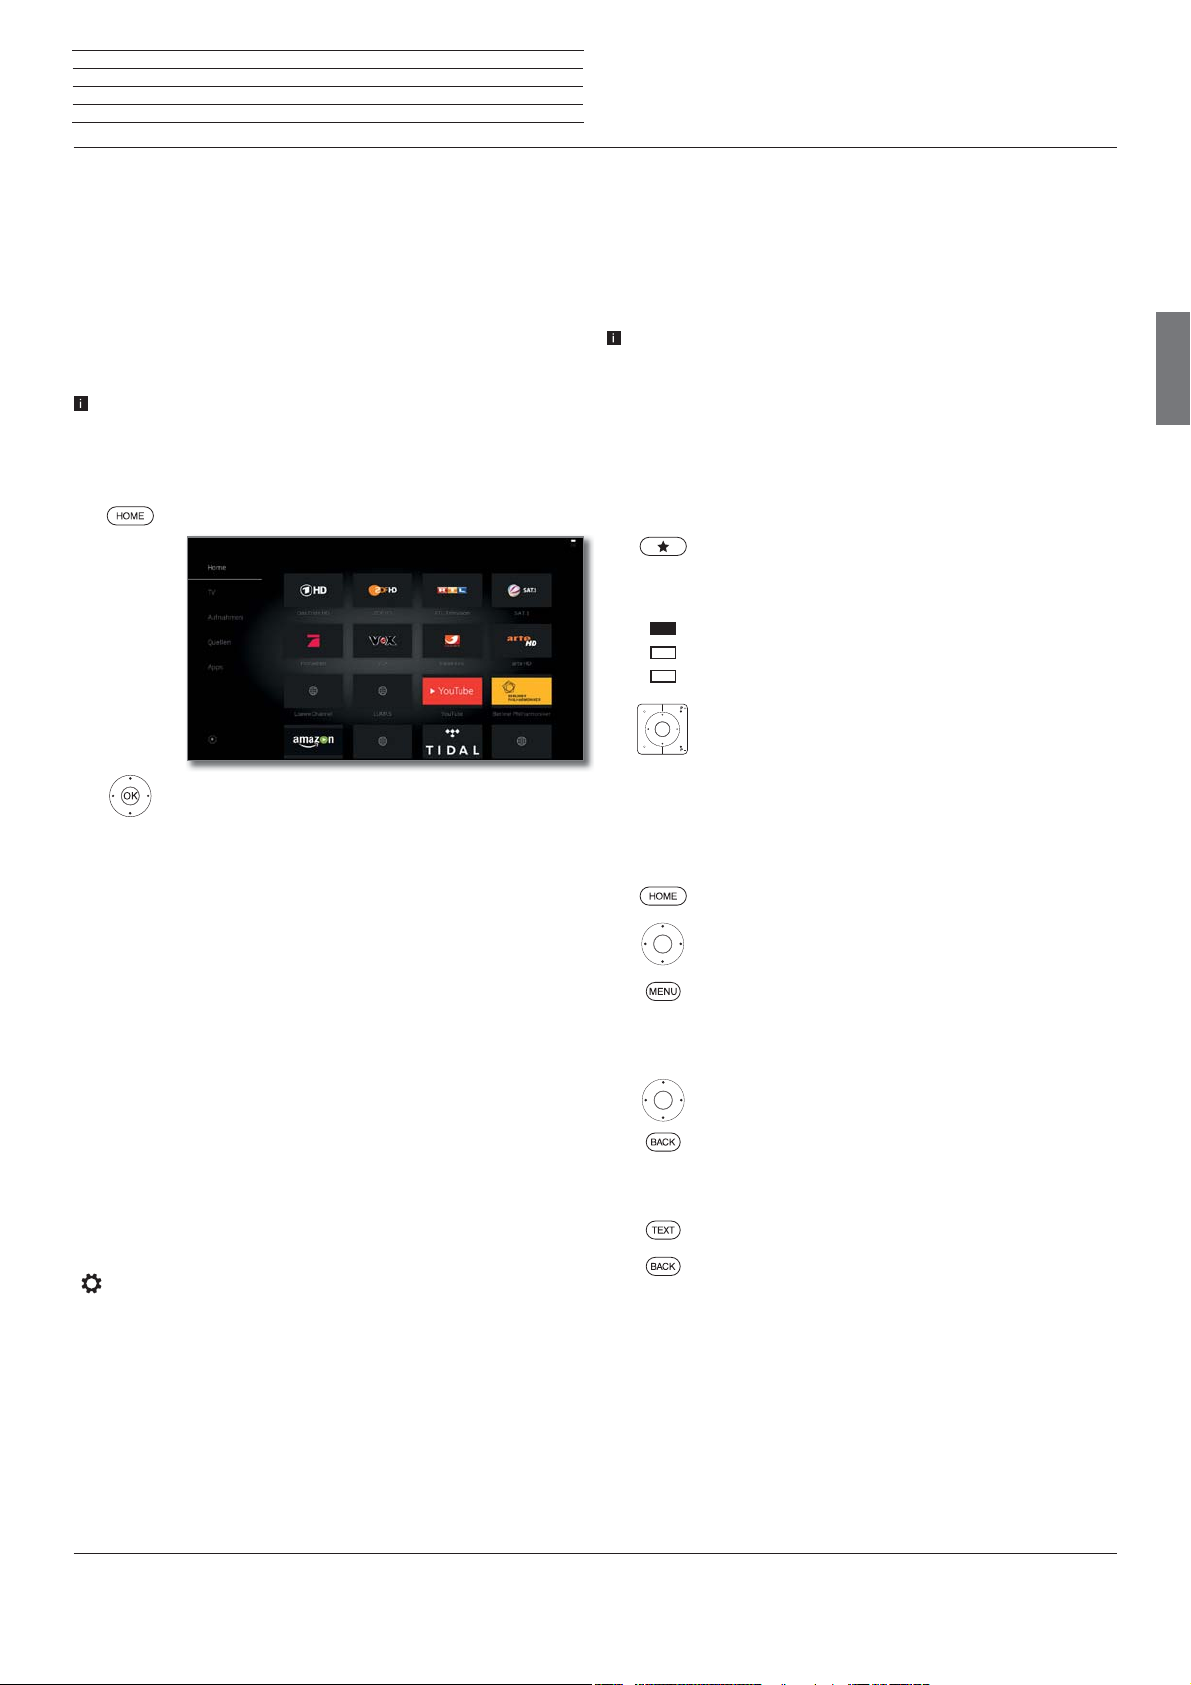
Home view
The Home view is the central overview page for all of your TV set‘s
operating modes.
The left selection bar allows you to access the operating modes TV,
recordings, sources, and apps. By means of System settings you
have access to more functions and you can configure your TV set.
The right part of the screen displays the favourites depending on the
selected operating mode (see also right column) and the available
sources.
The number of selectable items varies depending on the TV
equipment, network connection, available media/media servers
and connected gadgets.
Call Home view
HOME: Calling the Home view.
Home view - Favourites
You will find your favourites on the right of the individual operating
modes.
By selecting the operating mode, the favourites are filtered accordingly.
When selecting Home, the favourites of all operating modes are
displayed together.
After an initial installation, some favourites will already be
automatically created depending on the installation site of the TV
set and of existing Internet links (e.g. TV stations, online links).
Creating favourites
In the operating modes of the TV set you can define the current object
(e.g. station, music title, teletext page, website, photo, etc.) as favourite.
In the selected operating mode, the active object will be added as
favourite and placed at the end.
Create favourite.
If there are more favourites than can be shown on one
page, this will be indicated by rectangular symbols in
the upper line of Home view. Example:
Three pages with favourites exist. The first page of
them is indicated. Equivalent is the display with the
symbols for the source selection.
P+/P– Scrolling through the individual pages.
english
Select menu item / Favourite / Source,
OK call.
Description of the individual sections/functions:
Home: Under the item Home all favourites of the different sections
are summarized.
TV: You can access the TV favourites via the item TV.
See chapter TV for further information.
Recordings
local sources. (USB, DR+)
See chapter Recordings for further information.
Sources: Here you have access to the ports on your TV (HDMI, AV,
video, USB, etc.)
See chapter Sources for further information.
Apps: Via the menu item Apps you can find multimedia content
on the Internet (App Gallery), Internet and DVB radio and a fullfeatured browser.
See chapter Apps for further information.
System settings : In menu item System settings you find
the configuration menu of the TV set e.g., with settings for picture,
sound, connections or sound components.
See chapter System settings for further information.
: The item Recordings gives you access to videos from
Editing favourites
You can edit the existing favourites in Home view. Change the
sequence of your favourites as you wish or delete favourites you do
not need any more.
HOME: Calling the Home view.
Select the favourite to be changed.
MENU: Change favourite.
Move favourite or delete it (see below).
Moving favourites
Move favourite to new position.
BACK: Finish procedure.
Deleting favourites
TEXT: Delete selected favourite.
BACK: Finish procedure.
15
 Loading...