


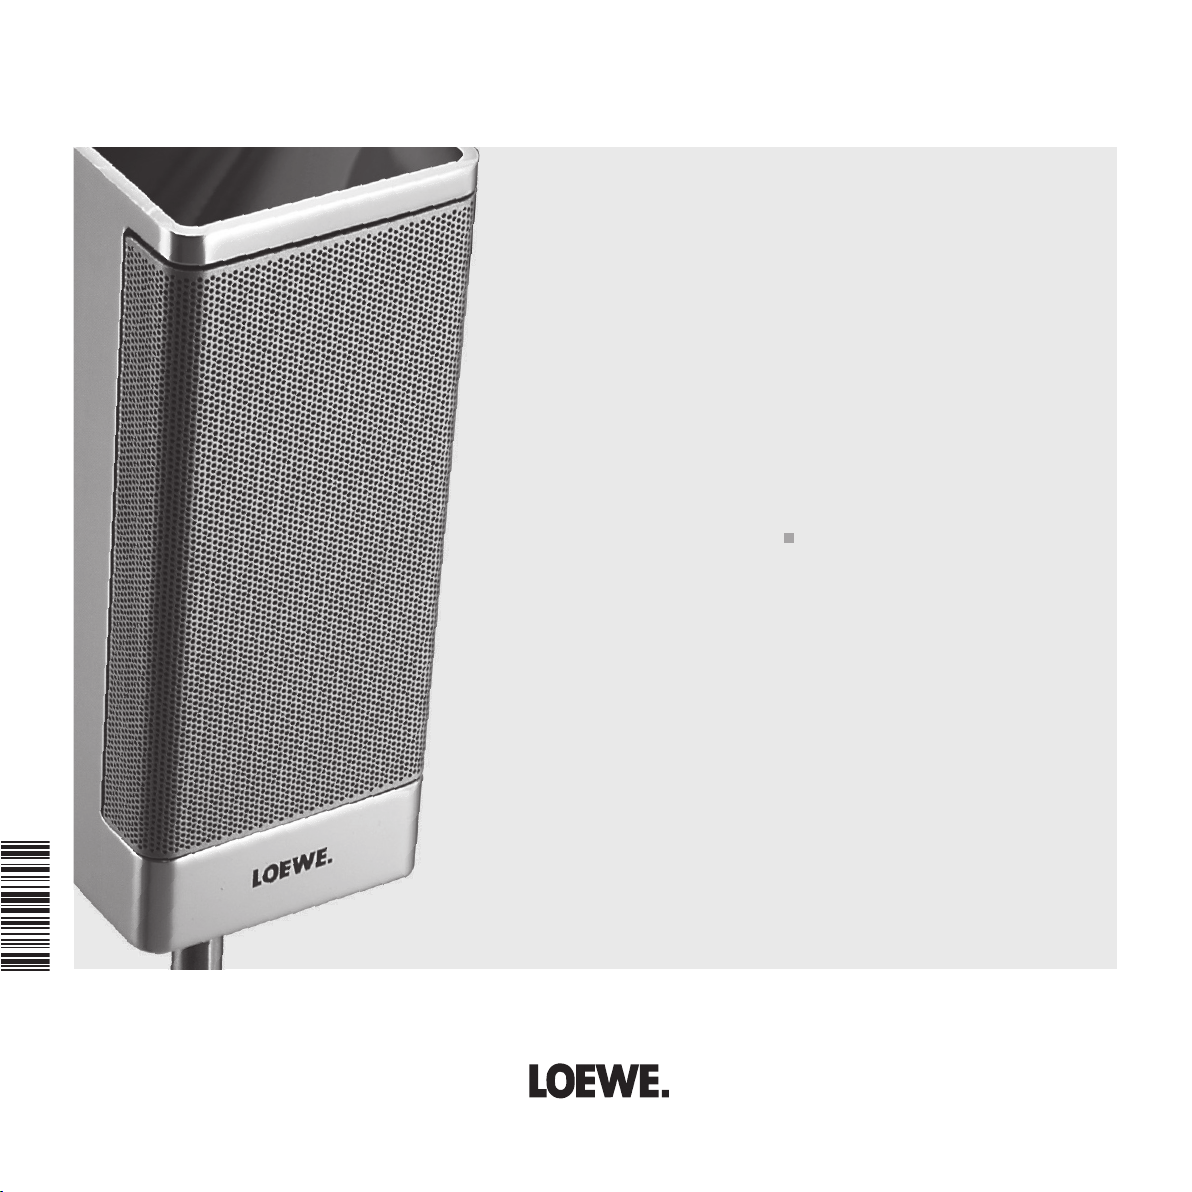
Auro 2216 PS
Operating Manual
3 2 4 8 6 0 2 5
Equipment
Auro 2216 PS
233–32486.025

Contents
Remote control Assist – DVD-operation 3
Auro 2216 PS Front Panel 4
Auro 2216 PS Rear Panel & Display 5
Welcome 6
Thank you, 6
Scope of delivery 6
Set up 6
Disposal 6
Cleaning 7
For your safety 7
Advantages of connection to a Loewe TV set 7
First installation 8
Connection 8
Wiring Loewe Flat TV – Auro – Individual Sound/Tremo 9
Wiring Auro – audio system 10
Remote control 10
Setting the language 11
Activate Digital Link 12
Switch over PAL/NTSC 12
Doing a reset 12
Switching over to Progressive Scan 12
Setting the loudspeaker system 13
About operation 15
Activate the mode of the remote control 15
Inserting a disc 15
Basic functions 15
User interface 15
User interface of the inserted DVD 18
Sleep timer 18
Numeric input 18
Automatic functions 18
Inserting a disc 19
Basic functions 19
DVD 19
Extended functions 22
Basic settings 25
Special features of DVD Audio 26
Audio-CD 28
MP3 and JPEG 32
Child Lock 34
Tuner 36
Audio functions 38
Setting the remote control 40
Remote control Assist – TV-operation 41
What to do, if ... 42
Technical Data 43
Service 44
- 2
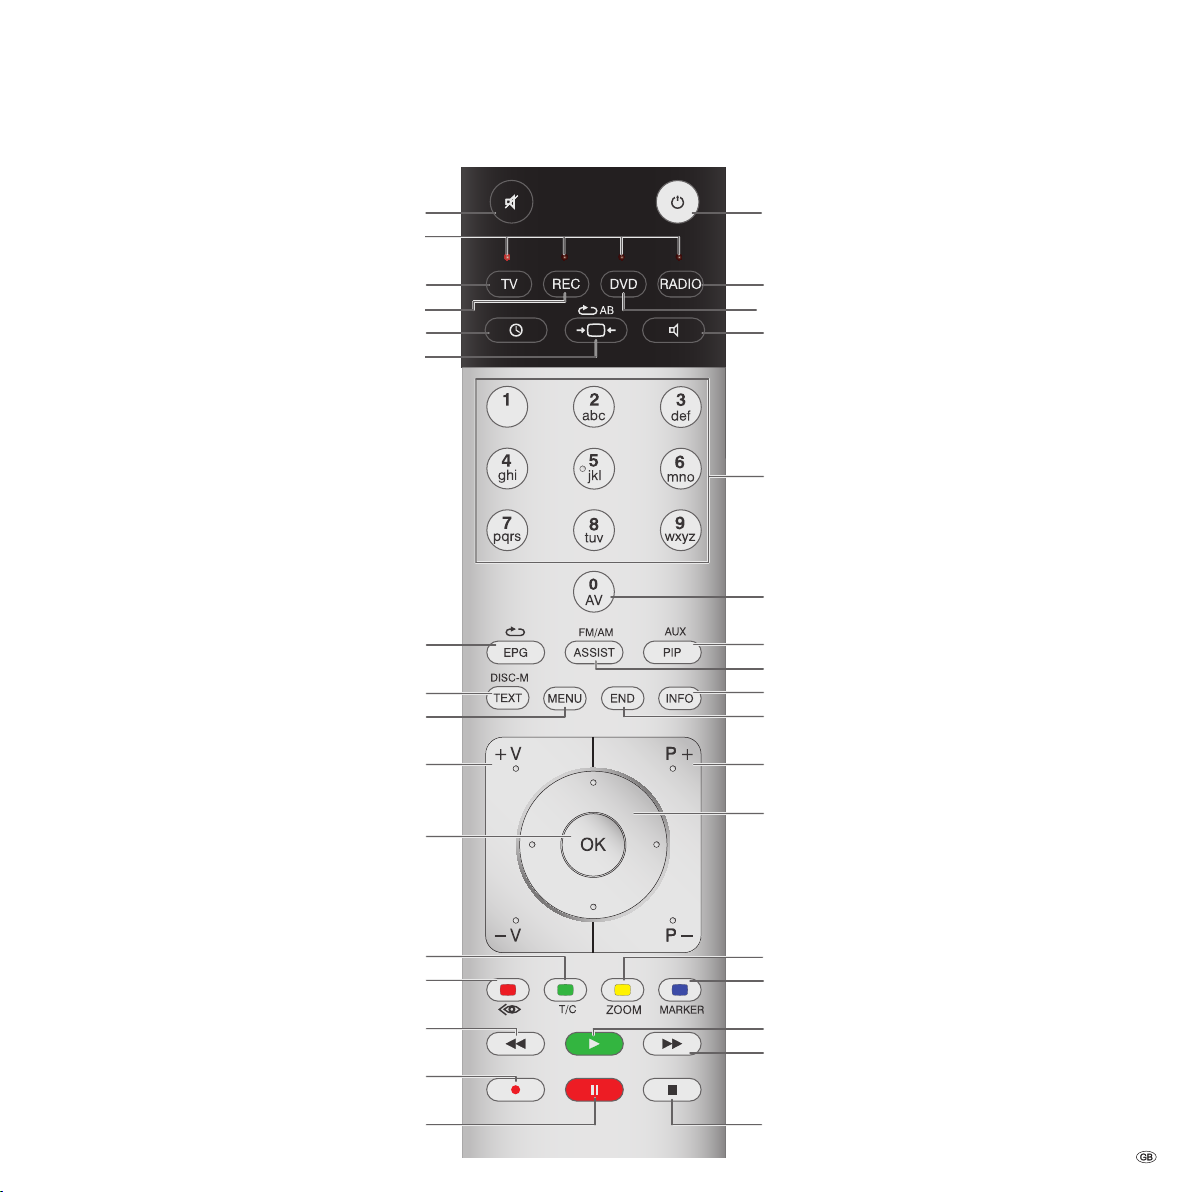
Remote control Assist – DVD-operation
(page 38) ................................................TV Sound off/on
LED indicator for current operating mode
Switch over to operate TV set
Switch over to operate Recorder
(page 18) .......................................................Sleep timer
DISK: Set TV picture format;
(page 37) .........................................RADIO: Mono/Stereo
(page 23) ....................................................DISC: Repeat;
RADIO: display RDS name/frequency of station
(page 18) ..............DISC: User interface of loaded DVD on
(page 16) ............Show/hide menu; MENU: close window
(page 38) ................................... V–/V+ Volume down/up
(page 16, 17) ...................... DISC: Title/Chapter overview;
RADIO: station table; MENU: confirm menu selection
Switch on/off - on stand by .............................. (page 11)
short: TV Radio Digital; long: Auro FM/AM-Radio .(p. 36)
Switch over to operate Auro ............................(page 11)
Select sound format ......................................... (page 38)
DISC: select chapter/title RADIO: select stored station
MENU: enter digits .......................................... (page 20)
MENU: enter numbers or letters....................... (page 20)
Select external audio source ............................(page 15)
DISC: Repeat A-B; RADIO: FM/AM-mode ...(page 23, 36)
DISC: menu bar on/off; MENU: context help on/off
DISC: Status display on/off; RADIO: station table
MENU: hide menu ....................................(page 16, 19)
P+/P– DISC: next/previous chapter;
RADIO: station forward/back .....................(page 20, 36)
56 DISC: chapter up/down; MENU: select up/down
34 DISC: search back/forward; MENU: select/set
(page 19) ................Green button: Title/Chapter selection
(page 22, 23) ..............Red button: DISC: camera position
DISC: short: beginning of chapter; long: search back
RADIO: short: fine tuning back long: search back
no function
(page 21) ......................Pause; single frame; slow motion
Yellow button: Zoom ........................................(page 23)
Blue button: Set marker ................................... (page 24)
Playback .......................................................... (page 19)
DISC: short: next chapter/title; long: search forward
RADIO: short: fine tuning forward; long: search forward
Stop ................................................................. (page 21)
3 -

Auro 2216 PS Front Panel
Source Store Vol - Vol +
Vol -
Vol +
1234567890
REMAIN
kHZ
MHZ
RANDOM
PROGRAM
MEMORY RDS
TITLE CHP/TRK
DIGITAL
PRO LOGIC
3 STEREO
DVD
MP3
CD
STEREO TUNED SLEEP A B ALL 1 REPEAT THEATER
MUTE
PCM dts
1234567890
REMAIN
kHZ
MHZ
RANDOM
PROGRAM
MEMORY RDS
TITLE CHP/TRK
DIGITAL
PRO LOGIC
3 STEREO
DVD
MP3
CD
STEREO TUNED SLEEP A B ALL 1 REPEAT THEATER
MUTE
PCM dts
Source
D IG I TA L
SUR ROU ND
Operating
indicator
Power button
Switch off in standby
Headphones jack
Disc tray
Disc tray
open/close
Display
Next
chapter
chapter
Front ap
(closed)
Stop Play / PausePrevious
- 4
Front ap
(open)
Select sound
source
Save
Search
(radio)
Control volume
-/+
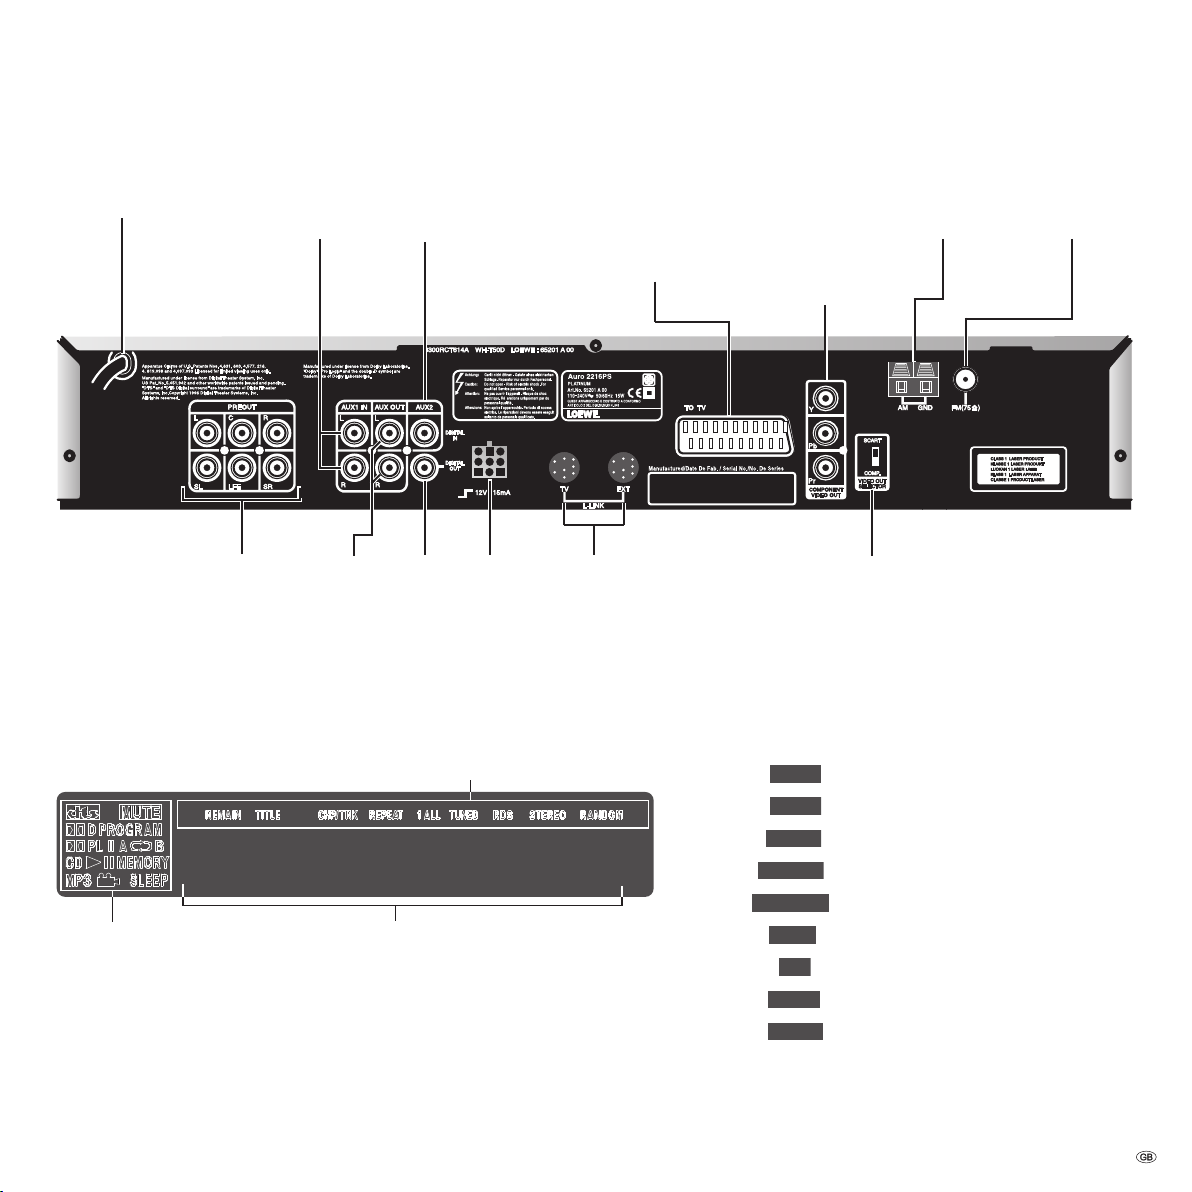
Auro 2216 PS Rear Panel & Display
1234567890
kHZ
MHZ
REMAIN
TITLE
CHP/TRK
REPEAT
1 ALL
TUNED
RDS
STEREO
RANDOM
Mains cable
Analog audio
input (AUX 1)
Digital audio
input (AUX 2)
Euro-AV output; TV
picture (RGB/CVBS)
and sound (stereo
analog) *
COMPONENT
VIDEO OUT (Y Pb
Pr) Connection for a
TV with component
Antenna input
AM (medium
wave)
inputs (Cinch) *
Multi-channel audio outputs; to speaker system
(Tremo) or active speakers
Analog audio output
Digital audio output
Cubic
socket
L-Link connections
VIDEO OUTPUT switch Position SCARTR: TO TV socket gives out the RGB signal and COMPONENT VIDEO OUT socket does not supply a signal Position
COMP.: COMPONENT VIDEO OUT socket gives out the RGB signal and TO TV
socket does not supply a signal
* Please note the position of the switch here.
Caution: Do not touch the inner pins of connection sockets on the rear panel. Electrostatic discharge may cause permanent damage to the unit.
to the status line:
Status line
Symbol range
Message line
Remaining playing time (DVD/CD).
Current title (DVD/CD).
Current chapter/title (DVD/CD).
Repeat chapter/title (DVD/CD)
Repeat disc (DVD/CD)
Adequate reception quality (tuner)
Station with RDS name (tuner)
see page 40
CD Random (DVD/CD)
Antenna input
FM (VHF)
5 -

Welcome
Thank you,
for choosing a Loewe product. We are happy to welcome you as our customer.
At Loewe we combine the highest standards of technology, design and user
friendliness. This is equally true of TV, DVD, video, audio and accessories.
Neither technology nor design is an end in itself, but both are intended to
provide our customers with the best possible audio and visual experience.
Our design is not inuenced by short-term, fashionable trends. You have,
after all, purchased a high-quality piece of equipment which you do not want to
get tired of looking at tomorrow or the day after.
You can control four units with the remote control, a Loewe TV set, a Loewe
video recorder or a Loewe DVD recorder in addition to this DVD preceiver.
The mains plug must be easily accessible so that the unit can be disconnected
•
at any time.
Lay the cable in such a way that it cannot get damaged. The power cable
•
should not be kinked or laid over sharp edges, not stood upon or exposed to
chemicals - the latter also applies to the device as a whole. A mains cable with
damaged insulation can cause electric shocks and is a re hazard.
When removing the power plug, pull the body of the plug, and not the cable.
•
Otherwise, the wires in the plug could get damaged and cause a short circuit
the next time it is plugged in.
You should also read and follow the safety advice on the following pages.
Disposal
Scope of delivery
DVD-Preceiver Loewe Auro 2216 PS
•
Assist remote control with 2 batteries
•
Euro AV cable (Scart cable)
•
Cubic plug cable
•
L-Link cablel
•
Audio cinch cablel
•
Digital-Audio-Cinch-cablel
•
Antenna cablel
•
AM antenna
•
this operating manual
•
Set up
Place the DVD-Preceiver on a rm, level base.
•
Do not place the DVD-Preceiver in the vicinity of sources of intense heat or in
•
direct sunlight.
When installing in a cabinet or enclosed shelf: Leave about 2.5cm free space
•
around the DVD Preceiver for unhindered air circulation to prevent build-up of
heat.
There can be interference to the images and sound of any nearby television,
•
video recorder or radio. If this occurs, do not place the unit near to a television, video recorder or radio, or switch the unit off after removing the disc.
Install the DVD-Preceiver where there is nothing to obstruct the remote con-
•
trol‘s infrared signal from reaching the DVD-Preceiver display.
Do not place strong articial light sources in front of the device. This may
•
affect infrared reception.
If there is an electrical storm, disconnect the antenna and mains plug. Power
•
surges caused by lightning strikes can damage the unit through the antenna
system or the mains.
The antenna and mains should also be disconnected if the unit is to remain
•
unsupervised for a long period of time.
Cardboard box and packaging
You have opted for a durable and technically sophisticated product. In line with
national regulations regarding the disposal of packaging materials, we pay a fee
to authorised recyclers who collect packaging from dealers. However, we recommend that you keep the original cardboard box and the rest of the packaging
materials so that the unit can, if necessary, be transported in the safest possible
conditions.
The unit
Important: The EU Directive 2002/96/EG governs the proper
re-acceptance, handling and recycling of used electronic appliances.
Old electronic appliances must therefore be disposed of
separately.
Never throw this set in the normal domestic waste. You can hand in your old set
free of charge at identied collection points or at your dealer if you buy a similar
new set. Other details about re-acceptance (also for non-EU countries) are available from your local administration.
- 6
Welcome
Cleaning
Only clean your DVD-Preceiver with a damp, soft, clean cloth (with no aggres-
•
sive cleaning agents).
If DVD-Preceiver fails to read the disc correctly, the reader unit in the device
•
may be soiled. Use a commercially-available cleaning disc.
Always keep the disc drawer closed to prevent dust getting into the drawer
•
and onto the lens.
For your safety
For your own safety and to avoid unnecessary damage to your unit, please read
and follow the safety advice below:
This DVD-Preceiver is only to be used for receiving, displaying and playing
•
visual and sound signals.
Switch off your DVD system (Centros, TV and any other audio components
•
which may be connected) before connecting or disconnecting other devices or
speakers.
Do not open up the hous-
•
ing, or you could be directly exposed to the laser beam. The laser beam will be
visible if the unit is open.
DO NOT LOOK INTO THE LASER BEAM.
Protect your DVD-Preceiver from:
liquids and damp
•
shock and mechanical stress
•
magnetic and electrical elds
•
cold, heat, direct sunlight and extreme uctuations in temperature
•
dust
•
anything which obstructs ventilation
•
manual interference with the unit‘s interior
•
PLEASE NOTE: TO AVOID RISK OF ELECTRICAL SHOCK, DO NOT REMOVE THE
COVER (OR THE REAR OF THE UNIT). THERE ARE NO PARTS INSIDE THE UNIT
THAT CAN BE REPAIRED BY THE USER. REPAIRS SHOULD ONLY BE CARRIED OUT
BY A LOEWE DEALER.
If you have moved the DVD-Preceiver from a cold to a warm environment,
leave it to stand for about an hour because of the risk of condensation building
up. Do not switch it on until it has reached room temperature. This will avoid
seriously damaging the components.
Read this operating manual, and experiment with your new equipment‘s features
so that you are familiar with it.
Advantages of connection to a Loewe TV set
If you connect your Auro to a Loewe TV, you are able to enjoy the Loewe system
communication ”L-Link”. With L-Link, Auro and your TV join forces in an intelligent network and form a high-performance home cinema system.
Auro and the TV exchange data via the L-Link, among other things to check
whether audio data are available (screen stays off) or whether audio and video
data are available (screen switches on automatically).
Thanks to L-Link your TV assumes that Auro will take over processing of all audio
signals within the equipment network. The Auro switches on automatically when
you switch on the TV.
You can operate the whole equipment network with ”one hand” using the Assist
remote control.
Technical requirements for L-Link
Loewe TV of chassis generation Q/S/P25xx TV software as of Version 6.0; if
•
your TV is equipped with an older software, please contact your Loewe dealer
for a software update
• L-Link cable connection must be established in a powerless state; see page
•
8/9.
Auro must be connected to the Euro AV-input AV2/3 of the TV; see page 9.
•
Your Auro has only been designed for use in a domestic environment. The warranty covers this normal use of the DVD-Preceiver.
7 -
First installation
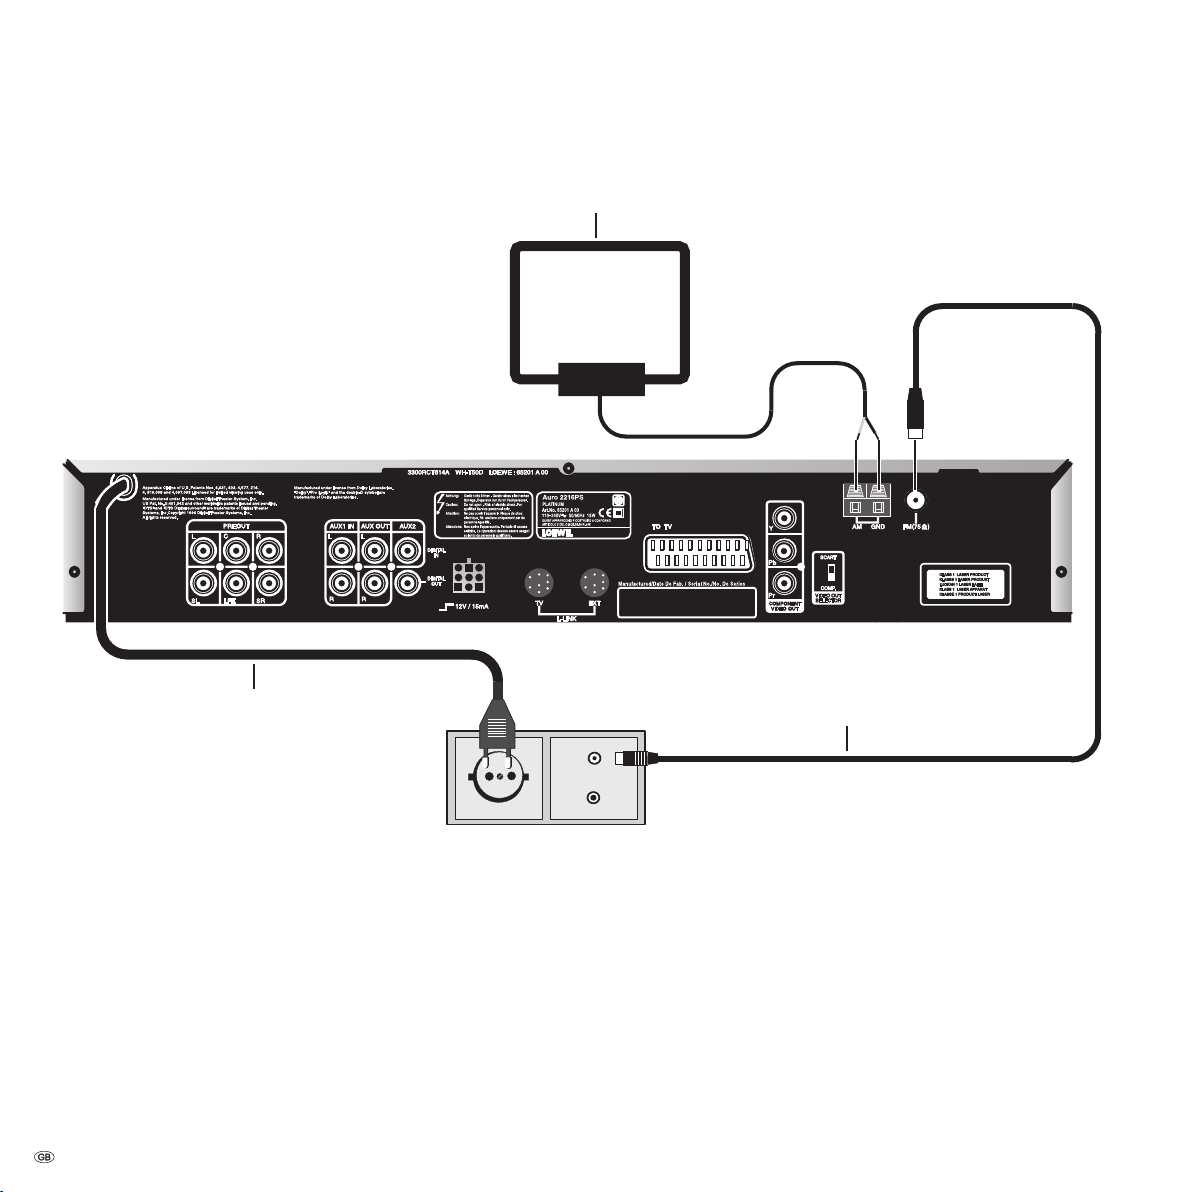
Connection
AM-antennae (medium wave)
line cord
Attention: : All the devices involved must be disconnected from the mains
when you are connecting the cables.
Connecting antennae
Connect the antennae for VHF (FM) and medium wave (AM) as shown in the
drawing:
Connect the enclosed AM antenna to the appropriate terminals – the light
•
insulated wire to terminal ”AM”, the dark insulated wire to terminal ”GND”.
Make sure the AM antenna and the TV are a great distance apart because the
•
- 8
FM-antennae (VHF)
TV interferes with AM reception when it is on.
Connect the antenna input ”FM” to an antenna system or FM antenna. Do not
•
use a cubical antenna if possible because the reception performance of cubical
antennae is usually unsatisfactory.
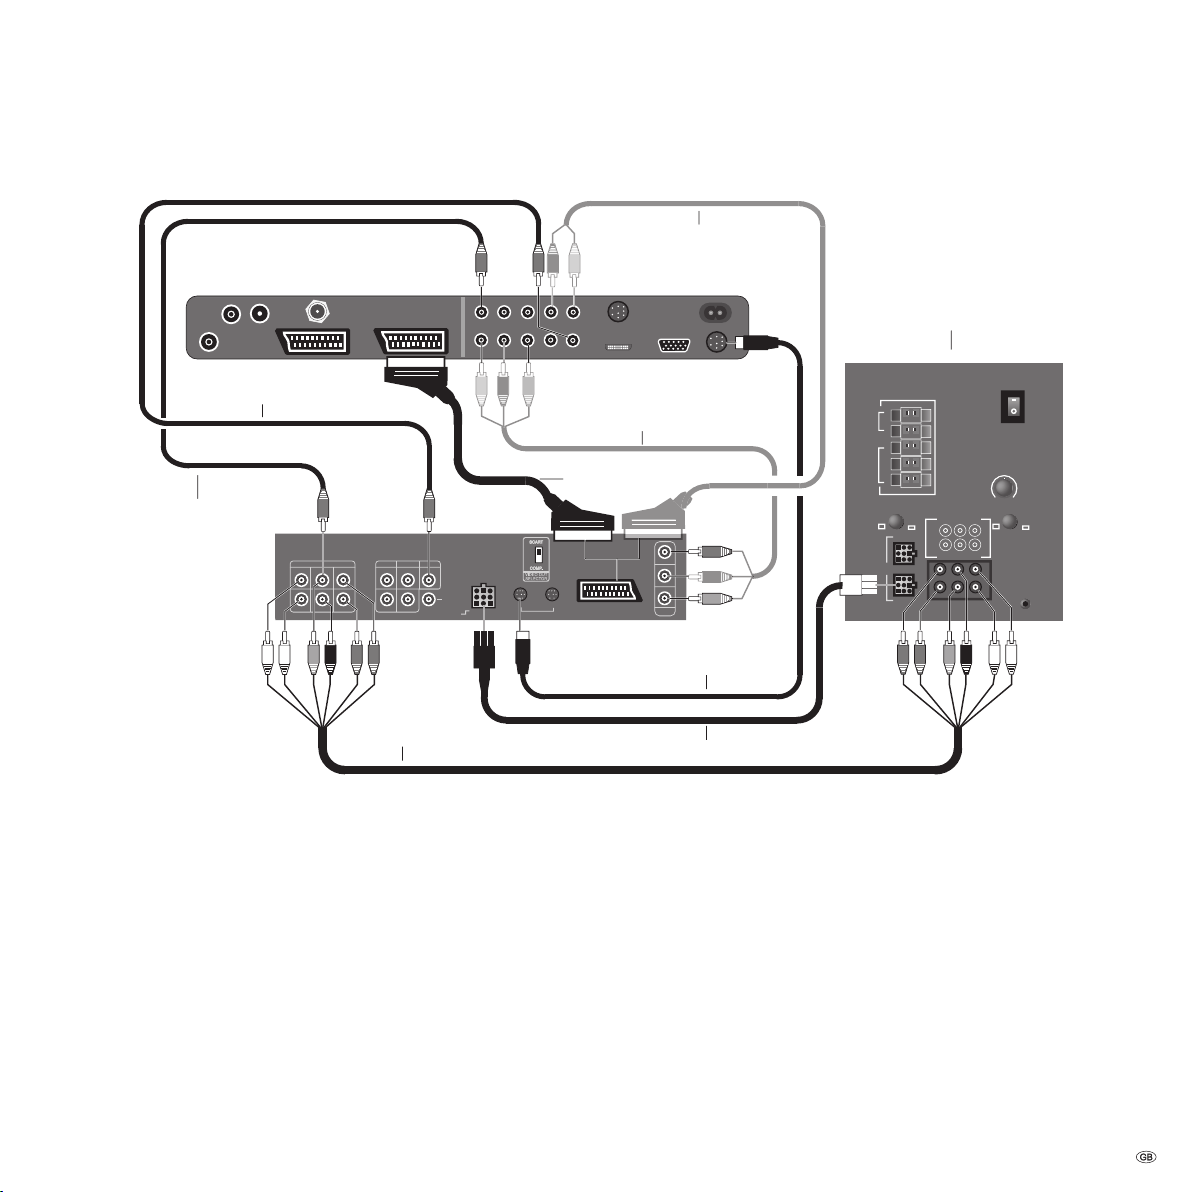
First installation
PREOUT
L C R L L
SL LFE SR R R
TO TV
AUX1 IN
DIGITAL
IN
DIGITAL
OUT
TV
L-LINK
12V / 15mA
EXT
AUX OUT AUX 2
ON
Line IN
Power OUT
OFF
Bass Intensity
Center to
System connector
230V~50/60Hz
Surr.
Front
Right
Surr.
Front
Subw.
Left
Right
Center
Left
Slave
Master
R
R
L
C
L
Phase
Min. Max.
TV
Sat
0 180
Loewe Individual Sound/Tremo
Loewe Flat-TV
Loewe
Auro
AV2-SCART
SERVICE
CENTER AUDIO OUT L/R
DIGITAL OUTCOMPONENT IN
COMPONENT
VIDEO OUT
Y
Pb
Pr
L
SL
SR
R
C
LFE
L
SL
SR
R
C
FLE
Wiring Loewe Flat TV – Auro – Individual Sound/Tremo
Audio cable cinch -> SCART
(available in specialised
trade)
Surround speaker system
Digital audio TV -> Auro
only required with TV as
centre spreaker
Six-pole cinch
Connect the cables as shown in the graphic:
Connect the Auro to socket AV2 of the Loewe Flat TV. If your Loewe TV set has
•
three AV sockets, use socket AV3.
You must use a Euro-AV cable in which all contacts are connected with each
•
other (21-fold as in the case with the enclosed cable).
To get a better picture quality, use a three-wire cinch cable and connect it to
•
Auro “COMPONENT VIDEO OUT“ and “SD/HD-COMPONENT IN“ of the TV set.
Pay attention to the exact polarity of the Y/Cb/Cr signals. In addition you have
to switch the “VIDEO OUT SELECTOR“ switch on the back of the Auro to the
“COMP.“ position.
Letters are embossed on the sides of the plugs on the six-wire cinch cable:
•
gray plug: ”C” for center channel; black plug: ”LFE” for subwoofer; red plug:
”FR” for front right or ”SR” for surround right; white plug: ”FL” for front left or
”SL” for surround left.
Two-wire (thin) cubic plug cable from Auro to the “Master” socket on Individ-
•
ual Sound/Tremo (connect the end of the cable with kink protection to Auro).
The cubic plugs are secured in the socket by a lug. You have to press down the
lug rst before you can remove the cubic plug.
Component Video
(available in specialised
trade)
EURO-AV-cable
L-Link-cable
Cubic plug cable
For TV as center loudspeaker use a cinch cable to connect “AUDIO IN C“ on
•
the TV set with “PRE OUT C“ on the DVD Preceiver (the connection of the gray
plug “C“ between Auro and Individual Sound/Tremo is omitted). In addition,
you have to move the ”Center to” switch on the back of Individual Sound/Tremo to the ”TV” position (switch must be pressed); see the separate operating
manual for Individual Sound/Tremo.
To play the TV sound over Auro/Individual Sound/Tremo, connect the digital
•
audio output of the TV set “AUDIO DIGITAL OUT“ with the “DIGITAL IN“ input
from Auro with a cinch cable.
When establishing the L-Link, Auro and the TV must be in the powerless state,
•
otherwise, these devices cannot identify each other after switching on; for
L-Link see page 7.
You can connect an additional external analogue source to the analogue audio
•
input AUX 1 IN.
Audio cable cinch -> SCART (available in specialised trade) for use of the
•
component signal and “TV as centre loudspeaker“ - see note on page 42.
9 -
PREOUT
L C R L L
SL LFE SR R R
TO TV
AUX1 IN
DIGITAL
IN
DIGITAL
OUT
TV
L-LINK
12V / 15mA
EXT
AUX OUT AUX 2
ON
OFF
Satellite Speaker OUT
Surr.
Front
RRL
C
L
Loewe
Auro
COMPONENT
VIDEO OUT
Y
Pb
Pr
PRE IN
L
SL
SR
R
C
LFE
L
SL
SR
R
C
FLE
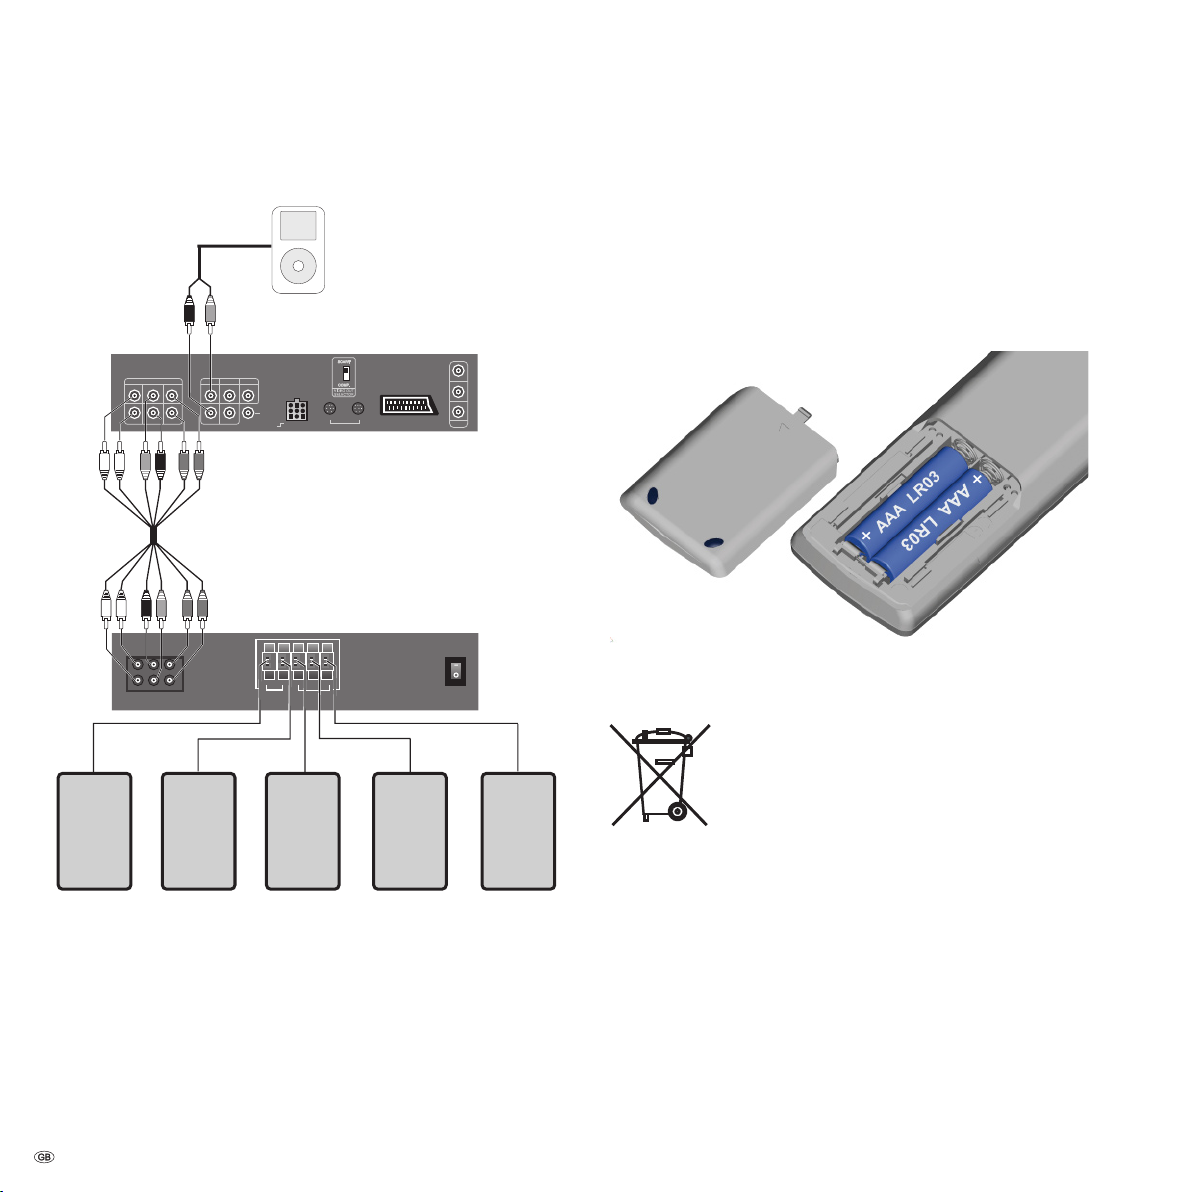
First installation
Wiring Auro – audio system
e.g. MP3 Player
Aktive 5.1 loudspeaker system
e.g. Loewe Individual Sound/Tremo
Remote control
Inserting the batteries
To insert or change the batteries, press on the point indicated by an imprinted
arrow. Push the battery compartment cover down and remove it. Insert batteries
of the alkaline-manganese LR 03 (AAA) type and make sure the + and – poles
are the right way round.
Then push the cover back on from below.
Note on disposing batteries
The batteries provided contain no harmful materials such as
cadmium, lead or mercury.
Regulations concerning used batteries stipulate that batteries
may no longer be thrown out with the household rubbish.
Deposit any used batteries free of charge into the designated
collection containers set up at commercial businesses. You can
dispose used batteries also at your dealer.
Satellite loudspeakers
Connect the cables as shown in the graphic:
Use a six-wire cinch cable to connect the PRE OUT outputs of the Auro to the
•
corresponding inputs of the active 5.1 loudspeaker system.
You can connect an additional external analogue source to the analogue audio
•
input AUX 1 IN.
Set the loudspeaker system to Auro as described on page 13.
•
Set the limit frequency for the bass speaker on your active 5.1 loudspeaker
•
system to at least 100 Hz.
- 10
First installation
DVD menu
Play from
Markers
Settings
Language Presettings
Sound
DVD menu
Languages Presettings
Back
End
Info
Subtitle active yes no
Subtitle English
Film English
Menu on DVD English
DVD Player Menu
DVD menu
Language DVD Player menu
Back
Ende
Info
Deutsch D
English GB
Español E
Français F
Nederlands NL
Italiano I
Switching on for the rst time
Power mains
Connect the TV set to a 220-240V/50- 60 hertz power outlet.
Note: First, read section ”About operation” on pg. 15/16 to nd out about the
basic operation of Auro.
Press the button on the front of the device
or
set the remote control to DVD-Preceiver mode and switch on
DVD/CD
or
press the button on the remote control briey and switch on
radio.
Auro is switched on, DVD/CD appears in the display. This indicates that the
DVD/CD sub-unit is switched on.
Shortly afterwards, the message READING appears in the display. Now Auro
tries to read the disc in the drive. NO DISC appears in the display if there is
no disc in the drive.
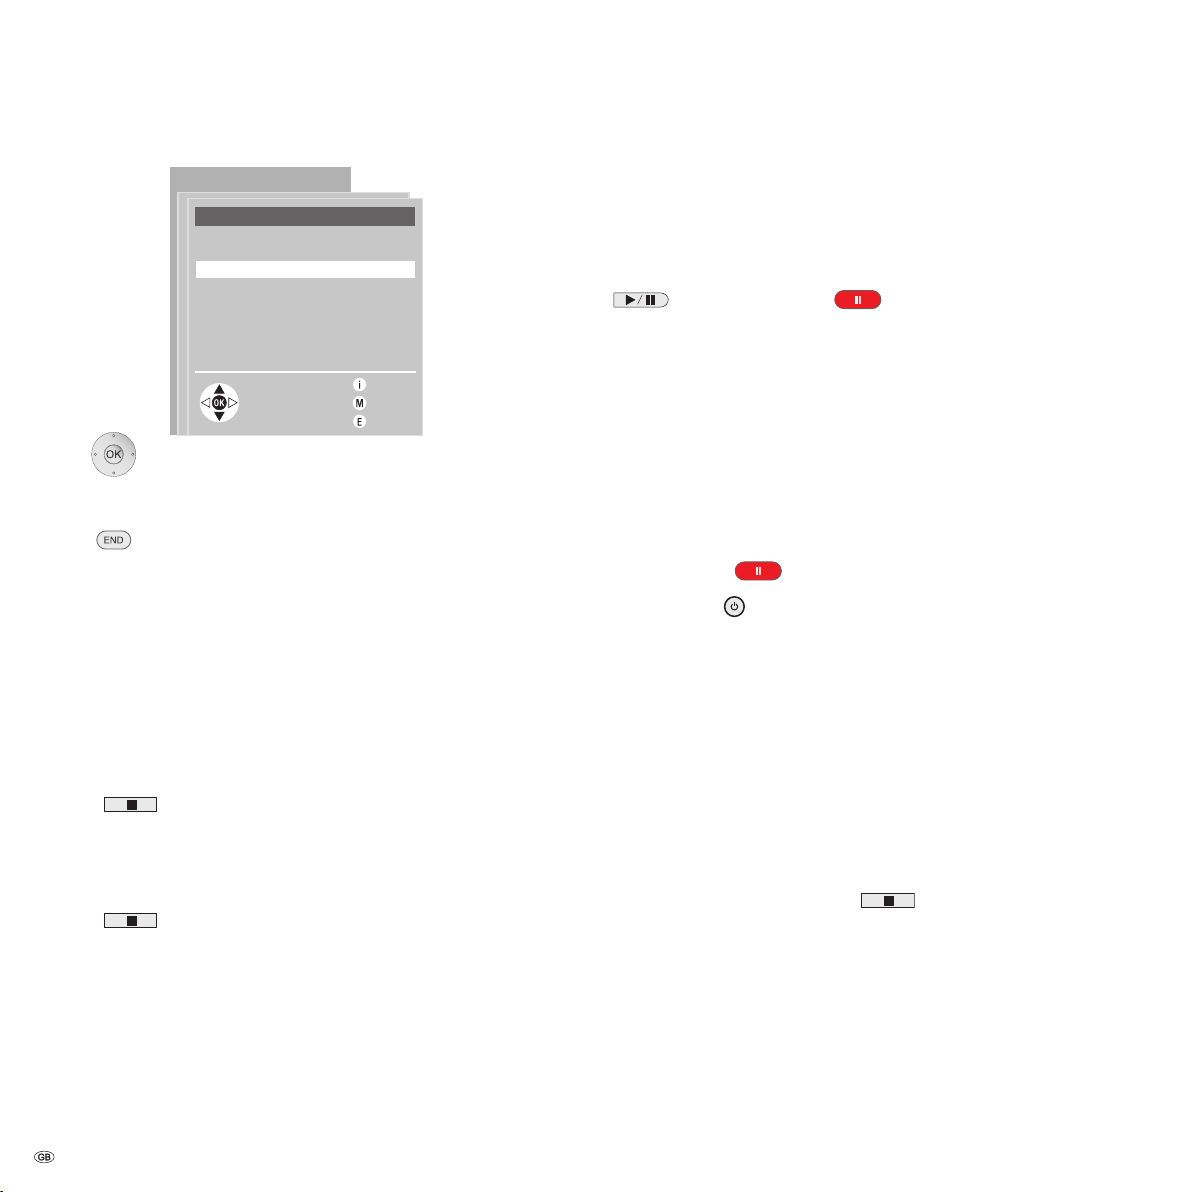
Go with 6 to the item “Language Presettings“.
Press 4.
The “Language Presettings“ window opens:
Go with 6 to the item “DVD Player menu”.
Press 4.
The “Language DVD Player Menu“ window opens:
Setting the language
First, set the desired language for the Auro menus. English is the default. Proceed as follows to set the language of your choice:
There is no disc in the drive and the drawer is closed.
Press the button.
The DVD menu is displayed.
Go with 65 to the language of your choise.
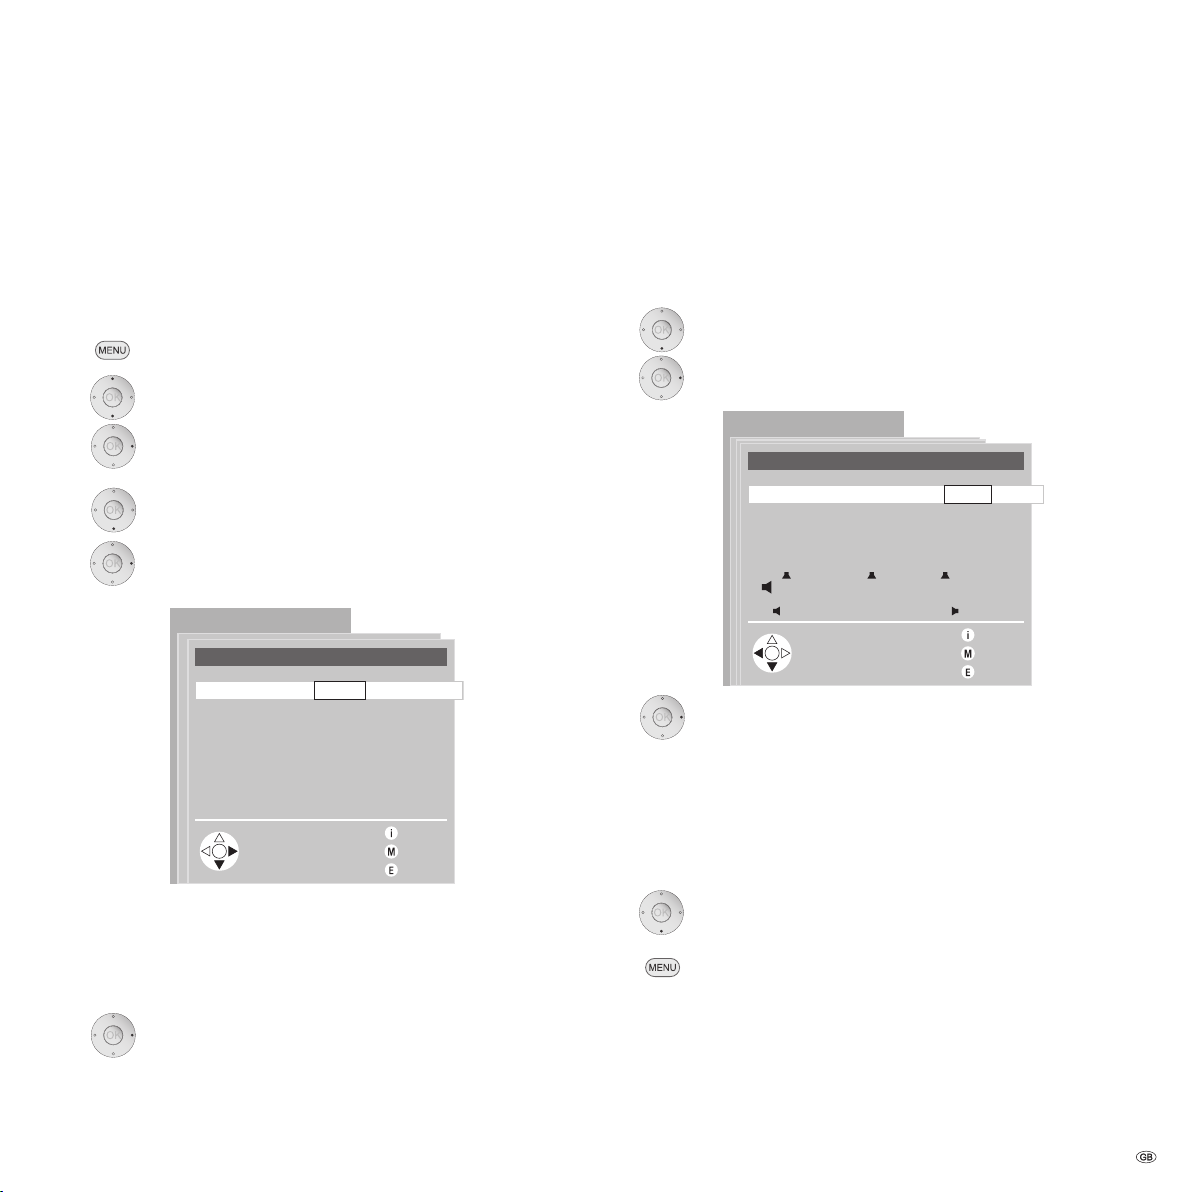
11 -
First installation
DVD menu
Language DVD Player Menu
Back
End
InfoAccept with OK
Deutsch D
English GB
Español E
Français F
Nederlands NL
Italiano I
Press the button OK .
The selected language is then set as Auro’s user interface
language.
The DVD menu is closed when you press the END button.
Activate Digital Link
With Digital Link, Loewe TVs pass on the remote control signals to Auro via the
Euro-AV connection. Digital Link is useful when you want to install Auro concealed, e.g. in a closed rack where it cannot be reached by the remote control
signals.
Switching on Digital Link
Auro must be in standby (standby indicator lights red, display is dark). Hold the
button the device pressed for at least ve seconds until the message
LINK appears in the display.
Switching off Digital Link
Auro must be in standby (standby indicator lights red, display is dark). Hold the
button the device pressed for at least ve seconds until the message
FRONT appears in the display.
Switch over PAL/NTSC
Auro is set to the PAL TV norm at the factory. If your TV is set to another standard
(NTSC), you have to adapt the Auro setting accordingly. There is no disc in the
drive and the drawer is closed.
If Auro is switched on: keep the Pause button on the device
or on the remote control pressed for ve seconds.
NTSC, appears in the device display, Auro is then set to the NTSC TV standard.
In the same way, you can set the Auro to AUTO or PAL.
In the AUTO AUTO setting, Auro automatically detects whether a PAL or an
NTSC-DVD is inserted and switches over to the respective standard.
Doing a reset
You can reset all settings in Auro to their original values with a Reset.
The state prior to initial installation (Factory Setting) is reinstated.
If Auro is in standby mode (red standby indicator lights) and the remote control
is set to the DVD/CD mode:
Press the button on the remote control and hold it down.
1.
Also press the button on the device and hold it down.
2.
Keep both the buttons held down for at least 5 seconds.
3.
Then, Auro switches on, the message RESET appears in the display. The
sub-device DVD/CD is active.
All settings are therefore reset to their original values. You have to perform initial
installation.
Switching over to Progressive Scan
With the Progressive Scan mode you get the highest possible picture quality
without ickering in the “Component Video” operating mode. Set the “VIDEO
OUT SELECTOR“ switch on the back of Auro to the “COMP“ position. If Auro is
switched on: Keep the stop button (there is no disc in the drive and the drawer is
closed. / no menu display) on the unit pressed for ve seconds.
P-SCAN ON, appears in the unit display so that Auro is switched to Progressive Scan mode.
In the same way you can set Auro to P-SCAN OFF.
- 12
First installation
DVD menu
Speaker System
Back
End
Info
System TREMO other
Connect speakers
Listener/Speaker distances
Adjust Loudspeaker Level
DVD menu
Connect speakers
Back
End
Info
Front speakers small large
Surround speakers small
Centre speaker small
Subwoofer yes
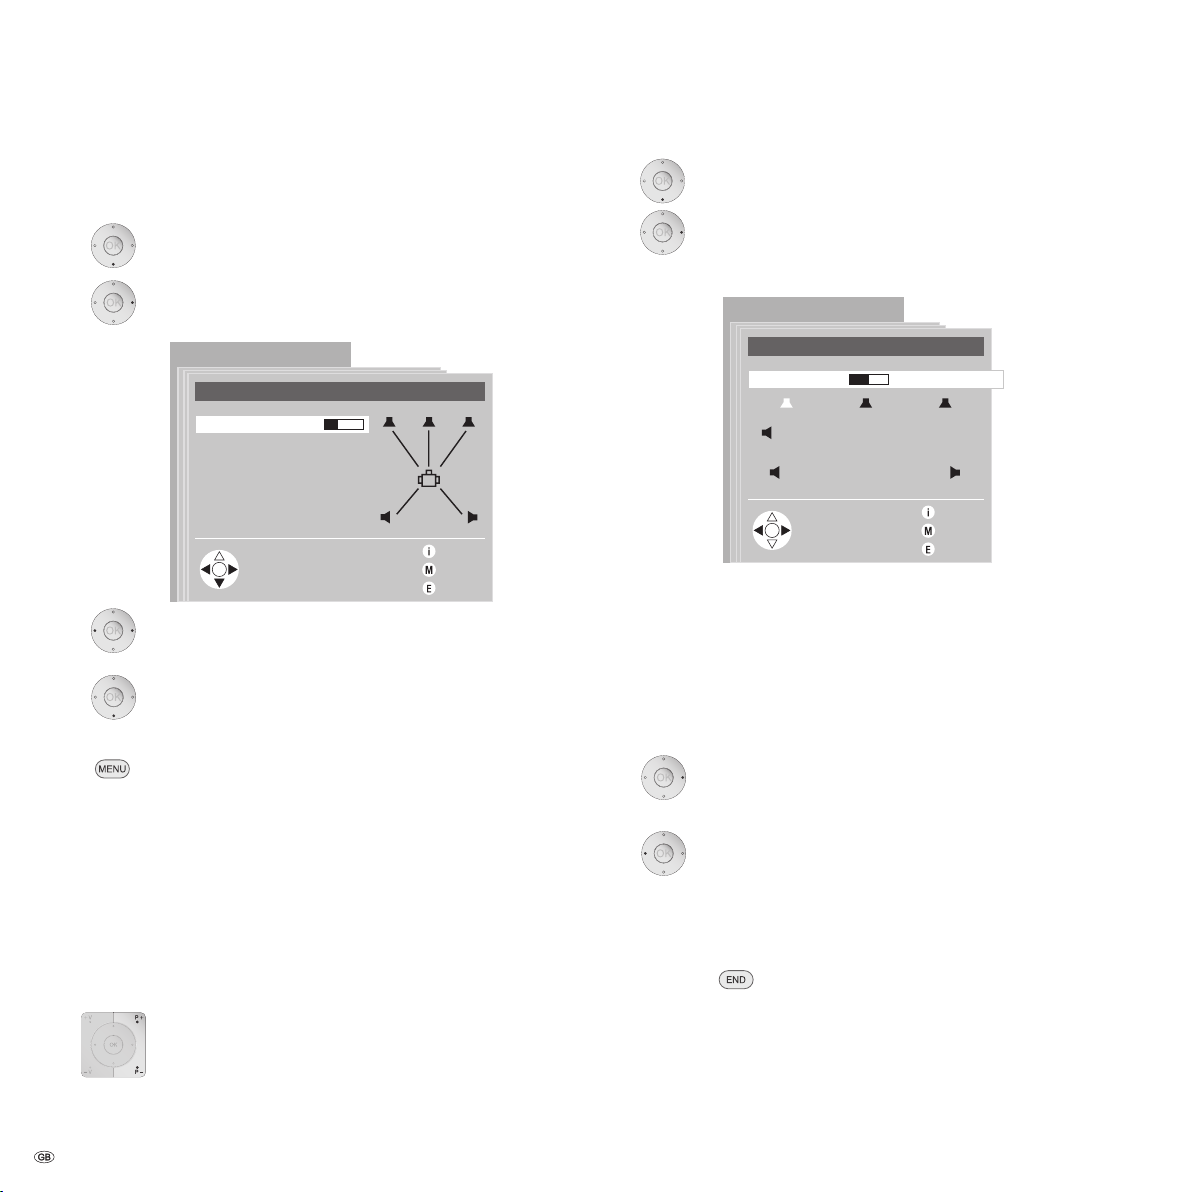
Setting the loudspeaker system
The dialogs for selecting and setting your loudspeaker system are all in the
”Speaker System” window.
Selecting the speaker system
There is no disc in the drive and the drawer is closed or an
inserted DVD is in Stop mode.
The DVD menu is displayed.
Go to the item ”Settings”.
Press 4.
The ”Settings” window opens.
Go to the item ”Speaker System”.
Press 4.
The ”Speaker System” window opens.
Connect speakers
Note: This dialog is omitted, if you have selected ”Tremo” as the connected
speaker system.
If you have selected ”other” as a speaker system:
Go to the item ”Connect speakers”.
Press 4.
The ”Connect speakers” window opens.
Specify whether you have connected large or small front speakers to Auro.
The Loewe Individual Sound S1 satellite speakers must be
logged in as “small”.
The Loewe Individual Sound L1 standing speakers must be
logged in as “large”.
In the graphic overview, you can check whether you have
logged in your speakers correctly.
Select “Tremo” if you have connected 4 satellite speakers (also in Individual
Sound).
If you use 2 or 4 Individual Sound standing speakers, select “other”. This also
applies for connecting an active speaker system or a passive system of another
provider.
Press 34 and select “TREMO” or “other”.
Go to ”Surround speakers” and so on.
Note: Some speaker combinations cancel each other out.
Press the button.
The ”Connect speakers” window is closed. You are back in the
”Speaker System” window.
13 -
DVD menu
Adjust loudspeaker level
Back
End
Info
Level 0
DVD menu
Listener/speaker Distances
Back
End
Info
Distance A 2.1m
Distance B1
Distance B2
Distance C1
Distance C2
A
B1
C1 C2
B2
First installation
Entering the distance between speakers
Open the “Loudspeaker System” menu as described on page
13.
Go to the item ”Listener/speaker Distances”.
Press 4
The ”Listener/Speaker distances” window opens.
Set the right distance value A (distance listener from center
loudspeaker). You can change the distance in steps of 0.3 m.
Go to ”Distance B1” (distance of listener from left front
speaker) and set the right distance here, too.
Go to the ”Adjust loudspeaker level” item in the ”Speaker
System” window.
Press 4.
The ”Adjust loudspeaker level” window opens.
You hear a noise in turn from every single loudspeaker starting with the front left speaker. The speaker is highlighted in
white in the overview (see the gure) whilst the noise is being
emitted from it. You can reduce or increase the volume of this
loudspeaker whilst the noise is being emitted from it.
Listen to all the speakers once rst. The perceived volume
should have the same intensity from all speakers.
Do the same for all connected speakers.
Press the button.
The ”Listener/Speaker distances” window closes. You are back
in the ”Speaker System” window.
Adjust loudspeaker level
With this dialog, you can compensate differences in volume between the individual speakers. The basic volume of the speaker system should not be inuenced with this function.
- 14
Take up your normal listening position.
Set normal volume.
Is one loudspeaker quieter than the others? Then, increase the
volume level of this speaker (4).
Is one loudspeaker louder than the others? Then, reduce the
volume level of this speaker (3).
Repeat the procedure until you are hearing all the speakers at
the same volume.
This completes the setting of your loudspeaker system. To close the DVD menu:
Press the button .
See the section on audio functions (pg. 38).
 Loading...