


 Loading...
8-Port 10/100 Ethernet Switch
 WIRED
WIRED
with WebView User Guide
Model No. SRW208/SRW208G/SRW208L/SRW208P/SRW208MP

WebView Switches
Copyright and Trademarks
Specifications are subject to change without notice. Linksys is a registered trademark or trademark of Cisco Systems, Inc. and/or its affiliates in the U.S. and certain other countries. Copyright © 2006 Cisco Systems, Inc. All rights reserved. Other brands and product names are trademarks or registered trademarks of their respective holders.
WARNING: This product contains chemicals, including lead, known to the State of California to cause cancer, and birth defects or other reproductive harm. Wash hands after handling.
How to Use this User Guide
The User Guide to the WebView Switches has been designed to make understanding networking with the switch easier than ever. Look for the following items when reading this User Guide:
This checkmark means there is a note of interest and is something you should pay special attention to while using the Switch.
This exclamation point means there is a caution or warning and is something that could damage your property or the Switch.
This question mark provides you with a reminder about something you might need to do while using the Switch.
In addition to these symbols, there are definitions for technical terms that are presented like this:
word: definition.
Also, each figure (diagram, screenshot, or other image) is provided with a figure number and description, like this:
Figure 0-1: Sample Figure Description
Figure numbers and descriptions can also be found in the “List of Figures” section.
7090310A-RR
WebView Switches
Table of Contents
Chapter 1: Introduction |
1 |
Welcome |
1 |
What’s in this User Guide? |
3 |
Chapter 2: Getting to Know the Switch |
4 |
Overview |
4 |
SRW208 - Front Panel |
4 |
SRW208G - Front Panel |
5 |
SRW208L - Front Panel |
7 |
SRW208P, SRW208MP - Front Panel |
8 |
The Back Panel |
10 |
Chapter 3: Connecting the Switch |
11 |
Overview |
11 |
Before You Install the Switch... |
12 |
Placement Options |
12 |
Connecting the Switch |
15 |
Chapter 4: Using the Console Interface for Configuration |
16 |
Overview |
16 |
Configuring the HyperTerminal Application |
16 |
Connecting to the Switch through a Telnet Session |
17 |
Configuring the Switch through the Console Interface |
18 |
Chapter 5: Using the Web-based Utility for Configuration |
30 |
Overview |
30 |
Accessing the Web-based Utility |
30 |
Setup Tab - Summary |
31 |
Setup Tab - Network Settings |
32 |
Setup Tab - Time |
33 |
Port Management Tab - Port Settings |
34 |
Port Management Tab - Link Aggregation |
37 |
Port Management Tab - LACP |
38 |
Port Management Tab - PoE Power Settings |
39 |
VLAN Management Tab - Create VLAN |
39 |
VLAN Management Tab - Port Settings |
40 |
WebView Switches |
|
VLAN Management Tab - Ports to VLAN |
41 |
VLAN Management Tab - VLAN to Ports |
42 |
VLAN Management Tab - GVRP |
43 |
Statistics Tab - RMON Statistics |
43 |
Statistics Tab - RMON History |
45 |
Statistics Tab - RMON Alarm |
47 |
Statistics Tab - RMON Events |
48 |
Statistics Tab - Port Utilization |
49 |
Statistics Tab - 802.1x Statistics |
50 |
Statistics Tab - GVRP Statistics |
50 |
ACL Tab - IP Based ACL |
51 |
ACL Tab - MAC Based ACL |
54 |
Security Tab - ACL Binding |
55 |
Security Tab - RADIUS |
55 |
Security Tab - TACACS+ |
56 |
Security Tab - 802.1x Settings |
57 |
Security Tab - Port Security |
58 |
Security Tab - Multiple Hosts |
59 |
Security Tab - Storm Control |
60 |
QoS |
61 |
QoS Tab - CoS Settings |
61 |
QoS Tab - Queue Settings |
62 |
QoS Tab - DSCP Settings |
63 |
QoS Tab - Bandwidth |
63 |
QoS Tab - Basic Mode |
64 |
QoS Tab - Advanced Mode |
64 |
Spanning Tree |
66 |
Spanning Tree Tab - STP Status |
67 |
Spanning Tree Tab - Global STP |
68 |
Spanning Tree Tab - STP Port Settings |
69 |
Spanning Tree Tab - RSTP Port Settings |
70 |
Spanning Tree Tab - MSTP Properties |
72 |
Spanning Tree Tab - MSTP Instance Settings |
72 |
Spanning Tree Tab - MSTP Interface Settings |
73 |
Multicast Tab - IGMP Snooping |
74 |
Multicast Tab - Bridge Multicast |
76 |
WebView Switches |
|
Multicast Tab - Bridge Multicast Forward All |
77 |
SNMP Tab - Global Parameters |
77 |
SNMP Tab - Views |
78 |
SNMP Tab - Group Profile |
78 |
SNMP Tab - Group Membership |
80 |
SNMP Tab - Communities |
81 |
SNMP Tab - Notification Filter |
82 |
SNMP Tab - Notification Recipient |
83 |
Admin Tab - User Authentication |
84 |
Admin Tab - Static Address |
85 |
Admin Tab - Dynamic Address |
86 |
Admin Tab - Logging |
87 |
Admin Tab - Port Mirroring |
88 |
Admin Tab - Cable Test |
88 |
Admin Tab - Save Configuration |
89 |
Admin Tab - Firmware Upgrade |
90 |
Admin Tab - Reboot |
90 |
Admin Tab - Factory Defaults |
91 |
Admin Tab - Server Logs |
91 |
Admin Tab - Memory Logs |
92 |
Admin Tab - Flash Logs |
92 |
Appendix A: About Gigabit Ethernet and Fiber Optic Cabling |
93 |
Gigabit Ethernet |
93 |
Fiber Optic Cabling |
93 |
Appendix B: Windows Help |
94 |
Appendix C: Downloading using Xmodem |
95 |
Startup Menu Procedures |
95 |
Appendix D: Glossary |
97 |
Appendix E: Specifications |
104 |
SRW208 |
104 |
SRW208G |
108 |
SRW208L |
112 |
SRW208MP |
116 |
SRW208P |
120 |
Appendix F: Warranty Information |
124 |
WebView Switches |
|
Appendix G: Regulatory Information |
125 |
Appendix H: Contact Information |
131 |
WebView Switches
List of Figures
Figure 2-1: Front Panel of the SRW208 |
4 |
Figure 2-2: Front Panel of the SRW208G |
5 |
Figure 2-3: Front Panel of the SRW208L |
7 |
Figure 2-4: Front Panel of the SRW208P |
8 |
Figure 2-5: Back Panel of the SRW208 |
10 |
Figure 3-1: Typical Network Configuration for the SRW208P |
11 |
Figure 3-2: Attach the Brackets to the Switch |
13 |
Figure 3-3: Mount the Switch in the Rack |
13 |
Figure 3-4: Proper Wall-Mount Orientation (Horizontal) |
14 |
Figure 3-5: Incorrect Wall-Mount Orientation (Vertical) |
14 |
Figure 3-6: Wall-Mount Template |
14 |
Figure 4-1: Finding HyperTerminal |
16 |
Figure 4-2: Connection Description |
16 |
Figure 4-3: Connect To |
16 |
Figure 4-4: COM1 Properties |
17 |
Figure 4-5: Telnet Login screen |
17 |
Figure 4-6: Switch Main Menu |
18 |
Figure 4-7: System Configuration Menu |
19 |
Figure 4-8: System Information Menu |
20 |
Figure 4-9: Versions |
20 |
Figure 4-10: General System Information |
20 |
Figure 4-11: Management Settings Menu |
21 |
Figure 4-12: Serial Port Configuration |
21 |
Figure 4-13: Telnet Configuration |
21 |
Figure 4-14: SSH Configuration |
22 |
Figure 4-15: SSH Server Configuration |
22 |
Figure 4-16: SSH Status |
22 |
Figure 4-17: SSH Crypto Key Generation |
23 |
WebView Switches |
|
Figure 4-18: SSH Keys Fingerprints |
23 |
Figure 4-19: Username & Password Settings |
24 |
Figure 4-20: Security Settings |
24 |
Figure 4-21: SSL Certificate Generation |
24 |
Figure 4-22: SSL Certificate |
25 |
Figure 4-23: IP Configuration |
25 |
Figure 4-24: IP Address Configuration |
26 |
Figure 4-25: HTTP |
26 |
Figure 4-26: HTTPS Configuration |
26 |
Figure 4-27: Network Configuration |
27 |
Figure 4-28: Ping Test |
27 |
Figure 4-29: TraceRoute Test |
27 |
Figure 4-30: File Management |
28 |
Figure 4-31: Restore System Default Settings |
28 |
Figure 4-32: Reboot System |
28 |
Figure 4-33: Port Status |
29 |
Figure 4-34: Port Configuration |
29 |
Figure 5-1: Login Screen |
30 |
Figure 5-2: Setup - Summary |
31 |
Figure 5-3: Setup - Network Settings |
32 |
Figure 5-4: Setup - Time |
33 |
Figure 5-5: Port Management - Port Settings |
34 |
Figure 5-6: Port Settings - Port Configuration Detail |
35 |
Figure 5-7: Port Management - Link Aggregration |
37 |
Figure 5-8: Link Aggregation - Link Aggregation Detail |
37 |
Figure 5-9: Port Management - LACP |
38 |
Figure 5-10: Port Management - PoE Power Settings |
39 |
Figure 5-11: VLAN Management - Create VLAN |
39 |
Figure 5-12: VLAN Management - Port Settings |
40 |
Figure 5-13: VLAN Management - Ports to VLAN |
41 |
WebView Switches |
|
Figure 5-14: VLAN Management - VLAN to Ports |
42 |
Figure 5-15: VLAN to Ports - Join VLAN |
42 |
Figure 5-16: VLAN Management - GVRP |
43 |
Figure 5-17: Statistics - RMON Statistics |
44 |
Figure 5-18: Statistics - RMON History |
45 |
Figure 5-19: RMON History Table |
46 |
Figure 5-20: Statistics - RMON Alarm |
47 |
Figure 5-21: Statistics - RMON Events |
48 |
Figure 5-22: RMON Events - Events Log |
49 |
Figure 5-23: Statistics - Port Utilization |
49 |
Figure 5-24: Statistics - 802.1x Statistics |
50 |
Figure 5-25: Statistics - GVRP Statistics |
50 |
Figure 5-26: ACL - IP Based ACL |
52 |
Figure 5-27: ACL - Mac Based ACL |
54 |
Figure 5-28: Security - ACL Binding |
55 |
Figure 5-29: Security - RADIUS |
55 |
Figure 5-30: Security - TACACS+ |
56 |
Figure 5-31: Security - 802.1x Settings |
57 |
Figure 5-32: 802.1x Settings - Setting Timer |
57 |
Figure 5-33: Security - Port Security |
58 |
Figure 5-34: Security - Multiple Hosts |
60 |
Figure 5-35: Security - Storm Control |
60 |
Figure 5-36: QoS - CoS Settings |
61 |
Figure 5-37: QoS - Queue Settings |
62 |
Figure 5-38: QoS - DSCP Settings |
63 |
Figure 5-39: QoS - Bandwidth |
63 |
Figure 5-40: QoS - Basic Mode |
64 |
Figure 5-41: QoS - Advanced Mode |
64 |
Figure 5-42: Advanced Mode - Out of Profile DSCP |
65 |
Figure 5-43: Advanced Mode - Policy Name |
65 |
WebView Switches |
|
Figure 5-44: Advanced Mode - New Class Map |
65 |
Figure 5-45: Advanced Mode - New Aggregate Policer |
66 |
Figure 5-46: Spanning Tree - STP Status |
67 |
Figure 5-47: Spanning Tree - Global STP |
68 |
Figure 5-48: Spanning Tree - STP Port Settings |
69 |
Figure 5-49: Spanning Tree - RSTP Port Settings |
70 |
Figure 5-50: Spanning Tree - MSTP Properties |
72 |
Figure 5-51: Spanning Tree - MSTP Instance Settings |
72 |
Figure 5-52: Spanning Tree - MSTP Interface Settings |
73 |
Figure 5-53: Multicast - IGMP Snooping |
75 |
Figure 5-54: Multicast - Bridge Multicast |
76 |
Figure 5-55: Multicast - Bridge Multicast Forward All |
77 |
Figure 5-56: SNMP - Global Parameters |
77 |
Figure 5-57: SNMP - Views |
78 |
Figure 5-58: SNMP - Group Profile |
79 |
Figure 5-59: SNMP - Group Membership |
80 |
Figure 5-60: SNMP - Communities |
81 |
Figure 5-61: SNMP - Notification Filter |
82 |
Figure 5-62: SNMP - Notification Recipient |
83 |
Figure 5-63: Admin - User Authentication |
84 |
Figure 5-64: Admin - Static Address |
85 |
Figure 5-65: Admin - Dynamic Address |
85 |
Figure 5-66: Admin - Logging |
87 |
Figure 5-67: Admin - Port Mirroring |
88 |
Figure 5-68: Admin - Cable Test |
88 |
Figure 5-69: Admin - Save Configuration |
89 |
Figure 5-70: Admin - Firmware Upgrade |
90 |
Figure 5-71: Admin - Reboot |
90 |
Figure 5-72: Admin - Factory Defaults |
91 |
Figure 5-73: Admin - Server Logs |
91 |
WebView Switches |
|
Figure 5-74: Admin - Memory Logs |
92 |
Figure 5-75: Admin - Flash Logs |
92 |
Figure C-1: Startup Menu |
95 |
Figure C-1: Auto-Boot Message |
95 |
Figure C-2: Send File |
96 |
Figure C-3: Download |
96 |
WebView Switches
Chapter 1: Introduction
Welcome
This guide covers five product models.
•SRW208 - 8-port 10/100 Ethernet Switch with WebView. Includes 8 10/100 RJ-45 ports.
•SRW208G - 8-port 10/100 Ethernet Switch with WebView and Expansion Slots. Includes 8 10/100 RJ-45 ports and 1 10/100/1000 RJ-45 port and 1 MiniGBIC slot.
•SRW208L - 8-port 10/100 Ethernet Switch with WebView and 100Base-LX Uplink Includes 8 10/100 RJ-45 ports and 1 MiniGBIC slot and 1 100LX Uplink port.
•SRW208MP - 8-port 10/100 Ethernet Switch with WebView and Maximum POE (Power over Ethernet) Includes 8 10/100 RJ-45 ports and 2 10/100/1000 RJ-45 ports and 2 shared MiniGBIC slots.
•SRW208P - 8-port 10/100 Ethernet Switch with WebView and POE (Power over Ethernet) Includes 8 10/100 RJ-45 ports and 2 10/100/1000 RJ-45 ports and 2 shared MiniGBIC slots.
For the purpose of this manual, whenever a feature applies to all models, the model number will be referenced as
SRW208x. If a specific model number is mentioned, then the feature is specific to that model.
The Linksys WebView Managed switch allows you to expand your network securely. Configuration of the switch is secured using SSL for Web access. User control is secured using 802.1x security using a RADIUS authentication mechanism and can also be controlled using MAC-based filtering.
Extensive QoS features makes the solution ideal for real-time applications like Voice and Video. The 4 priority queues together with the Weighted Round Robin and Strict Priority scheduling techniques facilitate efficient coexistence of real-time traffic with data traffic allowing them each to meet their QoS needs. Individual users or applications can be prioritized above others using various Class of Service options - by port, layer 2 priority (802.1p), and Layer 3 priority (TOS or DSCP). Intelligent Broadcast, and Multicast storm control minimizes and contain the effect of these types of traffic on regular traffic. IGMP Snooping limits bandwidth-intensive video traffic to only the requestors without flooding to all users. Incoming traffic can be policed and outgoing traffic can be shaped allowing you to control network access and traffic flow.
Chapter 1: Introduction |
1 |
Welcome
WebView Switches
There are features that allow you to expand and grow your network of switches. Link aggregation allows multiple high-bandwidth trunks between switches to be setup. This also provides a level of reliability in that the system continues to operate if one of the links break. Spanning Tree (STP), Fast Spanning Tree, and Rapid Spanning Tree (RSTP) allow you to build a mesh of switches increasing the availability of the system.
The rich management functionality of the WebView switches includes SNMP, RMON, Telnet, and HTTP
Management options, allowing you to flexibly integrate and manage these devices in your network.
The SRW208P and SRW208MP support Automatic Load Sensing - Power control circuitry automatically detects Power over Ethernet on access point before providing power. Power feeding of Ethernet limited for fixed 10/100 Base-T/TX ports. The SRW208MP can provide maximum output power per PoE port up to 15.4W on 8 ports simultaneously. while the SRW208P can provide maximum output power on 4 ports simultaneously or 8 ports at half power.
Chapter 1: Introduction |
2 |
Welcome
WebView Switches
What’s in this User Guide?
This user guide covers the steps for setting up and using the Switch.
•Chapter 1: Introduction
This chapter describes the Switch’s applications and this User Guide.
•Chapter 2: Getting to Know the Switch
This chapter describes the physical features of the Switch.
•Chapter 3: Connecting the Switch
This chapter explains how to install and connect the Switch.
•Chapter 4: Using the Console Interface for Configuration
This chapter instructs you on how to use the Switch’s console interface when you configure the Switch.
•Chapter 5: Using the Web-based Utility for Configuration
This chapter shows you how to configure the Switch using the Web-based Utility.
•Appendix A: About Gigabit Ethernet and Fiber Optic Cabling
This appendix gives a general description of Gigabit Ethernet and fiber optic cabling.
•Appendix B: Windows Help
This appendix describes how you can use Windows Help for instructions about networking, such as installing the TCP/IP protocol.
•Appendix C: Downloading using Xmodem
This appendix describes how you can download software into the Switch using Xmodem.
•Appendix D: Glossary
This appendix gives a brief glossary of terms frequently used in networking.
•Appendix E: Specifications
This appendix provides the Switch’s technical specifications.
•Appendix F: Warranty Information
This appendix supplies the Switch’s warranty information.
•Appendix G: Regulatory Information
This appendix supplies the Switch’s regulatory information.
•Appendix H: Contact Information
This appendix provides contact information for a variety of Linksys resources, including Technical Support.
Chapter 1: Introduction |
3 |
What’s in this User Guide?

WebView Switches
Chapter 2: Getting to Know the Switch
Overview
The Switches differ in number and types of LEDs and ports. The front panel of each Switch is displayed on one of the following pages. The back panel is the same on all five models.
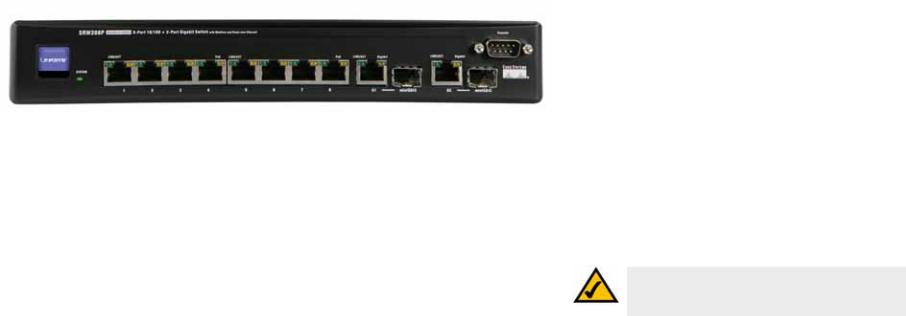
SRW208 - Front Panel
The Switch's LEDs and ports are located on the front panel.
|
Figure 2-1: Front Panel of the SRW208 |
LEDs |
|
System |
Green. The SYSTEM LED lights up to indicate that the Switch is powered on. |
Link/Act |
Green. The LINK/ACT LED lights up to indicate a functional network link through the |
|
corresponding port (1 through 8) with an attached device. It flashes to indicate that the |
|
Switch is actively sending or receiving data over that port. |
100M |
Orange. The 100M LED lights up to indicate a 100Mbps connection on the corresponding |
|
port (1 through 8). |
Chapter 2: Getting to Know the Switch |
4 |
Overview

WebView Switches
Ports
1-8 |
The Switch is equipped with 8 auto-sensing, Ethernet network ports, which use RJ-45 |
|
connectors. The Fast Ethernet ports support network speeds of 10Mbps or 100Mbps. |
|
They can operate in half and full-duplex modes. Auto-sensing technology enables each |
|
port to automatically detect the speed of the device connected to it (10Mbps or 100Mbps), |
|
and adjust its speed and duplex accordingly. |
Console |
The Console port is where you can connect a serial cable to a PC’s serial port for |
|
configuration using your PC’s HyperTerminal program. Refer to Chapter 4: Using the |
|
Console Interface for Configuration for more information. |
SRW208G - Front Panel
The Switch's LEDs and ports are located on the front panel.
|
Figure 2-2: Front Panel of the SRW208G |
|
LEDs |
|
|
System |
Green. The SYSTEM LED lights up to indicate that the Switch is powered on. |
|
Link/Act |
Green. The LINK/ACT LED lights up to indicate a functional network link through the |
|
|
corresponding port (1 through 8, G1, or G2) with an attached device. It flashes to indicate |
|
|
that the Switch is actively sending or receiving data over that port. |
|
100M |
Orange. The 100M LED lights up to indicate a 100Mbps connection on the corresponding |
|
|
port (1 through 8). |
|
Gigabit |
Orange. The Gigabit LED lights up to indicate a Gigabit connection on the corresponding |
|
|
RJ-45 port (G1) or miniGBIC port (G2). |
|
Chapter 2: Getting to Know the Switch |
5 |
|
SRW208G - Front Panel
WebView Switches
Ports
1-8 |
The Switch is equipped with 8 auto-sensing, Ethernet network ports, which use RJ-45 |
|
connectors. The Fast Ethernet ports support network speeds of 10Mbps or 100Mbps. |
|
They can operate in half and full-duplex modes. Auto-sensing technology enables each |
|
port to automatically detect the speed of the device connected to it (10Mbps or 100Mbps), |
|
and adjust its speed and duplex accordingly. |
G1 |
The Gigabit Ethernet port supports network speeds of 10Mbps, 100Mbps, and 1000Mbps. |
|
It can operate in half and full-duplex modes. Auto-sensing technology enables the port to |
|
automatically detect the speed of the device connected to it (10Mbps, 100Mbps, or |
|
1000Mbps), and adjust its speed and duplex accordingly. |
G2 |
The mini-GBIC (gigabit interface converter) port is a connection point for a mini-GBIC |
|
expansion module, so the Switch can be uplinked via fiber to another switch. The MiniGBIC |
|
port provides a link to a high-speed network segment or individual workstation at speeds |
|
of up to 1000Mbps. |
|
Use the Linksys MGBT1, MGBSX1, or MGBLH1 mini-GBIC modules with the Switch. The |
|
MGBSX1 and the MGBLH1 require fiber cabling with LC connectors, while the MGBT1 |
|
requires a Category 5e Ethernet cable with an RJ-45 connector. |
Console |
The Console port is where you can connect a serial cable to a PC’s serial port for |
|
configuration using your PC’s HyperTerminal program. Refer to Chapter 4: Using the |
|
Console Interface for Configuration for more information. |
Chapter 2: Getting to Know the Switch |
6 |
SRW208G - Front Panel

WebView Switches
SRW208L - Front Panel
The Switch's LEDs and ports are located on the front panel.
|
Figure 2-3: Front Panel of the SRW208L |
LEDs |
|
System |
Green. The SYSTEM LED lights up to indicate that the Switch is powered on. |
Link/Act |
Green. The LINK/ACT LED lights up to indicate a functional network link through the |
|
corresponding port (1 through 8, G1, or 100LX) with an attached device. It flashes to |
|
indicate that the Switch is actively sending or receiving data over that port. |
100M |
Orange. The 100M LED lights up to indicate a 100Mbps connection on the corresponding |
|
port (1 through 8). |
Gigabit |
Orange. The Gigabit LED lights up to indicate a Gigabit connection on the corresponding |
|
RJ-45 port (G1). |
Ports |
|
1-8 |
The Switch is equipped with 8 auto-sensing, Ethernet network ports, which use RJ-45 |
|
connectors. The Fast Ethernet ports support network speeds of 10Mbps or 100Mbps. |
|
They can operate in half and full-duplex modes. Auto-sensing technology enables each |
|
port to automatically detect the speed of the device connected to it (10Mbps or 100Mbps), |
|
and adjust its speed and duplex accordingly. |
Chapter 2: Getting to Know the Switch |
7 |
SRW208L - Front Panel
WebView Switches |
|
G1 |
The mini-GBIC (gigabit interface converter) port is a connection point for a mini-GBIC |
|
expansion module, so the Switch can be uplinked via fiber to another switch. Each |
|
MiniGBIC port provides a link to a high-speed network segment or individual workstation at |
|
speeds of up to 1000Mbps. |
|
Use the Linksys MGBT1, MGBSX1, or MGBLH1 mini-GBIC modules with the Switch. The |
|
MGBSX1 and the MGBLH1 require fiber cabling with LC connectors, while the MGBT1 |
|
requires a Category 5e Ethernet cable with an RJ-45 connector. |
9 |
The 100LX port is where you can connect |
Console |
The Console port is where you can connect a serial cable to a PC’s serial port for |
|
configuration using your PC’s HyperTerminal program. Refer to Chapter 4: Using the |
|
Console Interface for Configuration for more information. |
SRW208P, SRW208MP - Front Panel
The Switch's LEDs and ports are located on the front panel.
|
Figure 2-4: Front Panel of the SRW208P |
LEDs |
|
System |
Green. The SYSTEM LED lights up to indicate that the Switch is powered on. |
Link/Act |
Green. The LINK/ACT LED lights up to indicate a functional network link through the |
|
corresponding port (1 through 8) with an attached device. It flashes to indicate that the |
|
Switch is actively sending or receiving data over that port. |
PoE |
Orange. The PoE LED lights up to indicate a device is connected utilizing Power over |
|
Ethernet on the corresponding port (1 through 8). |
Chapter 2: Getting to Know the Switch
NOTE: The SRW208P supports up to 4 ports at 15.4W or up to 8 ports at 7.5W.
The SRW208MP supports up to 8 ports at 15.4W.
8
SRW208P, SRW208MP - Front Panel
WebView Switches |
|
Gigabit |
Orange. The Gigabit LED lights up to indicate a Gigabit connection on the corresponding |
|
RJ-45 port (G1 through G2). |
Ports |
|
1-8 |
The Switch is equipped with 8 auto-sensing, Ethernet network ports, which use RJ-45 |
|
connectors. The Fast Ethernet ports support network speeds of 10Mbps or 100Mbps. |
|
They can operate in half and full-duplex modes. Auto-sensing technology enables each |
|
port to automatically detect the speed of the device connected to it (10Mbps or 100Mbps), |
|
and adjust its speed and duplex accordingly. |
G1-G2 |
The Gigabit Ethernet ports support network speeds of 10Mbps, 100Mbps, and 1000Mbps. |
|
They can operate in half and full-duplex modes. Auto-sensing technology enables each |
|
port to automatically detect the speed of the device connected to it (10Mbps, 100Mbps, or |
|
1000Mbps), and adjust its speed and duplex accordingly. The G1 and G2 RJ-45 ports are |
|
shared with the miniGBIC ports. |
miniGBIC1/2 |
The mini-GBIC (gigabit interface converter) port is a connection point for a mini-GBIC |
|
expansion module, so the Switch can be uplinked via fiber to another switch. Each |
|
MiniGBIC port provides a link to a high-speed network segment or individual workstation at |
|
speeds of up to 1000Mbps. |
|
Use the Linksys MGBT1, MGBSX1, or MGBLH1 mini-GBIC modules with the Switch. The |
|
MGBSX1 and the MGBLH1 require fiber cabling with LC connectors, while the MGBT1 |
|
requires a Category 5e Ethernet cable with an RJ-45 connector. |
Console |
The Console port is where you can connect a serial cable to a PC’s serial port for |
|
configuration using your PC’s HyperTerminal program. Refer to Chapter 4: Using the |
|
Console Interface for Configuration for more information. |
Chapter 2: Getting to Know the Switch |
9 |
SRW208P, SRW208MP - Front Panel
WebView Switches
The Back Panel
The power port is located on the back panel of the Switch.
Figure 2-5: Back Panel of the SRW208
Power |
The Power port is where you will connect the power cord. |
NOTE: If you need to reset the Switch, unplug the power cord from the back of the Switch. Wait a few seconds and then reconnect it.
Chapter 2: Getting to Know the Switch |
10 |
The Back Panel
WebView Switches
Chapter 3: Connecting the Switch
Overview
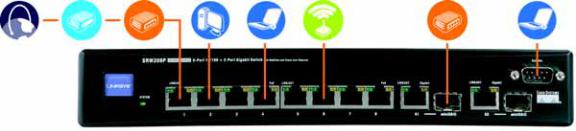
This chapter will explain how to connect network devices to the Switch. For an example of a typical network configuration, see the application diagram shown below.
|
Cable/DSL |
Router |
10/100 |
10/100 |
Wireless |
Uplink via Fiber to |
Administrator’s |
Internet |
Modem |
Desktop |
Notebook |
Access Point |
Switch |
Notebook |
Figure 3-1: Typical Network Configuration for the SRW208P
When you connect your network devices, make sure you don’t exceed the maximum cabling distances, which are listed in the following table:
Table 1: Maximum Cabling Distances
From |
To |
Maximum Distance |
|
|
|
Switch |
Switch or Hub* |
100 meters (328 feet) |
|
|
|
Hub |
Hub |
5 meters (16.4 feet) |
|
|
|
Switch or Hub |
Computer |
100 meters (328 feet) |
|
|
|
*A hub refers to any type of 100Mbps hub, including regular hubs and stackable hubs. A 10Mbps hub connected to another 10Mbps hub can span up to 100 meters (328 feet).
Chapter 3: Connecting the Switch |
11 |
Overview
WebView Switches
Before You Install the Switch...
When you choose a location for the Switch, observe the following guidelines:
•Make sure that the Switch will be accessible and that the cables can be easily connected.
•Keep cabling away from sources of electrical noise, power lines, and fluorescent lighting fixtures.
•Position the Switch away from water and moisture sources.
•To ensure adequate air flow around the Switch, be sure to provide a minimum clearance of two inches (50 mm).
•Do not stack free-standing Switches more than four units high.
Placement Options
Before connecting cables to the Switch, first you will physically install the Switch. Either set the Switch on its four rubber feet for desktop placement or mount the Switch in a standard-sized, 19-inch wide, 1U high rack for rackmount placement.
Desktop Placement
1.Attach the rubber feet to the recessed areas on the bottom of the Switch.
2.Place the Switch on a desktop near an AC power source.
3.Keep enough ventilation space for the Switch and check the environmental restrictions mentioned in the specifications.
4.Proceed to the section, “Connecting the Switch.”
Chapter 3: Connecting the Switch |
12 |
Before You Install the Switch...
WebView Switches
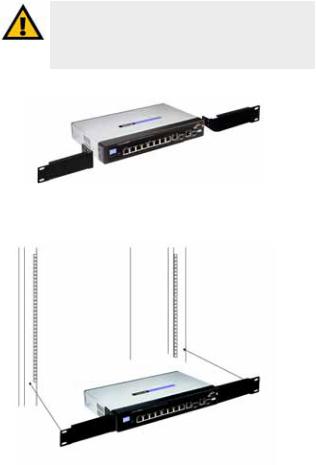
Rack-Mount Placement
To mount the Switch in any standard-sized, 19-inch wide, 1U high rack, follow these instructions:
1.Place the Switch on a hard flat surface with the front panel facing you.
2.Attach a rack–mount bracket to one side of the Switch with the supplied screws. Then attach the other bracket to the other side.
3.Make sure the brackets are properly attached to the Switch.
4.Use the appropriate screws (not included) to securely attach the brackets to your rack.
Proceed to the section, “Connecting the Switch.”
IMPORTANT: Make sure you use the screws supplied with the mounting brackets. Using the wrong screws could damage the Switch and would invalidate your warranty.
Figure 3-2: Attach the Brackets to the Switch
Figure 3-3: Mount the Switch in the Rack
Chapter 3: Connecting the Switch |
13 |
Placement Options
WebView Switches
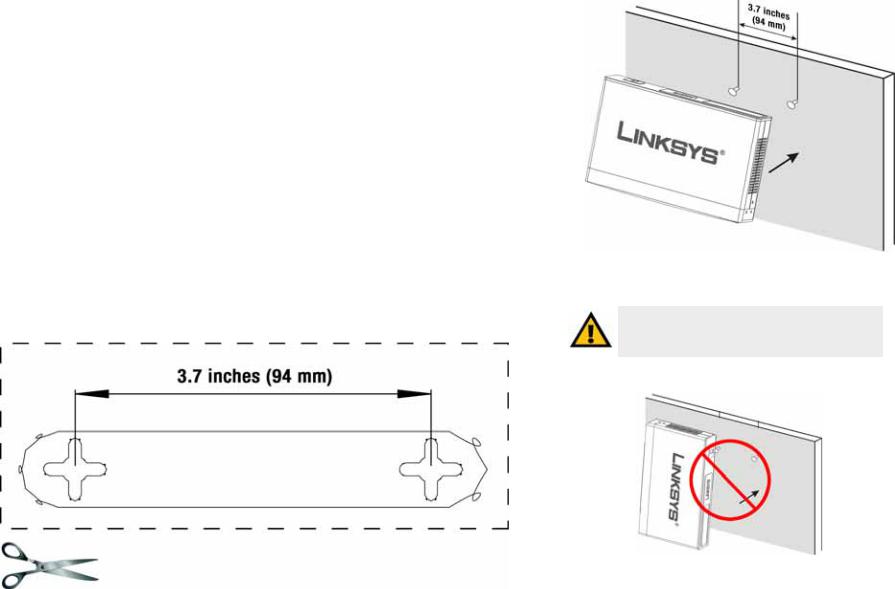
Wall-Mount Placement
When mounting the Switch on the wall, the Switch should be mounted horizontally. The front panel should face either up or down (see Figure 3-4). The unit should not be positioned vertically when mounted (see Figure 3-5).
You will need two suitable screws to mount the Switch.
1.Determine where you want to mount the Switch. Ensure that the wall you use is smooth, flat, dry and sturdy and make sure the location is within reach of the power outlet.
2.Drill two holes into the wall. Make sure the holes are 3.7 inches (94 mm) apart. You can print the template from this page.
3.Insert a screw into each hole, and leave 3 mm of its head exposed.
4.Maneuver the Switch so the wall-mount slots line up with the two screws.
5.Place the wall-mount slots over the screws and slide the Switch down until the screws fit snugly into the wall-mount slots.
Congratulations! The Wall-Mount installation of the Switch is complete.
Print this page at 100% size, cut along the dotted line and place on the wall to drill precise spacing.
Figure 3-6: Wall-Mount Template
Chapter 3: Connecting the Switch
Figure 3-4: Proper Wall-Mount Orientation (Horizontal)
IMPORTANT: When wall-mounting the switch, be sure to mount it horizontally. Do not mount the switch vertically.
Figure 3-5: Incorrect Wall-Mount Orientation (Vertical)
14
Placement Options

WebView Switches
Connecting the Switch
To connect network devices to the Switch, follow these instructions:
1.Make sure all the devices you will connect to the Switch are powered off.
2.For 10/100Mbps devices, connect a Category 5 Ethernet network cable to one of the numbered ports on the Switch. For a 1000Mbps device, connect a Category 5e Ethernet network cable to one of the numbered ports on the Switch.
3.Connect the other end to a PC or other network device.
4.Repeat steps 2 and 3 to connect additional devices.
5.If you are using the mini-GBIC port, then connect the mini-GBIC module to the mini-GBIC port. For detailed instructions, refer to the module’s documentation.
6.If you will use the Switch’s console interface to configure the Switch, then connect the supplied serial cable to the Switch’s Console port, and tighten the captive retaining screws. Connect the other end to your PC’s serial port. (This PC must be running the VT100 terminal emulation software, such as HyperTerminal.)
7.Connect the supplied power cord to the Switch’s power port, and plug the other end into an electrical outlet.
IMPORTANT: Make sure you use the power cord that is supplied with the Switch. Use of a different power cord could damage the Switch.
8.Power on the network devices connected to the Switch. Each active port’s corresponding Link/Act LED will light up on the Switch. If a port has an active Gigabit connection, then its corresponding Gigabit LED will also light up.
If you will use the Switch’s console interface to configure the Switch, proceed to Chapter 4: Using the Console Interface for Configuration for directions.
If you will use the Switch’s Web-based Utility to configure the Switch, proceed to Chapter 5: Using the Web-based Utility for Configuration.
NOTE: If you need to reset the Switch, unplug the power cord from the back of the Switch. Wait a few seconds and then reconnect it.
Chapter 3: Connecting the Switch |
15 |
Connecting the Switch
WebView Switches
Chapter 4: Using the Console Interface for Configuration
Overview
The Switch features a menu-driven console interface for basic configuration of the Switch and management of your network. The Switch can be configured using CLI through the console interface or through a telnet connection. This chapter describes console interface configuration. Configuration can also be performed through the web utility, which is covered in the next chapter.
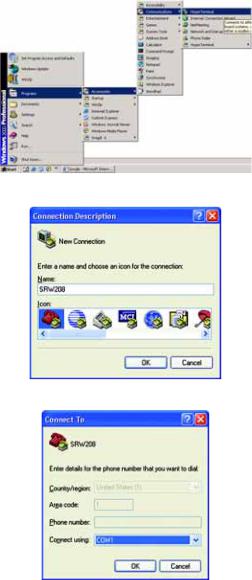
Configuring the HyperTerminal Application
Before you use the console interface, you will need to configure the HyperTerminal application on your PC.
Figure 4-1: Finding HyperTerminal
1. Click the Start button. Select Programs and choose Accessories. Select Communications. Select HyperTerminal from the options listed in this menu.
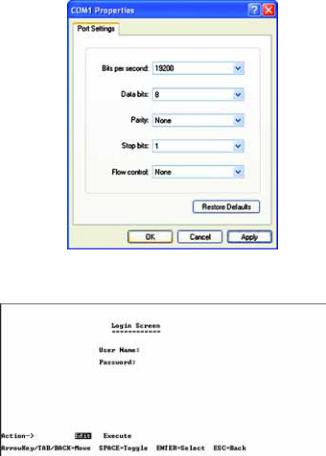
2. On the Connection Description screen, enter a name for this connection. In the example, the name of connection is SRW208. Select an icon for the application. Then, click the OK button.
3. On the Connect To screen, select a port to communicate with the Switch: COM1, COM2, or TCP/IP.
Figure 4-2: Connection Description
Chapter 4: Using the Console Interface for Configuration |
Figure 4-3: Connect To |
16 |
Overview
WebView Switches
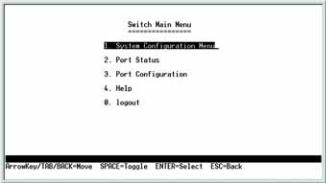
4. Set the serial port settings as follows: Bits per second: 38400
Data bits: 8
Parity: None
Stop bits: 1
Flow control: None
Then, click the OK button.
Figure 4-4: COM1 Properties
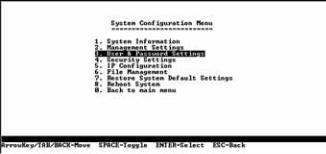
Connecting to the Switch through a Telnet Session
Open a command line editor and enter telnet 192.168.1.254. Then, press the Enter key.
The Login screen will now appear. The first time you open the CLI interface, select Edit and hit Enter. Enter admin in the User Name field. Leave the Password field blank.
Press the Esc button and you will return to the login screen. Use the right arrow button to navigate to Execute
and press the Enter button to enter the CLI interface.
Figure 4-5: Telnet Login screen
Chapter 4: Using the Console Interface for Configuration |
17 |
Connecting to the Switch through a Telnet Session
WebView Switches
Configuring the Switch through the Console Interface
The console screens consist of a series of menus. Each menu has several options, which are listed vertically. You select a menu option when you highlight it; pressing the Enter key activates the highlighted option.
To navigate through the menus and actions of the console interface, use the up or down arrow keys to move up or down, and use the left or right arrow keys to move left or right. Use the Enter key to select a menu option, and use the Esc key to return to the previous selection. Menu options and any values entered or present will be highlighted. The bottom of the screen lists the actions available.
Switch Main Menu
The System Main Menu screen displays these choices:
1.System Configuration Information Menu
2.Port Status
3.Port Configuration
4.Help
0. Logout
Chapter 4: Using the Console Interface for Configuration
Figure 4-6: Switch Main Menu
18
Configuring the Switch through the Console Interface
WebView Switches
System Configuration Menu
On the System Configuration Menu screen, you have these choices:
1.System Information
2.Management Settings
3.User & Password Settings
4.Security Settings
Figure 4-7: System Configuration Menu
5.IP Configuration
6.File Management
7.Restore System Default Settings
8.Reboot System
0. Back to main menu
Chapter 4: Using the Console Interface for Configuration |
19 |
Configuring the Switch through the Console Interface
Loading...