


 Loading...
USER GUIDE
Media Center Extender
Models: DMA2100, DMA2200 (EU)
DMA2100 |
DMA2200 |
About This Guide
About This Guide
Icon Descriptions
While reading through the User Guide you may see various icons that call attention to specific items. Below is a description of these icons:
NOTE: This check mark indicates that there is a note of interest and is something that you should pay special attention to while using the product.
WARNING: This exclamation point indicates that there is a caution or warning and it is something that could damage your property or product.
WEB: This globe icon indicates a noteworthy website address or e-mail address.
Online Resources
Website addresses in this document are listed without http:// in front of the address because most current web browsers do not require it. If you use an older web browser, you may have to add http:// in front of the web address.
Resource |
Website |
Linksys |
www.linksys.com |
|
|
Linksys International |
www.linksys.com/international |
|
|
Glossary |
www.linksys.com/glossary |
|
|
Network Security |
www.linksys.com/security |
|
|
Microsoft |
www.microsoft.com/media center |
|
|
Copyright and Trademarks
Specifications are subject to change without notice. Linksys is a registered trademark or trademark of Cisco Systems, Inc. and/or its affiliates in the U.S. and certain other countries. Copyright © 2010 Cisco Systems, Inc. All rights reserved. Other brands and product names are trademarks or registered trademarks of their respective holders.
i |
Media Center Extender |
About This Guide
CAUTION
These servicing instructions are for use by qualified service personnel only. To reduce the risk of electric shock do not perform any servicing other than that contained in the operating instructions unless you are qualified to do so.
Important Safety Instructions
1.Read these instructions.
2.Keep these instructions.
3.Heed all warnings.
4.Follow all instructions.
5.Do not use this apparatus near water.
6.Clean only with dry cloth.
7.Do not install near any heat sources such as radiators, heat registers, stoves or other apparatus (including amplifiers) that produce heat.
8.Protect the power cord from being walked on or pinched particularly at plugs, convenience receptacles, and the point where they exit from the apparatus.
9.Only use attachments/accessories specified by the manufacturer.
10.Unplug this apparatus during lightning storms or when unused for long periods of time.
11.Refer all servicing to qualified service personnel. Servicing is required when the apparatus has been damaged in any way, such as powersupply cord or plug is damaged, liquid has been spilled or objects have fallen into the apparatus, the apparatus has been exposed to rain or moisture, does not operate normally or has been dropped.
12.The socket-outlet shall be installed near the apparatus and shall be easily accessible.
WARNING: To reduce the risk of fire or electric shock, do not expose this apparatus to rain or moisture.
ii |
Media Center Extender |

Table of Contents
Important Safety Instructions |
|
|
ii |
Chapter 1: Product Overview |
|
|
1 |
Front Panel (DMA 2100) . . . . . . . . . . |
. . . . . . . |
. |
1 |
Front Panel (DMA 2200) . . . . . . . . . . |
. . . . . . . |
. |
1 |
Back Panel (DMA 2100) . . . . . . . . . . . |
. . . . . . . |
|
. 2 |
Back Panel (DMA 2200) . . . . . . . . . . . |
. . . . . . . |
|
. 3 |
Remote Control Overview . . . . . . . . . . |
. . . . . . |
. |
4 |
Chapter 2: Network Setup and Extender Connections |
|
6 |
|
Connect to a Wireless or Wired Network . . . . |
. . . . . . |
. |
6 |
Wireless Network |
|
|
7 |
Wireless Security |
|
|
8 |
Wired Network . . . . . . . . . . . . . . |
. . . . . . . |
. |
9 |
Extender Connections . . . . . . . . . . . |
. . . . . . . |
|
10 |
High Definition (HD) Connections . . . . . . |
. . . . . . . |
. 10 |
|
Standard Definition (SD) Connections . . . . |
. . . . . . . |
. 12 |
|
Power on the Media Center Extender |
|
|
15 |
Device Configuration . . . . . . . . . . . . |
. . . . . . |
. |
16 |
Record Setup Key from Device |
|
|
18 |
Media Center Configuration |
|
|
19 |
Chapter 3: Using the Media Center Extender |
|
|
23 |
Using Your Remote Control . . . . . . . . . |
. . . . . . . |
|
23 |
Menu Summary . . . . . . . . . . . . . . |
. . . . . . |
. |
30 |
Pictures + Videos |
|
|
30 |
Music . . . . . . . . . . . . . . . . . . |
. . . . . . . |
. 33 |
|
TV + Movies . . . . . . . . . . . . . . . . |
. . . . . . |
. |
34 |
View Your Libraries |
|
|
38 |
Stream Online Content . . . . . . . . . . . |
. . . . . . . |
|
38 |
Sports |
|
|
39 |
Tasks |
|
|
42 |
iii |
Media Center Extender |
||

Table of Contents
Special Features . . . . . . . . . . . |
. . . . . . . . |
. |
. 51 |
Appendix A: Troubleshooting |
|
|
52 |
Appendix B: Specifications |
|
|
63 |
Appendix C: License Information |
|
|
67 |
Appendix D: Warranty |
|
|
75 |
LIMITED WARRANTY |
|
|
75 |
Appendix E: Regulatory Information |
|
|
78 |
FCC Statement . . . . . . . . . . . . |
. . . . . . . . |
. |
. 78 |
Safety Notices |
|
|
79 |
Industry Canada Statement . . . . . . |
. . . . . . . . |
. . |
79 |
Wireless Disclaimer . . . . . . . . . . |
. . . . . . . . |
. |
. 80 |
Declaration of Conformity with Regard to the EU Directive 1999/5/ EC and 2004/108/EC(R&TTE and EMC Directive) . . . . . . . . 82
User Information for Consumer Products Covered by EU Directive 2002/96/EC on Waste Electric and Electronic Equipment (WEEE) 88
iv |
Media Center Extender |
Chapter 1
Product Overview
Chapter 1: Product Overview
The Linksys DMA 2100 and 2200 Media Center Extenders provide you with the ability to access your Windows Vista™ operating system and control content on your Vista Media Center computer. Your digital video, music and pictures are brought directly to your TV or home theater where you will enjoy an enhanced user experience.
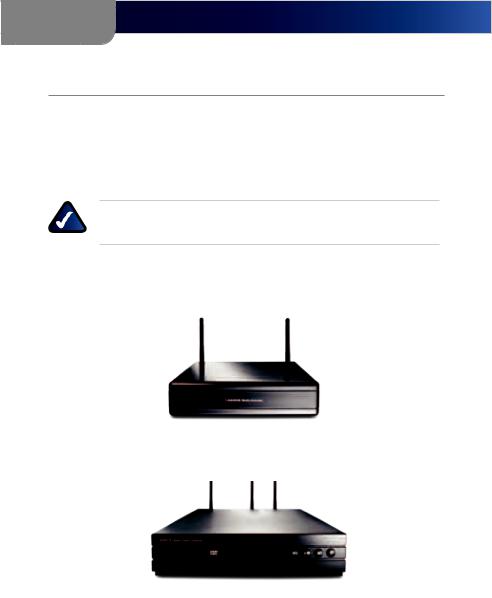
NOTE: There is an IR sensor on the front of the Media Center Extender. Make sure the front panel is visible for the remote control.
Front Panel (DMA 2100)
Front Panel (DMA 2200)
|
|
|
|
|
|
|
|
|
|
1 |
|
2 3 4 5 |
|||||
1 |
CD/DVD Tray |
4 |
Stop button |
|||||
2 |
Open/Close tray button |
5 |
Power button |
|||||
3 |
Pause, Fast forward button |
|
|
|
|
|
|
|
1 |
Media Center Extender |
Chapter 1
Product Overview
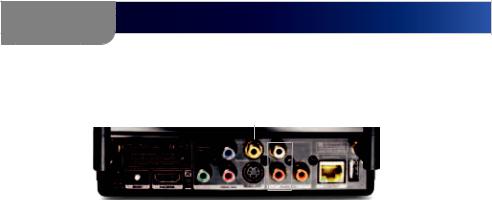
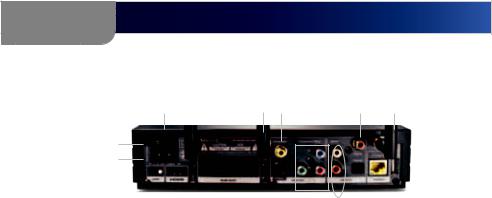
Back Panel (DMA 2100)
6
|
|
|
|
|
|
|
|
|
|
|
|
|
|
|
|
|
|
|
|
|
|
|
|
|
|
|
|
|
|
|
|
|
|
|
|
|
|
|
|
|
|
|
|
|
|
|
|
|
|
|
|
|
|
|
|
|
|
|
|
|
|
|
1 |
2 |
3 |
4 |
5 |
|
7 |
8 |
9 |
10 11 1 |
|||||||||||
1 |
|
|
Antenna |
|
|
|
|
|
|
|
|
|
|
|
|
|
||||
2 |
|
|
Power cord connector |
|
|
|
|
|
|
|
|
|
|
|||||||
3Reset (Default)
4HDMI connector
5Component Video out connectors ( Y, Pb, Pr)
6Composite Video out connector
7 S-Video out connector
8Stereo RCA Audio out connectors
9Digital Audio out connector (Coaxial RCA, SPDIF)
10Ethernet connector
1 1 For Service Only - do not use
2 |
Media Center Extender |
Chapter 1
Product Overview
Back Panel (DMA 2200)
1 |
1 |
7 |
11 |
1 |
2
3
|
|
|
|
|
|
|
|
|
|
|
|
|
|
|
|
|
|
|
|
|
|
|
|
|
|
|
|
|
|
|
|
|
|
|
|
|
|
|
|
|
|
|
|
|
|
|
|
|
|
|
|
|
|
|
|
|
|
|
|
|
4 |
5 |
6 |
8 |
9 |
10 12 13 14 |
||||||||
1 |
Antenna |
|
|
|
|
|
|
|
|
|
|
|
|
|
2 |
Power switch (on/off) |
|
|
|
|
|
|
|
|
|
|
|
||
3Power cord connector
4Reset (default)
5HDMI connector
6 SCART connector
7Composite Video out connector
8S-Video out connector
9Component Video out connectors ( Y, Pb, Pr)
10Stereo RCA Audio out connectors
11Digital Audio out connector (Coaxial RCA,SPDIF)
12Digital Audio out connector (Optical SPDIF Toslink)
13Ethernet connector
14For Service Only - do not use
3 |
Media Center Extender |

Chapter 1
Product Overview
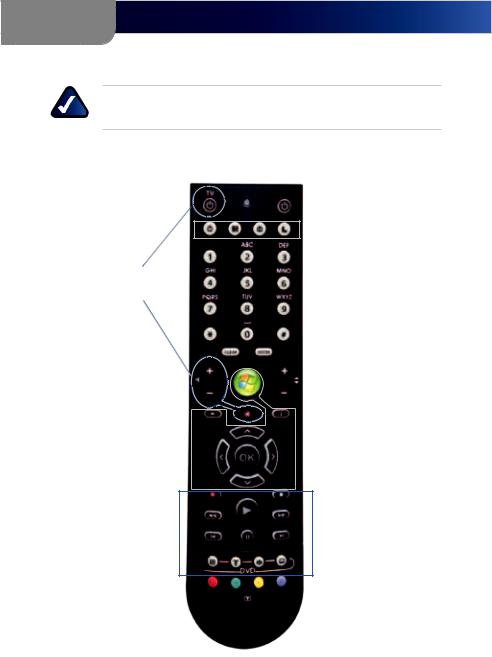
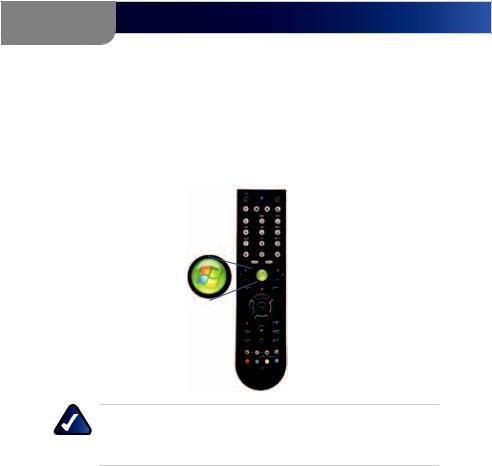
Remote Control Overview
Number |
Description |
|
|
1 |
TV Power |
|
|
2 |
Extender |
|
Power |
|
|
3 |
Recorded TV |
|
|
4 |
Guide |
|
|
5 |
Live TV |
|
|
6 |
Linksys menu |
7Alphanumeric keypad
8Clear
9Enter
10Volume up/down
11Media Center button
12Channel up/down
13Back
14Mute
15More information
16Up arrow
17Left arrow
1 |
|
|
2 |
3 |
4 |
5 |
6 |
|
|
|
|
7 |
|
|
|
|
|
|
|
8 |
9 |
|
10 |
11 |
|
12 |
13 |
14 |
|
15 |
|
16 |
|
|
17 |
18 |
19 |
|
|
20 |
|
|
21 |
|
|
22 |
23 |
24 |
|
25 |
26 |
27 |
|
28 |
29 |
30 |
31 |
32 |
33 |
34 |
35 |
36 |
|
37 |
|
|
Number |
Description |
|
|
18 |
OK |
|
|
19 |
Right arrow |
|
|
20 |
Down arrow |
|
|
21 |
Record |
|
|
22 |
Stop |
|
|
23 |
Rewind |
|
|
24 |
Play |
|
|
25 |
Fast Forward |
|
|
26 |
Skip Backward |
|
|
27 |
Pause |
|
|
28 |
Skip forward |
|
|
29 |
Media menu |
|
|
30 |
Media Top |
|
menu |
|
|
31 |
Audio track |
|
from Media |
|
|
32 |
Media |
|
Subtitles |
|
|
33-36 |
Teletext |
|
buttons |
|
(available |
|
in selected |
|
regions) |
|
|
37 |
Teletext |
|
on/off button |
|
(available |
|
in selected |
|
regions) |
|
|
4 |
Media Center Extender |
Chapter 1
Product Overview
NOTE: The remote control can learn some TV functions. See Chapter 3, Using Your Remote Control for programming details.
Shortcut Buttons
Learning
Buttons
Navigation
Buttons
Media Buttons
Teletext Buttons 
5 |
Media Center Extender |
Chapter 2
Network Setup and Extender Connections
Chapter 2:
Network Setup and Extender
Connections
If you have already used the Quick Install Guide and have successfully set up your Media Center Extender, you can skip this Chapter which provides more detailed information regarding networks and connections.
Connect to a Wireless or Wired Network
The following diagram shows a home network that is configured correctly, using a wireless connection. The PC is connected to the router using an Ethernet connection and the Extender is connected to this same router using a wireless connection. In this case both can connect to the internet and can communicate to each other.
Linksys Router
WRT600N
Media Center PC
Internet
Connection
Linksys Media
 Center Extender
DMA2100
DMA2200 (shown)
Home Network
NOTE: It is very important that your Media Center Extender is connected to the same network as the computer containing the files you want to share.
6 |
Media Center Extender |
Chapter 2
Network Setup and Extender Connections
Connecting your Extender to your home network and the Internet will enable you to access Online Services, and will also enable you to share your Vista Media Center computer’s audio, video and picture files.
Wireless Network
The maximum performance for wireless is derived from IEEE Standard 802.11 specifications. Actual performance can vary, including lower wireless network capacity, data throughput rate, range and coverage. Performance depends on many factors, conditions and variables, including distance from the access point, volume of network traffic, building materials and construction, operating system used, mix of wireless products used, interference and other adverse conditions.
Attach the Antennas
If connecting wirelessly, you need to attach the antennas. There are two (2) antennas for the DMA2100 and three (3) for the DMA2200. The antennas should be screwed on in a clockwise direction. Hand tighten until they are securely in place. The antennas should be raised when the Extender is in use.
|
|
|
|
|
|
|
|
n |
|
Reset/ |
|
|
|
|
k or |
|
|
|
Default |
|
|
MI |
logo is a |
|
|
|
|
|
Default |
trademar |
|
|
|||
HDMI, the |
|
|
HDMI,the |
HD |
|
C:N89- |
||
|
|
|
|
|
|
Contains FC |
WM821- |
|
HDMI |
|
|
|
|
|
LS |
||
|
|
|
|
|
|
|
|
|
|
logo |
|
|
|
|
|
|
|
|
is a |
|
|
|
|
|
|
|
|
|
trademark |
|
|
|
|
|
|
|
|
or re |
|
|
|
|
|
|
DMA2100 |
DMA2200 |
|||||||
Antenna Attachment
Antennas Raised
7 |
Media Center Extender |

Chapter 2
Network Setup and Extender Connections
Wireless Security
Wireless networks are convenient and easy to install, so homes with high-speed Internet access are adopting them at a rapid pace. Because wireless networking operates by sending information over radio waves, it can be more vulnerable to intruders than a traditional wired network. Like signals from your cellular or cordless phones, signals from your wireless network can also be intercepted. Since you cannot physically prevent someone from connecting to your wireless network, you need to take some additional steps to keep your network secure.
Your entire network must match security levels for each device to work. The security levels available for your Media Center Extender are WEP, WPA/PSK TKIP or WPA2/PSK AES. If your network is unencrypted, you can also choose that, however it is not recommended.
Encryption protects data transmitted over a wireless network. Wi-Fi Protected Access (WPA/WPA2) and Wired Equivalency Privacy (WEP) offer different levels of security for wireless communication.
A network encrypted with WPA/WPA2 is more secure than a network encrypted with WEP, because WPA/WPA2 uses dynamic key encryption. To protect the information as it passes over the airwaves, you should enable the highest level of encryption supported by your network equipment.
WEP is an older encryption standard and may be the only option available on some older devices that do not support WPA.
You can also purchase a wireless powerline adapter, such as Linksys PLE200 to improve wireless network speed and security.
8 |
Media Center Extender |

Chapter 2
Network Setup and Extender Connections
Wired Network
Wired Connection to your Computer
Connect the Ethernet cable (included) from the back panel of the Media Center Extender to the back panel of your router.
LEFT |
ANALOG AUDIO |
DIGITAL |
|
ADUIO |
ETHERNET |
S- |
|
VIDEO |
|
RIGHT |
USB |
s- |
|
PDIF |
|
|
DIGITAL |
|
|
ADUIO |
ETHERNET |
Pr |
|
|
|
Right |
|
USB
DMA2100 DMA2200
Ethernet Connection
9 |
Media Center Extender |
Chapter 2
Network Setup and Extender Connections
Extender Connections
Connect your Media Center Extender to a TV or A/V receiver with a digital or analog connection.
NOTE: Before you perform any of the following connections, power off your TV.
High Definition (HD) Connections
We recommend that you use a high definition connection, if possible. Component video cables are included with the Media Center Extender. If you use component video, you will need to make a separate audio connection. If your TV is capable of receiving an HDMI signal you can connect a HDMI cable (not included) which will supply both audio and video signals.
Component Video
Connect the component video cable (included) from the Media Center Extender’s back panel to yourTV’s available component video connection ports.
C:N89- |
E USE |
andards |
OSITE |
|
|
|
WM821-LS |
FICE USE |
|
COMPONENT |
|
|
|
Reset/ |
|
WM821-LS |
|
|
|
|
Default |
Pb |
|
|
|
|
|
|
|
|
VIDEO |
ANALOG |
|
|
|
COMPONENT |
|
|
|
A |
|
|
|
Pb |
|
Left |
||
|
VIDEO |
|
|
|
DIGITAL |
|
|
Pr |
|
|
|
ETH |
|
|
|
|
|
|
|
|
|
. |
|
|
|
|
1 |
|
|
|
|
Right |
|
|
DMA2100 |
DMA2200 |
|
||||
Component Video Connections
10 |
Media Center Extender |

Chapter 2
Network Setup and Extender Connections
HDMI (Video and Audio)
Connect a HDMI cable (not included) from the Media Center Extender’s back panel to your TV’s available HDMI connection port. You can then connect the Media Center Extender to the Media Center Computer. Skip to Power on Device.
Reset/ |
|
|
|
|
|
|
|
|
|
|
Default |
|
|
|
Pb |
Default |
|
|
|
|
|
HDMI, the HDMI |
logo is a |
|
COMPONENTVIDEO |
|
|
|
|
|||
|
trademark or |
|
|
|
HDMI, |
|
|
|
|
|
|
|
|
|
|
|
|
|
FCC:N89- |
|
|
|
|
registered |
Y |
|
|
mark |
|
Contains |
|
|
|
|
|
trademarks of |
|
Pr |
or |
WM821- |
|||
|
|
|
|
HDMI |
Licensing, |
|
|
registered |
trademarks of |
|
|
|
|
|
|
|
|
|
|
||
|
|
|
|
|
|
|
|
|
|
HDM |
DMA2100 |
DMA2200 |
|
||||||||
HDMI Connection
11 |
Media Center Extender |
Chapter 2
Network Setup and Extender Connections
Standard Definition (SD) Connections
SCART (Video and Audio) DMA2200
Connect a SCART cable by using the SCART cable (included) from the Media Center Extender’s back panel to the TV’s available SCART connection port.
SCART Cable (DMA2200)
DMA2100
Connect a SCART Adapter by using the composite video and audio cables (included) from the Media Center Extender’s to the SCART Adapter composite ports.
VIDEO |
|
|
LEFT |
ANALO |
|
DIGITAL |
||
|
||
ADUIO |
E |
|
S- |
|
|
VIDEO |
|
|
RIGHT |
|
|
s-PDIF |
|
|
~ |
|
|
~ |
|
|
~ |
|
SCART Adapter (DMA2100)
12 |
Media Center Extender |

Chapter 2
Network Setup and Extender Connections
Video
Connect one type of standard analog video cable from the Media Center Extender’s back panel to your TV’s video connection port.
You can connect a component video (red, green, blue) cable (included) composite video cable (included) or a S-Video cable (not included).
WM821-LS |
|
CE |
ds |
E |
|
|
|
|
USE |
|
|
COMPONENT |
|
|
|
|
|
M |
|
|
|
|
|
Reset/ |
|
821-LS |
|
|
|
|
|
Default |
Pb |
|
|
|
|
|
|
|
|
|
|
VIDEO |
ANALOG |
||
|
COMPONENT |
|
|
|
|
||
|
|
|
Pb |
|
Left |
|
|
|
VIDEO |
|
|
|
|
DIGITAL |
|
|
Pr |
|
|
|
|
E |
|
|
HDMI |
|
|
|
|
ADUIO |
|
|
|
|
|
|
|
||
|
LLC. |
|
|
|
Right |
|
|
|
|
|
|
|
|
|
|
DMA2100 |
|
DMA2200 |
|
||||
|
Component Video Connection |
|
|
||||
|
|
|
|
|
|
|
|
COMPOSITE |
Reset/ |
|
|
|
|
|
|
CO |
|
Default |
|
|
Pb |
|
|
|
||
HDMIlogo |
|
|
|
COMPONENTVIDEO |
mark |
Contains |
|
|
is a |
|
|
|
|
||||
|
trademark or |
|
VIDEO |
|
or reg |
istered |
Pb |
|
|
|
registered |
|
|
||||
|
|
|
LE |
|
|
|||
|
|
|
|
|
|
|
||
|
|
|
|
|
DIGIT |
|
|
|
|
|
|
|
|
ADUI |
|
|
|
|
|
|
|
S- |
|
|
|
Y |
|
|
|
|
VIDEO |
|
|
|
|
|
|
|
|
RIGHT |
|
|
|
Pr |
|
|
|
|
s- |
|
|
|
|
|
|
|
|
|
PDIF |
|
|
|
DMA2100 |
|
DMA2200 |
||||||
Composite Video Connection
Comply |
|
|
|
|
|
|
|
|
|
|
|
|
|
|
Standards |
|
|
|
|
|
|
|
|
|
|
|
|
|
|
-ICE USE |
|
|
|
|
|
|
|
|
|
|
|
|
|
|
WM821-LS |
|
|
|
|
|
|
|
|
|
|
|
|
COMPOSITE |
|
/ |
|
|
|
|
|
|
|
|
|
|
|
|
|
|
lt |
|
|
|
|
Pb |
|
|
|
|
|
|
|
|
|
|
|
|
VIDEOCOMPONENT |
|
|
|
o |
is a |
|
|
|
|
||
sa |
trademark or |
|
|
|
|
|
|
|
|
trademark |
Contains |
|
|
|
|
|
|
|
|
|
|
|
|
|
|
|
|||
|
|
registered |
Y |
|
Pr |
|
VIDEO |
|
|
|
|
or registered FCC:N89- |
|
|
|
|
|
trademarks |
|
|
LEFT |
ANALO |
|
|
|
WM821-LS |
|
||
|
|
|
|
ofHDMI |
Licen |
sing, LLC. |
DIGITAL |
|
|
|
trademarks of |
HDMI |
|
|
|
|
|
|
|
|
ADUIO |
E |
|
|
|
|
Licensing, |
||
|
|
|
|
|
|
|
S- |
|
|
|
|
|
|
|
|
|
|
|
|
|
|
VIDEO |
|
|
|
|
|
|
|
|
|
|
|
|
|
|
RIGHT |
|
|
|
|
|
|
Y |
|
|
|
|
|
|
|
s- |
|
|
|
|
|
|
|
|
|
|
|
|
|
|
PDIF |
|
|
|
|
|
|
|
|
DMA2100 |
|
|
|
DMA2200 |
|||||||||
S-Video Connection
13 |
Media Center Extender |

Chapter 2
Network Setup and Extender Connections
Audio
Connect one type of audio cable from the Media Center Extender’s back panel to your TV or AV receiver’s audio connection port. You can connect analog stereo RCA (included) or a digital SPDIF coaxial RCA (not included) or, for the DMA2200, digital SPDIF Optical Toslink (not included).
|
|
|
Pb |
|
|
|
OMPOSITE |
|
|
|
|
VIDEOCOMPONENT |
|
|
|
COMPONENT |
|
|
|
||
registered |
Y |
|
|
|
|
|
VIDEO |
ANALOG |
|
|
|
|
|
|
|
|
AUDIO |
||||
trademarks of |
|
Pr |
LEFT |
A |
|
Left |
|
|||
|
HDMI |
Licen |
DIGITAL |
|
|
|
|
|
||
|
|
|
i |
|
|
|
|
|||
|
|
|
|
ADUIO |
|
censing, |
|
DIGITAL |
|
|
|
|
|
|
|
|
LLC. |
|
|
|
|
|
|
|
|
|
|
|
|
ADUIO |
ETHERNE |
|
|
|
|
|
s- |
|
|
|
|
|
|
|
|
|
|
PDIF |
|
|
|
|
|
|
DMA2100 |
|
DMA2200 |
||||||||
Analog Stereo RCA Audio Connection
|
|
|
|
E |
|
|
|
|
|
VIDEO |
|
|
|
COMPONENT |
|
|
|
|
LEFT |
|
|
|
|
|
|
|
|
DIGITAL |
ANALOG |
AUDIO |
|
|
ANALOG |
AUDIO |
|
nsing, LLC. |
ADUIO |
ETHERNET |
Pb |
|
|
|
||
|
|
|
|
|
|
|
||
|
RIGHT |
|
|
USB |
|
|
ETHERNET |
|
|
|
|
|
|
|
|
||
|
|
|
|
|
|
|
|
US |
DMA2100 |
DMA2200 |
|||||||
Digital Audio (Coaxial RCA) Connection
|
ENT |
|
|
|
|
VIDEO |
ANALOG |
|
|
|
|
AUDIO |
||
Pb |
|
Left |
|
|
Pr |
|
DIGITAL |
ETHERNET |
|
Y |
|
|
|
|
DMA2200
DMA2200 only -Digital Audio (Optical Toslink) Connection
14 |
Media Center Extender |
Chapter 2
Network Setup and Extender Connections
Power on the Media Center Extender
NOTE: Power on your TV.
DMA2200
Plug the Media Center Extender’s power cord connector to the unit’s power port on the back panel. Plug the cord into an electrical outlet.
Power Switch
DMA2200
DMA2200 Power Cord and Switch
There is also an on/off power switch just above the power port. Power on the unit before starting Device Configuration.
DMA2100
This unit ships with the correct power clip for your region.
Default/
HDMI, the HDMI logo is a  trademark or registe
DMA2100
DMA2100 Power Cord
Plug the Media Center Extender’s power cord connector to the unit’s power port on the back panel. Plug the cord into an electrical outlet.
Regional Power adapters
If needed, pull out the clip covering the power port connector. You can then snap in the appropriate power clip that matches your main power outlet. Power clips are used in Europe and Asia.
15 |
Media Center Extender |
Chapter 2
Network Setup and Extender Connections
Device Configuration
Configure Language Settings
Use the arrow keys to highlight the correct language options for your configuration. Press OK on the remote control, or select Next to continue.
Menu Language
Configure Display Connection
A HDMI connection should automatically be discovered, depending on the TV and settings. For other connections you can choose the video, audio and aspect ratio to optimize the playback quality.
Your choice should match the actual hardware connection that you made. Press OK on the remote control or select Next to continue.
Connector Type
Configure Network Settings
Select the type of network connection you are using, wired or wireless and press OK on the remote control or select Next to continue.
16 |
Media Center Extender |
Chapter 2
Network Setup and Extender Connections
If you connect wirelessly, you will be asked to confirm your current network’s wireless security level. Using the remote, select Encryption Key on-screen and enter the encryption key for your network using the on-screen keyboard and click Next.
Press the Media Center button on the remote.The next message on theTV will be “Connecting to PC” when the Extender makes the connection.
NOTE: For wireless router settings, the security level chosen on the Extender setup screens must match your computer security.
17 |
Media Center Extender |
Chapter 2
Network Setup and Extender Connections
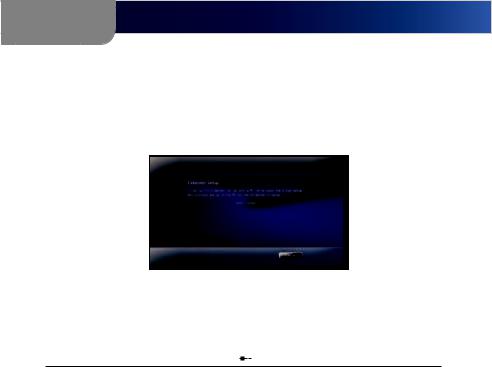
Record Setup Key from Device
1.For the computer to recognize the Media Center Extender, it will need a Setup key. The eight digit Setup key will display on the TV screen (and on the Media Center Extender if it is a DMA2200).
Setup Key
2.Write down this Setup Key and bring it to your Media Center computer. You can enter the number here:
--
18 |
Media Center Extender |
Chapter 2
Network Setup and Extender Connections
Media Center Configuration
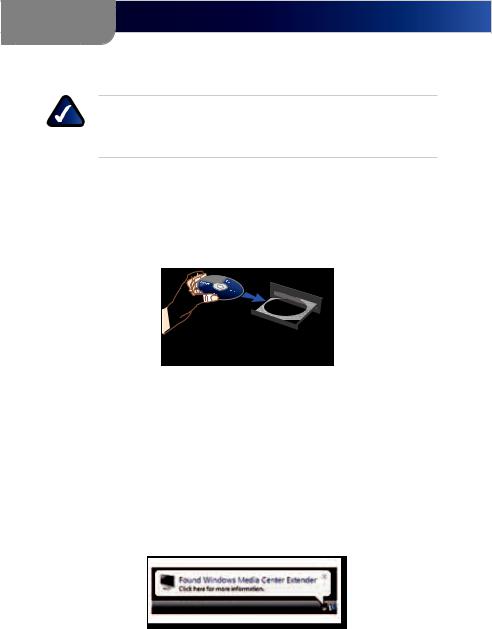
NOTE: Please follow the steps below in order. You must insert the CD-ROM and proceed through the setup screens.
Insert CD-ROM
Insert the CD-ROM that came with your Media Center Extender, into your Media Center computer. Proceed through the steps displayed onscreen.
Inserting the CD-ROM
Windows Vista Update
If you use a compatible version of Windows Vista you will be asked to update your system via Windows Vista Update. Proceed through the steps displayed on-screen.
Setup
If your computer has automatically discovered the Extender, a message will display, stating that the Extender was found.
Found Media Extender
The type of message displayed may vary. Click on the screen, or select Yes to start the setup.
19 |
Media Center Extender |
Chapter 2
Network Setup and Extender Connections
If your Extender was not automatically discovered, proceed with the following steps.
1.Open ”Media Center” on the computer and press the up or down arrow to select Tasks.
Add Extender
a.Press the left arrow to select settings.
b.Use the up or down arrow to highlight Extender and then press the up arrow to highlight add extender. Click Enter.
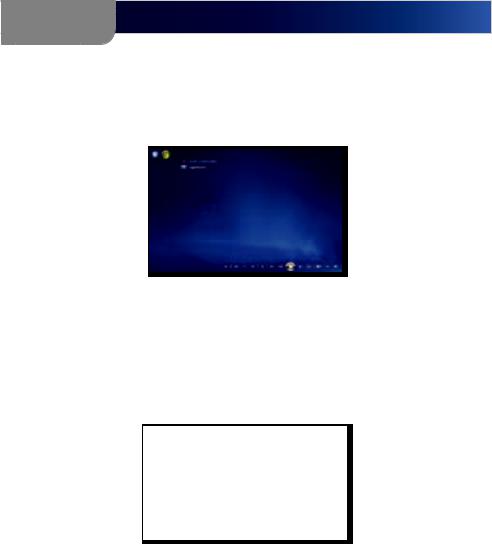
2.You will see a Welcome to Windows Media Center screen. Click Enter or select Next to continue.
Welcome Screen
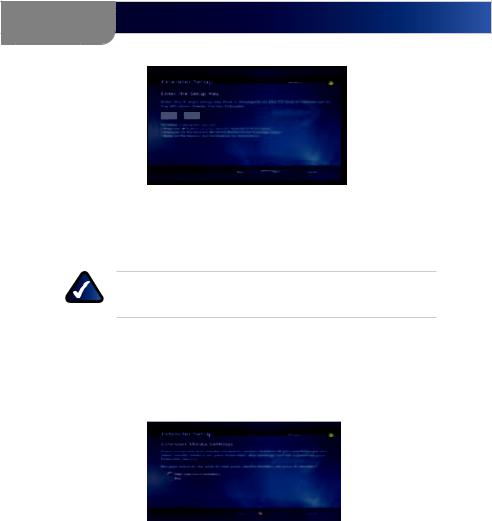
3.You will be asked to enter the Extender Setup key that you noted earlier. After entering the number, click Enter or select Next to continue.
20 |
Media Center Extender |
Chapter 2
Network Setup and Extender Connections
XXXX XXXX
Extender Setup
4.The next screen may ask about firewalls and changing computer settings, click Enter or select Next to continue.
NOTE: Third party firewalls may require additional manual configuration.
5.You will be asked if you want to make media files stored on your PC available. All media files (pictures, music, video) will be shared. You can modify this later in the settings menu. Click Yes and click Enter or select Next to continue.
Sharing Files
6.You may also be asked to allow changes to some computer settings, including enabling Away Mode. Away Mode is a power saving mode, that allows your Extender to continue to work even if you power off your computer.
21 |
Media Center Extender |
Chapter 2
Network Setup and Extender Connections
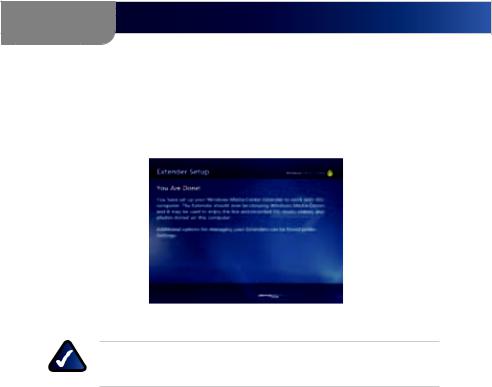
7.The final setup step configures your computer to work with the Extender. When the configuration is complete, the message “You are Done” will display. You can now play music, watch videos or stream online content (subscription may be required) on your television through your Extender. Click Enter or select Finish to exit the setup.
You are Done!
NOTE: If you see the error message “Extender did not connect” follow the steps starting with Insert CD-ROM.
.
22 |
Media Center Extender |
Chapter 3
Using the Media Center Extender
Chapter 3:
Using the Media Center Extender
Using Your Remote Control
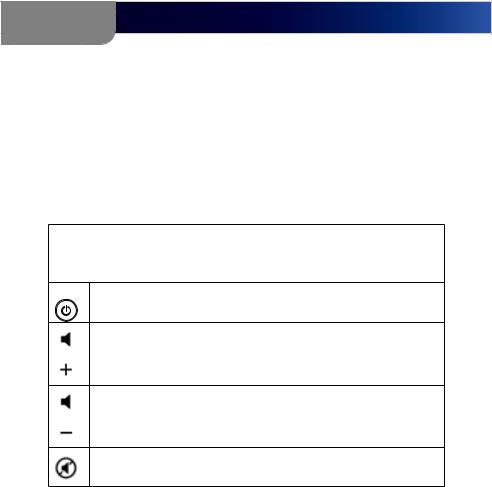
All of the Windows Media Center functions and choices can be made through the Media Center Extender’s remote control. Additionally, you can have this remote learn to control volume, mute and the power functions for your television or A/V receiver.
NOTE: There is an IR sensor on the front of the Media Center Extender. Make sure the front panel is visible for the remote control.
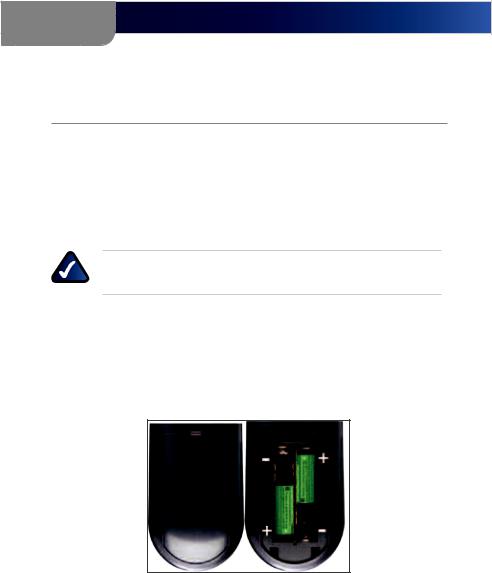
Installing Batteries in the Remote Control
If you have not already done so, install the AAA batteries (included) in the remote control. You can use the remote control during the setup process.
23 |
Media Center Extender |

Chapter 3
Using the Media Center Extender
Basic Menu Functions
Using the Remote Control
With just the left, right, down, up arrows and OK button, you can control almost all of the Media Center functions.
Press the back arrow below the Media Center button to move back one screen.
Press the Media Center button to return to the main Media Center menu.
Alphanumeric Keypad
In addition to numbers, you can use the keypad to enter letters if text is required.
•• Press the number key until the correct letter appears (letters are above numbers 2 through 9).
•• Press CLEAR to delete a character.
•• Press ENTER to submit the characters you have typed.
Remote Control Learning
•• The TV Power, Volume and Mute, buttons have no default function. These can be programmed to learn the TV functions.
To program the learning feature of the remote control:
1.Place the Extender’s remote control head to head (approximately 2”- 3” apart) with the TV’s remote control.
2.On the Extender’s remote control, press the TV power button then press and hold the DVD menu button and OK button. When you see the green LED light up, release the buttons. The Extender remote is now in learning mode.
3.Press the button for the feature you want to learn on the Extender’s remote control for 5 seconds. The green LED will blink one time, this means the Extender remote can learn this function. If you select a function which can not be learned, the green LED will not blink.
24 |
Media Center Extender |
Chapter 3
Using the Media Center Extender
4. After the green light blinks one time, press and hold the corresponding button on the TV’s remote control until the green LED of the Extender’s remote control blinks twice to confirm the selection. If the remote did not learn the command, the red LED blinks four times quickly and terminates the learning procedure.
5.If you want to learn another key, repeat steps 3 and 4. Press DVD MENU button to end learning mode.
6.If you do not press any button in 5 seconds, the learning setup mode will end automatically.
Learning Remote Buttons
This is a learning remote. It can learn to program your television or a/v receiver and can control the buttons listed below.
TV TV Power This button can“learn”to turn on the TV. This feature is not available in Europe.
Volume Up Increases the current volume by one unit. If the audio is currently muted when this button is pressed, muting is disabled and the volume increases by one unit
Volume Down Decreases the current volume by one unit. If the audio is currently muted when this button is pressed, muting is disabled and the volume decreases by one unit
Mute Mutes the TV’s audio
25 |
Media Center Extender |
Loading...