


 Loading...


 ®
®
A Division of Cisco Systems, Inc.
EtherFast®
Cable/DSL Router
with 4-Port Switch User Guide
WIRED
Model No. BEFSR41

EtherFast Cable/DSL Router with 4-Port Switch
Copyright and Trademarks
Specifications are subject to change without notice. Linksys and EtherFast are registered trademarks or trademarks of Cisco Systems, Inc. and/or its affiliates in the U.S. and certain other countries. Copyright © 2004 Cisco Systems, Inc. All rights reserved. Other brands and product names are trademarks or registered trademarks of their respective holders.
WARNING: This product contains chemicals, including lead, known to the State of California to cause cancer, and birth defects or other reproductive harm. Wash hands after handling.
How to Use this Guide
Your guide to the EtherFast Cable/DSL Router with 4-Port Switch has been designed to make understanding networking with the Router easier than ever. Look for the following items when reading this User Guide:
This checkmark means there is a note of interest and is something you should pay special attention to while using the Router.
This exclamation point means there is a caution or warning and is something that could damage your property or the Router.
This question mark provides you with a reminder about something you might need to do while using the Router.
In addition to these symbols, there are definitions for technical terms that are presented like this:
word: definition.
Also, each figure (diagram, screenshot, or other image) is provided with a figure number and description, like this:
Figure numbers and descriptions can also be found in the “List of Figures” section.
BEFSR41_V3-UG-40806A JL
EtherFast Cable/DSL Router with 4-Port Switch
Table of Contents
Chapter 1: Introduction |
1 |
Welcome |
1 |
What’s in this Guide? |
2 |
Chapter 2: Networking Basics |
4 |
An Introduction to Local Area Networks |
4 |
The Use of IP Addresses |
4 |
Chapter 3: Getting to Know the Router |
6 |
The Back Panel |
6 |
The Front Panel |
7 |
Chapter 4: Connecting the Router |
8 |
Overview |
8 |
Connection Instructions |
9 |
Chapter 5: Configuring the Router |
10 |
Overview |
10 |
How to Access the Web-based Utility |
11 |
The Setup Tab - Basic Setup |
12 |
The Setup Tab - DDNS |
18 |
The Setup Tab - MAC Address Clone |
19 |
The Security Tab - Filter |
22 |
The Security Tab - VPN |
24 |
The Applications & Gaming Tab - Port Range Forwarding |
25 |
The Applications & Gaming Tab - Port Triggering |
26 |
The Applications & Gaming Tab - UPnP Forwarding |
27 |
The Applications & Gaming Tab - DMZ |
29 |
The Administration Tab - Management |
30 |
The Administration Tab - Log |
32 |
The Administration Tab - Factory Defaults |
33 |
The Administration Tab - Firmware Upgrade |
34 |
The Status Tab - Router |
35 |
The Status Tab - Local Network |
36 |
Appendix A: Troubleshooting |
37 |
Common Problems and Solutions |
37 |
EtherFast Cable/DSL Router with 4-Port Switch |
|
Frequently Asked Questions |
47 |
Appendix B: Upgrading Firmware |
51 |
Appendix C: Finding the MAC Address and IP Address for Your |
|
Ethernet Adapter |
52 |
Windows 98 or Me Instructions |
52 |
Windows 2000 or XP Instructions |
52 |
For the Router’s Web-based Utility |
53 |
Appendix D: Windows Help |
54 |
Appendix E: Glossary |
55 |
Appendix F: Specifications |
60 |
Appendix G: Warranty Information |
62 |
Appendix H: Regulatory Information |
63 |
Appendix I: Contact Information |
64 |
EtherFast Cable/DSL Router with 4-Port Switch
List of Figures
Figure 3-1: Back Panel |
6 |
Figure 3-2: Front Panel |
7 |
Figure 4-1: Example of a Typical Network |
9 |
Figure 4-2: Connect a PC |
9 |
Figure 4-3: Connect the Cable/DSL Modem |
9 |
Figure 4-4: Connect the Power |
9 |
Figure 5-1: Router’s IP Address |
11 |
Figure 5-2: Router Login |
11 |
Figure 5-3: Setup Tab - Basic Setup (Obtain an IP automatically) |
12 |
Figure 5-4: Static IP |
13 |
Figure 5-5: PPPoE |
13 |
Figure 5-6: RAS |
14 |
Figure 5-7: PPTP |
14 |
Figure 5-8: Heart Beat Signal |
15 |
Figure 5-9: L2TP |
16 |
Figure 5-10: Setup Tab - DDNS (DynDNS.org) |
18 |
Figure 5-11: Setup Tab - DDNS (TZO.com) |
18 |
Figure 5-12: Setup Tab - MAC Address Clone |
19 |
Figure 5-13: Setup Tab - Advanced Routing |
20 |
Figure 5-14: Routing Table Entry List |
21 |
Figure 5-15: Security Tab - Firewall |
22 |
Figure 5-16: MAC Filter Setting |
22 |
Figure 5-17: Security Tab - VPN Passthrough |
24 |
Figure 5-18: Applications & Gaming Tab - Port Range Forwarding |
25 |
Figure 5-19: Applications & Gaming Tab - Port Triggering |
26 |
Figure 5-20: Applications & Gaming Tab - UPnP Forwarding |
27 |
Figure 5-21: Applications & Gaming Tab - DMZ |
29 |
Figure 5-22: Administration Tab - Management |
30 |
EtherFast Cable/DSL Router with 4-Port Switch |
|
Figure 5-23: Administration Tab - Log |
32 |
Figure 5-24: Incoming Log Table |
32 |
Figure 5-25: Outgoing Log Table |
32 |
Figure 5-26: System Log |
32 |
Figure 5-27: Administration Tab - Factory Defaults |
33 |
Figure 5-28: Administration Tab - Firmware Upgrade |
34 |
Figure 5-29: Status Tab - Router |
35 |
Figure 5-30: Status Tab - Local Network |
36 |
Figure 5-31: DHCP Client Table |
36 |
Figure B-1: Upgrade Firmware |
51 |
Figure C-1: IP Configuration Screen |
52 |
Figure C-2: MAC Address/Adapter Address |
52 |
Figure C-3: MAC Address/Physical Address |
53 |
Figure C-4: MAC Filtering |
53 |
Figure C-5: MAC Address Clone |
53 |
EtherFast Cable/DSL Router with 4-Port Switch
Chapter 1: Introduction
Welcome
Thank you for choosing the EtherFast Cable/DSL Router with 4-Port Switch. This Router will allow your computers to share a high-speed Internet connection as well as resources, including files and printers.
How does the Router do all of this? By connecting your computers and peripherals to the Router and connecting the Router to your cable or DSL modem, then the Router can direct and control communications for your network.
But what does all of this mean?
Networks are useful tools for sharing Internet access and computer resources. Multiple computers can share Internet access, so you don’t need more than one high-speed Internet connection. You can access one printer from different computers and access data located on another computer’s hard drive. Networks are even used for playing multiplayer video games. So, networks not only are useful in homes and offices, but also can be fun.
PCs on a wired network create a LAN, or Local Area Network. They are connected with Ethernet cables, which is why the network is called “wired”.
To create your network, install and set up the Router. To guide you through the process, Linksys strongly recommends that you run the Setup Wizard on the Setup CD-ROM. If you prefer to manually set up the Router, use the instructions in the Quick Installation or this User Guide to help you. These instructions should be all you need to get the most out of the Router.
Chapter 1: Introduction
lan (local area network): the computers and networking products that make up the network in your home or office
ethernet: an IEEE standard network protocol that specifies how data is placed on and retrieved from a common transmission medium
1
Welcome
EtherFast Cable/DSL Router with 4-Port Switch
What’s in this Guide?
This user guide covers the basic steps for setting up a network with a router. After going through “Chapter 3:
Getting to Know the Router,” most users will only need to use the following chapters:
•Chapter 4: Connecting the Router
This chapter instructs you on how to connect the Router to your cable or DSL modem, PCs, and peripherals, such as a printer.
•Chapter 5: Configuring the Router
This chapter explains how to configure the Router using your web browser and the Router’s Web-based Utility. You will configure the Router using the settings provided by your ISP.
When you’re finished with the basic steps, then you are ready to connect to the Internet.
You also have other chapter available for reference:
•Chapter 1: Introduction
This chapter describes the Router’s applications and this User Guide.
•Chapter 2: Networking Basics
This chapter briefly explains how a network functions.
•Appendix A: Troubleshooting
This appendix describes some possible problems and solutions, as well as frequently asked questions, regarding installation and use of the Router.
•Appendix B: Upgrading Firmware
This appendix explains how you can upgrade the Router’s firmware.
•Appendix C: Finding the MAC Address and IP Address for Your Ethernet Adapter
This appendix instructs you on how to find the MAC address or Ethernet address of your PC’s Ethernet network adapter.
•Appendix D: Windows Help
This appendix describes how you can use Windows Help for instructions about networking, such as installing the TCP/IP protocol.
•Appendix E: Glossary
This appendix gives a brief glossary of terms frequently used in networking.
Chapter 1: Introduction |
2 |
What’s in this Guide?
EtherFast Cable/DSL Router with 4-Port Switch
•Appendix F: Specifications
This appendix provides the technical specifications for the Router.
•Appendix G: Warranty Information
This appendix supplies the warranty information for the Router.
•Appendix H: Regulatory Information
This appendix supplies the regulatory information regarding the Router.
•Appendix I: Contact Information
This appendix provides contact information for a variety of Linksys resources, including Technical Support.
Chapter 1: Introduction |
3 |
What’s in this Guide?
EtherFast Cable/DSL Router with 4-Port Switch
Chapter 2: Networking Basics
An Introduction to Local Area Networks
Simply put, a router is a network device that connects two networks together.
The Router connects your local area network (LAN), or the group of PCs in your home or office, to the Internet. The Router processes and regulates the data that travels between these two networks.
The Router’s Network Address Translation (NAT) technology protects your network of PCs so users on the Internet cannot “see” your PCs. This is how your LAN remains private. The Router protects your network by inspecting the first packet coming in through the Internet port before delivery to the final destination on one of the Ethernet ports. The Router inspects Internet port services like the web server, ftp server, or other Internet applications, and, if allowed, it will forward the packet to the appropriate PC on the LAN side.
The Use of IP Addresses
IP stands for Internet Protocol. Every device in an IP-based network, including PCs, print servers, and routers, requires an IP address to identify its location, or address, on the network. This applies to both the Internet and LAN connections.
There are two ways of assigning IP addresses to your network devices.
A static IP address is a fixed IP address that you assign manually to a PC or other device on the network. Since a static IP address remains valid until you disable it, static IP addressing ensures that the device assigned it will always have that same IP address until you change it. Static IP addresses are commonly used with network devices such as server PCs or print servers.
If you use the Router to share your cable or DSL Internet connection, contact your ISP to find out if they have assigned a static IP address to your account. If so, you will need that static IP address when configuring the Router. You can get the information from your ISP.
A dynamic IP address is automatically assigned to a device on the network. These IP addresses are called dynamic because they are only temporarily assigned to the PC or other device. After a certain time period, they expire and may change. If a PC logs onto the network (or the Internet) and its dynamic IP address has expired, the DHCP server will assign it a new dynamic IP address.
Chapter 2: Networking Basics
nat (network address translation): NAT technology translates IP addresses of a local area network to a different IP address for the Internet.
static ip address: a fixed address assigned to a computer or device that is connected to a network
dynamic ip address: a temporary IP address assigned by a DHCP server
dhcp (dynamic host configuration protocol): a protocol that lets one device on a local network, known as a DHCP server, assign temporary IP addresses to the other network devices, typically computers
4
An Introduction to Local Area Networks
EtherFast Cable/DSL Router with 4-Port Switch
A DHCP server can either be a designated PC on the network or another network device, such as the Router. By default, the Router’s Internet Connection Type is Obtain an IP automatically (DHCP).
The PC or network device obtaining an IP address is called the DHCP client. DHCP frees you from having to assign
IP addresses manually every time a new user is added to your network.
For DSL users, many ISPs may require you to log on with a user name and password to gain access to the Internet. This is a dedicated, high-speed connection type called Point to Point Protocol over Ethernet (PPPoE). PPPoE is similar to a dial-up connection, but PPPoE does not dial a phone number when establishing a connection. It also will provide the Router with a dynamic IP address to establish a connection to the Internet.
By default, a DHCP server (on the LAN side) is enabled on the Router. If you already have a DHCP server running on your network, you MUST disable one of the two DHCP servers. If you run more than one DHCP server on your network, you will experience network errors, such as conflicting IP addresses. To disable DHCP on the Router, see the Basic Setup section in “Chapter 5: Configuring the Router.”
Chapter 2: Networking Basics |
5 |
The Use of IP Addresses

EtherFast Cable/DSL Router with 4-Port Switch
Chapter 3: Getting to Know the Router
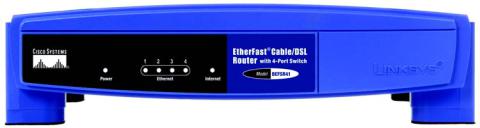
The Back Panel
The Router’s ports and the Reset button are located on the back panel of the Router.
|
Figure 3-1: Back Panel |
Reset Button |
There are two ways to reset the Router to its factory default settings. Either press the Reset |
|
button for approximately five seconds, or restore the defaults from the Administration tab - |
|
Factory Defaults of the Router's Web-based Utility. |
Internet |
This Internet port connects to your cable or DSL modem. |
1-4 |
These four Ethernet ports connect to network devices, such as PCs, print servers, or additional |
|
switches. |
Power |
The Power port is where you will connect the power adapter. |
IMPORTANT: If you reset the Router, all of your settings, including Internet connection and security settings, will be deleted and replaced with the factory defaults. Do not reset the Router if you want to retain these settings.
Chapter 3: Getting to Know the Router |
6 |
The Back Panel
EtherFast Cable/DSL Router with 4-Port Switch
The Front Panel
The Router’s LEDs, which inform you about network activities, are located on the front panel.
|
Figure 3-2: Front Panel |
Power |
Green. The Power LED lights up when the Router is powered on. If the LED is flashing, the |
|
Router is booting up, running a system self-test, or upgrading its firmware. |
Ethernet 1-4 |
Green. The Ethernet LED serves two purposes. If the LED is solidly lit, the Router is connected |
|
to a device through the corresponding port (Ethernet 1, 2, 3, or 4). If the LED is flashing, the |
|
Router is sending or receiving data over that port. |
Internet |
Green. The Internet LED lights up when the Router is connected to your cable or DSL modem. |
|
If the LED is flashing, the Router is sending or receiving data over the Internet port. |
|
Proceed to “Chapter 4: Connecting the Router.” |
Chapter 3: Getting to Know the Router |
7 |
The Front Panel
EtherFast Cable/DSL Router with 4-Port Switch
Chapter 4: Connecting the Router
Overview
Using the Setup Wizard
Linksys strongly recommends using the Setup CD-ROM for first-time installation of the Router. To use the Setup CD-ROM, insert the CD-ROM into your computer’s CD-ROM drive. The Setup Wizard should run automatically, and the Welcome screen should appear. If it does not, click the Start button and choose Run. In the field that appears, enter D:\setup.exe (if “D” is the letter of your CD-ROM drive). Then follow the on-screen instructions.
Using the Quick Installation or User Guide
If you do not wish to run the Setup Wizard, then follow the instructions in the Quick Installation or
Chapters 4 and 5 of the User Guide to connect and configure the Router.
To set up your network, do the following:
•Connect the Router to your PCs.
•If necessary, configure your PCs to obtain an IP address automatically from the Router. For instructions, refer to Windows Help. (By default, Windows 98, 2000, Millennium, and XP computers are set to obtain an IP address automatically, so unless you have changed the default setting, then you do not need to configure your PCs.)
•Using the Router’s Web-based Utility, configure the Router with the setting(s) provided by your Internet Service Provider (ISP).
The installation technician from your ISP should have left the setup information with you after installing your broadband connection. If not, you can contact your ISP to request the information. Once you have the setup information for your specific type of Internet connection, then you can begin installation and setup of the Router.
Chapter 4: Connecting the Router |
8 |
Overview
EtherFast Cable/DSL Router with 4-Port Switch
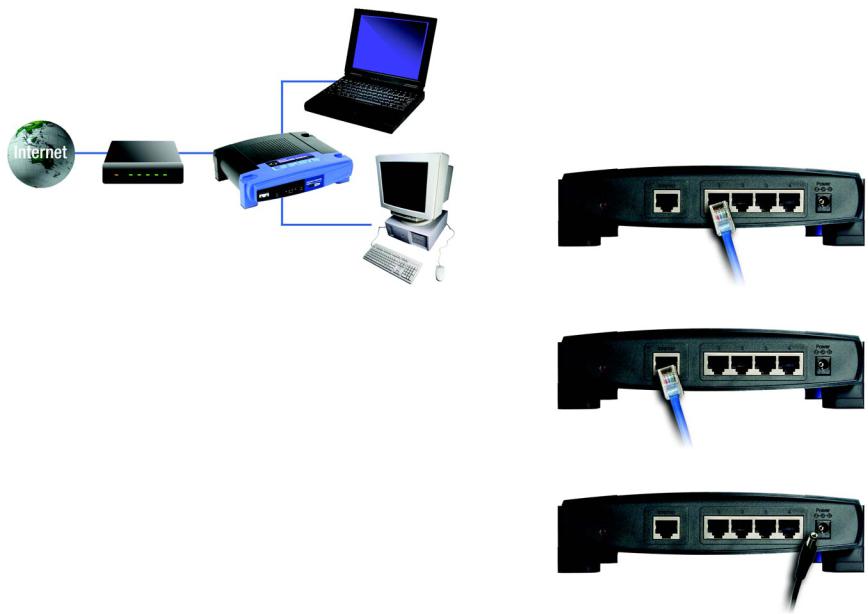
Notebook with
Ethernet Adapter
Cable or DSL
Modem
Router
PC with Ethernet Adapter
Figure 4-1: Example of a Typical Network
Connection Instructions
1.Make sure that all network devices are powered off, including the Router, PCs, switches, cable or DSL modem, and peripherals.
2.Connect one end of an Ethernet network cable to one of the numbered ports on the back of the Router. Connect the other end to an Ethernet port on a network device, e.g., a PC, print server, or switch.
Repeat this step to connect more PCs or other network devices to the Router.
3.Connect your cable or DSL modem’s Ethernet cable to the Router’s Internet port.
4.Power on the cable or DSL modem.
5.Connect the included power adapter to the Router’s Power port and then plug the power adapter into an electrical outlet. The Power LED on the Router’s front panel will light up as soon as the power adapter is connected properly.
6.Power on your PC(s).
Proceed to “Chapter 5: Configuring the Router.”
Chapter 4: Connecting the Router
Figure 4-2: Connect a PC
Figure 4-3: Connect the Cable/DSL Modem
Figure 4-4: Connect the Power
9
Connection Instructions
EtherFast Cable/DSL Router with 4-Port Switch
Chapter 5: Configuring the Router
Overview
Now that you have connected the Router following the instructions in Chapter 4, you can use the Web-based Utility to configure the Router. Advanced users may configure the Router’s advanced settings through the Webbased Utility.
This chapter will describe each web page on the Utility and each page’s key functions. The Utility can be accessed via your web browser through use of a computer connected to the Router. For a basic network setup, most users only have to use the following screens of the Utility:
•Basic Setup. On the Basic Setup screen, enter the Internet connection settings provided by your ISP. If you do not have this information, you can call your ISP to request the settings. Once you have the setup information for your specific type of Internet connection, then you can configure the Router.
•Management. Click the Administration tab and then the Management tab. The Router’s default password is admin. To secure the Router, change the Password from its default.
There are five main tabs: Setup, Security, Applications & Gaming, Administration, and Status. Additional tabs will be available after you click one of the main tabs.
Setup
•Basic Setup. Enter the Internet connection and network settings on this screen.
•DDNS. Enable the Router’s Dynamic Domain Name System (DDNS) feature on this screen.
•MAC Address Clone. If you need to clone a MAC address onto the Router, use this screen.
•Advanced Routing. On this screen, you can alter Network Address Translation (NAT), dynamic routing, and static routing configurations.
Security
•Filter. On this screen, you can configure a variety of filters to enhance the security of your network.
•VPN. To enable or disable IPSec, PPPoE, and/or PPTP Passthrough for Virtual Private Network (VPN) tunnels.
Chapter 5: Configuring the Router |
10 |
Overview
EtherFast Cable/DSL Router with 4-Port Switch
Applications & Gaming
•Port Range Forwarding. Set up public services or other specialized Internet applications on your network.
•Port Triggering. To set up triggered ranges and forwarded ranges for Internet applications, click this tab.
•UPnP Forwarding. Use this screen to alter Universal Plug and Play (UPnP) forwarding settings.
•DMZ. Click this tab to allow one local user to be exposed to the Internet for use of special-purpose services.
Administration
•Management. On this screen, alter the Router’s password and access privileges, as well as the UPnP settings.
•Log. If you want to view or save activity logs, click this tab.
•Factory Defaults. If you want to restore the Router’s factory defaults, then use this screen.
•Firmware Upgrade. Click this tab if you want to upgrade the Router’s firmware.
Status
•Router. This screen provides status information about the Router.
•Local Network. This provides status information about the local network.
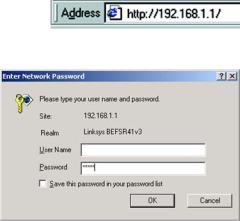
How to Access the Web-based Utility
To access the Web-based Utility of the Router, launch Internet Explorer or Netscape Navigator, and enter the Router’s default IP address, 192.168.1.1, in the Address field. Press the Enter key.
A screen will appear asking you for your User name and Password. Enter admin in the User Name and Password fields. Then click the OK button.
Make the necessary changes through the Utility. When you have finished making changes to a screen, click the Save Settings button to save the changes, or click the Cancel Changes button to undo your changes. Help information is shown on the right-hand side of a screen. For additional help on a tab, click More.
Chapter 5: Configuring the Router
Figure 5-1: Router’s IP Address
Figure 5-2: Router Login
11
How to Access the Web-based Utility
EtherFast Cable/DSL Router with 4-Port Switch
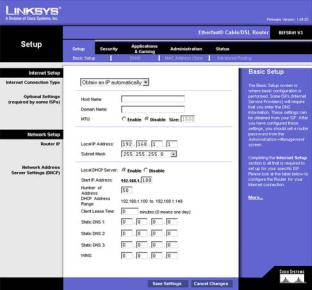
The Setup Tab - Basic Setup
The Basic Setup screen is the first screen you see when you access the Web-based Utility.
Internet Setup
The Internet Setup section configures the Router for your Internet connection type. This information can be obtained from your ISP.
Internet Connection Type
The Router supports seven connection types: Obtain an IP automatically, Static IP, PPPoE, RAS, PPTP, HBS, and L2TP. Each Basic Setup screen and available features will differ depending on what kind of connection type you select.
Obtain an IP Automatically
By default, the Router’s Internet Connection Type is set to Obtain an IP automatically, and it should be used only if your ISP supports DHCP or you are connecting through a dynamic IP address.
Figure 5-3: Setup Tab - Basic Setup
(Obtain an IP automatically)
Chapter 5: Configuring the Router |
12 |
The Setup Tab - Basic Setup
EtherFast Cable/DSL Router with 4-Port Switch
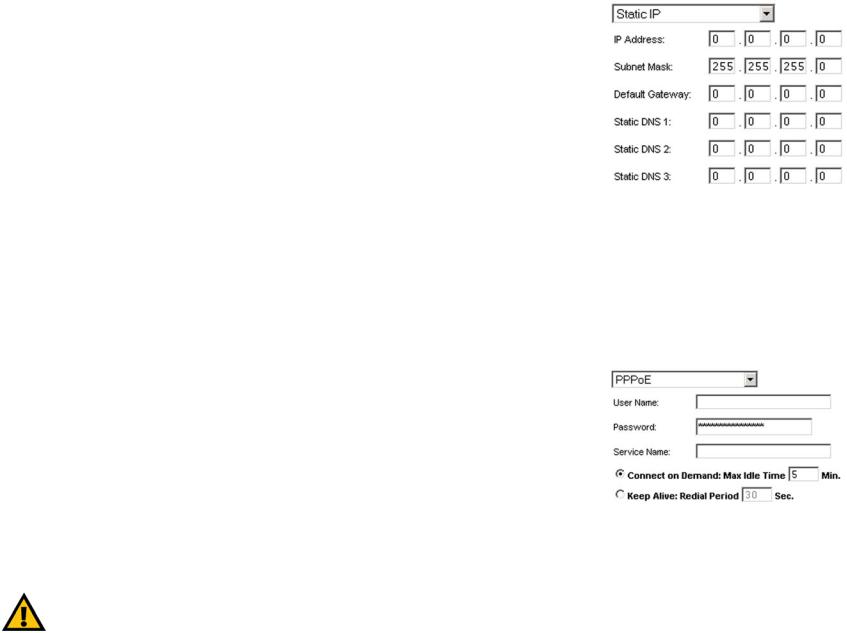
Static IP
If you are required to use a permanent IP address, then select Static IP.
IP Address. This is the IP address that the Router has, when seen from the Internet. Your ISP will provide you with the IP Address you need to specify here.
Subnet Mask. This is the Router’s Subnet Mask, as seen by external users on the Internet (including your ISP). Your ISP will provide you with the Subnet Mask.
Default Gateway. Your ISP will provide you with the Default Gateway Address.
Static DNS 1-3. Your ISP will provide you with at least one DNS (Domain Name System) Server IP Address.
PPPoE
Some DSL-based ISPs use PPPoE (Point-to-Point Protocol over Ethernet) for Internet connections. If you use a DSL line, check with your ISP to see if they use PPPoE. If they do, you will have to enable it.
User Name and Password. Enter the User Name and Password provided by your ISP.
Service Name. Enter the Service Name provided by your ISP.
Connect on Demand and Max Idle Time. You can configure the Router to cut the Internet connection after it has been inactive for a specific period of time (Max Idle Time). If your Internet connection has been terminated due to inactivity, Connect on Demand enables the Router to automatically re-establish your connection as soon as you attempt to access the Internet again. If you wish to activate Connect on Demand, click the radio button. If you want your Internet connection to remain on at all times, enter 0 in the Max Idle Time field. Otherwise, enter the number of minutes you want to have elapsed before your Internet access disconnects.
Keep Alive and Redial Period. This option keeps your Internet access connected indefinitely, even when it sits idle. If you select this option, the Router will periodically check your Internet connection. If the connection is down, then the Router will automatically re-establish the connection. To use this option, click the radio button next to Keep Alive. The default Redial Period is 30 seconds.
When you are finished, click the Save Settings button. Then click the Status tab, and click the Connect button to start the connection.
Note: For DSL users, if you need to enable PPPoE support, remember to remove any PPPoE applications that are installed on your PCs.
Chapter 5: Configuring the Router
Figure 5-4: Static IP
static ip address: a fixed address assigned to a computer or device connected to a network
subnet mask: an address code that determines the size of the network
default gateway: a device that forwards Internet traffic from your local area network
Figure 5-5: PPPoE
pppoe (point-to-point over ethernet): a type of broadband connection that provides authentication (username and password) in addition to data transport
13
The Setup Tab - Basic Setup
EtherFast Cable/DSL Router with 4-Port Switch
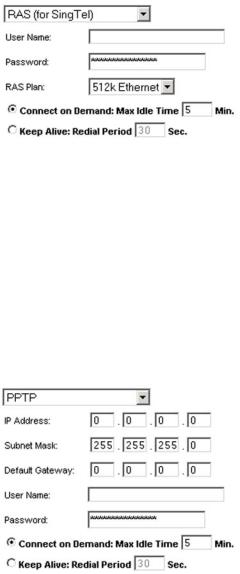
RAS
Remote Access Service (RAS) is a service that applies to connections in Singapore only. For users in Singapore, check with Singtel for information on RAS.
User Name and Password. Enter the User Name and Password supplied by Singtel.
RAS Plan. Select the type of plan you have.
Connect on Demand and Max Idle Time. You can configure the Router to cut the Internet connection after it has been inactive for a specific period of time (Max Idle Time). If your Internet connection has been terminated due to inactivity, Connect on Demand enables the Router to automatically re-establish your connection as soon as you attempt to access the Internet again. If you wish to activate Connect on Demand, click the radio button. If you want your Internet connection to remain on at all times, enter 0 in the Max Idle Time field. Otherwise, enter the number of minutes you want to have elapsed before your Internet access disconnects.
Keep Alive and Redial Period. This option keeps your Internet access connected indefinitely, even when it sits idle. If you select this option, the Router will periodically check your Internet connection. If the connection is down, then the Router will automatically re-establish the connection. To use this option, click the radio button next to Keep Alive. The default Redial Period is 30 seconds.
When you are finished, click the Save Settings button. Then click the Status tab, and click the Connect button to start the connection.
PPTP
Point-to-Point Tunneling Protocol (PPTP) is a service that applies to connections in Europe and Israel only.
IP Address. This is the IP address that the Router has, when seen from the Internet. Your ISP will provide you with the IP Address you need to specify here.
Subnet Mask. This is the Router’s Subnet Mask, as seen by external users on the Internet (including your ISP). Your ISP will provide you with the Subnet Mask.
Gateway. Your ISP will provide you with the Default Gateway Address.
User Name and Password. Enter the User Name and Password provided by your ISP.
Connect on Demand and Max Idle Time. You can configure the Router to cut the Internet connection after it has been inactive for a specific period of time (Max Idle Time). If your Internet connection has been terminated due to inactivity, Connect on Demand enables the Router to automatically re-establish your
Chapter 5: Configuring the Router
Figure 5-6: RAS
Figure 5-7: PPTP
14
The Setup Tab - Basic Setup
EtherFast Cable/DSL Router with 4-Port Switch
connection as soon as you attempt to access the Internet again. If you wish to activate Connect on Demand, click the radio button. If you want your Internet connection to remain on at all times, enter 0 in the Max Idle Time field. Otherwise, enter the number of minutes you want to have elapsed before your Internet access disconnects.
Keep Alive and Redial Period. This option keeps your Internet access connected indefinitely, even when it sits idle. If you select this option, the Router will periodically check your Internet connection. If the connection is down, then the Router will automatically re-establish the connection. To use this option, click the radio button next to Keep Alive. The default Redial Period is 30 seconds.
When you are finished, click the Save Settings button. Then click the Status tab, and click the Connect button to start the connection.
Heart Beat Signal
Heart Beat Signal is a service used in Australia only. If you are using a Heart Beat Signal connection, check with your ISP for the necessary setup information.
User Name and Password. Enter the User Name and Password provided by your ISP.
Heart Beat Server. Enter the IP address of your ISP’s Heart Beat server. This is provided by your ISP.
Connect on Demand and Max Idle Time. You can configure the Router to cut the Internet connection after it has been inactive for a specific period of time (Max Idle Time). If your Internet connection has been terminated due to inactivity, Connect on Demand enables the Router to automatically re-establish your connection as soon as you attempt to access the Internet again. If you wish to activate Connect on Demand, click the radio button. If you want your Internet connection to remain on at all times, enter 0 in the Max Idle Time field. Otherwise, enter the number of minutes you want to have elapsed before your Internet access disconnects.
Keep Alive and Redial Period. This option keeps your Internet access connected indefinitely, even when it sits idle. If you select this option, the Router will periodically check your Internet connection. If the connection is down, then the Router will automatically re-establish the connection. To use this option, click the radio button next to Keep Alive. The default Redial Period is 30 seconds.
When you are finished, click the Save Settings button. Then click the Status tab, and click the Connect button to start the connection.
Chapter 5: Configuring the Router
Figure 5-8: Heart Beat Signal
15
The Setup Tab - Basic Setup
Loading...