


LINCOLN ELECTRIC
INSTRUCTION MANUAL
MANUALE DI ISTRUZIONI
PC40 SINGLE PHASE
PC60 THREE PHASE
PC100 THREE PHASE
LINCOLN ELECTRIC ITALIA S.r.l.
Via Fratelli Canepa, 8
16010 SERRA RICCO' (GE)
ITALY
July 2003
REV7.0
1
ENGLISH INDEX |
|
INSTRUCTIONS FOR ELECTROMAGNETIC COMPATIBILITY ...................................................................................... |
3 |
SAFETY NORMS FOR THE OPERATOR. ......................................................................................................................... |
5 |
INSTRUCTION NOTES. ................................................................................................................................................... |
8 |
TECHNICAL DATA ....................................................................................................................................................... |
11 |
INDICE ITALIANO |
|
ISTRUZIONI SULLA COMPATIBILITÀ ELETTROMAGNETICA ................................................................................... |
15 |
NORME DI SICUREZZA PER L'OPERATORE ................................................................................................................ |
17 |
ISTRUZIONI GENERALI................................................................................................................................................ |
20 |
DATI TECNICI............................................................................................................................................................... |
23 |
SPARE PARTS LIST - ELENCO RICAMBI...................................................................................................................... |
27 |
ELECTRIC DIAGRAMS - SCHEMI ELETTRICI .............................................................................................................. |
33 |
2

WARNING!
THIS PLASMA CUTTING MACHINE
MUST BE USED BY TRAINED OPERATORS ONLY.
READ THIS MANUAL CAREFULLY BEFORE ATTEMPTING TO USE
THE CUTTING MACHINE.
INSTRUCTIONS FOR ELECTROMAGNETIC COMPATIBILITY
The user is responsible for installing and using the equipment according to the manufacturers instructions. If electromagnetic disturbances are detected then it shall be the responsibility of the user of the equipment to resolve the situation with the technical assistance of the manufacturer. In some cases this remedial action may be as simple as earthing the welding circuit. In other cases it could involve constructing an electromagnetic screen enclosing the power source and the work complete with associated input filters. In all cases electromagnetic disturbances must be reduced to the point where they are no longer troublesome.
Note - The welding circuit may or may not be earthed for safety reasons. Changing the earthing arrangements should only be authorized by a person who is competent to asses whether the changes increase the risk of injury, e.g. by allowing parallel welding current return paths which may damage the earth circuits of other equipment.
Assessment of area
Before installing the equipment the user shall make an assessment of potential electromagnetic problems in the surrounding area. The following shall be taken into account:
a)other supply cables, control cables, signaling and telephone cables; above, below and adjacent to the equipment;
b)radio and television transmitters and receivers;
c)computer and other control equipment;
d)safety critical equipment, e.g. guarding of industrial equipment;
e)the health of the people around, e.g. the use of pacemakers and hearing aids;
f)equipment used for calibration or measurement;
g)the immunity of other equipment in the environment. The user shall ensure that other equipment being used in the environment is compatible. This may require additional protection measures;
h)the time of the day that welding or other activities are to be carried out.
The size of the surrounding area to be considered will depend on the structure of the building and other activities that are taking place. The surrounding area may extend beyond the boundaries of the premises.
METHODS OF REDUCING EMISSIONS
Mains supply
Cutting equipment should be connected to the mains supply according to the manufacturers recommendations. If interference occurs, it may be necessary to take additional precautions such as filtering of the mains supply. Consideration should be given to shielding the supply cable of permanently installed equipment, in metallic conduit or equivalent. Shielding should be electrically continuous throughout its length. The shielding should be connected to the power source so that good electrical contact is maintained between the conduit and the power source enclosure.
Maintenance of the equipment
The equipment should be routinely maintained according to the manufacturers recommendations. All access and service doors and covers should be closed and properly fastened when the equipment is in operation. The equipment should not be modified in any way except for those changes and adjustments covered in the manufacturers instructions. In particular, the spark gaps of arc striking and stabilizing devices should be adjusted and maintained according to the manufacturers recommendations.
Cables
The cables should be kept as short as possible and should be positioned close together, running at or close to the floor level.
3
Equipotential bonding
Bonding of all metallic components in the installation and adjacent to it should be considered. However, metallic components bonded to the work piece will increase the risk that the operator could receive a shock by touching these metallic components and the electrode at the same time. The operator should be insulated from all such bonded metallic components.
Earthing of the workpiece
Where the workpiece is not bonded to hearth for electrical safety, nor connected to earth because of its size and position, e.g. ships hull or building steelwork, a connection bonding the workpiece to earth should be made by a direct connection to the workpiece, but in some countries where direct connection is not permitted, the bonding should be achieved by suitable capacitance, selected according to national regulations.
Screening and shielding
Selective screening and shielding of other cables and equipment in the surrounding area may alleviate problems of interference. Screening of entire equipment installation may be considered for special applications.
INTRODUCTION
The machine you have purchased has been designed, manufactured and tested to comply with the latest European Community regulations.
The working frequency (30 kHz) eliminates the characteristic noise of older electronic power supplies.
Variations of mains within the working limits set forth in this manual will not cause any variation in the cutting current. LINCOLN ELECTRIC, beyond using oversized and highly selected components, submits to bench test every single power supply simulating particularly heavy working conditions as in this way it is possible to spot any possibly defective component.
LINCOLN ELECTRIC has compiled this manual with the intention to furnish the instructions for operation of the plasma cutting machine PC40, PC60, PC100.
The arc cutting machine, if used correctly, can be operated in very safe conditions while if the prescribed safety norms are not observed it could cause serious damages to people and objects.
4
SAFETY NORMS FOR THE OPERATOR.
PREVENTION OF BURNS.
The electric arc is a source of intense visible light and heat emissions as well as very damaging invisible ultra red and ultraviolet radiation.
To avoid any possible damages, the operator must use adequate protective garments such as:
1)insulating gloves,
2)leather apron,
3)gaiters,
4)protective shoes,
5)welding mask provided with safety lenses of adequate DIN grade selected according to the welding being capable
of filtering the radiation and reducing the bright light intensity.
The safety lenses must always be kept clean and must be quickly replaced in case of damage.
Since incandescent spray products generated during the cutting or welding operations may be deposited on the safety lenses thus reducing the visual field, the use of a protective transparent lens in front of the safety lens is strongly recommended.
Never look at the electric arc without adequate protections for the eyes.
Protect the working area in order to prevent that other working people in the vicinity could be affected by the radiation from the electric arc.
Pay attention in handling the pieces being worked on, using adequate tools to avoid burns that can be caused by the overheating of the piece during the operations of welding and/or cutting.
PREVENTION OF ELECTRIC SHOCK
Electric PLASMA CUTTING machine is a power source of high intensity and therefore special care must be used when operating or maintaining this machine.
Mains cables:
Connect the mains cable to a plug equipped with fused switch.
Verify the conditions of the mains cable and replace it in case it results damaged.
Grounding:
Make sure that the mains supply line is adequately grounded and
Check that all connections are firmly made in order to avoid poor contacts and overheating.
Work side:
The ground from the power supply must be connected to the part being cut making sure of a good contact; the working bench must also be adequately earthed.
Operators protections:
The clothes of the operator must be dry.
Don't climb or lean on the parts being worked on when the power supply is in use.
Don't work in damp or wet environments, unless adequate protecting clothing is used in order to prevent electric shock. Check that the welding cables and the mains cable do not have areas with exposed bare wires otherwise replace them immediately.
Disconnect the mains line before any intervention on the torch, on the power supply or on the welding cables.
Do not place the welding electrode holder or the torch directly on the working bench or on any metallic surface connected to the ground of the power supply in order to avoid any risk of accidental short-circuit or lighting of the arc. WARNING: the electromagnetic fields generated by the high currents could cause malfunctions of electronic vital apparatuses.
PREVENTION OF TOXIC SMOKES.
These precautions must be adopted in order to prevent exposure of the operator or other people to the toxic smokes generated during the welding process.
Avoid to perform welding or cutting operations on painted or oil or grease dirty surfaces.
Some chlorinated solvents can break down during the process and generate harmful gases such as phosgene gas.
It is therefore important to make sure that such solvents are not present on the parts being worked on and in case they are present it is necessary to remove them before the operating the machine.
It is furthermore necessary to make sure that such solvents or other degrading agents are not in the immediate proximity of the working area.
5
Metal parts coated with or containing lead, graphite, cadmium, zinc, mercury beryllium and chrome could cause harmful concentrations of toxic smokes and must not be subjected to welding or cutting operations unless:
1)the coating is removed before starting to weld,
2)the working area is adequately ventilated.
3)the operator uses an adequate smoke filtering system.
Don't work in a space be missing adequate ventilation.
PREVENTION AGAINST FIRE.
During the process metal gets overheated and sparks and slag may be spread around. Adequate precautions must be taken in order to prevent fires and/or explosions.
Avoid of operate in areas where are containers of flammable substances.
All fuels and/or combustible products must be kept away from the working area. Fireproof devices must be in the immediate proximity.
Particular precautions must be taken for welding or cutting operations performed on barrels that have contained inflammable substances or inside metallic containers or places with scarce ventilation.
These operations must be always performed in presence of qualified personnel that could lend the necessary assistance. DON'T ever operate in an environment whose atmosphere is filled with flammable gases, vapors or combustible liquids (such as. gasoline or his vapors).
USE OF INERT GAS CYLINDERS.
When compressed air systems or gas cylinders are used it is necessary to comply with all the prescribed requirements.
Pressure regulators.
All pressure regulators used in the equipment must be in good working conditions.
These devices, if not kept in optimal conditions, could cause damages to the machine or to the operator. In case of damage replace the device immediately.
NEVER use regulators intended for a gas different from the one used with the machine. In no case use regulators that are visibly damaged.
Don't lubricate the regulators with oil or grease.
Gas cylinders:
Cylinders containing compressed gas are to be used according to the prescriptions of the relevant regulations. Never use a cylinder that is broken or visibly damaged.
Don't use cylinders that are not positioned in their holding bin. Don't move or transport a cylinder without the prescribed protection.
Don't use the gas of the cylinders for applications different from the originally intended for. Don't lubricate the valves of the cylinders with oil or grease.
Don't allow electric contact between the cylinders and the machine. Don't expose the cylinders to excessive heat, sparks, slag or flames ever.
NEVER try to repair a defective cylinder but send it back to the gas supplier.
Pipelines
The pipelines used for the various gases have the following color codes: Green = Oxygen
Black = Inert gas and Air
NEVER use green pipes for gases other than oxygen.
REPLACE any pipe that is damaged from cuts or that shows scorch marks.
Don't allow any crease or folds that could reduce the pressure or the delivery of the line. Examine periodically the pipelines seeking for possible leaks, wearing or defective connections.
PROTECTION FROM NOISE
On the subject of noise the prescriptions of the directive n86/ 188/ C.E.E. are to be applied.
The electronic apparatuses used in electric arc welding or plasma cutting do not cause in normal conditions noise levels above 80 dB.
In connection with the working procedure being and with the relative conditions of use (values of the welding parameters or distance between piece and cutting torch, closed or open environment) one could verify noise levels higher than this limit.
It is therefore necessary for the operator to apply the precautions foreseen by the relevant regulations.
6

SAFETY DEVICES
The power supplies are equipped with appropriate safety devices to prevent damages to the machine and the operator. Never tamper with the safety devices by short circuiting or opening the connecting terminals. Never try to use the power supply without the protection circuits and/or devices installed and in perfect working conditions as this could be extremely risky for the operator and any nearby person.
All electric connections must be shielded by the appropriate insulating material.
WARNING: The safety devices must be checked periodically and whenever found defective must be replaced immediately.
DANGER SIGNALS
Inside or outside the power supply are danger signals warning against possible risks.
The meaning of these signals is the following:
READ THE INSTRUCTIONS MANUAL ATTENTIVELY.
GENERAL WARNING: this symbol points out a danger of any nature that could cause damages to people or belongings.
WARNING!: In this spot contact wounds could occur (such as electric shock).
DANGER Of DEATH: maximum attention must be paid whenever this signal is exposed!
Never touch, for any reason whatsoever, the area so labeled as there exists a serious risk of deadly accident.
DANGER Of FIRE: where this sign is exposed there exists a risk of fire.
EXPLOSIVE SUBSTANCES OR DANGER OF EXPLOSION.
RADIATION DANGER: when this signal is exposed, safety lenses must be worn to avoid serious eye damages.
7

INSTRUCTION NOTES.
This part of the manual is important for a correct use of the of the arc power supply; it doesn't contain particular instructions for maintenance as these power supply don't require any ordinary maintenance.
The unique precautions to be taken are those typical for any electric machine with metallic frame and cover.
It is in fact recommended to avoid hitting, rubbing and in any way expose the machine to drippings, sources of excessive heat, or however anomalous situations.
In case of transportation and/or storage the machine should not be exposed to a temperature outside the range of:
- 25 to + 55 °C
If extraordinary maintenance is required, and only if the necessary technical expertise and tools are available, it is possible to follow the instructions provided for by the relevant technical assistance manual otherwise it is recommended to approach the nearest technical assistance center or directly the manufacturer.
Maintenance or repairs performed by technical assistance centers not authorized by LINCOLN ELECTRIC will immediately render null and void the manufacturer warranty.
START-UP PROCEDURE
READ CAREFULLY THE INSTRUCTION MANUAL BEFORE ATTEMPTING TO CONNECT THE
POWER SUPPLY TO THE LINE AND TO USE IT.
Following the instructions you will avoid a wrong installation of the machine that could also cause irreversible damages.
The damages caused by a wrong use of the power supply will not be covered by the manufacturer warranty.
This arc machine is a power unit designed for professional applications that must be used by trained personnel only. The power supply can perform in environments where conditions are particularly harsh and with outside temperature between20 and +40 °C, with a dampness level of:
max. 50% up to +40° C max. 90% up to +20° C
1.Do not place the unit close to walls or in positions where the flow of air through the cooling air slots is obstructed or limited in any way (avoid therefore to cover the power supply with rags, sheets of paper, plastic covers, etc.).
2.Make sure that the room temperature is lower than 40 °C and that the working area is not subject to any damaging pollution, such as:
a)damp air with dust mixed with acids or salts.
b)air with high concentrations of iron or metallic dust.
3.Verify that the value of the main line voltage is conforming to the value indicated for the power supply
4.Verify that the value of the available main line power is adequate to the requirements of the power supply. If in doubt, consult the table under the heading TECHNICAL DATA.
5.The degree of protection from external agents of these generators is IP 23, which means that the cover of the power supply protects it from external bodies having a diameter larger than 12 mm and from water spray up to 60 degrees from the vertical. Therefore avoid to:
•dip the power supply in liquid of any kind.
•place it on muddy and damp surfaces.
•insert foreign in or around the cooling air slots.
6.Don't use the power supply without his mantle; this could prove to be harmful for the machine and for the operator.
DESCRIPTION OF FRONT PANEL
Led indicators.
•Led 1: lit with "POWER" on.
•Led 2: lit when the output terminals of the power source are energized.
•Led 3: lit when the value of the cutting torch air pressure falls below the minimum level required.
•Led 4: lit when the power supply goes in thermal block caused by the triggering of the protections or by the main line voltage that at that time has gone above the allowed threshold.
•Led 5: lit during cutting.
Controls on which the operator can act.
M1 |
To set the value of the current required by the cutting process. |
I1 |
This switch enables the air stream from the torch without any cutting current being present; this feature is very |
|
useful to blow the work piece, to cool the torch or to simply check the availability of air in the torch circuit. |
I2 |
Switch to set the remote control CN1 on and off (on the PC100 power source only). |
CN1 |
Connector for the remote control unit. |
8

The functions related to each pin of the CN1 connector are as follows:
DIRECTION |
FUNCTION |
|
OUTPUT (120VAC,1A MAX) |
N.O. Switch closed when the Arc |
|
FRONT VIEW |
is transferred to the work |
|
OUTPUT (12VDC, @20mA Max.) |
Auxiliary supply |
|
INPUT (0 - 5 VDC*) |
Output Current Regulation |
|
INPUT |
Start power source |
|
|
active connecting to GROUND |
|
GROUND |
|
|
GROUND |
|
|
TORCH CONNECTION
The torch connection to the power source is very easy as it is performed via a quick-connector carrying the torch switch, the gas line and the torch power cable.
Shift the plastic safety sleeve on the torch cable, over the torch connector. Insert the torch connector to the corresponding on front panel. Shift down the safety sleeve till the front panel and fix it by using the three supplied screws
As far as the ground connection is concerned this is to be connected to the work piece and a "DINSE" connector on the front of the power source.
CUTTING GAS CIRCUIT
The air plasma cutting process uses air as primary cutting gas and as torch cooling gas. The air circuit includes a pressure regulator set at 5 bar, settings above 7,5 bar could damage the torch.
The pilot arc is assured energizing a first electrovalve.
When the cutting arc is activated a second electrovalve is energized allowing the flow of the primary air. This valve allows the air flow only when driven by the electronic logic devices during the pre-flow, post-flow and cutting phases or if the GAS-TEST switch on the front panel is turned on.
CONNECTION TO THE MAIN LINE
Three phase model.
Before connecting to the main line make sure that the line voltage is between 340 and 460 VAC. In case of voltage higher than this limit the power supply turns into "blocked conditions"; and the persistence of this condition could damage the power source; higher values could cause damages to the rectifier block and/ or to the main line filter.
2V model.
Before connecting to the main line make sure that the line voltage is between 200 and 255 VAC. with the voltage selector positioned on 230 VAC. With a voltage of 255 Vac the power supply turns into "blocked conditions"; and the persistence of this condition could damage the power source; higher values could damage the rectifier block and/ or the main line filter.
If the power supply is used with the voltage selector positioned on 400 VAC then the main line voltage must be between 340 and 460 VAC.
IT IS COMPULSORY TO HAVE A GROUND CONNECTION
9

PROTECTIONS
The power supply has a range of different inside protections that assure always a correct operation:
•Protection for the maximum value of the main voltage,
•Protections against overheating,
•Inside fuse.
Maximum value of main line voltage.
The power supply is protected against irregularities of voltage that could be caused by anomalies in the main line; in this case the power supply will turn into "blocked conditions" and this situation will be visualized by LED 4, on the front panel.
It will remain in this state until the main line voltage goes back within the pre-set values after which the unlocking will be automatic.
Overheating protections.
If the temperature climbs above the pre-set value or if the duty cycle goes beyond the expected limits, appropriate heat sensors, placed inside the power supply, will stop the operation with consequent lighting of LED 4 indicator; as soon as the conditions return to the expected ones, the power supply will resume functioning.
Inside fuse
The power supply is provided with an inside fuse for the protection of some circuits. The rating of such fuse is 0,5A and can be found on the input boards.
NOTE: The blowing of the fuse means a possible problem within the power source and therefore it is necessary to require the technical assistance of the nearest Center or address directly the manufacturer.
TORCH SAFETY
The torch delivered with the power source is equipped with a safety device that prevents the operator from getting in touch accidentally with parts under tension.
ATTENTION
INSERT BOTH TORCH AND PROTECTION SLEEVE INTO THE TORCH-CONNECTOR OTHERWISE
THE POWER SOURCE CAN’T WORK
A SETTED PRESSURE ABOVE 7,5 BAR COULD DAMAGE THE TORCH
TURN ALWAYS OFF THE POWER SOURCE WHEN WORKING ON THE TORCH
USE INSTRUCTIONS
Start-up
Rotate the main line switch on the back of the power supply on the position "I" or on the value of the main line voltage selected depending upon the power supply model being used; the led indicator "POWER" (Led 1) placed on the front panel will turn on.
After one second past the switching on of the power supply a "click" from the starter relay will be heard after which the unit will be ready to operate.
Adjustments for cutting.
The concept which is at the basis of these power sources design is to have available a constant current according to the set value, independently from the length of the plasma arc.
After having connected the torch and having turned on the power source, make sure that the primary air is available through the I1 switch.
The working pressure will be set at 5 bar
It will then be possible to set the desired current value through the M1 knob (from 15 to 40A max. for PC40, from 20 to 60A max. for PC60 and from 20 to 100A for PC100)
To start the cutting process it is sufficient to press the torch button making sure not to aim the torch air blow towards foreign objects.
During the cutting process it is possible to hold the torch away from the work piece for an extended period of time. Avoid to touch the work piece directly with the torch, when you haven’t the specifically nozzles.
The arc length should not be higher than 6-7mm.
Once the cutting process is terminated letting off the torch button will cause the plasma arc to be turned off; the air flow will continue for approximately 30 sec. (post-flow) to allow the cooling down of the torch.
10
TECHNICAL DATA
BLOCK DIAGRAM
Before describing the block diagram, we would like to introduce some general concepts upon which the construction of our generator is based. The equipment “hart”, the most technically advanced part is the inverter, is built using top quality electronic components, in order to obtain high reliability during heavy-duty operation.
The inverter is a particular oscillating circuit which, fed by a DC source, supplies an AC voltage at the desired frequency. Advantages can be obtained by increasing the frequency, e.g.:
•It is possible to use smaller and lighter transformers and obtain the same transferred power.
•It is possible to have instantaneous output variation (cutting current). This allows the current to be adjusted continuously, thereby adapting it to the requirements of the process.
•The application of such frequencies eliminates well-known and troublesome noises that are generally met when using electro-mechanical equipment.
Functional description of Block Diagram
a)The main supply voltage is rectified and filtered by rectification and filtering block (1)
b)The obtained DC voltage is converted by the inverter (2) to AC high frequency voltage.
c)AC voltage is then applied to the transformer’s (3) primary which galvanically insulates the output connectors from the main supply.
d)The output of the transformer provides a high frequency voltage which is rectified and filtered by block (4).
e)The control board (5) disables the power source if the voltage of the mains supply is not within the preset limits (nominal value +/- 10%)
f)The control panel (6) allows the following settings and controls:
•knob to set the cutting current
•warning lights to check the power source working conditions
•switch to check the air flow.
Only for PC100:
•switch to move control functions from the front panel to the remote controller
•remote control connector
11
TECHNICAL DATA |
|
|
|
|
|
|
Main Power Supply: |
|
|
|
|
|
|
|
PC40 |
|
PC60 |
PC100 |
|
|
Main supply voltage |
230/400V Single phase |
|
400 V |
400 V |
|
|
Frequency |
50/60 Hz |
|
50/60 Hz |
50/60 Hz |
|
|
Max. primary current |
30/17A |
|
13 A |
24 A |
|
|
Max. absorbed power |
7 KVA |
|
9 KVA |
16 KVA |
|
|
Power factor |
0,9 |
|
0,9 |
0,9 |
|
|
Efficiency |
0,85 |
|
0,85 |
0,85 |
|
|
Cutting: |
|
|
|
|
|
|
|
|
PC40 |
PC60 |
PC100 |
|
|
Cutting current regulation range |
|
15/40A |
20/60 A |
20/100 A |
|
|
Pilot arc current |
|
15A |
20 A |
20 A |
|
|
Duty cycle ED 35% |
|
|
60 A |
100 A |
|
|
Duty cycle ED 50 |
|
40A |
|
|
|
|
Duty cycle ED 60% |
|
|
45 A |
75 A |
|
|
Duty cycle ED 100% |
|
30A |
30 A |
50 A |
|
|
Dimensions (d x l x h) |
|
51,5x19,5x28 cm. |
51,5x19,5x28 cm. |
615x235x33 cm. |
|
|
Weight |
|
16kg |
16 Kg |
26 Kg |
|
|
protection class |
|
IP23 |
IP23 |
IP23 |
|
|
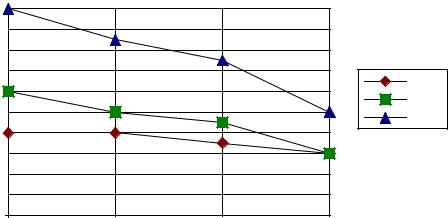
DUTY CYCLE:
Iout |
|
|
|
100 |
|
|
|
90 |
|
|
|
80 |
|
|
|
70 |
|
|
PC40 |
60 |
|
|
|
|
|
PC60 |
|
50 |
|
|
|
|
|
PC100 |
|
40 |
|
|
|
|
|
|
|
30 |
|
|
|
20 |
|
|
|
10 |
|
|
|
0 |
|
|
|
35% |
50% |
60% |
100% |
The graph shows the cutting current (in Amps.) on the Y axis and the percentage of working time calculated on a total time of 10 minutes on X axis.
12
 Loading...