


 Loading...
OWNER’S MANUAL
Mounting the battery backup unit (BBU) can be done using one of two methods. The BBU can be mounted directly on top of the motor unit or it can be secured on a structural support just above it.
BATTERY BACKUP UNIT
Model 475LM
 WARNING
To prevent possible SERIOUS INJURY or DEATH from electrocution, disconnect ALL electric and battery power
BEFORE performing ANY service or maintenance.
Holes for Ceiling Mount
Battery Backup
Unit (BBU)
Side Screw
Slots for Chassis Mount
Lag Screw 1-1/2"
1. Mounting the BBU Directly to the Motor Unit.
•Position the BBU on top of the motor unit. Make sure the motor unit power cord is drawn out from beneath the BBU. The BBU should sit firmly on top of the motor unit. Adjust angle iron placement so that it is out of the way of the BBU’s installation (Figure 1).
•Align the two screw slots on the BBU to the back chassis holes.
•Secure the BBU to each side of the chassis flanges with 3/4" screws provided.
3/4" Screw
 Power
Power 
Power
Cord


Bring Power Cord out left side slot
Antenna
3/4" Screw
2.Mounting the BBU Directly to the Ceiling Structural Support.
•After the motor unit has been installed, position the BBU above the motor unit to a structural support (joist) within BBU’s cord length (Figure 2).
•Attach the BBU to the support by using the ceiling mount holes on either side of the BBU.
•Secure the BBU to the ceiling using 1-1/2" lag screws (provided).
3. Connect the BBU to the Motor Unit.
•Disconnect the motor unit from the electrical outlet.
•Connect the BBU cord into the connector on the right side of the end panel on the motor unit. Connect the motor unit into the electrical outlet. The BBU will activate and all LEDs will turn on for 3 seconds.
•The green LED will begin flashing indicating the BBU is charging from the motor unit.
IMPORTANT NOTE: Installation of BBU when permanent electrical power is not available (such as new construction and the electricity is not installed) may damage the batteries. Unplug BBU after testing to prevent damage.

Bring BBU Cord out right side slot away from Antenna
Figure 1 |
BBU |
Structural |
Supports |
|
Connector |
|
|
Lag Screws |
|
1-1/2" |
|
Figure 2 |
CAUTION
To reduce the risk of FIRE or INJURY to persons use only Chamberlain part #41B591 for replacement batteries.
OPERATING INSTRUCTIONS
1. Test the installed BBU with the motor unit.
To test the BBU, disconnect the motor unit power cord from the electrical outlet.
•A solid yellow LED indicates the BBU is operating on battery power.
•A flashing yellow LED with beep indicates the BBU is operating on battery power and that the battery charge is low.
•To test the BBU is functioning properly, open and close the garage door.
•Re-connect the motor unit power cord back into the electrical outlet.
•Verify that the green LED is flashing on the BBU (indicates that the BBU is now charging).
•Test completed
2. Charge the battery.
•Allow the batteries 24 to 48 hours to fully charge before using the BBU system.
A fully charged BBU supplies 24V DC to the motor unit for one to two days of normal operation during an electrical power outage. If the battery voltage drops too low, the batteries will disconnect and the motor unit will no longer operate under battery power.
After the electrical power has been restored, the batteries will recharge within 48 hours. Under normal usage batteries will last 3 to 5 years.
To obtain maximum battery life and prevent damage, also disconnect the battery backup if you unplug the motor unit while on vacation or any other extended period of time.
NOTE: Door operation may be limited until batteries are fully charged. The motor unit’s lights will not turn on during BBU mode.
Replacement Parts
12V Rechargeable Batteries (2) . . . . . . . . . . . . . . . .41B591
Power Supply Board . . . . . . . . . . . . . . . . . . . . . . . .41A5726
Fuse . . . . . . . . . . . . . . . . . . . . . . . . . . . . . . . . . . . . . .72A35
FOR SERVICE, DIAL OUR TOLL-FREE NUMBER: USA 1-800-528-2817 • CANADA 1-800-654-4736
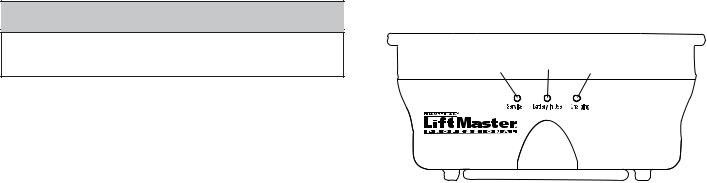
Battery Backup Unit (BBU) Diagnostics
(Red LED) |
(Yellow LED) |
(Green LED) |
GREEN LED:
All systems are normal.
•A solid LED light indicates the batteries are fully charged.
•A flashing LED indicates the batteries are being charged.
NOTE: Batteries do not have to be fully charged to operate the motor unit.
YELLOW LED:
The motor unit has lost power and is operating off of the BBU.
•A solid LED with beep, sounding approximately every 2 seconds, indicates the motor unit is activating the door and is operating off of the BBU.
•A flashing LED with beep, sounding every 30 seconds, indicates batteries are low.
•Once the power is restored the BBU will recharge. This is indicated by a flashing green LED.
RED LED:
An error has been detected and the BBU will automatically shut off. The BBU will attempt to restart by reconnecting to the batteries. If the error is still present it will shut itself off again. This process will repeat every 5 minutes or until the error has been resolved. This is used to prevent further draining of the batteries.
•If a red LED remains on when the power is restored, and is accompanied by a beep sounding every 30 seconds, please call for service.
|
©2006, The Chamberlain Group, Inc. |
114A2745C |
All Rights Reserved |
Loading...