


CORPORATE HEADQUARTERS
10601 West Belmont Avenue
Franklin Park, Illinois 60131 • U.S.A. 847.288.3300 • FAX: 847.288.3703 800.735.3867 (Toll-free within U.S.A., Canada)
INTERNATIONAL OFFICES
LIFE FITNESS ASIA PACIFIC LTD
Room 2610, Miramar Tower 132 Nathan Road Tsimshatsui, Kowloon HONG KONG
Telephone: (+852) 2891.6677 FAX: (+852) 2575.6001
LIFE FITNESS ATLANTIC BV LIFE FITNESS BENELUX
Bijdorpplein 25-31 2992 LB Barendrecht THE NETHERLANDS
Telephone: (+31) 180.646.666 FAX: (+31) 180.646.699
LIFE FITNESS DO BRAZIL
Av. Dr. Dib Sauaia Neto 1478 Alphaville, Barueri, SP 06465-140
BRAZIL
Telephone (+55) 11.4193.8282 FAX: (+55) 11.4193.8283
LIFE FITNESS AUSTRIA
Vertriebs GmbH
Hintschiggasse 1 1100 Vienna AUSTRIA
Telephone: (+43) 1.61 57 198 FAX: (+43) 1.61 57 198.20
LIFE FITNESS IBERIA
Pol. Ind. Molí dels Frares. c/C, nº 12 08620 Sant Vicenç dels Horts (Barcelona) España
Telephone: (+34) 93.672.4660 FAX: (+34) 93.672.4670
LIFE FITNESS EUROPE GMBH
Siemensstrasse 3 85716 Unterschleissheim GERMANY
Telephone: (+49) 89.31 77 51.0 FAX: (+49) 89.31 77 51.99
LIFE FITNESS ITALIA S.R.L.
Via Elvas 92
39042 Bressanone (BZ) ITALY
Telephone: (+39) 0472.835 470 FAX: (+39) 0472.833 150
LIFE FITNESS LATIN AMERICA and CARIBBEAN
10601 West Belmont Avenue Franklin Park, Illinois 60131 U.S.A.
Telephone: (+1) 847.288.3300 FAX:(+1) 847.288.3762
LIFE FITNESS UK LTD
Queen Adelaide
Ely, Cambs CB7 4UB
UNITED KINGDOM
Telephone: (+44) 1.353.666 017 FAX: (+44) 1.353.666 018
LIFE FITNESS JAPAN
Nippon Brunswick Bldg., #8F 5-27-7 Sendagaya Shibuya-Ku, Tokyo
Japan 151-0051
Telephone: (+81) 3.3359.4309 FAX: (+81) 3.3359.4307
M051-00K20-E159 1/02
1

Before using this product, it is essential to read
this ENTIRE operation manual and ALL installation instructions.
It describes equipment setup and instructs members on how to use it correctly and safely.
Avant toute utilisation de ce produit, il est indispensable de lire ce manuel d'utilisation dans son INTÉGRALITÉ, ainsi que TOUTES
les instructions d'installations.
Ce manuel explique comment installer l'équipement et comment l'utiliser correctement et sans danger.
FCC Warning - Possible Radio / Television Interference
NOTE: This equipment has been tested and found to comply with the limits for a Class A digital device, pursuant to part 15 of the FCC rules. These limits are designed to provide reasonable protection against harmful interference when the equipment is operated in a commercial environment. This equipment generates, uses and can radiate radio frequency energy, and if not installed and used in accordance with the instruction manual, may cause harmful interference to radio communications. Operation of this equipment in a residential area is likely to cause harmful interference in which case the user will be required to correct the interference at his own expense.
Class SB (Studio): Professional and / or commercial use.
CAUTION: Any changes or modifications to this equipment could void the product warranty.
Mise en garde : tout changement et toute modification de ce matériel peut annuler la garantie du produit.
Any service, other than cleaning or user maintenance, must be performed by an authorized service representative. There are no user serviceable parts.
2
TABLE OF CONTENTS
Section Description Page
1. Getting Started . . . . . . . . . . . . . . . . . . . . . . . . . . . . . . . . . . . . . . . . . . . . . . . . . . . . . . . .6 1.1 Important Safety Instructions . . . . . . . . . . . . . . . . . . . . . . . . . . . . . . . . . . . . . . . . . . . . . .6 1.2 Setup . . . . . . . . . . . . . . . . . . . . . . . . . . . . . . . . . . . . . . . . . . . . . . . . . . . . . . . . . . . . . . .10
Electrical Power Requirements Grounding Instructions
Wax Bag Instructions
How to Position and Stabilize the Life Fitness Treadmill Power Switch
Setting the Clock
Centering the Belt
Smart StopTM Belt Stop System Fitness Networking
Power Cord Routing
2. The Display Console . . . . . . . . . . . . . . . . . . . . . . . . . . . . . . . . . . . . . . . . . . . . . . . . . . .16 2.1 Display Console Overview . . . . . . . . . . . . . . . . . . . . . . . . . . . . . . . . . . . . . . . . . . . . . . .16 2.2 Display Console Descriptions . . . . . . . . . . . . . . . . . . . . . . . . . . . . . . . . . . . . . . . . . . . . .17 2.3 Reading Rack . . . . . . . . . . . . . . . . . . . . . . . . . . . . . . . . . . . . . . . . . . . . . . . . . . . . . . . .19 2.4 Accessory Trays . . . . . . . . . . . . . . . . . . . . . . . . . . . . . . . . . . . . . . . . . . . . . . . . . . . . . .19 3. Heart Rate Zone Training® Exercise? . . . . . . . . . . . . . . . . . . . . . . . . . . . . . . . . . . . . . .20 3.1 Why Heart Rate Zone Training Exercise . . . . . . . . . . . . . . . . . . . . . . . . . . . . . . . . . . . . .20 3.2 Heart Rate Monitoring . . . . . . . . . . . . . . . . . . . . . . . . . . . . . . . . . . . . . . . . . . . . . . . . . .21
The LifepulseTM System
The Optional Heart Rate Chest Strap
4. The Workouts . . . . . . . . . . . . . . . . . . . . . . . . . . . . . . . . . . . . . . . . . . . . . . . . . . . . . . . .22 4.1 Workout Overviews . . . . . . . . . . . . . . . . . . . . . . . . . . . . . . . . . . . . . . . . . . . . . . . . . . . .22 4.2 Using the Workouts . . . . . . . . . . . . . . . . . . . . . . . . . . . . . . . . . . . . . . . . . . . . . . . . . . . .23 4.3 Workout Descriptions . . . . . . . . . . . . . . . . . . . . . . . . . . . . . . . . . . . . . . . . . . . . . . . . . . .24
Quick Start
Fat Burn
Cardio
Using Time in Zone Goal Hill
Random
Manual
Sport TrainingTM
Heart Rate HillTM Heart Rate IntervalTM Extreme Heart RateTM Distance Goal Calories Goal Custom Workouts
Fit Test
Military Fitness Tests
4.4 Maximizing Workouts on a Life Fitness Treadmill . . . . . . . . . . . . . . . . . . . . . . . . . . . . . .33 Selecting a Level
Using the InstaPaceTM Feedback
Using ZerOutTM Speed Control Cool-Down
Dimming
4.5 Logging On to the Network . . . . . . . . . . . . . . . . . . . . . . . . . . . . . . . . . . . . . . . . . . . . . . .34
3
5. The Manager’s Configuration . . . . . . . . . . . . . . . . . . . . . . . . . . . . . . . . . . . . . . . . . . . . .35 5.1 Entering and Using the Manager's Configuration . . . . . . . . . . . . . . . . . . . . . . . . . . . . . .35 5.2 Configuration Settings . . . . . . . . . . . . . . . . . . . . . . . . . . . . . . . . . . . . . . . . . . . . . . . . . .36
Programming Custom Workouts Using the MaxTimeTM Setup Using the Standby Setup
6. Service and Technical Data . . . . . . . . . . . . . . . . . . . . . . . . . . . . . . . . . . . . . . . . . . . . . .39 6.1 Preventive Maintenance Tips . . . . . . . . . . . . . . . . . . . . . . . . . . . . . . . . . . . . . . . . . . . . .39 6.2 Preventive Maintenance Schedule . . . . . . . . . . . . . . . . . . . . . . . . . . . . . . . . . . . . . . . . .40 6.3 Troubleshooting the Optional Heart Rate Chest Strap . . . . . . . . . . . . . . . . . . . . . . . . . . .41
Heart Rate Reading Is Erratic or Absent Entirely Heart Rate Reading Is Erratic or Extremely High
6.4 Removing the Accessory Trays . . . . . . . . . . . . . . . . . . . . . . . . . . . . . . . . . . . . . . . . . . .41 6.5 How to Adjust and Tension the Striding Belt . . . . . . . . . . . . . . . . . . . . . . . . . . . . . . . . . .42
The Belt Tensioning Bolts Tracking (Centering) a Striding Belt
Tensioning an Existing Striding Belt
6.6 Cleaning the Wax Nozzle . . . . . . . . . . . . . . . . . . . . . . . . . . . . . . . . . . . . . . . . . . . . . . . .44 6.7 How to Obtain Product Service . . . . . . . . . . . . . . . . . . . . . . . . . . . . . . . . . . . . . . . . . . . .45 7. Specifications . . . . . . . . . . . . . . . . . . . . . . . . . . . . . . . . . . . . . . . . . . . . . . . . . . . . . . . . .46 7.1 Life Fitness 9500HR Treadmill Specifications . . . . . . . . . . . . . . . . . . . . . . . . . . . . . . . . .46 7.2 Life Fitness 9700HR Treadmill Specifications . . . . . . . . . . . . . . . . . . . . . . . . . . . . . . . . .47
© 2002 Life Fitness, a division of Brunswick Corporation. All rights reserved. Life Fitness, Lifecycle, FlexDeck, and Heart Rate Zone Training are registered trademarks, and Sport Training, Heart Rate Hill, Heart Rate Interval, Extreme Heart Rate, InstaPace, ZerOut, MaxTime, Lifepulse, Intelli, MagnaDrive, Your Zone, Power Factor Plus, Lifespring, and Custom Plus are trademarks of Brunswick Corporation. Polar is a registered trademark of Polar Electro, Inc. Cardio Theater is a registered trademark of Cardio TheaterHoldings and a wholly owned subsidiary of ClubCom corporation. Broadcast Vision is a trademark of Broadcast Vision, Inc. Fitlinxx is a registered trademark of the Integrated Fitness Corp. Any use of these trademarks, without the express written consent of Life Fitness or the corresponding companies is forbidden.
4
This Operation Manual describes the functions of the following products: Life Fitness Treadmills:
9500HR
9700HR
See "Specifications" in this manual for product specific features.
Statement of Purpose: The treadmill is an exercise machine that enables users to walk or run, in place, on a moving surface.
Life Fitness STRONGLY recommends seeing a physician for a complete medical exam before undertaking an exercise program, particularly if the user has a family history of high blood pressure or heart disease, or is over the age of 45, or smokes, has high cholesterol, is obese, or has not exercised regularly in the past year.
If, at any time while exercising, the user experiences faintness, dizziness, pain, or shortness of breath, he or she must stop immediately.
Life Fitness conseille VIVEMENT de consulter un médecin pour subir un examen médical complet avant de commencer tout programme d'exercice, et tout particulièrement si l'utilisateur a des antécédents familiaux d'hypertension ou de troubles cardiaques, ou s'il a plus de 45 ans, s'il fume, s'il a du cholestérol, s'il est obèse ou n'a pas fait d'exercice régulièrement depuis un an.
Si, pendant l'utilisation de l'appareil, l'utilisateur ressent un malaise, des vertiges, des douleurs ou des difficultés à respirer, il doit cesser immédiatement.
5
1 GETTING STARTED
1.1 IMPORTANT SAFETY INSTRUCTIONS
Read all instructions before using the treadmill.
•DANGER: To reduce the risk of electrical shock, always unplug this Life Fitness product before cleaning or attempting any maintenance activity.
•WARNING: To reduce the risk of burns, fire, electric shock, or injury, it is imperative to connect each product to a properly grounded electrical outlet.
•To disconnect, turn power OFF at the ON/OFF switch, then remove plug from electrical outlet.
•Never operate a Life Fitness product if it has a damaged power cord or electrical plug, or if it has been dropped, damaged, or even partially immersed in water. Contact Life Fitness Customer Support Services.
•Position this product so that the power cord plug is accessible to the user.
•Keep the power cord away from heated surfaces. Do not pull the equipment by the power cord or use the cord as a handle. Do not run the power cord on the floor under or along the side of the treadmill.
•If the electrical supply cord is damaged, it must be replaced by the manufacturer, an authorized service agent, or a similarly qualified person to avoid a hazard.
•Do not use this product in areas where aerosol spray products are being used or where oxygen is being administered. Such substances create the danger of combustion and explosion.
•Always follow the console instructions for proper operation.
•Close supervision is necessary when used near children, invalids or disabled persons.
•Do not use this product outdoors, near swimming pools or in areas of high humidity.
•Never operate a Life Fitness product with the air openings blocked. Keep air openings free of lint, hair, or any obstructing material.
•Never insert objects into any opening in this product. If an object should drop inside, turn off the power, unplug the power cord from the outlet, and carefully retrieve it. If the item cannot be reached, contact Life Fitness Customer Support Services.
•Never place liquids of any type directly on the unit, except in an accessory tray or holder. Containers with lids are recommended.
•Wear shoes with rubber or high-traction soles. Do not use shoes with heels, leather soles, cleats or spikes. Make sure no stones are embedded in the soles.
•Keep all loose clothing, shoelaces, and towels away from moving parts.
•Do not use this product in bare feet.
6
•Do not reach into, or underneath, the unit or tip it on its side during operation.
•Keep the area six feet (two meters) by three feet (one meter) behind the treadmill clear of any obstructions, including walls, furniture, and other equipment.
•Handrails may be held to enhance stability as needed, but are not for continuous use.
•Never mount or dismount the treadmill while the running belt is moving. Use the handrails whenever additional stability is required. In case of an emergency, such as tripping, grasp the handrails, and place the feet on the side platforms.
•Never walk or jog backwards on the treadmill.
•When it is necessary to immobilize the treadmill, set the display to read SELECT WORKOUT. (Press the STOP key twice if not already there.) Then hold down the SPEED DOWN key and press the PAUSE key. The treadmill now displays IMMOBILIZED. In this state, the treadmill cannot be operated. The main motor, inline and waxer are all disabled. The treadmill will remain in this state across resets, power cycles, etc. To restore normal operation, repeat the same key sequence: hold down the SPEED DOWN key, and press the PAUSE key. The treadmill will display SELECT WORKOUT again.
•Use this appliance only for its intended use as described in this manual. Do not use attachments that have not been recommended by the manufacturer.
SAVE THESE INSTRUCTIONS FOR FUTURE REFERENCE.
7
1 POINT DE DÉPART
1.1CONSIGNES DE SÉCURITÉ IMPORTANTES
Pour réduire les risques de décharges électriques, l'appareil Life Fitness doit toujours être débranché avant tout nettoyage ou travail d'entretien.
Pour réduire les risques de brûlures, d'incendies, de décharges électriques ou de blessures, tout appareil doit être branché impérativement sur une prise électrique correctement mise à la terre.
•Pour d brancher l'appareil, coupez l'alimentation au niveau de l'interrupteur de marche/arrêt, puis retirez la fiche de la prise électrique.
•Ne faites jamais fonctionner d'appareil Life Fitness dont le cordon d'alimentation ou la fiche seraient abîmés, qui aurait fait une chute ou qui aurait été endommagé ou partiellement plongé dans l'eau. Contactez le service après-vente de Life Fitness.
•Placez ce produit de manière à ce que l'utilisateur puisse accéder à la fiche du cordon d'alimentation.
•Maintenez le cordon d'alimentation à l'écart des surfaces chaudes. Ne tirez pas l'appareil par son cordon et n'utilisez pas celui-ci pas comme poignée. Ne placez pas le cordon sur le sol sous le tapis roulant ni le long de l'appareil.
•Si le cordon d'alimentation électrique est endommagé, il doit être remplacé par le fabricant, par un réparateur agréé ou par une personne qualifiée afin d'éviter tout danger.
•N'utilisez pas ce produit dans des zones où vous utilisez des aérosols ou administrez de l'oxygène. De telles substances pourraient entraîner des risques d'incendie et d'explosion.
•Pour un fonctionnement correct, suivez toujours les instructions de la console.
•Une surveillance étroite est nécessaire en cas d'utilisation par des enfants, des personnes invalides ou handicapées.
•N'utilisez pas ce produit à l'extérieur, près d'une piscine ou dans endroits très humides.
•Ne faites jamais fonctionner de produit Life Fitness dont les bouches d'aération seraient bloquées. Maintenez-les exemptes de peluches, de cheveux ou de toute obstruction.
•N'insérez jamais d'objet dans les ouvertures de cet appareil. Si un objet tombe dedans, coupez l'alimentation électrique, débranchez le cordon de la prise et récupérez-le avec précaution. Si vous ne pouvez pas l'atteindre, consultez le service après-vente de Life Fitness.
•Ne placez jamais de liquides d'aucune sorte directement sur l'appareil, sauf si vous disposez d'un support ou d'un plateau pour accessoires. Il est recommandé d'utiliser des conteneurs munis d'un couvercle.
•Portez des chaussures avec semelles en caoutchouc ou antidérapantes. N'utilisez pas de chaussures à talons, de semelles en cuir ou à crampons. Assurez-vous qu'aucun caillou ne s'est incrusté dans les semelles.
8
•Maintenez les vêtements lâches, les lacets et les serviettes à l'écart des pièces en mouvement.
•N'utilisez pas cet appareil sans chaussures.
•Ne placez pas les mains sous ou dans l'appareil, et ne le renversez pas sur le côté pendant le fonctionnement.
•Derrière le tapis roulant, conservez une zone de 1,80 m sur 1 m libre de toute obstruction (aucun mur, meuble ou autre appareil).
•Les barres latérales peuvent servir à améliorer la stabilité, le cas échéant, mais elles ne sont pas conçues pour être utilisées de façon continue.
•Ne montez jamais sur le tapis roulant et n'en descendez jamais tandis qu'il tourne. Le cas échéant, utilisez les barres latérales pour augmenter votre stabilité.
•Ne marchez et ne courrez jamais à l'envers sur ce tapis roulant.
•Lorsque vous devez immobiliser le tapis roulant, réglez l'afficheur sur SELECT WORKOUT (Sélectionner exercice). (Appuyez deux fois sur la touche STOP si vous n'en êtes pas déjà à ce point.) Maintenez ensuite la touche SPEED DOWN (Ralentir) enfoncée et appuyez sur la touche PAUSE. Le tapis roulant affiche alors le message IMMOBILIZED (Immobilisé), état dans lequel il ne peut plus fonctionner. Le moteur principal, le moteur en ligne et le cireur sont désactivés. Le tapis roulant reste dans cet état pendant les remises à zéro, les arrêts et remises en route, etc. Pour repasser en mode de fonctionnement normal, utilisez la même combinaison de touches : maintenez SPEED DOWN (Ralentir) enfoncée et appuyez sur PAUSE. L'appareil affichera SELECT WORKOUT (Sélectionner exercice) à nouveau.
CONSERVEZ CES INSTRUCTIONS POUR USAGE ULTÉRIEUR.
9

1.2SETUP
Read the Operation Manual before setting up the Life Fitness Treadmill. Place the treadmill where it will be used before beginning the setup procedure.
ELECTRICAL POWER REQUIREMENTS
The Life Fitness Treadmill is intended for use on a normal 120-Volt electrical circuit in the United States and Canada. The following table provides the current rating for this product based on supply voltage. Make sure that this treadmill model supports the proper line voltage for the installation location before plugging it into the outlet.
GROUNDING INSTRUCTIONS
This Life Fitness product must be properly grounded. If the unit malfunctions or breaks down, proper grounding provides a path of least resistance for the electric current, which reduces the risk of shock to anyone touching or using the equipment. Each unit is equipped with an electrical cord, which includes an equipment grounding conductor and a grounding plug. The plug must be inserted into an outlet that has been properly installed and grounded in accordance with all local codes and ordinances.
A temporary adapter MUST NOT BE USED to connect this plug to a two-pole receptacle in North America. If a properly grounded, 20-amp outlet is not available, one must be installed by a qualified electrician. Models drawing 16 amps or more must be installed on a dedicated line.
IL EST ABSOLUMENT INTERDIT d'employer un adaptateur temporaire pour brancher cette fiche sur une prise à deux pôles en Amérique du Nord. Si aucune prise de 20 A correctement mise à la terre n'est disponible, il convient d'en faire installer une par un électricien qualifié. Les modèles utilisant 16 A ou plus doivent être installés sur des lignes qui leur sont réservées.
DANGER: A risk of electrical shock may result from improper connection of the equipment-grounding conductor. Check with a qualified electrician if in doubt as to proper grounding technique. DO NOT modify the plug provided with the product. If it will not fit an electrical outlet, have a proper outlet installed by a qualified electrician.
Un branchement incorrect du conducteur de mise à la terre peut entraîner des risques de décharge électrique. Consultez un électricien si des doutes subsistent quant à la technique de mise à la terre. NE MODIFIEZ PAS la fiche fournie avec l'appareil. Si elle ne s'adapte pas à une prise, faites en installer une correcte par un électricien qualifié.
10

WAX BAG INSTRUCTIONS
To install the wax bag, turn the power off at the ON/OFF switch, and unplug the unit from the electrical outlet.
Remove the access panel. Remove the two screws (A) securing the wax bag access panel (B), located on the user left side of the unit. Remove the panel and set it aside.
Install the wax bag. Verify that the wax bag protective liner (C) is open and ready to receive the wax bag (D). Remove the new wax bag from its packaging and carefully insert it into the access hole. The wax bag hose faces the rear of the unit. Remove the two wingnuts (E) located just inside the access hole. Align the mounting holes located in the wax bag flange with the two wingnut studs (F). Secure the wax bag with the two wingnuts.
CAUTION: Be careful to not rip or damage the wax bag on the wingnuts or wingnut studs when inserting the new wax bag.
MISE EN GARDE : lors de l'insertion du nouveau sac de cire, veillez à ne pas le déchirer ou l'endommager sur les écrous papillon ou sur leurs goujons.
Attach the hose clamp. Slide the hose clamp (G) over the end of
the wax bag outlet hose (H). Position the clamp approximately three inches from the end of the hose and engage it, clamping it
(1) onto the wax bag hose to prevent spillage.
Connect the wax bag hose to the pump inlet hose. Cut the end of the wax bag hose one half-inch from the end. Slide it onto the barbed nozzle on the wax pump inlet hose (J). Be sure to fully seat the wax bag hose onto the inlet hose. Release the hose clamp (2).
CAUTION: Failure to release the hose clamp greatly shortens belt life.
MISE EN GARDE : la bride de serrage doit être relâchée sous peine de réduire de façon importante la durée de vie du tapis.
Replace the access panel. Replace the wax bag access panel, and secure it with the two screws.
11
HOW TO POSITION AND STABILIZE THE LIFE FITNESS TREADMILL
Following all safety instructions in Section 1.1, move the treadmill to the location in which it will be used. See Section 7, titled Specifications, for the dimensions of the
footprint. Allow a distance of eight inches, or 21 centime-
ters, between the treadmill and other units on either side. Allow a distance of six feet, or two meters, from the rear of the treadmill to any object or surface.
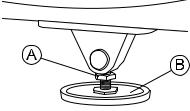
After placing the unit where it will be used, check its stability. If there is even a slight rocking motion or the unit is not stable, determine which stabilizing leg is not resting on the floor. To adjust, loosen the JAM NUT (A), and turn the STABILIZING LEG (B) until the rocking motion ceases, and both stabilizing legs rest firmly on the floor. Retighten the JAM NUT.
NOTE: It is extremely important that the stabilizing leg be correctly adjusted for proper operation. An unbalanced unit may cause striding belt misalignment.
POWER SWITCH
Located on the front panel at the base of the treadmill, the ON/OFF switch has two positions: "I" (one) for ON and "0" (zero) for OFF.
SETTING THE CLOCK
The unit contains a clock, which is used for system maintenance and event tracking. After the unit has been turned on†, the display will prompt for the following:
"Would you like to change the clock from GMT to local time - if YES press Enter - if NO press Clear"
It is not mandatory to change the clock setting. To accept the current settings, press the CLEAR key.
To change the setting, press the ENTER key. The MESSAGE CENTER displays: “CHOOSE DISPLAY MODE - 12 HOUR MODE AM PM”. Use an ARROW key to toggle the setting to CHOOSE DISPLAY MODE - 24 HOUR MODE. To accept the mode, press the ENTER key.
The current time (in Greenwich Mean Time) will be displayed.
•Use the TIME arrows to change the hours
•Use the INCLINE arrows to change the minutes
•Use the SPEED arrows to change the seconds
When finished press the ENTER key. The MESSAGE CENTER displays “UPDATING CLOCK”. At this point, the clock has been reset, and the normal startup procedure continues.
†This prompt appears for the first five times that the unit is turned on, including power-ups at the factory.
12
CENTERING THE BELT
After installing and levelling the treadmill, check the belt to ensure that it is tracking properly. First, plug the power cord into an appropriate outlet. See Electrical Requirements at the beginning of this section for details. Then, turn the treadmill ON.
Have one person stand on the platforms on either side of the treadmill belt. Do not stand on the belt at this time. Press the QUICK START key, and increase the speed to 4.0 miles per hour (MPH), or 6.4 kilometers per hour (KPH), using the SPEED UP arrow.
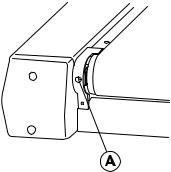
If the striding belt moves to the right while it is running, have a second person turn the right tension bolt a quarter-turn clockwise, and then turn the left tension bolt (A) a quarter-turn counterclockwise. See the illustration below. This action sets the striding belt tracking back to center of the roller.
If the striding belt moves to the left, turn the left tension bolt a quarter-turn clockwise and then turn the right tension bolt a quarter-turn counter-clockwise to start the striding belt tracking back to center of roller.
Repeat these adjustments until striding belt appears centered. Allow the belt to continue running for several minutes to be sure that the tracking is stabilized.
NOTE: Do not exceed one full turn of the adjusting screws in either direction. If, after one full turn, the belt does not track properly, contact Customer Support Services. The phone numbers are listed in Section 6.7, titled How to Obtain Product Service.
13
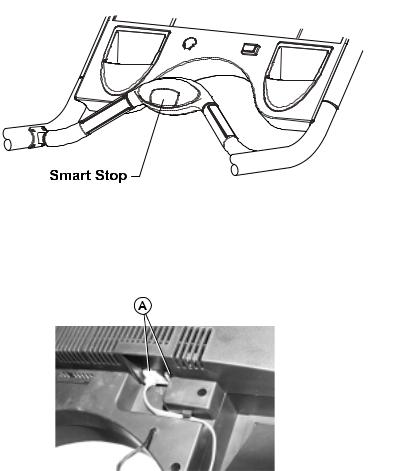
SMART STOPTM BELT STOP SYSTEM
The Smart StopTM belt stop system senses that a user is standing on the belt. If the user steps off while the striding belt is in motion, the system automatically pauses the workout. During the FIT TEST, the workout is aborted. To continue the workout, press the ENTER key.
FITNESS NETWORKING
The two interchangeable networking ports (A) are located on the back of the display console. These openly accessible ports allow the treadmill to be connected to a fitness entertainment system and/or a fitness network, such as FitLinxx®.
•Networking: The built-in networking ports allow the unit to exchange workout information with a fitness network database.
•Fitness Entertainment: The built-in network ports allow the treadmill to power a third-party receiver for use with an entertainment system, such as the Cardio Theater® system or BroadcastVisionTM.
14
POWER CORD ROUTING
The power cord can be run straight from the treadmill, shortened and exited out the user-front left side, or run under the frame and exited out the user right-rear side of the treadmill.
For efficient cord management, the following routing options are recommended:
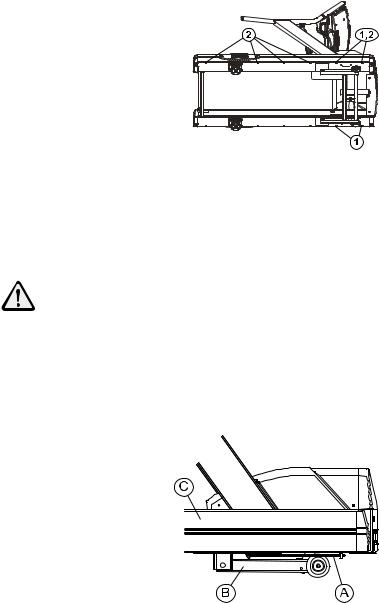
With the power cord unplugged, insert the clips in the appropriate holes. See the illustration below. Use Hole Pattern 1 or 2 to locate the clips and secure the power cord with the clips, taking up any slack between clips.
NOTE: It may be necessary to tip the treadmill to route the power cord properly.
To plug the power cord into an outlet in front of the treadmill, use Hole Pattern 1 for outlets located at the front of the machine.
To plug the power cord into an outlet in rear of the treadmill, use Hole Pattern 2 for outlets located at the rear of the machine.
Make sure that there is a 6-foot clearance behind the treadmill. Contact Life Fitness Customer Service for a longer power cord if necessary.
WARNING: Insure that the power cord (A) does not contact the striding belt or get pinched between the frame (C), lift arm (B) or the wheel; failure to follow this warning may result in serious injury.
AVERTISSEMENT : assurez-vous que le cordon d'alimentation n'entre pas en contact avec le tapis et ne soit pas pincé entre le cadre, le bras de levage ou
la roue. Le non respect de cet avertissement peut provoquer de graves blessures.
NOTE: When using Pattern 1, it is extremely important to route the power cord BETWEEN the lift frame and the main frame.
15
 Loading...