


Operating and installation instructions
fridge with BioFresh
20190315 7088097 - 00
SKBes 43.. / RBS 1500
Appliance at a glance
Contents |
|
1 Appliance at a glance |
||
1 |
Appliance at a glance............................................ |
2 |
1.1 Description of appliance and equip- |
|
1.1 |
Description of appliance and equipment.................. |
2 |
||
1.2 |
Appliance range of use............................................. |
2 |
ment |
|
1.3 |
Conformity................................................................ |
3 |
|
|
1.4 |
Product data............................................................. |
3 |
|
|
1.5 |
External dimensions of the appliance....................... |
3 |
|
|
1.6 |
Saving energy.......................................................... |
3 |
|
|
1.7 |
Example of contents arrangement............................ |
4 |
|
|
1.8 |
Smart device ........................................................... |
4 |
|
|
2 |
General safety information................................... |
4 |
|
|
3 |
Controls and displays........................................... |
5 |
|
|
3.1 |
Home screen............................................................ |
5 |
|
|
3.2 |
Operating structure................................................... |
5 |
|
|
3.3 |
Navigation................................................................ |
5 |
|
|
3.4 |
Display symbols....................................................... |
6 |
|
|
3.5 |
Appliance options..................................................... |
6 |
|
|
4 |
Putting into operation............................................ |
6 |
|
|
4.1 |
Transporting the appliance....................................... |
6 |
|
|
4.2 |
Installing the appliance............................................. |
6 |
|
|
4.3 |
Reversing the door................................................... |
7 |
|
|
4.4 |
Insertion into a row of kitchen units........................... |
12 |
|
|
4.5 |
Disposing of packaging............................................ |
12 |
|
|
4.6 |
Connecting the appliance......................................... |
12 |
|
|
4.7 |
Switching on the appliance....................................... |
13 |
|
|
4.8 |
Inserting the FreshAir filter. ...................................... |
13 |
|
|
4.9 |
Setting the clean ventilation grid timer...................... |
13 |
|
|
5 |
Control.................................................................... |
13 |
|
|
5.1 |
Changing the temperature unit................................. |
13 |
|
|
5.2 |
Child proofing........................................................... |
13 |
|
|
5.3 |
Sabbath Mode.......................................................... |
14 |
|
|
5.4 |
Refrigerator compartment........................................ |
14 |
|
|
5.5 |
BioFresh compartment............................................. |
16 |
|
|
6 |
Maintenance........................................................... |
19 |
|
|
6.1 |
Change the FreshAir filter......................................... |
19 |
|
|
6.2 |
Defrosting................................................................. |
19 |
|
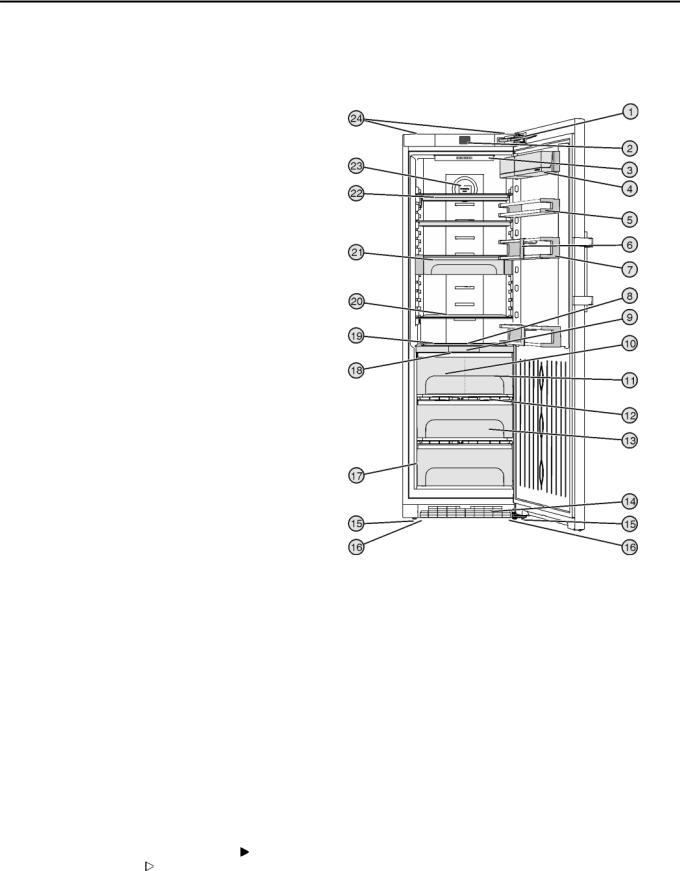
Fig. 1 |
6.3 |
Cleaning the ventilation grid..................................... |
19 |
(1) Soft closing fittings |
|
6.4 |
Cleaning the appliance............................................. |
20 |
(13) Biofresh compartment, |
|
6.5 |
Customer service..................................................... |
20 |
(2) Operating and control |
Hydrosafe |
7 |
Malfunctions |
20 |
(14) Ventilation grid |
|
elements |
|
|||
8 |
Messages................................................................ |
21 |
(3) Internal LED light |
(15) Adjusting feet |
9 |
Decommissioning |
22 |
(4) Box shelf |
(16) Front transport handles, |
(5) Can rack |
rear transport castors |
|||
9.1 |
Switching the appliance off....................................... |
22 |
(17) Type plate |
|
9.2 |
Taking the appliance out of service........................... |
22 |
(6) Bottle holder |
(18) Biofresh compartment |
10 |
Disposing of the appliance |
22 |
(7) Bottle rack |
LED lighting |
(19) Adjustable bottle shelf |
||||
The manufacturer works constantly on the further development |
(8) LED interior lighting |
(20) Shelf |
||
(9) BioFresh Plus display |
(21) VarioSafe |
|||
of all the types and models. Therefore please understand that |
(10) BioFresh Plus compart- |
(22) Shelf, sectioned |
||
we have to reserve the right to make design, equipment and |
ment |
(23) Retainer for fresh air filter |
||
technical modifications. |
|
(11) Fish & Seafood |
||
To get to know all the benefits of your new appliance, please |
compartment |
(24) Rear transport handles |
||
read the information contained in these instructions carefully. |
|
(12) Humidity control plate |
||
The instructions apply to several models. Differences may |
|
|
||
Note |
|
|||
occur. Text relating only to specific appliances is marked with |
|
|||
an asterisk (*). |
|
u Shelves, drawers and baskets are arranged for optimum |
||
Instructions for action are marked with a , the results of |
energy efficiency on delivery. |
|
||
action are marked with a . |
1.2 Appliance range of use |
|
|
|
Intended use |
|
The appliance is only suitable for cooling food |
|
products in a domestic or household-like envi- |
|
ronment. This includes, for example, use: |
2 |
* Depending on model and options |
Appliance at a glance
-in staff kitchens, bed and breakfast establishments,
-by guests in country houses, hotels, motels and other accommodation,
-for catering and similar services in the wholesale trade.
All other types of use are not permitted.
Foreseeable misuse
The following applications are expressly forbidden:
-Storing and refrigerating medicines, blood plasma, laboratory preparations or similar substances and products based on the Medical Device Directive 2007/47/EC
-Use in outdoor areas with very high humidity.
-Use in areas at risk of explosions
-Use on moving substrates, such as ships, rail travel or aeroplanes
-Storing live animals
Misusing the appliance may lead to damage to the goods stored or they may spoil.
Climate classifications
Depending on the climate classification the appliance is designed to operate in restricted ambient temperatures. The climate classification applying to your appliance is printed on the rating plate.
Note
uKeep to the specified ambient temperatures in order to guarantee that the appliance works properly.
Climate classi- |
for ambient temperatures of |
fication |
|
SN |
10 °C to 32 °C |
N |
16 °C to 32 °C |
ST |
16 °C to 38 °C |
T |
16 °C to 43 °C |
1.3 Conformity
The refrigerant circuit has been tested for leaks. This appliance complies with the applicable safety stipulations and with directives 2014/35/EU, 2014/30/EU, 2009/125/EG, 2011/65/EU and 2010/30/EU.
The BioFresh compartment satisfies the requirements for a cold storage compartment in acc. with DIN EN 62552.
1.4 Product data
Product data is included with the appliance, as per Directive (EU) 2017/1369. The complete product data sheet is available on the Liebherr website under Downloads.
1.5 External dimensions of the appliance
|
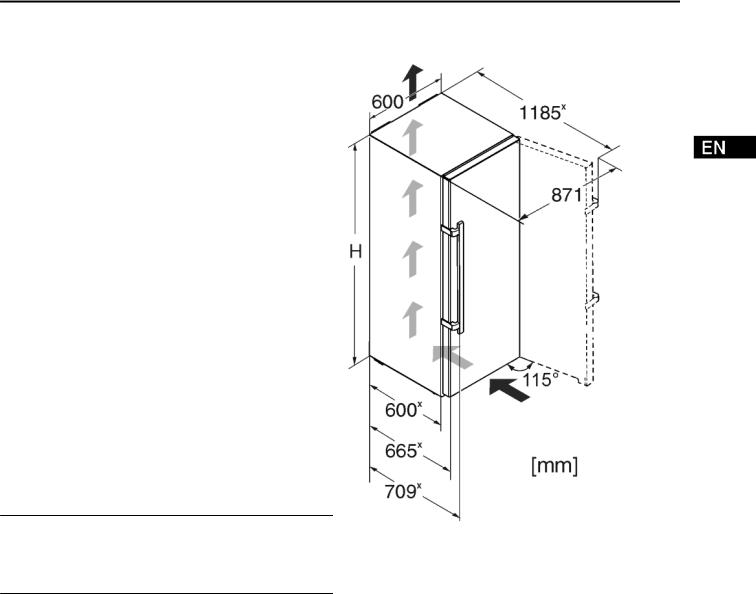
Fig. 2 |
|
|
Model |
Appliance height H (mm) |
SKBes 43.. / RBS 1500 |
1850 |
x If wall spacers are used, the dimensions increase by 15 mm (see 4.2) .
Dimensions when the door is open apply to an opening angle of 115 °. Clearance dimensions vary according to the opening angle.
1.6Saving energy
-Pay attention to good ventilation. Do not cover ventilation holes or grids.
-Always keep the fan air slits clear.
-Do not install the appliance in direct sunlight, next to an oven, radiator or similar.
-Energy consumption is dependent on the installation conditions, e.g. ambient temperature (see 1.2) . If the ambient temperature deviates from the standard temperature of 25°C, the energy consumption may differ.
-Open the appliance for as short a time as possible.
-The lower the temperature is set the higher the energy consumption.
-Arrange the food in an organised way (see 1) .
-Keep all food properly packed and covered. This prevents frost from forming.
-Only take food out for as long as necessary so that it doesn’t warm up too much.
-Insertingfirst. warm food: allow to cool down to room temperature
-Use the holiday function if you intend to be away for an extended period (see 5.4.3) .
* Depending on model and options |
3 |
General safety information
1.7 Example of contents arrangement
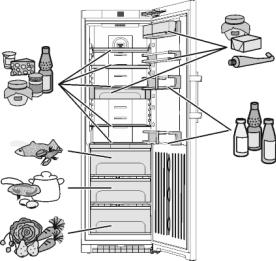 Fig. 3
1.8 Smart device
The appliance is ready for integration into a smart home and for extended services. Other options can be selected with a SmartDeviceBox. This is activated via the MyLiebherr customer portal.
You will find more information about availability and pre-requi- sites and the individual options on the website www.smartdevice.liebherr.com.
2 General safety information
Danger for the user:
-This device can be used by children and people with impaired physical, sensory or mental abilities or with a lack of experience and knowledge provided that they are supervised or have received instruction in the safe use of this device, and about the resulting hazards. Children must not play with this appliance. Cleaning and user maintenance work must not be carried out by children without adult supervision. Children aged between 3 and 8 are allowed to load and unload the appliance. Children below the age of 3 must be kept away from the appliance unless they are under continuous adult supervision.
-When disconnecting the appliance from the supply, always take hold of the plug. Do not pull the cable.
-In the event of a fault pull out the mains plug or deactivate the fuse.
-Do not damage the mains power cable. Do not operate the appliance with a defective mains power cable.
-Only customer service or other specially trained staff may repair or perform other operations on the appliance.
-Only assemble, connect and dispose of the appliance according to the instructions.
-Please keep these instructions in a safe place and pass them on to any subsequent owners.
-Special lights, such as LED lights on the appliance, are used to illuminate the interior of the appliance and are not suitable for room lighting.
Fire hazard:
-The coolant used (information on the model plate) is eco-friendly but also flammable. Any leaking coolant may ignite.
•Do not damage the refrigerant circuit pipes.
•Do not use an open flame or other source of ignition inside the appliance.
•Do not use electrical appliances inside the appliance (e.g. steam cleaners, heaters, ice cream makers, etc.).
•If the refrigerant leaks: remove any naked flames or ignition sources from the vicinity of the leakage point. Properly air the room. Inform customer services.
-Do not store explosives or sprays using combustible propellants such as butane, propane, pentane, etc. in the appliance. To identify these spray cans, look for the list of contents printed on the can, or a flame symbol. Gases possibly escaping may ignite due to electrical components.
-Keep burning candles, lamps and other items with naked flames away from the appliance so that they do not set the appliance on fire.
-Please be sure to store alcoholic drinks or other packaging containing alcohol in tightly closed containers. Any alcohol that leaks out may be ignited by electrical components.
Danger of tipping and falling:
-Do not misuse the plinth, drawers, doors etc. as a step or for support. This applies particularly to children.
Danger of food poisoning:
-Do not consume food which has been stored too long.
Danger of frostbite, numbness and pain:
-Avoid lasting skin contact with cold surfaces or refrigerated/frozen food or take protective steps, e.g. wear gloves. Do not consume ice cream, water ice or ice cubes immediately and do not consume them too cold.
Danger of injury and damage:
4 |
* Depending on model and options |
Controls and displays
-Hot steam can lead to injury. Do not use electrical heating or steam cleaning equipment, open flames or defrosting sprays to defrost.
-Do not use sharp implements to remove the ice.
Danger of crushing:
-Do not hold the hinge when opening and closing the door. Fingers may get caught.
Symbols on the appliance:
The symbol can be located on the compressor. It refers to the oil in the compressor and indicates the following danger: Swallowing or inhaling can be fatal. This is only relevant for recycling. There is no danger in normal operation.
A sticker to this effect may be applied to the rear of the appliance. It refers to the foampadded panels in the door and/or the housing. This is only relevant for recycling. Do not remove the sticker.
Please observe the specific information in the other sections:
|
DANGER |
identifies a situation involving direct |
|||
|
|
danger which, if not obviated, may |
|||
|
|
result in death or severe bodily |
|||
|
|
injury. |
|
|
|
|
WARNING |
identifies |
a |
dangerous |
situation |
|
|
which, if not obviated, may result in |
|||
|
|
death or severe bodily injury. |
|||
|
CAUTION |
identifies |
a |
dangerous |
situation |
|
|
which, if not obviated, may result in |
|||
|
|
minor or medium bodily injury. |
|||
|
NOTICE |
identifies |
a |
dangerous |
situation |
|
|
which, if not obviated, may result in |
|||
|
|
damage to property. |
|
||
|
|
|
|||
|
Note |
identifies useful information and tips. |
|||
3 Controls and displays
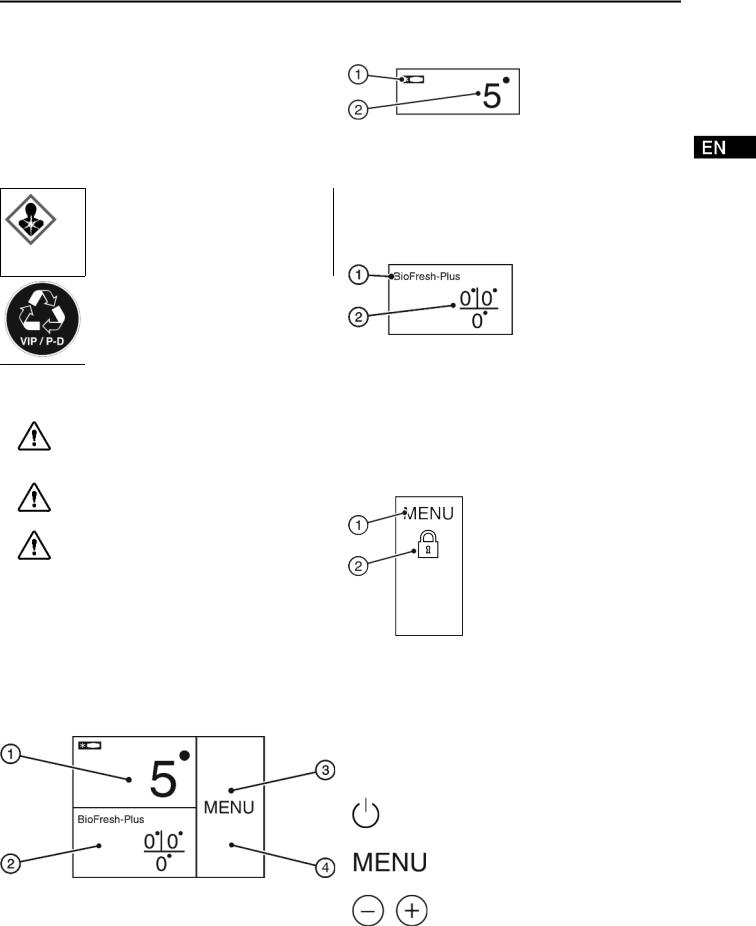
3.1 Home screen
Fig. 4 |
(3) |
Menu field |
|
(1) |
Fridge compartment |
||
(2) |
field |
(4) |
Screen |
BioFresh Plus field |
|||
The home screen is the first screen the user sees. All settings can be made from there.
All functions can be called up by touching the screen and values can be changed.
3.2 Operating structure
Fridge compartment field
(1) Fridge compartment |
Fig. 5 |
(2) Fridge compartment |
|
symbol |
temperature display |
The fridge compartment temperature is displayed in the fridge compartment field.
The following settings can be entered:
-Temperature settings
-Switch off appliance. Screen remains functional.
BioFresh Plus field
Fig. 6
(1) BioFresh Plus symbol (2) BioFresh Plus temperature display
The BioFresh Plus temperature set is displayed in the BioFresh Plus field.
The following settings can be entered:
-Temperature settings
-Switch off appliance. Screen remains functional.
Setting the Biofresh temperature (see 5.5)
Menu field
(1) Main menu |
(2) Option selected |
The menu field |
gives access to the appliance options and |
settings. Selected options are also displayed.
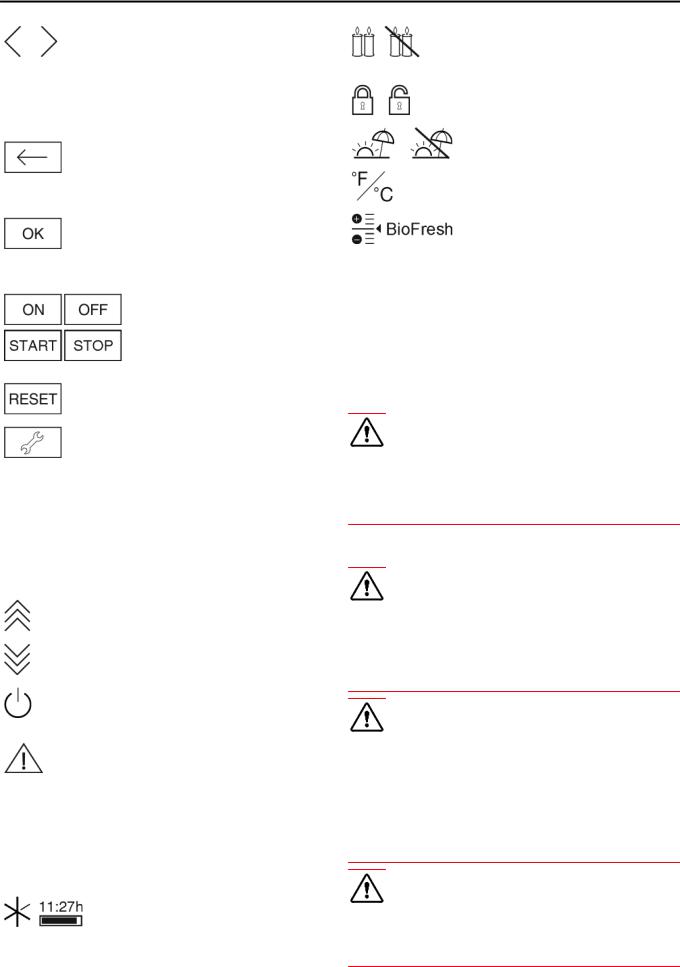
3.3 Navigation
Touch the menu to access the individual options. An audible signal sounds after confirming an option or a setting. The display switches to the home screen.
The appliance is operated using the following symbols:
Standby:
Switches the appliance or temperature zone on.
Menu:
Calls up options.
Minus / Plus:
Changing settings (e.g. adjusting temperatures).
* Depending on model and options |
5 |
Putting into operation
Left/right navigation arrow:
Selects options and navigates through the menu.
You can scroll through the individual options using the navigation arrows. The first option is displayed again after the last one.
Back:
Cancels the selection.
The display switches to the next higher level or to the home screen
OK:
Confirms the selection.
After confirmation the display switches to the home screen.
ON / OFF, START / STOP
Starts/ stops options.
After selecting or cancelling an option the display switches to the home screen.
RESET:
Resets timer.
Access to customer service
Note
If no selection is made after 1 minute the display switches to the home screen.
SabbathMode
Child safety devicex
Holiday function
Temperature unit
BioFresh
x If the option is selected, the relevant symbol is displayed in the menu field.
The symbol disappears if the option ends or is disabled.
4 Putting into operation
4.1 Transporting the appliance
CAUTION
Risk of injury and danger of damage as a result of incorrect transport!
u Transport the appliance in a packed condition. u Transport the appliance upright.
u Do not transport the appliance without assistance.
3.4 Display symbols
Display symbols provide information on the current appliance status:
Up arrows:
The temperature increases.
Down arrows:
The temperature reduces.
Standby:
The appliance or temperature zone is switched off.
Messages:
There are active error messages and reminders.
3.5 Appliance options
You can select or set the following options; explanations and setting options, (see 5) :
Symbol |
Option |
|
SuperCoolx |
4.2 Installing the appliance
WARNING
Fire hazard due to dampness!
If live parts or the mains lead become damp this may cause short circuits.
u The appliance is designed for use in enclosed areas. Do not operate the appliance outdoors or in areas where it is exposed to splash water or damp conditions.
WARNING
Risk of fire due to short circuit!
If the mains cable/connector of the appliance or of another appliance touch the rear of the appliance, the mains cable/ connector may be damaged by the appliance vibrations, leading to a short circuit.
u Stand the appliance so that it is not touched by connectors or main cables.
u Do not plug the appliance or any others into sockets located near the rear of the appliance.
WARNING
Fire hazard due to refrigerant!
The coolant used is eco-friendly but also flammable. Any leaking coolant may ignite.
u Do not damage the piping of the refrigeration circuit.
6 |
* Depending on model and options |
Putting into operation
WARNING
Fire hazard and danger of damage!
u Do not place appliances emitting heat e.g. microwaves, toasters etc. on the appliance!
WARNING
Blocked ventilation openings pose a risk of fire and damage!
u Always keep the ventilation openings clear. Always ensure that the appliance is properly ventilated!
If your appliance is not a side-by-side (SBS) appliance:*
NOTICE
Risk of damage due to condensate!*
u Do not install the appliance directly alongside a further refrigerator/freezer.
q In the event that the appliance is damaged, contact the supplier immediately before connecting to the mains.
q The floor at the site must be flat and level.
q Do not install the appliance in a location where it is exposed to direct radiation of the sun, next to a cooker, heater and similar.
q Always stand the appliance backed directly to the wall using the enclosed wall spacers (see below).
q The appliance may be moved only when it is empty.
q The surface supporting the appliance must be at the same level as the surrounding floor.
q Do not install the appliance without assistance.
q The more coolant there is in the appliance, the larger the room in which the appliance is installed must be. If the room is too small, any leak may create a flammable mixture of gas and air. For each 8 g of coolant the installation space must be at least 1 m3. Information on the coolant is on the model plate inside the appliance.
u Remove the protective film from the outside of the appliance.
NOTICE
Risk of damage from stainless steel care products!
The stainless steel doors and stainless steel side panels are treated with a premium surface finish.
Stainless steel care products attack these surfaces.  u Only use a soft, clean cloth to wipe down finished door
and side panel surfaces and painted door and side panel surfaces. To remove heavy dirt, use a little water or neutral detergent. Alternatively, you can use a micro-fibre cloth.
uRemove the protective film from the decorative trims.
uRemove all transit supports.
Spacers must be used to achieve the declared energy consumption and to prevent condensation in the event of high surrounding humidity. This increases the appliance depth by about 15 mm. The appliance will work perfectly well without the spacers but will have a slightly higher energy consumption.
u If your appliance comes with wall spacers, mount these on the back of the appliance, bottom left and right.
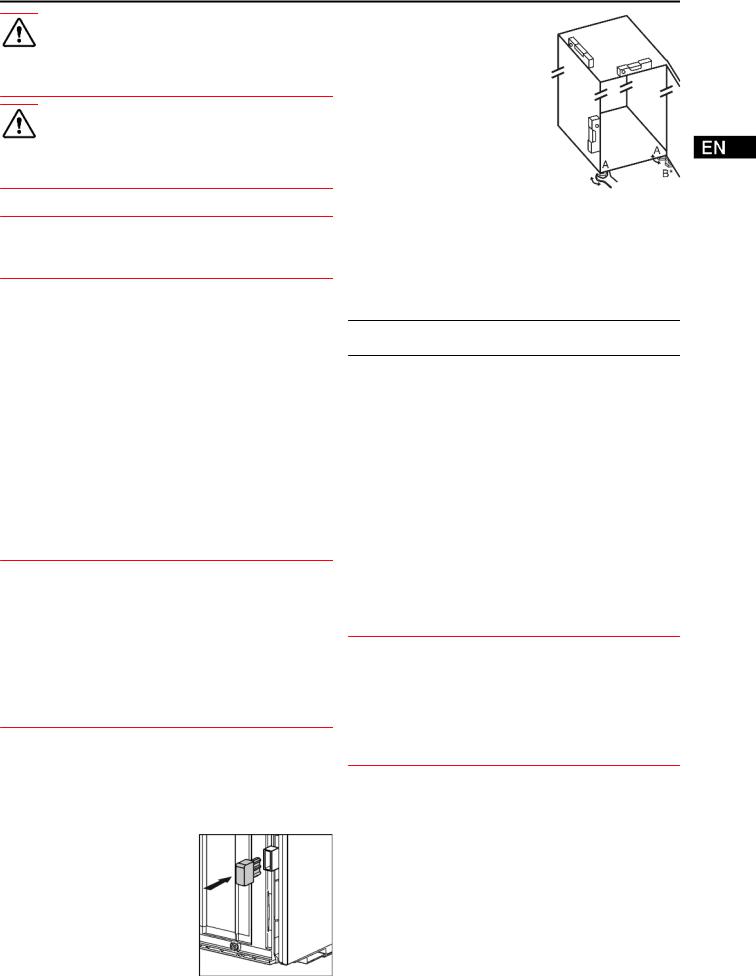
u Dispose of packaging material (see 4.5) .
u Align the appliance so that it stands firmly and on a level by applying the accompanying spanner to the adjustableheight feet (A) and using a spirit level.
u Then support the door: Use saddle wrench SW10 to unscrew the base on mounting block (B) until it makes contact with the ground, then continue turning it for a further 90°.
When a Side-by-Side appliance (S…) is fitted together with a second appliance (as a SBS combination):*
u Proceed according to the Side-by-Side combined fridgefreezer installation instructions. (Accessories bag of the SBS freezer/appliance with freezer compartment)*
Note
u Clean the appliance (see 6.4) .
If the appliance is installed in a very damp environment, condensate may form on the outside of the appliance.
u Always see to good ventilation at the installation site.
4.3 Reversing the door
If necessary, you can change the way the door opens:
Ensure that the following tools are available:
q Torx® 25 (T25)
q Torx® 15 (T15)
q Slotted screwdriver
q Open-ended wrench SW10 q Spirit level
q Open-ended wrench supplied with the T25 tool q If necessary, a cordless screwdriver
q Get a stepladder if necessary
q If necessary, a second person for assembly
NOTICE
Risk of condensation damage for Side-by-Side appliances!* Certain appliances can be set up as Side-by-Side combinations (two appliances next to each other).
If your appliance is a Side-by-Side (SBS) appliance:
u Set up the SBS combination in accordance with the enclosed document.
If the positioning of the devices is stipulated: u Do not change the door hinges over.
* Depending on model and options |
7 |

Putting into operation
4.3.1 Remove the soft stop mechanism
Fig. 8
u Open the door.
NOTICE
Risk of damage!
If the door seal is damaged, the door may fail to close properly and the cooling will be inadequate.
u Do not damage the door seal with the screwdriver!
u Remove the outer cover. Fig. 8 (1)
u Disengage and release the bearing bracket cover. Remove the bearing bracket cover. Fig. 8 (2)
u Unlatch the panel with a slotted screwdriver and swivel it to one side. Fig. 8 (3)
Fig. 9
CAUTION
Crushing hazard by joint folding up! u Engage safety device.
u Engage the locking device in the opening. Fig. 9 (1) u Unscrew the bolt with a screwdriver. Fig. 9 (2)
u Remove the bolt in an upward direction. Fig. 9 (3) u Turn the hinge in the direction of the door. Fig. 9 (4)
Fig. 10
u Press the tab with the slotted screwdriver. Fig. 10 (1) u Pull cover out of the catch mechanism. Fig. 10 (2)
Fig. 11
u Undo the soft stop mechanism screw with a T15 screwdriver approx. 14 mm. Fig. 11 (1)
u Insert a screwdriver behind the soft stop mechanism on the handle side and rotate forwards. Fig. 11 (2)
u Remove the soft stop mechanism. Fig. 11 (3)
4.3.2 Remove the door
Note
u Remove any food from the door racks before removing the door, so that no food falls out.
8 |
* Depending on model and options |
 Loading...