


Installation Manual |
5824000G |
|
|
|
|
SumpJet® - Water Powered Backup System |
|
MODEL SJ10
No Alarm
MODEL SJ10A
With Alarm
7000 Apple Tree Avenue Bergen, NY 14416 Phone: (800) 543-2550 Fax: (585) 494-1839 www.libertypumps.com
IMPORTANT:
Prior to installation, record Model, Serial Number, and Code Number from pump nameplate for future reference.
MODEL ________________________
SERIAL ______________________
CODE ______________________
INSTALLATION
DATE _______________________
©Copyright 2014 Liberty Pumps Inc. All rights reserved |
1 |
TABLE OF CONTENTS
SECTION |
1 |
GENERAL INFORMATION------------------------------------------------------------------------------ |
3 |
SECTION |
2 |
INTRODUCTION-------------------------------------------------------------------------------------------- |
4 |
SECTION |
3 |
MECHANICAL INSTALLATION ----------------------------------------------------------------------- |
5-7 |
SECTION |
4 |
WARRANTY STATEMENT------------------------------------------------------------------------------ |
7 |
SECTION |
5 |
TEMPLATE ------------------------------------------------------------------------------------------------ |
9 |
©Copyright 2014 Liberty Pumps Inc. All rights reserved |
2 |

1 General Information
Before installation, read the following instructions carefully. Each Liberty Pump is individually factory tested to ensure proper performance. Closely following these instructions will eliminate potential operating problems, assuring years of trouble-free service.
Health Risk. Sump water is non potable. To reduce the risk of contamination of the potable water supply additional backflow protection must be provided by the installer to meet the requirements of the local plumbing code or the requirements of the local water authority. As per the Uniform Plumbing Code and per the Plumbing Codes of some states, including the State of Michigan, installation of this product requires the use of an RP (RPZ) backflow protection device. Contact your local plumbing or water authority for more information regarding the requirements for your specific area.
Risk of electric shock. When installing the SumpJet®, Always disconnect any electric pumps from the power source before handling or making adjustments.
The SumpJet® is designed for use with municipal water supply, and is intended to be used as an emergency backup to your existing pump system.
The SumpJet® comes with a foot valve installed and therefore does not require a check valve on the discharge. The foot valve has a removable poppet. Where freezing discharge pipes are a problem, simply unscrew the strainer screen, remove the poppet and spring, and replace the strainer. The SumpJet® will now allow water to flow back into the pit, eliminating discharge pipe freezing.
Maximum water pressure = 100 psi (690 kPa) with the valve closed.
Minimum water pressure = 30 psi (207 kPa) with the valve open. (less pressure may not eject water from your basement)
For nominal backflow protection SumpJet® is pre-equipped with an internal check valve certified to ASME A112.18.3-2002 and ASME A112.18.1/CSA B125.1.2005.
The discharge of the water-powered sump pump must not to be connected to the primary sump pump. Also, the discharge of the water-powered sump pump is not to be directly connected to the municipal drain. An air gap with a minimum 1” gap should be used, or the discharge should be directed outside of the building, with the end of the pipe between 150 and 610 mm (6 and 24 in) above the ground or the flood level of the area receiving the discharge.
The inlet of the SumpJet® is pre-equipped with a push-type pipe connector, SharkBite®, and can be used with PEX, CPVC, or copper pipe.
Do not use pipe dope on inlet threads, and do not sweat copper fittings within 18” of SumpJet® body. Use PTFE (Teflon®) sealing tape only when assembling threaded fittings into SumpJet® inlet. Do not over tighten threaded inlet fitting, and do not hold onto float plunger shroud when tightening.
Purge water line prior to connection to SumpJet® to insure debris does not enter unit and clog the operating valve.
The SumpJet® utilizes a quick acting valve which, per UPC, requires the use of an approved water pressure absorbing device to prevent water hammer.
DO NOT use SumpJet® in hot water.
The SumpJet® is designed for use in clear water only. It is not designed to remove waste water, sewage, effluent, or water with debris in it.
WATER PRESSURE AT |
|
|
SUMP WATER REMOVAL AT VARIOUS HEADS. |
|
||||||||||||
INLET OF SumpJet® WITH |
|
|
|
|||||||||||||
|
|
|
|
|
|
|
|
|
|
|
|
|
|
|||
VALVE OPEN AND WATER |
|
|
|
( STATIC HEAD IN 1-1/2 PIPE OR LARGER) |
|
|
||||||||||
|
FLOWING |
|
|
|
|
|
||||||||||
|
LIFT |
4FT |
|
1.21 M |
8FT |
2.4 M |
12 FT |
3.6 M |
15 FT |
4.5 M |
||||||
PSI |
|
KPA |
GPM |
GPH |
|
M 3 / HR |
GPM |
GPH |
M 3 / HR |
GPM |
GPH |
M 3 / HR |
GPM |
GPH |
M 3 / HR |
|
20 |
|
138 |
11.0 |
660 |
|
2.5 |
5.8 |
348 |
1.3 |
|
|
|
|
|
|
|
30 |
|
207 |
12.8 |
765 |
|
2.9 |
9 |
540 |
2.0 |
5.5 |
|
330 |
1.2 |
|
|
|
40 |
|
276 |
15.4 |
924 |
|
3.5 |
12.5 |
750 |
2.8 |
9.3 |
|
558 |
2.1 |
7.2 |
432 |
1.6 |
50 |
|
345 |
17.2 |
1032 |
|
3.9 |
14.5 |
870 |
3.3 |
12 |
|
720 |
2.7 |
10 |
600 |
2.3 |
60 |
|
414 |
19.8 |
1185 |
|
4.5 |
17 |
1020 |
3.9 |
15.2 |
|
912 |
3.5 |
13.5 |
810 |
3.1 |
Note: For optimal performance minimum recommended operating pressure is 30 psi. Use of an RP (RPZ) may lower operating pressure. |
|
|||||||||||||||
|
|
|
©Copyright 2014 Liberty Pumps Inc. |
All rights reserved |
|
|
|
|
3 |
|||||||
2 |
|
|
|
|
Introduction |
|
|
2-1 |
INTRODUCTION |
||
|
This manual was prepared to assist you in the correct installation, operation, and maintenance of your Liberty Pumps |
||
|
SumpJet®. Please read it completely before installing the pump. Make certain that you are familiar with the contents, and the |
||
|
chapters on installation and operation are fully understood before running the pump. |
||
|
Liberty products are designed for minimal maintenance. However, regular checks will ensure longer life and greater operating |
||
|
reliability. |
||
|
WARRANTY: No repair work should be carried out during the warranty period without prior factory approval. To do so may |
||
|
render the warranty void. |
||
|
SERIAL #: In all correspondence and reports, make certain that the pump serial number is given. |
||
2-2 |
DESIGN OF PUMP |
||
|
The Liberty SumpJet® is designed for emergency backup to your existing pump system. It uses the municipal water supply to |
||
|
evacuate water from the sump. It is not intended to be used as the main sump water removal pump. It is intended to remove |
||
|
clear sump water only. Liberty Pumps recommends the use of an audible high water alarm. The model SJ10A features an |
||
|
alarm system to warn when the SumpJet® is activated. If you purchased the model SJ10 (without alarm) and wish to add the |
||
|
alarm feature, order part number ALM-P1 from you local distributor or contact the factory for more information. Prolonged use of |
||
|
the SumpJet® will result in increased municipal water consumption. The SumpJet® will use approximately 1 gallon of water |
||
|
to remove 2 gallons of sump water, depending on elevation. |
||
2-3 |
INSPECTION UPON RECEIPT |
||
|
The shipping container should be immediately inspected for damage that may have occurred in shipment. Exercise care in |
||
|
opening the shipping container to avoid damage to the pump. Remove any blocking and cushioning from within the container. |
||
|
Check all cushioning for spare parts before discarding. Visually check the pump and any spare parts for damage. Report any |
||
|
damage or shortage of parts. |
||
2-4 |
STORAGE BEFORE USE |
||
|
Liberty pumps are shipped from the factory ready for installation and use. They should be held in storage if the pump station is |
||
|
not complete. If storage is necessary, the pump should remain in its shipping container. It should be stored in a warehouse or |
||
|
storage shed that has a clean, dry temperature-stable area where the pump and its container should be covered to protect it |
||
|
from water, dirt, dust, etc. |
||
|
|
AT NO TIME SHOULD THE PUMP BE STORED WITHIN AN INCOMPLETE WET PIT. THE PUMP SHOULD |
|
|
NOT BE PLACED INTO THE PIT UNTIL IT CAN BE FULLY OPERATED. |
||
2-5 |
LONG TERM STORAGE |
||
|
If it is necessary to store a pump for a long period of time, it should be stored indoors in a clean, dry temperature-stable |
||
|
environment. The pump should be covered to protect it from dust, dirt and water. |
||
|
Do not allow the pump to freeze. |
||
2-6 |
MAINTENANCE |
||
|
Installed pumps which are idle for long periods of time should be manually operated once a month to ensure proper |
||
|
operation. Check for proper operation of the float and clean any debris that may be on the float or the suction screen. Make |
||
|
sure that the float operates freely without any restrictions. |
||
2-7 |
OPTIONAL ALARM |
||
|
The SJ10A pump comes supplied with a pre-mounted alarm probe. If you would like to add an alarm to the SJ10 system, |
||
|
Liberty Pumps offers a model, ALM-P1, which is suitable for this installation. |
||
©Copyright 2014 Liberty Pumps Inc. All rights reserved |
4 |

3 Mechanical Installation
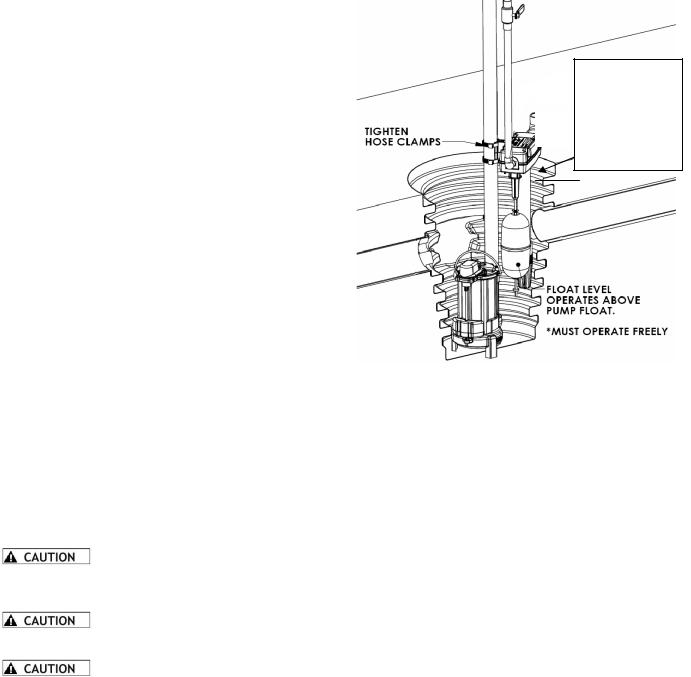
Figure 1 Typical installation
NoteThe SumpJet® comes fully assembled. Only placement and connection is required.
3-1 For nominal backflow protection SumpJet® is pre-equipped with an internal check valve certified to ASME A112.18.3-2002 and ASME A112.18.1/CSA B125.1.2005. Additional backflow protection must be provided by the installer to meet the requirements of the local plumbing code or the requirements of the local water authority. As per the Uniform Plumbing Code and per the Plumbing Codes of some states, including the State of Michigan, installation of this product requires the use of an RP (RPZ) backflow protection device. Contact your local plumbing or water authority for more information regarding the requirements for your specific area. The discharge of the water-powered sump pump must not to be connected to the primary sump pump. Also, the discharge of the water-powered sump pump is not to be directly connected to the municipal drain. An air gap with a minimum 1” gap should be used, or the discharge should be directed outside of the building, with the end of the pipe between 150 and 610 mm (6 and 24 in) above the ground or the flood level of the area receiving the discharge.
3-2
Disconnect the existing sump pump from the electrical supply before installation of the SumpJet®.
3-3 |
DO NOT USE A GARDEN HOSE. Garden hose is not designed to hold municipal pressure indefinitely. It could |
leak or burst and cause flooding. The SumpJet® requires permanent piping methods such as copper, PEX, or CPVC, or any other permanent plumbing method, be used for installation. To achieve maximum performance from the SumpJet® it is recommended that the unit is plumbed with 3/4” pipe. All water supply piping shall be made of materials and methods approved by the local plumbing codes.
©Copyright 2014 Liberty Pumps Inc. All rights reserved |
5 |
3-4 The inlet of the SumpJet® is factory equipped with a SharkBite® push-type fitting. This fitting can be used with various approved 3/4-inch potable water tubing and pipe, such as PEX tubing (ASTM F876, CSA B137.5), copper pipe (ASTM B 88), or Copper Tube Size (CTS) CPVC pipe (ASTM D 2846, CSA B137.6). Follow the instructions below for connecting the municipal water line to the SharkBite®. For more details on using the SharkBite® go to www.cashacme.com.
3-5 |
Using the Hose clamps provided, mount the SumpJet® to the |
|
|
existing discharge pipe. Place the unit so that the float level will |
|
|
operate a few inches above the turn on level of the existing sump |
|
|
pump. (Refer to figure 2). Tighten hose clamps on discharge |
|
|
pipe. |
NOTE: If this type of installation will not work refer to |
|
alternate installation 3-17. |
|
3-6 |
After mounting the SumpJet®, you are ready to hook into the |
|
|
existing municipal water supply line. Shut off the municipal water |
|
|
supply, and plumb the tubing or piping into the municipal water |
|
|
supply line. Use the appropriate backflow prevention for your |
|
|
jurisdiction. The water supply and discharge piping each require |
|
|
a union or other quick disconnect fitting to make the pump |
|
|
accessible for servicing, and a dedicated shut off valve installed |
|
|
on the water supply line within 6 ft. (1.8 m) of the pump. All water |
|
|
supply piping shall be made of materials and methods approved |
|
|
by the local plumbing codes. |
|
3-7 |
Prior to connecting water line to the SumpJet® purge the water |
|
|
line to insure it is free from debris, solder, pie sealant, etc. |
|
3-8 |
To connect the water line to the SharkBite® cut the pipe or tubing |
|
|
end square. Ensure that there are no burrs or scratches 1” from |
|
|
the cut end. Mark the pipe or tubing 1” from the cut end to |
|
|
indicate proper insertion depth. If using PEX tubing the tube liner |
|
|
in the end of the SharkBite® must be used. For copper and |
|
|
CPVC piping the tube liner must be removed by using your |
|
|
fingers or pliers. Insert the tubing or pipe into the SharkBite® |
|
|
through the release collar to rest against the grab ring. Then |
|
|
push the tube or pipe firmly until it reaches the tube stop. To |
|
|
insure the tube or pipe is correctly inserted, check that the depth |
|
|
mark is up to the end of the release collar. |
|
3-9 |
If the Shark fitting is removed for connection to other types of |
|
|
3/4” NPT threaded fittings, make sure all sealing tape is removed |
|
|
from the threaded inlet of the SumpJet®. Use a small pick-type |
|
|
tool if necessary. Do not allow any debris to enter the valve |
|
|
body. |
|
3-10 |
|
If reconnecting the SharkBite® or other |
|
threaded fitting use PTFE (Teflon®) sealing tape only when |
|
|
assembling threaded fittings into SumpJet® inlet. |
|
3-11 |
|
Do not over tighten threaded inlet fitting, and |
|
do not hold onto float plunger shroud when tightening. |
|
3-12 |
|
DO NOT SWEAT PIPES OR FITTINGS |
|
DIRECTLY CONNECTED TO THE SumpJet® . HEAT |
|
|
TRANSFERRED FROM THE COPPER WILL DAMAGE |
|
|
PLASTIC PARTS! |
|
3-13 |
Determine the length of discharge pipe required to the discharge |
|
|
exit point. Using schedule 40 PVC pipe, glue the discharge pipe |
|
|
into the socket elbow of the SumpJet®. Complete all |
|
discharge piping. Discharge piping should be routed to the yard outside the building.
The bottom of the grey pump housing should be approximately 12” above the water level at which the normal sump pump turns on.
©Copyright 2014 Liberty Pumps Inc. All rights reserved |
6 |
NOTE: The SumpJet® comes complete with a foot valve. There is no need to install a check valve on the discharge pipe.
NOTE: The foot valve has a removable poppet. Where freezing discharge pipes are a problem, simply unscrew the strainer screen, remove the poppet and spring, and replace the strainer. The SumpJet® will now allow water to flow back into the pit, eliminating discharge pipe freezing.
3-14 Turn the municipal water supply back on and open the shutoff valve. Check for leaks. Test the SumpJet® to ensure that it is operational. You will need to fill the sump pit with water by garden hose or bucket.
3-15 Re-connect primary electric sump pump to power supply.
3-16 If you want to replace the sump cover it will be necessary to add additional holes and slots to make access for the SumpJet® suction pipe and float rod. Refer to template provided in Figure (4) at the end of the manual.
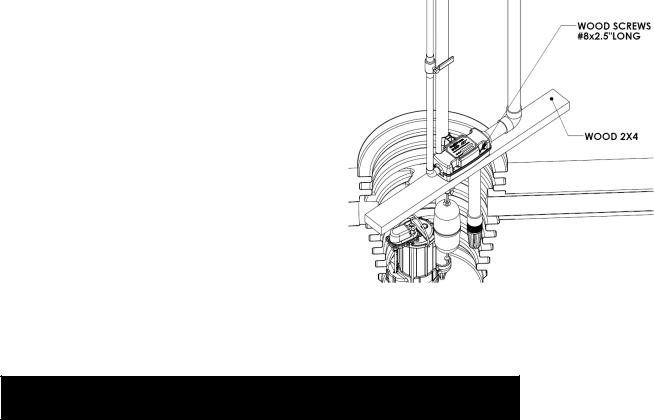
3-17 If you cannot mount the SumpJet® to the pump discharge pipe you may use a piece of wood to mount the SumpJet®. Cut holes as per figure (4) at the end of the manual. There are 4 screw holes that you
can use to fasten the SumpJet® to the wood. Use #8x2.5" long Figure 3 wood screws. Refer to Figure ( 3 )
4 Warranty
NOTE: Liberty Pumps, Inc. assumes no responsibility for damage or injury due to disassembly in the field. Disassembly, other than at Liberty Pumps or its authorized service centers, automatically voids warranty.
Liberty Pumps, Inc. warrants that pumps of its manufacture are free from all factory defects in material and workmanship for a period of 3 years from the date of purchase. The date of purchase shall be determined by a dated sales receipt noting the model and serial number of the pump. The dated sales receipt must accompany the returned pump if the date of return is more than 3 years from the "CODE" (date of manufacture) number noted on the pump nameplate.
The manufacturer's obligation under this Warranty shall be limited to the repair or replacement of any parts found by the manufacturer to be defective, provided the part or assembly is returned freight prepaid to the manufacturer or its authorized service center, and provided that none of the following warranty-voiding characteristics are evident.
The manufacturer shall not be liable under this Warranty if the product has not been properly installed; if it has been disassembled, modified, abused or tampered with; if the electrical cord has been cut, damaged or spliced; if the pump discharge has been reduced in size; if the pump has been used in water temperatures above the advertised rating, or water containing sand, lime, cement, gravel or other abrasives; if the product has been used to pump chemicals or hydrocarbons; if a non-submersible motor has been subjected to excessive moisture; or if the label bearing the serial, model and code number has been removed. Liberty Pumps, Inc. shall not be liable for any loss, damage or expenses resulting from installation or use of its products, or for consequential damages, including costs of removal, reinstallation or transportation.
There is no other express warranty. All implied warranties, including those of merchantability and fitness for a particular purpose, are limited to three years from the date of purchase.
This Warranty contains the exclusive remedy of the purchaser, and, where permitted, liability for consequential or incidental damages under any and all warranties are excluded.
©Copyright 2014 Liberty Pumps Inc. All rights reserved |
7 |
©Copyright 2014 Liberty Pumps Inc. All rights reserved |
8 |
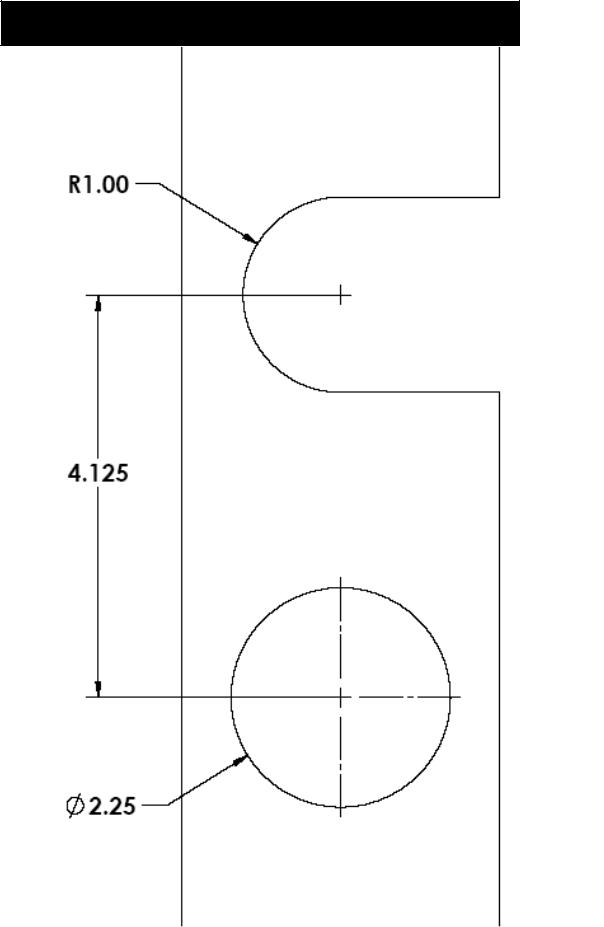
5 Hole Template
Figure 7
©Copyright 2014 Liberty Pumps Inc. All rights reserved |
9 |
 Loading...