


DISHWASHER
USER’S GUIDE
Please retain this owner’s manual for future reference.
Read and follow all safety rules and instructions before using this product.
LAVAPLATOS
GUIA DE USUARIO
Guarde este manual de usuario para referencia futura. Lea y siga todas las reglas e instrucciones de seguridad antes de utilizar este producto.
LAVE-VAISSELLE
GUIDE DE L'UTILISATEUR
Veuillez conserver ce manuel de l'utilisateur pour référence future.
Lisez et suivez toutes les règles et les instructions relatives à la sécurité avant d'utiliser ce produit.
Model/Modelo/Modèle
To contact LG Electronics:
1-800-243-0000 (US)
Or visit us on the Web at: us.lge.com
Para comunicarse con LG Electronics:
1-800-243-0000 (US)
O visítenos en la Web en: us.lge.com
To contact LG Electronics:
1-888-542-2623 (Canada)
Or visit us on the Web at: ca.lge.com
Pour contacter LG Electronics, appelez le
1-888-542-2623 (Canada)
Ou visitez-nous sur le Web à l'adresse : ca.lge.com
Français Español English
LDF7932WW
LDF7932BB
LDF7932ST

I N T RO D U C T I O N
 IMPORTANT SAFETY INSTRUCTIONS
Basic Safety Precautions 
 3, 4
3, 4
Electrical Safety 
 4
4
Before Using the Dishwasher 
 5
5
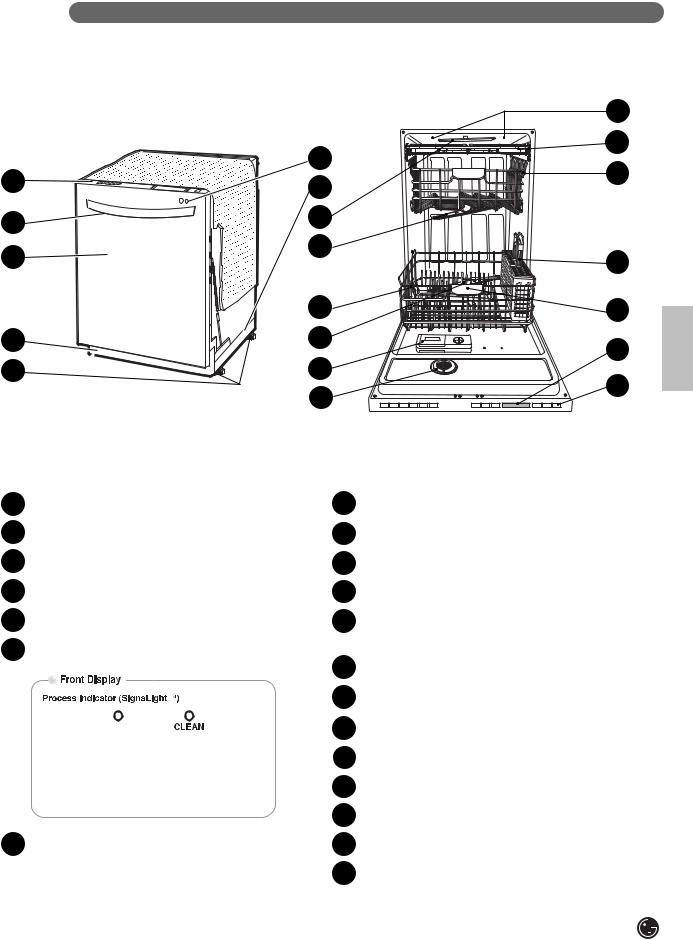
 PARTS AND FEATURES
Features |
6 |
Parts |
7 |
Control Panel |
8, 9 |
 OPERATING INSTRUCTIONS
Quick Start |
10 |
Selecting a Cycle |
11 |
Loading the Lower Rack |
13 |
Loading for Steam |
13 |
Loading the Upper Rack |
14 |
Loading the Silverware Basket |
14 |
Height-Adjustable Upper Rack |
15 |
Adding Detergent to the Dispenser |
16 |
Adding Rinse Aid to the Dispenser |
17 |
 CARE AND CLEANING
Cleaning Metallic Parts |
18 |
Cleaning the Lower Spray Arm |
18 |
Cleaning the Upper Spray Arm |
18 |
Cleaning the Top Spray Arm |
19 |
Seasonal Maintenance and Storage |
19 |
 TROUBLESHOOTING
Before Calling for Service |
20,21 |
 SPECIFICATIONS
Specifications |
22 |
 WARRANTY
Product Registration Information |
23, 24 |
THANK YOU!
Congratulations on your purchase and welcome to the LG family. Your new LG Dishwasher combines quiet, efficient operation with advanced cleaning technology.
By following the operating and care instructions in this manual, your dishwasher will provide you with many years of reliable service.
 2
2

I M P O RTA N T S A F E T Y I N S T R U C T I O N S
READ ALL INSTRUCTIONS BEFORE USE
 Your safety and the safety of others is very important.
We have provided many important safety messages in this manual and on your appliance. Always read and follow all safety messages.
This is the safety alert symbol.
This symbol alerts you to potential hazards that could eventually result in property damage or serious bodily harm, even death.
The safety alert symbol will be followed by either the word “WARNING” or “CAUTION,” then an important safety message. These words mean:
|
|
WARNING |
This symbol indicates the possibility of serious bodily harm, even death. |
|
|
||
|
|
||
|
|
|
|
|
|
CAUTION |
This symbol indicates the possibility of injury or damage to property. |
|
|
||
|
|
||
|
|
||
|
|
|
|
|
|
|
|
|
|
|
|
 BASIC SAFETY PRECAUTIONS
 WARNING To reduce the risk of fire, electric shock, or injury to persons when using this appliance, follow basic precautions, including the following:
•This manual contains very important information regarding the installation, use, and maintenance of your dishwasher.
•The manufacturer cannot be responsible for injuries or damage caused by failure to follow these safety and caution instructions.
•Read all instructions carefully before using the dishwasher.
•Use the dishwasher only for its intended function.
•Use only detergents or rinse agents recommended for use in a dishwasher. Keep all dishwasher detergents and additives out of the reach of children.
•This appliance is not intended for use by young children or unqualified persons.
•When loading items to be washed:
1)Load sharp items so that they are not likely to damage the door seal; and
2)Load sharp knives with the handles up to reduce the risk of injury when reaching into the dishwasher.
•Do not wash plastic items in the dishwasher unless they are labeled dishwasher-safe or the equivalent. For plastic items not so labeled, check the manufacturer’s recommendations.
•Do not operate the dishwasher unless all enclosure panels are properly in place.
•Do not tamper with controls.
•Do not abuse, sit on, or stand on the door or dish racks of the dishwasher.
•To reduce the risk of injury, do not allow children to play in or around a dishwasher.
•Under certain conditions, hydrogen gas may be produced in a hot water system that has not been used for two weeks or more. HYDROGEN GAS IS EXPLOSIVE. If the hot water system has not been used for such a period of time, turn on all hot water faucets and let the water flow for several minutes. This will release any accumulated hydrogen gas. Since hydrogen
gas is flammable, do not smoke or use an open flame during this time.
•Remove the door to the wash compartment when disposing of an old dishwasher.
English
3

I M P O RTA N T S A F E T Y I N S T R U C T I O N S
READ ALL INSTRUCTIONS BEFORE USE
 BASIC SAFETY PRECAUTIONS
 WARNING To reduce the risk of fire, electric shock, or injury to persons when using this appliance, follow basic precautions, including the following:
For a permanently connected dishwasher:
This appliance must be connected to a grounded metal, permanent wiring system or an equipmentgrounding conductor must be run with the circuit conductors and connected to the equipmentgrounding terminal or lead on the appliance. Consult with a qualified electrician.
Tip Hazard
Do not put excessive downward force on the open dishwasher door prior to installation, as this could cause damage to the unit or cause it to tip over. Do not use the dishwasher before installation has been completed in accordance with the Installation Instructions.
 ELECTRICAL SAFETY
 WARNING
Electrical Shock Hazard
Failure to follow these instructions can result in death, fire, or electrical shock.
•The dishwasher MUST be grounded. Connect the ground wire to the green ground connector in the terminal box.
•Do not use an extension cord with this appliance.
•The dishwasher is designed to be used with standard household current (120 Volts AC, 60 Hz.). Before connecting the dishwasher, ensure that the outlet or cable is properly grounded and polarized by circuit breakers or fuses. Failure to provide adequate grounding of this appliance may cause electrical shock or malfunction of the appliance. Consult with a qualified electrician.
•Do not install or store the dishwasher where it will be exposed to weather conditions. Failure to observe this precaution may result in electrical shock, fire, malfunction, and/or deformation of the dishwasher.
•Do not damage or place heavy items on the power cord of the appliance. Do not use the dishwasher if it has a damaged power cord.
Power cord damage may cause fire and electrical shock. Consult with a qualified electrician.
•Do not grasp the power cord or touch the dishwasher controls with wet hands. Do not use the dishwasher if it has a damaged power cord or plug, and do not plug the dishwasher into a damaged outlet. Failure to observe these instructions may result in electrical shock.
•Disassembly or repair must be performed by experienced service persons. Improper disassembly or repair could lead to product failure or electrical shock.
 4
4

I M P O RTA N T S A F E T Y I N S T R U C T I O N S
READ ALL INSTRUCTIONS BEFORE USE
 BEFORE USING THE DISHWASHER
Before using the dishwasher, please read the Important Safety Instructions.
Water supply temperature should be a minimum of 120°F (49°C) for better washing and reasonable cycle time.
For this reason, use the hot water supply only. It is also important that the dishwasher is loaded according to instructions for effective cleaning. When loading the dishwasher, make sure that insoluble items such as bones, toothpicks, and pieces of paper have been removed.
When loading the dishwasher, observe the following general guidelines:
1.Place items with deep dish bottoms at an angle to help water run off and speed the drying process.
2.Remove solid, burned-on scraps from dishes prior to loading in the dishwasher.
3.Only load items that are dishwasher-safe. NOTE: Do not load utensils that are not heat-resistant, have decorative metal trim, etc.
SAVE THESE INSTRUCTIONS
English
5

PA RT S A N D F E AT U R E S
 FEATURES
LARGE CAPACITY
LG dishwashers allow you to load very large
items in both the upper
and lower racks. The
tall tub provides extra
overall capacity and
the clearance to
accommodate large
dishes. Extra large items
(max. 14 in.) may be
loaded in the lower rack by raising the upper rack.
VARIO SPRAY SYSTEM
Because the water spray alternates between the upper and lower racks, all of the power from
the motor is directed
to one rack at a time.
This concentrates all
the cleaning power of
the motor on each rack in turn.
SLIM DIRECT MOTOR™
The new Slim Direct Motor™ is invertercontrolled. Wash power is controlled
based on cycle selection. It also
offers high energy
efficiency to minimize energy use.
SOFT FOOD GRINDER AND SELF-CLEANING FILTER
For best wash results, your LG dishwasher has a built-in soft food grinder and a self-
cleaning filter. The
grinder grinds up soft
food and residue into
small particles that can be caught in the filter and washed down the drain. The self-cleaning
filter system continuously cleans the wash water as it circulates to separate any residue from the wash water. All dirt and residue is easily washed down the drain.
HYBRID DRYING SYSTEM
This system effectively dries dishes without the use of a heating
element that would
increase energy consumption.
STEAM WASHING
Steam technology provides better cleaning performance than
regular wash systems.
Steam is the most
energy efficient gentle
care for your finest china and stemware.
 6
6
PA RT S A N D F E AT U R E S
 PARTS
PARTS
|
14 |
|
|
15 |
|
|
6 |
|
1 |
16 |
|
7 |
||
|
||
2 |
8 |
|
|
||
3 |
9 |
|
17 |
||
|
|
10 |
18 |
English |
|
4 |
11 |
19 |
||
|
||||
|
|
|
||
5 |
12 |
20 |
|
|
|
13 |
|
||
|
|
|
1CONTROL PANEL
2DOOR HANDLE
3FRONT COVER
4LOWER COVER
5LEVELING FEET
6FRONT DISPLAY (SignaLight™)
OPERATING
The OPERATING lamp will twinkle during the washing, rinsing, and drying phases of dishwashing.
The CLEAN lamp will light for about 4 minutes to indicate the completion of the entire operation.
7 BASE
8TOP SPRAY ARM
9UPPER SPRAY ARM 10 STEAM NOZZLE
11 LOWER SPRAY ARM
12DETERGENT AND RINSE AID DISPENSER
13DRYING VENT COVER
14TUB LAMP(Illumitub™)
15CUTLERY RACK
16 UPPER RACK
17SILVERWARE BASKET
18LOWER RACK
19TOP DISPLAY
20POWER BUTTON
7

PA RT S A N D F E AT U R E S
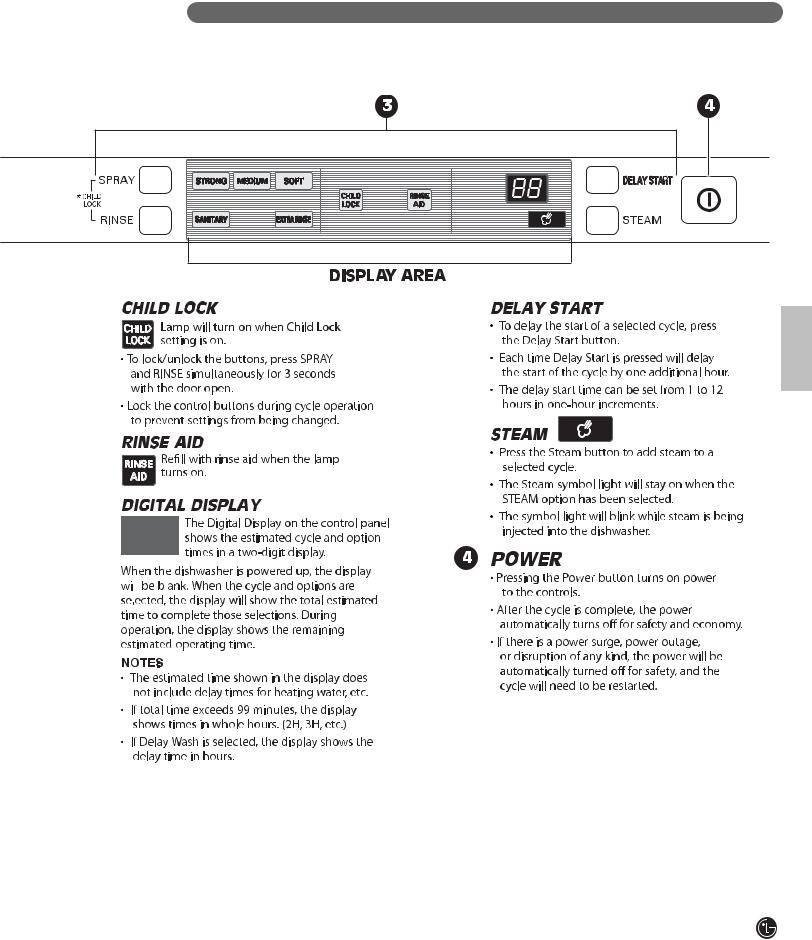
 CONTROL PANEL
 8
8
PA RT S A N D F E AT U R E S
 CONTROL PANEL(continued)
English
9

O P E R AT I N G I N S T RU C T I O N S
 QUICK START
1 LOAD THE DISHES
Scrape the dishes free of excess food, bones, and any other hard, non-soluble residue.
Pull each rack out and load the dishes as described on pages 13 and 14.
2 MEASURE THE DETERGENT
Using the guidelines on page 16, fill the detergent cup with the recommended amount of detergent and close the lid. If a prewash is desired, the recess on top of the lid should also be filled with detergent.
3 TURN ON THE DISHWASHER
To start the cycle, open the door and press the Power button. The control will default to the Normal cyccle.
4 CHECK THE RINSE AID
The Rinse Aid indicator light will illuminate if the level of rinse aid in the dishwasher is low. Add rinse aid if the level is low to maintain the effectiveness of the dry cycle.
5 SELECT THE CYCLE AND OPTIONS
Select the cycle and options that best fit the load by referring to the chart on page 11. The display will show the estimated time for the cycle and options selected.
6 CLOSE THE DOOR
The dishwasher will start automatically, after a slight delay, when the door is closed and latched. During the cycle, the display will indicate the estimated time remaining for the cycle and options selected. If the door is opened during the cycle, the dishwasher will stop. When the door is closed, the cycle will resume from the point where it was stopped.
7 END OF CYCLE
When the cycle is completed, a chime will sound and the display will show “END.” After a short time, the display and controls will shut off for safety and energy conservation.
 CAUTION
Empty the lower rack first and then the upper rack. This will avoid water dripping from the upper rack onto dishes in the lower rack.
AUTO-OFF
The dishwasher will automatically turn off if a cycle is not selected or if the door is not closed within 10 minutes.
 WARNING
In general, it is not advisable to open the door while the dishwasher is in operation. If the door is opened, a safety device stops the dishwasher. Care should be taken when opening the door immediately following the cycle, as steam may escape.
NOTE :
If small hard items such as bones, nut shells or plastic or glass pieces get into the pump, they can cause a grinding noise as the soft food disposer in the dishwasher attempts to grind up these hard objects. Some objects that might get into the pump could eventually be ground up and drained away. However, if a grinding noise is heard and it does not go away, call for service to have the objects removed from the pump. Some objects such as pieces of glass could cause damage to the pump if not removed promptly.
 10
10
O P E R AT I N G I N S T RU C T I O N S
 SELECTING A CYCLE
English |
*Actual water consumption will vary depending on soil level.
**Actual cycle times may vary depending on soil levels and water temperature.
Power Scrub
This cycle is for very heavily soiled loads such as cookware.
Normal
Select this cycle for normally soiled, everyday loads.
Dual Intensity
This cycle allows the upper and lower racks to be washed at different spray intensities in the same cycle for a precise balance of cleaning performance and care of the dishes. See page 8.
Quick Wash
This is a shortened cycle that is perfect for recently used or lightly soiled loads.
Steam Delicate
This cycle adds the gentle power of steam to boost the cleaning power of the delicate cycle. The cycle is perfect for effectively cleaning delicate items like fine china or stemware.
Steam Fresh
This cycle can be used to freshen up dishes that may have been stored or not used for a long time.
Rinse Only
If you don’t plan to wash a load of dishes immediately, use this cycle to remove excess soil and soften dried-on residue. To select Rinse Only, press Rinse button without selecting a main cycle. See page 8.
11

O P E R AT I N G I N S T RU C T I O N S
 CAUTION
NON-DISHWASHER-SAFE ITEMS
The combination of high water temperature and dishwasher detergents may damage certain items. LG does not recommend washing the following items in the dishwasher:
•Hand-painted silver or gold-leaf dishes
•Woodor bone-handled utensils
•Iron or other rust-prone utensils
•Plastic items that are not dishwasher-safe
When in doubt, check manufacturers’ recommendations.
 12
12
O P E R AT I N G I N S T RU C T I O N S
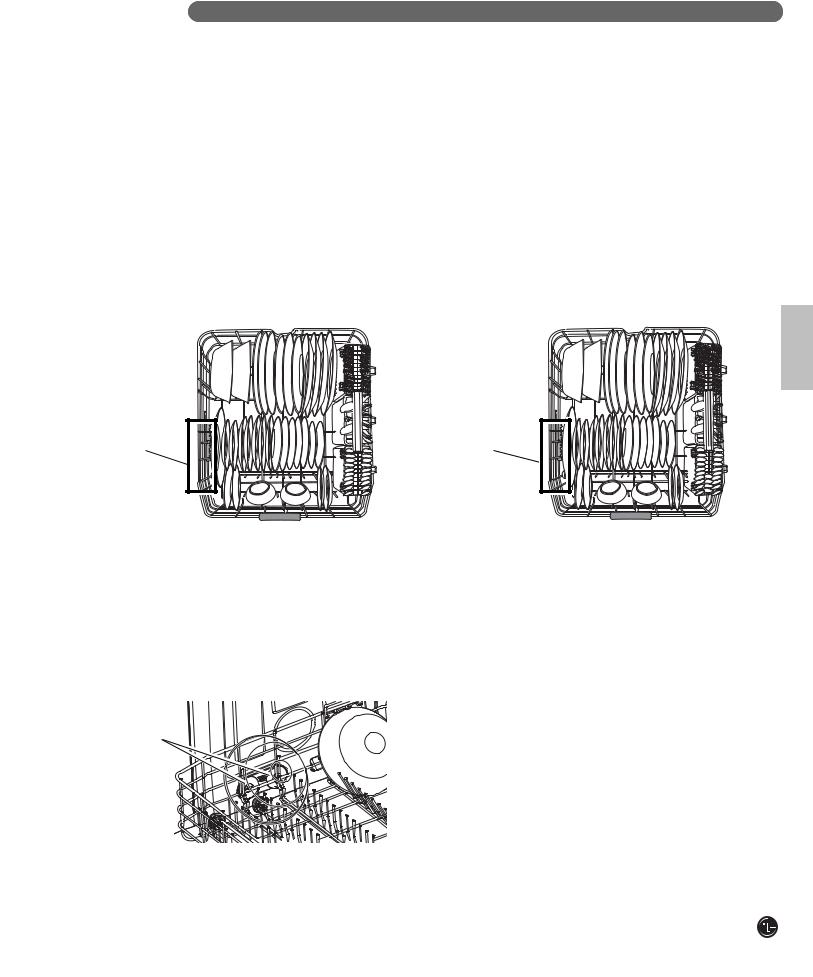
 LOADING THE LOWER RACK
The extra tall tub allows loading of dishes, pans, or other utensils up to 14 inches high.
NOTE: Make sure large items do not interfere with the rotation of the spray arms, and do not prevent the detergent dispenser from opening.
The lower rack is recommended for dinner plates, soup bowls, dishes, pots, pans, lids, and grill trays. Plates should be positioned vertically and facing the center of the rack. Pots, pans, and large bowls must be turned so that the inside faces downward. The silverware basket
may be used in either the lower or upper rack.
The lower rack should not be used for small items like cups, wine glasses, or small plates. These items should be loaded in the upper rack.
Load heavily soiled or stained dishes in the front left side of the lower rack with the dirty side facing out and down. This is the area the stream enters the dishwasher. The use of hot steam maximizes the dishwasher’s cleaning performance.
LOADING 10 PLACE SETTINGS, LOWER RACK |
LOADING 12 PLACE SETTINGS, LOWER RACK |
English
Steam |
Steam |
Nozzle |
Nozzle |
Area |
Area |
 LOADING FOR STEAM
To maximize the benefits of steam for removing difficult or baked-on soils, load the target dishes on the lower rack to the left side. For best effect, load the dishes so they are facing down and to the left to benefit from both the direct steam spray and the lower spray arm wash action.
Steam
Nozzles
13
O P E R AT I N G I N S T RU C T I O N S
 LOADING THE UPPER RACK
Use the upper rack for small or delicate items such as small plates, cups, saucers, glasses, and dishwasher-safe plastic items. Cups, glasses, and bowls must be positioned upside down. Extra cups or cooking utensils can be laid
on the fold down cup racks, which may also provide support for long stemmed glasses. Make sure items do not interfere with the rotation of the spray arms above and below
the upper rack.
LOADING 10 PLACE SETTINGS, UPPER RACK |
LOADING 12 PLACE SETTINGS, UPPER RACK |
||||||||||||||||
|
|
|
|
|
|
|
|
|
|
|
|
|
|
|
|
|
|
|
|
|
|
|
|
|
|
|
|
|
|
|
|
|
|
|
|
|
|
|
|
|
|
|
|
|
|
|
|
|
|
|
|
|
|
|
|
|
|
|
|
|
|
|
|
|
|
|
|
|
|
|
|
|
|
|
|
|
|
|
|
|
|
|
|
|
|
|
|
|
|
|
|
|
|
|
|
|
|
|
|
|
|
|
|
|
|
|
|
|
|
|
|
|
|
|
|
|
|
|
|
|
|
|
|
|
|
|
|
|
|
|
|
|
|
|
|
|
|
|
|
|
|
|
|
|
|
|
|
|
|
|
|
|
|
|
|
|
|
|
|
|
|
|
|
|
|
|
|
|
|
|
|
|
|
|
|
|
|
|
|
 LOADING THE SILVERWARE BASKET
The silverware basket has separators to avoid scratching and tarnishing of delicate silverware. The basket can be separated into three modules that can be used individually in both the upper and lower racks. For small loads of silverware, modules can be removed, allowing extra space for other dishes.
 WARNING
Be careful when loading and unloading sharp |
|
|
|
|
|
items. Load sharp knives with the handles |
|
|
|
|
|
up to reduce the risk of personal injury. |
1 |
2 |
3 |
4 |
5 |
 14
14

O P E R AT I N G I N S T RU C T I O N S
 HEIGHT-ADJUSTABLE UPPER RACK
The upper rack adjusts up to allow you to place tall and oversized items up to 14 inches high in the lower rack. Or, you can adjust the upper rack down to allow placement of large dishes up to 12 inches high in the upper rack.
NOTE: After adjusting, make sure that dishes in the upper and lower racks do not interfere with the rotation of the spray arm. Do not adjust the rack while it is loaded with dishes.
1To raise the rack:
Simply lift the rack at the center of each side (see illustration) until the rack locks into place in the upper position. It is not necessary to lift the lock levers to raise the rack.
English
2To lower the rack:
Hold the rack at the center of each side to support its weight; then lift the lever on
each side to release the rack and lower it to the lower position.
15

O P E R AT I N G I N S T RU C T I O N S
 ADDING DETERGENT TO THE DISPENSER
•Detergent must be put into the detergent compartment before starting any cycle except Rinse Only.
•If dishes are only moderately soiled, you may be able to use less detergent than recommended.
•The total capacity of the main detergent compartment is 1.4 oz (40 ml). The recommended usage marks in the dispenser are
0.5 oz (15 ml) and 0.9 oz (25 ml). Using excess detergent can leave a film on dishes and in the dishwasher resulting in poor wash performance.
•The amount of detergent needed depends on the cycle, load size, and soil level of dishes.
NOTE : Remove the label on the dispenser prior to running the dishwasher.
Dispenser Latch
1If the lid is closed, press the lever on the bottom side of the lid to open the dispenser.
|
Prewash |
Main Wash Compartment |
Compartment |
2Add dishwashing detergent to the main wash compartment until the level is between the 15 and 25 lines. Fill to 25 line for hard water or heavily soiled loads or to 15 line for soft water or lightly soiled loads. Adjust amount of detergent to best meet your cleaning needs and conditions.
Close the lid firmly until a click is heard. NOTE: DO NOT add detergent when the Rinse Only cycle is selected.
3If a prewash is desired, fill the recessed prewash compartment area in the lid with detergent.
NOTE: Too much detergent can leave a film on dishes and in the dishwasher resulting in poor wash performance.
 CAUTION
DETERGENT INFORMATION
Use only detergent intended for automatic dishwashers. Incorrect detergent may cause the dishwasher to fill with suds during operation. Excess sudsing may reduce wash performance and may cause the unit to leak. DO NOT use hand dishwashing detergent in this dishwasher.
 16
16

O P E R AT I N G I N S T RU C T I O N S
 ADDING RINSE AID TO THE DISPENSER
The use of rinse aid products is recommended to prevent spots on dishes from water droplets remaining after the completion of the wash cycle, and to enhance the performance of the dry cycle. NOTE: Only use liquid rinse aid in this dishwasher.
2Add a liquid rinse aid to the maximum fill level (max. 4.8 oz [145 ml]).
1Rotate the round cap counterclockwise to remove it.
3Replace the cap and turn clockwise to lock.
Rinse aid will be dispensed automatically during the final rinse cycle.
RINSE AID DISPENSER ADJUSTMENT
The rinse aid dispenser is factory-set to level 3, which should provide the best performance
under most conditions.
Setting the rinse aid
control too low will
contribute to spotting and streaking of dishes and poor drying performance. Setting
the control too high can cause foaming, which will cause poor wash performance.
To adjust the rinse aid dispenser setting, remove the cap and adjust the rinse aid lever to the desired setting.
REFILLING THE RINSE AID
The capacity of the rinse aid dispenser is 4.8 oz (145 ml). How often the dispenser will need to be refilled depends on how often dishes are washed and the rinse aid setting used.
If the rinse aid level is low, the Rinse Aid light on the control panel will illuminate.
NOTE :
The dispenser also has a round Rinse Aid Indicator Eye that is dark when the dispenser is full and light when it is empty.
English
17

C A R E & C L E A N I N G
For best results, it is important to periodically check and care for the spray arms.
 WARNING To prevent injury during care and maintenance/cleaning, wear gloves and/or protective clothing.
 CLEANING METALLIC PARTS
Some exterior and interior parts can be cleaned with a damp cloth or sponge. A cloudy film may form on the surface of the stainless steel tub, especially with hard water.
 CLEANING THE LOWER SPRAY ARM
• Make sure that the water jet holes are not blocked by food particles.
• When cleaning is necessary, remove the lower spray arm by pulling up.
• After cleaning the lower spray arm, replace it by pushing down until it clips into place. Be sure the spray arm turns freely.
 CLEANING THE UPPER SPRAY ARM
1Pull the upper rack forward. Make sure that the water jet holes are not blocked by food particles.
When cleaning is necessary, remove the upper spray arm by turning the nut on the bottom of the spray arm 1/8 turn counterclockwise and pulling down (see illustrations).
2After cleaning the upper spray arm, press it up into place. Turn the nut 1/8 turn clockwise to make sure the nut locks back into place.
 18
18

C A R E & C L E A N I N G
 CLEANING THE TOP SPRAY ARM
1 Make sure that the water jet holes are not |
2 Then pull the spray arm out. |
blocked by food particles. |
|
When cleaning is necessary, use a screwdriver |
|
to release the retainer clip from the bracket |
|
that holds the top spray arm assembly to |
|
the tub. |
|
3After cleaning the top spray arm, replace it. Slide it back into place and make sure the retainer clip engages.
 SEASONAL MAINTENANCE AND STORAGE
•During the summer, if you will be absent for extended periods of time, it is recommended that you close the water valve and unplug the power cord, or turn off the circuit breaker.
•During winter, if you will be absent for extended periods of time and there is a possibility of freezing temperatures, it is recommended that you winterize the water supply lines and the dishwasher itself. Winterization must be performed by experienced service personnel.
English
19

T RO U B L E S H O OT I N G
 BEFORE CALLING FOR SERVICE
Problem |
Possible Causes |
Solutions |
|
Dishwasher does not |
Door is not completely closed. |
Make sure the door is completely closed and latched. |
|
operate |
Power supply or power cord is |
Connect the power supply or cord properly. |
|
|
|
||
|
not connected. |
|
|
|
Fuse is blown or circuit breaker tripped. |
Replace fuse or reset circuit breaker. |
|
Dishwasher operates |
Unit is connected to cold water. |
Check the water supply connection or water heater |
|
too long |
|
setting. (Heating cold water takes longer.) |
|
Odor |
Previous cycle was stopped before |
Operate the Quick Wash cycle with detergent without |
|
|
completion. |
loading any dishes. |
|
Water remains in tub |
Drain hose is kinked or clogged. |
Adjust hose or clear blockage. |
|
after completion of cycle |
|
|
|
Spots and filming on |
Low water temperature. |
Water supply should be at least 120°F for best wash |
|
dishes |
|
performance. |
|
|
Wrong amount of detergent used. |
Use the recommended amount of detergent. |
|
|
Overloading. |
Load the proper amount of dishes. |
|
|
Improper loading. |
See the Using Your Dishwasher section. |
|
|
Insufficient water pressure. |
Adjust water pressure to between 20 and 120 psi. |
|
|
Insufficient detergent. |
Add the recommended amount of detergent. See Using |
|
|
|
Your Dishwasher section. |
|
|
Rinse aid dispenser empty. |
Refill rinse aid dispenser. |
|
|
Extremely hard water. |
|
|
|
The best way to eliminate spots on your dishes is to install a whole house water softener in your home. |
|
|
|
If a water softener is already installed or you do not plan on installing one, |
|
|
|
try adding an “Extra Rinse” option as part of the wash cycle to help minimize this condition. |
|
|
|
To add an Extra Rinse to the cycle, select the wash cycle then press extra rinse. |
|
|
|
Note: When selecting the “Extra Rinse” cycle times and water usage will be increased from normal use. |
|
|
|
To remove hard water build up in tub |
|
|
|
Remove all dishes, silverware and silverware holder from the dishwasher. Only the racks should remain |
|
|
|
in the tub. |
|
|
|
Fill a measuring cup with white vinegar approximately 14~17ounces(400~500mL), place the measuring |
|
|
|
cup in the lower rack. |
|
|
|
Run a “Normal” cycle and select “Extra Rinse” and “Sanitary”, then close the door. |
|
|
|
DO NOT USE ANY DETERGENT |
|
|
|
Note: Make sure to let the dishwasher complete the entire cycle. The cleaning method should only be |
|
|
|
done as needed. |
|
|
|
|
|
|
If you have followed this troubleshooting guide and the problem persists, or if the problem you are experiencing is not listed here,
please call LGE Customer Service at 1-800-243-0000(US), 1-888-542-2623(Canada).
 20
20
T RO U B L E S H O OT I N G
 BEFORE CALLING FOR SERVICE (continued)
|
Problem |
Possible Causes |
Solutions |
|
|
|
Food soil remains on |
Improper cycle selection. |
Select correct cycle based on soil level and type of |
|
|
|
dishes |
|
dishware being washed. |
|
|
|
|
Water temperature is too low. |
Check water supply connection or water heater setting. |
|
|
|
|
Dishwashing detergent was not used. |
Use recommended detergent. |
|
|
|
|
Low inlet water pressure. |
Water pressure should be between 20 and 120 psi. |
|
|
|
|
Water jet holes on spray arms blocked. |
Clean the spray arms. |
|
|
|
|
Improper loading of dishes. |
Make sure dishes do not block spray arm rotation or |
|
|
|
|
|
interfere with detergent dispenser. |
|
|
|
Noise |
Some level of noise is normal during |
Detergent cover opening. |
|
|
|
English |
||||
|
|
operation. |
Drain pump at the beginning of drain cycle. |
|
|
|
|
The dishwasher is not level. |
Adjust the leveling feet. |
|
|
|
|
Nozzle arm knocking against dishes. |
Reposition the dishes. |
|
|
|
Cloudiness on glassware |
Combination of excessive detergent and |
Use less detergent and use a rinse aid to minimize |
|
|
|
|
||||
|
|
soft water. |
the problem. |
|
|
|
Black or gray marks on |
Aluminum items rubbing dishes |
Reposition the dishes. |
|
|
|
dishes |
during cycle. |
|
|
|
|
Yellow or brown film on |
Coffee or tea stains. |
Eliminate the stain by using a stain removal product. |
|
|
|
inside surfaces of |
|
|
|
|
|
dishwasher |
|
|
|
|
|
Dishes don’t dry |
Rinse agent dispenser empty. |
Check and refill the rinse agent dispenser if empty. |
|
|
|
Lamps don’t illuminate |
Power is not connected. |
Connect power supply. |
|
|
|
|
Fuse is blown or circuit breaker tripped. |
Replace fuse or reset circuit breaker. |
|
|
|
Sprays arms do not |
Holes of spray arms are blocked by food |
Clean the holes of spray arms. |
|
|
|
rotate smoothly |
particles. |
|
|
|
|
Upper rack crooked |
Rack is poorly adjusted. |
See Using Your Dishwasher section. |
|
|
|
IE Error |
Water inlet problem. |
Check for clogged, kinked or frozen water inlet hose. |
|
|
|
|
|
Check water supply. |
|
|
|
OE Error |
Drainage problem. |
Check for clogged, kinked or frozen drain hose. |
|
|
|
FE Error |
Excessive water supplied. |
|
|
|
|
E1 Error |
Water leakage problem. |
Please call your Authorized Service Center or LGE |
|
|
|
HE Error |
Heater circuit failure. |
|
|
|
|
Customer Service at |
|
|
||
|
|
|
|
|
|
|
TE Error |
Thermistor failure or very high inlet |
1-800-243-0000(US), 1-888-542-2623(Canada). |
|
|
|
|
water temperature (over 194°F). |
|
|
|
|
The display shows PF |
The dishwasher experienced a power |
This is not an error. The dishwasher will restart |
|
|
|
|
failure. |
automatically after 10 seconds. |
|
|
|
|
|
|
|
|
If you have followed this troubleshooting guide and the problem persists, or if the problem you are experiencing is not listed here,
please call LGE Customer Service at 1-800-243-0000(US), 1-888-542-2623(Canada).
21

S P E C I F I C AT I O N S
 SPECIFICATIONS
•Power Supply: 120V, 60 Hz AC only, minimum 15A circuit breaker
•Water Pressure: 20–120 psi (140–830 kPa)
•Size (WxDxH): 23 3/4” x 24 5/8” x 33 5/8” (603 mm x 625 mm x 854 mm)
•Inlet Water Temperature: 120°F (49°C) minimum
•Product Weight : 97 lbs. (43.8 kg)
The appearance and specifications are subject to change without notice.
 22
22
 Loading...