


USB Plus
(Go to page 8)
XTS & XTS Pro
(Go to page 15)
Virtual Sound
(Go to page 15)
FM & AM Tuner Function
(Go to page 19)
DVD/CD RECEIVER
OWNER’S MANUAL
Model : HT302SD, HT302SD-A8
SH32SD-SZ, SH32SD-WZ
USBplus
Before connecting, operating or adjusting this product,
please read this instruction booklet carefully and completely.
P/No. : MFL62665902(00)
Dear Customer
Thank You for Purchasing the LG DVD Player. After going through the instruction manual , you will be able to enjoy all the features and functions of the Product .
CAUTION
RISK OF ELECTRIC SHOCK
DO NOT OPEN
CAUTION : TO REDUCE THE RISK OF ELECTRIC SHOCK DO NOT REMOVECOVER (OR BACK) NO USER-SERVICEABLE PARTS INSIDE REFER S E R V I C I N G T O Q U A L I F I E D S E R V I C E PERSONNEL.
This lightning flash with arrowhead symbol within an equilateral triangle is intended to alert the user to the presence of uninsulated dangerous voltage within the product’s enclosure that may be of sufficient magnitude to constitute a risk of electric shock to persons.
The exclamation point within an equilateral triangle is intended to alert the user to the presence of important operating and maintenance (servicing) instructions in the literature accompanying the product.
WARNING : TO PREVENT FIRE OR ELECTRIC SHOCK HAZARD, DO NOT EXPOSE THIS PRODUCT TO RAIN OR MOISTURE.
WARNING : Do not install this equipment in a confined space such as a book case or similar unit.
CAUTION: Do not block any ventilation openings. Install in accordance with the manufacturer's instructions.
Slots and openings in the cabinet are provided for ventilation and to ensure reliable operation of the product and to protect it from over heating.
The openings should be never be blocked by placing the product on a bed, sofa, rug or other similar surface. This product should not be placed in a built-in installation such as a bookcase or rack unless proper ventilation is provided or the manufacturer's instruction has been adhered to.
CAUTION : This product employs a Laser System.
To ensure proper use of this product, please read this owner’s manual carefully and retain it for future reference. Shall the unit require maintenance, contact an authorized service center.
Use of controls, adjustments or the performance of procedures other than those specified herein may result in hazardous radiation exposure.
To prevent direct exposure to laser beam, do not try to open the enclosure. Visible laser radiation when open. DO NOT STARE INTO BEAM.
CAUTION : The apparatus shall not be exposed to water (dripping or splashing) and no objects filled with liquids, such as vases, shall be placed on the apparatus.
CAUTION : concerning the Power Cord
Most appliances recommend they be placed upon a dedicated circuit ; That is, a single outlet circuit which powers only that appliance and has no additional outlets or branch circuits. Check the specification page of this owner's manual to becertain.
Do not overload wall outlets. Overloaded wall outlets, loose or damaged wall outlets, extension cords, frayed power cords, or damaged or cracked wire insulation are dangerous. Any of these conditions could result in electric shock or fire. Periodically examine the cord of your appliance, and if its appearance indicates damage or deterioration, unplug it, discontinue use of the appliance, and have the cord replaced with an exact replacement part by an authorized service center.
Protect the power cord from physical or mechanical abuse, such as being twisted, kinked, pinched, closed in a door, or walked upon. Pay particular attention to plugs, wall outlets, and the point where the cord exits the appliance.
To disconnect power from the mains, pull out the mains cord plug. When installing the product, ensure that the plug is easily accessible.
Note: The marking of product shall be on the exterior of the apparatus.
3

Welcome to your new DVD Receiver
Contents
Introduction ................................................................................. |
5 |
Maintenance & Service ............................................................... |
5 |
Main Unit ..................................................................................... |
6 |
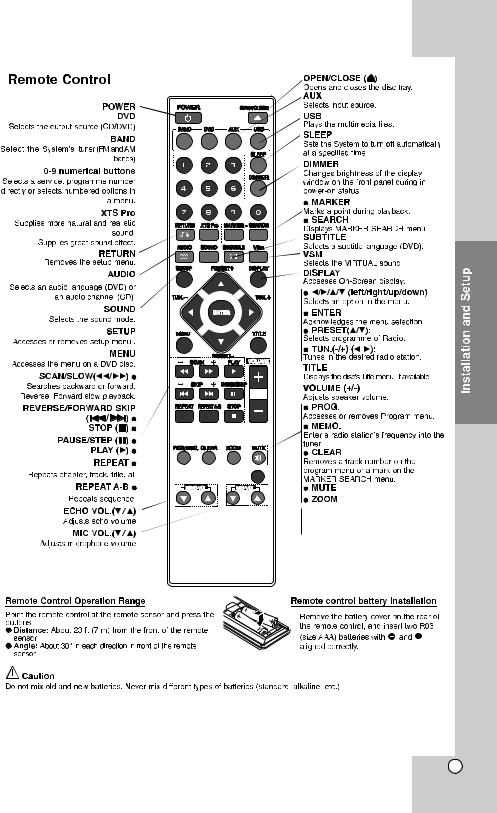
Remote Control ........................................................................... |
7 |
Hooking up the Unit (Audio & Video) .......................................... |
8 |
USB Equipment Connection ....................................................... |
8 |
Antenna Connection ................................................................... |
9 |
5.1 Channel Speaker System Configuration .............................. |
9 |
Initial Settings ............................................................................. |
10 |
Language ................................................................................... |
10 |
Display ....................................................................................... |
10 |
Audio ......................................................................................... |
11 |
Lock (Parental Control) ............................................................. |
11 |
Others ....................................................................................... |
14 |
Displaying Disc Information ....................................................... |
12 |
Operations ................................................................................. |
13 |
Equalizer Effect ......................................................................... |
15 |
XTS/XTS Pro ............................................................................. |
15 |
Virtual Sound ............................................................................ |
15 |
Sound Mode ............................................................................. |
15 |
Other Operations ...................................................................... |
15 |
Playing a Disc or File ................................................................ |
16 |
Playing a DivX Movie File ......................................................... |
17 |
Programmed Playback .............................................................. |
18 |
Viewing a JPEG File ................................................................. |
18 |
Listening to Music from External Device ................................... |
19 |
Presetting the Radio Stations ................................................... |
19 |
Listening to the Radio .............................................................. |
19 |
Using an USB Device ............................................................... |
20 |
Types of Playable Discs ........................................................... |
21 |
Troubleshooting .................................................................. |
12~13 |
Language Codes ...................................................................... |
22 |
Area Codes ............................................................................... |
22 |
Specifications ........................................................................... |
22 |
4

Before Use


 It is recommended to remove any disc from the player while moving the set
CD-G CD-G Discs


 /CD Receiver


" Always keep a disc inside the Receiver to prevent
optical lens damage due to dust "
5
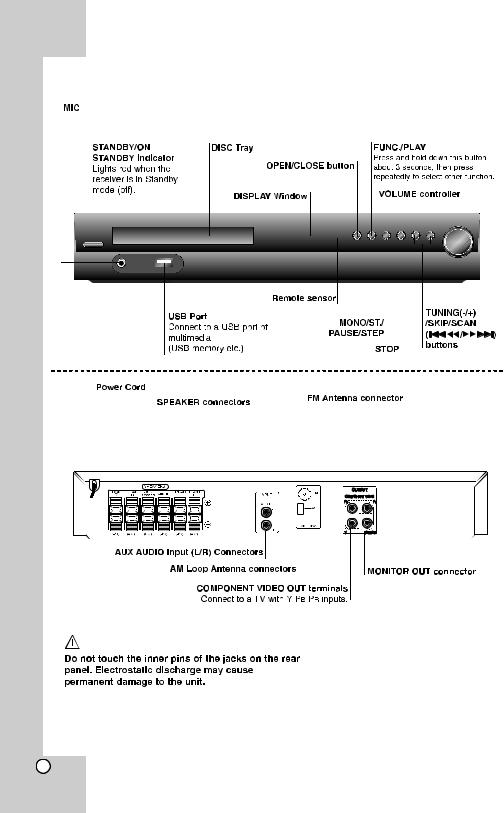
Front Panel/Rear Panel
Connect a microphone to MIC Port.
6
EQ
 EQ
EQ
You Can Choose 8 Fixed
Sound Impressions.
7
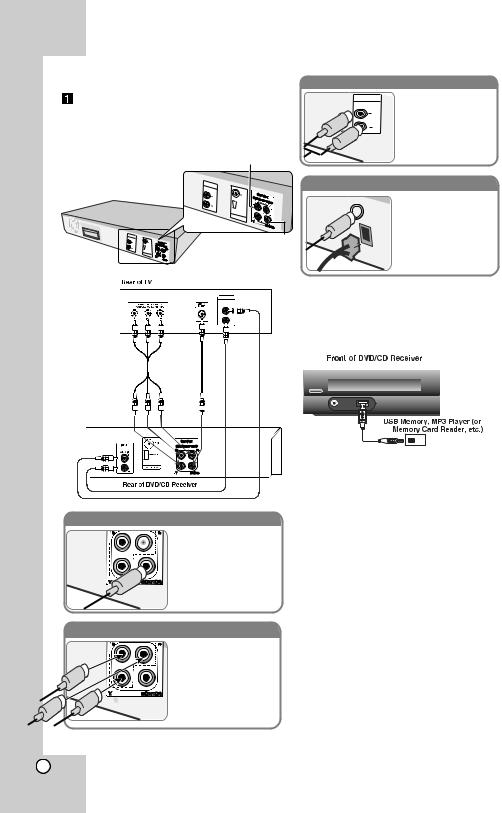
Hooking up the unit
Connect jacks on the unit and your TV (DVD
player or Digital Device etc.) using the cables.
Check the jacks of your TV, and choose the  ,
,
 or
or  connection. Picture quality improves in order from
  to
to  .
.
(B)
Audio In connection
INPUT
AUX IN
L
R
The unit’s Audio jacks are colour coded (red for right audio and white for left audio). If your TV has only one output for audio (mono), connect it to the left (?white)
audio jack on the unit.
INPUT |
|
AUX IN |
|
L |
FM |
R |
|
|
FM |
|
ANTENNA |
INPUT |
|
AUX IN |
|
L |
FM |
Pb |
|
R |
Pr |
|
|
|
AM |
|
ANT |
|
ENNA |
(A)
AM FM connection

 FM
FM
 AM
AM
AM - Connect the AM loop aerial to the DVD receiver. FM - Connect the FM aerial. The reception will be its best when the two loose ends of the aerial are in a straight and horizontal line.
OUTPUT
AUDIO OUT
 B
B  A
A  C
C
Video Out connection 

 Connect the VIDEO
  OUTPUT(MONITOR) jack on
the unit to the corresponding
input jack on your TV using a
Video cable.
Component Video connection

Connect the COMPONENT VIDEO (PROGRESSIVE SCAN) OUTPUT jacks on the unit to the corresponding input jacks on your TV using a Y PB PR cable.
USB Equipment Connection
Connect the USB port of a USB Memory (or
MP3 player, etc.) to the USB port on the front
of the unit.
Removing the USB Device from the unit
1.Choose a different function mode or press STOP(■) twice in a row.
2.Remove the USB device from the unit.
Notes:
•Don’t extract the USB device while operating.
•Music files (MP3/WMA), image files (JPEG) and Video files (.avi) can be played.
•This unit can not use a USB HUB.
8
 Loading...