


04 06.30
SECTION 6 ± 1
SERVICE PROCEDURES AND
SPECIFICATIONS
Introduction
Vehicle identification . . . . . . . . . . . . . . . . . . . . . . . . . . . . . . . . . . . . . . . . . . . . . . . . . . . . . . . . . . . . . . . . 316
Theft prevention labels . . . . . . . . . . . . . . . . . . . . . . . . . . . . . . . . . . . . . . . . . . . . . . . . . . . . . . . . . . . . . . 317
Engine compartment overview . . . . . . . . . . . . . . . . . . . . . . . . . . . . . . . . . . . . . . . . . . . . . . . . . . . . . . . 318
Do±it±yourself service precautions . . . . . . . . . . . . . . . . . . . . . . . . . . . . . . . . . . . . . . . . . . . . . . . . . . . 319
Parts and tools . . . . . . . . . . . . . . . . . . . . . . . . . . . . . . . . . . . . . . . . . . . . . . . . . . . . . . . . . . . . . . . . . . . . . 320
Positioning the jack . . . . . . . . . . . . . . . . . . . . . . . . . . . . . . . . . . . . . . . . . . . . . . . . . . . . . . . . . . . . . . . . . 322
315
04 06.30
INTRODUCTION
VEHICLE IDENTIFICATION
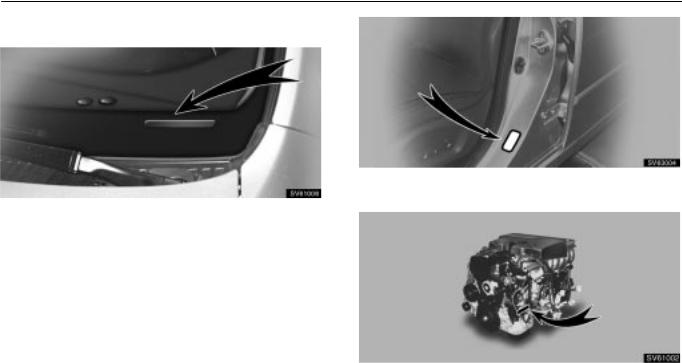
The vehicle identification number (VIN) is the legal identifier for your vehicle. This number is on the left top of the instrument panel and can be seen through the windshield from outside.
This is the primary identification number for your Lexus. It is used in registering the ownership of your vehicle.
The vehicle identification number (VIN) is also on the Certification Label.
The engine number is stamped on the engine block as shown.
316
04 06.30
INTRODUCTION
THEFT PREVENTION LABELS
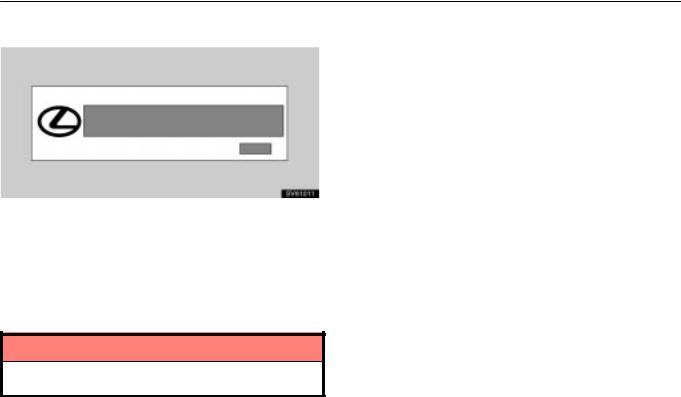
Your new vehicle carries theft prevention labels which are approximately 47 mm (1.85 in.) by 12 mm (0.47 in.).
The purpose of these labels is to reduce the incidence of vehicle thefts by facilitating the tracing and recovery of parts from stolen vehicles. The label is designed so that once it is applied to a surface, any attempt to remove it will result in destroying the integrity of the label. Transferring these labels intact from one part to another will be impossible.
NOTICE
You should not attempt to remove the theft prevention labels as it may violate certain state or federal laws.
317

04 06.30
INTRODUCTION
ENGINE COMPARTMENT OVERVIEW
1 |
Battery |
2 |
Fuse box |
3 |
Engine oil filler cap |
4 |
Engine oil level |
|
dipstick |
5 |
Brake fluid reservoir |
6 |
Washer fluid tank |
7 |
Power steering fluid |
|
reservoir |
8 |
Engine coolant |
|
reservoir |
9 |
Electric cooling fans |
10 |
Condenser |
11 |
Radiator |
318
04 06.30
INTRODUCTION
DO±IT±YOURSELF SERVICE
PRECAUTIONS
If you perform maintenance yourself, be sure to follow the correct procedure given in this Section.
You should be aware that improper or incomplete servicing may result in operating problems.
Performing do±it±yourself maintenance during the warranty period may affect your warranty coverage. Read the separate Lexus Warranty statement for details and suggestions.
This Section gives instructions only for those items that are relatively easy for an owner to perform. As explained in Section 5, there are still a number of items that must be performed by a qualified technician with special tools.
For information on tools and parts for do±it±yourself maintenance, see ªParts and toolsº on page 320.
Utmost care should be taken when working on your vehicle to prevent accidental injury. Here are a few precautions that you should be especially careful to observe:
CAUTION
When the engine is running, keep hands, clothing, and tools away from the moving fan and engine drive belt. (Removing rings, watches, and ties is advisable.)
Right after driving, the engine compartment ± the engine, radiator, exhaust manifold and power steering fluid reservoir, etc. ± will be hot. So be careful not to touch them. Oil and other fluids may also be hot.
Do not leave anything that may burn easily, such as paper or rags, in the engine compartment.
Do not smoke, cause sparks or allow open flames around fuel or the battery. Their fumes are flammable.
Do not get under your vehicle with just the body jack supporting it. Always use automotive jack stands or other solid supports.
Be sure the ignition is off if you work near the electric cooling fan or radiator grille. With the ignition on, the electric cooling fan may automatically start to run if the air conditioning is on and/or if the coolant temperature is high.
Use eye protection whenever you work on or under your vehicle where you may be exposed to flying or falling material, fluid spray, etc.
Be extremely cautious when working on the battery. It contains poisonous and corrosive sulfuric acid.
319

04 06.30
INTRODUCTION
NOTICE |
PARTS AND TOOLS |
|
|
||
|
Here is a list of parts and tools you will need to perform |
|
Remember that battery and ignition cables carry high |
||
do±it±yourself maintenance. Remember all Lexus parts are |
||
currents or voltages. Be careful of accidentally |
||
designed in metric sizes, so your tools must be metric. |
||
causing a short circuit. |
||
|
||
Add only ªToyota Super Long Life Coolantº or similar |
CHECKING THE ENGINE OIL LEVEL |
|
high quality ethylene glycol based non±silicate, non± |
Parts (if level is low): |
|
amine, non±nitrite, and non±borate coolant with |
||
|
||
long±life hybrid organic acid technology to fill the |
ªToyota Genuine Motor Oilº or equivalent |
|
radiator. ªToyota Super Long Life Coolantº is a mix- |
Oil grade: API grade SL ªEnergy±Conservingº or ILSAC |
|
ture of 50% coolant and 50% deionized water (for the |
multigrade engine oil. For recommended oil viscosity, see |
|
U.S.A.) or 55% coolant and 45% deionized water (for |
page 335. |
|
Canada). |
Tools: |
|
If you spill some of the coolant, be sure to wash it off |
||
Rag or paper towel |
||
with water to prevent it from damaging the parts or |
||
|
||
paint. |
Funnel (only for adding oil) |
|
Before closing the engine hood, check to see that you |
CHECKING THE ENGINE COOLANT LEVEL |
|
have not forgotten any tools, rags, etc. |
||
Do not drive with the air cleaner removed, or |
Parts (if level is low): |
|
excessive engine wear could result. Also backfiring |
ªToyota Super Long Life Coolantº or similar high quality |
|
could cause a fire in the engine compartment. |
||
ethylene glycol based non±silicate, non±amine, non±nitrite, |
||
Do not overfill automatic transmission fluid, or the |
||
and non±borate coolant with long±life hybrid organic acid |
||
transmission could be damaged. |
technology. |
|
Be careful not to scratch the glass surface with the |
ªToyota Super Long Life Coolantº is a mixture of 50% |
|
wiper frame. |
coolant and 50% deionized water (for the U.S.A.) or 55% |
|
|
coolant and 45% deionized water (for Canada). |
|
|
Tools: |
|
|
Funnel (only for adding coolant) |
320

04 06.30
INTRODUCTION
CHECKING BRAKE FLUID
Parts (if level is low):
FMVSS No. 116 DOT 3 or SAE J1703 brake fluid
Tools:
Funnel (only for adding fluid)
CHECKING POWER STEERING FLUID
Parts (if level is low):
CHECKING THE CARTRIDGE TYPE FUSES
Parts (if replacement is necessary):
Genuine Lexus fuse or equivalent with same amperage rating as original
ADDING WASHER FLUID
Parts:
Water
Automatic transmission fluid DEXRON II or III
Tools:
Rag or paper towel
Funnel (only for adding fluid)
Washer fluid containing antifreeze (for winter use)
Tools:
Funnel
CHECKING BATTERY CONDITION
Tools:
Warm water
Baking soda
Grease
Conventional wrench (for terminal clamp bolts)
CHECKING AND REPLACING THE BLADE TYPE FUSES
Parts (if replacement is necessary):
Fuse with same amperage rating as original
321
04 06.30
INTRODUCTION
POSITIONING THE JACK
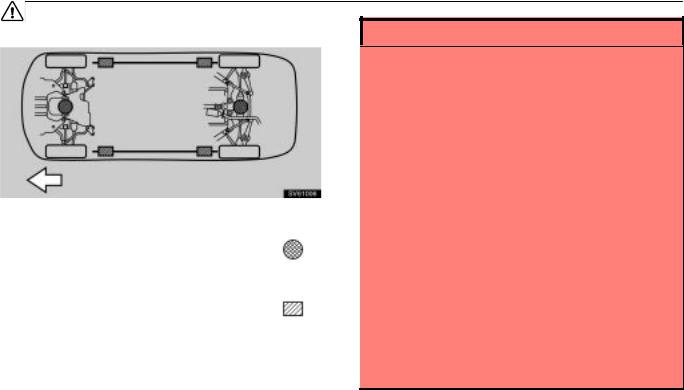
Front of vehicle
When jacking up your vehicle with the jack, position the jack correctly as shown in the illustration.
Jack position . . . . . . . . . . . . . . . . . . . . . . . . . . . . . . . . .
Front± Front crossmember
Rear± Rear differential
Support position and Pantograph jack position . . . .
CAUTION
When jacking, be sure to observe the following to reduce the possibility of personal injury:
Follow jacking instructions.
Do not put any part of your body under the vehicle supported by a jack. Personal injury may occur.
Do not start or run the engine while your vehicle is supported by the jack.
Stop the vehicle on a level firm ground, firmly set the parking brake and put the transmission in ªPº (automatic) or reverse (manual). Block the wheel diagonally opposite to the one being changed if necessary.
Make sure to set the jack properly in the jack point. Raising the vehicle with jack improperly positioned will damage the vehicle or may allow the vehicle to fall off the jack and cause personal injury.
Never get under the vehicle when the vehicle is supported by the jack alone; use vehicle support stands.
Do not raise the vehicle with someone in the vehicle.
When raising the vehicle, do not place any objects on top of or underneath the jack.
322

04 06.30
INTRODUCTION
NOTICE
Make sure to place the jack correctly, or your vehicle may be damaged.
323
04 06.30
INTRODUCTION
324
04 06.30
SECTION 7
REPORTING SAFETY DEFECTS
FOR U.S. OWNERS
Reporting safety defects for U.S. owners
Reporting safety defects for U.S. owners . . . . . . . . . . . . . . . . . . . . . . . . . . . . . . . . . . . . . . . . . . . . . . 404
403

04 06.30
REPORTING SAFETY DEFECTS
REPORTING SAFETY DEFECTS
FOR U.S. OWNERS
If you believe that your vehicle has a defect which could cause a crash or could cause injury or death, you should immediately inform the National Highway Traffic Safety Administration (NHTSA) in addition to notifying Toyota Motor Sales, U.S.A., Inc. (Toll±free: 1±800±25±LEXUS).
If NHTSA receives similar complaints, it may open an investigation, and if it finds that a safety defect exists in a group of vehicles, it may order a recall and remedy campaign. However, NHTSA cannot become involved in individual problems between you, your dealer, or Toyota Motor Sales, U.S.A., Inc.
To contact NHTSA, you may either call the Auto Safety Hotline toll±free at 1±800±424±9393 (or 366±0123 in Washington, D.C. area) or write to: NHTSA, U.S. Department of Transportation, Washington, D.C. 20590. You can also obtain other information about motor vehicle safety from the Hotline.
404

04 06.30
SECTION 6 ± 5
SERVICE PROCEDURES AND
SPECIFICATIONS
Body
Specifications (Sedan) . . . . . . . . . . . . . . . . . . . . . . . . . . . . . . . . . . . . . . . . . . . . . . . . . . . . . . . . . . . . . . 394
Specifications (SportCross) . . . . . . . . . . . . . . . . . . . . . . . . . . . . . . . . . . . . . . . . . . . . . . . . . . . . . . . . . . 395
Protecting your vehicle from corrosion . . . . . . . . . . . . . . . . . . . . . . . . . . . . . . . . . . . . . . . . . . . . . . . . 396
Washing and waxing . . . . . . . . . . . . . . . . . . . . . . . . . . . . . . . . . . . . . . . . . . . . . . . . . . . . . . . . . . . . . . . . 397
Cleaning the interior . . . . . . . . . . . . . . . . . . . . . . . . . . . . . . . . . . . . . . . . . . . . . . . . . . . . . . . . . . . . . . . . 399
Rain clearing mirrors . . . . . . . . . . . . . . . . . . . . . . . . . . . . . . . . . . . . . . . . . . . . . . . . . . . . . . . . . . . . . . . 402
393

04 06.30
BODY
SPECIFICATIONS (Sedan)
± DIMENSIONS AND WEIGHT
Overall length |
4485 mm (176.6 in.) |
|
|
Overall width |
1725 mm (67.9 in.) |
|
|
Overall height |
1410 mm (55.5 in.)* |
|
|
Wheelbase |
2670 mm (105.1 in.) |
|
|
Tread ± Front |
1495 mm (58.9 in.) |
± Rear |
1485 mm (58.5 in.) |
|
|
Vehicle capacity weight (occupants + cargo) |
390 kg (860 lb.) |
|
|
*Unladen vehicle |
|
± FUEL TANK |
|
|
|
Capacity |
66 L (17.5 gal., 14.5 lmp.gal.) |
|
|
394

04 06.30
BODY
SPECIFICATIONS (SportCross)
± DIMENSIONS AND WEIGHT
Overall length |
4495 mm (177.0 in.) |
|
|
Overall width |
1725 mm (68.0 in.) |
|
|
Overall height |
1430 mm (56.3 in.)* |
|
|
Wheelbase |
2670 mm (105.1 in.) |
|
|
Tread ± Front |
1495 mm (58.9 in.) |
± Rear |
1475 mm (58.1 in.) (with the 225/45ZR17 tires) |
|
1485 mm (58.5 in.) (except the 225/45ZR17 tires) |
|
|
Vehicle capacity weight (occupants + cargo) |
390 kg (860 lb.) |
|
|
*Unladen vehicle |
|
± FUEL TANK |
|
|
|
Capacity |
66 L (17.5 gal., 14.5 lmp.gal.) |
|
|
395

04 06.30
BODY
PROTECTING YOUR VEHICLE
FROM CORROSION
Proper care of your Lexus can help ensure long±term corrosion prevention.
The most common causes of corrosion to your vehicle are:
The accumulation of road salt, dirt and moisture in hard±to±reach areas under the vehicle.
Chipping of paint or undercoating caused by minor accidents or by stones and gravel.
The following conditions will cause or accelerate corrosion of your vehicle, so it is important to keep your vehicle, particularly the underside, as clean as possible and to repair any damage to paint or protective coatings as soon as possible.
The presence of road salt or dust control chemicals, salt in the air near the sea coast, industrial air pollution.
High humidity, especially at temperatures just above freezing point.
Certain parts of your vehicle are wet or damp for an extended period of time, even though other parts of the
vehicle are dry.
Components of the vehicle which are prevented from quick±drying due to lack of proper ventilation are exposed
to high ambient temperature.
To help prevent corrosion on your Lexus, follow these guidelines:
Keep your vehicle clean by regular washing. In addition, observe the following points.
If you drive on salted roads in the winter or if you live near the ocean, you should hose off the undercarriage at least
once a month to minimize corrosion.
High pressure water or steam is effective for cleaning the vehicle's underside and wheel housings. Pay particular attention to these areas as it is difficult to see all the mud and dirt. It will do more harm than good to simply wet the mud and debris without removing. The lower edge of doors, rocker panels and frame members have drain holes which should not be allowed to clog with dirt as trapped water in
these areas can cause corrosion.
Wash the underside of the vehicle thoroughly when winter is over.
See ªWashing and waxingº on page 397 for more tips.
Check the condition of your vehicle's paint and trim. If you find any chips or scratches in the paint, touch them up immediately to prevent corrosion from starting. If the chips or scratches have gone through the bare metal, have a qualified body shop make the repair.
396

04 06.30
BODY
Check the interior of your vehicle. Water and dirt can accumulate under the floor mats and could cause corrosion. Occasionally check under the mats to make sure the area is dry. Be particularly careful when transporting chemicals, cleansers, fertilizers, salt, etc. These should be transported in proper containers. If a spill or leak should occur, immediately clean and dry the area.
Keep your vehicle in a well ventilated garage or a roofed place. Do not park your vehicle in a damp, poorly ventilated garage. If you wash your vehicle in the garage, or if you drive it covered with water or snow, your garage may be so damp as to cause corrosion. Even if your garage is heated, a wet vehicle can corrode if the ventilation is poor.
WASHING AND WAXING
Washing your Lexus
Keep your vehicle clean by regular washing.
The following cases may cause weakness to the paint or corrosion to the body and parts. Wash your vehicle as soon as possible.
When driving in a coastal area
When driving on a road sprinkled with antifreeze
When exposed to coal tar, tree sap, bird droppings and carcass of an insect
When driving in areas where there is a lot of smoke, soot, dust, iron dust or chemical substances
When the vehicle becomes remarkably dirty with dust and mud
Hand±washing your Lexus
Work in the shade and wait until the vehicle body is not hot to the touch.
1.Rinse off loose dirt with a hose. Remove any mud or road salt from the underside of the vehicle or in the wheel wells.
2.Wash with a mild car±wash soap, mixed according to the manufacturer's instructions. Use a soft cotton mitt and keep it wet by dipping it frequently into the wash water. Do not rub hard
± let the soap and water remove the dirt.
397
04 06.30
BODY
Plastic wheel ornaments: The plastic wheel ornaments are damaged easily by organic substances. If any organic substance splashes an ornament, be sure to wash it off with water and check if the ornament is damaged.
CAUTION
Do not attach the heavily damaged plastic wheel ornament. It may fly off the wheel and cause accidents while the vehicle is moving.
Aluminum wheels: Use only a mild soap or neutral detergent.
Urethane bumpers and side moldings: Wash carefully. Do not scrub with abrasive cleaners. The bumper and side molding faces are soft.
Road tar: Remove with turpentine or cleaners that are marked safe for painted surfaces.
Automatic car wash
NOTICE
To prevent damage to the antenna, make sure it is removed before driving your vehicle through an automatic car wash.
Your vehicle may be washed in an automatic car wash, but remember that the paint can be scratched by some types of brushes, unfiltered washing water, or the washing process itself. Scratching reduces paint durability and gloss, especially on darker colors. The manager of the car wash should be able to advise you whether the process is safe for the paint on your vehicle.
NOTICE
Do not use organic substances (gasoline, kerosene, benzine or strong solvents), which may be toxic or cause damage.
3.Rinse thoroughly ± dried soap can cause streaking. In hot weather you may need to rinse each section right after you wash it.
4.To prevent water spots, dry the vehicle using a clean soft cotton towel. Do not rub or press hard ± you might scratch the paint.
398
04 06.30
BODY
Waxing your Lexus
Polishing and waxing is recommended to maintain the original beauty of your Lexus' finish.
Apply wax once a month or if the vehicle surface does not repel water well.
1.Always wash and dry the vehicle surface before you begin waxing, even if you are using a combined cleaner and wax.
2.Use a good quality polish and wax. If the finish has become extremely weathered, use a car±cleaning polish, followed by a separate wax. Carefully follow the manufacturer's instructions and precautions. Be sure to polish and wax the chrome trim as well as the paint.
3.Wax the vehicle again when water does not bead but remains on the surface in large patches.
Windshield washer nozzles: Make sure that the nozzles do not become blocked when waxing. If a nozzle becomes blocked, contact your Lexus dealer to have the vehicle serviced.
NOTICE
If a nozzle becomes blocked, do not try to clear it with a pin or other object. The nozzle will be damaged.
CLEANING THE INTERIOR
CAUTION
Be careful not to splash water or spill liquid on the floor. This may prevent the side airbags from activating correctly, resulting in serious injury.
Do not wash the vehicle floor with water, or allow water to get onto the floor when cleaning the vehicle interior or exterior. Water may get into audio components or other electrical components above or under the floor carpet (or mat) and cause a malfunction; and it may cause body corrosion.
Leather±trimmed interior
The selected leather is used in your Lexus. Due to characteristics of leather products, some parts of leather may be rough, uneven or scratched originally.
To keep good appearance, we recommend you to clean it periodically twice a year.
Remove dirt on the leather in the following ways:
1.Wipe it off lightly using a soft cloth (e.g. gauze) dampened with 5% solution of neutral detergent for wool.
2.Wring water from a clean cloth and thoroughly wipe off all traces of detergent with it.
3.Wipe off the surface of the leather with a dry soft cloth. Allow the leather to dry in a ventilated shaded area. Excess of wet may cause the hardening or shrinking of the leather.
399

04 06.30
BODY
NOTICE
Dirt or sand adhered to the leather may damage the treated surface and cause it to wear earlier. Remove dirt or sand using a vacuum cleaner.
If a stain should fail to come out with a neutral detergent, apply a cleaner that does not contain an organic solvent.
Never use organic substances such as benzine, alcohol or gasoline, or alkaline or acid solutions for cleaning the leather as these could cause discoloring.
Use of a nylon brush or synthetic fiber cloth, etc. may scratch the fine grained surface of the leather.
Mildew may develop on soiled leather upholstery. Be especially careful to avoid oil spots. Try to keep your upholstery always clean.
Long exposure to direct sunlight may cause the leather surface to harden and shrink. Keep your vehicle in a shaded area, especially in the summer.
The interior of your vehicle is apt to heat up on hot summer days, so avoid placing on the upholstery items made of vinyl or plastic or containing wax as these tend to stick to leather when warm.
Improper cleaning of the leather upholstery could result in discoloration or staining.
If you have any questions about the cleaning of your Lexus, your local Lexus dealer will be pleased to answer them.
Carpets, Windows and Seat Belts
Begin by vacuuming thoroughly to remove as much dirt as possible. Several types of foam cleaners are available; some are in aerosol cans and others are powders or liquids which you mix with water to produce a foam. To shampoo the carpets, use a sponge or brush to apply the foam. Rub in overlapping circles. Do not apply water ± the best results are obtained by keeping the carpet as dry as possible. Read the shampoo instructions and follow them closely.
The seat belts may be cleaned with mild soap and water or with lukewarm water.
Use a cloth or sponge. As you are cleaning, check the belts for excessive wear, fraying or cuts.
400
04 06.30
BODY
NOTICE
Use a good foam±type shampoo to clean the carpets.
Do not use dye or bleach on the belts ± it may weaken them.
Do not use the belts until they become dry.
The windows may be cleaned with any household window cleaner.
When cleaning the inside of the rear window, be careful not to scratch or damage the heater wires or connectors.
Air Conditioning Control Panel, Audio Panel,
Instrument Panel, Console Panel, and
Switches
Use a soft damp cloth for cleaning.
Soak a clean soft cloth in water or lukewarm water then lightly wipe off any dirt.
NOTICE
Do not use organic substances (solvents, kerosene, alcohol, gasoline, etc.) or alkaline or acidic solutions. These chemicals can cause discoloring, staining or peeling of the surface.
If you use cleaners or polishing agents, make sure their ingredients do not include the substances mentioned above.
If you use a liquid car freshener, do not spill the liquid onto the vehicle's interior surfaces. It may contain the ingredients mentioned above. Immediately clean any spill using the method mentioned above.
If you have any questions about the cleaning of your Lexus, your local Lexus dealer will be pleased to answer them.
401

04 06.30
BODY
RAIN CLEARING MIRRORS
The rear view mirrors have been coated to produce a ªrain clearingº effect. This coating causes the raindrops to spread, clearing the driver's rear view when it rains.
It is sufficient to wash the mirrors with water for day to day care.
The rain clearing effect is reduced in drizzle and light rain.
In the following cases, the rain clearing effect will be reduced temporarily, but will gradually recover.
After wiping dirt off the mirrors
When the mirrors fog up
After waxing your vehicle in an automatic car wash
After your vehicle has been parked for a long period in underground parking lots, etc. where there is no direct
sunlight.
If you would like to restore the rain clearing effect to its normal level immediately in the above cases, wash the mirrors with neutral detergent, then rinse thoroughly.
NOTICE
To maintain the rain clearing ability, and prevent the mirrors from being scratched, observe the following precautions.
Do not use any glass cleaners that contain compounds.
If ice should jam the mirror, do not scrape the mirror. Use a spray deicer to free the mirror.
Wash off any wax stuck to the mirrors with neutral detergent and rinse thoroughly as any wax on the surface of the mirrors can cause the rain clearing effect to be lost.
Do not use any water repellents as they can destroy the rain clearing effect. If any repellent gets stuck on the surface of the mirrors, wash it off with neutral detergent, then rinse thoroughly.
402

04 06.30
SECTION 6 ± 4
SERVICE PROCEDURES AND
SPECIFICATIONS
Electrical components
Specifications . . . . . . . . . . . . . . . . . . . . . . . . . . . . . . . . . . . . . . . . . . . . . . . . . . . . . . . . . . . . . . . . . . . . . 376
Checking battery condition . . . . . . . . . . . . . . . . . . . . . . . . . . . . . . . . . . . . . . . . . . . . . . . . . . . . . . . . . . 380
Battery recharging precautions . . . . . . . . . . . . . . . . . . . . . . . . . . . . . . . . . . . . . . . . . . . . . . . . . . . . . . . 382
Checking and replacing the blade type fuses . . . . . . . . . . . . . . . . . . . . . . . . . . . . . . . . . . . . . . . . . . . 383
Checking the cartridge type fuses . . . . . . . . . . . . . . . . . . . . . . . . . . . . . . . . . . . . . . . . . . . . . . . . . . . . 385
Adding washer fluid . . . . . . . . . . . . . . . . . . . . . . . . . . . . . . . . . . . . . . . . . . . . . . . . . . . . . . . . . . . . . . . . 386
Checking the headlight aim . . . . . . . . . . . . . . . . . . . . . . . . . . . . . . . . . . . . . . . . . . . . . . . . . . . . . . . . . . 387
Replacing light bulbs . . . . . . . . . . . . . . . . . . . . . . . . . . . . . . . . . . . . . . . . . . . . . . . . . . . . . . . . . . . . . . . 388
375
04 06.30
ELECTRICAL COMPONENTS
SPECIFICATIONS
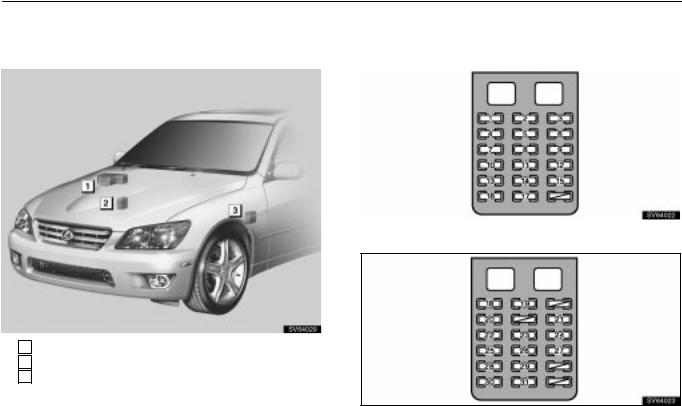
± FUSE LOCATION |
± FUSES |
|
|
|
|
Driver's side kick panel
1 Engine compartment
2 Passenger's side kick panel
3 Driver's side kick panel
Passenger's side kick panel
376
04 06.30
ELECTRICAL COMPONENTS
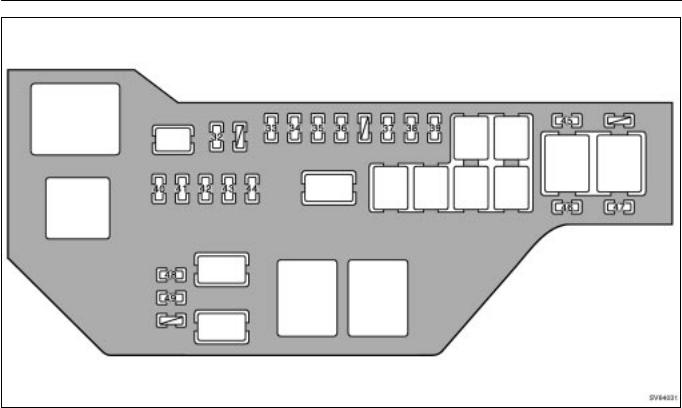
Engine compartment
377

04 06.30
ELECTRICAL COMPONENTS
No. |
FUSE |
AMPERE |
CIRCUIT |
|
|
|
|
|
|
1 |
D FR P/W |
20 |
Power window system |
|
|
|
|
|
|
2 |
TAIL |
10 |
Tail lights, Side marker lights, |
|
License plate lights, |
||||
|
|
|
Parking lights |
|
|
|
|
|
|
|
|
|
Back±up lights, Power window, |
|
|
|
|
Gauges and meters, |
|
|
|
|
Service reminder indicators and |
|
3 |
GAUGE |
10 |
buzzers, |
|
Emergency flashers, |
||||
|
|
|
||
|
|
|
Windshield defogger, |
|
|
|
|
Outside rear view mirror |
|
|
|
|
defogger |
|
|
|
|
|
|
4 |
DOOR |
20 |
Door lock system |
|
|
|
|
|
|
|
|
|
Instrument panel lights, |
|
5 |
PANEL |
7.5 |
Seat heater, Cigarette lighter, |
|
Automatic transmission system, |
||||
|
|
|
Traction control system, |
|
|
|
|
Rear fog light, Ashtray light |
|
|
|
|
|
|
6 |
WASHER |
15 |
Windshield washer, |
|
Headlight cleaner |
||||
|
|
|
||
|
|
|
|
|
7 |
STARTER |
7.5 |
Starting system |
|
|
|
|
|
|
8 |
FR DEF |
20 |
Windshield wiper deicer |
|
|
|
|
|
|
9 |
A/C |
10 |
Air conditioning system |
|
|
|
|
|
|
10 |
SEAT HTR |
15 |
Seat heater |
|
|
|
|
|
|
11 |
CIG |
15 |
Cigarette lighter, Power outlet |
|
|
|
|
|
|
12 |
S/ROOF |
30 |
Moon roof |
|
|
|
|
|
No. |
FUSE |
AMPERE |
CIRCUIT |
|
|
|
|
|
|
|
|
|
Radiator fan, |
|
|
|
|
Anti±lock brake system, |
|
13 |
ECU±IG |
10 |
Moon roof, Shift lock system, |
|
Air conditioning system, |
||||
|
|
|
Door lock system, |
|
|
|
|
Headlight beam level control, |
|
|
|
|
Theft deterrent system |
|
|
|
|
|
|
14 |
SRS±ACC |
10 |
SRS system |
|
|
|
|
|
|
15 |
STOP |
15 |
Stop lights, Shift lock system, |
|
Anti±lock brake system |
||||
|
|
|
||
|
|
|
|
|
16 |
WIPER |
25 |
Windshield wipers |
|
|
|
|
|
|
17 |
RADIO |
10 |
Audio system, Air conditioning, |
|
Outside rear view mirror, |
||||
NO.2 |
||||
|
|
Shift lock system |
||
|
|
|
||
|
|
|
|
|
18 |
DOOR DL |
15 |
Power seat system |
|
|
|
|
|
|
|
|
|
Interior lights, Trunk light, |
|
19 |
DOME |
7.5 |
Vanity lights, |
|
Ignition switch light, Map light, |
||||
|
|
|
||
|
|
|
Door courtesy lights |
|
|
|
|
|
|
20 |
FR FOG |
15 |
Fog lights |
|
|
|
|
|
|
21 |
P FR P/W |
20 |
Power window system |
|
|
|
|
|
|
22 |
PWR |
15 |
Power outlets |
|
OUTLET |
||||
|
|
|
||
|
|
|
|
|
23 |
ECU±B2 |
7.5 |
Theft deterrent system, |
|
Door lock system |
||||
|
|
|
||
|
|
|
|
|
24 |
D RR P/W |
20 |
Power window system |
|
|
|
|
|
|
25 |
MIR HTR |
15 |
Outside rear view mirror |
|
|
|
|
|
378

04 06.30
ELECTRICAL COMPONENTS
No. |
FUSE |
AMPERE |
CIRCUIT |
|
|
|
|
|
|
|
|
|
Power window system, |
|
26 |
MPX±B |
10 |
Air conditioning, |
|
Gauges and meters, |
||||
|
|
|
||
|
|
|
Theft deterrent system |
|
|
|
|
|
|
27 |
P RR P/W |
20 |
Power window system |
|
|
|
|
|
|
28 |
SRS±B |
7.5 |
SRS system, Door lock system |
|
|
|
|
|
|
29 |
TV |
7.5 |
Television |
|
|
|
|
|
|
30 |
OBD |
7.5 |
On±board diagnosis system |
|
|
|
|
|
|
|
|
|
SRS system, |
|
31 |
IGN |
7.5 |
Multiport fuel injection |
|
system/sequential multiport fuel |
||||
|
|
|
injection system, |
|
|
|
|
Cruise control system |
|
|
|
|
|
|
|
|
|
Theft deterrent system, |
|
|
|
|
Door lock system, |
|
|
|
|
Interior light, Trunk light, |
|
32 |
ECU±B1 |
20 |
Vanity light, Ignition switch light, |
|
Map light, Door courtesy lights, |
||||
|
|
|
||
|
|
|
Power window system, |
|
|
|
|
Air conditioning, |
|
|
|
|
Gauges and meters |
|
|
|
|
|
|
33 |
ALT±S |
7.5 |
Charging system |
|
|
|
|
|
|
34 |
ETCS |
15 |
Electronic throttle control |
|
system |
||||
|
|
|
||
|
|
|
|
|
|
|
|
Starting system, SRS system, |
|
35 |
AM2 |
20 |
Multiport fuel injection |
|
system/sequential multiport fuel |
||||
|
|
|
injection system, Cruise control |
|
|
|
|
system |
|
|
|
|
|
|
36 |
HORN |
10 |
Horn |
|
|
|
|
|
No. |
FUSE |
AMPERE |
CIRCUIT |
|
|
|
|
|
|
37 |
RADIO |
20 |
Audio system |
|
NO.1 |
|
|||
|
|
|
||
|
|
|
|
|
38 |
TURN±HAZ |
15 |
Turn signal lights |
|
|
|
|
|
|
|
|
|
Multiport fuel injection |
|
39 |
EFI |
25 |
system/sequential multiport fuel |
|
injection system, |
||||
|
|
|
Emission control system, |
|
|
|
|
Engine immobilizer system |
|
|
|
|
|
|
40 |
DRL NO.2 |
30 |
Daytime running light system |
|
|
|
|
|
|
41 |
DRL NO.1 |
7.5 |
Daytime running light system |
|
|
|
|
|
|
42 |
H±LP L |
15 |
Left±hand headlight |
|
LWR |
(low beam), Fog lights |
|||
|
|
|||
|
|
|
|
|
43 |
H±LP R |
15 |
Right±hand headlight |
|
LWR |
(low beam) |
|||
|
|
|||
|
|
|
|
|
44 |
ABS2 |
7.5 |
Anti±lock brake system |
|
|
|
|
|
|
45 |
SPARE |
|
Spare fuse |
|
|
|
|
|
|
46 |
SPARE |
|
Spare fuse |
|
|
|
|
|
|
47 |
SPARE |
|
Spare fuse |
|
|
|
|
|
|
48 |
H±LP L |
10 |
Left±hand headlight |
|
UPR |
(high beam) |
|||
|
|
|||
|
|
|
|
|
|
H±LP R |
|
Right±hand headlight |
|
49 |
10 |
(high beam), |
||
UPR |
Service reminder indicators and |
|||
|
|
|||
|
|
|
buzzers |
|
|
|
|
|
379
04 06.30
ELECTRICAL COMPONENTS
CHECKING BATTERY CONDITION
Precautions
CAUTION
BATTERY PRECAUTIONS
The battery produces flammable and explosive hydrogen gas.
Do not cause a spark by contacting the battery terminals with tools.
Do not smoke or light a match near the battery.
The electrolyte contains poisonous and corrosive sulfuric acid.
Avoid contact with eyes, skin or clothes.
Never inhale or swallow electrolyte.
Wear protective safety glasses when working near the battery.
Keep children away from the battery.
EMERGENCY MEASURES
If electrolyte gets in your eyes, flush your eyes with clean water immediately and get immediate medical attention. If possible, continue to apply water with a sponge or cloth while traveling to the medical office.
If electrolyte gets on your skin, thoroughly wash the contacted area. If you feel a pain or burn, get medical attention immediately.
If electrolyte gets on your clothes, there is a possibility of its soaking through to your skin, so immediately take off the exposed clothing and follow the procedure above, if necessary.
If you accidentally swallow electrolyte, drink a large quantity of water or milk. Follow with milk of magnesia, beaten raw egg or vegetable oil. Then go immediately for emergency help.
380
04 06.30
ELECTRICAL COMPONENTS
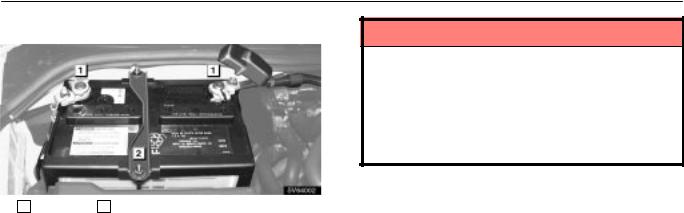
Checking battery exterior
NOTICE
Make sure the engine and all accessories are turned off before performing maintenance.
When checking the battery, remove the ground cable first and reinstall it last.
Be careful not to cause a short circuit with tools.
Take care no solution gets into the battery when washing it.
1 Terminals 2 Hold±down clamp
Check the battery for corroded or loose connections, cracks, or loose hold±down clamps.
1.If the battery is corroded, wash it off with a solution of warm water and baking soda. Coat the terminals with grease to prevent further corrosion.
2.If the connections are loose, tighten the clamp bolts ± but do not overtighten.
3.Tighten the hold±down clamp only enough to keep the battery firmly in place. Overtightening may damage the battery case.
381

04 06.30
ELECTRICAL COMPONENTS
Checking battery condition
Checking by indicator
Check the battery condition by the indicator color.
1BLUE ± Good condition.
2WHITE ± Charging necessary. Have the battery checked by your Lexus dealer.
3RED ± Have the battery checked by your Lexus dealer.
BATTERY RECHARGING
PRECAUTIONS
During recharging, the battery is producing hydrogen gas.
Therefore, before recharging:
1.If recharging with the battery installed on the vehicle, be sure to disconnect the ground cable.
2.Make sure the power switch on the recharger is off when connecting the charger cables to the battery and when disconnecting them.
CAUTION
Always charge the battery in an unconfined area. Do not charge the battery in a garage or closed room where there is not sufficient ventilation.
Only do a slow charge (5 A or less). Charging at a quicker rate is dangerous. The battery may explode causing personal injuries.
NOTICE
Do not refill the battery with water.
NOTICE
Never recharge the battery while the engine is running. Also, be sure all accessories are turned off.
382
 Loading...