


Lexus GS300 2006, GS350 2006, GS400 2006, GS430 2006, GS450H 2006 Owner Manual
...SECTION 7
REPORTING SAFETY DEFECTS
FOR U.S. OWNERS
Reporting safety defects for U.S. owners
Reporting safety defects for U.S. owners . . . . . . . . . . . . . . . . . . . . . . . . . . . . . . . . . . . . . . . . . . . . . . 598
597

REPORTING SAFETY DEFECTS FOR U.S. OWNERS
REPORTING SAFETY DEFECTS
FOR U.S. OWNERS
If you believe that your vehicle has a defect which could cause a crash or could cause injury or death, you should immediately inform the National Highway Traffic Safety Administration (NHTSA) in addition to notifying Toyota Motor Sales, U.S.A., Inc. (Toll-free: 1-800-25-LEXUS).
If NHTSA receives similar complaints, it may open an investigation, and if it finds that a safety defect exists in a group of vehicles, it may order a recall and remedy campaign. However, NHTSA cannot become involved in individual problems between you, your dealer, or Toyota Motor Sales, U.S.A., Inc.
To contact NHTSA, you may either call the Auto Safety Hotline tollfree at 1- 800424- 9393 (or 366-0123 in Washington, D.C. area) or write to: NHTSA, U.S. Department of Transportation, Washington, D.C. 20590. You can also obtain other information about motor vehicle safety from the Hotline.
598

SECTION 6 ± 5
SERVICE PROCEDURES AND
SPECIFICATIONS
Body
Specifications . . . . . . . . . . . . . . . . . . . . . . . . . . . . . . . . . . . . . . . . . . . . . . . . . . . . . . . . . . . . . . . . . . . . . 590 Protecting your vehicle from corrosion . . . . . . . . . . . . . . . . . . . . . . . . . . . . . . . . . . . . . . . . . . . . . . . . 591 Washing and waxing . . . . . . . . . . . . . . . . . . . . . . . . . . . . . . . . . . . . . . . . . . . . . . . . . . . . . . . . . . . . . . . . 592 Cleaning the interior . . . . . . . . . . . . . . . . . . . . . . . . . . . . . . . . . . . . . . . . . . . . . . . . . . . . . . . . . . . . . . . . 594
589

BODY
SPECIFICATIONS
- DIMENSIONS AND WEIGHT
Overall length |
4825 mm (189.9 in.) |
|
|
Overall width |
1820 mm (71.6 in.) |
|
|
Overall height |
1425 mm (56.1 in.)* |
Two-wheel drive models |
|
Four-wheel drive models |
1435 mm (56.4 in.)* |
|
|
Wheelbase |
2850 mm (112.2 in.) |
|
|
Tread ± Front |
1535 mm (60.4 in.) |
± Rear |
1540 mm (60.6 in.) |
|
|
Vehicle capacity weight (occupants + luggage) |
370 kg (815 lb.) |
|
|
*Unladen vehicle |
|
- FUEL TANK |
|
|
|
Capacity |
71 L (18.7 gal., 15.6 lmp.gal.) |
|
|
590

BODY
PROTECTING YOUR VEHICLE
FROM CORROSION
Proper care of your Lexus can help ensure longterm corrosion prevention.
The most common causes of corrosion to your vehicle are:
The accumulation of road salt, dirt and moisture in hard-to-reach areas under the vehicle.
Chipping of paint or undercoating caused by minor accidents or by stones and gravel.
The following conditions will cause or accelerate corrosion of your vehicle, so it is important to keep your vehicle, particularly the underside, as clean as possible and to repair any damage to paint or protective coatings as soon as possible.
The presence of road salt or dust control chemicals, salt in the air near the sea coast, industrial air pollution.
High humidity, especially at temperatures just above freezing point.
Certain parts of your vehicle are wet or damp for an extended period of time, even though other parts of the
vehicle are dry.
Components of the vehicle which do not dry quickly due to lack of proper ventilation are exposed to high ambient
temperature.
To help prevent corrosion on your Lexus, follow these guidelines:
Keep your vehicle clean by regular washing. In addition, observe the following points.
If you drive on salted roads in the winter or if you live near the ocean, you should hose off the undercarriage at least
once a month to minimize corrosion.
High pressure water or steam is effective for cleaning the vehicle's underside and wheel housings. Pay particular attention to these areas as it is difficult to see all the mud and dirt. It will do more harm than good to simply wet the mud and debris without removing them. The lower edge of doors, rocker panels and frame members have drain holes which should not be allowed to clog with dirt as trapped
water in these areas can cause corrosion.
Wash the underside of the vehicle thoroughly when winter is over.
See ºWashing and waxingº on page 592 for more tips.
Check the condition of your vehicle's paint and trim. If you find any chips or scratches in the paint, touch them up immediately to prevent corrosion from starting. If the chips or scratches have gone through the bare metal, have a qualified body shop make the repair.
591

BODY
Check the interior of your vehicle. Water and dirt can accumulate under the floor mats and could cause corrosion. Occasionally check under the mats to make sure the area is dry. Be particularly careful when transporting chemicals, cleansers, fertilizers, salt, etc. These should be transported in proper containers. If a spill or leak should occur, immediately clean and dry the area.
Keep your vehicle in a well ventilated garage or a roofed place. Do not park your vehicle in a damp, poorly ventilated garage. If you wash your vehicle in the garage, or if you drive it covered with water or snow, your garage may be so damp as to cause corrosion. Even if your garage is heated, a wet vehicle can corrode if the ventilation is poor.
WASHING AND WAXING
Washing your Lexus
Keep your vehicle clean by regular washing.
The following cases may cause weakness to the paint or corrosion to the body and parts. Wash your vehicle as soon as possible.
When driving in a coastal area
When driving on a road sprinkled with antifreeze
When exposed to coal tar, tree sap, bird droppings and carcass of an insect
When driving in areas where there is a lot of smoke, soot, dust, iron dust or chemical substances
When the vehicle becomes remarkably dirty with dust and mud
Hand-washing your Lexus
Work in the shade and wait until the vehicle body is not hot to the touch.
1.Rinse off loose dirt with a hose. Remove any mud or road salt from the underside of the vehicle or the wheel wells.
2.Wash with a mild car-wash soap, mixed according to the manufacturer's instructions. Use a soft cotton mitt and keep it wet by dipping it frequently into the wash water. Do not rub hard - let the soap and water remove the dirt.
592

BODY
Fuel filler door: Do not apply water (high-pressure car wash, for example) at or near the fuel tank inlet with the fuel filler door opened. If the water enters the air vent, you may experience trouble with refueling or rough engine idling.
Plastic wheel ornaments: The plastic wheel ornaments are damaged easily by organic substances. If any organic substances splash an ornament, be sure to wash them off with water and check if the ornament is damaged.
Aluminum wheels: Use only a mild soap or neutral detergent.
Plastic bumpers and side moldings: Wash carefully. Do not scrub with abrasive cleaners. The bumper and side molding faces are soft.
Exterior lights: Wash carefully. Do not use organic substances or scrub them with a hard brush. This may damage the surfaces of the lights.
Road tar: Remove with turpentine or cleaners that are marked safe for painted surfaces.
3.Rinse thoroughly - dried soap can cause streaking. In hot weather you may need to rinse each section right after you wash it.
4.To prevent water spots, dry the vehicle using a clean soft cotton towel. Do not rub or press hard - you might scratch the paint.
NOTICE
Do not use organic substances (gasoline, kerosene, benzine or strong solvents), which may be toxic or cause damage.
Do not scrub any part of the vehicle with a hard brush, which may cause damage.
Automatic car wash
Your vehicle may be washed in an automatic car wash, but remember that the paint can be scratched by some types of brushes, unfiltered washing water, or the washing process itself. Scratching reduces paint durability and gloss, especially on darker colors. The manager of the car wash should be able to advise you whether the process is safe for the paint on your vehicle.
Waxing your Lexus
Polishing and waxing is recommended to maintain the original beauty of your Lexus' finish.
Apply wax once a month or if the vehicle surface does not repel water well.
1.Always wash and dry the vehicle surface before you begin waxing, even if you are using a combined cleaner and wax.
2.Use a good quality polish and wax. If the finish has become extremely weathered, use a car-cleaning polish, followed by a separate wax. Carefully follow the manufacturer's instructions and precautions. Be sure to polish and wax the chrome trim as well as the paint.
593

BODY
3. Wax the vehicle again when water does not bead but remains on the surface in large patches.
Exterior lights: Do not apply wax on the surfaces of the lights. Wax may cause damage to the lenses. If you accidentally put wax on the light surfaces, wipe or wash it off.
CLEANING THE INTERIOR
CAUTION
Be careful not to splash water or spill liquid on the floor. This may prevent the SRS side airbags from activating correctly, resulting in serious injury.
Do not wash the vehicle floor with water, or allow water to get onto the floor when cleaning the vehicle interior or exterior. Water may get into audio components or other electrical components above or under the floor carpet (or mat) and cause a malfunction; and it may cause body corrosion.
Leather-trimmed interior
The selected leather is used in your Lexus. Due to characteristics of leather products, some parts of leather may be rough, uneven or scratched originally.
To keep good appearance, we recommend you to clean it periodically twice a year.
Remove dirt on the leather in the following ways:
1.Wipe it off lightly using a soft cloth (e.g. gauze) dampened with 5% solution of neutral detergent for wool.
2.Wring water from a clean cloth and thoroughly wipe off all traces of detergent with it.
594

BODY
3. Wipe off the surface of the leather with a dry soft cloth. Allow the leather to dry in a ventilated shaded area. Excess of wet may cause the hardening or shrinking of the leather.
NOTICE
Dirt or sand adhered to the leather may damage the treated surface and cause it to wear earlier. Remove dirt or sand using a vacuum cleaner.
If a stain should fail to come out with a neutral detergent, apply a cleaner that does not contain an organic solvent.
Never use organic substances such as benzine, alcohol or gasoline, or alkaline or acid solutions for cleaning the leather as these could cause discoloring.
Use of a nylon brush or synthetic fiber cloth, etc. may scratch the fine grained surface of the leather.
Mildew may develop on soiled leather upholstery. Be especially careful to avoid oil spots. Try to keep your upholstery always clean.
Long exposure to direct sunlight may cause the leather surface to harden and shrink. Keep your vehicle in a shaded area, especially in the summer.
The interior of your vehicle is apt to heat up on hot summer days, so avoid placing on the upholstery items made of vinyl or plastic or containing wax as these tend to stick to leather when warm.
Improper cleaning of the leather upholstery could result in discoloration or staining.
Non-leather trim (Dash and sun visors)
The non-leather trim may be easily cleaned with a mild soap or detergent and water.
First vacuum over the upholstery to remove loose dirt. Then, using a sponge or soft cloth, apply the soap solution to the non-leather trim. After allowing it to soak in for a few minutes to loosen the dirt, remove the dirt and wipe off the soap with a clean damp cloth. If all the dirt does not come off, repeat the procedure. Commercial foamingtype cleaners are also available which work well. Follow the manufacturer's instructions.
NOTICE
Do not use solvent, thinner, gasoline or window cleaner on the interior.
595

BODY
Carpets, Windows and Seat Belts
Begin by vacuuming thoroughly to remove as much dirt as possible. Several types of foam cleaners are available; some are in aerosol cans and others are powders or liquids which you mix with water to produce a foam. To shampoo the carpets, use a sponge or brush to apply the foam. Rub in overlapping circles. Do not apply water - the best results are obtained by keeping the carpet as dry as possible. Read the shampoo instructions and follow them closely.
The seat belts may be cleaned with mild soap and water or with lukewarm water.
Use a cloth or sponge. As you are cleaning, check the belts for excessive wear, fraying or cuts.
NOTICE
Use a good foam-type shampoo to clean the carpets.
Do not use dye or bleach on the belts - it may weaken them.
Do not use the belts until they become dry.
The windows may be cleaned with any household window cleaner.
When cleaning the inside of the rear window, be careful not to scratch or damage the heater wires.
Air Conditioning Control Panel, Audio
System, Instrument Panel, Console Panel,
and Switches
Use a soft damp cloth for cleaning.
Soak a clean soft cloth in water or lukewarm water then lightly wipe off any dirt.
NOTICE
Do not use organic substances (solvents, kerosene, alcohol, gasoline, etc.) or alkaline or acidic solutions. These chemicals can cause discoloring, staining or peeling of the surface.
If you use cleaners or polishing agents, make sure their ingredients do not include the substances mentioned above.
If you use a liquid car freshener, do not spill the liquid onto the vehicle's interior surfaces. It may contain the ingredients mentioned above. Immediately clean any spill using the method mentioned above.
If you have any questions about the cleaning of your Lexus, your local Lexus dealer will be pleased to answer them.
596
SECTION 6 ± 4
SERVICE PROCEDURES AND
SPECIFICATIONS
Electrical components
Specifications . . . . . . . . . . . . . . . . . . . . . . . . . . . . . . . . . . . . . . . . . . . . . . . . . . . . . . . . . . . . . . . . . . . . . 564 Checking battery condition . . . . . . . . . . . . . . . . . . . . . . . . . . . . . . . . . . . . . . . . . . . . . . . . . . . . . . . . . . 571 Battery recharging precautions . . . . . . . . . . . . . . . . . . . . . . . . . . . . . . . . . . . . . . . . . . . . . . . . . . . . . . . 574 Checking and replacing the blade type fuses . . . . . . . . . . . . . . . . . . . . . . . . . . . . . . . . . . . . . . . . . . . 574 Checking the cartridge type fuses . . . . . . . . . . . . . . . . . . . . . . . . . . . . . . . . . . . . . . . . . . . . . . . . . . . . 577 Adding washer fluid . . . . . . . . . . . . . . . . . . . . . . . . . . . . . . . . . . . . . . . . . . . . . . . . . . . . . . . . . . . . . . . . 579 Checking the headlight aim . . . . . . . . . . . . . . . . . . . . . . . . . . . . . . . . . . . . . . . . . . . . . . . . . . . . . . . . . . 579 Replacing light bulbs . . . . . . . . . . . . . . . . . . . . . . . . . . . . . . . . . . . . . . . . . . . . . . . . . . . . . . . . . . . . . . . 584
563
ELECTRICAL COMPONENTS
SPECIFICATIONS |
- FUSES |
||
- FUSE LOCATION |
|
|
|
|
|
|
|
|
|
|
|
|
|
|
|
|
|
|
|
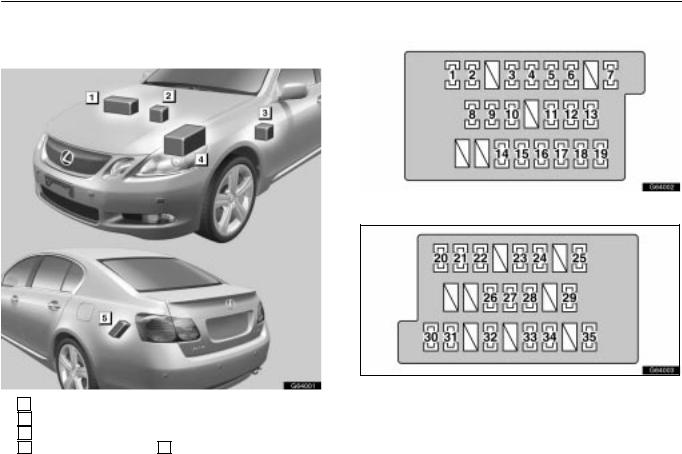
Right side kick panel
Left side kick panel
1 Engine compartment
2 Left side kick panel
3 Right side kick panel
4 Engine compartment 5 Trunk
564

ELECTRICAL COMPONENTS
Engine compartment
Engine compartment (GS430)
Engine compartment (GS300)
Trunk
565

ELECTRICAL COMPONENTS
No. |
FUSE |
AMPERE |
CIRCUIT |
|
|
|
|
|
|
1 |
STR LOCK |
25 |
Steering lock system |
|
|
|
|
|
|
2 |
SECURITY |
7.5 |
Smart access system with |
|
push-button start |
||||
|
|
|
||
|
|
|
|
|
3 |
TI &TE |
20 |
Power tilt and telescopic |
|
steering wheel, Multiplex |
||||
|
|
|
communication system |
|
|
|
|
|
|
4 |
AM1 |
7.5 |
Starting system |
|
|
|
|
|
|
|
|
|
Stop/tail lights, Multi-port fuel |
|
|
|
|
injection system/sequential |
|
5 |
STOP SW |
7.5 |
multiport fuel injection system, |
|
Starting system, Electronic |
||||
|
|
|
control brake system, Vehicle |
|
|
|
|
stability control system, Shift |
|
|
|
|
lock system |
|
|
|
|
|
|
6 |
OBD |
7.5 |
On-board diagnosis system |
|
|
|
|
|
|
7 |
FR P/SEAT |
30 |
Power seat system |
|
RH |
|
|||
|
|
|
||
|
|
|
|
|
8 |
AIR SUS |
20 |
Electronic modulated |
|
suspension |
||||
|
|
|
||
|
|
|
|
|
9 |
PWR |
15 |
Power outlet |
|
OUTLET |
|
|||
|
|
|
||
|
|
|
|
|
10 |
CIG |
15 |
Cigarette lighter |
|
|
|
|
|
|
|
|
|
Multiplex communication |
|
11 |
ACC |
7.5 |
system, Smart access system |
|
with push-button start, Rear |
||||
|
|
|
view monitor system, Audio |
|
|
|
|
system, Air conditioning system |
|
|
|
|
|
No. |
FUSE |
AMPERE |
CIRCUIT |
|
|
|
|
|
|
|
|
|
Multi-port fuel injection |
|
|
|
|
system/sequential multiport fuel |
|
12 |
IGN |
10 |
injection system, SRS airbag |
|
system, Stop/tail lights, |
||||
|
|
|
||
|
|
|
Steering lock system, Electronic |
|
|
|
|
control brake system |
|
|
|
|
|
|
13 |
GAUGE |
7.5 |
Gauges and meters |
|
|
|
|
|
|
|
|
|
Power tilt and telescopic |
|
|
|
|
steering wheel, Multiplex |
|
|
|
|
communication system, Smart |
|
14 |
ECU-IG |
10 |
access system with |
|
push-button start, Audio |
||||
RH |
||||
|
|
system, Air conditioning |
||
|
|
|
||
|
|
|
system, Shift lock system, Tire |
|
|
|
|
pressure warning system, |
|
|
|
|
Combination switch |
|
|
|
|
|
|
15 |
FR S/HTR |
15 |
Seat heater, Heated and |
|
RH |
ventilated seats |
|||
|
|
|||
|
|
|
|
|
|
|
|
Seat heater switches, Front |
|
|
|
|
right door control system, Rear |
|
16 |
RH-IG |
7.5 |
right door control system, |
|
Capacitor, Combination switch, |
||||
|
|
|
||
|
|
|
Seat belt pretensioners, |
|
|
|
|
Intuitive parking assist |
|
|
|
|
|
|
17 |
AM2 |
15 |
Starting system |
|
|
|
|
|
566

ELECTRICAL COMPONENTS
No. |
FUSE |
AMPERE |
CIRCUIT |
|
|
|
|
|
|
|
|
|
Front right door control system |
|
|
|
|
(Power door lock system, |
|
18 |
FR DOOR |
20 |
Power rear view mirror control |
|
system, Door courtesy light, |
||||
RH |
||||
|
|
Outside rear view mirror heater, |
||
|
|
|
||
|
|
|
Power window), Multiplex |
|
|
|
|
communication system |
|
|
|
|
|
|
19 |
RR DOOR |
20 |
Rear right door control system |
|
(Power door lock system, Door |
||||
RH |
||||
|
|
courtesy light, Power window) |
||
|
|
|
||
|
|
|
|
|
20 |
RR DOOR |
20 |
Rear left door control system |
|
(Power door lock system, Door |
||||
LH |
||||
|
|
courtesy light, Power window) |
||
|
|
|
||
|
|
|
|
|
|
|
|
Front left door control system |
|
|
FR DOOR |
|
(Power door lock system, |
|
21 |
20 |
Power rear view mirror control |
||
LH |
system, Door courtesy light, |
|||
|
|
|||
|
|
|
Outside rear view mirror heater, |
|
|
|
|
Power window) |
|
|
|
|
|
|
22 |
RAD NO.3 |
10 |
Audio system |
|
|
|
|
|
|
23 |
H-LP LVL |
7.5 |
Adaptive front lighting system |
|
(AFS), Automatic headlight |
||||
|
|
|
leveling control system |
|
|
|
|
|
No. |
FUSE |
AMPERE |
CIRCUIT |
|
|
|
|
|
|
|
|
|
Charging system, Headlight |
|
|
|
|
cleaners, Exhaust gas sensor, |
|
|
|
|
Rear window defogger, Electric |
|
|
|
|
cooling fans, Rear left door |
|
24 |
LH-IG |
10 |
control system, Front left door |
|
control system, Emergency |
||||
|
|
|
||
|
|
|
flashers, Automatic |
|
|
|
|
transmission, Seat belt |
|
|
|
|
pretensioners, Intuitive parking |
|
|
|
|
assist |
|
|
|
|
|
|
25 |
FR WIP |
30 |
Windshield wipers and washer |
|
|
|
|
|
|
|
|
|
Steering switch illumination, |
|
|
|
|
Audio system, Glove box light, |
|
|
|
|
Automatic transmission selector |
|
|
|
|
lever illumination, Console box |
|
|
|
|
light, Adaptive variable |
|
|
|
|
suspension switch illumination, |
|
26 |
PANEL |
7.5 |
Cigarette lighter illumination, Air |
|
conditioning system, Traction |
||||
|
|
|
||
|
|
|
control off switch illumination, |
|
|
|
|
Driving pattern selector switch, |
|
|
|
|
Seat heater or Heated and |
|
|
|
|
ventilated seat switches, |
|
|
|
|
Register ILL RH, Register ILL |
|
|
|
|
LH, Register ILL CTR |
|
|
|
|
|
|
27 |
FUEL |
10 |
Fuel filler door opener, Trunk lid |
|
OPEN |
opener |
|||
|
|
|||
|
|
|
|
567

ELECTRICAL COMPONENTS
No. |
FUSE |
AMPERE |
CIRCUIT |
|
|
|
|
|
|
|
|
|
Vehicle stability control system, |
|
|
|
|
Electronic control brake system, |
|
|
|
|
Yaw rate and G sensor, |
|
|
|
|
Steering sensor, Cruise control |
|
|
|
|
system, Dynamic radar cruise |
|
28 |
ECU-IG LH |
10 |
control system, Electronic |
|
power steering system, Variable |
||||
|
|
|
||
|
|
|
gear ratio steering system, |
|
|
|
|
Rear view monitor system, |
|
|
|
|
Four-wheel drive system, Front |
|
|
|
|
controller, Moon roof, Rain |
|
|
|
|
sensor |
|
|
|
|
|
|
29 |
FR S/HTR |
15 |
Seat heater, Heated and |
|
LH |
ventilated seats |
|||
|
|
|||
|
|
|
|
|
30 |
FR P/SEAT |
30 |
Power seat system |
|
LH |
|
|||
|
|
|
||
|
|
|
|
|
31 |
A/C |
7.5 |
Air conditioning system |
|
|
|
|
|
|
32 |
TV |
7.5 |
Audio system, Air conditioning |
|
system, Rear view monitor |
||||
|
|
|
system |
|
|
|
|
|
|
33 |
TRK OPN |
10 |
Trunk lid opener |
|
|
|
|
|
|
34 |
LH-B |
10 |
Theft deterrent system |
|
|
|
|
|
|
35 |
S/ROOF |
25 |
Moon roof |
|
|
|
|
|
|
|
|
|
Variable gear ratio steering |
|
36 |
ECU-B |
10 |
system, Electronic power |
|
steering system, Driver's seat |
||||
|
|
|
||
|
|
|
switch module |
|
|
|
|
|
|
37 |
ABS |
10 |
Electronic control brake system |
|
MAIN3 |
|
|||
|
|
|
||
|
|
|
|
No. |
FUSE |
AMPERE |
CIRCUIT |
|
|
|
|
|
|
38 |
TURN-HAZ |
15 |
Turn signal lights, Emergency |
|
flashers |
||||
|
|
|
||
|
|
|
|
|
39 |
IG2 MAIN |
20 |
“IG2º, “GAUGEº and “IGNº |
|
|
|
|
|
|
40 |
RAD NO.2 |
30 |
Audio system |
|
|
|
|
|
|
41 |
D/C CUT |
20 |
“DOME “ and “MPX-Bº |
|
|
|
|
|
|
42 |
RAD NO.1 |
30 |
Audio system |
|
|
|
|
|
|
|
|
|
Multiplex communication |
|
|
|
|
system, Front controller, Door |
|
|
|
|
control system (Power door |
|
|
|
|
lock system, Door courtesy |
|
|
|
|
lights, Power windows, Power |
|
43 |
MPX-B |
10 |
rear view mirror control system, |
|
Outside rear view mirror |
||||
|
|
|
heaters), Power seat system, |
|
|
|
|
Steering sensors, Electronic |
|
|
|
|
control brake system, Power tilt |
|
|
|
|
and telescopic steering system, |
|
|
|
|
Gauges and meters, |
|
|
|
|
Combination switch |
|
|
|
|
|
|
|
|
|
Foot lights, Vanity lights, |
|
|
|
|
Gauges and meters, Steering |
|
44 |
DOME |
10 |
spot light, Steering switch |
|
illumination, Rear personal |
||||
|
|
|
lights, Automatic transmission |
|
|
|
|
selector lever spot light, Front |
|
|
|
|
personal lights |
|
|
|
|
|
|
45 |
ABS |
10 |
Electronic control brake system |
|
MAIN2 |
|
|||
|
|
|
||
|
|
|
|
|
46 |
ABS |
30 |
Anti-lock brake system |
|
MOTOR |
|
|||
|
|
|
||
|
|
|
|
568

ELECTRICAL COMPONENTS
No. |
FUSE |
AMPERE |
CIRCUIT |
|
|
|
|
|
|
47 |
ABS |
10 |
Capacitor |
|
MAIN1 |
|
|||
|
|
|
||
|
|
|
|
|
48 |
E/G-B |
60 |
“FR CTRL BATTº, “ETCSº and |
|
“ALT-Sº |
||||
|
|
|
||
|
|
|
|
|
49 |
ABS1 |
50 |
Vehicle stability control system, |
|
“ABS MAIN1º, “ABS MAIN2º |
||||
|
|
|
and “ABS MTRº |
|
|
|
|
|
|
50 |
RH J/B-B |
30 |
“AM2º, “DOOR FRº and “DOOR |
|
RRº |
||||
|
|
|
||
|
|
|
|
|
51 |
VGRS |
40 |
Variable gear ratio steering |
|
system |
||||
|
|
|
||
|
|
|
|
|
52 |
MAIN |
30 |
“H-LP R LWRº and “H-LP L |
|
LWRº |
||||
|
|
|
||
|
|
|
|
|
53 |
STARTER |
30 |
Starting system |
|
|
|
|
|
|
54 |
LH J/B-B |
30 |
“FL DOORº, “RL DOORº and |
|
“RAD No.3º |
||||
|
|
|
||
|
|
|
|
|
55 |
P/I-B |
60 |
Multi-port fuel injection |
|
system/sequential multiport fuel |
||||
|
|
|
injection system |
|
|
|
|
|
|
56 |
EPS |
80 |
Electronic power steering |
|
system |
||||
|
|
|
||
|
|
|
|
|
|
|
|
“RH J/B-AMº, “LH J/B-AMº, |
|
57 |
ALT |
150 |
“E/G-AMº, “RR JBº, “HEATERº, |
|
“DEFOGº, “FAN1º, “FAN2º, |
||||
|
|
|
“ABS2º, “ABS MOTORº, “ABS |
|
|
|
|
MAIN1º, and “ABS MAIN2º |
|
|
|
|
|
No. |
FUSE |
AMPERE |
CIRCUIT |
|
|
|
|
|
|
|
|
|
“STOP LP Rº, “STOP LP Lº, |
|
58 |
RR J/B |
80 |
“RR-Bº, “RR TAILº, “RR FOGº, |
|
“RR-IG1º, “PSBº, and “RR |
||||
|
|
|
||
|
|
|
S/SHADEº |
|
|
|
|
|
|
59 |
GLW PLG1 |
50 |
Glow plug heater |
|
|
|
|
|
|
|
|
|
“AM1º, “OBDº, “STOP SWº, “TI |
|
|
|
|
&TEº, “PWR OUTLETº, “FR |
|
60 |
RH J/B-AM |
80 |
P/SEAT RHº, “STR LOCKº, |
|
“ECU-IG RHº, “RH-IGº, “ACCº, |
||||
|
|
|
||
|
|
|
“CIGº, “SECURITYº, “FR |
|
|
|
|
S/HTR RHº, and “AIR SUSº |
|
|
|
|
|
|
61 |
ABS2 |
30 |
Vehicle stability control system, |
|
Anti-lock brake system |
||||
|
|
|
||
|
|
|
|
|
62 |
DEFOG |
50 |
Rear window defogger, Noise |
|
filter |
||||
|
|
|
||
|
|
|
|
|
63 |
FAN1 |
40 |
Electric cooling fans |
|
|
|
|
|
|
64 |
HEATER |
50 |
Air conditioning system |
|
|
|
|
|
|
65 |
GLW PLG2 |
50 |
Glow plug heater |
|
|
|
|
|
|
66 |
E/G-AM |
60 |
“H-LMP CLNº, “FR CTRL-AMº |
|
and “A/C COMPº |
||||
|
|
|
||
|
|
|
|
|
|
|
|
“S/ROOFº, “FR P/SEAT LHº, |
|
67 |
LH J/ |
80 |
“TVº, “FR S/HTR LHº, “ECU-IG |
|
LHº, “FR WIPº, “H-LP LVLº, |
||||
B-AM |
||||
|
|
“LH-IGº, “FUEL OPENº, “A/Cº, |
||
|
|
|
||
|
|
|
“PANELº, and “LH-Bº |
|
|
|
|
|
|
68 |
FAN2 |
60 |
No circuit |
|
|
|
|
|
|
69 |
FR |
25 |
“H-LP UPRº and “HORNº |
|
CTRL-B |
|
|||
|
|
|
||
|
|
|
|
569

ELECTRICAL COMPONENTS
No. |
FUSE |
AMPERE |
CIRCUIT |
|
|
|
|
|
|
70 |
A/F |
15 |
Multi-port fuel injection |
|
system/sequential multiport fuel |
||||
|
|
|
injection system |
|
|
|
|
|
|
71 |
ETCS |
10 |
Multi-port fuel injection |
|
system/sequential multiport fuel |
||||
|
|
|
injection system |
|
|
|
|
|
|
72 |
ALT-S |
7.5 |
Charging system |
|
|
|
|
|
|
73 |
EM VLV |
10 |
No circuit |
|
|
|
|
|
|
74 |
H-LP CLN |
30 |
Headlight cleaner system |
|
|
|
|
|
|
75 |
A/C COMP |
7.5 |
Air conditioning system |
|
|
|
|
|
|
76 |
DEICER |
25 |
No circuit |
|
|
|
|
|
|
77 |
FR |
30 |
“FR TAILº, “FR FOGº and |
|
CTRL-AM |
“WASHERº |
|||
|
|
|||
|
|
|
|
|
78 |
IG2 |
10 |
Starting system |
|
|
|
|
|
|
|
|
|
Multi-port fuel injection |
|
79 |
EFI NO.2 |
10 |
system/sequential multiport fuel |
|
injection system, Evaporative |
||||
|
|
|
||
|
|
|
system |
|
|
|
|
|
|
80 |
H-LP R |
15 |
Right-hand headlight (low |
|
LWR |
beam) |
|||
|
|
|||
|
|
|
|
|
81 |
H-LP L |
15 |
Left-hand headlight (low beam) |
|
LWR |
|
|||
|
|
|
||
|
|
|
|
|
82 |
F/PMP |
25 |
Fuel pump |
|
|
|
|
|
No. |
FUSE |
AMPERE |
CIRCUIT |
|
|
|
|
|
|
|
|
GS430: |
Multi-port fuel injection |
|
83 |
EFI |
25 |
system/sequential multiport fuel |
|
GS300: |
injection system |
|||
|
|
|
||
|
|
25 |
|
|
|
|
|
|
|
84 |
INJ |
20 |
Multi-port fuel injection |
|
system/sequential multiport fuel |
||||
|
|
|
injection system |
|
|
|
|
|
|
85 |
H-LP UPR |
15 |
Headlights (high beam) |
|
|
|
|
|
|
86 |
HORN |
10 |
Horn |
|
|
|
|
|
|
87 |
WASHER |
20 |
Windshield wipers and washer |
|
|
|
|
|
|
88 |
FR TAIL |
10 |
Parking lights, Side marker |
|
lights |
||||
|
|
|
||
|
|
|
|
|
89 |
FR FOG |
15 |
Front fog lights |
|
|
|
|
|
|
90 |
RR |
7.5 |
Rear electric sunshade |
|
S/SHADE |
|
|||
|
|
|
||
|
|
|
|
|
91 |
PSB |
30 |
Pre-collision system |
|
|
|
|
|
|
92 |
RR-IG2 |
10 |
No circuit |
|
|
|
|
|
|
93 |
RR-IG1 |
10 |
Pre-collision system, Rear |
|
electric sunshade, Seat belt |
||||
|
|
|
pretensioners |
|
|
|
|
|
|
94 |
RR-B |
10 |
Luggage compartment light, |
|
Noise filter |
||||
|
|
|
||
|
|
|
|
|
95 |
RR FOG |
7.5 |
Rear fog lights |
|
|
|
|
|
|
96 |
STOP LP L |
10 |
Stoplights, Back up lights |
|
|
|
|
|
570

ELECTRICAL COMPONENTS
No. |
FUSE |
AMPERE |
CIRCUIT |
|
|
|
|
|
|
97 |
STOP LP R |
10 |
High mounted stoplights |
|
|
|
|
|
|
98 |
RR TAIL |
10 |
License plate lights, Tail lights, |
|
Rear side marker lights |
||||
|
|
|
||
|
|
|
|
CHECKING BATTERY CONDITION
Precautions
CAUTION
BATTERY PRECAUTIONS
The battery produces flammable and explosive hydrogen gas.
Do not cause a spark by contacting the battery terminals with tools.
Do not smoke or light a match near the battery.
The electrolyte contains poisonous and corrosive sulfuric acid.
Avoid contact with eyes, skin or clothes.
Never inhale or swallow electrolyte.
Wear protective safety glasses when working near the battery.
Keep children away from the battery.
EMERGENCY MEASURES
If electrolyte gets in your eyes, flush your eyes with clean water for at least 15 minutes and get immediate medical attention. If possible, continue to apply water with a sponge or cloth while traveling to the medical office.
571
ELECTRICAL COMPONENTS
If electrolyte gets on your skin, thoroughly wash the contacted area. If you feel a pain or burn, get medical attention immediately.
If electrolyte gets on your clothes, there is a possibility of its soaking through to your skin, so immediately take off the exposed clothing and follow the procedure above, if necessary.
If you accidentally swallow electrolyte, drink a large quantity of water or milk. Follow with milk of magnesia, beaten raw egg or vegetable oil. Then go immediately for emergency help.
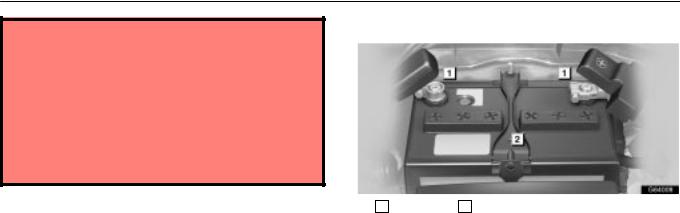
Checking battery exterior
1 Terminals 2 Hold-down clamp
Check the battery for corroded or loose connections, cracks, or loose hold-down clamps.
1.If the battery is corroded, wash it off with a solution of warm water and baking soda. Coat the terminals with grease to prevent further corrosion.
2.If the connections are loose, tighten the clamp bolts - but do not overtighten.
3.Tighten the holddown clamp only enough to keep the battery firmly in place. Overtightening may damage the battery case.
572
ELECTRICAL COMPONENTS
NOTICE
Make sure the engine and all accessories are turned off before performing maintenance.
When checking the battery, remove the ground cable first and reinstall it last.
Be careful not to cause a short circuit with tools.
Take care no solution gets into the battery when washing it.
If the battery is disconnected or run down
The following functions may not operate correctly when you reconnect or replace the battery. In these cases, you should normalize each system referring to the following pages.
Power windows (See page 59.)
Moon roof (See page 134.)
Variable gear ratio steering system (See page 424.)
Intuitive parking assist (See page 380.)
Checking battery condition
Checking by indicator
Check the battery condition by the indicator color.
1BLUE - Good condition.
2WHITE - Charging necessary. Have the battery checked by your Lexus dealer.
3RED - Have the battery checked by your Lexus dealer.
NOTICE
Do not refill the battery with water.
573
ELECTRICAL COMPONENTS
BATTERY RECHARGING
PRECAUTIONS
During recharging, the battery is producing hydrogen gas.
Therefore, before recharging:
1.If recharging with the battery installed on the vehicle, be sure to disconnect the ground cable.
2.Make sure the power switch on the recharger is off when connecting the charger cables to the battery and when disconnecting them.
CAUTION
Always charge the battery in an unconfined area. Do not charge the battery in a garage or closed room where there is not sufficient ventilation.
Only do a slow charge (5 A or less). Charging at a quicker rate is dangerous. The battery may explode causing personal injuries.
NOTICE
Never recharge the battery while the engine is running. Also, be sure all accessories are turned off.
CHECKING AND REPLACING THE
BLADE TYPE FUSES
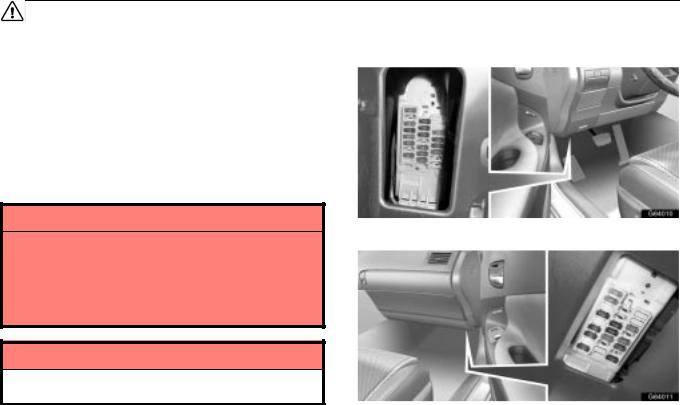
Left side kick panel
Right side kick panel
574
ELECTRICAL COMPONENTS
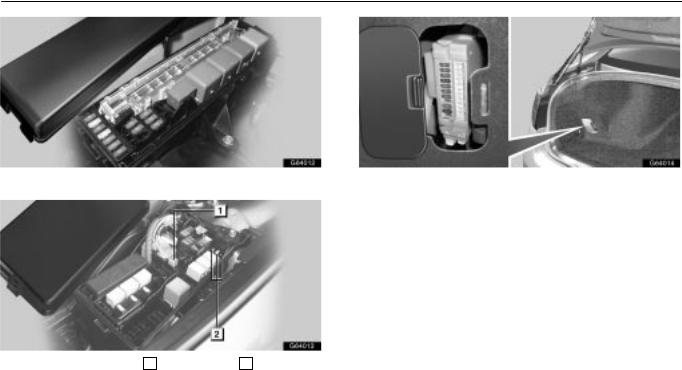
Engine compartment |
Trunk |
|
|
|
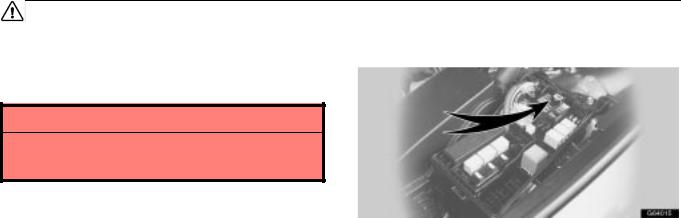
1. Turn the engine switch off and open the fuse box lid. |
|
|
Determine which fuse may be causing the problem. The lid of |
|
|
the fuse box shows the name of the circuit for each fuse. |
|
|
|
|
|
|
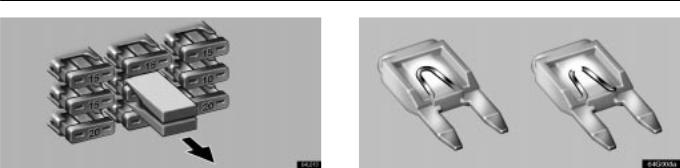
Engine compartment 1 Pull-out tool 2 Spare fuses
575
ELECTRICAL COMPONENTS
2. Make sure the inoperative component is turned off. Pull the suspected fuse straight out with the pull-out tool and check it. If it has blown, push a new fuse into the clips.
Good |
Blown |
a.Look carefully at the fuse. If the thin wire is broken, the fuse has blown. If you are not sure or if it is too dark to see, try replacing the suspected fuse with one of the same value that you know is good.
b.Install only a fuse with the amperage rating designated on the fuse box lid.
If you do not have a spare fuse, in an emergency you can pull out the ºCIGº, ºRAD NO.1º or ºOBDº fuse, which may be dispensable for normal driving, and use it if its amperage rating is the same.
If you cannot use one of the same amperage, use one lower than, but as close to the amperage as possible. If the amperage is lower than that specified, the fuse might blow out again but this does not indicate anything wrong. Be sure to get the correct fuse as soon as possible and return the substitute to its original clips.
576
ELECTRICAL COMPONENTS
It is a good idea to purchase a set of spare fuses and keep them in your vehicle for emergencies.
If the new fuse immediately blows out, there is a problem with the electrical system. Have your Lexus dealer correct it as soon as possible.
CAUTION
Never use a fuse with a higher amperage rating, or any other object, in place of a fuse. This may cause extensive damage and possibly a fire.
CHECKING THE CARTRIDGE TYPE
FUSES
Engine compartment
577
ELECTRICAL COMPONENTS
NOTICE
Before replacing the fuses, have the cause of electrical overload determined and repaired by your Lexus dealer.
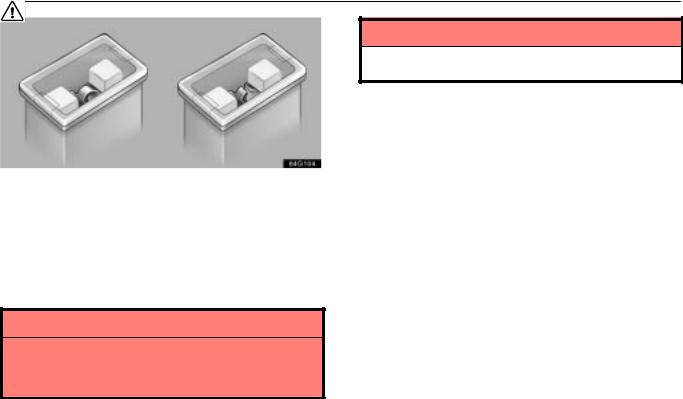
Good |
Blown |
If the headlights or other electrical components do not work and the blade type fuses are O.K., check the cartridge type fuses. If any of the cartridge type fuses are blown, they must be replaced.
If there is an overload in the circuits from the battery, the fuses are designed to blow before the entire wiring harness is damaged.
CAUTION
Always use a genuine Lexus fuse or equivalent for replacement. Never install an ordinary wire - even for a temporary fix. This may cause extensive damage and possibly a fire.
578
ELECTRICAL COMPONENTS
ADDING WASHER FLUID |
CHECKING THE HEADLIGHT AIM |
||
|
|
|
|
|
|
|
|
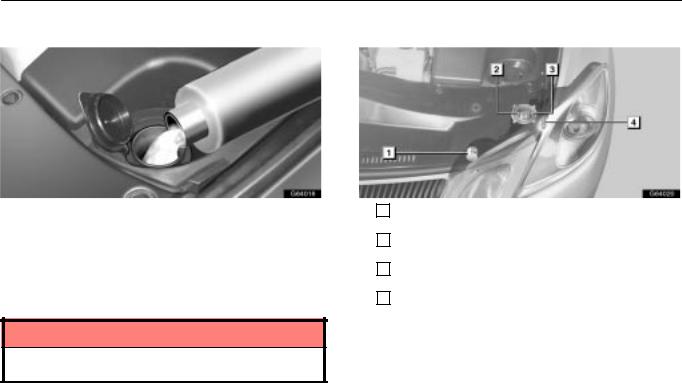
If the washer tank becomes nearly empty, add washer fluid.
You may use plain water as washer fluid. However, in cold areas where temperatures range below the freezing point, use washer fluid containing antifreeze. This product is available at your Lexus dealer and most auto parts stores. Follow the manufacturer's directions for how much to mix with water.
NOTICE
Do not use engine antifreeze or any other substitute because it may damage your vehicle's paint.
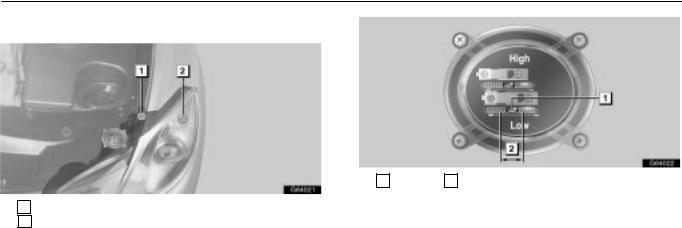
1 |
Beam angle gauge |
|
(horizontal movement for high beam) |
2 |
Beam angle gauge |
|
(vertical movement for high beam) |
3 |
Beam angle gauge |
|
(vertical movement for low beam) |
4 |
Beam angle gauge |
|
(horizontal movement for low beam) |
Before checking the headlight aim:
1.Be sure that the body around the headlight is not deformed.
2.Park the vehicle on a level spot.
3.The driver gets into the driver's seat and puts the vehicle in a state readying for a driving (with a full tank).
4.Bounce the vehicle several times.
579
ELECTRICAL COMPONENTS
Adjusting the headlight aiming (low beam)
1 Adjusting bolt A
2 Adjusting bolt B
1 Bubble 2 Acceptable range
Vertical movement gauge: The bubble of the gauge should not deviate from the center of the gauge by more than 2 marks to either side of the gauge.
If the bubble is out of the acceptable range of the beam angle gauge, adjust it using bolt A and B.
580
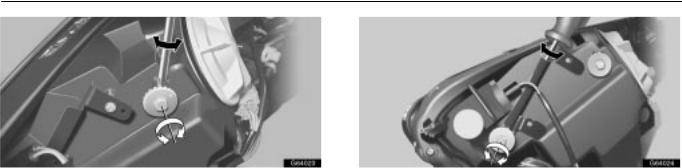
ELECTRICAL COMPONENTS
1. Turn the bolt A in either direction using a Phillips-head screwdriver. At this time, keep the turning direction and number of turns in mind.
2. Turn the bolt B the same number of turns and in the same direction as step 1 using a Phillips-head screwdriver.
If you do not know or cannot find the original position, or if you feel that there is a large deviation, take the vehicle to your Lexus dealer to adjust the headlight aim.
After adjusting the headlight in the vertical direction, check that the light has been shifted from the adjusted position in the horizontal direction.
581
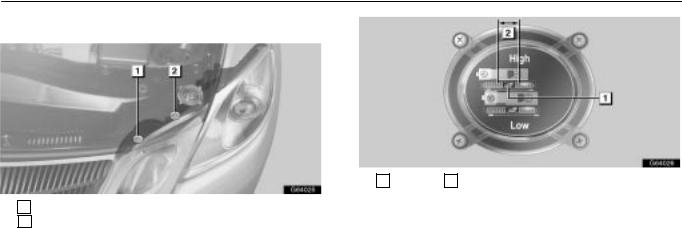
ELECTRICAL COMPONENTS
Adjusting the headlight aiming (high beam)
1 Adjusting bolt A
2 Adjusting bolt B
1 Bubble 2 Acceptable range
Vertical movement gauge: The bubble of the gauge should not deviate from the center of the gauge by more than 2 marks to either side of the gauge.
If the bubble is out of the acceptable range of the beam angle gauge, adjust it using bolt A.
582
 Loading...