


Lexus GS300 1996, GS350 1996, GS400 1996, GS430 1996, GS450H 1996 Owner Manual
...SECTION |
2 |
AIR CONDITIONING AND AUDIO |
|
Automatic air conditioning controls |
84 |
Audio system |
90 |
83
AIR CONDITIONING AND AUDIO
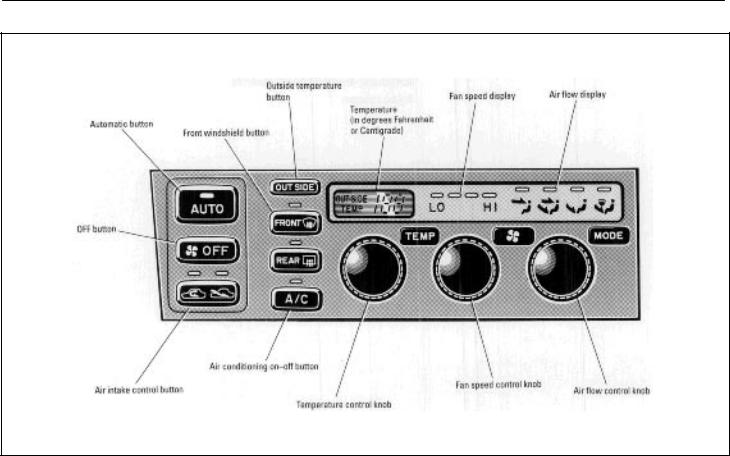
AUTOMATIC AIR CONDITIONING CONTROLS
84

AIR CONDITIONING AND AUDIO
85
AIR CONDITIONING AND AUDIO
The automatic air conditioning automatically maintains the |
2. Turn the ªTEMPº knob until the desired temperature |
|||
set temperature. |
|
is displayed. |
||
This air conditioning features automatic fan speed and air |
The ªTEMPº knob is used to set the desired passenger |
|||
flow control which automatically selects the most suitable |
compartment temperature. The temperature of air delivered |
|||
fan speed and air flow to control the temperature. The |
to the passenger compartment will be controlled |
|||
ignition key must be in the ªONº position. |
automatically according to the setting. The figures on the |
|||
You may use manual control to override the automatic |
panel indicate degrees Fahrenheit or Centigrade. |
|||
settings. |
|
SETTING OPERATION ± manual control |
||
(a) |
Climate control |
If manual air flow selection is desired ± |
||
SETTING OPERATION ± automatic control |
The outlets from which air is delivered can be selected |
|||
1. |
Press in the |
(AUTO) button. |
manually by turning the air flow control knob. The mode |
|
appears on the display. The function of each button is as |
||||
Air flow quantity, switching of the diffusers, on±off of the air |
||||
follows: |
||||
conditioning, and switching of the air intake between |
||||
PANEL mode ± Directs air flow at face level. |
||||
RECIRCULATED AIR and OUTSIDE AIR are automatically |
||||
adjusted. The operation status is shown by each indicator. |
BI±LEVEL mode ± Directs air flow at face level and at |
|||
When one of the manual control buttons or knobs is operated |
||||
floor level for both front and rear. Except in ventilation, the |
||||
in automatic mode, the operation corresponding to that |
air to the floor is slightly warmer than air to the face. |
|||
button or knob is |
set. Other conditions continue to be |
|
||
adjusted automatically. |
FLOOR mode ± Directs air flow mostly at floor level for |
|
both front and rear. |
||
|
||
|
FLOOR/WINDSHIELD mode ± Directs air flow to the |
|
|
windshield and front side windows as well as floor level for |
|
|
both front and rear. |
|
|
FRONT WINDSHIELD mode ± Directs air flow mostly |
|
|
to the windshield and front side windows. |
86

|
|
|
|
|
AIR CONDITIONING AND AUDIO |
|
|
When this mode is selected while operating in automatic |
If manual fan speed control is desired ± |
||||
|
mode, the air conditioning is set to operate and the |
The fan speed can be set to your desired speed by turning |
||||
|
OUTSIDE AIR mode is set. |
the fan speed control knob. The higher the fan speed is, the |
||||
|
If you push the ªFRONT WINDSHIELDº button once again |
more air is delivered. Pushing in the ªOFFº button turns off |
||||
|
while in the FRONT WINDSHIELD mode, the mode then |
the fan. |
|
|
||
|
returns to the last mode used. |
To remove exterior windshield frost, use the high speed |
||||
|
|
|
|
setting. |
|
|
|
|
CAUTION |
|
|
|
|
|
! |
|
Stopping the fan ± |
|||
|
Do not use the FRONT WINDSHIELD button during |
|
Push in the |
(OFF) button. |
||
|
|
The fan stops in automatic mode or manual mode. |
||||
|
cooled air operation in extremely humid weather. |
|
||||
|
|
If manual switching of air intake is desired ± |
||||
|
The difference between the temperature of the |
|
||||
|
outside air and that of the windshield could cause |
|
(AIR INTAKE) button is used to switch the air intake |
|||
|
the outer surface |
of the windshield to fog up |
|
|||
|
|
between the OUTSIDE AIR mode and RECIRCULATED |
||||
|
blocking your vision. |
|
||||
|
|
AIR mode. |
|
|
||
|
|
|
|
|
|
|
|
|
|
|
With the button in the OUTSIDE AIR mode, the OUTSIDE |
||
|
|
|
|
AIR mode indicator light will come on and the system will |
||
|
|
|
|
take fresh outside air into the vehicle. |
||
|
|
|
|
If quick circulation of cooled air is desired, press in the air |
||
|
|
|
|
intake control button for RECIRCULATED AIR. The |
||
|
|
|
|
RECIRCULATED AIR mode indicator light will come on. |
||
|
|
|
|
For normal use, it is best to keep the air intake control button |
||
|
|
|
|
set to OUTSIDE AIR mode. If recirculated air is used during |
||
|
|
|
|
heating, the windows will fog up more easily. |
||
87

AIR CONDITIONING AND AUDIO
If manual on±off of the air conditioning is desired ± |
(b) |
Windshield defogging and defrosting |
|||||||||
Push the |
A/C |
(A/C) button to turn the air conditioning on |
See ª(a) Climate controlº for details on each button. |
||||||||
|
|
||||||||||
and push it again to turn the air conditioning off. |
To remove interior fog on the windshield ± |
||||||||||
The air conditioning does not work if the outside temperature |
Push the |
(WINDSHIELD) button. |
|||||||||
is lowered down to around 0°C (32°F). |
|||||||||||
To remove frost or exterior fog on the windshield ± |
|||||||||||
If the system is used for ventilation, heating in dry weather |
|||||||||||
1. |
Place the temperature control knob at the maximum |
||||||||||
or removing frost or exterior fog on the windshield, turn the |
|||||||||||
air conditioning off once it is no longer required. This will |
temperature. |
|
|||||||||
improve fuel economy. The air conditioning can be used for |
2. |
Push the |
(WINDSHIELD) button. |
||||||||
year±round automatic temperature control including cooling |
|||||||||||
3. Turn the fan speed control knob to set the fan speed at |
|||||||||||
and dehumidifying operation. |
|||||||||||
the maximum speed. |
|||||||||||
If the air conditioning compressor does not operate, the |
|||||||||||
|
|
|
|||||||||
|
(A/C) button will blink. If the |
|
(A/C) button blinks |
|
|
|
|||||
A/C |
A/C |
|
|
|
|||||||
|
|
|
|
|
|||||||
even when the |
|
|
(A/C) button is pushed again, have the |
|
|
|
|||||
|
A/C |
|
|
|
|||||||
|
|
|
|
|
|||||||
compressor checked by your nearest Lexus dealer.
Displaying the outside temperature ±
When you push the OUTSIDE (OUTSIDE) button, the temperature display shows the outside temperature for about 5 seconds, then returns to the current set temperature or turns off. The temperature display ranges from ±30°C (±22°F) up to 50°C (122°F).
88
AIR CONDITIONING AND AUDIO
(c) Operating tips |
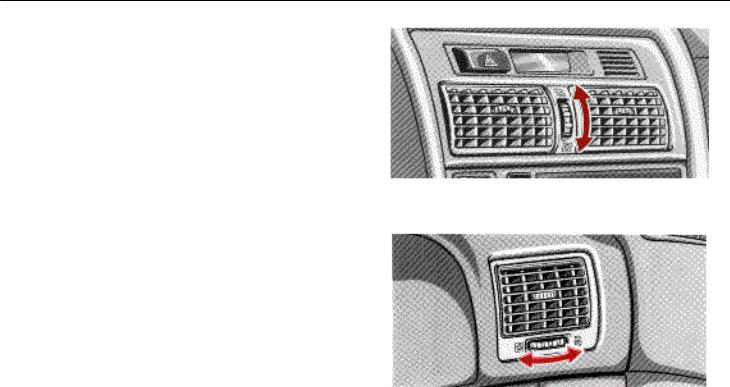
Center vents |
Make sure the air inlet grilles in front of the windshield are not blocked by leaves or other obstructions.
If air flow control is not satisfactory, check the dashboard vents. (See ªCenter vents,º ªSide vents,º ªLower ventº and ªRear vents.º)
To help cool down the interior after parking in the hot sun, drive for the first few minutes with the windows open. After the excess heat has blown away, close the windows.
When driving on dusty roads, close all windows. If dust thrown up by the vehicle is still drawn into the vehicle after closing the windows, it is recommended that the air intake control button be left to the OUTSIDE AIR mode and the fan speed control button be pressed to anywhere except the ªOFFº button.
If following another vehicle on a dusty road, or driving in windy and dusty conditions, it is recommended that the air intake control button be temporarily pressed in to the RECIRCULATED AIR mode, which will close off the outside passage and prevent outside air and dust from entering the vehicle interior.
The center vents may be opened or closed as shown.
Side vents
The side vents may be opened or closed as shown.
89
AIR CONDITIONING AND AUDIO
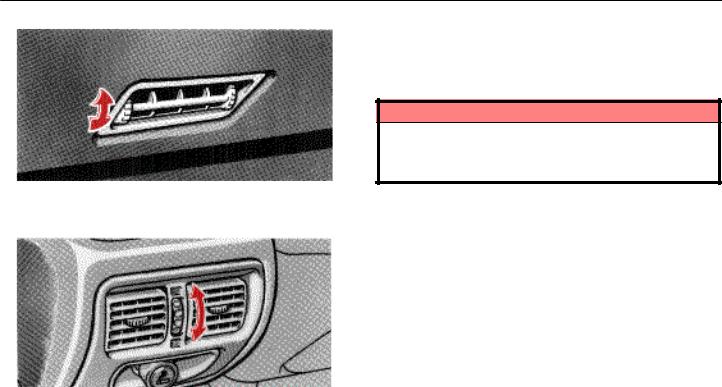
Lower vent
The lower vent may be opened or closed as shown.
Rear vents
AUDIO SYSTEM
Car audio operating tips
You can listen to the car audio when the ignition key is at ªONº or ªACC.º However, if the engine is not running, the key must be in the ªACCº position.
NOTICE
To prevent the battery from being discharged, do not leave the car audio on longer than necessary when the engine is not running.
Audio operation is described in detail on the following pages:
Radio operation ± See page 91.
Cassette tape player operation ± See page 95.
Compact disc player operation ± See page 99.
Anti±theft system ± See page 105.
The rear vents may be opened or closed as shown.
90

SECTION |
6 ± 1 |
SERVICE PROCEDURES AND |
|
SPECIFICATIONS |
|
Introduction |
|
Vehicle identification |
160 |
Engine compartment overview |
161 |
Do±it±yourself service precautions |
162 |
Parts and tools |
163 |
159
INTRODUCTION
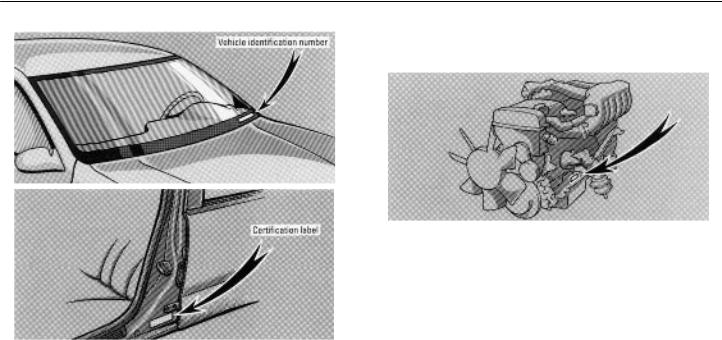
VEHICLE IDENTIFICATION |
The vehicle identification number (VIN) is also on the |
|
Certification Label. |
|
This is the primary identification number for your Lexus. It is |
|
used in registering the ownership of your vehicle. |
The engine number is stamped on the engine block as shown.
The vehicle identification number (VIN) is the legal identifier for your vehicle. This number is on the left top of the instrument panel and can be seen through the windshield from outside.
160
INTRODUCTION
ENGINE COMPARTMENT OVERVIEW
161
INTRODUCTION
DO±IT±YOURSELF SERVICE
PRECAUTIONS
If you perform maintenance yourself, be sure to follow the correct procedure given in this Section.
You should be aware that improper or incomplete servicing may result in operating problems.
Performing do±it±yourself maintenance during the warranty period may affect your warranty coverage. Read the separate Lexus Warranty statement for details and suggestions.
This Section gives instructions only for those items that are relatively easy for an owner to perform. As explained in Section 5, there are still a number of items that must be performed by a qualified technician with special tools.
For information on tools and parts for do±it±yourself maintenance, see ªParts and tools.º
Utmost care should be taken when working on your vehicle to prevent accidental injury. Here are a few precautions that you should be especially careful to observe:
!CAUTION
When the engine is running, keep hands, clothing, and tools away from the moving fan and engine drive belt. (Removing rings, watches, and ties is advisable.)
Right after driving, the engine compartment ± the engine, radiator, exhaust manifold and power steering fluid reservoir, etc. ± will be hot. So be careful not to touch them. Oil and other fluids may also be hot.
Do not smoke, cause sparks or allow open flames around fuel or the battery. Their fumes are flammable.
Be extremely cautious when working on the battery. It contains poisonous and corrosive sulfuric acid.
Do not get under your vehicle with just the body jack supporting it. Always use automotive jack stands or other solid supports.
Be sure the ignition is off if you work near the electric cooling fan or radiator grille. With the ignition on, the electric cooling fan may automatically start to run if the air conditioning is on and/or if the coolant temperature is high.
Use eye protection whenever you work on or under your vehicle where you may be exposed to flying or falling material, fluid spray, etc.
NOTICE
Remember that battery and ignition cables carry high currents or voltages. Be careful of accidentally causing a short circuit.
162

INTRODUCTION
Before closing the engine hood, check to see that you have not forgotten any tools, rags, etc.
Do not drive with the air cleaner removed, or excessive engine wear could result. Also backfiring could cause a fire in the engine compartment.
Do not overfill automatic transmission fluid, or the transmission could be damaged.
Be careful not to scratch the glass surface with the wiper frame.
PARTS AND TOOLS
Here is a list of parts and tools you will need to perform do±it±yourself maintenance. Remember all Lexus parts are designed in metric sizes, so your tools must be metric.
Checking the engine oil level
Parts (if level is low):
API SH, Energy±Conserving II multigrade engine oil or ILSAC multigrade engine oil. For recommended oil viscosity, see page 172.
Tools:
Rag or paper towel
Funnel (only for adding oil)
Checking the engine coolant level
Parts (if level is low):
Ethylene±glycol coolant
Demineralized or distilled water
Tools:
Funnel (only for adding coolant)
Checking brake fluid
Parts (if level is low):
FMVSS No. 116 DOT 3 or SAE J1703 brake fluid
Tools:
Funnel (only for adding fluid)
Checking power steering fluid
Parts (if level is low):
Automatic transmission fluid DEXRON ±II or III
Tools:
Rag or paper towel
Funnel (only for adding fluid)
163

INTRODUCTION
Checking battery condition
Non±maintenance batteries
Tools:
Warm water
Baking soda
Grease
Conventional wrench (for terminal clamp bolts)
Maintenance type batteries
Parts (if level is low):
Distilled water
Tools:
Warm water
Baking soda
Grease
Conventional wrench (for terminal clamp bolts)
Coin (for vent plugs)
Funnel (only for adding distilled water)
Checking and replacing the blade type fuses
Parts (if replacement is necessary):
Fuse with same amperage rating as original
Checking the cartridge type fuses
Parts (if replacement is necessary):
Genuine Lexus fuse or equivalent with same amperage rating as original
Adding washer fluid
Parts:
Water
Washer fluid containing antifreeze (for winter use)
Tools:
Funnel
164

SECTION |
5 |
MAINTENANCE |
|
Maintenance requirements |
154 |
General maintenance |
155 |
Does your vehicle need repairing? |
158 |
For scheduled maintenance information, please refer to the separate ªOwner's Manual Supplement/ Maintenance Scheduleº.
153

MAINTENANCE REQUIREMENTS |
For details of your maintenance schedule, read the separate |
|||
Your Lexus vehicle has been designed to have fewer |
ªOwner's Manual Supplement/Maintenance Schedule.º |
|||
It is recommended that any replacement parts used for |
||||
maintenance requirements with longer service intervals to |
||||
maintenance or for the repair of the emission control |
||||
save both your time and money. However, each regular |
||||
system be Lexus supplied. |
|
|||
maintenance as well as day±to±day care is more important |
|
|||
The owner may elect to use non±Lexus supplied parts |
||||
than ever before to ensure smooth, trouble±free, safe, and |
||||
economical driving. |
for replacement purposes without invalidating the |
|||
It is the owner's responsibility to make sure the specified |
emission control system warranty. However, use of |
|||
replacement parts which are not of equivalent quality |
||||
maintenance, including general maintenance services, is |
||||
may impair the effectiveness of the emission control |
||||
performed. Note that both the new vehicle and emission |
||||
systems. |
|
|
||
control system warranties specify that proper maintenance |
|
|
||
and care must be performed. See the Owner's Guide, |
You may also elect to have maintenance, replacement, |
|||
Owner's Manual Supplement or Warranty Booklet for |
or repair of the emission control devices and system |
|||
complete warranty information. |
performed by any automotive repair establishment or |
|||
General maintenance |
individual without invalidating this warranty. See |
|||
General maintenance items are those day±to±day care |
Owner's |
Guide, Owner's Manual |
Supplement or |
|
Warranty Booklet for complete warranty information. |
||||
practices that are important to your vehicle for proper |
||||
Where to go for service? |
|
|||
operation. It is the owner's responsibility to ensure that the |
|
|||
general maintenance items are performed regularly. |
Lexus technicians are well±trained specialists and are kept |
|||
These checks or inspections can be done either by yourself |
up to date with the latest service information through |
|||
or your Lexus dealer. |
technical bulletins, service tips, and in±dealership training |
|||
Scheduled maintenance |
programs. They are well informed about the operation of all |
|||
the systems on your vehicle. |
|
|||
The scheduled maintenance items listed in the ªOwner's |
|
|||
You can |
be confident that your Lexus |
dealer's service |
||
Manual Supplement/Maintenance Scheduleº are those |
||||
|
|
|
||
MAINTENANCE |
department performs the best job to meet the maintenance |
|
|
required to be serviced at regular intervals. |
requirements of your vehicle. |
|
154

MAINTENANCE
Your copy of the repair order is proof that all required maintenance has been performed for warranty coverage. And if any problems should arise with your vehicle while under warranty, your Lexus dealer will promptly take care of it. Again, be sure to keep a copy of the repair order for any service performed on your Lexus.
What about do±it±yourself maintenance?
Many of the maintenance items are easy to do yourself, if you have a little mechanical ability and a few basic automotive tools. Simple instructions for how to perform them are presented in Section 6.
If you are a skilled do±it±yourself mechanic, the Lexus service manuals are recommended. Please be aware that do±it±yourself maintenance can affect your warranty coverage. See your Owner's Guide, Owner's Manual Supplement or Warranty Booklet for the details.
GENERAL MAINTENANCE
Listed below are the general maintenance items that should be performed at the intervals specified. It is recommended that any problem you notice be brought to the attention of your Lexus dealer or qualified service shop for their advice.
!CAUTION
Make these checks only where adequate ventilation can be obtained if you run the engine.
Vehicle exterior
Items listed below should be performed from time to time, unless otherwise specified.
Tire pressure
Check the pressure with a gauge every two weeks, or at least once a month and adjust as shown on the tire pressure label. See page 180 for additional information.
Tire surface
Check the tires carefully for cuts, damage or excessive wear. See page 181 for additional information.
Wheel nuts
When checking the tires, make sure to check the nuts for looseness. Tighten them if necessary.
Tire rotation
Rotate the tires every 12000 km (7500 miles). See page 181 for additional information.
155

MAINTENANCE
Fluid leaks |
Seats |
Check underneath for leaking fuel, oil, water or other fluid after the vehicle has been parked for a while. If you smell fuel fumes or notice any leak, have the cause found and corrected immediately.
Doors and engine hood
Check that all doors, including trunk lid, operate smoothly and all latches lock securely. Make sure the engine hood secondary latch secures the hood when the primary latch is released.
Vehicle interior
Items listed below should be checked regularly, e.g. while performing periodic services, cleaning the vehicle, etc.
Lights
Make sure the headlight, stop lights, tail lights, turn signal lights, and other lights are working. Check headlight aim.
Service reminder indicators and warning buzzers
Check that all service reminder indicators and warning buzzers function properly.
Steering wheel
Check that it has the specified freeplay. Be alert for changes in steering condition, such as hard steering, excessive freeplay or strange noise.
Check that all front seat controls such as seat adjusters, seatback recliner, etc. operate smoothly and that all latches lock securely in any position. Check that the head restraints move up and down smoothly and that the locks hold securely in any latched position.
Seat belts
Check that the seat belt system such as buckles, retractors and anchors operate properly and smoothly. Make sure the belt webbing is not cut, frayed, worn or damaged.
Accelerator pedal
Check the pedal for smooth operation and uneven pedal effort or catching.
Brake pedal
Check the pedal for smooth operation and the proper clearance and freeplay. Check the brake booster function.
Brakes
At a safe place, check that the brakes do not pull to one side when applied.
Parking brake
Check that the lever has the proper travel and that, on a safe incline, your vehicle is held securely with only the parking brake applied.
156

MAINTENANCE
Automatic transmission ªParkº mechanism |
Engine oil level |
Check the lock release button of the selector lever for proper and smooth operation. On a safe incline, check that your vehicle is held securely with the selector lever in ªPº position and all brakes released.
Engine compartment
Items listed below should be checked from time to time, e.g. each time when refueling.
Washer fluid
Make sure there is sufficient fluid in the tank. See page 199 for additional information.
Engine coolant level
Make sure the coolant level is between the Upper and Lower lines on the see±through reservoir when the engine is cool. See page 173 for additional information.
Battery
Check the level on the dipstick with the engine turned off and the vehicle parked on a level spot. See page 171 for additional information.
Power steering fluid level
Check the level on the dipstick. The level should be in the ªHOTº orªCOLDº range depending on the fluid temperature. See page 179 for additional information.
Exhaust system
Look for cracks, holes and loose supports. If you notice any change in the sound of the exhaust or smell exhaust fumes, have the cause located and corrected immediately. (See engine exhaust cautions in Section 3±1.)
Your Lexus has a maintenance free battery. You do not have to add distilled water. For longer life of the battery, however, see page 192 for additional information.
Brake fluid level
Make sure the brake fluid level is correct. See page 178 for additional information.
157

MAINTENANCE
DOES YOUR VEHICLE NEED
REPAIRING?
Be on the alert for changes in performances and sounds, and visual tip±offs that indicate service is needed. Some important clues are:
Engine missing, stumbling, or pinging
Appreciable loss of power
Strange engine noises
A fluid leak under the vehicle (however, water dripping from the air conditioning after use is normal.)
Change in exhaust sound (This may indicate a dangerous carbon monoxide leak. Drive with the windows open and have the exhaust system checked immediately.)
Flat±looking tires, excessive tire squeal when cornering, uneven tire wear
Vehicle pulls to one side when driving straight on a level road
Strange noises related to suspension movement
Loss of brake effectiveness, spongy feeling brake pedal, pedal almost touches floors, vehicle pulls to one side when braking
Engine coolant temperature continually higher than normal If you notice any of these clues, take your vehicle to your Lexus dealer as soon as possible. It probably needs adjustment or repair.
!CAUTION
Do not continue driving with the vehicle unchecked. It could result in serious vehicle damage and possibly personal injury.
158
SECTION |
3 ± 2 |
STARTING AND DRIVING |
|
Driving tips |
|
Break±in period |
130 |
Operation in foreign countries |
130 |
Tips for driving in various conditions |
130 |
Winter driving tips |
131 |
Trailer towing |
132 |
How to save fuel and make your vehicle |
|
last longer |
133 |
129

DRIVING TIPS
BREAK±IN PERIOD
Drive gently and avoid high speeds.
You need not follow a break±in schedule with your new Lexus. But following a few simple tips for the first 1600 km (1000 miles) can add to the future economy and long life of your vehicle:
Do not drive over 88 km/h (55 mph).
Avoid overrevving. Maintain engine speed between 2000 and 4000 rpm.
Avoid full±throttle starts.
Try to avoid hard stops during the first 300 km (200 miles).
Do not drive for a long time at any single speed, either fast or slow.
OPERATION IN FOREIGN
COUNTRIES
If you plan to drive your Lexus in another country...
First, comply with the vehicle registration laws.
Second, confirm the availability of the correct fuel (unleaded and minimum octane number).
TIPS FOR DRIVING IN VARIOUS
CONDITIONS
Always slow down in gusty crosswinds. This will allow you much better control.
Drive slowly onto curbs and, if possible, at a right angle. Avoid driving onto high, sharp±edged objects and other road hazards. Failure to do so can lead to severe tire damage resulting in tire bursts.
When parking on a hill, turn the front wheels until they touch the curb so that the vehicle will not roll. Apply the parking brake, and place the transmission in ªP.º If necessary, block the wheels.
Washing your vehicle or driving through deep water may get the brakes wet. To see whether they are wet, check that there is no traffic near you and then press the pedal lightly. If you do not feel a normal braking force, the brakes are probably wet. To dry them, drive the vehicle cautiously while lightly pressing the brake pedal with the parking brake applied. If they still do not work safely, pull to the side of the road and call a Lexus dealer for assistance.
!CAUTION
Before driving off, make sure the parking brake is fully released and that the parking brake reminder light is off.
Do not rest your foot on the brake pedal while driving. It can cause dangerous overheating, needless wear, and poor fuel economy.
130

DRIVING TIPS
To drive down a long or steep hill, reduce your speed and downshift. Remember, if you ride the brakes excessively, they may overheat and not work properly. See page 120.
Be careful when accelerating, upshifting, downshifting or braking on a slippery surface. The abrupt change in engine speed, such as sudden acceleration or engine braking, could cause the vehicle to spin or skid.
Even if the legal speed limit permits it, do not drive over 140 km/h (85 mph) unless your vehicle has high±speed capability tires. Driving over 140 km/h (85 mph) may result in tire failure, loss of control and possible injury. Be sure to consult a tire dealer to determine whether the tires on your vehicle are high±speed capability tires or not before driving at such speeds.
Do not continue normal driving when the brakes are wet. If they are wet, your vehicle will require a longer stopping distance, and it may pull to one side when the brakes are applied. Also, the parking brake will not hold the vehicle securely.
WINTER DRIVING TIPS
Make sure you have ethylene±glycol antifreeze in the radiator.
NOTICE
Do not use alcohol type antifreeze.
Check the condition of the battery and cables.
Cold temperatures reduce the capacity of any battery, so it must be in top shape to provide enough power for winter starting. Page 192 tells you how to visually inspect the battery. Your Lexus dealer and most service stations will be pleased to check the battery charge level.
Make sure the engine oil viscosity is suitable for the cold weather.
See page 172 for recommended viscosity. Leaving a heavy summer oil in your vehicle during winter months may cause harder starting. If you are not sure about which oil to use, call your Lexus dealer ± they will be pleased to help.
Check the electronic ignition system/distributor ignition system for loose connections or obvious damage.
Keep the door locks from freezing.
Squirt lock de±icer or glycerine into the locks to keep them from freezing. To open a frozen lock, try heating the key before inserting it.
131

DRIVING TIPS
Use a washer fluid containing an antifreeze solution. |
TRAILER TOWING |
This product is available at your Lexus dealer and most auto parts stores. Follow the manufacturer's directions for how much to mix with water.
NOTICE
Do not use engine antifreeze or any other substitute because it may damage your vehicle's paint.
Do not use your parking brake when there is a possibility it could freeze.
When parking, put the transmission into ªPº and block the front wheels. Do not use the parking brake, or snow or water accumulated in and around the parking brake mechanism may freeze the parking brake, making it hard to release.
Keep ice and snow from accumulating under the fenders.
Lexus does not recommend towing a trailer with your GS300. It is not designed for trailer towing.
Ice and snow built up under your fenders can make steering difficult. During bad winter driving, stop and check under the fenders occasionally.
Depending on where you are driving, we recommend you carry some emergency equipment.
Some of the things you might put in the vehicle are tire chains, window scraper, bag of sand or salt, flares, small shovel, jumper cables, etc.
132
|
DRIVING TIPS |
|
|
HOW TO SAVE FUEL AND MAKE |
Avoid unnecessary stopping and braking. Maintain a |
||
YOUR VEHICLE LAST LONGER |
steady pace. Try to time the traffic signals so you only need |
||
to stop as little as possible or take advantage of through |
|||
Getting more kilometer/mileage from a liter/gallon of fuel is |
streets to avoid traffic lights. Keep a proper distance from |
||
easy ± just take it easy. It will help make your vehicle last |
other vehicles to avoid sudden braking. This will also |
||
longer, too. Here are some specific tips on how to save |
reduce wear on your brakes. |
||
money on both fuel and repairs: |
Avoid heavy traffic or traffic jams whenever possible. |
||
Keep your tires inflated at the correct pressure. Check |
Do not rest your foot on the brake pedal. This causes |
||
the pressure every two weeks, or at least once a month. |
needless wear, overheating and poor fuel economy. |
||
Underinflation causes tire wear and wastes fuel. |
Maintain a moderate speed on highways. The faster |
||
Do not carry unneeded weight in your vehicle. Excess |
you drive, the greater the fuel consumption. By reducing |
||
weight puts a heavier load on the engine, causing greater |
your speed, you will cut down on fuel consumption. |
||
fuel consumption. |
Keep the front wheels in proper alignment. Avoid |
||
Avoid lengthy warm±up idling. Once the engine is |
hitting the curb and slow down on rough roads. Improper |
||
running smoothly, begin driving ± but gently. Remember, |
alignment not only causes faster tire wear but also puts an |
||
however, that on cold winter days this may take a little |
extra load on the engine, which, in turn, wastes fuel. |
||
longer. |
Keep the bottom of your vehicle free from mud, etc. |
||
Accelerate slowly and smoothly. Avoid jackrabbit starts. |
This not only lessens weight but also helps prevent |
||
Avoid long engine idling. If you have a long wait and you |
corrosion. |
||
are not in traffic, it is better to turn off the engine and start |
Keep your vehicle tuned±up and in top shape. A dirty |
||
again later. |
air cleaner, improper valve clearance, dirty plugs, dirty oil |
||
Avoid engine overrevving. Use a gear position suitable |
and grease, brakes not adjusted, etc. all lower engine |
||
for the road on which you are traveling. |
performance and contribute to poor fuel economy. For |
||
Avoid continuous speeding up and slowing down. |
longer life of all parts and lower operating costs, keep all |
||
maintenance work on schedule, and if you often drive |
|||
Stop±and±go driving wastes fuel. |
|||
under severe conditions, see that your vehicle receives |
|||
|
|||
|
more frequent maintenance. (For scheduled maintenance |
||
|
information, please refer to the separate ªOwner's Manual |
||
|
Supplement/Maintenance Scheduleº.) |
||
133

DRIVING TIPS
!CAUTION
Never turn off the engine to coast down hills. Your power steering and brake booster will not function without the engine running. Also, the emission control system operates properly only when the engine is running.
134

SECTION |
4 |
IN CASE OF AN EMERGENCY |
|
If your engine stalls while driving |
136 |
If your vehicle will not start |
136 |
If your vehicle overheats |
139 |
If you have a flat tire |
140 |
If your vehicle needs to be towed |
145 |
If you cannot shift automatic transmission |
|
selector lever |
150 |
If you lose your keys or lock yourself out |
151 |
135

IN CASE OF AN EMERGENCY
|
IF YOUR ENGINE STALLS WHILE |
If the light is O.K., but the engine still will not start, it needs |
||||
|
|
DRIVING |
adjustment or repair. Call a Lexus dealer, Roadside |
|||
|
|
Assistance or Customer Service Assistance. (See |
||||
If your engine stalls while driving.... |
ªForeword.º) |
|||||
1. |
Reduce your speed gradually, keeping a straight line. |
|
|
|
||
|
NOTICE |
|
||||
Move cautiously off the road to a safe place. |
|
|
||||
Do not pull± or push±start the vehicle. It may |
|
|||||
2. Turn on your emergency flashers. |
|
|||||
3. Try starting the engine again. |
damage the vehicle or cause a collision when the |
|
||||
If the engine will not start, see ªIf your vehicle will not start.º |
engine starts. Also the three±way catalytic |
|
||||
|
|
|
|
converter may overheat and become a fire hazard. |
|
|
|
! |
CAUTION |
|
|||
|
|
|
|
|||
|
|
If the engine turns over at its normal speed but will not |
||||
If the engine is not running, the power assist for the |
|
start ± |
||||
|
1. |
The engine may be flooded because of repeated |
||||
brakes and steering will not work, so steering and |
|
|||||
|
cranking. See ª(b) Starting a flooded engineº for further |
|||||
braking will be much harder than usual. |
|
|||||
|
instructions. |
|||||
|
|
|
|
|||
IF YOUR VEHICLE WILL NOT START |
2. If the engine still will not start, it needs adjustment or |
|||||
repair. Call a Lexus dealer, Roadside Assistance or |
||||||
(a) |
Simple checks |
Customer Service Assistance. (See ªForeword.º) |
||||
Before making these checks, make sure you have followed |
(b) |
Starting a flooded engine |
||||
the correct starting procedure instructions in ªHow to start |
If the engine will not start, your engine may be flooded |
|||||
the engineº on page 115 and that you have sufficient fuel. |
because of repeated cranking. |
|||||
If the engine is not turning over or is turning over too |
If this happens, turn the key to ªSTARTº with the accelerator |
|||||
slowly ± |
|
|
pedal held down. Continue this operation for 15 seconds and |
|||
1. Check that the battery terminals are tight and clean. |
then stop cranking. Then try starting the engine with your |
|||||
2. |
If the battery terminals are O.K., switch on the interior |
foot off the accelerator pedal. |
||||
light. |
|
|
If the engine does not start after 15 seconds of cranking, |
|||
3. |
If the light is out, dim or goes out when the starter is |
release the key, wait a few minutes and try again. |
||||
cranked, the battery is discharged. You may try jump |
|
|
|
|||
starting. See ª(c) Jump startingº for further instruction. |
|
|
|
|||
136
IN CASE OF AN EMERGENCY
If the engine still will not start, it needs adjustment or repair. Call a Lexus dealer, Roadside Assistance or Customer Service Assistance. (See ªForeword.º)
NOTICE
Do not crank for more than 15 seconds at a time. This may overheat the starter and wiring systems.
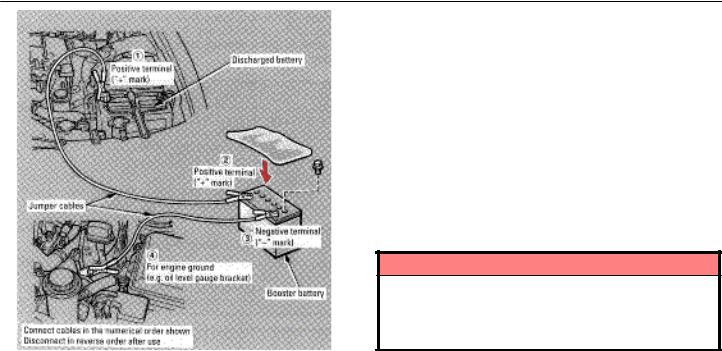
(c)Jump starting
To avoid serious personal injury and damage to your vehicle which might result from battery explosion, acid burns, electrical burns, or damaged electronic components, these instructions must be followed precisely.
If you are unsure about how to follow this procedure, we strongly recommend that you seek help from your Lexus dealer, Roadside Assistance or Customer Service Assistance. (See ªForeword.º)
!CAUTION
Batteries contain sulfuric acid which is poisonous and corrosive. Wear protective safety glasses when jump starting, and avoid spilling acid on your skin, clothing, or vehicle.
If you should accidentally get acid on yourself or in your eyes, remove any contaminated clothing and flush the affected area with water for at least 15 minutes. Then get immediate medical attention. If possible, continue to apply water with a sponge or cloth while en route to the medical office.
The gas normally produced by a battery will explode if a flame or spark is brought near. Use only standardized jumper cables and do not smoke or light a match while jump starting.
NOTICE
The battery used for boosting must be 12 V. Do not jump start unless you are sure that the booster battery is correct.
137
IN CASE OF AN EMERGENCY
JUMP STARTING PROCEDURE
1.If the booster battery is installed in another vehicle, make sure the vehicles are not touching. Turn off all unnecessary lights and accessories.
2.If required, remove all the vent plugs from the booster battery. Lay a cloth over the open vents on the booster
battery. (This helps reduce the explosion hazard, personal injuries and burns.)
3.If the engine in the vehicle with the booster battery is not running, start it and let it run for about 5 minutes. During jump starting, run the engine at about 2000 rpm with the accelerator pedal lightly depressed.
4.Connect the jumper cables in the exact order shown in the illustration: positive terminal (ª+º mark)±to±positive terminal (ª+º mark), and negative terminal (ª±º mark) ±to±engine or body ground. Note that you first connect the positive cable to the discharged battery and then to the booster battery. Next, connect the negative cable to the booster battery and then to a solid, stationary, unpainted metallic point (e.g. oil level gauge bracket) away from the battery. Do not connect it to or near any part that moves when the engine is cranked.
NOTICE
When making the connections, do not lean over the battery or accidentally let the jumper cables or clamps touch anything except the correct battery terminals or the ground.
5.Start your engine in the normal way. After starting, run it at about 2000 rpm for several minutes with the accelerator pedal lightly depressed.
6.Carefully disconnect the cables in the exact reverse order: the negative cable and then the positive cable.
7.Carefully dispose of the battery cover cloths which may now contain sulfuric acid.
138
 Loading...