


 Loading...
2400 Series All-In-One
User's Guide
February 2006 |
www.lexmark.com |
|
|
Lexmark and Lexmark with diamond design are trademarks of Lexmark International, Inc., registered in the United States and/or other countries. All other trademarks are the property of their respective owners.
© 2006 Lexmark International, Inc. All rights reserved.
740 West New Circle Road
Lexington, Kentucky 40550
Edition notice
February 2006
The following paragraph does not apply to any country where such provisions are inconsistent with local law: LEXMARK INTERNATIONAL, INC., PROVIDES THIS PUBLICATION “AS IS” WITHOUT WARRANTY OF ANY KIND, EITHER EXPRESS OR IMPLIED, INCLUDING, BUT NOT LIMITED TO, THE IMPLIED WARRANTIES OF MERCHANTABILITY OR FITNESS FOR A PARTICULAR PURPOSE. Some states do not allow disclaimer of express or implied warranties in certain transactions; therefore, this statement may not apply to you.
This publication could include technical inaccuracies or typographical errors. Changes are periodically made to the information herein; these changes will be incorporated in later editions. Improvements or changes in the products or the programs described may be made at any time.
Comments about this publication may be addressed to Lexmark International, Inc., Department F95/032-2, 740 West New Circle Road, Lexington, Kentucky 40550, U.S.A. In the United Kingdom and Eire, send to Lexmark International Ltd., Marketing and Services Department, Westhorpe House, Westhorpe, Marlow Bucks SL7 3RQ. Lexmark may use or distribute any of the information you supply in any way it believes appropriate without incurring any obligation to you. To obtain additional copies of publications related to this product, visit the Lexmark Web site at www.lexmark.com.
References in this publication to products, programs, or services do not imply that the manufacturer intends to make these available in all countries in which it operates. Any reference to a product, program, or service is not intended to state or imply that only that product, program, or service may be used. Any functionally equivalent product, program, or service that does not infringe any existing intellectual property right may be used instead. Evaluation and verification of operation in conjunction with other products, programs, or services, except those expressly designated by the manufacturer, are the user’s responsibility.
© 2006 Lexmark International, Inc. All rights reserved.
UNITED STATES GOVERNMENT RIGHTS
This software and any accompanying documentation provided under this agreement are commercial computer software and documentation developed exclusively at private expense.
Safety information
Use only the power supply and power supply cord provided with this product or the manufacturer's authorized replacement power supply and power supply cord.
Connect the power supply cord to an electrical outlet that is near the product and easily accessible.
Refer service or repairs, other than those described in the user documentation, to a professional service person.
CAUTION: Do not set up this product or make any electrical or cabling connections, such as the power supply cord or telephone, during a lightning storm.

Contents |
|
Finding information about the printer.......................................................................... |
7 |
Setting up the printer..................................................................................................... |
9 |
Checking the box contents.................................................................................................................. |
9 |
Learning about the printer.......................................................................................... |
10 |
Understanding the parts of the printer............................................................................................... |
10 |
Using the control panel...................................................................................................................... |
11 |
Learning about the software....................................................................................... |
12 |
Using the printer software.................................................................................................................. |
12 |
Using the Imaging Studio.................................................................................................................. |
12 |
Using the All-In-One Center.............................................................................................................. |
13 |
Opening the All-In-One Center................................................................................................................... |
13 |
Using the Scanning & Copying tab............................................................................................................. |
13 |
Using the Saved Images tab....................................................................................................................... |
14 |
Using the Maintain/Troubleshoot link.......................................................................................................... |
15 |
Using the Solution Center.................................................................................................................. |
15 |
Using Print Properties........................................................................................................................ |
17 |
Opening Print Properties............................................................................................................................. |
17 |
Using the Save Settings menu.................................................................................................................... |
17 |
Using the I Want To menu.......................................................................................................................... |
17 |
Using the Options menu............................................................................................................................. |
17 |
Using the Print Properties tabs................................................................................................................... |
18 |
Using the Photo Editor....................................................................................................................... |
18 |
Using the Web Toolbar...................................................................................................................... |
19 |
Loading paper and original documents..................................................................... |
21 |
Loading paper.................................................................................................................................... |
21 |
Loading various paper types............................................................................................................. |
21 |
Loading original documents on the scanner glass............................................................................ |
24 |
Printing......................................................................................................................... |
26 |
Changing the paper type................................................................................................................... |
26 |
Printing a document........................................................................................................................... |
26 |
Printing a Web page.......................................................................................................................... |
26 |
Printing photos or images from a Web page..................................................................................... |
27 |
Printing cards..................................................................................................................................... |
28 |
3
Printing envelopes............................................................................................................................. |
28 |
Printing transparencies...................................................................................................................... |
28 |
Printing collated copies...................................................................................................................... |
29 |
Printing the last page first (reverse page order)................................................................................ |
29 |
Working with photos................................................................................................... |
30 |
Printing photos................................................................................................................................... |
30 |
Printing photos stored on the computer...................................................................................................... |
30 |
Using a PictBridge-enabled digital camera to control printing photos......................................................... |
31 |
Customizing photos........................................................................................................................... |
31 |
Creating and printing a scrapbook or album page...................................................................................... |
31 |
Adding text captions to a photo page.......................................................................................................... |
32 |
Copying......................................................................................................................... |
33 |
Making a copy................................................................................................................................... |
33 |
Copying 4x6 photos........................................................................................................................... |
33 |
Customizing copy settings................................................................................................................. |
33 |
Scanning....................................................................................................................... |
35 |
Scanning a document........................................................................................................................ |
35 |
Customizing scan settings................................................................................................................. |
35 |
Saving a scanned image................................................................................................................... |
36 |
Scanning documents or images for e-mailing................................................................................... |
37 |
Scanning text for editing.................................................................................................................... |
37 |
Scanning images for editing.............................................................................................................. |
37 |
Scanning clear images from magazines or newspapers................................................................... |
38 |
Faxing........................................................................................................................... |
39 |
Sending a fax using the software...................................................................................................... |
39 |
Receiving a fax using the software.................................................................................................... |
40 |
Networking the printer................................................................................................. |
41 |
Shared printing.................................................................................................................................. |
41 |
Maintaining the printer................................................................................................ |
42 |
Changing a print cartridge................................................................................................................. |
42 |
Removing a used print cartridge................................................................................................................. |
42 |
Installing a print cartridge............................................................................................................................ |
42 |
Achieving better print quality............................................................................................................. |
44 |
Improving print quality................................................................................................................................. |
44 |
Aligning the print cartridge using the computer........................................................................................... |
44 |
Cleaning the print cartridge nozzles............................................................................................................ |
44 |
Wiping the print cartridge nozzles and contacts......................................................................................... |
45 |
4
Preserving the print cartridge............................................................................................................ |
46 |
Cleaning the scanner glass............................................................................................................... |
46 |
Ordering supplies.............................................................................................................................. |
46 |
Using genuine Lexmark print cartridges............................................................................................ |
46 |
Refilling a print cartridge.................................................................................................................... |
47 |
Recycling Lexmark products............................................................................................................. |
47 |
Troubleshooting........................................................................................................... |
48 |
Setup troubleshooting........................................................................................................................ |
48 |
Power button is not lit.................................................................................................................................. |
48 |
Software does not install............................................................................................................................. |
48 |
Page does not print..................................................................................................................................... |
49 |
Cannot print from digital camera using PictBridge...................................................................................... |
51 |
Print troubleshooting.......................................................................................................................... |
51 |
Improving print quality................................................................................................................................. |
51 |
Poor text and graphic quality...................................................................................................................... |
52 |
Poor quality at the edges of the page......................................................................................................... |
53 |
Printer does not print or respond................................................................................................................ |
53 |
Print speed is slow...................................................................................................................................... |
53 |
Partial document or photo prints................................................................................................................. |
54 |
Copy troubleshooting......................................................................................................................... |
54 |
Copier does not respond............................................................................................................................. |
54 |
Scanner unit does not close........................................................................................................................ |
54 |
Poor copy quality........................................................................................................................................ |
54 |
Partial document or photo copies............................................................................................................... |
55 |
Scan troubleshooting......................................................................................................................... |
55 |
Scanner does not respond.......................................................................................................................... |
55 |
Scanning takes too long or freezes the computer....................................................................................... |
56 |
Scan was not successful............................................................................................................................. |
56 |
Poor scanned image quality........................................................................................................................ |
57 |
Partial document or photo scans................................................................................................................ |
57 |
Cannot scan to an application..................................................................................................................... |
57 |
Fax troubleshooting........................................................................................................................... |
57 |
Tips for faxing using the Imaging Studio..................................................................................................... |
58 |
Cannot send or receive a fax...................................................................................................................... |
58 |
Cannot print a fax or received fax has poor print quality............................................................................. |
58 |
Received fax is blank.................................................................................................................................. |
58 |
Jams and misfeeds troubleshooting.................................................................................................. |
59 |
Paper jam in the printer............................................................................................................................... |
59 |
Paper jam in the paper support................................................................................................................... |
59 |
Paper or specialty media misfeeds............................................................................................................. |
59 |
5
Printer does not feed paper, envelopes, or specialty media....................................................................... |
60 |
Banner paper jams...................................................................................................................................... |
60 |
Error messages................................................................................................................................. |
60 |
Removing and reinstalling the software............................................................................................ |
61 |
Notices.......................................................................................................................... |
62 |
Index.............................................................................................................................. |
68 |
6

Finding information about the printer
Setup Sheet
Description |
Where to find |
The Setup Sheet gives you instructions for setting up |
You can find this document in the printer box or on the |
hardware and software. |
Lexmark Web site. |
|
|
User's Guide
Description |
|
Where to find |
|
The User's Guide gives you instructions for using the printer |
You can find this document on the Lexmark Web site. |
||
and other information such as: |
|
When you install the printer software, the User's |
|
• |
|
|
|
Maintenance |
|
Guide will be installed. |
|
• |
Troubleshooting |
|
1 Click Start Programs or All |
• |
Safety |
|
Programs Lexmark 2400 Series. |
|
|
|
2 Click User's Guide. |
|
|
|
|
CD |
|
|
|
|
|
||
Description |
Where to find |
||
|
|
|
|
The CD contains drivers, software, and publication files. You can find this CD in the printer box. See the Setup The CD installs the Help system on your computer if your Sheet for installation instructions.
printer connects to a computer.
Help
Description |
Where to find |
The Help gives you instructions for using the software if |
While in any Lexmark software program, click Help, |
your printer connects to a computer. |
Tips Help, or Help Help Topics. |
|
|
Lexmark Solution Center
Description |
Where to find |
|
The Lexmark Solution Center software is included on |
To access the Lexmark Solution Center: |
|
your CD if your printer connects to a computer. It installs |
|
1 Click Start Programs or All Programs Lexmark |
with the other software. |
|
2400 Series. |
|
|
|
|
|
2 Select Lexmark Solution Center. |
|
|
|
Readme file |
|
|
|
|
|
Description |
|
Where to find |
This file contains late-breaking information about the |
|
To access the Readme file: |
printer and software that does not appear in other |
|
1 Click Start Programs or All |
documentation, as well as information specific to your |
|
Programs Lexmark 2400 Series. |
operating system. |
|
|
|
2 Select Readme. |
|
|
|
|
|
|
|
7
Web site
Description |
Where to find |
|
Our Web site contains a variety of information. |
Visit our Web site at www.lexmark.com. |
|
Note: All paths for the Web site are subject to |
1 |
Go to the Web site. |
change. |
2 |
Select a country or region from the drop-down list in the |
|
|
upper-left corner of the page. |
|
3 |
Select the link for the information you need. |
|
|
|
Record the following information (located on the store receipt and the back of the printer), and have it ready when you contact us so that we may serve you faster:
•Machine Type number
•Serial number
•Date purchased
•Store where purchased
8
Setting up the printer
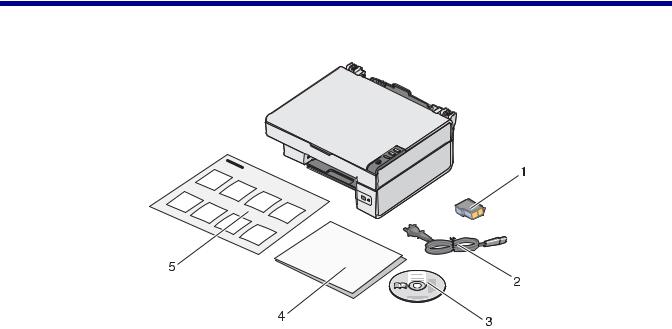
Checking the box contents
|
Name |
Description |
|
1 |
Color print cartridge |
Cartridge to be installed in the printer |
|
|
|
|
|
2 |
Power supply cord |
Attaches to the power supply port located at the back |
|
|
|
of the printer |
|
|
|
|
|
3 |
Installation software CD |
• Installation software for the printer |
|
|
|
• |
Help |
|
|
• |
User's Guide in electronic format |
|
|
|
|
4 |
Getting Started or Setup Solutions |
Additional information depending on your country or |
|
|
|
region |
|
|
|
|
|
5 |
Setup Sheet |
Instructions on setting up printer hardware and |
|
|
|
software, and information on setup troubleshooting |
|
|
|
|
|
9

Learning about the printer
Understanding the parts of the printer
6 1
5
7
4
|
|
3 |
2 |
|
|
|
|
|
Use the |
To |
|
1 |
Paper support |
Load paper. |
|
2 |
Control panel |
Operate the printer. |
|
3 |
PictBridge port |
Connect a PictBridge-enabled digital camera to the printer. |
|
4 |
Paper exit tray |
Stack paper as it exits. |
|
5 |
Top cover |
Access the scanner glass. |
|
6 |
Paper guide |
Align paper when feeding. |
|
7 |
Scanner glass |
Scan, copy, or remove an item. |
|
|
|
3 |
|
1
2
|
|
4 |
|
|
5 |
|
Use the |
To |
1 |
Scanner support |
Hold up the scanner unit. |
2 |
Print cartridge carrier |
Install or replace a print cartridge. |
10
|
Use the |
To |
3 |
Scanner unit |
Raise to access the print cartridge carrier. |
|
|
|
4 |
Power supply port |
Connect the printer to a power source. |
|
|
|
5 |
USB port |
Connect the printer to a computer using a USB cable. |
|
|
|
Using the control panel
|
|
|
|
|
|
|
|
|
|
|
|
|
|
|
|
|
|
|
|
|
|
|
|
|
|
|
|
|
|
|
|
|
|
|
|
|
|
|
|
|
|
|
|
|
|
|
|
|
|
|
|
|
|
|
|
|
|
|
|
|
|
|
|
|
|
|
|
|
|
|
|
|
|
|
|
|
|
|
|
|
|
|
|
|
|
|
|
|
|
|
|
|
|
|
|
|
|
|
|
|
|
|
|
|
|
|
|
|
|
|
|
|
|
|
|
|
|
|
|
|
|
|
|
|
|
Press |
To |
|
|
|
|
|
|
|
|
||||||||||||||
1 |
|
|
|
|
|
|
|
|
|
|
|
|
|
|
|
Make a color copy. |
||||||||
|
|
|
|
|
|
|
|
|
|
|
|
|
|
|
||||||||||
|
|
|
|
|
|
|
|
|
|
|
|
|
|
|
|
|
|
|
|
|
|
|
|
|
|
|
|
|
|
|
|
|
|
|
|
|
|
|
|
|
|
|
|
|
|
|
|
|
|
|
|
|
|
|
|
|
|
|
|
|
|
|
|
|
|
|
|
|
|
|
|
|
|
|
|
|
|
|
|
|
|
|
|
|
|
|
|
|
|
|
|
|
|
|
|
|
|
|
|
|
|
|
|
|
|
|
|
|
|
|
|
|
|
|
|
|
|
|
|
|
|
|
|
|
2 |
|
|
|
|
|
|
|
|
|
|
|
|
|
|
|
Make a 4 x 6 in. or 10 x 15 cm borderless, color copy of a photo. |
||||||||
|
|
|
|
|
|
|
|
|
|
|
|
|
|
|
||||||||||
|
|
|
|
|
|
|
|
|
|
|
|
|
|
|
|
|
|
|
|
|
|
|
|
|
3 |
|
|
|
|
|
|
|
|
|
|
|
|
|
|
|
• |
Open the All-In-One Center and preview the scan on the computer |
|||||||
|
|
|
|
|
|
|
|
|
|
|
|
|
|
|
|
|
screen. |
|||||||
|
|
|
|
|
|
|
|
|
|
|
|
|
|
|
|
• |
Print an alignment page if the button is held down for three seconds. |
|||||||
|
|
|
|
|
|
|
|
|
|
|
|
|
|
|
|
|
Note: To complete the scan back alignment process, follow the |
|||||||
|
|
|
|
|
|
|
|
|
|
|
|
|
|
|
|
|
instructions on the computer screen. |
|||||||
|
|
|
|
|
|
|
|
|
|
|
|
|
|
|
|
|
|
|
|
|
||||
4 |
|
|
|
|
|
|
|
|
|
|
|
|
|
|
|
• |
Turn the printer on and off. |
|||||||
|
|
|
|
|
|
|
|
|
|
|
|
|
|
|
||||||||||
|
|
|
|
|
|
|
|
|
|
|
|
|
|
|
|
• |
Cancel a copy, scan, or print job. |
|||||||
|
|
|
|
|
|
|
|
|
|
|
|
|
|
|
|
• |
Reset the printer. |
|||||||
|
|
|
|
|
|
|
|
|
|
|
|
|
|
|
|
• |
Feed or eject paper. |
|||||||
|
|
|
|
|
|
|
|
|
|
|
|
|
|
|
|
|||||||||
|
|
|
|
|
|
|
|
|
|
|
|
|
|
|
|
Note: If the power light blinks, see “Error messages” on page 60. |
||||||||
|
|
|
|
|
|
|
|
|
|
|
|
|
|
|
|
|
|
|
|
|
|
|
|
|
11

Learning about the software
Using the printer software
Use this software |
To |
The Imaging Studio |
Open the software component necessary for you to complete a task. |
|
|
The All-In-One Center |
Scan, copy, print, or fax. |
|
|
The Solution Center |
Find troubleshooting, maintenance, and cartridge ordering information. |
|
|
Print Properties |
Select the best print settings for the document you are printing. |
|
|
The Photo Editor |
Edit photos and graphics. |
|
|
Fast Pics |
Print photos or images. |
|
|
Web Toolbar |
Create printer-friendly versions of Web pages. |
|
|
Using the Imaging Studio
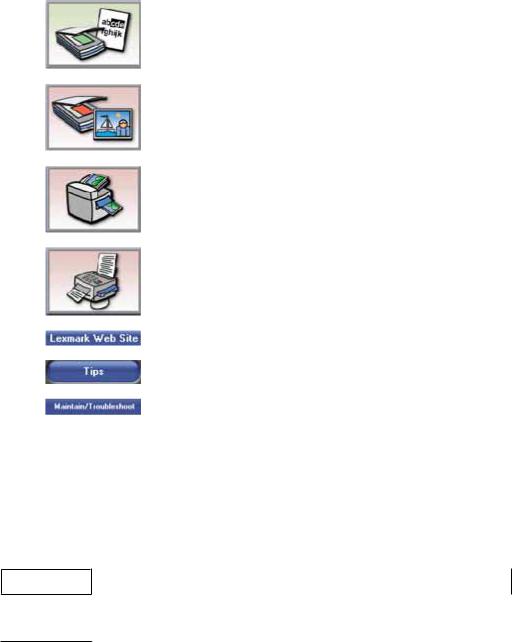
The Imaging Studio buttons link to software and information that help you with the following tasks:
•Printing, browsing, or sharing photos
•Using photos stored on your computer
•Scanning and editing text using OCR
•Scanning, copying, or faxing
•Finding our Web site
•Finding tips on using the software
•Finding maintenance and troubleshooting information
To open the Imaging Studio, use one of these methods:
Method 1 |
Method 2 |
|
From the desktop, double-click the Imaging Studio |
1 |
Click Start Programs or All Programs Lexmark |
icon. |
|
2400 Series. |
|
2 |
Select Imaging Studio. |
|
|
|
Click the Imaging Studio button for the task you want to complete.
Click |
To |
Details |
|
|
Browse and print photos |
• |
View photos saved on the computer. |
|
|
• |
Print common photo sizes from saved |
|
|
|
images on the computer. |
|
|
|
|
|
Share photos |
• |
Scan and e-mail images or photos. |
|
|
• |
Find and e-mail images or photos which |
|
|
|
are stored on the computer. |
|
|
|
|
12
Click |
To |
Details |
|
|
Scan and edit text (OCR) |
Use Optical Character Recognition (OCR) to |
|
|
|
scan a document to a word processor so you |
|
|
|
can edit the text. |
|
|
|
|
|
|
Scan |
• |
Scan a photo or document. |
|
|
• |
Choose scan settings. |
|
|
|
|
|
Copy |
• |
Copy photos or documents. |
|
|
• |
Enlarge, reduce, or change other features |
|
|
|
before printing. |
|
|
|
|
|
Fax |
• |
Scan and send a fax. |
|
|
• |
Receive a fax. |
|
|
• |
View fax settings and fax history. |
|
|
|
|
|
Access the Web |
Visit our Web site. |
|
|
|
|
|
|
Learn more about what you can do with this software. |
||
|
|
||
|
Find maintenance and troubleshooting information and tools to keep the printer |
||
|
working properly. |
|
|
|
|
|
|
Using the All-In-One Center
Opening the All-In-One Center
Use the All-In-One Center software to scan, copy, and fax documents.
To open the All-In-One Center, use one of these methods:
Method 1 |
Method 2 |
|
|
Press 
 . 1 Click Start Programs or All Programs Lexmark 2400 Series.
2 Select All-In-One Center.
Using the Scanning & Copying tab
From here |
You can |
|
Scan |
• |
Select a program to send a scanned image to. |
|
• |
Select what type of image is being scanned. |
|
• |
Select the scan quality. |
|
Note: Click See More Scan Settings to view all settings. |
|
|
|
|
13
From here |
You can |
|
Copy |
• |
Select the quantity and color of copies. |
|
• |
Select a quality setting for copies. |
|
• |
Select a blank paper size. |
|
• |
Select the size of the original document. |
|
• |
Lighten or darken copies. |
|
• |
Enlarge or reduce copies. |
|
Note: Click Display Advanced Copy Settings to view all settings. |
|
|
|
|
Creative Tasks |
• |
|
|
|
– Repeat an image several times on one page. |
|
|
– Enlarge or reduce an image. |
|
|
– Print an image as a multiple-page poster. |
|
• |
Share |
|
|
– E-mail an image. |
|
|
– Fax using your computer modem. |
|
• |
Save |
|
|
– Save an image on your computer. |
|
|
– MagiChop—Save multiple photos. |
|
• |
Edit |
|
|
– Edit text found in a scanned document (OCR). |
|
|
– Modify an image with a photo editor. |
|
|
|
Preview |
• |
Select a region of the previewed image to scan or copy. |
|
• |
View an image of what will be printed or copied. |
|
|
|
Note: For more information about the Scanning & Copying tab, click Help in the top center of the screen.
Using the Saved Images tab
Use the Saved Images tab to perform tasks with images that are saved on the computer.
From here |
You can |
|
Preview |
• |
Show or create folders. |
|
• |
Preview and select images. |
|
• |
Rename, delete, or edit selected images. |
|
|
|
Open With |
Select where to send the saved images. |
|
|
|
|
Photo Prints |
Click Next to print selected photos in Fast Pics. |
|
|
|
|
14
From here |
You can |
|
Creative Tasks |
• |
|
|
|
– Print an album page with various photo sizes. |
|
|
– Enlarge or reduce an image. |
|
|
– Print an image as a multiple-page poster. |
|
• |
Share |
|
|
– E-mail an image. |
|
|
– Fax using your computer modem. |
|
• |
Edit |
|
|
– Edit text found in a scanned document (OCR). |
|
|
– Modify an image with a photo editor. |
|
|
|
Note: For more information about the Saved Images tab, click Help in the top center of the screen.
Using the Maintain/Troubleshoot link
The Maintain/Troubleshoot link provides you with direct links to the Solution Center.
1Click Start Programs or All Programs Lexmark 2400 Series.
2Select All-In-One Center.
3Click Maintain/Troubleshoot.
4Select from these topics:
•Maintain or fix quality problems
•Troubleshoot problems
•Device status and ink level
•More printing ideas and how to's
•Contact information
•Advanced
•View the software version and copyright information
Using the Solution Center
The Solution Center provides help, as well as information about the printer status and ink level.
To open the Solution Center, use one of these methods:
Method 1 |
Method 2 |
|
From the desktop, double-click the Imaging Studio |
1 |
Click Start Programs or All Programs Lexmark |
icon, and then click the Maintain/Troubleshoot button. |
|
2400 Series. |
|
2 |
Select Solution Center. |
|
|
|
15

The Solution Center consists of six tabs:
From this tab |
You can |
|
Printer Status (Main dialog) |
• |
View the status of the printer. For example, while printing, the |
|
|
status of the printer is Busy Printing. |
|
• |
View the ink level of the print cartridge. |
|
|
|
How To |
Learn how to: |
|
|
• |
Print, scan, copy, and fax. |
|
• |
Find and change settings. |
|
• |
Use basic features. |
|
• Print projects such as banners, photos, envelopes, cards, iron-on |
|
|
|
transfers, and transparencies. |
|
• |
Find the electronic guide for more information. |
|
|
|
Troubleshooting |
• |
Learn tips about the current status. |
|
• |
Solve printer problems. |
|
|
|
Maintenance |
• |
Install a print cartridge. |
|
|
Note: Wait until scanning is complete before installing a new print |
|
|
cartridge. |
|
• |
View shopping options for a new cartridge. |
|
• |
Print a test page. |
|
• |
Clean to fix horizontal streaks. |
|
• |
Align to fix blurry edges. |
|
• |
Troubleshoot other ink problems. |
|
|
|
Contact Information |
Learn how to contact us by telephone or on the World Wide Web. |
|
|
|
|
Advanced |
• |
Change the appearance of the Printing Status window. |
|
• |
Turn printing voice notification on or off. |
|
• |
Change network printing settings. |
|
• |
Share information with us regarding how you use the printer. |
|
• |
Obtain software version information. |
|
|
|
Note: For more information, click Help in the lower right corner of the screen.
16
Using Print Properties
Opening Print Properties
Print Properties is the software that controls the printing function when the printer is connected to a computer. You can change the settings in Print Properties based on the type of project you want to create. You can open Print Properties from almost any program:
1With a document open, click File Print.
2From the Print dialog, click Properties, Preferences, Options, or Setup.
Using the Save Settings menu
From the “Save Settings” menu, you can name and save the current Print Properties settings for future use. You can save up to five custom settings.
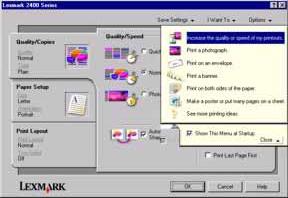
Using the I Want To menu
The “I Want To” menu contains a variety of task wizards (printing a photo, an envelope, a banner, a poster, or printing on both sides of the paper) to help you select the correct print settings for a project.
Using the Options menu
Use the “Options” menu to make changes to the Quality Options, Layout Options, and Printing Status Options settings. For more information on these settings, open the tab dialog from the menu, and then click the Help button on the dialog.
The “Options” menu also provides direct links to different parts of the Solution Center as well as software version information.
17
Using the Print Properties tabs
All of the print settings are on the three main tabs of the Print Properties software: Quality/Copies, Paper Setup, and Print Layout.
Tab |
Options |
|
Quality/Copies |
• |
Select a Quality/Speed setting. |
|
• |
Select a Paper Type. |
|
• |
Customize how the printer prints several copies of a single print job: |
|
|
collated or normal. |
|
• |
Choose Automatic Image Sharpening. |
|
• |
Choose to have the last page printed first. |
|
|
|
Paper Setup |
• |
Specify the size of paper loaded. |
|
• |
Select the orientation of the document on the printed page: portrait or |
|
|
landscape. |
|
|
|
Print Layout |
• |
Select the layout you want to print. |
|
• |
Choose to print on both sides of the paper, and select a duplexing |
|
|
preference. |
|
|
|
Note: For more information about these settings, right-click a setting on the screen, and then select What's This?
Using the Photo Editor
Use the Photo Editor software to edit graphics or photos.
1Click Start Programs or All Programs Lexmark 2400 Series.
2Select Photo Editor.
3Click File Open to select the image you want to edit.
4Edit the image with the available tools.
Notes:
•You can edit only one image at a time.
•Move the mouse pointer over the tool for a description.
•To undo or redo changes, click the corresponding arrow next to Undo in the top center of the screen. You can reverse multiple changes.
5Click File Save as.
6Enter a file name and file type, and then click Save.
From this section |
You can |
|
Quick Fixes |
• |
Remove the red-eye effect caused by light reflection. |
|
• |
Fix the photo with one click. |
|
• |
Colorize the image using antiquing or sepia tones. |
|
• |
Crop the image. |
|
• |
Rotate the image. |
|
• |
Flip the image. |
|
|
|
18
From this section |
You can |
|
Image Adjust |
• |
Adjust the color depth. |
|
• |
Adjust the color balance. |
|
• |
Colorize the image. |
|
• |
Adjust the Brightness/Contrast. |
|
• |
Adjust the blur. |
|
• |
Adjust the sharpness. |
|
• |
Despeckle (blur) the image to remove dust and scratches. |
|
• |
Adjust the exposure. |
|
• |
Balance color groupings. |
|
|
|
Image Size |
• |
Change the units of measurement. |
|
• |
Resize the image. |
|
• |
Crop the image. |
|
|
|
Drawing Tools |
• |
Select an area by dragging a box around it. Use this for text box placement |
|
|
and cutting and copying areas. |
|
• |
Add text. |
|
• |
Fill pixels with color. |
|
• |
Draw with a pencil tool. |
|
• |
Draw with a line tool. |
|
• |
Erase areas. |
|
• |
Paint areas with a paintbrush tool. |
|
• |
Pick up a color using the eyedropper. |
|
|
|
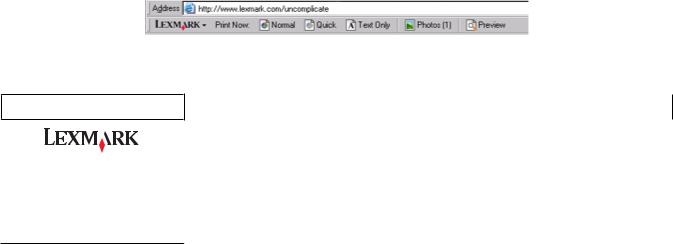
Using the Web Toolbar
The Lexmark Web Toolbar lets you create printer-friendly Web pages.
Note: The Lexmark Web Toolbar launches automatically when you browse the Web using Microsoft Windows Internet Explorer version 5.5 or later.
Click |
To |
|
|
• Select Page Setup options.
•Select Options to customize the toolbar appearance or select a different setting for printing photos.
•Access links to the Lexmark Web site.
•Access Help for additional information.
•Uninstall the Web Toolbar.
19

Click |
To |
Normal |
Print an entire Web page in normal quality. |
Quick |
Print an entire Web page in draft quality. |
Text Only |
Print only the text of a Web page. |
Photo |
Print only the photos or images on a Web page. |
|
Note: The number of photos or images valid for printing appears next to Photos. |
Preview |
Preview a Web page before printing. |
20
Loading paper and original documents
Loading paper
1Make sure:
•You use paper designed for inkjet printers.
•If you are using photo, glossy, or heavyweight matte paper, you load it with the glossy or printable side facing you. (If you are not sure which side is the printable side, see the instructions that came with the paper.)
•The paper is not used or damaged.
•If you are using specialty paper, you follow the instructions that came with it.
•You do not force paper into the printer.
2Before loading paper the first time, squeeze and slide the paper guide to the left side of the paper support.
3Load the paper vertically against the right side of the paper support.
1
2 |
4 Adjust the paper guide until it rests against the left edge of the paper.
Note: To avoid paper jams, make sure the paper does not buckle when you adjust the paper guide.
Loading various paper types
Load up to |
Make sure |
||
|
|
|
|
100 sheets of plain paper |
• |
The paper is designed for use with inkjet printers. |
|
|
• |
The paper is loaded against the right side of the paper support. |
|
|
• |
The paper guide rests against the left edge of the paper. |
|
|
|
|
|
100 sheets of heavyweight matte paper |
• |
The glossy or printable side of the paper faces you. (If you are not |
|
25 sheets of photo paper |
|
sure which side is the printable side, see the instructions that came |
|
25 sheets of glossy paper |
|
with the paper.) |
|
• |
The paper is loaded against the right side of the paper support. |
||
|
|||
|
• |
The paper guide rests against the left edge of the paper. |
|
|
Note: Photos require more drying time. Remove each photo as it exits, |
||
|
and allow it to dry to avoid ink smudging. |
||
|
|
|
|
21
Loading...