


 Loading...
MS710 Series
User's Guide
June 2013 |
www.lexmark.com |
|
|
Machine type(s):
4063
Model(s):
832, 835

Contents |
2 |
Contents |
|
Safety information....................................................................................... |
6 |
Learning about the printer........................................................................... |
8 |
Finding information about the printer...................................................................................................... |
8 |
Selecting a location for the printer............................................................................................................ |
9 |
Printer configurations............................................................................................................................. |
10 |
Using the printer control panel............................................................................................................... |
12 |
Understanding the colors of the Sleep button and indicator lights........................................................ |
13 |
Additional printer setup............................................................................. |
14 |
Installing internal options........................................................................................................................ |
14 |
Installing hardware options..................................................................................................................... |
31 |
Attaching cables...................................................................................................................................... |
35 |
Setting up the printer software............................................................................................................... |
37 |
Networking.............................................................................................................................................. |
39 |
Verifying printer setup............................................................................................................................ |
47 |
Loading paper and specialty media............................................................ |
49 |
Setting the paper size and type............................................................................................................... |
49 |
Configuring Universal paper settings...................................................................................................... |
49 |
Loading the 250 or 550 sheet tray........................................................................................................ |
49 |
Loading the 2100 sheet tray................................................................................................................... |
56 |
Loading the multipurpose feeder............................................................................................................ |
62 |
Linking and unlinking trays...................................................................................................................... |
66 |
Linking and unlinking trays ............................................................................................................................... |
66 |
Creating a custom name for a paper type ........................................................................................................ |
67 |
Assigning a custom paper type name ............................................................................................................... |
67 |
Assigning a custom paper type ......................................................................................................................... |
68 |
Paper and specialty media guide................................................................ |
69 |
Using specialty media.............................................................................................................................. |
69 |
Paper guidelines...................................................................................................................................... |
70 |
Supported paper sizes, types, and weights............................................................................................. |
73 |
Printing...................................................................................................... |
78 |
Printing a document................................................................................................................................ |
78 |

Contents |
3 |
Printing a document ......................................................................................................................................... |
78 |
Adjusting toner darkness .................................................................................................................................. |
78 |
Printing from a flash drive or a mobile device........................................................................................ |
79 |
Printing from a flash drive ................................................................................................................................ |
79 |
Supported flash drives and file types................................................................................................................ |
80 |
Printing from a mobile device........................................................................................................................... |
81 |
Printing confidential and other held jobs................................................................................................ |
81 |
Storing print jobs in the printer ........................................................................................................................ |
81 |
Printing confidential and other held jobs ......................................................................................................... |
82 |
Printing information pages...................................................................................................................... |
83 |
Printing a font sample list ................................................................................................................................. |
83 |
Printing a directory list...................................................................................................................................... |
83 |
Canceling a print job................................................................................................................................ |
83 |
Canceling a print job from the printer control panel........................................................................................ |
83 |
Canceling a print job from the computer ......................................................................................................... |
83 |
Understanding printer menus.................................................................... |
85 |
Menus list................................................................................................................................................ |
85 |
Paper menu............................................................................................................................................. |
86 |
Reports menu.......................................................................................................................................... |
96 |
Network/Ports menu............................................................................................................................... |
97 |
Security menu....................................................................................................................................... |
109 |
Settings menu........................................................................................................................................ |
112 |
Help menu............................................................................................................................................. |
132 |
Saving money and the environment......................................................... |
133 |
Saving paper and toner......................................................................................................................... |
133 |
Saving energy........................................................................................................................................ |
134 |
Recycling................................................................................................................................................ |
137 |
Securing the printer.................................................................................. |
139 |
Using the security lock feature.............................................................................................................. |
139 |
Statement of Volatility.......................................................................................................................... |
139 |
Erasing volatile memory........................................................................................................................ |
140 |
Erasing non volatile memory................................................................................................................ |
140 |
Erasing printer hard disk memory......................................................................................................... |
141 |
Configuring printer hard disk encryption.............................................................................................. |
141 |
Finding printer security information..................................................................................................... |
142 |
Contents |
4 |
Maintaining the printer............................................................................ |
143 |
Cleaning the printer.............................................................................................................................. |
143 |
Checking the status of parts and supplies............................................................................................. |
144 |
Ordering supplies.................................................................................................................................. |
146 |
Storing supplies..................................................................................................................................... |
149 |
Replacing supplies................................................................................................................................. |
149 |
Moving the printer................................................................................................................................ |
158 |
Managing the printer............................................................................... |
161 |
Finding advanced networking and administrator information............................................................. |
161 |
Accessing the remote control panel...................................................................................................... |
161 |
Modifying confidential print settings.................................................................................................... |
161 |
Copying printer settings to other printers............................................................................................. |
162 |
Restoring factory default settings......................................................................................................... |
162 |
Clearing jams............................................................................................ |
163 |
Avoiding jams........................................................................................................................................ |
163 |
Understanding jam messages and locations......................................................................................... |
165 |
[x] page jam, lift front cover to remove cartridge [200–201]............................................................... |
167 |
[x] page jam, open upper rear door [202]............................................................................................ |
170 |
[x] page jam, open upper and lower rear door [231–234]................................................................... |
171 |
[x] page jam, remove standard bin jam [203]....................................................................................... |
173 |
[x] page jam, remove tray 1 to clear duplex [235–239]........................................................................ |
174 |
[x] page jam, open tray [x] [24x]........................................................................................................... |
175 |
[x] page jam, clear manual feeder [250]............................................................................................... |
176 |
[x] page jam, remove paper, open stapler door. Leave paper in bin. [455–457].................................. |
177 |
[x] page jam, remove paper, open finisher rear door. Leave paper in bin. [451]................................. |
180 |
[x] page jam, remove paper, open expander rear door. Leave paper in bin. [41y.xx].......................... |
181 |
[x] page jam, remove paper, open mailbox rear door. Leave paper in bin. [43y.xx]............................ |
182 |
Troubleshooting....................................................................................... |
184 |
Understanding the printer messages.................................................................................................... |
184 |
Solving printer problems....................................................................................................................... |
201 |
Solving print problems.......................................................................................................................... |
209 |
Embedded Web Server does not open................................................................................................. |
235 |
Contacting customer support................................................................................................................ |
235 |
Contents |
5 |
Notices..................................................................................................... |
237 |
Product information.............................................................................................................................. |
237 |
Edition notice........................................................................................................................................ |
237 |
Power consumption.............................................................................................................................. |
241 |
Index........................................................................................................ |
250 |

Safety information |
6 |
Safety information


Connect the power cord to a properly grounded electrical outlet that is near the product and easily accessible.
Do not place or use this product near water or wet locations.
CAUTION—POTENTIAL INJURY: This product uses a laser. Use of controls or adjustments or performance of procedures other than those specified herein may result in hazardous radiation exposure.
This product uses a printing process that heats the print media, and the heat may cause the media to release emissions. You must understand the section in your operating instructions that discusses the guidelines for selecting print media to avoid the possibility of harmful emissions.
CAUTION—POTENTIAL INJURY: The lithium battery in this product is not intended to be replaced. There is a danger of explosion if a lithium battery is incorrectly replaced. Do not recharge, disassemble, or incinerate a lithium battery. Discard used lithium batteries according to the manufacturer's instructions and local regulations.
CAUTION—HOT SURFACE: The inside of the printer might be hot. To reduce the risk of injury from a hot component, allow the surface to cool before touching.
CAUTION—POTENTIAL INJURY: To reduce the risk of equipment instability, load each tray separately. Keep all other trays closed until needed.
CAUTION—POTENTIAL INJURY: The printer weight is greater than 18 kg (40 lb) and requires two or more trained personnel to lift it safely.
CAUTION—POTENTIAL INJURY: Before moving the printer, follow these guidelines to avoid personal injury or printer damage:
•Turn off the printer, and then unplug the power cord from the electrical outlet.
•Disconnect all cords and cables from the printer.
•If two or more optional finishers are installed, then remove the finishers individually from the printer.
Notes:
–Make sure to remove the topmost finisher first.
–To remove the finisher, hold the finisher on both sides, and then lift the latches to unlock the finisher.
•If the printer does not have a caster base but is configured with optional trays, then remove the trays.
Note: Slide the latch on the right side of the optional tray toward the front of the tray until it clicks into place.
•Use the handholds located on both sides of the printer to lift it.
•Make sure your fingers are not under the printer when you set it down.
•Make sure there is adequate clearance around the printer.
•Use only the power cord provided with this product or the manufacturer's authorized replacement.
CAUTION—SHOCK HAZARD: If you are accessing the controller board or installing optional hardware or memory devices sometime after setting up the printer, then turn the printer off, and unplug the power cord from the electrical outlet before continuing. If you have any other devices attached to the printer, then turn them off as well, and unplug any cables going into the printer.
CAUTION—SHOCK HAZARD: To avoid the risk of electrical shock when cleaning the exterior of the printer, unplug the power cord from the electrical outlet and disconnect all cables from the printer before proceeding.
Use only the power cord provided with this product or the manufacturer's authorized replacement.

Safety information |
7 |
CAUTION—SHOCK HAZARD: Make sure that all external connections (such as Ethernet and telephone system connections) are properly installed in their marked plug-in ports.
This product is designed, tested, and approved to meet strict global safety standards with the use of specific manufacturer's components. The safety features of some parts may not always be obvious. The manufacturer is not responsible for the use of other replacement parts.
CAUTION—POTENTIAL INJURY: Do not cut, twist, bind, crush, or place heavy objects on the power cord. Do not subject the power cord to abrasion or stress. Do not pinch the power cord between objects such as furniture and walls. If any of these things happen, a risk of fire or electrical shock results. Inspect the power cord regularly for signs of such problems. Remove the power cord from the electrical outlet before inspecting it.
Refer service or repairs, other than those described in the user documentation, to a service representative.
CAUTION—SHOCK HAZARD: Do not set up this product or make any electrical or cabling connections, such as a power cord, a fax feature or USB cable, during a lightning storm.
CAUTION—TIPPING HAZARD: Floor-mounted configurations require additional furniture for stability. You must use either a printer stand or printer base if you are using multiple input options. If you purchased a printer with a similar configuration, then you may need additional furniture. For more information, see www.lexmark.com/multifunctionprinters.
SAVE THESE INSTRUCTIONS.

Learning about the printer |
8 |
Learning about the printer

Finding information about the printer
|
What are you looking for? |
Find it here |
|
|
|
|
|
|
Initial setup instructions: |
Setup documentation—The setup documentation came |
|
|
• |
Connecting the printer |
with the printer and is also available at |
|
• Installing the printer software |
http://support.lexmark.com. |
|
|
|
||
|
|
|
|
|
Additional setup and instructions for using the printer: |
User's Guide and Quick Reference Guide—The guides may |
|
|
• Selecting and storing paper and specialty media |
be available on the Software and Documentation CD. |
|
|
• |
Loading paper |
For more information, visit |
|
http://support.lexmark.com. |
||
|
• |
Configuring printer settings |
|
|
|
||
|
• Viewing and printing documents and photos |
|
|
|
• Setting up and using the printer software |
|
|
|
• Configuring the printer on a network |
|
|
|
• Caring for and maintaining the printer |
|
|
|
• Troubleshooting and solving problems |
|
|
|
|
|
|
|
Instructions for: |
Networking Guide—Open the Software and |
|
|
• Connecting the printer to an Ethernet network |
Documentation CD, and then navigate to: |
|
|
• Troubleshooting printer connection problems |
Documentation > User’s Guide and other publications > |
|
|
Networking Guide |
||
|
|
|
|
|
|
|
|
|
Help using the printer software |
Windows or Mac Help—Open a printer software program |
|
|
|
|
or application, and then click Help. |
|
|
|
Click ? to view context sensitive information. |
|
|
|
Notes: |
|
|
|
• Help is automatically installed with the printer |
|
|
|
software. |
|
|
|
• The printer software is located in the printer |
|
|
|
program folder or on the desktop, depending on |
|
|
|
your operating system. |
|
|
|
|

Learning about the printer |
|
9 |
||
|
|
|
|
|
|
What are you looking for? |
Find it here |
||
|
|
|
||
|
The latest supplemental information, updates, and customer |
Lexmark support Web site— |
||
|
support: |
http://support.lexmark.com |
||
|
• |
Documentation |
Note: Select your country or region, and then select |
|
|
• |
Driver downloads |
your product to view the appropriate support site. |
|
|
• |
Live chat support |
Support telephone numbers and hours of operation for |
|
|
• |
E mail support |
your country or region can be found on the support Web |
|
|
site or on the printed warranty that came with your |
|||
|
• |
Voice support |
printer. |
|
|
|
|
Record the following information (located on the store |
|
|
|
|
receipt and at the back of the printer), and have it ready |
|
|
|
|
when you contact customer support so that they may |
|
|
|
|
serve you faster: |
|
|
|
|
• |
Machine Type number |
|
|
|
• |
Serial number |
|
|
|
• |
Date purchased |
|
|
|
• |
Store where purchased |
|
|
|
||
|
Warranty information |
Warranty information varies by country or region: |
||
|
|
|
• In the U.S.—See the Statement of Limited Warranty |
|
|
|
|
|
included with this printer, or at |
|
|
|
|
http://support.lexmark.com. |
|
|
|
• In other countries and regions—See the printed |
|
|
|
|
|
warranty that came with your printer. |
|
|
|
|
|
Selecting a location for the printer
CAUTION—POTENTIAL INJURY: The printer weight is greater than 18 kg (40 lb) and requires two or more trained personnel to lift it safely.
When selecting a location for the printer, leave enough room to open trays, covers, and doors. If you plan to install any options, then leave enough room for them also. It is important to:
•Set up the printer near a properly grounded and easily accessible electrical outlet.
•Make sure airflow in the room meets the latest revision of the ASHRAE 62 standard or the CEN Technical Committee 156 standard.
•Provide a flat, sturdy, and stable surface.
•Keep the printer:
–Clean, dry, and free of dust.
–Away from stray staples and paper clips.
–Away from the direct airflow of air conditioners, heaters, or ventilators.
–Free from direct sunlight and humidity extremes.
•Observe the recommended temperatures and avoid fluctuations:
Ambient temperature 15.6 to 32.2°C (60 to 90°F)
 Storage temperature -40 to 43°C (-40 to 110°F)
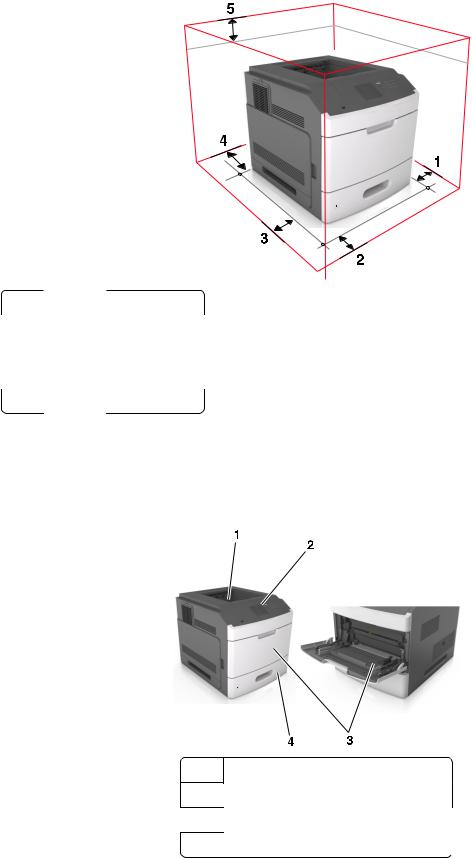
• Allow the following recommended amount of space around the printer for proper ventilation:
Learning about the printer |
10 |
1 |
Right side |
305 mm (12 in.) |
|
|
|
2 |
Front |
508 mm (20 in.) |
|
|
|
3 |
Left side |
305 mm (12 in.) |
|
|
|
4 |
Rear |
305 mm (12 in.) |
|
|
|
5 |
Top |
115 mm (4.5 in.) |
|
|
|
Printer configurations
Basic model
1 Standard bin
2Printer control panel
3Multipurpose feeder
4 Standard 250 or 550 sheet tray (Tray 1)
Learning about the printer |
11 |
Fully configured model
CAUTION—TIPPING HAZARD: Floor-mounted configurations require additional furniture for stability. You must use either a printer stand or printer base if you are using multiple input options. If you purchased a printer with a similar configuration, then you may need additional furniture. For more information, see www.lexmark.com/multifunctionprinters.
The following illustration shows the maximum number of optional finishers and trays that are supported by the printer. For more information on other configurations, visit www.lexmark.com/multifunctionprinters.
|
|
Hardware option |
Alternative hardware option |
|
|
|
|
|
|
|
1 |
Staple finisher |
• |
Output expander |
|
|
|
• |
4 bin mailbox |
|
|
|
• Staple, hole punch finisher |
|
|
|
|
|
|
|
2 |
4 bin mailbox |
• |
Output expander |
|
|
|
• High capacity output expander |
|
|
|
|
• Staple, hole punch finisher |
|
|
|
|
|
|
|
3 |
Caster base |
None |
|
|
|
|
|
|
|
4 |
2100 sheet tray |
None |
|
|
5 |
550 sheet tray |
250 sheet tray |
|
|
6 |
250 sheet tray |
550 sheet tray |
|
|
|
|
|
|
|
7 |
4 bin mailbox |
Output expander |
|
|
|
|
|
|
|
8 |
Output expander |
4 bin mailbox |
|
Learning about the printer |
12 |
The staple, hole punch finisher must not be combined with any other output option.
In a configuration with two or more optional finishers:
•The staple finisher must always be on top.
•The high capacity output expander must always be at the bottom.
•The output expander is the only option that can be placed on top of the high capacity output expander.
•The output expander and mailbox may be installed in any order.
When using optional trays:
•Always use a caster base when the printer is configured with a 2100 sheet tray.
•The 2100 sheet tray must always be at the bottom of a configuration.
•A maximum of four optional trays may be configured with the printer.
•The optional 250 and 550 sheet trays may be installed in any order.
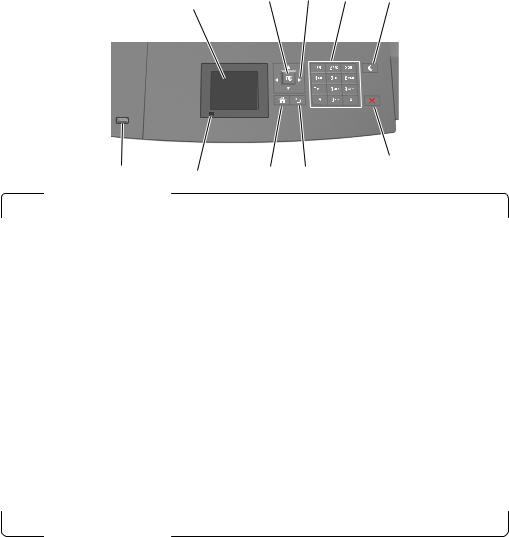
Using the printer control panel
1 |
2 |
3 |
4 |
5 |
|
|
|
|
|
|
10 |
|
8 |
6 |
|
|
9 |
7 |
||
|
|
|
|
|
|
|
|
Use the |
To |
|
|
|
|
|
|
||
|
1 |
Display |
• View the printer status. |
||
|
|
|
• Set up and operate the printer. |
||
|
|
|
|
||
|
2 |
Select button |
Submit changes made in the printer settings. |
||
|
|
|
|
||
|
3 |
Arrow buttons |
Scroll up and down or left and right. |
||
|
|
|
|
||
|
4 |
Keypad |
Enter numbers, letters, or symbols. |
||
|
|
|
|
||
|
5 |
Sleep button |
Enable Sleep mode or Hibernate mode. |
||
|
|
|
Do the following to wake the printer from Sleep mode: |
||
|
|
|
• Press any hard button. |
||
|
|
|
• Pull out Tray 1 or load paper in the multipurpose feeder. |
||
|
|
|
• Open a door or cover. |
||
|
|
|
• Send a print job from the computer. |
||
|
|
|
• Perform a power on reset with the main power switch. |
||
|
|
|
• Attach a device to the USB port on the printer. |
||
|
|
|
|
|
|
|
6 |
Stop or Cancel button |
Stop all printer activity. |
|
|
|
|
|
|
|
|

Learning about the printer |
13 |
|||
|
|
|
|
|
|
|
Use the |
To |
|
|
|
|
|
|
|
7 |
Back button |
Return to the previous screen. |
|
|
|
|
|
|
|
8 |
Home button |
Go to the home screen. |
|
|
|
|
|
|
|
9 |
Indicator light |
Check the status of the printer. |
|
|
|
|
|
|
10 |
USB port |
Connect a flash drive to the printer. |
||
|
|
|
Note: Only the front USB port supports flash drives. |
|
|
|
|
|
|
Understanding the colors of the Sleep button and indicator lights
The colors of the Sleep button and indicator lights on the printer control panel signify a certain printer status or condition.
|
Indicator light |
Printer status |
|
|
|
|
Off |
The printer is off or in Hibernate mode. |
|
|
|
|
Blinking green |
The printer is warming up, processing data, or printing. |
|
|
|
|
Solid green |
The printer is on, but idle. |
|
|
|
|
Blinking red |
The printer requires user intervention. |
|
|
|
|
Sleep button light |
Printer status |
|
|
|
|
Off |
The printer is off, idle or in Ready state. |
|
|
|
|
Solid amber |
The printer is in Sleep mode. |
|
|
|
|
Blinking amber |
The printer is entering or waking from Hibernate mode. |
|
|
|
|
Blinking amber for 0.1 second, then goes |
The printer is in Hibernate mode. |
|
completely off for 1.9 seconds in a slow, |
|
|
pulsing pattern |
|
|
|
|
Additional printer setup |
14 |
Additional printer setup


Installing internal options
CAUTION—SHOCK HAZARD: If you are accessing the controller board or installing optional hardware or memory devices sometime after setting up the printer, then turn the printer off, and unplug the power cord from the electrical outlet before continuing. If you have any other devices attached to the printer, then turn them off as well, and unplug any cables going into the printer.
Available internal options
•Memory card
–DDR3 DIMM
–Flash memory
•Fonts
•Firmware cards
–Forms and Bar Code
–PRESCRIBE
–IPDS
•Printer hard disk
•LexmarkTM Internal Solutions Ports (ISP)
–Parallel 1284-B interface
–MarkNetTM N8350 802.11 b/g/n wireless printer server
–RS-232-C serial interface
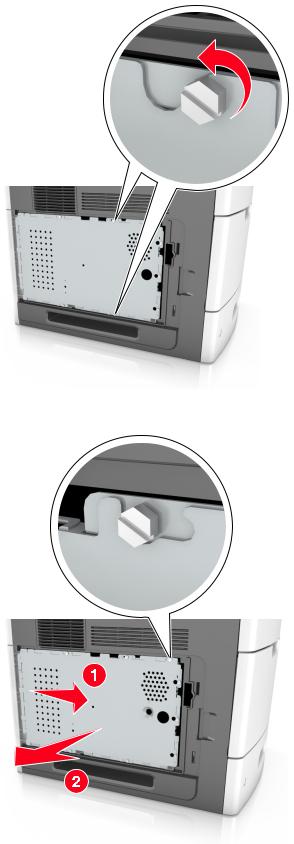
Accessing the controller board
Note: This task requires a flat head screwdriver.
CAUTION—SHOCK HAZARD: If you are accessing the controller board or installing optional hardware or memory devices sometime after setting up the printer, then turn the printer off, and unplug the power cord from the electrical outlet before continuing. If you have any other devices attached to the printer, then turn them off as well, and unplug any cables going into the printer.
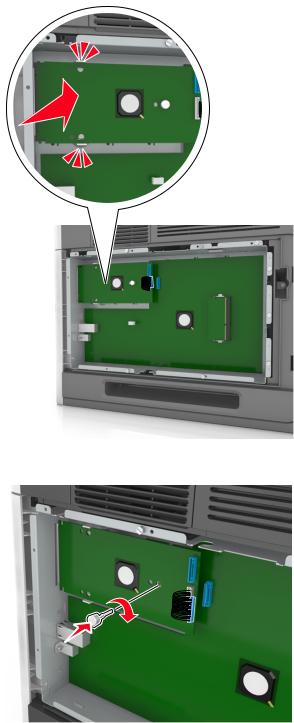
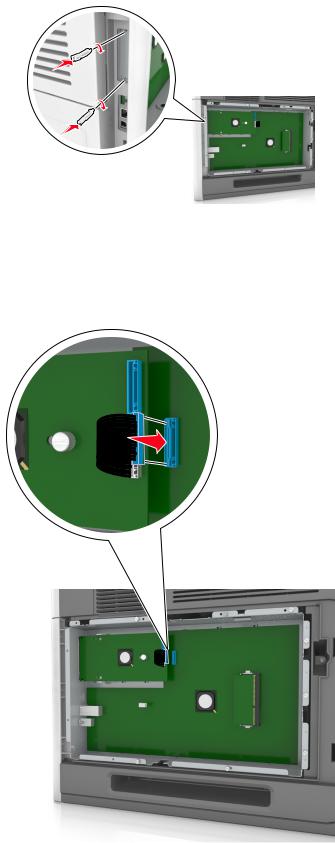
1 Remove the controller board access cover.
1 |
2 |
|
|
Additional printer setup |
15 |
2 Using a screwdriver, loosen the screws on the controller board shield.
3 Remove the shield.
Additional printer setup |
16 |
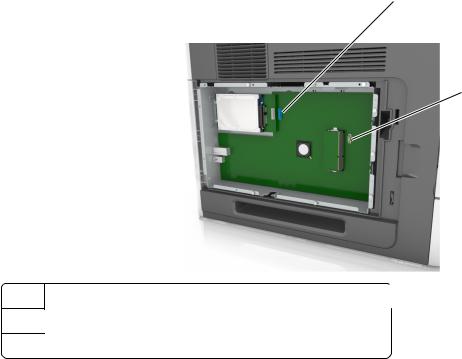
4 Use the following illustration to locate the appropriate connector:
Warning—Potential Damage: Controller board electronic components are easily damaged by static electricity. Touch a metal surface on the printer first before touching any controller board electronic component or connector.
1
2
 3
3
1 Lexmark Internal Solutions Port or printer hard disk connector
2 Option card connector
3 Memory card connector

Additional printer setup |
17 |
5 Align the screws with the holes on the shield, and then reattach the shield.
6 Tighten the screws on the shield.
Additional printer setup |
18 |
7 Reattach the access cover.
1 |
2 |
|
|
Installing a memory card
CAUTION—SHOCK HAZARD: If you are accessing the controller board or installing optional hardware or memory devices sometime after setting up the printer, then turn the printer off, and unplug the power cord from the electrical outlet before continuing. If you have any other devices attached to the printer, then turn them off as well, and unplug any cables going into the printer.
Warning—Potential Damage: Controller board electronic components are easily damaged by static electricity. Touch something metal on the printer first before touching any controller board electronic components or connectors.
An optional memory card can be purchased separately and attached to the controller board.
1Access the controller board.
For more information, see “Accessing the controller board” on page 14.
2Unpack the memory card.
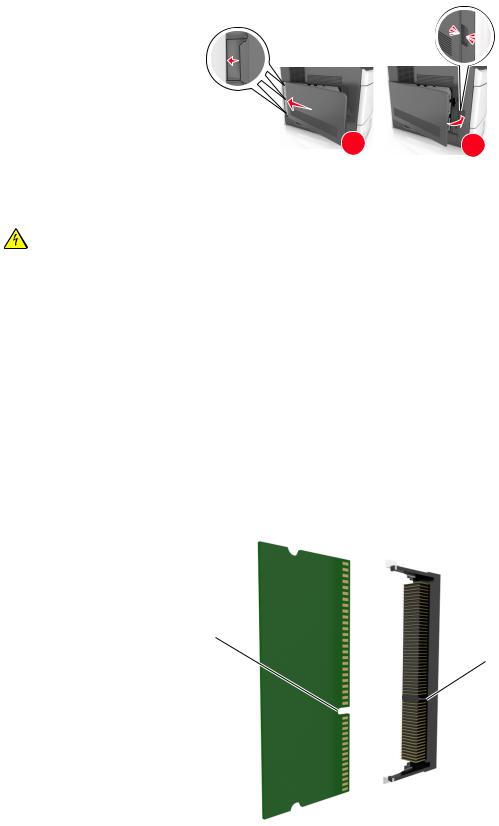
Warning—Potential Damage: Do not touch the connection points along the edge of the card. Doing so may cause damage.
3 Align the notch (1) on the memory card with the ridge (2) on the connector.
1
2
Additional printer setup |
19 |
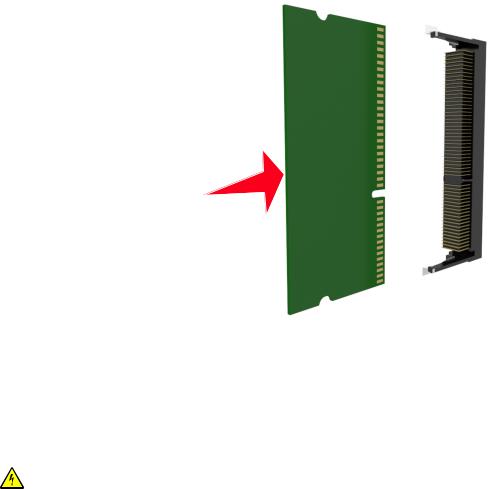
4Push the memory card straight into the connector, and then push the card toward the controller board wall until it clicks into place.
5 Reattach the controller board shield, and then the controller board access cover.
Installing an Internal Solutions Port
The controller board supports one optional Lexmark Internal Solutions Port (ISP).
Note: This task requires a flat head screwdriver.
CAUTION—SHOCK HAZARD: If you are accessing the controller board or installing optional hardware or memory devices sometime after setting up the printer, then turn the printer off, and unplug the power cord from the electrical outlet before continuing. If you have any other devices attached to the printer, then turn them off as well, and unplug any cables going into the printer.
Warning—Potential Damage: Controller board electronic components are easily damaged by static electricity. Touch something metal on the printer first before touching any controller board electronic components or connectors.
1Access the controller board.
For more information, see “Accessing the controller board” on page 14.
2If an optional printer hard disk is installed, then remove the printer hard disk first. For more information, see “Removing a printer hard disk” on page 29.
Additional printer setup |
20 |
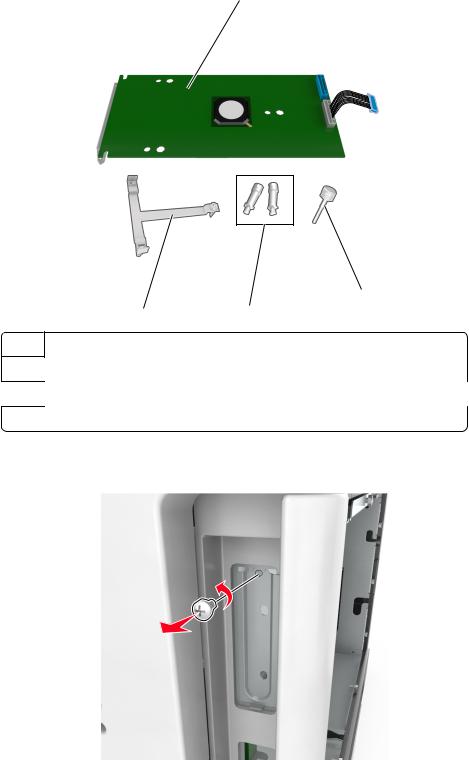
3 Unpack the ISP kit.
1
2
4 |
3 |
1 ISP solution
2Screw for attaching the plastic bracket to the ISP
3Screws for attaching the ISP mounting bracket to the controller board shield
4 Plastic bracket
4Remove the metal cover from the ISP opening. a Loosen the screw.
b Lift the metal cover, and then pull it out completely.
Additional printer setup |
21 |
1 |
2 |
3 |
5Align the posts of the plastic bracket with the holes on the controller board cage, and then press the plastic bracket on the controller board cage until it clicks into place. Make sure the cables are neatly tucked under the plastic bracket.
6 Install the ISP on the plastic bracket.
Note: Hold the ISP at an angle over the plastic bracket so that any overhanging connectors will pass through the ISP opening in the controller board cage.
Additional printer setup |
22 |
7 Lower the ISP toward the plastic bracket until the ISP is seated between the guides of the plastic bracket.
8 Use the provided thumbscrew for the ISP to attach the plastic bracket to the ISP.
Note: Turn the screw clockwise, enough to hold the ISP in place, but do not tighten it yet.
Additional printer setup |
23 |
9 Attach the two provided screws to secure the ISP mounting bracket to the controller board shield.
10Tighten the thumbscrew that is attached to the ISP.
Warning—Potential Damage: Do not screw it on too tightly.
11Connect the ISP solution interface cable into the receptacle of the controller board.
Note: The plugs and receptacles are color-coded.
Additional printer setup |
24 |
Installing an optional card
CAUTION—SHOCK HAZARD: If you are accessing the controller board or installing optional hardware or memory devices sometime after setting up the printer, then turn the printer off, and unplug the power cord from the electrical outlet before continuing. If you have other devices attached to the printer, then turn them off as well, and unplug any cables going into the printer.
Warning—Potential Damage: Controller board electronic components are easily damaged by static electricity. Touch a metal surface on the printer before touching any controller board electronic components or connectors.
1Access the controller board.
For more information, see “Accessing the controller board” on page 14.
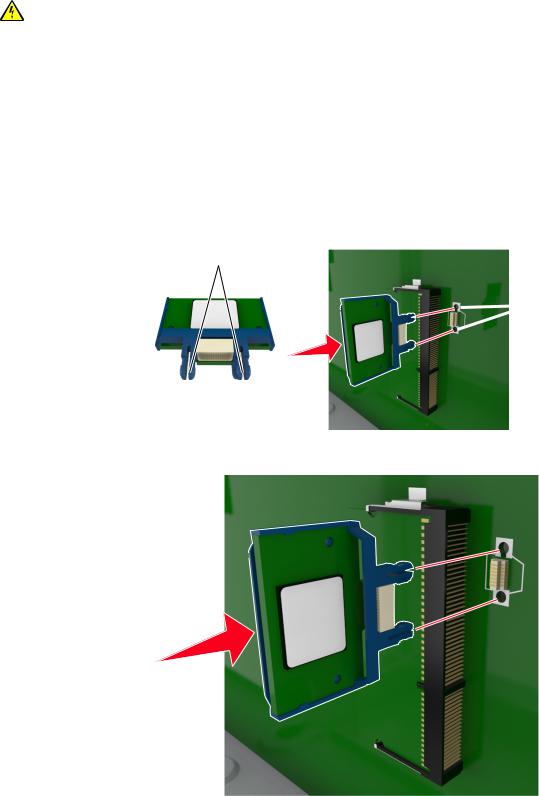
2Unpack the optional card.
Warning—Potential Damage: Avoid touching the connection points along the edge of the card.
3 Holding the card by its sides, align the plastic pins (1) on the card with the holes (2) on the controller board.
1
 2
2
4 Push the card firmly into place as shown in the illustration.
Warning—Potential Damage: Improper installation of the card may cause damage to the card and the controller board.

Additional printer setup |
25 |
Note: The entire length of the connector on the card must touch and be flushed against the controller board.
5 Close the controller board access door.
Note: When the printer software and any hardware options are installed, it may be necessary to manually add the options in the printer driver to make them available for print jobs. For more information, see “Updating available options in the printer driver” on page 38.
Installing a printer hard disk
Note: This task requires a flat head screwdriver.
CAUTION—SHOCK HAZARD: If you are accessing the controller board or installing optional hardware or memory devices sometime after setting up the printer, then turn the printer off, and unplug the power cord from the electrical outlet before continuing. If you have any other devices attached to the printer, then turn them off as well, and unplug any cables going into the printer.
Warning—Potential Damage: Controller board electronic components are easily damaged by static electricity. Touch something metal on the printer first before touching any controller board electronic components or connectors.
1Access the controller board.
For more information, see “Accessing the controller board” on page 14.
2Unpack the printer hard disk.
Additional printer setup |
26 |
3 Locate the appropriate connector on the controller board cage.
Note: If an optional ISP is currently installed, then the printer hard disk must be installed onto the ISP.
Additional printer setup |
27 |
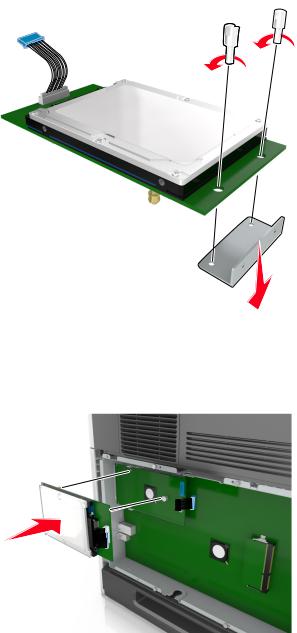
To install a printer hard disk onto the ISP:
a Remove the screws attached to the printer hard disk mounting bracket, and then remove the bracket.
bAlign the standoffs of the printer hard disk to the holes in the ISP, and then press the printer hard disk down until the standoffs are in place.
Installation warning: Hold only the edges of the printed circuit board assembly. Do not touch or press on the center of the printer hard disk. Doing so may cause damage.
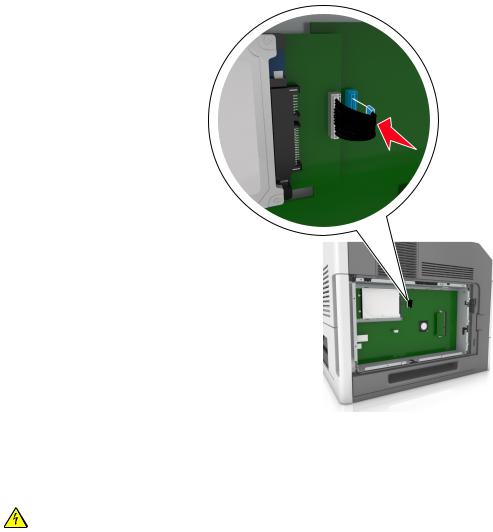
c Insert the plug of the printer hard disk interface cable into the receptacle of the ISP.
Note: The plugs and receptacles are color coded.
Additional printer setup |
28 |
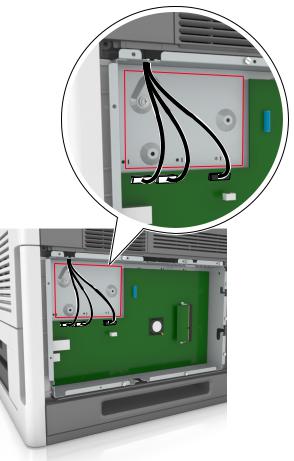
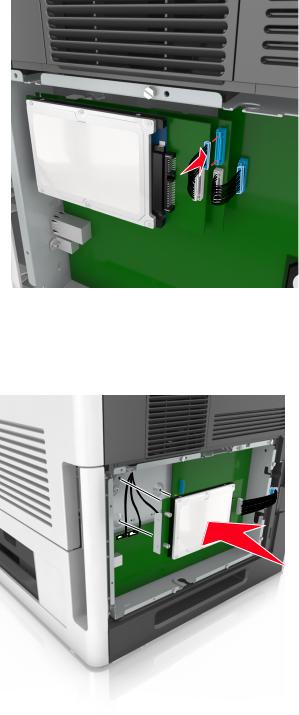
4Align the standoffs of the printer hard disk to the holes in the controller board cage, and then press the printer hard disk down until the standoffs are in place.
Installation warning: Hold only the edges of the printed circuit board assembly. Do not touch or press on the center of the printer hard disk. Doing so may cause damage.
Note: Make sure the cables are neatly tucked under the printer hard disk.
5Insert the plug of the printer hard disk interface cable into the receptacle of the controller board.
Note: The plugs and receptacles are color coded.
Additional printer setup |
29 |
Removing a printer hard disk
Note: This task requires a flat head screwdriver.
CAUTION—SHOCK HAZARD: If you are accessing the controller board or installing optional hardware or memory devices sometime after setting up the printer, then turn the printer off, and unplug the power cord from the electrical outlet before continuing. If you have any other devices attached to the printer, then turn them off as well, and unplug any cables going into the printer.
Additional printer setup |
30 |
Warning—Potential Damage: Controller board electronic components are easily damaged by static electricity. Touch a metal surface on the printer before touching any controller board electronic components or connectors.
1Access the controller board.
For more information, see “Accessing the controller board” on page 14.
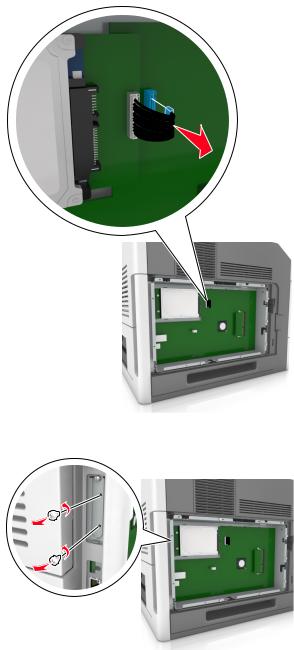
2Unplug the printer hard disk interface cable from the controller board, leaving the cable attached to the printer hard disk. To unplug the cable, squeeze the paddle at the plug of the interface cable to disengage the latch before pulling out the cable.
3 Remove the screws holding the printer hard disk in place.
Loading...