


 Loading...
LevelOne
FCS-1000
IP Network Camera
WCS-2000
Wireless IP Network Camera
User’s Manual
VERSION 1.0

Table of Contents
CHAPTER 1 INTRODUCTION.............................................................................................. |
1 |
Overview ............................................................................................................................ |
1 |
Physical Details.................................................................................................................. |
3 |
Package Contents .............................................................................................................. |
4 |
CHAPTER 2 BASIC SETUP ................................................................................................... |
5 |
System Requirements........................................................................................................ |
5 |
Installation ......................................................................................................................... |
5 |
Setup ................................................................................................................................... |
7 |
CHAPTER 3 SETUP FOR VIEWING.................................................................................. |
11 |
Introduction ..................................................................................................................... |
11 |
Adjusting the Video Image ............................................................................................. |
11 |
Controlling User Access to the Video Stream ............................................................... |
13 |
Making Video available from the Internet.................................................................... |
14 |
Motion Detection/E-mail Alerts ..................................................................................... |
17 |
CHAPTER 4 WEB-BASED MANAGEMENT .................................................................... |
18 |
Introduction ..................................................................................................................... |
18 |
Connecting to LevelOne IP Network Camera .............................................................. |
18 |
Welcome Screen............................................................................................................... |
19 |
View Video Screen........................................................................................................... |
20 |
Administration Menu...................................................................................................... |
21 |
System Screen .................................................................................................................. |
21 |
Network Screen................................................................................................................ |
22 |
Image Screen.................................................................................................................... |
27 |
User Screen ...................................................................................................................... |
28 |
Status Screen.................................................................................................................... |
30 |
CHAPTER 5 VIEWING & RECORDING........................................................................... |
32 |
Overview .......................................................................................................................... |
32 |
Installation ....................................................................................................................... |
32 |
System Tray Icon............................................................................................................. |
33 |
Main Screen ..................................................................................................................... |
33 |
Adding Cameras to the Camera List ............................................................................. |
34 |
Viewing Live Video ......................................................................................................... |
37 |
Recording Video .............................................................................................................. |
38 |
Viewing with your Web Browser ................................................................................... |
42 |
CHAPTER 6 TROUBLESHOOTING .................................................................................. |
46 |
Overview .......................................................................................................................... |
46 |
Problems........................................................................................................................... |
46 |
APPENDIX A SPECIFICATIONS........................................................................................ |
48 |
FCS-1000.......................................................................................................................... |
48 |
WCS-2000 ........................................................................................................................ |
48 |
FCC Statement ................................................................................................................ |
49 |
Copyright Notice.............................................................................................................. |
50 |
i

P/N: 9560GF01A0
Copyright 2003. All Rights Reserved.
Document Version: 1.0
All trademarks and trade names are the properties of their respective owners.
ii
Chapter 1 |
1 |
Introduction |
This Chapter provides details of the LevelOne IP Network Camera's features, components and capabilities.
Overview
The LevelOne IP Network Camera has an Integrated Microcomputer and a high quality CMOS digital-Image-Sensor, enabling it to display high quality live streaming video over your wired LAN, the Internet, and for the WCS-2000, an 802.11b Wireless LAN.
Using enhanced MPEG-4 technologies, the LevelOne IP Network Camera is able to stream high quality video directly to your PC. The high compression capabilities of MPEG-4 reduce network bandwidth requirements to amazingly low levels.
A convenient and user-friendly Windows program is provided for both viewing and recording video. If necessary, you can even view video using your Web Browser and Microsoft Media Player, on a variety of software platforms.
Figure 1: LevelOne IP Network Camera
Features
•Standalone Design. The LevelOne IP Network Camera is a standalone system with built-in CPU and Video encoder. It requires only a power source and a connection to your LAN or Wireless LAN.
1

•Suitable for Home, Business or Public Facilities. Whether for Home, Business or Public Facility surveillance, or just for entertainment and fun, the LevelOne IP Network Camera has the features you need.
•Multi-Protocol Support. Supporting TCP/IP networking, SMTP (E-mail), HTTP and other Internet related protocols, the LevelOne IP Network Camera can be easily integrated into your existing network.
•Easy Configuration. A Windows-based Wizard is provided for initial setup. Subsequent administration and management can be performed using a standard web browser. The administrator can configure and manage the LevelOne IP Network Camera via the LAN or Internet.
•Viewing/Recording Utility. A user-friendly Windows utility is provided for viewing live video. For periods when you are absent, or for scheduled recording, this application also allows you to record video to an ASF file on your PC. The recorded files are in a standard Windows Media format, and thus usable by a wide variety of programs if required.
•Motion Detection. This feature will capture a short video and send it to your E-mail address when motion is detected. The LevelOne IP Network Camera will compare consecutive frames to detect changes caused by the movement of large objects. This function only works indoors due to the sensitivity of the CMOS sensor.
Internet Features
•User-definable HTTP port number. This allows Internet Gateways to use “port mapping” so the LevelOne IP Network Camera and a Web Server can share the same Internet IP address.
•DDNS Support. In order to view video over the Internet, users must know the Internet IP address of the gateway used by the LevelOne IP Network Camera. But if the Gateway has a dynamic IP address, DDNS (Dynamic DNS) is required. Since many existing Gateways do not support DDNS, this function is incorporated into the LevelOne IP Network Camera.
•NTP (Network-Time-Protocol) Support. NTP allows the LevelOne IP Network Camera to calibrate its internal clock from an Internet Time-Server. This ensures that the time stamp on Video from the LevelOne IP Network Camera will be correct.
Security Features
•User Authentication. If desired, access to live video can be restricted to known users. Users will have to enter their username and password before being able to view the video stream. Up to 20 users can be entered.
•Password-Protected Configuration. Configuration data can be password protected, so that it only be changed by the LevelOne IP Network Camera Administrator.
Wireless Features (WCS-2000 only)
•Standards Compliance. The IEEE 802.11b standard is fully supported. Gain the advantages of mobility, flexibility and high-speed by using IEEE 802.11b wireless LAN technology.
•Wired and Wireless Network Support. The WCS-2000 supports both wired and wireless transmission.
•WEP Support. Full WEP support (64/128 Bit) on the Wireless interface is provided.
2
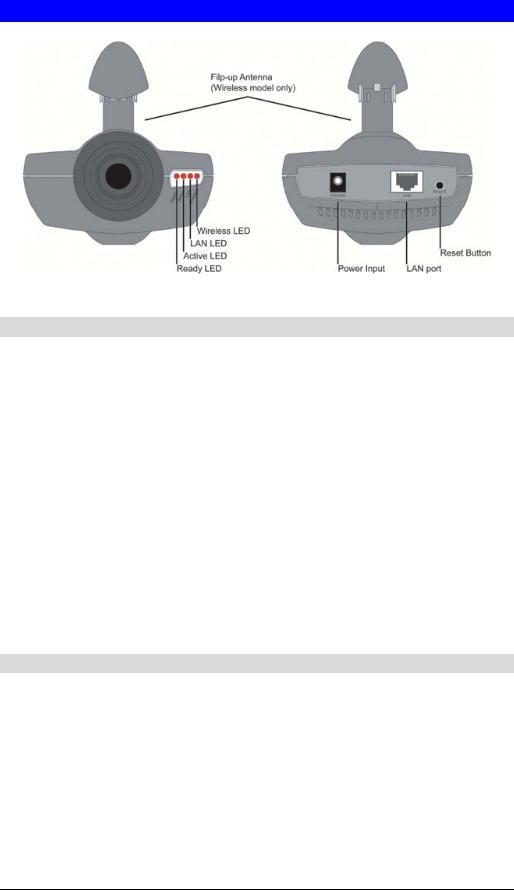
Physical Details
Figure 2: LevelOne IP Network Camera
Front-mounted LEDs
Ready
Active
LAN
Wireless (WCS-2000 only)
On - Power on. Off - No power.
Blinking - The Ready LED will blink during start up. This will take 15 to 20 seconds.
Off - Idle.
Blinking - LevelOne IP Network Camera is providing a live video stream to at least one viewer.
On - LAN port is active.
Off - LAN port is not available.
Blinking - Data is being transmitted or received via the LAN port. On - Wireless interface is active.
Off - Wireless interface is not available.
Blinking - Data is being transferred via the Wireless interface.
Rear Panel
Power Input |
Connect the supplied power adapter here. |
LAN port |
Use a standard LAN cable to connect your LevelOne IP Network |
|
Camera to a 10/100BaseT hub or switch. |
Reset Button |
This button has two (2) functions: |
|
• Restore Default IP Address. When pressed and released, the |
|
LevelOne IP Network Camera will reset its IP address to the |
|
default value |
|
• Restore Default IP Address, Administrator ID, and |
|
Administrator password. When pressed and held or 3 |
|
seconds, the IP address, Administrator ID, and Administrator |
3
Password settings will be set to their default values.
•IP address: 192.168.0.99
•Administrator ID: administrator
•Administrator Password: null (no password)
Note: After this procedure is completed, all LEDs will blink three times to confirm that the reset was completed successfully.
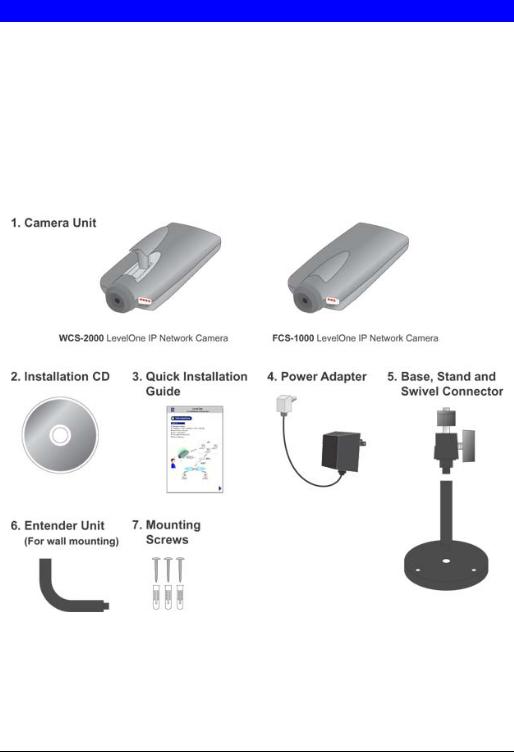
Package Contents
The following items should be included: If any of these items are damaged or missing, please contact your dealer immediately.
1.The LevelOne IP Network Camera
2.Installation CD-ROM
3.Quick Installation Guide
4.Power adapter
5.Base, Stand and Swivel Connector
6.Extender Unit
7.Mounting Screws
4
Chapter 2 |
2 |
Basic Setup |
This Chapter provides details of installing and configuring the LevelOne IP Network Camera.
System Requirements
•To use the LAN interface, a standard 10/100BaseT hub or switch and network cable is required.
•To use the Wireless interface on the WCS-2000, other Wireless devices must be compliant with the IEEE802.11b specifications. All Wireless stations must use compatible settings.
Installation
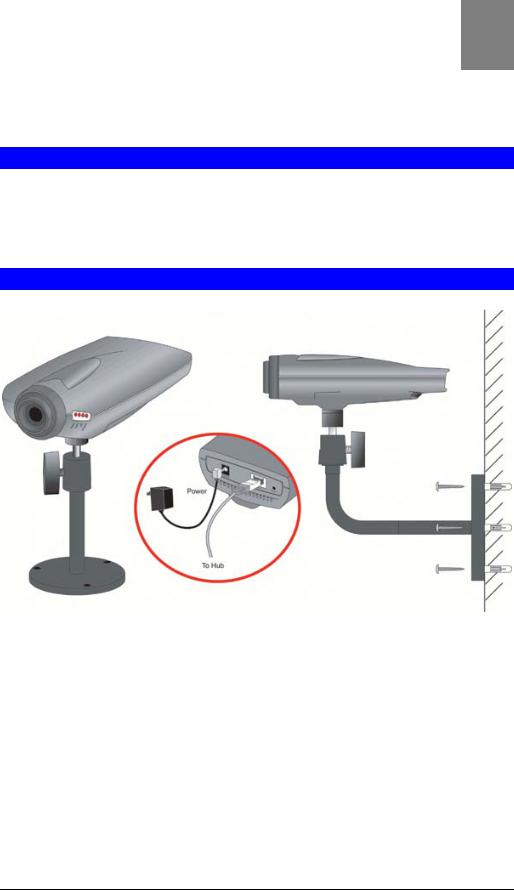
Figure 3: LevelOne IP Network Camera Installation
1. Mount the Camera on the supplied Base and Stand.
Join the Base, stand and swivel connector to the camera, as shown in the diagram above.
2. Connect the LAN Cable
Connect the LevelOne IP Network Camera to a 10/100BaseT hub or switch.
5

For the WCS-2000, this disables the Wireless Interface, because only one interface can be active. The LAN interface is recommended for initial configuration.
The default Wireless settings for the WCS-2000 are:
Mode: Infrastructure
Channel: 11 ESSID: wireless WEP: Disabled
3. Adjust the Antenna
On the WCS-2000, flip the top-mounted Antenna to the upright position to improve wireless reception.
4. Power Up
Connect the supplied power adapter to the LevelOne IP Network Camera and power up. Use only the power adapter provided. Using a different one may cause hardware damage.
4. Check the LEDs
•The Ready LED will turn on briefly, then start blinking. It will blink during startup, which takes 15 to 20 seconds.
After startup is completed, the Ready LED should remain ON.
•The Active LED should be OFF.
It will flash when anyone is viewing live video.
•Either the LAN LED OR the Wireless LED should be ON.
For more information, refer to Front-mounted LEDs in Chapter 1.
6
Setup
Initial setup should be performed using the supplied Windows-based setup Wizard. This program can locate the LevelOne IP Network Camera even if its IP address is invalid for your network. You can then configure the LevelOne IP Network Camera with appropriate TCP/IP settings for your LAN.
Subsequent administration can be performed with your Web browser, as explained in Chapter 3 - Web-based Administration.
Setup Procedure
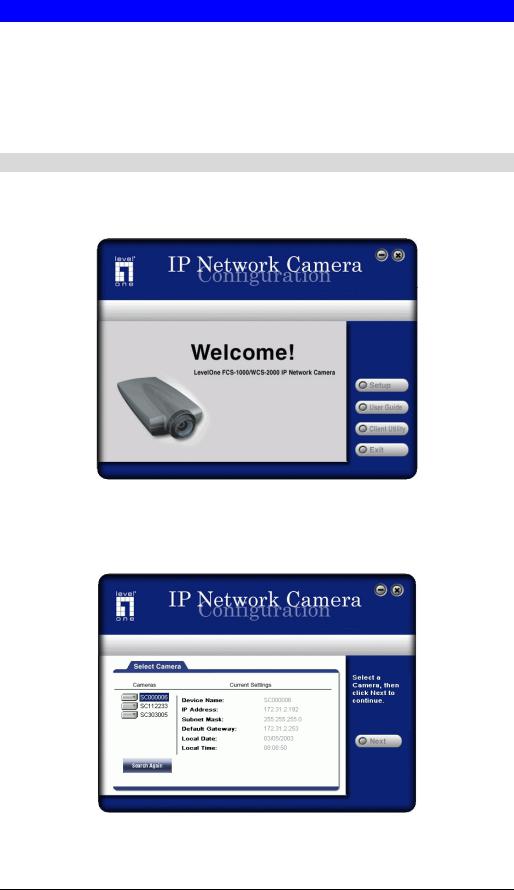
1.Insert the supplied CD-ROM into your drive. If the setup program does not start automatically, run Netcam_Setup.exe in the root folder. You will see the Welcome screen shown below.
Figure 4: Welcome Screen
2.Click the Setup button to start the setup Wizard.
3.The next screen will list all the LevelOne IP Network Cameras on your LAN. An example screen is shown below.
Figure 5: Camera List Screen
7
4.Select the desired Camera from the list on the left. The current settings for the selected Camera will be displayed in the table on the right.
5.Click Next to continue.
6.If the Administrator ID and Password have been set, you will be prompted to enter them, as shown below. Enter the Administrator ID and Password set on the User screen.
Figure 6: Password Dialog
By default, the Administrator ID and password are blank. However, you should assign a name and password, on the "User" screen of the Web interface. The Web interface can be accessed via the "Web UI" button on the final screen of the Wizard.
7.On the following screen, shown below, choose Fixed IP or Dynamic IP.
•Fixed IP is recommended, and can always be used.
•Dynamic IP can only be used if your LAN has a DCHP Server.
Figure 7: Fixed or Dynamic IP Selection
8.Click Next to continue.
•If Dynamic IP Address was selected, you will then see the screen shown in Figure 9: Camera Settings.
•If you selected Fixed IP Address, the following screen will be displayed.
8

Figure 8: TCP/IP Settings
9.Enter the desired IP address values:
•Enter an unused IP Address from within the address range used on your LAN.
•The Subnet Mask and Default Gateway fields must match the values used by PCs on your LAN.
•Click Next to continue.
Figure 9: Camera Settings
10.This screen allows you to enter a suitable Description, and set the correct Date, Time, and Time Zone. Make any desired changes, then click Next to continue.
9
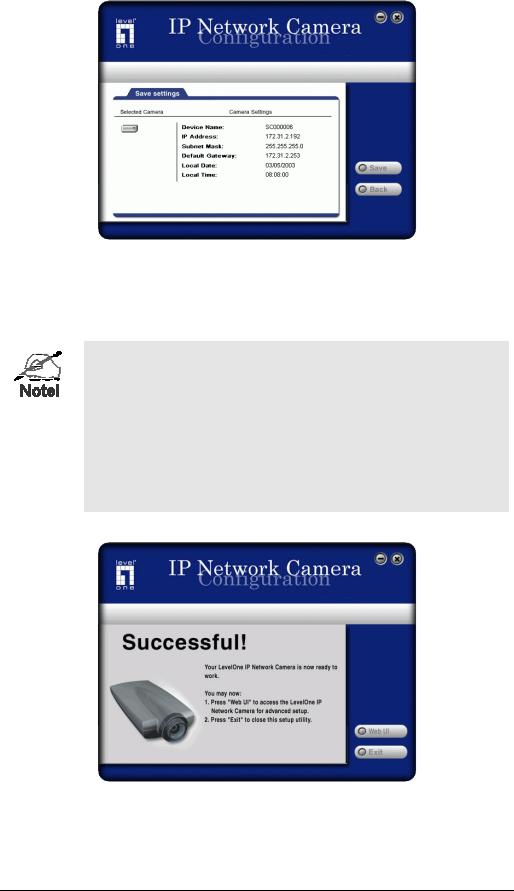
Figure 10: Save Screen
11.This screen displays all details of the LevelOne IP Network Camera.
Click Save if the settings are correct, or click Back to modify any incorrect values.
12.After clicking Save, you will see the screen below.
You can click the Web UI button to connect to the camera using your Web Browser.
Using the Web UI is required in order the change the Wireless settings for the WCS-2000, on the Network screen. The default Wireless settings for the WCS-2000 are:
Mode: Infrastructure
Channel:11 ESSID: wireless WEP: Disabled
Figure 11: Final Screen
13.Click Exit to end the Wizard. Setup is now complete.
10

Chapter 3 |
3 |
Setup for Viewing |
This Chapter provides information about the optional settings and features for viewing video via the LevelOne IP Network Camera. This Chapter is for Administrators only.
Introduction
After finishing setup via the Windows-based Wizard, the LevelOne IP Network Camera can immediately be used by all users on your LAN.
This chapter describes some additional settings and options for viewing live Video:
•Adjusting the video image
•Controlling user access to the live video stream
•Making video available from the Internet
•Using the Motion Detection/E-mail feature
Adjusting the Video Image
If necessary, the LevelOne IP Network Camera Administrator can adjust the Video image. Settings are provided for:
•Image size - Select 320 x 240 or 160 x 120. The larger size requires greater bandwidth.
•Image quality - This determines the degree of compression applied to the Video stream. Higher quality requires greater bandwidth.
•Exposure - Adjust the brightness of the image, if the Auto-Exposure does not give satisfactory results.
•Color Adjustment - Red, Green, Blue intensity can be adjusted.
•Time Stamp - If enabled, the date/time will be displayed on the Video image.
•Text Overlay - If enabled, up to 20 characters can be superimposed on the Video image. This is useful for identifying the camera.
To Adjust the Video Image:
1.Connect to the Web-based interface of the LevelOne IP Network Camera. (See Chapter 4 - Web-based Management for details.)
2.On the Administration menu, select Image. You will see a screen like the example below.
11
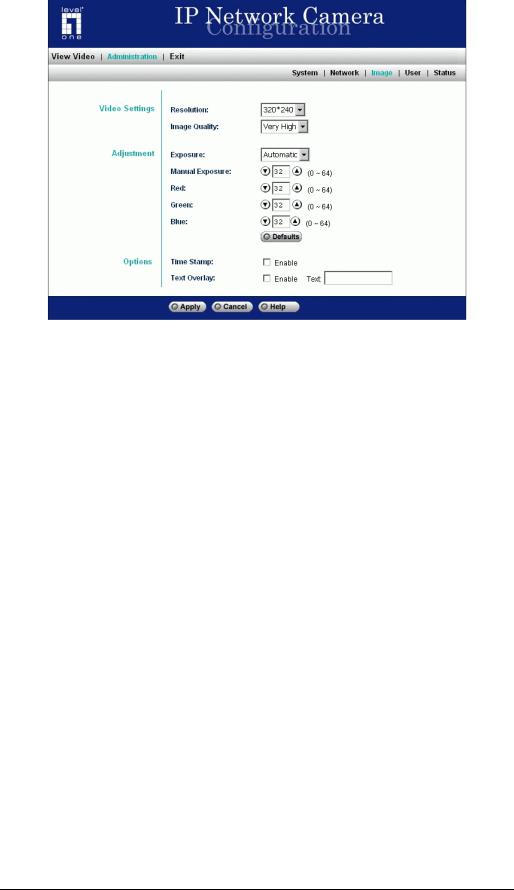
Figure 12: Image Screen
3.Make the required adjustments, and save your changes.
12
Controlling User Access to the Video Stream
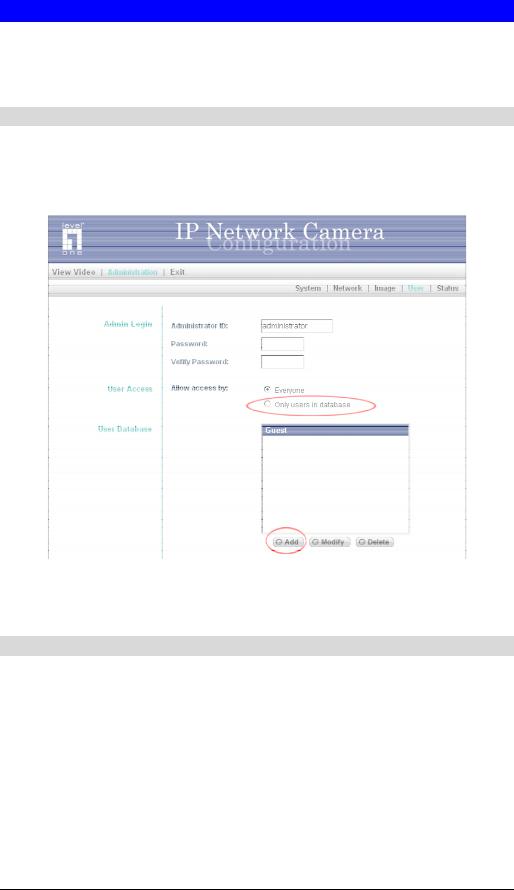
By default, all users can connect to the LevelOne IP Network Camera and view live Video.
If desired, you can limit access to known users, by requiring each user to login to the LevelOne IP Network Camera with their individual username and password.
To Enable this feature:
1.Connect to the Web-based interface of the LevelOne IP Network Camera. (See Chapter 4 - Web-based Management for details.)
2.On the Administration menu, select User.
3.Select the setting Allow access by Only users in database, as shown below.
Figure 13: User Screen
4.To add users to the database, click the Add button, and enter the name and password for each user.
Operation
•When each user connects, they will be prompted for their username and password. They must enter the name and password defined on the User screen above.
•If using the Windows Viewing/Recording utility, the username and password can be entered into the program, so that users do not need to provide the login data each time.
13
Making Video available from the Internet
If your LAN is connected to the Internet, typically by a Broadband Gateway/Router and Broadband modem, you can make the LevelOne IP Network Camera available via the Internet.
LevelOne IP Network Camera Setup
The LevelOne IP Network Camera configuration does NOT have be changed, unless:
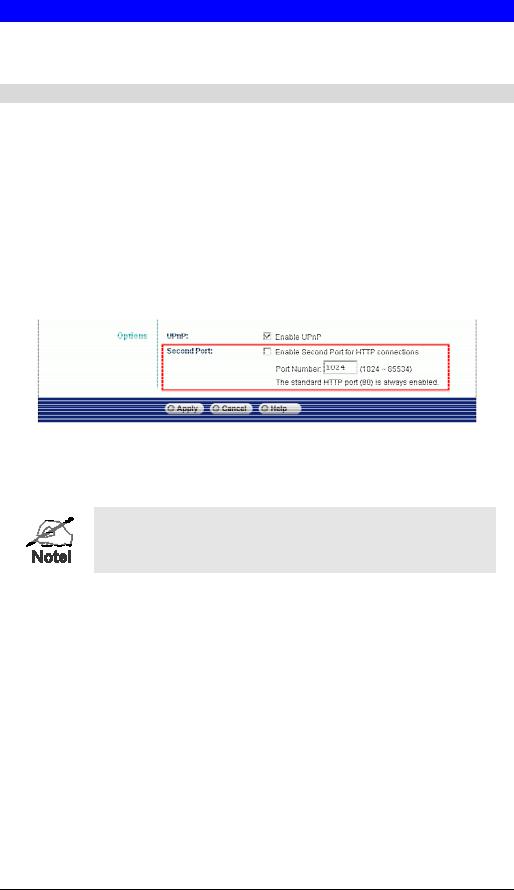
•You wish to change the port number from the default value (1024).
•You wish to use the DDNS (Dynamic DNS) feature of the LevelOne IP Network Camera.
Second Port Configuration
Normally, HTTP (Web) connections use port 80. Since the LevelOne IP Network Camera uses HTTP, but port 80 is likely to be used by a Web Server, you can use a different port for the LevelOne IP Network Camera. This port is called the "Second Port". (The first port is port 80.)
The default "Second Port" number is 1024. If you prefer to use a different port number, you can specify the port number on the LevelOne IP Network Camera's Network screen, as shown below.
Figure 14: Network Screen
The Network screen is part of the Web-based Administration interface. See Chapter 4 - Webbased Management for further details on using this interface.
Viewers need to know this port number in order to connect and view live Video, so you must inform viewers of the current port number.
DDNS (Dynamic DNS)
Many internet connections use a "Dynamic IP address", where the Internet IP address is allocated whenever the Internet connection is established.
This means that other Internet users don't know the IP address, so can't establish a connection.
DDNS is designed to solve this problem, by allowing users to connect to your LAN using a domain name, rather than an IP address.
To use DDNS:
1.Register for the DDNS service with a supported DDNS service provider. You can then apply for, and be allocated, a Domain Name.
2.Enter and save the correct DDNS settings on the Network screen of the LevelOne IP Network Camera.
14
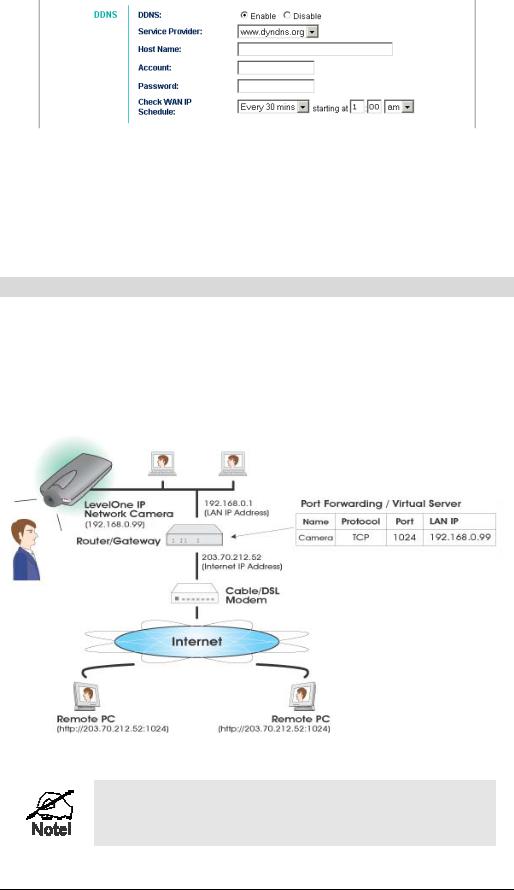
Figure 15: DDNS Settings - Network Screen
3.Operation is then automatic:
•The LevelOne IP Network Camera will then automatically contact the DDNS server whenever it detects that the Internet IP address has changed, and inform the DDNS server of the new IP address.
•Internet users can then connect to your LAN using the Domain Name allocated by the DDNS service provider.
Router/Gateway Setup
Your Router or Gateway must be configured to pass incoming TCP (HTTP) connections (from Viewers) to the LevelOne IP Network Camera. The Router/Gateway use the Port Number to determine which incoming connections are intended for the LevelOne IP Network Camera.
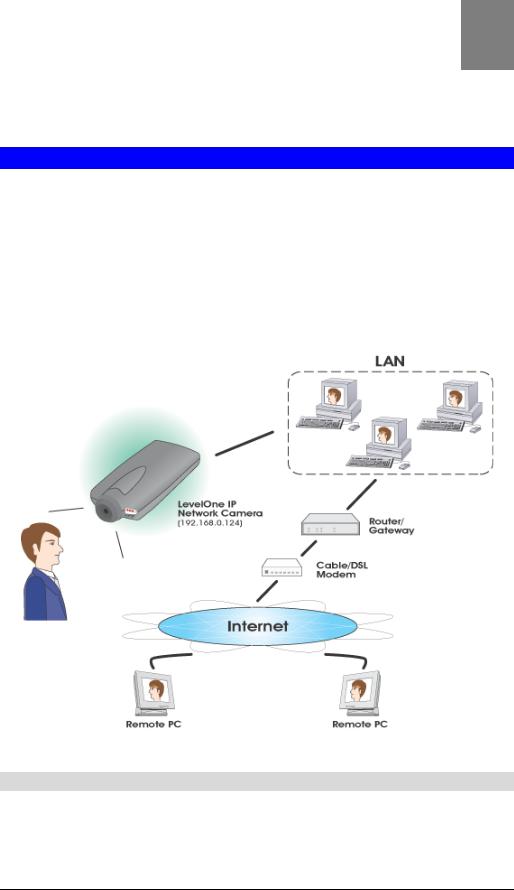
This feature is normally called Port Forwarding or Virtual Servers, and is illustrated below. The Port Forwarding/Virtual Server entry tells the Router/Gateway that incoming TCP connections on port 1024 should be passed to the LevelOne IP Network Camera. If necessary, check your Router/Gateway's user manual to check how to perform this configuration.
Figure 16: Connecting via the Internet
The "Port" for the Port Forwarding / Virtual Server entry above is the port number specified on the Network screen of the LevelOne IP Network Camera.
15
Viewing via the Internet
Clients (viewers) will also need a broadband connection; dial-up connections are NOT recommended.
Using the Windows Viewing/Recording Utility
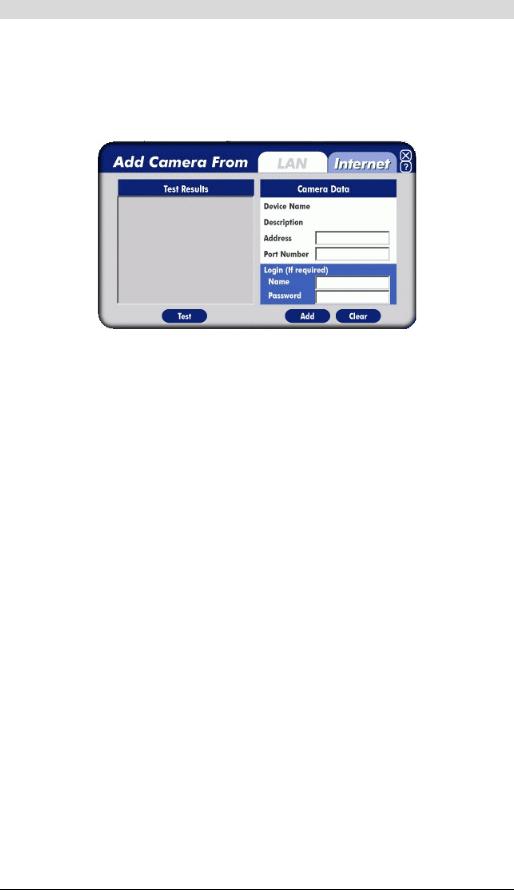
If using the Windows Viewing/Recording Utility, the details of the LevelOne IP Network Camera must be entered on the Internet tab of the Add Camera screen.
Figure 17: Add Camera from Internet
You can then select the camera in the Cameras list on the main screen, and click View to establish a connection and view live video.
See Chapter 5 - Viewing and Recording for full details on using the Windows Viewing/Recording utility.
Using your Web Browser
If using your Web browser, you need to enter EITHER the Internet IP address OR the Domain name, AND the correct port number, of the LevelOne IP Network Camera.
Enter the address of the LevelOne IP Network Camera, and its port number, in the Address (or Location) field of your Browser.
Example - IP address:
HTTP://203.70.212.52:1024
Where the Router/Gateway's Internet IP address is 203.70.212.52 and the "Second Port" number on the LevelOne IP Network Camera is 1024.
Example - Domain Name:
HTTP://mycamera.dyndns.tv:1024
Where the Router/Gateway's Internet Domain name (using DDNS in this example) is mycamera.dyndns.tv and the "Second Port" number on the LevelOne IP Network Camera is 1024.
See Chapter 5 -Viewing and Recording for further details of viewing Video using either the Windows Viewing/Recording utility or your Web Browser.
16
Motion Detection/E-mail Alerts
The Motion Detection feature will capture a short video and send it to your E-mail address when motion is detected.
The LevelOne IP Network Camera will compare consecutive frames to detect changes caused by the movement of large objects.
But the motion detector can also be triggered by:
•Sudden changes in the level of available light
•Movement of the camera itself.
Try to avoid these situations. The motion detection feature works best in locations where there is good steady illumination, and the camera is mounted securely. It cannot be used outdoors due to the sensitivity of the CMOS sensor.
To Use Motion Detection/E-mail Alert
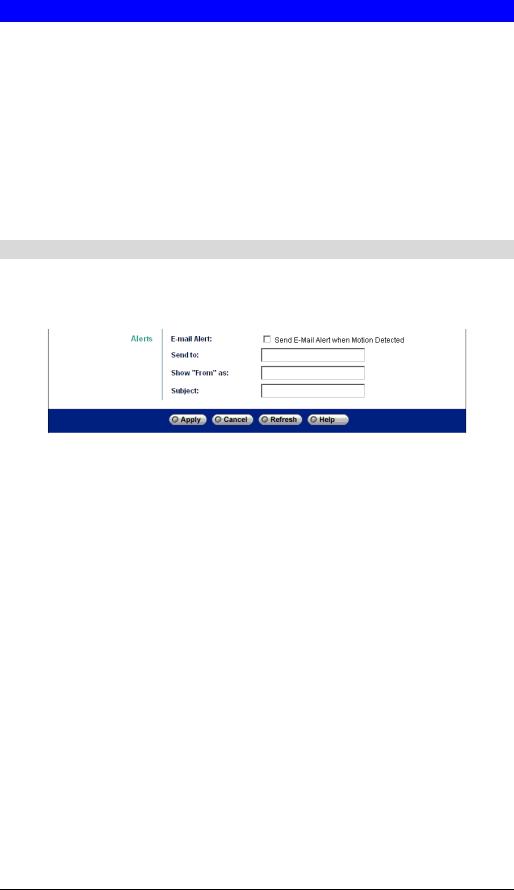
1.Using the Web-based interface on the LevelOne IP Network Camera, select the User screen.
2.Configure the Alerts section shown below.
Figure 18: Motion Detection/E-mail Alert
•Check the box Send E-mail Alert when Motion Detected.
•Enter the destination E-mail address in the Send to: field.
•Enter a valid E-mail address in the Show "From" as field. The SMTP (Simple Mail Transport Protocol) Server associated with this E-mail address is used to send the mail.
•Enter a suitable Subject for the E-mail
•Save (Apply) your changes.
17
Chapter 4 |
4 |
Web-based Management |
This Chapter provides Setup details of the LevelOne IP Network Camera’s Web-based Interface. This Chapter is for Administrators only.
Introduction
The LevelOne IP Network Camera can be configured using your Web Browser. The LevelOne IP Network Camera must have an IP address which is compatible with your PC.
The recommended method to ensure this is to use the supplied Windows-based Wizard, as described in the previous chapter.
Connecting to LevelOne IP Network Camera
•If you have run the Windows-based setup Wizard, the final screen provided a button Web UI. Clicking this button will immediately connect to the LevelOne IP Network Camera, using your Web Browser.
•If using only your Web Browser, use the following procedure to establish a connection from your PC to the LevelOne IP Network Camera:
•Once connected, you can add the LevelOne IP Network Camera to your Browser's
Favorites or Bookmarks.
Connecting using your Web Browser
1.Start your WEB browser.
2.In the Address box, enter "HTTP://" and the IP Address of the LevelOne IP Network Camera, as in this example, which uses the LevelOne IP Network Camera's default IP Address:
HTTP://192.168.0.99
3.If the Administrator ID and Password have been assigned, you will then be prompted for a username and password. Enter the name and password you assigned.
18
Loading...