


ThinkPad® X200 Tablet
Service and Troubleshooting Guide

ThinkPad® X200 Tablet
Service and Troubleshooting Guide

Note
Before using this information and the product it supports, be sure to read the following:
vSafety and Warranty Guide included in the package with this publication.
vWireless related information in online Access Help and Appendix D, “Notices,” on page 69.
vRegulatory Notice included in the package with this publication.
The Safety and Warranty Guide and the Regulatory Notice have been uploaded on the Web site. To refer to them, go to http://www.lenovo.com/think/support, click Troubleshooting, and then click User’s guides and manuals.
First Edition (July 2008)
© Copyright Lenovo 2008. All rights reserved.
LENOVO products, data, computer software, and services have been developed exclusively at private expense and are sold to governmental entities as commercial items as defined by 48 C.F.R. 2.101 with limited and restricted rights to use, reproduction and disclosure.
LIMITED AND RESTRICTED RIGHTS NOTICE: If products, data, computer software, or services are delivered pursuant a General Services Administration ″GSA″ contract, use, reproduction, or disclosure is subject to restrictions set forth in Contract No. GS-35F-05925.
© 2008 Lenovo

Read this first . . . . . . . . . . |
. v |
Hard disk drive (HDD) or solid state drive |
|
|||
|
|
|
(SSD) problems . . . . . . . . . |
. |
29 |
|
Chapter 1. Finding information . . . . |
. |
1 |
Fingerprint reader problems . . . . |
. |
31 |
|
This guide and other publications . . . . |
. |
1 |
Startup problems . . . . . . . . |
. |
31 |
|
Finding information with the ThinkVantage |
|
|
Chapter 4. Recovery options . . . . . |
. |
33 |
|
button . . . . . . . . . . . . . |
. |
2 |
||||
|
|
|
Introducing Rescue and Recovery . . . . |
. 33 |
||
Chapter 2. Taking care of your ThinkPad |
|
|
Solid state drive (SSD) . . . . . . |
. |
33 |
|
computer . . . . . . . . . . . . |
. |
3 |
Restoring the factory contents . . . . . |
. |
34 |
|
Important tips. . . . . . . . . . . |
. |
3 |
Recovering data . . . . . . . . . . |
. |
35 |
|
Be careful about where and how you work |
3 |
Chapter 5. Upgrading and replacing |
|
|
||
Be gentle with your computer . . . . |
. 4 |
|
|
|||
Register your computer . . . . . . |
. |
4 |
devices . . . . . . . . . . . . |
. |
37 |
|
Carry your computer properly . . . . |
. |
4 |
Replacing the battery . . . . . . . . |
. |
37 |
|
Connect the internal modem correctly . . |
. 4 |
Upgrading the hard disk drive or solid state |
|
|
||
Handle storage media and drives properly |
|
4 |
drive . . . . . . . . . . . . . |
. |
39 |
|
Be sure not to modify your computer . . |
. 5 |
Replacing memory . . . . . . . . . |
. 45 |
|||
Take care in setting passwords . . . . |
. |
5 |
|
|
|
|
Care for the fingerprint reader . . . . |
. |
5 |
Chapter 6. Getting help and service . . |
. |
51 |
|
Tips on using your computer in tablet mode |
5 |
Getting help and service . . . . . . . |
. 51 |
|||
Tips on using the Tablet Digitizer Pen . . |
. |
6 |
Getting help on the Web . . . . . . . |
. |
51 |
|
Tips on using the touch panel . . . . |
. 6 |
Calling the Customer Support Center . . |
. 51 |
|||
Cleaning the cover of your computer . . |
. 7 |
Getting help around the world . . . . . |
. 53 |
|||
Cleaning your computer keyboard . . . |
. 7 |
Worldwide telephone list. . . . . . . |
. 53 |
|||
Cleaning your computer display . . . |
. 7 |
|
|
|
||
Cleaning the touch panel display . . . |
. 8 |
Appendix A. Warranty information . . . |
. 59 |
|||
Chapter 3. Solving computer problems . |
. 9 |
Types of warranty service . . . . . . |
. |
60 |
||
|
|
|
||||
Frequently asked questions . . . . . . |
. |
9 |
Appendix B. Customer Replaceable Units |
|
|
|
Entering the BIOS Setup Utility . . . . |
. |
10 |
(CRUs) . . . . . . . . . . . . |
. |
63 |
|
Diagnosing problems . . . . . . . . |
. |
11 |
|
|
|
|
HDD diagnostic program . . . . . |
. 11 |
Appendix C. Features and Specifications |
|
65 |
||
Diagnosing problems using PC-Doctor |
|
|
Features . . . . . . . . . . . . |
. |
65 |
|
from the service partition . . . . . |
. |
12 |
||||
Specifications . . . . . . . . . . |
. |
66 |
||||
Troubleshooting . . . . . . . . . . . 13 |
||||||
|
|
|
||||
Error messages . . . . . . . . . |
. |
13 |
Appendix D. Notices. . . . . . . . |
. |
69 |
|
Errors without messages . . . . . . |
. |
19 |
||||
Notices. . . . . . . . . . . . . |
. |
69 |
||||
Memory problems . . . . . . . . |
. |
21 |
||||
Export classification notice . . . . . |
. |
70 |
||||
Password problems . . . . . . . |
. |
21 |
||||
Electronic emissions notices . . . . . . |
. |
70 |
||||
Keyboard problems . . . . . . . |
. |
22 |
||||
Federal Communications Commission |
|
|
||||
Pointing device problems . . . . . |
. |
22 |
|
|
||
(FCC) Statement . . . . . . . . |
. |
70 |
||||
Sleep (standby) or hibernation problems |
|
23 |
||||
|
Industry Canada Class B emission |
|
|
|||
Computer screen problems . . . . . |
. 25 |
|
|
|||
compliance statement . . . . . . . |
. |
71 |
||||
Battery problems . . . . . . . . |
. |
28 |
||||
|
|
|
||||
AC adapter problems . . . . . . . |
. |
28 |
|
|
|
|
© Copyright Lenovo 2008 |
|
|
|
|
iii |
|
Avis de conformité à la réglementation |
|
Notice for users in the U.S.A. . . . . |
. |
. 73 |
|
d’Industrie Canada. . . . . . . . |
. 71 |
ENERGY STAR model information . . |
. |
. 74 |
|
European Union EMC Directive |
|
Notice for Regulatory information . . |
. |
. 76 |
|
conformance statement . . . . . . |
. 71 |
|
|
|
|
EU-EMC Directive (2004/108/EC) EN |
|
Trademarks . . . . . . . . . . |
. |
. |
77 |
55022 class B Statement of Compliance . |
. 72 |
|
|
|
|
Japanese VCCI Class B statement . . . |
. 73 |
Index . . . . . . . . . . . . |
. |
. |
79 |
EU WEEE Statements . . . . . . . . |
. 73 |
|
|
|
|
iv ThinkPad® X200 Tablet Service and Troubleshooting Guide
Read this first
Be sure to follow the important tips given here to continue to get the most use and enjoyment out of your computer. Failure to do so might lead to discomfort or injury, or cause your computer to fail.
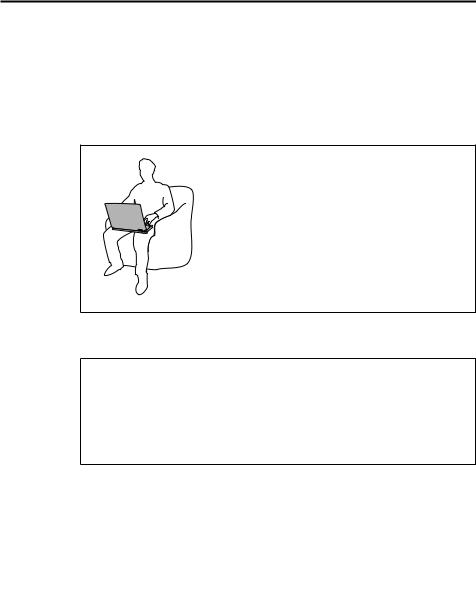
Protect yourself from the heat that your computer generates.
When your computer is turned on or the battery is charging, the base, the palm rest, and some other parts may become hot. The temperature they reach depends on the amount of system activity and the level of charge in the battery.
Extended contact with your body, even through clothing, could cause discomfort or even a skin burn.
vAvoid keeping your hands, your lap, or any other part of your body in contact with a hot section of the computer for any extended time.
vPeriodically take breaks from using the keyboard by lifting your hands from the palm rest.
Protect yourself from the heat generated by the AC adapter.
When the AC adapter is connected to an electrical outlet and your computer, it generates heat.
Extended contact with your body, even through clothing, may cause a skin burn.
v Do not place the AC adapter in contact with any part of your body while it is in use.
v Never use it to warm your body.
Prevent your computer from getting wet.
To avoid spills and the danger of electrical shock, keep liquids away from your computer.
© Copyright Lenovo 2008 |
v |

Protect the cables from being damaged.
Applying strong force to cables may damage or break them.
Route communication lines, or the cables of an AC adapter, a mouse, a keyboard, a printer, or any other electronic device, so that they cannot be walked on, tripped over, pinched by your computer or other objects, or in any way subjected to treatment that could interfere with the operation of your computer.
Protect your computer and data when moving it.
Before moving a computer equipped with a hard disk drive, do one of the following, and make sure that the power-on indicator is off:
– Turn it off.
– Press Fn+F4 to put it in sleep (standby) mode.
– Press Fn+F12 to put it in hibernation mode.
This will help to prevent damage to the computer, and possible loss of data.
Handle your computer gently.
Do not drop, bump, scratch, twist, hit, vibrate, push, or place heavy objects on your computer, display, or external devices.
Carry your computer carefully.
v Use a quality carrying case that provides adequate cushioning and protection.
vDo not pack your computer in a tightly packed suitcase or bag.
viThinkPad® X200 Tablet Service and Troubleshooting Guide
Chapter 1. Finding information
This guide and other publications
Setup Instructions
helps you to unpack your ThinkPad® computer and get started. It includes a few tips for first-time users.
This Service and Troubleshooting Guide
provides information about caring for your ThinkPad computer, basic troubleshooting information, some recovery procedures, help and service information, and warranty information for your computer. The troubleshooting information in this Guide applies only to problems that might prevent you from accessing the comprehensive online manual, called Access Help, preinstalled on your ThinkPad computer.
Access Help
is a comprehensive online manual that provides answers to most of your questions about your computer, helps you to configure preloaded features and tools, or solve problems. To open Access Help, do either of the following:
vPress the ThinkVantage® button. Under Quick Links in the Productivity Center, click Access on-system help.
vClick Start, move the pointer to All Programs; then to ThinkVantage. Click
Access Help.
Safety and Warranty Guide
includes general safety instructions and complete Lenovo® Limited Warranty.
© Copyright Lenovo 2008 |
1 |
Regulatory Notice
supplements this Guide. Read it before you use the wireless features of your ThinkPad computer. The ThinkPad computer complies with the radio frequency and safety standards of any country or region in which it has been approved for wireless use. You are requested to install and use your ThinkPad computer in strict accordance with the local RF regulations.
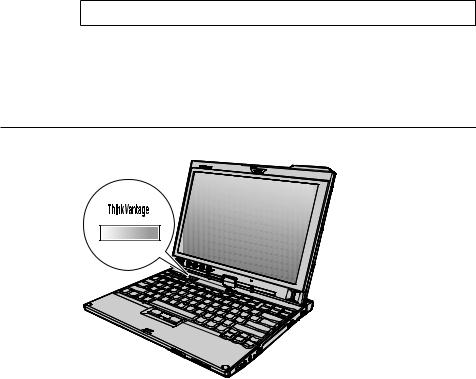
Finding information with the ThinkVantage button
The blue ThinkVantage button can help you in many situations when your computer is working normally, and even when it is not. Press the ThinkVantage button to open the ThinkVantage Productivity Center and get access to informative illustrations and easy-to-follow instructions for getting started and staying productive.
You can also use the ThinkVantage button to interrupt the startup sequence of your computer and start the Rescue and Recovery® workspace, which runs independently of the Windows® operating system and is hidden from it.
2ThinkPad® X200 Tablet Service and Troubleshooting Guide
Chapter 2. Taking care of your ThinkPad computer
Though your computer is designed to function reliably in normal work environments, you need to use common sense in handling it. By following these important tips, you will get the most use and enjoyment out of your computer.
For the most important instructions for using your computer, see “Read this first” on page v.
Important tips
Be careful about where and how you work
vStore packing materials safely out of the reach of children to prevent the risk of suffocation from plastic bags.
vKeep your computer away from magnets, activated cellular phones, electrical appliances, or speakers (within 13 cm or 5″).
vAvoid subjecting your computer to extreme temperatures (below 5°C/41°F or above 35°C/95°F).
vSome appliances, such as certain portable desktop fans or air purifiers, can produce negative ions. If a computer is close to such an appliance, and is exposed for an extended time to air containing negative ions, it may become electrostatically charged. Such a charge may be discharged through your hands when you touch the keyboard or other parts of the computer, or through connectors on I/O devices connected to it. Even though this kind of electrostatic discharge (ESD) is the opposite of a discharge from your body or clothing to the computer, it poses the same risk of a computer malfunction.
Your computer is designed and manufactured to minimize any effects of electrostatic charge. An electrostatic charge above a certain limit, however, can increase the risk of ESD. Therefore, when using the computer close to an appliance that can produce negative ions, give special attention to the following:
–Avoid directly exposing your computer to the air from an appliance that can produce negative ions.
–Keep your computer and peripherals as far as possible from such an appliance.
–Wherever possible, ground your computer to facilitate safe electrostatic discharge.
© Copyright Lenovo 2008 |
3 |
Note: Not all such appliances cause a significant electrostatic charge.
Be gentle with your computer
vAvoid placing any objects (including paper) between the display and the keyboard or the palm rest.
vYour computer display is designed to be opened and used at an angle slightly greater than 90 degrees. Do not open the display beyond 180 degrees, as this might damage the computer hinge.
vDo not turn your computer over while the AC adapter is plugged in. This could break the adapter plug.
Register your computer
vRegister your ThinkPad products with Lenovo (visit the following Web site: http://www.lenovo.com/register). This can help authorities return your computer to you if it is lost or stolen. Registering your computer also enables Lenovo to notify you about possible technical information and upgrades.
Carry your computer properly
vBefore moving your computer, be sure to remove any media, turn off attached devices, and disconnect cords and cables.
vWhen picking up your open computer, hold it by the bottom. Do not pick up or hold your computer by the display.
Connect the internal modem correctly
vYour computer modem might use only an analog telephone network, or public-switched telephone network (PSTN). Do not connect the modem to a PBX (private branch exchange) or any other digital telephone extension line because this could damage your modem. Analog phone lines are often used in homes, while digital phone lines are often used in hotels or office buildings. If you are not sure which kind of phone line you are using, contact your telephone company.
vYour computer might have both an Ethernet connector and a modem connector. If so, be sure to connect your communication cable to the correct one, so your connector is not damaged.
Handle storage media and drives properly
vIf your computer comes with an optical drive, do not touch the surface of a disc or the lens on the tray.
vWait until you hear the CD or DVD click into the center pivot of an optical drive before closing the tray.
vWhen installing the HDD, SSD, or optical drive, follow the instructions shipped with your hardware, and apply pressure only where needed on the device.
vTurn off your computer if you are replacing the HDD or SSD.
4ThinkPad® X200 Tablet Service and Troubleshooting Guide
vWhen replacing the primary HDD or SSD, reattach the cover of the drive slot.
vStore your external and removable hard disk or optical drives in the appropriate containers or packaging when they are not being used.
vBefore you install any of the following devices, touch a metal table or a grounded metal object. This action reduces any static electricity from your body. The static electricity could damage the device.
–Memory module
–PCI Express Mini Card
–ExpressCard
–Smart Card
–Memory Card, such as SD Card, Memory Stick, and MultiMediaCard
Note: When transferring data to or from a Flash Media Card, such as an SD card, do not put your computer in sleep (standby) or hibernation mode before the data transfer is complete. To do so might cause damage to your data.
Be sure not to modify your computer
vOnly an authorized ThinkPad repair technician should disassemble and repair your computer.
vDo not modify or tape the latches to keep the display open or closed.
Take care in setting passwords
vRemember your passwords. If you forget a supervisor or hard disk password, Lenovo authorized service provider cannot reset it, and you will have to replace your system board, or HDD or SSD.
Care for the fingerprint reader
The following actions could damage the fingerprint reader or cause it not to work properly:
vScratching the surface of the reader with a hard, pointed object.
vScraping the surface of the reader with your nail or anything hard.
vUsing or touching the reader with a dirty finger.
If you notice any of the following conditions, gently clean the surface of the reader with a dry, soft, lint-free cloth:
vThe surface of the reader is dirty or stained.
vThe surface of the reader is wet.
vThe reader often fails to enroll or authenticate your fingerprint.
Tips on using your computer in tablet mode
vTo close the computer display, first make sure that the display either faces the keyboard or is positioned at 180 degrees to the keyboard, so that the back of the display faces the keyboard.
Chapter 2. Taking care of your ThinkPad computer 5
vDo not pick up or hold the computer by the display only.
vDo not hit, vibrate, or bump the computer display.
vTo allow free ventilation, do not place any obstacle, such as a thick-piled carpet or a soft cushion, in front of the fan.
vWhen you use the computer in picture frame mode, hold the display with one hand and use the Tablet Digitizer Pen.
vIf you hold the computer in one hand while using it in tablet mode, do not expose it to excessive vibration, shock, or rotation.
vDo not use the computer outdoors. Do not expose it to rain.
vIf you put your computer in a carrying case, put it into notebook mode and close the display.
Tips on using the Tablet Digitizer Pen
vUse only the Tablet Digitizer Pen that was shipped with your ThinkPad X200 Tablet computer or that you purchased with that computer as an option. Only this pen is designed for use with the ThinkPad X200 Tablet computer. Any other pen might stick in the penholder or cause other problems.
vThe Tablet Digitizer Pen is not waterproof. Take care not to soak or dip the pen in water.
Tips on using the touch panel
vThe touch panel is a glass panel covered with a plastic film. For input you can use either your finger or the Tablet Digitizer Pen shipped with your computer. Do not use any pen other than the specified one, or any metallic object, because to do so might damage the touch panel or cause it to malfunction.
vIf you put your computer in a carrying case, put it into notebook mode and close the display. Do not carry your computer in tablet mode.
vIf you use both your finger and the Tablet Digitizer Pen simultaneously for input to the screen, only data entered by use of the Digitizer Pen will be processed.
vIf you use your finger to input to the touch panel, touch only one point at a time. If you touch several points simultaneously, the input will not be processed correctly.
vWith the touch panel, gradually a discrepancy may start to appear between the point you touched with your finger during the finger point, and its actual position on the screen. To avoid this, regularly correct the accuracy of the finger input by use of the touch panel Settings Utility.
6ThinkPad® X200 Tablet Service and Troubleshooting Guide
Cleaning the cover of your computer
Occasionally clean your computer as follows:
1.Prepare a mixture of a gentle kitchen-use detergent (one that does not contain abrasive powder or strong chemicals such as acid or alkaline). Use 5 parts water to 1 part detergent.
2.Absorb the diluted detergent into a sponge.
3.Squeeze excess liquid from the sponge.
4.Wipe the cover with the sponge, using a circular motion and taking care not to let any excess liquid drip.
5.Wipe the surface to remove the detergent.
6.Rinse the sponge with clean running water.
7.Wipe the cover with the clean sponge.
8.Wipe the surface again with a dry, soft lint-free cloth.
9.Wait for the surface to dry completely and remove any cloth fibers from the computer surface.
Cleaning your computer keyboard
1.Absorb some isopropyl rubbing alcohol on a soft, dust-free cloth.
2.Wipe each keytop surface with the cloth. Wipe the keys one by one; if you wipe several keys at a time, the cloth may hook onto an adjacent key and possibly damage it. Make sure that no liquid drips onto or between the keys.
3.Allow to dry.
4.To remove any crumbs and dust from beneath the keys, you can use a camera blower with a brush or cool air from a hair drier.
Note: Avoid spraying cleaner directly on the display or the keyboard.
Cleaning your computer display
1.Gently wipe the display with a dry, soft lint-free cloth. If you see a
scratch-like mark on your display, it might be a stain transferred from the keyboard or the TrackPoint® pointing stick when the cover was pressed from the outside.
2.Wipe or dust the stain gently with a soft, dry cloth.
3.If the stain remains, moisten a soft, lint-free cloth with water or a 50-50 mixture of isopropyl alcohol and water that does not contain impurities.
4.Wring out as much of the liquid as you can.
5.Wipe the display again; do not let any liquid drip into the computer.
6.Be sure to dry the display before closing it.
Chapter 2. Taking care of your ThinkPad computer 7
Cleaning the touch panel display
1.To remove fingerprints, etc., from the touch panel display, use a dry, soft, lint-free cloth. (A piece of absorbent cotton will also serve the purpose.) Do not apply solvents to the cloth.
2.Gently wipe foreign particles and dust from the touch panel with one side of the cloth.
3.Wipe smudges or fingerprints with the other side of the cloth, or with a clean cloth.
4.After using the cloth, wash it with a neutral detergent.
8ThinkPad® X200 Tablet Service and Troubleshooting Guide

Chapter 3. Solving computer problems
Note: See Access Help if your system is running and Access Help is accessible. This chapter presents information for use when Access Help is inaccessible.
Frequently asked questions
This section lists frequently asked questions and tells where you can find detailed answers. For details about each publication included in the package with the ThinkPad computer, see “This guide and other publications” on page 1.
What safety precautions should I follow when using my ThinkPad computer?
See the separate Safety and Warranty Guide for detailed information about safety.
How can I prevent problems with my ThinkPad computer?
See “Read this first” on page v, and also Chapter 2, “Taking care of your ThinkPad computer,” on page 3 of this Guide. More tips can be found in the following sections of Access Help:
vPreventing problems
vTroubleshooting
What are the main hardware features of my new ThinkPad computer?
See “About your computer” in Access Help.
Where can I find the detailed specifications for my ThinkPad computer?
See http://www.lenovo.com/think/support.
I need to upgrade a device or I need to replace one of the following: the
HDD, the SSD, the PCI Express Mini Card, the memory, the keyboard, or the palm rest.
See the Appendix B, “Customer Replaceable Units (CRUs),” on page 63 of this Guide for the list of Customer Replaceable Units and the location of the instructions for removing or replacing components.
My computer is not operating properly.
See “Problem solving” in Access Help. This guide describes methods of troubleshooting for use when online Access Help is inaccessible.
Where are the recovery discs?
Your computer may have come with or without a recovery disc or Windows disc depending on your model. For an explanation of the alternative recovery methods offered by Lenovo, see “Restoring the factory contents” on page 34 of this Guide.
© Copyright Lenovo 2008 |
9 |

How can I contact the Customer Support Center?
See Chapter 6, “Getting help and service,” on page 51 of this Guide. For the phone numbers of the Customer Support Center nearest to you, see “Worldwide telephone list” on page 53.
Where can I find warranty information?
See the separate Safety and Warranty Guide for detailed warranty information. For the warranty applicable to your computer, including the warranty period and type of warranty service, see Appendix A, “Warranty information,” on page 59.
Entering the BIOS Setup Utility
Your computer provides a program, called BIOS Setup Utility, that enables you to select various setup parameters.
vConfig: Set the configuration of your computer.
vDate/Time: Set the date and time.
vSecurity: Set security features.
vStartup: Set the startup device.
vRestart: Restart the system.
vHDD diagnostic program: Run the diagnostic test of the HDD or SSD.
To enter the BIOS Setup Utility, do as follows:
1.To protect yourself against accidental loss of data, back up your data and computer registry. For details, see “Basics” in Access Help.
2.Turn off the computer, and then turn it on again.
3.When the ThinkPad logo comes up, immediately press F1 to enter the BIOS Setup Utility.
If you have set a supervisor password, the BIOS Setup Utility menu appears after you enter the password. You can start the utility by pressing Enter instead of entering the supervisor password; however, you cannot change the parameters that are protected by the supervisor password. For more information, see the on-board help.
4.Using the cursor keys, move to an item you want to change. When the item you want is highlighted, press Enter. A submenu is displayed.
5.Change the items you wish to change. To change the value of an item, use the F5 or F6 key. If the item has a submenu, you can display it by pressing Enter.
6.Press F3 or Esc to exit from the submenu. If you are in a nested submenu, press Esc repeatedly until you reach the BIOS Setup Utility menu.
Note: If you need to restore the settings to their original state as of the time of purchase, press F9 key to load the default settings. You can also select an option in the Restart submenu to load the default settings or discard the changes.
10 ThinkPad® X200 Tablet Service and Troubleshooting Guide

7.Select Restart; then press Enter. Move the cursor to the option you want for restarting your computer; then press Enter. Your computer restarts.
Diagnosing problems
If you have a problem with your computer, you can test it by using
PC-Doctor® for Windows.
To run PC-Doctor for Windows, do as follows:
1.Click Start.
2.Move the pointer to All Programs and then to PC-Doctor for Windows.
3.Click PC-Doctor for Windows.
For more information about PC-Doctor for Windows, see the Help for the program.
Attention:
vIf you need help or further information about the problem, choose any of the following:
–Lenovo Troubleshooting Center
–Update System Drivers
–System Information
vRunning any tests may take up to several minutes or longer. Make sure you have time to run the entire test; do not interrupt the test while it is running.
When preparing to contact the Customer Support Center, be sure to print the test log so that you can rapidly provide information to the help technician.
HDD diagnostic program
If your hard disk drive (HDD) or solid state drive (SSD) is not operating properly, you may be able to find the problem by running the HDD diagnostic program in the BIOS Setup Utility.
To run the diagnostic program, do as follows:
1.Turn off the computer, and then turn it on again.
2.When the ThinkPad logo comes up, immediately press F1 to enter the BIOS Setup Utility.
3.Using cursor keys, select HDD diagnostic program and press Enter. The menu for the HDD diagnostic program opens.
Chapter 3. Solving computer problems 11
4.Using cursor keys, select Main hard disk drive or Ultrabay hard disk drive. Press Enter to start the diagnostic program. The diagnostic program runs a read verification test and a speed test of the drive you select, and reports its findings.
5.If the diagnostic program returns any error messages, call the Customer Support Center for service. The diagnostic program may return one or both of the following error messages:
For the main storage drive:
v Error code 0000: Read verification failed
vError code 0100: Speed test failed
vError code 0200: Controller Diag failed For the Ultrabay™ storage drive:
vError code 0002: Read verification failed
vError code 0102: Speed test failed
vError code 0202: Controller Diag failed
6.If the diagnostic program returns no error message but you still have some concerns:
vSee the instructions in the ″Introducing Rescue and Recovery″ section in online Access Help, and run the program for a diagnostic test of the HDD or SSD.
vDownload PC-Doctor for DOS for your computer from the following Web site: http://www.lenovo.com/support/site.wss/ document.do?sitestyle=lenovo&lndocid=tpad-matrix.
Diagnosing problems using PC-Doctor from the service partition
By using PC-Doctor from the Rescue and Recovery workspace in the service partition of the hard disk drive, you can diagnose your system without starting up the operating system.
To run PC-Doctor, do as follows:
1.Turn off the computer, and then turn it on again.
2.When the ThinkPad logo comes up, immediately press the ThinkVantage button. The Rescue and Recovery workspace opens.
3.Click Diagnose hardware.
For more information about PC-Doctor, see the Help for the program.
12 ThinkPad® X200 Tablet Service and Troubleshooting Guide
Troubleshooting
If you do not find your problem here, see Access Help. The following section only describes problems that might prevent you from accessing this help system.
Error messages
Note:
1.In the charts, x can be any character.
2.The version of PC-Doctor referred to here is PC-Doctor for Windows.
Message |
Solution |
|
|
0176: System |
This message is displayed if you remove the Security Chip and |
Security - The |
reinstall it, or install a new one. To clear the error, enter the |
System has been |
BIOS Setup Utility. If this does not solve the problem, have the |
tampered with. |
computer serviced. |
|
|
0182: Bad CRC2. |
Checksum of the CRC2 setting in the EEPROM is not correct. |
Enter BIOS Setup |
Press F1 to enter the BIOS Setup Utility. Press F9 and then |
and load Setup |
Enter to load the default setting. Press F10 and then Enter to |
defaults. |
restart the system. |
|
|
0185: Bad startup |
Checksum of the startup sequence setting in the EEPROM is |
sequence settings. |
not correct. Press F1 to enter the BIOS Setup Utility. Press F9 |
Enter BIOS Setup |
and then Enter to load the default setting. Press F10 and then |
and load Setup |
Enter to restart the system. |
defaults. |
|
|
|
0190: Critical |
The computer turned off because the battery is low. Connect |
low-battery error |
the AC adapter to the computer and charge the battery, or |
|
replace the battery with a fully charged one. |
|
|
0191: System |
The system configuration change has failed. Confirm the |
Security - Invalid |
operation and try again. To clear the error, enter the BIOS |
remote change |
Setup Utility. |
requested. |
|
|
|
0199: System |
This message is displayed if you enter a wrong supervisor |
Security - Security |
password more than three times. Confirm the supervisor |
password retry |
password and try again. To clear the error, enter the BIOS |
count exceeded. |
Setup Utility. |
|
|
01C8: More than one |
Remove one of the Modem Daughter Cards. Otherwise, press |
modem devices are |
Esc to ignore the warning message. If this does not solve the |
found. Remove one |
problem, have the computer serviced. |
of them. Press <Esc> |
|
to continue. |
|
|
|
Chapter 3. Solving computer problems 13
Message |
Solution |
|
|
01C9: More than one |
Your ThinkPad computer has a built-in Ethernet feature, and |
Ethernet devices are |
you cannot add another such feature by installing an Ethernet |
found. Remove one |
device such as a Mini-PCI Ethernet Card or an Ethernet |
of them. Press <Esc> |
Daughter Card. If this error message is displayed, remove the |
to continue. |
Ethernet device that you installed. Otherwise press Esc to |
|
ignore the warning message. If this does not solve the problem, |
|
have the computer serviced. |
|
|
0200: Hard disk |
The HDD or SSD is not working. Make sure that the HDD or |
error |
SSD is attached firmly. Run the BIOS Setup Utility; then make |
|
sure the drive is not disabled in the Startup menu. |
|
|
021x: Keyboard error |
Make sure that there are no objects placed on the keyboard, or |
|
if you have one, the external keyboard. Turn off the computer, |
|
and turn off all attached devices. Turn on the computer first; |
|
then turn on the attached devices. |
|
If you still see the same error code, do the following: |
|
If an external keyboard is connected, do the following: |
|
v Turn off the computer and disconnect the external keyboard; |
|
then turn on the computer. Make sure that the built-in |
|
keyboard operates correctly. If it does, have the external |
|
keyboard serviced. |
|
v Make sure that the external keyboard is connected to the |
|
correct connector. |
|
Test the computer by using PC-Doctor. |
|
v If the computer stops during the test, have the computer |
|
serviced. |
|
|
0230: Shadow RAM |
The shadow RAM failed. Test your computer’s memory with |
error |
PC-Doctor. If you added a memory module just before turning |
|
the computer on, reinstall it. Then test the memory with |
|
PC-Doctor. |
|
|
0231: System RAM |
The system RAM failed. Test your computer’s memory with |
error |
PC-Doctor. If you added a memory module just before turning |
|
the computer on, reinstall it. Then test the memory with |
|
PC-Doctor. |
|
|
0232: Extended RAM |
The extended RAM failed. Test your computer’s memory with |
error |
PC-Doctor. If you have increased memory just before turning |
|
the computer on, reinstall it. Then test the memory with |
|
PC-Doctor. |
|
|
0250: System battery |
The backup battery, which is used to preserve the |
error |
configuration information, such as the date and time, while the |
|
computer is turned off, is depleted. Replace the battery and |
|
run the BIOS Setup Utility to verify the configuration. If you |
|
still have a problem, have the computer serviced. |
|
|
14 ThinkPad® X200 Tablet Service and Troubleshooting Guide
Message |
Solution |
|
|
0251: System CMOS |
The system CMOS might have been corrupted by an |
checksum bad |
application program. The computer uses the default settings. |
|
Run the BIOS Setup Utility to reconfigure the settings. If you |
|
still see the same error code, have the computer serviced. |
|
|
0271: Date and time |
Neither the date nor the time is set in the computer. Set the |
error |
date and time, using the BIOS Setup Utility. |
|
|
0280: Previous boot |
Your computer was previously unable to complete the boot |
incomplete |
process. |
|
Turn the computer off; then turn it on to start the BIOS Setup |
|
Utility. Verify the configuration and then restart the computer |
|
either by choosing the Exit Saving Changes option under the |
|
Restart item or by pressing F10. If you still see the same error |
|
code, have the computer serviced. |
|
|
1802: Unauthorized |
The Mini-PCI network card is not supported on this computer. |
network card is |
Remove it. |
plugged in - Power |
|
off and remove the |
|
miniPCI network |
|
card. |
|
|
|
1803: Unauthorized |
The daughter card is not supported on this computer. Remove |
daughter card is |
it. |
plugged in - Power |
|
off and remove the |
|
daughter card. |
|
|
|
1804: Unauthorized |
The WAN card is not supported on this computer. Remove it. |
WAN card is |
|
plugged in - Power |
|
off and remove the |
|
WAN card. |
|
|
|
1805: Unauthorized |
The Wireless USB card is not supported on this computer. |
Wireless USB card is |
Remove it. |
plugged in - Power |
|
off and remove the |
|
Wireless USB card. |
|
|
|
1830: Invalid |
The current memory configuration is not supported. If you |
memory |
install a memory module in only one of the two memory slots, |
configuration - |
install it in the slot indicated as ″SLOT-0″. |
Power off and install |
|
a memory module to |
|
Slot-0 or the lower |
|
slot. |
|
|
|
Chapter 3. Solving computer problems 15
Message |
Solution |
|
|
2100: Initialization |
The HDD or SSD is not working. Have the drive serviced. |
error on HDD0 |
|
(Main hard disk |
|
drive) |
|
|
|
2102: Initialization |
The HDD or SSD is not working. Have the drive serviced. |
error on HDD1 |
|
(Ultrabay hard disk |
|
drive) |
|
|
|
2110: Read error on |
The HDD or SSD is not working. Have the drive serviced. |
HDD0 (Main hard |
|
disk drive) |
|
|
|
2112: Read error on |
The HDD or SSD is not working. Have the drive serviced. |
HDD1 (Ultrabay |
|
hard disk drive) |
|
|
|
The power-on |
A power-on password or a supervisor password is set. Type |
password prompt |
the password and press Enter to use the computer. If the |
|
power-on password is not accepted, a supervisor password |
|
might have been set. Type the supervisor password and press |
|
Enter. If you still see the same error message, have the |
|
computer serviced. |
|
|
The hard disk |
An HDD or SSD password is set. Type the password and press |
password prompt |
Enter to use the computer. |
|
If you still see the same error message, have the computer |
|
serviced. |
|
|
Hibernation error |
The system configuration changed between the time your |
|
computer entered hibernation mode and the time it left this |
|
mode, and your computer cannot resume normal operation. |
|
v Restore the system configuration to what it was before your |
|
computer entered hibernation mode. |
|
v If the memory size has been changed, re-create the |
|
hibernation file. |
|
|
Operating system |
Verify the following: |
not found. |
v The HDD or SSD is correctly installed. |
|
v A startable disc is in the drive |
|
If you still see the same error message, check the boot |
|
sequence, using the BIOS Setup Utility. |
|
|
16 ThinkPad® X200 Tablet Service and Troubleshooting Guide
Message |
Solution |
|
|
|
|
EMM386 Not |
Edit C:\CONFIG.SYS and change a line from |
|
Installed - Unable to |
device=C:\WINDOWS\EMM386.EXE RAM |
|
Set Page Frame Base |
||
|
||
Address. |
to |
|
|
||
|
device=C:\WINDOWS\EMM386.EXE NOEMS |
|
|
and save this file. |
|
|
|
|
CardBus |
Enter the BIOS Setup Utility. Press F9 and then Enter to load |
|
Configuration Error - |
the default setting. |
|
Device Disabled |
Press F10 and then Enter to restart the system. |
|
|
||
|
|
|
Cannot boot from |
Check the status of the device which you want to boot from. |
|
any device. |
Device not found |
|
|
||
|
Check the device you want to boot from. |
|
|
Device error |
|
|
Check the device you want to boot from. |
|
|
No valid operating system |
|
|
Check that the operating system has no failure and is |
|
|
installed correctly. |
|
|
Excluded from boot order |
|
|
Open the BIOS Setup Utility and add the device to boot |
|
|
order. |
|
|
|
|
|
|
|
Beep errors |
|
|
|
|
|
One short beep, |
If you install a memory module in only one of the two |
|
pause, three short |
memory slots, make sure that it is correctly installed in the slot |
|
beeps, pause, three |
indicated as ″SLOT-0″. If memory modules are installed in both |
|
more short beeps, |
of the slots, make sure that they are installed correctly. If they |
|
and one short beep |
are, and you still hear the beeps, have the computer serviced. |
|
|
|
|
One long and two |
The video function has a problem. Have the computer |
|
short beeps |
serviced. |
|
|
|
|
Four cycles of four |
The Security Chip has a problem. Have the computer serviced. |
|
short beeps |
|
|
|
|
|
Five beeps |
The system board has a problem. Have the computer serviced. |
|
|
|
Chapter 3. Solving computer problems 17

If one of the following error code messages is displayed on the screen, have the computer serviced:
0175: Bad CRC1, stop POST task
0177: Bad SVP data, stop POST task. Checksum of the supervisor password in the EEPROM is not correct.
0187: EAIA data access error
0188: Invalid RFID serialization information area
0189: Invalid RFID configuration information area
0192: System Security - Embedded Security hardware tamper detected.
0260: System timer error
0270: Real time clock error
02D0: System cache error
02F4: EISA CMOS not writable
02F5: DMA test failed
02F6: Software NMI failed
02F7: Fail-safe timer NMI failed
Fan error
Thermal sensing error
18 ThinkPad® X200 Tablet Service and Troubleshooting Guide

Errors without messages
Problem:
When I turn on the machine, nothing appears on the screen and the machine does not beep while starting up.
Note: If you are not sure whether you heard any beeps:
1.Turn off the computer by pressing and holding the power switch for 4 seconds or more.
2.Turn it on and listen again.
Solution:
1. Make sure that:
vThe battery is installed correctly.
vThe AC adapter is connected to the computer and the power cord is plugged into a working electrical outlet.
vThe computer is turned on. (Turn the power switch on again for confirmation.)
2.If a power-on password is set:
a.Press any key to display the prompt for the power-on password. If the brightness level of the screen is low, increase it by pressing the Fn+Home.
b.Type the correct password and press Enter.
3.If these items are set properly, and the screen remains blank, have the computer serviced.
Problem:
When I turn on the machine, only a white cursor appears on a blank screen.
Solution:
Note: If you have modified a partition on your HDD or SSD by using a partition software, information about that partition, or the master boot record, may have been destroyed.
1.Turn off the computer, and then turn it on again.
2.If you still see only the cursor on the screen, do the following:
v If you have used the partition software, examine the partition on the HDD or SSD by using the software, and recover the partition if required.
vUse either the Rescue and Recovery workspace or the recovery discs to restore the system to the factory state.
For details about restoring the system to the factory state, see Chapter 4, “Recovery options,” on page 33.
3.If the problem persists, have the computer serviced.
Chapter 3. Solving computer problems 19
 Loading...