


 Loading...
ThinkCentre M83, M93/p
User Guide
Machine Types: 10A0, 10A1, 10A6, 10A7, 10AG, 10AK, 10AL, and 10BE
Note: Before using this information and the product it supports, be sure to read and understand the “Important safety information” on page v and Appendix A “Notices” on page 145.
Fourth Edition (June 2014)
© Copyright Lenovo 2013, 2014.
LIMITED AND RESTRICTED RIGHTS NOTICE: If data or software is delivered pursuant a General Services Administration “GSA” contract, use, reproduction, or disclosure is subject to restrictions set forth in Contract No. GS-35F-05925.

Contents
Important safety information . . . . . . |
v |
Service and upgrades . . . . . . . . . . . . . |
v |
Static electricity prevention. . . . . . . . . . . |
v |
Power cords and power adapters . . . . . . . . |
vi |
Extension cords and related devices . . . . . . . |
vi |
Plugs and outlets. . . . . . . . . . . . . . |
vii |
External devices . . . . . . . . . . . . . . |
vii |
Heat and product ventilation . . . . . . . . . |
vii |
Operating environment . . . . . . . . . . . |
viii |
Modem safety information . . . . . . . . . . |
viii |
Laser compliance statement . . . . . . . . . . |
ix |
Power supply statement . . . . . . . . . . . . |
ix |
Cleaning and maintenance . . . . . . . . . . . |
ix |
Chapter 1. Product overview . . . . . . |
1 |
Features . . . . . . . . . . . . . . . . . . |
1 |
Specifications . . . . . . . . . . . . . . . . |
5 |
Lenovo programs . . . . . . . . . . . . . . |
5 |
Accessing Lenovo programs on the Windows |
|
7 operating system . . . . . . . . . . . . |
5 |
Accessing Lenovo programs on the Windows |
|
8 or Windows 8.1 operating system . . . . . |
6 |
An introduction to Lenovo programs . . . . . |
7 |
Locations. . . . . . . . . . . . . . . . . . |
9 |
Locating connectors, controls, and indicators |
|
on the front of your computer . . . . . . . . |
9 |
Locating connectors on the rear of your |
|
computer . . . . . . . . . . . . . . . |
10 |
Locating components . . . . . . . . . . |
12 |
Locating parts on the system board . . . . |
13 |
Locating internal drives . . . . . . . . . |
16 |
Machine type and model label. . . . . . . |
17 |
Chapter 2. Using your computer . . . |
19 |
Frequently asked questions . . . . . . . . . |
19 |
Navigating among screens on the Windows 8 and |
|
Windows 8.1 operating systems . . . . . . . . |
20 |
Navigating on Windows 8 . . . . . . . . |
20 |
Navigating on Windows 8.1 . . . . . . . . |
21 |
Accessing Control Panel on the Windows 8 or |
|
Windows 8.1 operating system . . . . . . . . |
22 |
Using the keyboard . . . . . . . . . . . . . |
23 |
Using Windows shortcut keys . . . . . . . |
23 |
Using the fingerprint reader . . . . . . . . |
23 |
Using the wheel mouse . . . . . . . . . . . |
24 |
Adjusting audio . . . . . . . . . . . . . . |
24 |
About your computer audio . . . . . . . . |
24 |
Setting the volume from the desktop . . . . |
24 |
Setting the volume from Control Panel . . . |
25 |
Using CDs and DVDs . . . . . . . . . . . . |
25 |
Handling and storing CD and DVD media . . |
26 |
Playing a CD or DVD . . . . . . . . . . |
26 |
Recording a CD or DVD . . . . . . . . . |
26 |
Chapter 3. You and your computer . |
. |
29 |
Accessibility and comfort . . . . . . . . . |
. |
29 |
Arranging your workspace . . . . . . . |
. |
29 |
Comfort . . . . . . . . . . . . . . |
. |
29 |
Glare and lighting . . . . . . . . . . . |
. |
30 |
Air circulation . . . . . . . . . . . . |
. |
30 |
Electrical outlets and cable lengths . . . . |
. |
30 |
Accessibility information . . . . . . . . |
. |
30 |
Registering your computer . . . . . . . . . |
. |
34 |
Moving your computer to another country or |
|
|
region . . . . . . . . . . . . . . . . . |
. |
34 |
Chapter 4. Security . . . . . . . . . . |
35 |
Security features . . . . . . . . . . . . . . |
35 |
Locking the computer cover . . . . . . . . . |
36 |
Attaching a Kensington-style cable lock. . . . . |
37 |
Attaching a cable lock. . . . . . . . . . . . |
38 |
Using passwords. . . . . . . . . . . . . . |
38 |
BIOS passwords . . . . . . . . . . . . |
38 |
Windows passwords . . . . . . . . . . |
39 |
Configuring the fingerprint reader . . . . . . . |
39 |
Using and understanding firewalls . . . . . . . |
39 |
Protecting data against viruses . . . . . . . . |
39 |
Chapter 5. Installing or replacing |
|
hardware . . . . . . . . . . . . . . . |
41 |
Handling static-sensitive devices . . . . . . . |
41 |
Installing or replacing hardware . . . . . . . . |
41 |
Installing external options . . . . . . . . |
41 |
Removing the computer cover. . . . . . . |
42 |
Removing and reinstalling the front bezel . . |
43 |
Installing or replacing a PCI card . . . . . . |
44 |
Installing or replacing a memory module. . . |
47 |
Installing or replacing the optical drive . . . |
49 |
Installing or replacing the card reader . . . . |
51 |
Installing or replacing the front USB |
|
assembly . . . . . . . . . . . . . . . |
55 |
Replacing the battery . . . . . . . . . . |
59 |
Replacing the power supply assembly . . . |
61 |
Replacing the heat sink and fan assembly . . |
62 |
Replacing the microprocessor . . . . . . . |
64 |
© Copyright Lenovo 2013, 2014 |
i |
Installing or replacing the mSATA solid-state |
|
drive . . . . . . . . . . . . . . . . . |
66 |
Replacing the primary hard disk drive . . . . |
72 |
Replacing the secondary hard disk drive. . . |
74 |
Installing the solid-state drive . . . . . . . |
76 |
Replacing the front fan assembly . . . . . |
77 |
Replacing the rear fan assembly . . . . . . |
79 |
Replacing the front audio and USB |
|
assembly . . . . . . . . . . . . . . . |
81 |
Replacing the internal speaker. . . . . . . |
84 |
Replacing the thermal sensor . . . . . . . |
86 |
Replacing the cover presence switch . . . . |
88 |
Replacing the Wi-Fi units . . . . . . . . . |
90 |
Installing or removing the rear Wi-Fi antenna . |
97 |
Installing or removing the front Wi-Fi |
|
antenna . . . . . . . . . . . . . . . |
98 |
Replacing the keyboard or mouse . . . . . |
100 |
Completing the parts replacement . . . . . |
101 |
Chapter 6. Recovery information . . |
103 |
Recovery information for the Windows 7 operating |
|
system . . . . . . . . . . . . . . . . . . |
103 |
Creating and using recovery media . . . . . |
103 |
Performing backup and recovery |
|
operations . . . . . . . . . . . . . . |
104 |
Using the Rescue and Recovery |
|
workspace . . . . . . . . . . . . . . |
105 |
Creating and using a rescue medium . . . . |
106 |
Reinstalling preinstalled applications and |
|
device drivers . . . . . . . . . . . . . |
107 |
Reinstalling software programs . . . . . . |
108 |
Reinstalling device drivers . . . . . . . . |
108 |
Solving recovery problems . . . . . . . . |
108 |
Recovery information for the Windows 8 or |
|
Windows 8.1 operating system . . . . . . . . |
109 |
Refreshing your computer . . . . . . . . |
109 |
Resetting your computer to the factory default |
|
settings. . . . . . . . . . . . . . . . |
109 |
Using the advanced startup options . . . . |
109 |
Recovering your operating system if Windows |
|
8 or Windows 8.1 fails to start . . . . . . . |
110 |
Chapter 7. Using the Setup Utility |
|
program . . . . . . . . . . . . . . . |
111 |
Starting the Setup Utility program . . . . . . . |
111 |
Viewing and changing settings . . . . . . . . |
111 |
Using passwords. . . . . . . . . . . . . . |
111 |
Password considerations . . . . . . . . . |
112 |
Power-On Password . . . . . . . . . . |
112 |
Administrator Password . . . . . . . . . |
112 |
Hard Disk Password. . . . . . . . . . . |
112 |
Setting, changing, and deleting a password . . |
112 |
Erasing lost or forgotten passwords (clearing |
|
CMOS) . . . . . . . . . . . . . . . . |
113 |
Enabling or disabling a device . . . . . . . . |
113 |
Selecting a startup device . . . . . . . . . . |
114 |
Selecting a temporary startup device . . . . |
114 |
Selecting or changing the startup device |
|
sequence . . . . . . . . . . . . . . . |
114 |
Enabling ErP LPS compliance mode . . . . . . |
114 |
ICE performance mode . . . . . . . . . . . |
115 |
ICE thermal alert . . . . . . . . . . . . . . |
115 |
Exiting the Setup Utility program . . . . . . . |
116 |
Chapter 8. Updating system |
|
programs . . . . . . . . . . . . . . |
117 |
Using system programs . . . . . . . . . . . |
117 |
Updating (flashing) the BIOS from a disc . . . . |
117 |
Updating (flashing) the BIOS from your operating |
|
system . . . . . . . . . . . . . . . . . . |
118 |
Recovering from a POST/BIOS update failure . . |
118 |
Chapter 9. Preventing problems . . |
119 |
Keeping your computer current . . . . . . . . |
119 |
Getting the latest device drivers for your |
|
computer . . . . . . . . . . . . . . . |
119 |
Updating your operating system . . . . . . |
119 |
Using System Update . . . . . . . . . . |
120 |
Cleaning and maintenance . . . . . . . . . . |
120 |
Basics . . . . . . . . . . . . . . . . |
120 |
Cleaning your computer . . . . . . . . . |
121 |
Good maintenance practices . . . . . . . |
122 |
Moving your computer . . . . . . . . . . . |
122 |
Chapter 10. Troubleshooting and |
|
diagnostics . . . . . . . . . . . . . |
123 |
Basic troubleshooting . . . . . . . . . . . . |
123 |
Troubleshooting procedure . . . . . . . . . . |
124 |
Troubleshooting . . . . . . . . . . . . . . |
124 |
Audio problems . . . . . . . . . . . . |
125 |
CD problems . . . . . . . . . . . . . |
126 |
DVD problems . . . . . . . . . . . . . |
127 |
Intermittent problems . . . . . . . . . . |
129 |
Keyboard, mouse, or pointing device |
|
problems . . . . . . . . . . . . . . . |
129 |
Monitor problems. . . . . . . . . . . . |
131 |
Networking problems . . . . . . . . . . |
132 |
Option problems . . . . . . . . . . . . |
135 |
Performance and lockup problems . . . . . |
136 |
Printer problems . . . . . . . . . . . . |
138 |
Serial port problems. . . . . . . . . . . |
138 |
Software problems . . . . . . . . . . . |
139 |
USB problems . . . . . . . . . . . . . |
140 |
Lenovo Solution Center . . . . . . . . . . . |
140 |
ii ThinkCentre M83, M93/p User Guide

Chapter 11. Getting information, help, |
|
and service . . . . . . . . . . . . . |
141 |
Information resources . . . . . . . . . . . . |
141 |
Lenovo ThinkVantage Tools . . . . . . . . |
141 |
Help and Support. . . . . . . . . . . . |
141 |
Safety and Warranty. . . . . . . . . . . |
141 |
Lenovo Web site . . . . . . . . . . . . |
141 |
Lenovo Support Web site. . . . . . . . . |
142 |
Help and service . . . . . . . . . . . . . . |
142 |
Using the documentation and diagnostic |
|
program . . . . . . . . . . . . . . . |
142 |
Calling for service. . . . . . . . . . . . |
142 |
Using other services . . . . . . . . . . |
143 |
Purchasing additional services . . . . . . |
143 |
Appendix A. Notices. . . . . . . . . |
145 |
Trademarks . . . . . . . . . . . . . . . . |
146 |
Appendix B. Regulatory |
|
information . . . . . . . . . . . . . |
147 |
Export classification notice . . . . . . . . . . |
147 |
Electronic emissions notices . . . . . . . . . |
147 |
Federal Communications Commission |
|
Declaration of Conformity . . . . . . . . |
147 |
Eurasian compliance mark . . . . . . . . . . |
149 |
Brazil regulatory notice . . . . . . . . . . . |
149 |
Mexico regulatory notice. . . . . . . . . . . |
149 |
Additional regulatory information . . . . . . . |
149 |
Appendix C. WEEE and recycling information . . . . . . . . . . . . . 151
Important WEEE information . . . . . . . . . 151 Recycling information for Japan . . . . . . . . 151 Recycling information for Brazil . . . . . . . . 152 Battery recycling information for Taiwan . . . . . 152
Battery recycling information for the European
Union . . . . . . . . . . . . . . . . . . 152
Appendix D. Restriction of Hazardous Substances Directive (RoHS) . . . . 155
European Union RoHS . . . . . . . . . . . |
155 |
China RoHS. . . . . . . . . . . . . . . . |
155 |
Turkish RoHS . . . . . . . . . . . . . . . |
155 |
Ukraine RoHS . . . . . . . . . . . . . . . |
156 |
India RoHS . . . . . . . . . . . . . . . . |
156 |
Appendix E. China Energy Label . . 157
Appendix F. ENERGY STAR model information . . . . . . . . . . . . . 159
Index. . . . . . . . . . . . . . . . . 161
© Copyright Lenovo 2013, 2014 |
iii |
iv ThinkCentre M83, M93/p User Guide
Important safety information
CAUTION:
Before using this manual, be sure to read and understand all the related safety information for this product. Refer to the information in this section and the safety information in the Safety, Warranty, and Setup Guide that you received with this product. Reading and understanding this safety information reduces the risk of personal injury and damage to your product.
If you no longer have a copy of the Safety, Warranty, and Setup Guide, you can obtain a Portable Document Format (PDF) version from the Lenovo® Support Web site at http://www.lenovo.com/support. The Lenovo Support Web site also provides the Safety, Warranty, and Setup Guide and this User Guide in additional languages.
Service and upgrades
Do not attempt to service a product yourself unless instructed to do so by the Customer Support Center or your documentation. Only use a Service Provider who is approved to repair your particular product.
Note: Some computer parts can be upgraded or replaced by the customer. Upgrades typically are referred to as options. Replacement parts approved for customer installation are referred to as Customer Replaceable Units, or CRUs. Lenovo provides documentation with instructions when it is appropriate for customers to install options or replace CRUs. You must closely follow all instructions when installing or replacing parts. The Off state of a power indicator does not necessarily mean that voltage levels inside a product are zero. Before you remove the covers from a product equipped with a power cord, always make sure that the power is turned off and that the product is unplugged from any power source. For more information on CRUs, refer to Chapter 5 “Installing or replacing hardware” on page 41. If you have any questions or concerns, contact the Customer Support Center.
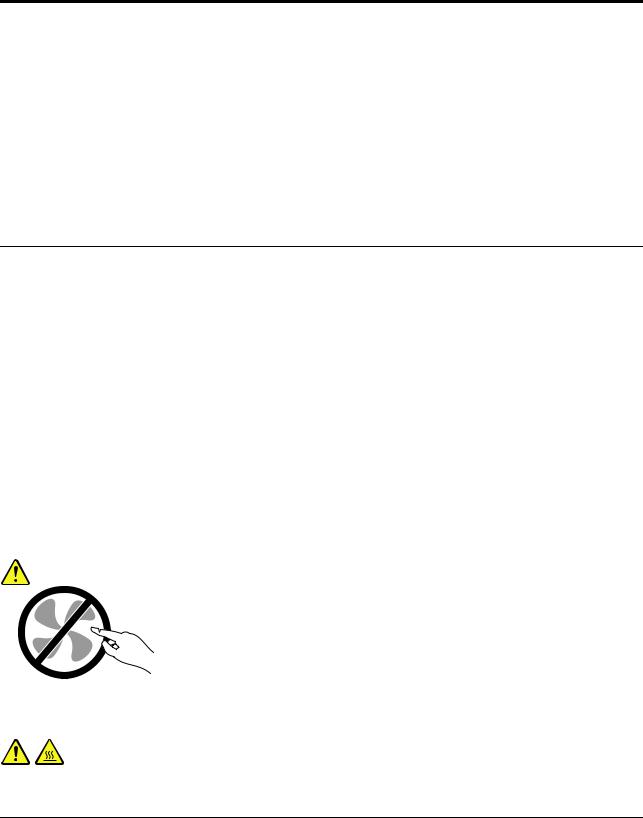
Although there are no moving parts in your computer after the power cord has been disconnected, the following warnings are required for your safety.
CAUTION:
Hazardous moving parts. Keep fingers and other body parts away.
CAUTION:
Before you open the computer cover, turn off the computer and wait several minutes until the computer is cool.
Static electricity prevention
Static electricity, although harmless to you, can seriously damage computer components and options. Improper handling of static-sensitive parts can cause damage to the part. When you unpack an option
© Copyright Lenovo 2013, 2014 |
v |

or CRU, do not open the static-protective package containing the part until the instructions direct you to install it.
When you handle options or CRUs, or perform any work inside the computer, take the following precautions to avoid static-electricity damage:
•Limit your movement. Movement can cause static electricity to build up around you.
•Always handle components carefully. Handle adapters, memory modules, and other circuit boards by the edges. Never touch exposed circuitry.
•Prevent others from touching components.
•When you install a static-sensitive option or CRU, touch the static-protective package containing the part to a metal expansion-slot cover or other unpainted metal surface on the computer for at least two seconds. This reduces static electricity in the package and your body.
•When possible, remove the static-sensitive part from the static-protective packaging and install the part without setting it down. When this is not possible, place the static-protective packaging on a smooth, level surface and place the part on it.
•Do not place the part on the computer cover or other metal surface.
Power cords and power adapters
Use only the power cords and power adapters supplied by the product manufacturer.
The power cords shall be safety approved. For Germany, it shall be H05VV-F, 3G, 0.75 mm2, or better. For other countries, the suitable types shall be used accordingly.
Never wrap a power cord around a power adapter or other object. Doing so can stress the cord in ways that can cause the cord to fray, crack, or crimp. This can present a safety hazard.
Always route power cords so that they will not be walked on, tripped over, or pinched by objects.
Protect power cord and power adapters from liquids. For instance, do not leave your power cord or power adapter near sinks, tubs, toilets, or on floors that are cleaned with liquid cleansers. Liquids can cause a short circuit, particularly if the power cord or power adapter has been stressed by misuse. Liquids also can cause gradual corrosion of power cord terminals and/or the connector terminals on a power adapter, which can eventually result in overheating.
Ensure that all power cord connectors are securely and completely plugged into receptacles.
Do not use any power adapter that shows corrosion at the ac input pins or shows signs of overheating (such as deformed plastic) at the ac input or anywhere on the power adapter.
Do not use any power cords where the electrical contacts on either end show signs of corrosion or overheating or where the power cord appears to have been damaged in any way.
Extension cords and related devices
Ensure that extension cords, surge protectors, uninterruptible power supplies, and power strips that you use are rated to handle the electrical requirements of the product. Never overload these devices. If power strips are used, the load should not exceed the power strip input rating. Consult an electrician for more information if you have questions about power loads, power requirements, and input ratings.
vi ThinkCentre M83, M93/p User Guide

Plugs and outlets
If a receptacle (power outlet) that you intend to use with your computer equipment appears to be damaged or corroded, do not use the outlet until it is replaced by a qualified electrician.
Do not bend or modify the plug. If the plug is damaged, contact the manufacturer to obtain a replacement.
Do not share an electrical outlet with other home or commercial appliances that draw large amounts of electricity; otherwise, unstable voltage might damage your computer, data, or attached devices.
Some products are equipped with a three-pronged plug. This plug fits only into a grounded electrical outlet. This is a safety feature. Do not defeat this safety feature by trying to insert it into a non-grounded outlet. If you cannot insert the plug into the outlet, contact an electrician for an approved outlet adapter or to replace the outlet with one that enables this safety feature. Never overload an electrical outlet. The overall system load should not exceed 80 percent of the branch circuit rating. Consult an electrician for more information if you have questions about power loads and branch circuit ratings.
Be sure that the power outlet you are using is properly wired, easily accessible, and located close to the equipment. Do not fully extend power cords in a way that will stress the cords.
Be sure that the power outlet provides the correct voltage and current for the product you are installing.
Carefully connect and disconnect the equipment from the electrical outlet.
External devices
Do not connect or disconnect any external device cables other than Universal Serial Bus (USB) and 1394 cables while the computer power is on; otherwise, you might damage your computer. To avoid possible damage to attached devices, wait at least five seconds after the computer is shut down to disconnect external devices.
Heat and product ventilation
Computers, power adapters, and many accessories can generate heat when turned on and when batteries are charging. Always follow these basic precautions:
•Do not leave your computer, power adapter, or accessories in contact with your lap or any part of your body for an extended period when the products are functioning or when the battery is charging. Your computer, power adapter, and many accessories produce some heat during normal operation. Extended contact with the body could cause discomfort or, potentially, a skin burn.
•Do not charge the battery or operate your computer, power adapter, or accessories near flammable materials or in explosive environments.
•Ventilation slots, fans, and heat sinks are provided with the product for safety, comfort, and reliable operation. These features might inadvertently become blocked by placing the product on a bed, sofa, carpet, or other flexible surface. Never block, cover, or disable these features.
Inspect your desktop computer for dust accumulation at least once every three months. Before inspecting your computer, turn off the power and unplug the computer's power cord from the electrical outlet; then remove any dust from vents and perforations in the bezel. If you notice external dust accumulation, then examine and remove dust from the inside of the computer including heat sink inlet fins, power supply vents, and fans. Always turn off and unplug the computer before opening the cover. If possible, avoid operating your computer within two feet of high-traffic areas. If you must operate your computer in or near a high-traffic area, inspect and, if necessary, clean your computer more frequently.
© Copyright Lenovo 2013, 2014 |
vii |

For your safety and to maintain optimum computer performance, always follow these basic precautions with your desktop computer:
•Keep the cover closed whenever the computer is plugged in.
•Regularly inspect the outside of the computer for dust accumulation.
•Remove dust from vents and any perforations in the bezel. More frequent cleanings might be required for computers in dusty or high-traffic areas.
•Do not restrict or block any ventilation openings.
•Do not store or operate your computer inside furniture, as this might increase the risk of overheating.
•Airflow temperatures into the computer should not exceed 35°C (95°F).
•Do not install air filtration devices. They may interfere with proper cooling.
Operating environment
The optimal environment in which to use your computer is 10°C-35°C (50°F-95°F) with humidity ranging between 35% and 80%. If your computer is stored or transported in temperatures less than 10°C (50°F), allow the cold computer to rise slowly to an optimal operating temperature of 10°C-35°C (50°F-95°F) before use. This process could take two hours in extreme conditions. Failure to allow your computer to rise to an optimal operating temperature before use could result in irreparable damage to your computer.
If possible, place your computer in a well-ventilated and dry area without direct exposure to sunshine.
Keep electrical appliances such as an electric fan, radio, high-powered speakers, air conditioner, and microwave oven away from your computer because the strong magnetic fields generated by these appliances can damage the monitor and data on the hard disk drive.
Do not place any beverages on top of or beside the computer or other attached devices. If liquid is spilled on or in the computer or an attached device, a short circuit or other damage might occur.
Do not eat or smoke over your keyboard. Particles that fall into your keyboard can cause damage.
Modem safety information
CAUTION:
To reduce the risk of fire, use only No. 26 AWG or larger (for example, No. 24 AWG) telecommunication line cord listed by Underwriters Laboratories (UL) or certified by the Canadian Standards Association (CSA).
To reduce the risk of fire, electrical shock, or injury when using telephone equipment, always follow basic safety precautions, such as:
•Never install telephone wiring during a lightning storm.
•Never install telephone jacks in wet locations unless the jack is specifically designed for wet locations.
•Never touch uninsulated telephone wires or terminals unless the telephone line has been disconnected at the network interface.
•Use caution when installing or modifying telephone lines.
•Avoid using a telephone (other than a cordless type) during an electrical storm. There may be a remote risk of electric shock from lightning.
•Do not use the telephone to report a gas leak in the vicinity of the leak.
viii ThinkCentre M83, M93/p User Guide
Laser compliance statement
CAUTION:
When laser products (such as CD-ROMs, DVD drives, fiber optic devices, or transmitters) are installed, note the following:
•Do not remove the covers. Removing the covers of the laser product could result in exposure to hazardous laser radiation. There are no serviceable parts inside the device.
•Use of controls or adjustments or performance of procedures other than those specified herein might result in hazardous radiation exposure.
 DANGER
Some laser products contain an embedded Class 3A or Class 3B laser diode. Note the following:
Laser radiation when open. Do not stare into the beam, do not view directly with optical instruments, and avoid direct exposure to the beam.
Power supply statement
Never remove the cover on a power supply or any part that has the following label attached.
Hazardous voltage, current, and energy levels are present inside any component that has this label attached. There are no serviceable parts inside these components. If you suspect a problem with one of these parts, contact a service technician.
Cleaning and maintenance
Keep your computer and workspace clean. Shut down the computer and then disconnect the power cord before cleaning the computer. Do not spray any liquid detergent directly on the computer or use any detergent containing flammable material to clean the computer. Spray the detergent on a soft cloth and then wipe the computer surfaces.
© Copyright Lenovo 2013, 2014 |
ix |
x ThinkCentre M83, M93/p User Guide

Chapter 1. Product overview
This chapter provides information about the computer features, specifications, software programs provided by Lenovo, and locations of connectors, components, parts on the system board, and internal drives.
Features
This section introduces the computer features. The information covers a variety of models.
Microprocessor
To view the microprocessor information of your computer, do the following:
•On the Microsoft® Windows® 7 operation system, click Start, right-click Computer, and select Properties to view the information.
•On the Microsoft Windows 8.1 operating system, go to the desktop and move your pointer to the top-right or bottom-right corner of the screen to display the charms. Then click Settings PC info to view the information.
Memory
Your computer supports up to four double data rate 3 unbuffered dual inline memory modules (DDR3 UDIMMs).
Internal drives
•mSATA solid-state drive (optional)
•Optical drive: DVD-ROM or DVD-Rambo (optional)
•Serial Advanced Technology Attachment (SATA) hard disk drive
•SATA solid-state drive (optional)
Note: Your computer supports eSATA and SATA 3.0 devices. For more information, see “Locating parts on the system board” on page 13.
Video subsystem
•Integrated graphics for a Video Graphics Array (VGA) connector and two DisplayPort® connectors
•Peripheral Component Interconnect (PCI) Express x16 graphics card slot on the system board for a discrete graphics card
Audio subsystem
•Integrated high-definition (HD) audio
•Audio line-in connector, audio line-out connector, and microphone connector on the rear panel
•Microphone connector and headphone connector on the front panel
•Internal speaker (available in some models)
Connectivity
•100/1000 Mbps integrated Ethernet controller
•PCI Fax modem (available in some models)
© Copyright Lenovo 2013, 2014 |
1 |
System management features
•Ability to store power-on self-test (POST) hardware test results
•Desktop Management Interface (DMI)
Desktop Management Interface provides a common path for users to access information about all aspects of a computer, including processor type, installation date, attached printers and other peripherals, power sources, and maintenance history.
•ErP LPS compliance mode
The energy-related products directive (ErP) lowest power state (LPS) compliance mode reduces the consumption of electricity when your computer is in sleep or off mode. For more information, see “Enabling ErP LPS compliance mode” on page 94.
•Intel® Standard Manageability
Intel Standard Manageability is hardware and firmware technology that builds certain functionality into computers in order to make them easier and less expensive for businesses to monitor, maintain, update, upgrade, and repair.
•Intel Active Management Technology (AMT) (available on some models)
Intel Active Management Technology is hardware and firmware technology that builds certain functionality into computers in order to make them easier and less expensive for businesses to monitor, maintain, update, upgrade, and repair.
•Intel Matrix Storage Manager
Intel Matrix Storage Manager is a device driver that provides support for SATA RAID 5 arrays and SATA RAID 10 arrays on specific Intel chipset system boards to enhance hard disk performance.
•Preboot Execution Environment (PXE)
The Preboot Execution Environment is an environment to start computers using a network interface independent of data storage devices (such as the hard disk drive) or installed operating systems.
•Intelligent Cooling Engine (ICE)
The Intelligent Cooling Engine is a system thermal management solution that enables your computer to run with better thermal and acoustic performance. The ICE function also monitors the thermal
performance of your computer to identify thermal problems. For more information, see “ICE performance mode” on page 115 and “ICE thermal alert” on page 115.
•System Management (SM) Basic Input/Output System (BIOS) and SM software
The SM BIOS specification defines data structures and access methods in a BIOS that allows a user or application to store and retrieve information specific about the computer in question.
•Wake on LAN
Wake on LAN is an Ethernet computer networking standard that allows a computer to be turned on or woken up by a network message. The message is usually sent by a program running on another computer on the same local area network.
•Wake on Ring
Wake on Ring, sometimes referred to as Wake on Modem, is a specification that allows supported computers and devices to resume from sleep or hibernation mode.
•Windows Management Instrumentation (WMI)
Windows Management Instrumentation is a set of extensions to the Windows Driver Model. It provides an operating system interface through which instrumented components provide information and notification.
2 ThinkCentre M83, M93/p User Guide
Input/Output (I/O) features
•9-pin serial port (one standard and one optional)
•Eight Universal Serial Bus (USB) connectors (two on the front panel and six on the rear panel)
•One Ethernet connector
•One Personal System/2 (PS/2) keyboard connector (optional)
•One PS/2 mouse connector (optional)
•One VGA monitor connector
•Three audio connectors on the rear panel (audio line-in connector, audio line-out connector, and microphone connector)
•Two audio connectors on the front panel (microphone connector and headphone connector)
•Two DisplayPort connectors
For more information, see “Locating connectors, controls, and indicators on the front of your computer” on page 9 and “Locating connectors on the rear of your computer” on page 10.
Expansion
•One PCI card slot (available in ThinkCentre® M93/p computers)
•One PCI Express x1 card slot
•One PCI Express x16 graphics card slot
•One PCI Express card slot (physical link width x16; negotiable link width x4, x1)
•Two hard disk drive bays
•Two optical drive bays
For more information, see “Locating internal drives” on page 16 and “Locating parts on the system board” on page 13.
Power supply
Your computer comes with one of the following types of power supply:
•280-watt automatic voltage-sensing power supply
•320-watt automatic voltage-sensing power supply
Security features
•Ability to enable or disable a device
•Ability to enable or disable USB connectors individually
•Computrace Agent software embedded in firmware
•Cover presence switch (also called intrusion switch)
•Keyboard with fingerprint reader (shipped with some models)
•Power-on password (POP), administrator password, and hard disk drive password to deter unauthorized use of your computer
•Support for a Kensington-style cable lock
•Support for a padlock
•Startup sequence control
•Startup without keyboard or mouse
•Trusted Platform Module (TPM)
Chapter 1. Product overview 3

For more information, see Chapter 4 “Security” on page 35.
Preinstalled software programs
Your computer is preinstalled with software programs to help you work more easily and securely. For more information, see “Lenovo programs” on page 5.
Preinstalled operating system
Your computer is preinstalled with one of the following operating systems:
•Microsoft Windows 7 operating system
•Microsoft Windows 8 operating system
•Microsoft Windows 8.1 operating system
Operating system(s), certified or tested for compatibility1 (varies by model type)
• Linux®
1.The operating system(s) listed here are being certified or tested for compatibility at the time this publication goes to press. Additional operating systems might be identified by Lenovo as compatible with your computer following the publication of this manual. This list is subject to change. To determine if an operating system has been certified or tested for compatibility, check the Web site of the operating system vendor.
4 ThinkCentre M83, M93/p User Guide

Specifications
This section lists the physical specifications for your computer.
Dimensions
Width: 175 mm (6.89 inches)
Height: 414 mm (16.30 inches)
Depth: 442 mm (17.40 inches)
Weight
Maximum configuration as shipped: 11.2 kg (24.69 lb)
Environment
• Air temperature:
Operating: 10°C to 35°C (50°F to 95°F)
Storage in original shipping package: -40°C to 60°C (-40°F to 140°F)
Storage without package: -10°C to 60°C (14°F to 140°F)
• Humidity:
Operating: 20% to 80% (non-condensing)
Storage: 20% to 90% (non-condensing)
• Altitude:
Operating: -15.2 to 3048 m (-50 to 10 000 ft)
Storage: -15.2 to 10 668 m (-50 to 35 000 ft)
Electrical input
•Input voltage:
– Low range:
Minimum: 100 V ac
Maximum: 127 V ac
Input frequency: 50/60 Hz
– High range:
Minimum: 200 V ac
Maximum: 240 V ac
Input frequency: 50/60 Hz
Lenovo programs
Your computer comes with Lenovo programs to help you work more easily and securely. Depending on the Windows operating system preinstalled, the programs might vary.
Accessing Lenovo programs on the Windows 7 operating system
You can access Lenovo programs on the Windows 7 operating system through Windows Search or from Control Panel. The icon name displayed in the search result or Control Panel might be different from the program name. You can find the program by its program name or icon name as shown in the Lenovo programs available on the Windows 7 operating system table.
Chapter 1. Product overview 5

Note: If you do not find the program you need, open the Lenovo ThinkVantage® Tools program to find the dimmed icon for the program. Then double-click the icon to install the program.
To access Lenovo programs through Windows Search, do the following:
1.Click the Start button and then type the program name or the icon name into the search box.
2.Locate the program by the program name or the icon name and then click the program to launch it.
To access Lenovo programs from Control Panel, do the following:
Note: Some Lenovo programs might not be displayed in Control Panel. To find these programs, use Windows Search.
1.Click Start Control Panel. Change the view of Control Panel from Category to Large icons or Small icons.
2.Locate the program by the icon name and then click the program to launch it.
The following table lists the programs available on the Windows 7 operating system.
Note: Depending on your computer model, some of the Lenovo programs might not be available.
Table 1. Lenovo programs available on the Windows 7 operating system
Program name |
Icon name |
|
|
Communications Utility |
Lenovo - Web Conferencing |
|
|
Fingerprint Manager Pro or |
Lenovo - Fingerprint Manager Pro or Lenovo - Fingerprint Reader |
ThinkVantage Fingerprint Software |
|
|
|
Lenovo Bluetooth Lock |
Lenovo Bluetooth Lock |
|
|
Lenovo Reach |
Lenovo Reach |
|
|
Lenovo SHAREit |
Lenovo SHAREit |
|
|
Lenovo Solution Center |
Lenovo - System Health and Diagnostics |
|
|
Lenovo ThinkVantage tools |
Lenovo Thinkvantage tools |
|
|
Password Manager |
Lenovo - Password Vault |
|
|
PC Cloud Manager |
PC Cloud Manager |
|
|
Power Manager |
Lenovo - Power Controls |
|
|
Recovery Media |
Lenovo - Factory Recovery Disks or Create Recovery Media |
|
|
Rescue and Recovery® |
Lenovo - Enhanced Backup and Restore |
System Update |
Lenovo - Update and Drivers |
|
|
View Management Utility |
Lenovo - View Management Utility |
|
|
Accessing Lenovo programs on the Windows 8 or Windows 8.1 operating system
If your computer is preinstalled with the Windows 8 or Windows 8.1 operating system, you can access Lenovo programs by doing one of the following:
•On the Windows 8 operating system, press the Windows key  to go to the Start screen. Click a Lenovo program to launch it. If you cannot find the program you need, move the pointer to the bottom-right corner of the screen to display the charms. Then click the Search charm to search for the desired program.
6 ThinkCentre M83, M93/p User Guide

•On the Windows 8.1 operating system, press the Windows key  to go to the Start screen. Click a Lenovo program to launch it. If you cannot find the program you need, click the arrow icon
  in the bottom-left corner of the screen to go to the Apps screen. Find the desired program in the apps list or search for it in the search box in the top-right corner of the screen.
Your computer supports the following Lenovo programs:
•Fingerprint Manager Pro or ThinkVantage Fingerprint Software
•Lenovo Bluetooth Lock
•Lenovo Companion
•Lenovo Reach
•Lenovo SHAREit
•Lenovo Solution Center
•Lenovo Support
•Lenovo Tools
•Password Manager
•PC Cloud Manager
•Power Manager
•System Update
An introduction to Lenovo programs
This topic provides a brief introduction to some Lenovo programs.
Note: Depending on your computer model, some of the programs might not be available.
•Communications Utility (Windows 7)
The Communications Utility program provides a central location for integrated camera and microphone settings. It controls advanced settings for the integrated microphone and camera to optimize Web conferencing and Voice over IP (VOIP) experience.
•Fingerprint Manager Pro or ThinkVantage Fingerprint Software (Windows 7, Windows 8, and Windows 8.1)
The integrated fingerprint reader provided on some keyboards enables you to enroll your fingerprint and associate it with your power-on password, hard disk password, and Windows password. As a result, fingerprint authentication can replace passwords and enable simple and secure user access. A fingerprint reader keyboard is available with select computers or can be purchased for computers that support this option.
•Lenovo Bluetooth Lock (Windows 7 and Windows 8.1)
The Lenovo Bluetooth Lock program enables you to use a Bluetooth device (such as your smartphone) as a proximity-based unit for locking or unlocking your computer automatically. By detecting the distance between your computer and the predefined Bluetooth device that you are carrying, the Lenovo Bluetooth Lock program automatically locks your computer when you walk away and unlocks your computer when you come back. This is a simple way to protect your computer against unauthorized access in case
that you forget to lock your computer.
•Lenovo Companion (Windows 8 and Windows 8.1)
Through the Lenovo Companion program, you can get the information about the accessories for your computer, view blogs and articles about your computer, and check for other recommended programs.
•Lenovo Reach (Windows 7, Windows 8, and Windows 8.1)
Chapter 1. Product overview 7
Use the Lenovo Reach program to enhance your cloud experience. Lenovo Reach keeps you connected at all times and enables you to access all your favorite items from personal computers, smartphones, or tablets. As a result, you can access, edit, and share your files from anywhere. With Lenovo Reach, you also can add your favorite Web services to your cloud desktop and stay logged-in to Web sites with the cloud password manager.
•Lenovo SHAREit (Windows 7, Windows 8, and Windows 8.1)
The Lenovo SHAREit program provides a quick and easy way to share files and folders among computers, smartphones, tablets, or smart TVs with the Android or the Windows operating system installed. SHAREit uses any type of network or even no network at all to share files and folders.
•Lenovo Solution Center (Windows 7, Windows 8, and Windows 8.1)
The Lenovo Solution Center program enables you to troubleshoot and resolve computer problems. It combines diagnostic tests, system information collection, security status, and support information, along with hints and tips for maximum system performance.
•Lenovo Support (Windows 8 and Windows 8.1)
The Lenovo Support program enables you to register your computer with Lenovo, check the computer health condition and battery status, download and view user manuals for your computer, get the warranty information of your computer, and explore help and support information.
•Lenovo ThinkVantage Tools (Windows 7)
The Lenovo ThinkVantage Tools program guides you to a host of information sources and provides easy access to various tools to help you work more easily and securely.
•Lenovo Tools (Windows 8 and Windows 8.1)
The Lenovo Tools program guides you to a host of information sources and provides easy access to various tools to help you work more easily and securely.
•Password Manager (Windows 7, Windows 8, and Windows 8.1)
The Password Manager program automatically captures and fills in authentication information for Windows programs and Web sites.
•PC Cloud Manager (Windows 7 and Windows 8.1)
The PC Cloud Manager (PCM) program is a browser-based solution for client-computer management. The PCM program has two components: PCM Server and PCM Client. PCM Server is installed on the computer, where the administrator performs management work, such as power management and security management. PCM Client is installed on the client computers to be managed. The administrator can log in to PCM Server to manage computers with PCM Client installed, through the Internet Web browser.
•Power Manager (Windows 7, Windows 8, and Windows 8.1)
The Power Manager program provides convenient, flexible, and complete power management for your computer. It enables you to adjust your computer power settings to achieve the best balance between performance and power saving.
•Recovery Media (Windows 7)
The Recovery Media program enables you to restore the contents of the hard disk drive to the factory default settings.
•Rescue and Recovery (Windows 7)
The Rescue and Recovery program is a one-button recovery and restore solution that includes a set of self-recovery tools to help you diagnose computer problems, get help, and recover from system crashes, even if you cannot start the Windows operating system.
•System Update (Windows 7, Windows 8, and Windows 8.1)
The System Update program helps you keep the software on your computer up-to-date by downloading and installing software update packages (Lenovo programs, device drivers, UEFI BIOS updates, and other third party programs).
8 ThinkCentre M83, M93/p User Guide
•View Management Utility (Windows 7)
The View Management Utility program enables you to easily organize your open windows. It divides your screen into multiple parts and then resizes and positions open windows into different parts to make the best use of your desktop. The program also is able to work across multiple monitors to improve your productivity.
Locations
This section provides information to help you locate the connectors on the front and rear of your computer, parts on the system board, and components and internal drives in your computer.
Note: The components in your computer might look slightly different from the illustrations.
Locating connectors, controls, and indicators on the front of your computer
Figure 1 “Front connector, control, and indicator locations” on page 9 shows the locations of the connectors, controls, and indicators on the front of your computer.
 1
1 

 2
2
Figure 1. Front connector, control, and indicator locations
|
|
Hard disk drive activity indicator |
|
|
Power indicator |
|
1 |
|
2 |
||
|
|
|
|
|
|
|
|
Power button |
|
|
Optical drive eject/close button |
|
3 |
|
4 |
||
|
|
|
|
|
|
|
|
USB 3.0 connector (USB port 1) |
|
|
Headphone connector |
|
5 |
|
6 |
||
|
|
|
|
|
|
|
|
Microphone connector |
|
|
USB 3.0 connector (USB port 2) |
|
7 |
|
8 |
||
|
|
|
|
|
|
Chapter 1. Product overview 9

Locating connectors on the rear of your computer
•Figure 2 “ThinkCentre M93/p rear connector locations” on page 10 shows the locations of the connectors on the rear of ThinkCentre M93/p computer. Some connectors on the rear of your computer are color-coded to help you determine where to connect the cables on your computer.
•Figure 3 “ThinkCentre M83 rear connector locations” on page 11 shows the locations of the connectors on the rear of ThinkCentre M83 computer. Some connectors on the rear of your computer are color-coded to help you determine where to connect the cables on your computer.
Figure 2. ThinkCentre M93/p rear connector locations
|
|
|
Power cord connector |
|
|
|
|
Serial port 1 |
|
1 |
|
|
|
2 |
|
||
|
|
|
|
|
|
|
|
|
|
|
|
VGA monitor connector |
|
|
|
|
DisplayPort connectors (2) |
|
3 |
|
|
|
4 |
|
||
|
|
|
|
|
|
|
|
|
|
|
|
PS/2 keyboard and mouse connectors |
|
|
|
|
USB 3.0 connectors (USB ports 5 and 6) |
|
5 |
|
|
|
6 |
|
||
|
(optional) |
|
|
|
|
|
||
|
|
|
|
|
|
|
|
|
|
|
|
USB 3.0 connectors (USB ports 7 and 8) |
|
|
|
|
USB 2.0 connectors (USB ports 3 and 4) |
|
7 |
|
|
|
8 |
|
||
|
|
|
|
|
|
|
|
|
|
|
|
Ethernet connector |
|
|
|
|
Microphone connector |
|
9 |
|
|
|
10 |
|
||
|
|
|
|
|
|
|
|
|
|
|
|
Audio line-out connector |
|
|
|
|
Audio line-in connector |
|
11 |
|
|
|
12 |
|
||
|
|
|
|
|
|
|
|
|
|
|
|
PCI Express x16 graphics card slot |
|
|
|
|
PCI Express x1 card slot |
|
13 |
|
|
|
14 |
|
||
|
|
|
|
|
|
|
|
|
|
|
PCI Express card slot (physical link width |
|
|
|
|
PCI card slot |
|
|
15 |
|
16 |
|
||||
|
x16; |
negotiable link width x4, x1) |
|
|
|
|
|
|
|
|
|
|
|
|
|
|
|
|
|
Cable-lock slots (2) |
|
|
|
|
Optional serial port (serial port 2) |
|
|
17 |
|
|
18 |
|
|||
|
|
|
|
|
|
|
||
|
|
|
Security-lock slot |
|
|
|
|
|
|
19 |
|
|
|
|
|
|
|
|
|
|
|
|
|
|
|
|
10 ThinkCentre M83, M93/p User Guide
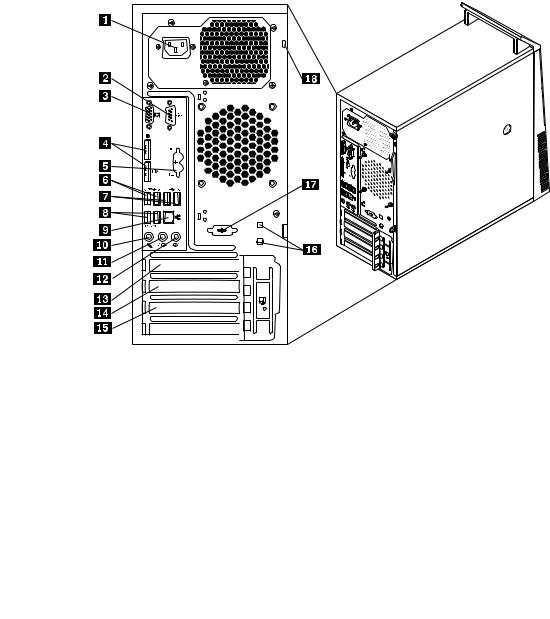
Figure 3. ThinkCentre M83 rear connector locations
|
|
|
Power cord connector |
|
|
|
|
Serial port 1 |
||
|
1 |
|
|
|
2 |
|
||||
|
|
|
|
|
|
|
|
|
|
|
|
|
|
VGA monitor connector |
|
|
|
|
DisplayPort connectors (2) |
||
|
3 |
|
|
|
4 |
|
||||
|
|
|
|
|
|
|
|
|
|
|
|
|
|
PS/2 keyboard and mouse connectors |
|
|
|
USB 3.0 connectors (USB ports 5 and 6) |
|||
|
5 |
|
|
6 |
|
|||||
|
(optional) |
|
|
|
|
|
|
|
||
|
|
|
|
|
|
|
|
|
|
|
|
|
|
USB 2.0 connectors (USB ports 7 and 8) |
|
|
|
USB 2.0 connectors (USB ports 3 and 4) |
|||
|
7 |
|
|
8 |
|
|||||
|
|
|
|
|
|
|
|
|
|
|
|
|
|
Ethernet connector |
|
|
|
|
|
|
Microphone connector |
|
9 |
|
|
|
10 |
|
|
|||
|
|
|
|
|
|
|
|
|
|
|
|
|
|
Audio line-out connector |
|
|
|
|
|
|
Audio line-in connector |
|
11 |
|
|
|
12 |
|
|
|||
|
|
|
|
|
|
|
|
|||
|
|
|
PCI Express x16 graphics card slot |
|
|
|
|
|
PCI Express x1 card slot |
|
|
13 |
|
|
14 |
|
|
||||
|
|
|
|
|
|
|
|
|
|
|
|
|
PCI Express card slot (physical link width |
|
|
|
|
Cable-lock slots (2) |
|||
|
15 |
|
16 |
|
|
|||||
|
x16; |
negotiable link width x4, x1) |
|
|
|
|
|
|
|
|
|
|
|
|
|
|
|
|
|||
|
|
Optional serial port (serial port 2) |
|
|
|
|
Security-lock slot |
|||
|
17 |
|
|
18 |
|
|
||||
|
|
|
|
|
|
|
|
|
|
|
|
|
|
Connector |
|
|
|
|
|
|
Description |
|
Audio line-in connector |
Used to receive audio signals from an external audio device, such as a stereo |
||||||||
|
|
|
|
system. When you attach an external audio device, a cable is connected between |
||||||
|
|
|
|
the audio line-out connector of the device and the audio line-in connector of the |
||||||
|
|
|
|
computer. |
|
|
|
|
|
|
|
Audio line-out connector |
Used to send audio signals from the computer to external devices, such as powered |
||||||||
|
|
|
|
stereo speakers (speakers with built-in amplifiers), headphones, multimedia |
||||||
|
|
|
|
keyboards, or the audio line-in connector on a stereo system or other external |
||||||
|
|
|
|
recording device. |
|
|
|
|||
|
DisplayPort connector |
Used to attach a high-performance monitor, a direct-drive monitor, or other devices |
||||||||
|
|
|
|
that use a DisplayPort connector. |
||||||
Chapter 1. Product overview 11
Connector |
Description |
Ethernet connector |
Used to attach an Ethernet cable for a local area network (LAN). |
|
Note: To operate the computer within FCC Class B limits, use a Category 5 Ethernet |
|
cable. |
Microphone connector |
Used to attach a microphone to your computer when you want to record sound or if |
|
you use speech-recognition software. |
PS/2 keyboard connector |
Used to attach a keyboard that uses a PS/2 keyboard connector. |
(optional) |
|
PS/2 mouse connector |
Used to attach a mouse, a trackball, or other pointing devices that use a PS/2 |
(optional) |
mouse connector. |
Serial port |
Used to attach an external modem, a serial printer, or other devices that use a |
|
9-pin serial port. |
USB connector |
Used to attach a device that requires a USB connector, such as a USB keyboard, a |
|
USB mouse, a USB scanner, or a USB printer. If you have more than eight USB |
|
devices, you can purchase a USB hub, which you can use to connect additional |
|
USB devices. |
VGA monitor connector |
Used to attach a VGA monitor or other devices that use a VGA monitor connector. |
Locating components
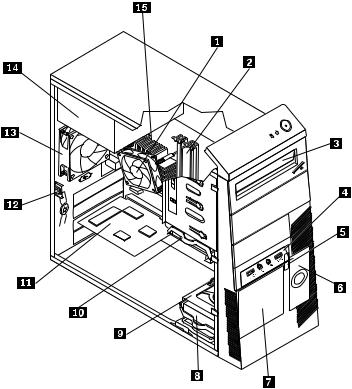
Figure 4 “Component locations” on page 12 shows the locations of the various components in your computer. To remove the computer cover, see “Removing the computer cover” on page 42.
Figure 4. Component locations
12 ThinkCentre M83, M93/p User Guide

|
|
|
Heat sink and fan assembly |
|
|
|
Memory modules |
|
1 |
|
|
2 |
|
||
|
|
|
|
|
|
|
|
|
|
|
Optical drive |
|
|
|
Front audio and USB assembly |
|
3 |
|
|
4 |
|
||
|
|
|
|
|
|
|
|
|
|
|
Thermal sensor |
|
|
|
Internal speaker (available in some models) |
|
5 |
|
|
6 |
|
||
|
|
|
|
|
|
|
|
|
|
|
Front fan assembly (available in some models) |
|
|
|
Secondary hard disk drive (available in some models) |
|
7 |
|
|
8 |
|
||
|
|
|
|
|
|
|
|
|
|
|
Secondary hard disk drive bay |
|
|
|
Primary hard disk drive |
|
9 |
|
|
10 |
|
||
|
|
|
|
|
|
|
|
|
|
|
PCI card (available in ThinkCentre M93/p |
|
|
Cover presence switch (intrusion switch) (available in some |
|
|
11 |
|
|
12 |
|
||
|
computers) |
|
models) |
||||
|
|
|
|
|
|
||
|
|
Rear fan assembly |
|
|
Power supply assembly |
||
|
13 |
|
|
14 |
|
||
|
|
|
|
|
|
|
|
|
|
Microprocessor |
|
|
|
|
|
|
15 |
|
|
|
|
|
|
|
|
|
|
|
|
|
|
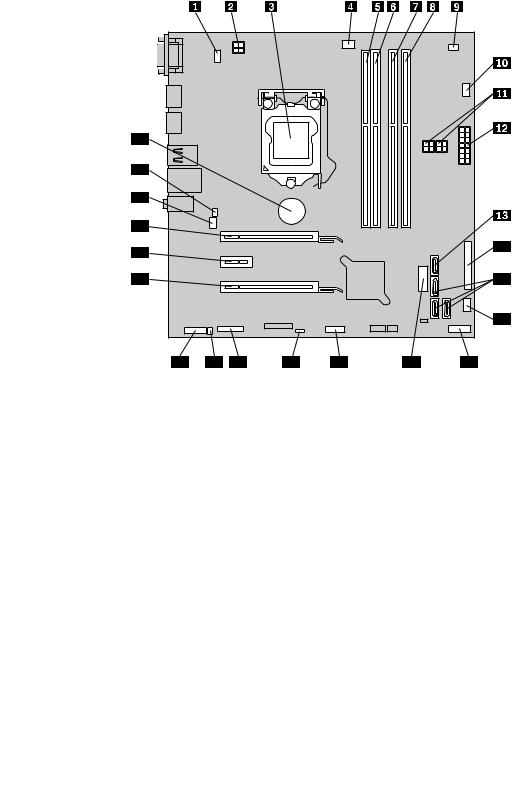
Locating parts on the system board
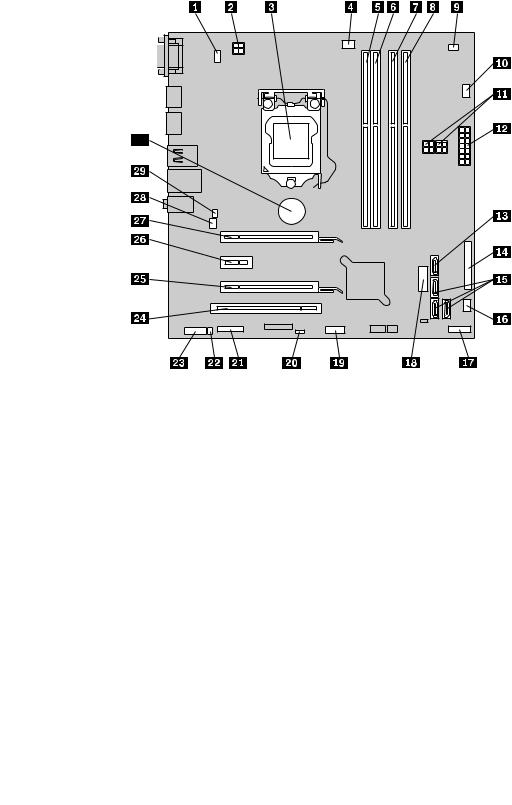
•Figure 5 “ThinkCentre M93/p system board part locations” on page 14 shows the locations of the parts on the system board of ThinkCentre M93/p computer.
•Figure 6 “ThinkCentre M83 system board part locations” on page 15 shows the locations of the parts on the system board of ThinkCentre M83 computer.
Chapter 1. Product overview 13
30
Figure 5. ThinkCentre M93/p system board part locations
|
|
|
|
|
PS/2 keyboard and mouse connector |
|
|
|
4-pin power connector |
|
|
1 |
|
|
|
2 |
|
||
|
|
|
|
|
|
|
|
||
|
|
|
|
|
Microprocessor |
|
|
|
Microprocessor fan connector |
|
|
3 |
|
|
|
4 |
|
||
|
|
|
|
|
|
|
|
||
|
|
|
|
|
Memory slot 1 (DIMM1) |
|
|
|
Memory slot 2 (DIMM2) |
|
|
5 |
|
|
|
6 |
|
||
|
|
|
|
|
|
|
|
||
|
|
|
|
|
Memory slot 3 (DIMM3) |
|
|
|
Memory slot 4 (DIMM4) |
|
|
7 |
|
|
|
8 |
|
||
|
|
|
|
|
|
|
|
||
|
|
|
|
|
Thermal sensor connector |
|
|
|
Hard disk drive fan connector |
|
|
9 |
|
|
|
10 |
|
||
|
|
|
|
|
|
|
|||
|
|
|
|
|
4-pin power connectors (2) |
|
|
|
14-pin power connector |
|
|
11 |
|
|
12 |
|
|||
|
|
|
|
|
|
||||
|
|
|
|
|
eSATA connector |
|
|
|
Parallel connector |
|
|
13 |
|
|
14 |
|
|||
|
|
|
|
|
|
||||
|
|
|
|
|
SATA 3.0 connectors (3) |
|
|
|
Power fan connector |
|
|
15 |
|
|
16 |
|
|||
|
|
|
|
|
|
||||
|
|
|
|
|
Front panel connector |
|
|
|
Front USB connector 2 (for connecting USB ports 1 and 2 |
|
|
17 |
|
|
18 |
|
|||
|
|
|
|
|
|
|
on |
the front bezel) |
|
|
|
|
|
|
|
||||
|
|
|
|
|
Front USB connector 1 (for connecting |
|
|
|
Clear CMOS (Complementary Metal Oxide Semiconductor) |
|
|
19 |
|
|
20 |
|
|||
|
additional USB devices) |
|
/Recovery jumper |
||||||
|
|
|
|
|
|
||||
|
|
|
|
|
Serial (COM2) connector |
|
|
|
Internal speaker connector |
|
|
21 |
|
|
22 |
|
|||
|
|
|
|
|
|
||||
|
|
|
|
|
Front audio connector |
|
|
|
PCI card slot |
|
|
23 |
|
|
24 |
|
|||
|
|
|
|
|
|
||||
|
|
|
|
|
PCI Express card slot (physical link width x16; |
|
|
|
PCI Express x1 card slot |
|
|
25 |
|
|
26 |
|
|||
|
negotiable link width x4, x1) |
|
|
|
|
||||
|
|
|
|
|
|
||||
|
|
|
|
|
PCI Express x16 graphics card slot |
|
|
|
System fan connector |
|
|
27 |
|
|
28 |
|
|||
|
|
|
|
|
|
||||
|
|
|
|
|
Cover presence switch connector (intrusion |
|
|
|
Battery |
|
|
29 |
|
|
30 |
|
|||
|
switch connector) |
|
|
|
|
||||
|
|
|
|
|
|
|
|
|
|
14 ThinkCentre M83, M93/p User Guide
29 |
|
|
|
|
|
|
28 |
|
|
|
|
|
|
27 |
|
|
|
|
|
|
26 |
|
|
|
|
|
|
25 |
|
|
|
|
|
14 |
|
|
|
|
|
|
|
24 |
|
|
|
|
|
15 |
|
|
|
|
|
|
16 |
23 |
22 |
21 |
20 |
19 |
18 |
17 |
Figure 6. ThinkCentre M83 system board part locations
|
|
|
|
|
PS/2 keyboard and mouse connector |
|
|
|
4-pin power connector |
|
|
1 |
|
|
|
2 |
|
||
|
|
|
|
|
|
|
|
||
|
|
|
|
|
Microprocessor |
|
|
|
Microprocessor fan connector |
|
|
3 |
|
|
|
4 |
|
||
|
|
|
|
|
|
|
|
||
|
|
|
|
|
Memory slot 1 (DIMM1) |
|
|
|
Memory slot 2 (DIMM2) |
|
|
5 |
|
|
|
6 |
|
||
|
|
|
|
|
|
|
|
||
|
|
|
|
|
Memory slot 3 (DIMM3) |
|
|
|
Memory slot 4 (DIMM4) |
|
|
7 |
|
|
|
8 |
|
||
|
|
|
|
|
|
|
|
||
|
|
|
|
|
Thermal sensor connector |
|
|
|
Hard disk drive fan connector |
|
|
9 |
|
|
|
10 |
|
||
|
|
|
|
|
|
|
|||
|
|
|
|
|
4-pin power connectors (2) |
|
|
|
14-pin power connector |
|
|
11 |
|
|
12 |
|
|||
|
|
|
|
|
|
||||
|
|
|
|
|
eSATA connector |
|
|
|
Parallel connector |
|
|
13 |
|
|
14 |
|
|||
|
|
|
|
|
|
||||
|
|
|
|
|
SATA 3.0 connectors (3) |
|
|
|
Power fan connector |
|
|
15 |
|
|
16 |
|
|||
|
|
|
|
|
|
||||
|
|
|
|
|
Front panel connector |
|
|
|
Front USB connector 2 (for connecting USB ports 1 and 2 |
|
|
17 |
|
|
18 |
|
|||
|
|
|
|
|
|
|
on |
the front bezel) |
|
|
|
|
|
|
|
||||
|
|
|
|
|
Front USB connector 1 (for connecting |
|
|
|
Clear CMOS (Complementary Metal Oxide Semiconductor) |
|
|
19 |
|
|
20 |
|
|||
|
additional USB devices) |
|
/Recovery jumper |
||||||
|
|
|
|
|
|
||||
|
|
|
|
|
Serial (COM2) connector |
|
|
|
Internal speaker connector |
|
|
21 |
|
|
22 |
|
|||
|
|
|
|
|
|
||||
|
|
|
|
|
Front audio connector |
|
|
|
PCI Express card slot (physical link width x16; negotiable |
|
|
23 |
|
|
24 |
|
|||
|
|
|
|
|
|
|
link |
width x4, x1) |
|
|
|
|
|
|
|
||||
|
|
|
|
|
PCI Express x1 card slot |
|
|
|
PCI Express x16 graphics card slot |
|
|
25 |
|
|
26 |
|
|||
|
|
|
|
|
|
||||
|
|
|
|
|
System fan connector |
|
|
|
Cover presence switch connector (intrusion switch |
|
|
27 |
|
|
28 |
|
|||
|
|
|
|
|
|
|
connector) |
||
|
|
|
|
|
|
|
|||
|
|
|
|
|
Battery |
|
|
|
|
|
|
29 |
|
|
|
|
|
||
|
|
|
|
|
|
|
|
|
|
Chapter 1. Product overview 15

Locating internal drives
Internal drives are devices that your computer uses to read and store data. You can add drives to your computer to increase storage capacity and enable your computer to read other types of media. Internal drives are installed in bays.
When installing or replacing an internal drive, it is important to note the type and size of the drive that you can install or replace in each bay and correctly connect the cables to the drive installed. Refer to the appropriate section in “Installing or replacing hardware” on page 41 for instructions on how to install or replace internal drives for your computer.
Figure 7 “Drive bay locations” on page 16 shows the locations of the drive bays.
Figure 7. Drive bay locations
1Bay 1 - Primary optical drive bay (with an optical drive available in some models)
2Bay 2 - Secondary optical drive bay
3Bay 3 - Card reader drive bay or mSATA solid-state drive bay
4Bay 4 - Primary SATA hard disk drive bay (for installing a 3.5-inch SATA hard disk drive or a 2.5-inch SATA solid-state drive)
5Bay 5 - Secondary SATA hard disk drive bay (for installing a 3.5-inch SATA hard disk drive or a 2.5-inch SATA solid-state drive)
16 ThinkCentre M83, M93/p User Guide
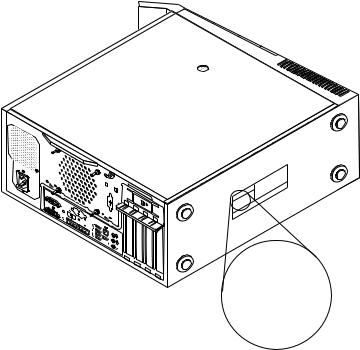
Machine type and model label
The machine type and model label identifies your computer. When you contact Lenovo for help, the machine type and model information helps support technicians to identify your computer and provide faster service.
The following is a sample of the machine type and model label.
88 |
7 |
7 |
6 6
5
 3 4
3 4
3 4
Machine Type: XXXX
Model Number: XXX
Figure 8. Machine type and model label
Chapter 1. Product overview 17
18 ThinkCentre M83, M93/p User Guide
Loading...