


Lenovo®
IdeaPad™ S9e and S10e User Guide

Note
Before using this information and the product it supports, be sure to read the following:
vChapter 7, “Safety, use, and care information,” on page 83.
vAppendix D, “Notices,” on page 139.
vRegulatory Notice included in the package with this publication.
The Regulatory Notice has been uploaded on the Web site. To refer to it, go to http://www.lenovo.com/support, click Troubleshooting, and then click User’s guides and manuals.
Second Edition (October 2008)
© Copyright Lenovo 2008. All rights reserved.
LENOVO products, data, computer software, and services have been developed exclusively at private expense and are sold to governmental entities as commercial items as defined by 48 C.F.R. 2.101 with limited and restricted rights to use, reproduction and disclosure.
LIMITED AND RESTRICTED RIGHTS NOTICE: If products, data, computer software, or services are delivered pursuant a General Services Administration ″GSA″ contract, use, reproduction, or disclosure is subject to restrictions set forth in Contract No. GS-35F-05925.
© 2008 Lenovo

Contents
Chapter 1. Getting to know your computer . |
. . |
. . . |
. . . |
. |
1 |
Top view . . . . . . . . . . . . . . |
. |
. . . . |
. . . |
. |
1 |
Left-side view . . . . . . . . . . . . |
. |
. . . . |
. . . |
. |
3 |
Right-side view . . . . . . . . . . . . |
. |
. . . . |
. . . |
. |
4 |
Front view . . . . . . . . . . . . . |
. |
. . . . |
. . . |
. |
6 |
Bottom view . . . . . . . . . . . . . |
. |
. . . . |
. . . |
. |
7 |
Chapter 2. Using your computer . . . . . . . . . . . . |
. |
. |
9 |
Putting your computer to standby or shutting it down . . . . . . |
. |
. |
. 9 |
Putting your computer to standby . . . . . . . . . . . |
. |
. |
. 9 |
Shutting down your computer . . . . . . . . . . . . . |
. |
. |
10 |
Using the touch pad . . . . . . . . . . . . . . . . . |
. |
. |
10 |
Using the keyboard . . . . . . . . . . . . . . . . . |
. |
. |
12 |
Numeric keypad . . . . . . . . . . . . . . . . . |
. |
. |
12 |
Function key combinations . . . . . . . . . . . . . . |
. |
. |
13 |
Using memory cards . . . . . . . . . . . . . . . . . |
. |
. |
15 |
Inserting a memory card . . . . . . . . . . . . . . . |
. |
. |
15 |
Removing a memory card. . . . . . . . . . . . . . . |
. |
. |
16 |
Using the integrated camera . . . . . . . . . . . . . . . |
. |
. |
16 |
Using the Internet . . . . . . . . . . . . . . . . . . |
. |
. |
16 |
Using LAN port . . . . . . . . . . . . . . . . . |
. |
. |
17 |
Using wireless LAN . . . . . . . . . . . . . . . . |
. |
. |
18 |
Securing your computer . . . . . . . . . . . . . . . . |
. |
. |
18 |
Attaching a security lock (optional) . . . . . . . . . . . . |
. |
. |
18 |
Using passwords . . . . . . . . . . . . . . . . . |
. |
. |
19 |
Installing device drivers . . . . . . . . . . . . . . . . |
. |
. |
25 |
Using battery and AC adapter . . . . . . . . . . . . . . |
. |
. |
26 |
© Copyright Lenovo 2008 |
iii |
Your computer batteries . . . . . . . . . . . . |
. . . |
. |
. |
27 |
Checking battery status . . . . . . . . . . . . |
. . . |
. |
. |
27 |
Using the AC adapter . . . . . . . . . . . . . |
. . . |
. |
. |
28 |
Charging the battery . . . . . . . . . . . . . |
. . . |
. |
. |
30 |
Handling the battery . . . . . . . . . . . . . |
. . . |
. |
. |
30 |
Using Lenovo Quick Start. . . . . . . . . . . . . |
. . . |
. |
. |
33 |
Chapter 3. Using external devices . . . . |
. . . . . . . . |
. |
35 |
Connecting a Universal Serial Bus (USB) device . . |
. . . . . . . . |
. |
35 |
Connecting a PC card device . . . . . . . . |
. . . . . . . . |
. |
37 |
Connecting an external display . . . . . . . |
. . . . . . . . |
. |
38 |
Connecting a VGA monitor . . . . . . . |
. . . . . . . . |
. |
38 |
Connecting a headphone and audio device . . . |
. . . . . . . . |
. 39 |
|
Connecting an external microphone . . . . . . |
. . . . . . . . |
. |
41 |
Connecting a Bluetooth device . . . . . . . |
. . . . . . . . |
. |
41 |
Enabling Bluetooth communications . . . . |
. . . . . . . . |
. |
42 |
Chapter 4. Troubleshooting . . . . . . . |
. . |
. |
. . |
. |
. |
. |
43 |
Frequently asked questions . . . . . . . . . |
. . |
. |
. . |
. |
. |
. |
43 |
Diagnosing problems . . . . . . . . . . . |
. . |
. |
. . |
. |
. |
. |
45 |
Diagnosing problems using PC-Doctor for DOS . . |
. . |
. |
. . |
. |
. |
. 46 |
|
Troubleshooting. . . . . . . . . . . . . |
. . |
. |
. . |
. |
. |
. |
47 |
Display problems . . . . . . . . . . . |
. . |
. |
. . |
. |
. |
. |
47 |
Password problems . . . . . . . . . . |
. . |
. |
. . |
. |
. |
. |
48 |
Keyboard problems . . . . . . . . . . |
. . |
. |
. . |
. |
. |
. |
49 |
Standby or hibernation problems . . . . . . |
. . |
. |
. . |
. |
. |
. |
49 |
Computer screen problems . . . . . . . . |
. . |
. |
. . |
. |
. |
. |
51 |
Sound problems . . . . . . . . . . . |
. . |
. |
. . |
. |
. |
. |
54 |
Battery problems . . . . . . . . . . . |
. . |
. |
. . |
. |
. |
. |
55 |
A hard disk drive problem . . . . . . . . |
. . |
. |
. . |
. |
. |
. |
56 |
iv Lenovo® IdeaPad™ S9e and S10e User Guide
A startup problem . . . . . . . . . . . . . . . . . |
. |
. |
56 |
Other problems . . . . . . . . . . . . . . . . . . |
. |
. |
57 |
Chapter 5. Upgrading and replacing devices . |
. . . |
. . . . |
. |
|
59 |
Replacing the battery . . . . . . . . . . . |
. . . |
. . . |
. |
. |
59 |
Upgrading the hard disk drive . . . . . . . . |
. . . |
. . . |
. |
. |
64 |
Replacing memory . . . . . . . . . . . . |
. . . |
. . . |
. |
. |
71 |
Chapter 6. Getting help and service |
. . . . . . . . . |
. . |
. |
77 |
Getting help and service . . . . . . |
. . . . . . . . . |
. . |
. |
77 |
Getting help on the Web . . . . . . |
. . . . . . . . . |
. . |
. |
77 |
Calling the Customer Support Center . . |
. . . . . . . . . |
. . |
. |
78 |
Getting help around the world . . . . |
. . . . . . . . . |
. . |
. |
80 |
Worldwide telephone list . . . . . . |
. . . . . . . . . |
. . |
. |
81 |
Chapter 7. Safety, use, and care information . . . . . . . . |
. |
83 |
Important safety information . . . . . . . . . . . . . . . . |
. |
83 |
Conditions that require immediate action . . . . . . . . . . . |
. |
84 |
Safety guidelines . . . . . . . . . . . . . . . . . . |
. |
85 |
Caring your computer . . . . . . . . . . . . . . . . . |
. |
105 |
Be careful about where and how you work . . . . . . . . . . |
. 105 |
|
Be gentle with your computer . . . . . . . . . . . . . . |
. |
108 |
Carry your computer properly . . . . . . . . . . . . . . |
. |
108 |
For outdoor use . . . . . . . . . . . . . . . . . . |
. |
108 |
Handle storage media and drives properly . . . . . . . . . . |
. |
109 |
Data safety . . . . . . . . . . . . . . . . . . . . |
. |
109 |
Take care in setting passwords . . . . . . . . . . . . . . |
. |
109 |
Other important tips . . . . . . . . . . . . . . . . . |
. |
109 |
Cleaning the cover of your computer . . . . . . . . . . . . |
. |
110 |
Cleaning your computer keyboard . . . . . . . . . . . . . |
. |
111 |
Contents v
Cleaning your computer display . . . . . . . . . . . . . |
. |
112 |
Accessibility and comfort . . . . . . . . . . . . . . . . |
. |
112 |
Ergonomic information . . . . . . . . . . . . . . . . |
. |
112 |
What if you are traveling? . . . . . . . . . . . . . . . |
. |
114 |
Questions about vision? . . . . . . . . . . . . . . . . |
. |
115 |
Maintenance . . . . . . . . . . . . . . . . . . . . |
. |
115 |
General tips for maintenance . . . . . . . . . . . . . . |
. |
115 |
Appendix A. Warranty information . . . . . . . . . |
. . |
. |
119 |
Lenovo Limited Warranty . . . . . . . . . . . . . . |
. . |
. |
119 |
Warranty information . . . . . . . . . . . . . . . |
. . |
. |
126 |
Types of warranty service . . . . . . . . . . . . . |
. . |
. |
128 |
Suplemento de Garantía para México . . . . . . . . . . . |
. . |
. |
130 |
Appendix B. Customer Replaceable Units (CRUs) . . . . |
. . |
. 133 |
|
Appendix C. Specifications . . . . . . . . . . . . |
. . |
. |
137 |
Specifications . . . . . . . . . . . . . . . . . . |
. . |
. |
137 |
Appendix D. Notices . . . . . . . . . . . . . . |
. . |
. |
139 |
Notices . . . . . . . . . . . . . . . . . . . . |
. . |
. |
139 |
Export classification notice . . . . . . . . . . . . . . |
. . |
. |
141 |
Television output notice . . . . . . . . . . . . . . . |
. . |
. |
141 |
Wireless related information. . . . . . . . . . . . . . |
. . |
. |
141 |
Wireless interoperability . . . . . . . . . . . . . . |
. . |
. |
141 |
Usage environment and your health . . . . . . . . . . |
. . |
. |
143 |
Electronic emissions notices . . . . . . . . . . . . . . |
. . |
. |
143 |
Federal Communications Commission (FCC) Statement . . . . |
. . |
. 144 |
|
Industry Canada Class B emission compliance statement . . . . |
. . |
. 145 |
|
vi Lenovo® IdeaPad™ S9e and S10e User Guide
Avis de conformité à la réglementation d’Industrie Canada . . . . . |
. 145 |
|
European Union EMC Directive conformance statement . . . . . . |
. 145 |
|
EU-EMC Directive (2004/108/EC) EN 55022 class B Statement of Compliance |
|
146 |
Japanese VCCI Class B statement . . . . . . . . . . . . . |
. |
148 |
Japan compliance statement for power line harmonics . . . . . . . |
. 148 |
|
WEEE and recycling statements . . . . . . . . . . . . . . |
. |
149 |
General recycling statement . . . . . . . . . . . . . . . |
. |
149 |
EU WEEE Statements. . . . . . . . . . . . . . . . . . |
. |
149 |
Japan recycling statements . . . . . . . . . . . . . . . . |
. |
150 |
Collecting and recycling a disused Lenovo computer or monitor . . . . . 150 Disposing of a Lenovo computer components . . . . . . . . . . 150 Disposing a disused battery pack from Lenovo notebook computers . . . . 151
Notice for users in the U.S.A. . . . . . . . . . . . . . |
. |
. |
. |
151 |
Notice on deleting data from your hard disk drive or solid state drive . |
. |
. |
. 152 |
|
ENERGY STAR model information. . . . . . . . . . . . |
. |
. |
. 153 |
|
Explanation of hard disk capacity . . . . . . . . . . . . |
. |
. |
. |
155 |
Trademarks . . . . . . . . . . . . . . . . . |
. |
. |
. |
157 |
Index . . . . . . . . . . . . . . . . . . . . |
. |
. |
. |
159 |
Contents vii
viii Lenovo® IdeaPad™ S9e and S10e User Guide

Chapter 1. Getting to know your computer
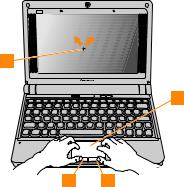
Top view
6
1 |
7 |
|
2 |
||
|
||
|
8 |
|
3 |
|
4
5
* The illustrations in this manual may differ from the actual product.
© Copyright Lenovo 2008 |
1 |
 Integrated camera
See “Using the integrated camera” on page 16.
 Wireless LAN (main)
See “Using wireless LAN” on page 18.
 Computer display
The color display with TFT technology provides clear and brilliant text and graphics.
 Power button
Use the power button to turn on the computer.
 Microphone (built-in)
The built-in microphone can be used for video conferencing, voice narration, or simple audio recordings.
 Wireless LAN (auxiliary)
See “Using wireless LAN” on page 18.
 Novo button
Use to open Application Launcher when the Windows® operating system is running. The Application Launcher provides quick access to common and frequently used applications.
For more information about using the Novo button with Lenovo Quick Start, see “Using Lenovo Quick Start” on page 33.
2 Lenovo® IdeaPad™ S9e and S10e User Guide
 Wireless device switch
Use this switch to simultaneously turn on or turn off Wireless LAN and
Bluetooth devices.
Left-side view
 Fan louvers
The fan louvers allow warm air to exit the computer.
Important:
Make sure that paper, books, clothing, cables, or other objects do not block any of the fan louvers or else overheating of the computer may occur.
 AC power adapter jack
Connect the power adapter here to supply power to the computer and charge the internal battery.
Chapter 1. Getting to know your computer 3
Note:
To prevent damage to the computer and battery pack, use the supplied AC adapter only. The AC adapter is for this product. Do not use it for any other product.
 VGA port
See “Connecting a VGA monitor” on page 38.
 Multi-media reader slot
See “Using memory cards” on page 15.
 USB 2.0 port
See “Connecting a Universal Serial Bus (USB) device” on page 35.
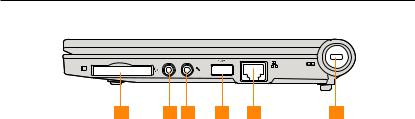
Right-side view
 PCI Express card slot
See “Connecting a PC card device” on page 37.
4 Lenovo® IdeaPad™ S9e and S10e User Guide
 Headphone jack (external)
See “Connecting a headphone and audio device” on page 39.
 Microphone jack (external)
See “Connecting an external microphone” on page 41.
 USB 2.0 port
See “Connecting a Universal Serial Bus (USB) device” on page 35.
 LAN port
See “Using LAN port” on page 17.
 Security keyhole
Your computer comes with a security keyhole. You can purchase a security cable and lock to fit this keyhole.
Note:
Before purchasing any security product, verify that it is compatible with this type of security keyhole.
Chapter 1. Getting to know your computer 5
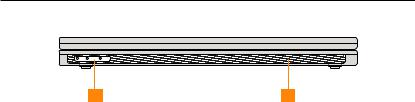
Front view
 System status indicators
The system status indicators show the current status of your computer.
 Speakers
Built-in speakers for rich powerful sound.
6 Lenovo® IdeaPad™ S9e and S10e User Guide
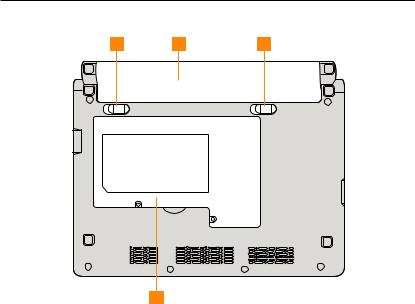
Bottom view
 Battery latch - spring loaded
The spring-loaded battery latch keeps the battery pack secured in place.
Chapter 1. Getting to know your computer 7
When you insert a battery pack, this latch automatically secures the battery in place. To remove the battery, hold this latch in the unlocked position.
 Battery pack
See “Handling the battery” on page 30.
 Battery latch - manual
The manual battery latch is used to keep the battery pack secured. Move the manual battery latch to the unlocked position to insert or remove the battery pack. Move the manual latch to the locked position after inserting the battery pack.
 Hard disk drive/memory (RAM) compartment v Hard disk drive
The hard disk drive is secured in a compartment.
Important:
Do not disassemble the hard disk drive by yourself. If you do need to, ask a Lenovo authorized service center or dealer to disassemble it.
v Memory (RAM) compartment
The memory compartment provides expansion capabilities for additional memory. The BIOS automatically detects the amount of memory in the system and configures CMOS accordingly during the Power-On Self-Test (POST) process. There is no hardware or software (including BIOS) setup required after the memory is installed.
Note:
Only purchase expansion modules from authorized retailers of this computer to ensure maximum compatibility and reliability.
8 Lenovo® IdeaPad™ S9e and S10e User Guide
Chapter 2. Using your computer
Putting your computer to standby or shutting it down
When you finish working with your computer, you can put it to standby or shut it down.
The computer with the solid state drive (SSD) does not support hibernation function.
Putting your computer to standby
If you will be away from your computer for only a short time, put the computer to standby.
When the computer is in standby, you can quickly wake it and bypass the startup process.
To put the computer to standby, do one of the following.
vClick Start and select Standby from Turn Off Computer.
vPress Fn + F1.
 WARNING
Wait until the power indicator light starts blinking (indicating that the computer is in standby) before you move your computer. Moving your computer while the hard disk is spinning can damage the hard disk, causing loss of data.
© Copyright Lenovo 2008 |
9 |

To wake the computer, press the power button.
Shutting down your computer
If you are not going to use your computer for a day or two, shut it down.
To shut down your computer, click Start and select Turn Off from Turn Off Computer.
Using the touch pad
The touch pad consists of a pad  and two click buttons at the bottom of the keyboard. To move the cursor
  on the screen, slide your fingertip over the pad in the direction in which you want the cursor to move. The functions of the left
  and
and
right  click buttons correspond to those of the left and right mouse buttons on a conventional mouse.
10 Lenovo® IdeaPad™ S9e and S10e User Guide
Note:
You can also attach and use a USB mouse through the USB connector.
For details, see “Connecting a Universal Serial Bus (USB) device” on page 35.
Chapter 2. Using your computer |
11 |
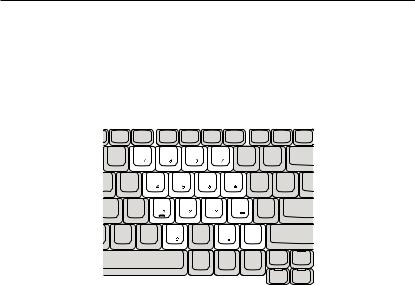
Using the keyboard
Your computer has a numeric keypad and function keys incorporated in the standard keyboard.
Numeric keypad
The keyboard has keys that, when enabled, work as a 10-key numeric keypad.
To enable or disable the numeric keypad, press Fn + F7.
* The illustrations in this manual may differ from the actual product.
12 Lenovo® IdeaPad™ S9e and S10e User Guide
Function key combinations
Through the use of the function keys, you can change operational features instantly. To use this function, press and hold the Fn key  ; then press one of the function keys
  .
.
|
1 |
The following describes the features of each function key. |
|
Fn + F1: |
Put your computer in standby mode. |
Fn + F2: |
Turn off/on the LCD screen. |
Fn + F3: |
Shift to other connected display devices. |
Fn + F5: |
Enable/disable the built-in wireless device feature. |
Chapter 2. Using your computer |
13 |
Fn + F6: |
Enable/disable the touch pad. |
Fn + F7/NmLk: |
Enable/disable the Numeric keypad. |
Fn + F8/ScrLk: |
Enable/disable Scroll Lock. |
Fn + F9/Break: |
Activate the Break function. |
Fn + F10/Pause: |
Activate the Pause function. |
Fn + F11/F12: |
Activate the F12 function. |
Fn + PgUp/Home: |
Activate the Home function. |
Fn + PgDn/End: |
Activate the End function. |
Fn + Ins/SysRq: |
Activate the System Request. |
Fn + Del/PrtSc: |
Activate the Print Screen. |
Fn + up/down arrow: |
Increase/decrease display brightness. |
Fn + right/left arrow: |
Increase/decrease computer volume. |
14 Lenovo® IdeaPad™ S9e and S10e User Guide

Using memory cards
Your computer comes with one Multi-media reader slot used to insert a memory card, such as an SD Card, a Multi-media Card, a Memory Stick, or a Memory Stick pro card.
Note:
Only use the memory card listed above; for more information about the usage, read the instructions shipped with the memory card.
Inserting a memory card
Gently slide the memory card with the arrow facing upward and pointing toward the Multi-media reader slot. Slide until it clicks into place.
Chapter 2. Using your computer |
15 |

Removing a memory card
1.Push the memory card until you hear a click.
2.Gently pull the memory card out of the Multi-media reader slot.
Using the integrated camera
Your computer has an integrated camera (USB2.0 Camera).
With the built-in camera, you can take photos or movies and use with various applications, such as MSN, Yahoo! Messenger, Windows Live Messenger, or Windows Movie Maker.
Using the Internet
Your computer comes with LAN port for high-speed DSL connection and local area network (LAN), wireless LAN for wireless connection.
16 Lenovo® IdeaPad™ S9e and S10e User Guide
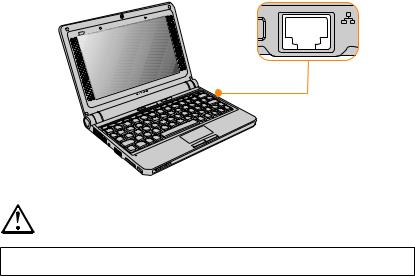
Using LAN port
The LAN port supports a standard RJ-45 connector, and allows you to connect the computer to a high-speed DSL connection and local area network (LAN).
 CAUTION
As the voltage of a telephone connection is higher than that of a network, do not attempt to connect a telephone cable to the LAN port or else a short circuit of the computer might occur.
Chapter 2. Using your computer |
17 |

Using wireless LAN
An isotropic antenna system is built into the display for optimal reception, enabling wireless communication wherever you are.
To enable wireless communications, do the following;
1.Press the Wireless device switch.
2.Press Fn + F5.
3.Press Fn + F5, then enable the wireless LAN card in the wireless setting menu.
Securing your computer
This section provides information about how to help protect your computer from theft and unauthorized use.
Attaching a security lock (optional)
You can attach a security lock to your computer to help prevent it from being removed without your permission.
Attach a security lock to the keyhole of the computer; then secure the chain on the lock to a stationary object. Refer to the instructions shipped with the security lock.
See “Right-side view” on page 4 for the location of the security keyhole.
Note:
You are responsible for evaluating, selecting, and implementing the locking devices and security features. Lenovo makes no comments, judgements, or warranties about the function, quality, or performance of locking devices and security features.
18 Lenovo® IdeaPad™ S9e and S10e User Guide
Using passwords
Using passwords helps prevent your computer from being used by others. Once you set a password and enable it, a prompt appears on the screen each time you power on the computer. Enter your password at the prompt. The computer cannot be used unless you enter the correct password.
Make sure that only authorized individuals access your computer. Establishing different kinds of passwords requires that other possible users know the proper passwords in order to access your computer or your data.
As many as three passwords might be needed for your computer: the Supervisor password, the User password, and the Hard disk drive (HDD) password. When the Supervisor password is set, only the Supervisor password entitles you full control of the computer.
vSupervisor password
With a Supervisor password, you can get full control of the computer. It also can be used as a power-on password if Password on boot is set to Enabled. Also, when you enter the BIOS Setup Utility with a Supervisor password, you are entitled to set all of the options.
vUser password
If a User password is set and Password on boot is set to Enabled, a password prompt appears when you turn on the computer. Unauthorized users cannot get access to configuration data. You can also use the User password to enter the BIOS Setup Utility, but only a part of the options can be set. User password can not be set if Supervisor password is not set.
vHard disk drive (HDD) passwords
Chapter 2. Using your computer |
19 |
Once an HDD password is set, you need to enter it to get access to the hard disk. You can set the HDD password through Set Hard Disk Passwords in the BIOS Setup Utility.
Note:
If you set passwords through the BIOS Setup Utility and put your computer into standby mode by pressing Fn + F1, the following describes the behavior of the computer when you bring it out of standby mode:
vYou are prompted to enter the Windows log-on password rather than the User password to resume operation.
vIf an HDD password is assigned to any hard disk drive, the hard disk drive is unlocked automatically when you resume operation.
To set a Supervisor Password:
Only a system administrator is able to perform this procedure.
1.Turn on your computer. When the Lenovo logo and “Press <F2> to Setup” come up, immediately press F2 to enter the BIOS Setup Utility .
2.Select Security, using the cursor directional keys.
3.Select Set Supervisor Password, and press Enter. The Set Supervisor Password window opens.
4.Choose your Supervisor password, which can be from one to eight alphanumeric characters in any combination. Type it in the Enter New Password field.
5.Press Enter once to move to the Confirm New Password field. Retype the password you just entered to verify it.
6.Commit your password to memory, and press Enter.
7.Press F10 to exit.
20 Lenovo® IdeaPad™ S9e and S10e User Guide
8. Select Yes in the Setup Confirmation window.
Changing or Removing the Supervisor Password
To change the password, do the following:
1.Select Set Supervisor Password, and press Enter. The Set Supervisor Password window opens.
2.Select Enter Current Password and type in the correct password. Then press Enter once to move to Enter New Password field, type a new supervisor password in.
3.Press Enter once to move to the Confirm New Password field. Retype the password you just entered to verify it.
4.Commit your password to memory, and press Enter.
To remove password, do the following:
1.Select Set Supervisor Password, and press Enter.
2.Select Enter Current Password and type in the correct password, and press Enter thrice.
Note:
Make sure the Password on boot is set to Enabled if you need the password protection at power on.
To set a User Password:
1.Turn on your computer. When the Lenovo logo and “Press <F2> to Setup” come up, immediately press F2 to enter the BIOS Setup Utility .
2.Select Security, using the cursor directional keys.
3.Select Set User Password, and press Enter. The Set User Password window opens.
Chapter 2. Using your computer |
21 |
4.Choose your user password, which can be from one to eight alphanumeric characters in any combination. Type it in the Enter New Password field.
5.Press Enter once to move to the Confirm New Password field. Retype the password you just entered to verify it.
6.Commit your password to memory, and press Enter.
7.Press F10 to exit.
8.Select Yes in the Setup Confirmation window.
Note:
You can set the User Password only when the Supervisor Password has been set.
Changing or Removing the User Password
To change the password, do the following:
1.Select Set User Password, and press Enter. The Set User Password window opens.
2.Type correct password in the Enter Current Password field. Then press Enter once to move to the Enter New Password field, type a new user password in.
3.Press Enter once to move to the Confirm New Password field. Retype the password you just entered to verify it.
4.Commit your password to memory, and press Enter.
To remove the password, do the following:
1.Select Set User Password, and press Enter.
2.Type correct user password in Enter Current Password, and press Enter twice.
Note:
Make sure the Password on boot is set to Enabled if you need the password protection at power on.
22 Lenovo® IdeaPad™ S9e and S10e User Guide
 Loading...