


 Loading...
User Guide
ThinkPad X1 Carbon
Notes: Before using this information and the product it supports, be sure to read and understand the following:
•Safety, Warranty, and Setup Guide
•Regulatory Notice
•“Important safety information” on page vi
•Appendix D “Notices” on page 121
The Safety, Warranty, and Setup Guide and the Regulatory Notice have been uploaded to the Web site. To refer to them, go to http://www.lenovo.com/ThinkPadUserGuides.
Fourth Edition (December 2012)
© Copyright Lenovo 2012.
LIMITED AND RESTRICTED RIGHTS NOTICE: If data or software is delivered pursuant a General Services Administration “GSA” contract, use, reproduction, or disclosure is subject to restrictions set forth in Contract No. GS-35F-05925.

Contents
Read this first . . . . . . . . . . . . . . |
v |
Important safety information . . . . . . . . . . |
vi |
Conditions that require immediate action . . |
vii |
Safety guidelines . . . . . . . . . . . . |
vii |
Chapter 1. Product overview . . . . . . |
1 |
Locating computer controls, connectors, and |
|
indicators. . . . . . . . . . . . . . . . . . |
1 |
Front view. . . . . . . . . . . . . . . . |
1 |
Rear view . . . . . . . . . . . . . . . . |
3 |
Right-side view. . . . . . . . . . . . . . |
3 |
Left-side view . . . . . . . . . . . . . . |
5 |
Bottom view . . . . . . . . . . . . . . . |
6 |
Status indicators . . . . . . . . . . . . . |
6 |
Locating important product information . . . . . . |
9 |
Machine type and model label. . . . . . . . |
9 |
FCC ID and IC Certification number label . . . |
9 |
Certificate of Authenticity label . . . . . . . |
9 |
Features . . . . . . . . . . . . . . . . . |
10 |
Specifications . . . . . . . . . . . . . . . |
11 |
Operating environment . . . . . . . . . . . |
11 |
Lenovo programs . . . . . . . . . . . . . |
12 |
Accessing Lenovo programs on the Windows |
|
7 operating system . . . . . . . . . . . |
12 |
Accessing Lenovo programs on the Windows |
|
8 operating system . . . . . . . . . . . |
14 |
An introduction to Lenovo programs . . . . |
14 |
Chapter 2. Using your computer . . . |
17 |
Registering your computer . . . . . . . . . . |
17 |
Frequently asked questions . . . . . . . . . |
17 |
Special keys and buttons . . . . . . . . . . |
19 |
Function key combinations . . . . . . . . |
19 |
Volume and mute buttons . . . . . . . . |
20 |
Windows key . . . . . . . . . . . . . |
21 |
Using the multi-touch screen . . . . . . . . . |
22 |
Using the UltraNav pointing device. . . . . . . |
23 |
Using the TrackPoint pointing device . . . . |
23 |
Using the touch pad. . . . . . . . . . . |
25 |
Disabling the UltraNav pointing device and |
|
using an external mouse . . . . . . . . . |
26 |
Adding the UltraNav icon to the Windows |
|
notification area . . . . . . . . . . . . |
26 |
Power management . . . . . . . . . . . . |
27 |
Checking the battery status . . . . . . . . |
27 |
Using the ac power adapter. . . . . . . . |
27 |
Charging the battery . . . . . . . . . . |
28 |
Disabling the built-in battery . . . . . . . |
28 |
Maximizing the battery life . . . . . . . . |
28 |
Managing the battery power . . . . . . . |
28 |
Power-saving modes . . . . . . . . . . |
29 |
Connecting to the network . . . . . . . . . . |
30 |
Ethernet connections . . . . . . . . . . |
30 |
Wireless connections . . . . . . . . . . |
30 |
Presentations and multimedia. . . . . . . . . |
34 |
Changing display settings . . . . . . . . |
34 |
Connecting a projector or an external |
|
monitor . . . . . . . . . . . . . . . . |
34 |
Using dual displays . . . . . . . . . . . |
36 |
Using audio features . . . . . . . . . . . . |
37 |
Using the camera . . . . . . . . . . . . . |
38 |
Using a flash media card. . . . . . . . . . . |
38 |
Chapter 3. You and your computer . |
. |
41 |
Accessibility and comfort . . . . . . . . . |
. |
41 |
Ergonomic information. . . . . . . . . |
. |
41 |
Comfort . . . . . . . . . . . . . . |
. |
42 |
Accessibility information . . . . . . . . |
. |
42 |
Traveling with your computer . . . . . . . . |
. |
43 |
Travel tips . . . . . . . . . . . . . . |
. |
43 |
Travel accessories . . . . . . . . . . |
. |
44 |
Chapter 4. Security . . . . . . . . . . |
45 |
Attaching a mechanical lock . . . . . . . . . |
45 |
Using passwords. . . . . . . . . . . . . . |
45 |
Passwords and sleep mode. . . . . . . . |
45 |
Typing passwords . . . . . . . . . . . |
45 |
Power-on password . . . . . . . . . . . |
46 |
Hard disk passwords . . . . . . . . . . |
46 |
Supervisor password . . . . . . . . . . |
48 |
Solid-state drive security. . . . . . . . . . . |
50 |
Setting the security chip . . . . . . . . . . . |
50 |
Using a fingerprint reader . . . . . . . . . . |
51 |
Notice on deleting data from your solid-state |
|
drive. . . . . . . . . . . . . . . . . . . |
55 |
Using firewalls . . . . . . . . . . . . . . . |
56 |
Protecting data against viruses . . . . . . . . |
56 |
Chapter 5. Recovery overview . . . . |
57 |
Recovery overview for Windows 7 models . . . . |
57 |
Creating and using recovery media . . . . . |
57 |
Performing backup and recovery operations . |
58 |
Using the Rescue and Recovery workspace . |
59 |
Creating and using a rescue medium . . . . |
60 |
© Copyright Lenovo 2012 |
i |
Reinstalling preinstalled applications and |
|
device drivers . . . . . . . . . . . . . |
61 |
Solving recovery problems . . . . . . . . |
62 |
Recovery overview for Windows 8 models . . . . |
62 |
Recovery solutions for Windows 8 models . . |
62 |
Chapter 6. Advanced configuration . . |
65 |
Installing a new operating system . . . . . . . |
65 |
Before you begin . . . . . . . . . . . . |
65 |
Installing the Windows 7 operating system . . |
66 |
Installing the Windows 8 operating system . . |
67 |
Installing device drivers . . . . . . . . . . . |
67 |
Installing the driver for the 4-in-1 media card |
|
reader . . . . . . . . . . . . . . . . |
67 |
Installing the driver for USB 3.0 on the |
|
Windows 7 operating system . . . . . . . |
67 |
Installing the ThinkPad monitor file for |
|
Windows 2000/XP/Vista/7/8 on the Windows |
|
7 operating system . . . . . . . . . . . |
68 |
Installing other device drivers and software on |
|
the Windows 7 operating system. . . . . . |
68 |
ThinkPad Setup . . . . . . . . . . . . . . |
68 |
Main menu . . . . . . . . . . . . . . |
69 |
Config menu. . . . . . . . . . . . . . |
70 |
Date/Time menu . . . . . . . . . . . . |
76 |
Security menu . . . . . . . . . . . . . |
76 |
Startup menu . . . . . . . . . . . . . |
81 |
Restart menu . . . . . . . . . . . . . |
83 |
Updating your system UEFI BIOS . . . . . |
84 |
Using system management. . . . . . . . . . |
84 |
System management . . . . . . . . . . |
84 |
Chapter 7. Preventing problems . . . |
85 |
General tips for preventing problems . . . . . . |
85 |
Making sure device drivers are current . . . . . |
86 |
Taking care of your computer . . . . . . . . . |
86 |
Cleaning the cover of your computer . . . . |
88 |
Chapter 8. Troubleshooting computer |
|
problems . . . . . . . . . . . . . . . |
89 |
Diagnosing problems . . . . . . . . . . . . |
89 |
Troubleshooting . . . . . . . . . . . . . . |
89 |
Computer stops responding . . . . . . . |
89 |
Spills on the keyboard . . . . . . . . . . |
90 |
Error messages . . . . . . . . . . . . |
90 |
Errors without messages . . . . . . . . . |
92 |
Beep errors . . . . . . . . . . . . . . |
93 |
Memory module problems . . . . . . . . |
93 |
Networking problems . . . . . . . . . . |
93 |
Problems with the keyboard and other pointing |
|
devices . . . . . . . . . . . . . . . . |
95 |
Problems with the display and multimedia |
|
devices . . . . . . . . . . . . . . . . |
96 |
Fingerprint reader problems. . . . . . . . |
100 |
Battery and power problems . . . . . . . |
100 |
Solid-state drive problems . . . . . . . . |
103 |
Software problems . . . . . . . . . . . |
103 |
USB problems . . . . . . . . . . . . . |
103 |
Chapter 9. Getting support . . . . . |
105 |
Before you contact Lenovo . . . . . . . . . . |
105 |
Getting help and service . . . . . . . . . . . |
105 |
Using diagnostic programs . . . . . . . . |
106 |
Lenovo Support Web site. . . . . . . . . |
106 |
Calling Lenovo . . . . . . . . . . . . . |
106 |
Finding ThinkPad options . . . . . . . . |
107 |
Purchasing additional services . . . . . . . . |
107 |
Appendix A. Regulatory |
|
information . . . . . . . . . . . . . |
109 |
Wireless related information . . . . . . . . . |
109 |
Location of the UltraConnect™ wireless |
|
antennas . . . . . . . . . . . . . . . |
110 |
Locating wireless regulatory notices . . . . |
111 |
Export classification notice . . . . . . . . . . |
111 |
Electronic emission notices. . . . . . . . . . |
111 |
Federal Communications Commission |
|
Declaration of Conformity . . . . . . . . |
111 |
Industry Canada Class B emission compliance |
|
statement . . . . . . . . . . . . . . . |
111 |
European Union - Compliance to the |
|
Electromagnetic Compatibility Directive . . . |
112 |
German Class B compliance statement . . . |
112 |
Korea Class B compliance statement . . . . |
113 |
Japan VCCI Class B compliance statement . . 113 |
|
Japan compliance statement for products |
|
which connect to the power mains with |
|
rated current less than or equal to 20 A per |
|
phase . . . . . . . . . . . . . . . . |
113 |
Lenovo product service information for |
|
Taiwan . . . . . . . . . . . . . . . . |
113 |
Appendix B. WEEE and recycling |
|
statements . . . . . . . . . . . . . |
115 |
Important WEEE information . . . . . . . . . |
115 |
Japan recycling statements . . . . . . . . . |
115 |
Recycling information for Brazil . . . . . . . . |
116 |
Battery recycling information for Taiwan . . . . . |
116 |
Battery recycling information for the European |
|
Union . . . . . . . . . . . . . . . . . . |
117 |
Battery recycling information for the United States |
|
and Canada . . . . . . . . . . . . . . . . |
117 |
ii User Guide

Appendix C. ENERGY STAR model |
|
China RoHS. . . . . . . . . . . . . . . . |
123 |
|
information . . . . . . . . . . . . . |
119 |
Turkish RoHS . . . . . . . . . . . . . . . |
123 |
|
Appendix D. Notices. . . . . . . . . |
121 |
Ukraine RoHS . . . . . . . . . . . . . . . |
123 |
|
India RoHS . . . . . . . . . . . . . . . . |
124 |
|||
Trademarks . . . . . . . . . . . . . . . . |
122 |
|||
|
|
|||
Appendix E. Restriction of Hazardous |
|
|
|
|
Substances Directive (RoHS) . . . . |
123 |
|
|
© Copyright Lenovo 2012 |
iii |
iv User Guide

Read this first
Be sure to follow the important tips given here to get the most use and enjoyment out of your computer. Failure to do so might lead to discomfort or injury, or cause your computer to fail.
Protect yourself from the heat that your computer generates.
When your computer is turned on or the battery is charging, the base, the palm rest, and some other parts may become hot. The temperature they reach depends on the amount of system activity and the level of charge in the battery.
Extended contact with your body, even through clothing, could cause discomfort or even a skin burn.
•Avoid keeping your hands, your lap, or any other part of your body in contact with a hot section of the computer for any extended time.
•Periodically take hands from using the keyboard by lifting your hands from the palm rest.
Protect yourself from the heat generated by the ac power adapter.
When the ac power adapter is connected to an electrical outlet and your computer, it generates heat.
Extended contact with your body, even through clothing, may cause a skin burn.
•Do not place the ac power adapter in contact with any part of your body while it is in use.
•Never use it to warm your body.
Prevent your computer from getting wet.
To avoid spills and the danger of electrical shock, keep liquids away from your computer.
Protect the cables from being damaged.
Applying strong force to cables may damage or break them.
Route communication lines, or the cables of an ac power adapter, a mouse, a keyboard, a printer, or any other electronic device, so that they cannot be walked on, tripped over, pinched by your computer or other objects, or in any way subjected to treatment that could interfere with the operation of your computer.
© Copyright Lenovo 2012 |
v |
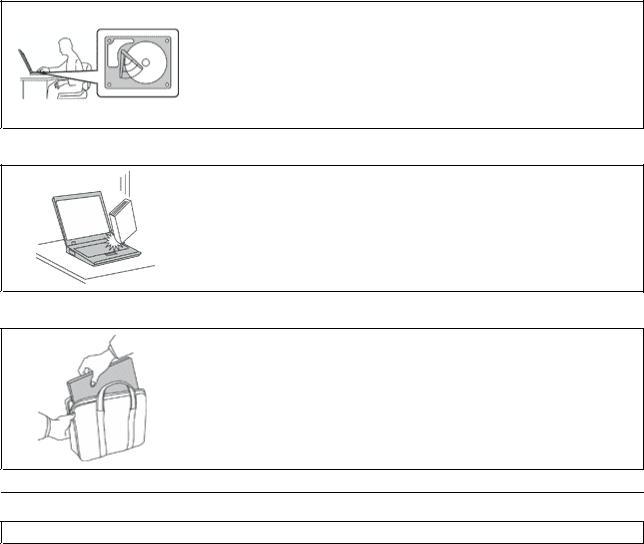
Protect your computer and data when moving it.
Before moving a computer equipped with a hard disk drive, do one of the following, and make sure that the power switch is off or is blinking:
•Turn it off.
•Put it in sleep mode.
•Put it in hibernation mode.
This will help to prevent damage to the computer, and possible loss of data.
Handle your computer gently.
Do not drop, bump, scratch, twist, hit, vibrate, push, or place heavy objects on your computer, display, or external devices.
Carry your computer carefully.
•Use a quality carrying case that provides adequate cushioning and protection.
•Do not pack your computer in a tightly packed suitcase or bag.
•Before putting your computer in a carrying case, ensure that it is off, in sleep mode, or in hibernation mode. Do not put a computer in a carrying case while it is turned on.
Important safety information
Note: Read the important safety information first.
This information can help you safely use your notebook computer. Follow and retain all information included with your computer. The information in this document does not alter the terms of your purchase agreement or the Lenovo® Limited Warranty. For more information, see “Warranty Information” in the Safety, Warranty, and Setup Guide that comes with your computer.
Customer safety is important. Our products are developed to be safe and effective. However, personal computers are electronic devices. Power cords, power adapters, and other features can create potential safety risks that can result in physical injury or property damage, especially if misused. To reduce these risks, follow the instructions included with your product, observe all warnings on the product and in the operating instructions, and review the information included in this document carefully. By carefully following the information contained in this document and provided with your product, you can help protect yourself from hazards and create a safer computer work environment.
Note: This information includes references to power adapters and batteries. In addition to notebook computers, some products (such as speakers and monitors) ship with external power adapters. If you have such a product, this information applies to your product. In addition, computer products contain a coin-sized internal battery that provides power to the system clock even when the computer is unplugged, so the battery safety information applies to all computer products.
vi User Guide
Conditions that require immediate action
Products can become damaged due to misuse or neglect. Some product damage is serious enough that the product should not be used again until it has been inspected and, if necessary, repaired by an authorized servicer.
As with any electronic device, pay close attention to the product when it is turned on. On very rare occasions, you might notice an odor or see a puff of smoke or sparks vent from your product. Or you might hear sounds like popping, cracking or hissing. These conditions might merely mean that an internal electronic component has failed in a safe and controlled manner. Or, they might indicate
a potential safety issue. However, do not take risks or attempt to diagnose the situation yourself. Contact the Customer Support Center for further guidance. For a list of Service and Support phone numbers, see the following Web site:
http://www.lenovo.com/support/phone
Frequently inspect your computer and its components for damage or wear or signs of danger. If you have any question about the condition of a component, do not use the product. Contact the Customer Support Center or the product manufacturer for instructions on how to inspect the product and have it repaired, if necessary.
In the unlikely event that you notice any of the following conditions, or if you have any safety concerns with your product, stop using the product and unplug it from the power source and telecommunication lines until you can speak to the Customer Support Center for further guidance.
•Power cords, plugs, power adapters, extension cords, surge protectors, or power supplies that are cracked, broken, or damaged.
•Signs of overheating, smoke, sparks, or fire.
•Damage to a battery (such as cracks, dents, or creases), discharge from a battery, or a buildup of foreign substances on the battery.
•A cracking, hissing or popping sound, or strong odor that comes from the product.
•Signs that liquid has been spilled or an object has fallen onto the computer product, the power cord or power adapter.
•The computer product, power cord, or power adapter has been exposed to water.
•The product has been dropped or damaged in any way.
•The product does not operate normally when you follow the operating instructions.
Note: If you notice these conditions with a product (such as an extension cord) that is not manufactured for or by Lenovo, stop using that product until you can contact the product manufacturer for further instructions, or until you get a suitable replacement.
Safety guidelines
Always observe the following precautions to reduce the risk of injury and property damage.
Service and upgrades
Do not attempt to service a product yourself unless instructed to do so by the Customer Support Center or your documentation. Only use a Service Provider who is approved to repair your particular product.
Note: Some computer parts can be upgraded or replaced by the customer. Upgrades typically are referred to as options. Replacement parts approved for customer installation are referred to as Customer Replaceable Units, or CRUs. Lenovo provides documentation with instructions when it is appropriate for customers to install options or replace CRUs. You must closely follow all instructions when installing or replacing parts. The Off state of a power indicator does not necessarily mean that voltage levels inside a product are zero. Before you remove the covers from a product equipped with a power cord, always ensure
© Copyright Lenovo 2012 |
vii |
that the power is turned off and that the product is unplugged from any power source. If you have any questions or concerns, contact the Customer Support Center.
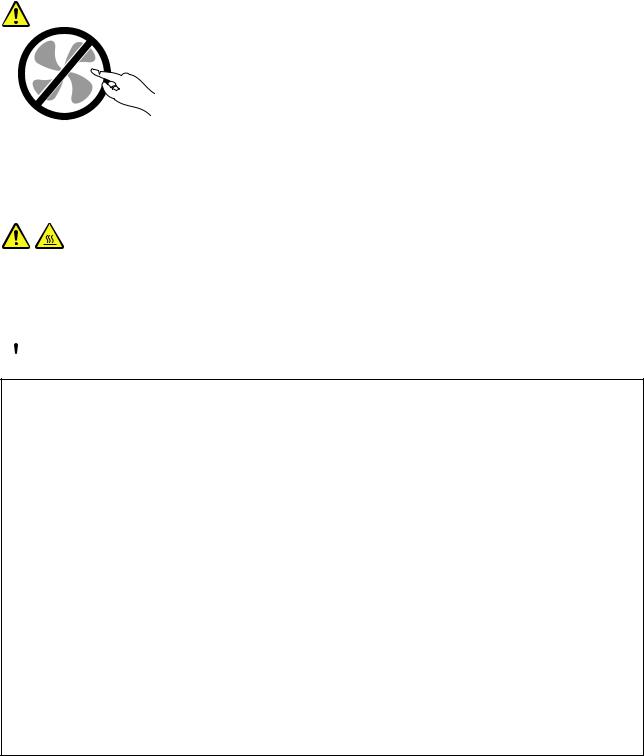
Although there are no moving parts in your computer after the power cord has been disconnected, the following warnings are required for your safety.
CAUTION:
Hazardous moving parts. Keep fingers and other body parts away.
CAUTION:
Before replacing any CRUs, turn off the computer and wait three to five minutes to let the computer cool before opening the cover.
Power cords and power adapters
 DANGER
Use only the power cords and power adapters supplied by the product manufacturer.
The power cords shall be safety approved. For Germany, it shall be H05VV-F, 3G, 0.75 mm2, or better. For other countries, the suitable types shall be used accordingly.
Never wrap a power cord around a power adapter or other object. Doing so can stress the cord in ways that can cause the cord to fray, crack, or crimp. This can present a safety hazard.
Always route power cords so that they will not be walked on, tripped over, or pinched by objects.
Protect power cords and power adapters from liquids. For instance, do not leave your power cord or power adapter near sinks, tubs, toilets, or on floors that are cleaned with liquid cleansers. Liquids can cause a short circuit, particularly if the power cord or power adapter has been stressed by misuse. Liquids also can cause gradual corrosion of power cord terminals and/or the connector terminals on a power adapter, which can eventually result in overheating.
Ensure that all power cord connectors are securely and completely plugged into receptacles.
Do not use any power adapter that shows corrosion at the ac input pins or shows signs of overheating (such as deformed plastic) at the ac input pins or anywhere on the power adapter.
Do not use any power cords where the electrical contacts on either end show signs of corrosion or overheating or where the power cord appears to have been damaged in any way.
viii User Guide
To prevent possible overheating, do not cover the power adapter with clothing or other objects when the power adapter is plugged into an electrical outlet.
Extension cords and related devices
Ensure that extension cords, surge protectors, uninterruptible power supplies, and power strips that you use are rated to handle the electrical requirements of the product. Never overload these devices. If power strips are used, the load should not exceed the power strip input rating. Consult an electrician for more information if you have questions about power loads, power requirements, and input ratings.
Plugs and outlets
 DANGER
If a receptacle (power outlet) that you intend to use with your computer equipment appears to be damaged or corroded, do not use the outlet until it is replaced by a qualified electrician.
Do not bend or modify the plug. If the plug is damaged, contact the manufacturer to obtain a replacement.
Do not share an electrical outlet with other home or commercial appliances that draw large amounts of electricity; otherwise, unstable voltage might damage your computer, data, or attached devices.
Some products are equipped with a three-pronged plug. This plug fits only into a grounded electrical outlet. This is a safety feature. Do not defeat this safety feature by trying to insert it into a non-grounded outlet. If you cannot insert the plug into the outlet, contact an electrician for an approved outlet adapter or to replace the outlet with one that enables this safety feature. Never overload an electrical outlet. The overall system load should not exceed 80 percent of the branch circuit rating. Consult an electrician for more information if you have questions about power loads and branch circuit ratings.
Ensure that the power outlet you are using is properly wired, easily accessible, and located close to the equipment. Do not fully extend power cords in a way that will stress the cords.
Ensure that the power outlet provides the correct voltage and current for the product you are installing.
Carefully connect and disconnect the equipment from the electrical outlet.
Power supply statement
 DANGER
Never remove the cover on a power supply or any part that has the following label attached.
© Copyright Lenovo 2012 |
ix |

Hazardous voltage, current, and energy levels are present inside any component that has this label attached. There are no serviceable parts inside these components. If you suspect a problem with one of these parts, contact a service technician.
External devices
CAUTION:
Do not connect or disconnect any external device cables other than USB while the computer power is on; otherwise, you might damage your computer. To avoid possible damage to attached devices, wait at least five seconds after the computer is shut down to disconnect external devices.
Notice for lithium coin cell battery
 DANGER
Danger of explosion if battery is incorrectly replaced.
Do not:
•Throw or immerse into water
•Heat to more than 100°C (212°F)
•Repair or disassemble
Dispose of the battery as required by local ordinances or regulations.
The following statement applies to users in the state of California, U.S.A.
California Perchlorate Information:
Products containing manganese dioxide lithium coin cell batteries may contain perchlorate.
Perchlorate Material - special handling may apply, See
www.dtsc.ca.gov/hazardouswaste/perchlorate
Notice for built-in rechargeable batteries
 DANGER
Do not attempt to replace the internal rechargeable lithium batteries. Contact Lenovo Support for factory replacement.
Heat and product ventilation
 DANGER
Computers, ac power adapters, and many accessories can generate heat when turned on and when batteries are charging. Notebook computers can generate a significant amount of heat due to their compact size. Always follow these basic precautions:
•When your computer is turned on or the battery is charging, the base, the palm rest, and some other parts may become hot. Avoid keeping your hands, your lap, or any other part of your body in contact with a hot section of the computer for any extended length of time. When you use the keyboard, avoid keeping your palms on the palm rest for a prolonged period of time.
xUser Guide

Your computer generates some heat during normal operation. The amount of heat depends on the amount of system activity and the battery charge level. Extended contact with your body, even through clothing, could cause discomfort or even a skin burn. Periodically take breaks from using the keyboard by lifting your hands from the palm rest; and be careful not to use the keyboard for any extended length of time.
•Do not operate your computer or charge the battery near flammable materials or in explosive environments.
•Ventilation slots, fans and/or heat sinks are provided with the product for safety, comfort, and reliable operation. These features might inadvertently become blocked by placing the product on a bed, sofa, carpet, or other flexible surface. Never block, cover, or disable these features.
•When the ac power adapter is connected to an electrical outlet and your computer, it generates heat. Do not place the adapter in contact with any part of your body while using it. Never use the ac power adapter to warm your body. Extended contact with your body, even through clothing, may cause a skin burn.
For your safety, always follow these basic precautions with your computer:
•Keep the cover closed whenever the computer is plugged in.
•Regularly inspect the outside of the computer for dust accumulation.
•Remove dust from vents and any perforations in the bezel. More frequent cleanings might be required for computers in dusty or high-traffic areas.
•Do not restrict or block any ventilation openings.
•Do not operate your computer inside furniture, as this might increase the risk of overheating.
•Airflow temperatures into the computer should not exceed 35°C (95°F).
Electrical current safety information
 DANGER
Electric current from power, telephone, and communication cables is hazardous.
To avoid a shock hazard:
•Do not use your computer during a lightning storm.
•Do not connect or disconnect any cables or perform installation, maintenance, or reconfiguration of this product during an electrical storm.
•Connect all power cords to a properly wired and grounded electrical outlet.
•Connect to properly wired outlets any equipment that will be attached to this product.
•Whenever possible, use one hand only to connect or disconnect signal cables.
•Never turn on any equipment when there is evidence of fire, water, or structural damage.
•Do not use you computer until all internal parts enclosures are fastened into place. Never use the computer when internal parts and circuits are exposed.
© Copyright Lenovo 2012 |
xi |

 DANGER
Connect and disconnect cables as described in the following procedures when installing, moving, or opening covers on this product or attached devices.
To connect:
1.Turn everything OFF.
2.First, attach all cables to devices.
3.Attach signal cables to connectors.
4.Attach power cords to outlets.
5.Turn devices ON.
To disconnect:
1.Turn everything OFF.
2.First, remove power cords from outlets.
3.Remove signal cables from connectors.
4.Remove all cables from devices.
The power cord must be disconnected from the wall outlet or receptacle before installing all other electrical cables connected to the computer.
The power cord may be reconnected to the wall outlet or receptacle only after all other electrical cables have been connected to the computer.
Liquid crystal display (LCD) notice
CAUTION:
The LCD is made of glass, and rough handling or dropping the computer can cause the LCD to break. If the LCD breaks and the internal fluid gets into your eyes or on your hands, immediately wash the affected areas with water for at least 15 minutes; if any symptoms are present after washing, get medical care.
Note: For products with mercury-containing fluorescent lamps (for example, non-LED), the Liquid crystal display (LCD) contains mercury; dispose of according to local, state, or federal laws.
Using headphones or earphones
CAUTION:
Excessive sound pressure from earphones and headphones can cause hearing loss. Adjustment of the equalizer to maximum increases the earphone and headphone output voltage and the sound pressure level. Therefore, to protect your hearing, adjust the equalizer to an appropriate level.
Excessive use of headphones or earphones for a long period of time at high volume can be dangerous if the output of the headphone or earphone connectors do not comply with specifications of EN 50332-2. The headphone output connector of your computer complies with EN 50332-2 Sub clause 7. This specification limits the computer’s maximum wide band true RMS output voltage to 150 mV. To help protect against hearing loss, ensure that the headphones or earphones you use also comply with EN 50332-2 (Clause 7 limits) for a wide band characteristic voltage of 75 mV. Using headphones that do not comply with EN 50332-2 can be dangerous due to excessive sound pressure levels.
If your Lenovo computer came with headphones or earphones in the package, as a set, the combination of the headphones or earphones and the computer already complies with the specifications of EN 50332-1. If different headphones or earphones are used, ensure that they comply with EN 50332-1 (Clause 6.5 Limitation Values). Using headphones that do not comply with EN 50332-1 can be dangerous due to excessive sound pressure levels.
xii User Guide

Additional safety information
 DANGER
Plastic bags can be dangerous. Keep plastic bags away from babies and children to avoid danger of suffocation.
Notice for users in the U.S.A.
Many personal computer products and accessories contain cords, cables or wires, such as power cords or cords to connect the accessory to a personal computer. If this product has such a cord, cable or wire, then the following warning applies:
WARNING: Handling the cord on this product or cords associated with accessories sold with this product will expose you to lead, a chemical known to the State of California to cause cancer, and birth defects or other reproductive harm. Wash hands after handling.
Save these instructions.
© Copyright Lenovo 2012 |
xiii |
xiv User Guide
Chapter 1. Product overview
This chapter provides information about the locations of connectors, locations of important product labels, computer features, specifications, operating environment, and preinstalled programs.
This chapter contains the following topics:
•“Locating computer controls, connectors, and indicators” on page 1
•“Locating important product information” on page 9
•“Features” on page 10
•“Specifications” on page 11
•“Operating environment” on page 11
•“Lenovo programs” on page 12
Locating computer controls, connectors, and indicators
This section introduces the computer hardware features to give you the basic information you will need to start using the computer.
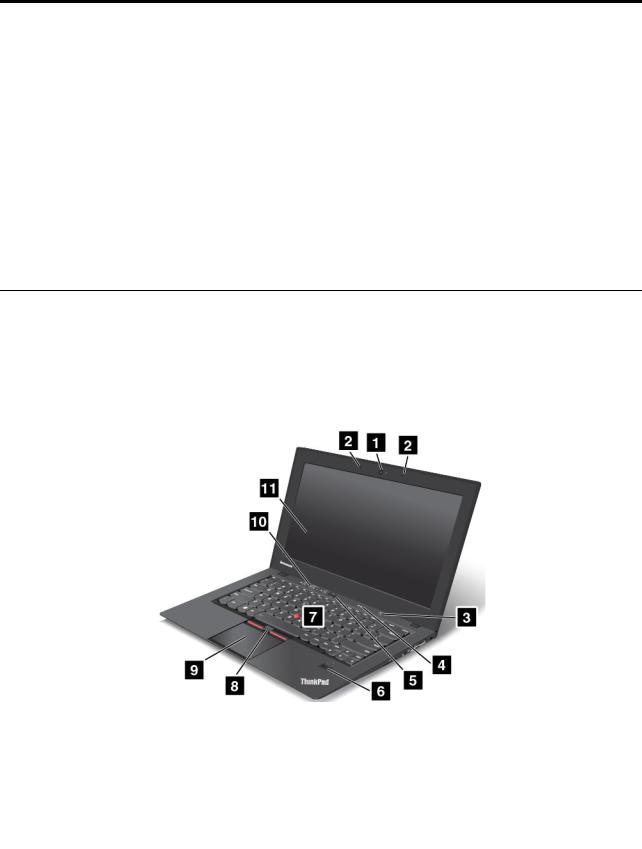
Front view
Note: Your computer might have slight variations from the following illustration.
|
|
Camera |
|
|
|
TrackPoint® pointing stick |
|
1 |
|
7 |
|
||
|
|
|
|
|
|
|
|
|
Microphones |
|
|
|
TrackPoint buttons |
|
2 |
|
8 |
|
||
|
|
|
|
|
|
|
|
|
Power button |
|
|
|
Touch pad |
|
3 |
|
9 |
|
||
|
|
|
|
|
|
|
|
|
Status indicators |
|
|
|
Volume control buttons |
|
4 |
|
10 |
|
||
|
|
|
|
|
|
|
|
|
Black button |
|
|
|
Screen (multi-touch screen on some models) |
|
5 |
|
11 |
|
||
|
|
|
|
|
|
|
|
|
Fingerprint reader |
|
|
|
|
|
6 |
|
|
|
|
|
|
|
|
|
|
|
|
© Copyright Lenovo 2012 |
1 |

1 |
Camera |
Use the camera to take pictures or hold a video conference.
2 |
Microphones |
The microphones capture sound and voice when used with an application program capable of handling audio.
3 |
Power button |
Use the power button to turn on the computer.
To turn off the computer, use the Start menu shutdown option on the Windows® 7 operating system. For the Windows 8 operating system, move the cursor to the bottom right corner of the screen to bring up the charms. Then click Settings Power Shut down.
If your computer stops responding and you cannot turn it off, press and hold the power button for four seconds or more. If the computer still is not responding, remove the ac power adapter and use the emergency reset hole to reset the computer. See “Bottom view” on page 6.
You also can program the power button so that by pressing the power button you can shut down the computer or put it into sleep or hibernation mode. To achieve this, you need to change your power plan settings. To access power plan settings, do the following:
•For Windows 7: Start the Power Manager program and then click the Power Plan tab. For instructions on how to start the Power Manager program, see “Accessing Lenovo programs on the Windows 7 operating system” on page 12.
•For Windows 8: Click the battery status icon from the Windows notification area and click More power options. Then click Choose what the power buttons do.
4 |
Status indicators |
Your computer has several status indicators. For the detailed information about the location and meaning of each indicator, see “Status indicators” on page 6.
5 |
Black button |
When the operating system is working normally, pressing the black button launches the SimpleTap program on the Windows 7 operating system or the Lenovo PC Device Experience program on the Windows 8 operating system.
On the Windows 7 operating system, you also can use the black button to interrupt the startup sequence of your computer to start the Rescue and Recovery® workspace. To access the Rescue and Recovery workspace, turn on your computer and press the black button when the ThinkPad logo is displayed on the screen. For more information about the Rescue and Recovery Workspace, see “Using the Rescue and Recovery workspace” on page 59.
6 |
Fingerprint reader |
Some models have a fingerprint reader. The fingerprint authentication technology enables you to use your fingerprint to start the computer, enter the ThinkPad® Setup program, or enter the Windows® operating system.
UltraNav® pointing device
7 |
TrackPoint pointing stick |
8 |
TrackPoint buttons |
9 |
Touch pad |
2 User Guide
The keyboard contains the Lenovo unique UltraNav pointing device. Pointing, selecting, and dragging are all part of a single process that you can perform without moving your fingers from a typing position.
10 |
Volume control buttons |
The volume control buttons enable you to quickly adjust the sound volume, mute the speakers, or mute the microphones of your computer.
11 |
Screen (multi-touch screen on some models) |
For more information, refer to “Using the multi-touch screen” on page 22.
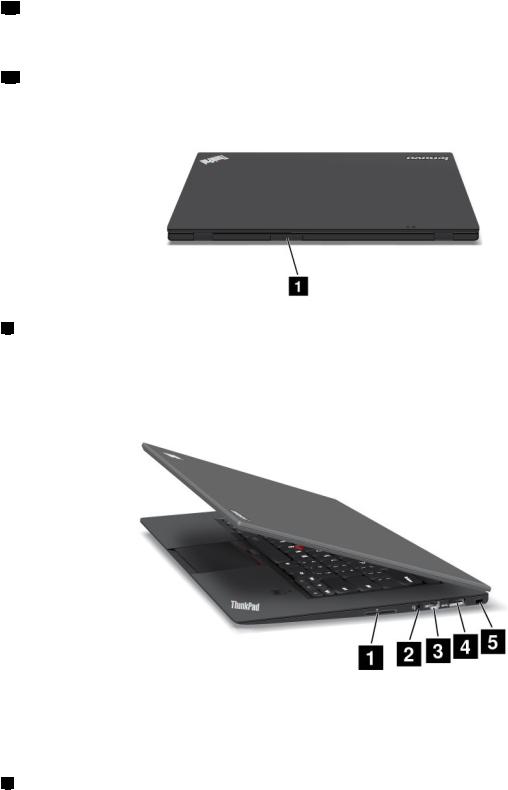
Rear view
1 |
SIM card slot |
If your computer has a wireless WAN feature, it might require a Subscriber Identification Module (SIM) card to establish wireless WAN connections. Depending on the country of delivery, the SIM card might be already installed in the SIM card slot.
Right-side view
|
|
4-in-1 media card reader slot |
|
|
USB 3.0 connector |
|
1 |
|
4 |
||
|
|
|
|
|
|
|
|
Combo audio jack |
|
|
Security keyhole |
|
2 |
|
5 |
||
|
|
|
|
|
|
|
|
Mini DisplayPort connector |
|
|
|
|
3 |
|
|
|
|
|
|
|
|
|
|
1 |
4-in-1 media card reader slot |
The 4-in-1 media card reader supports the following cards:
• Secure Digital (SD) card
Chapter 1. Product overview 3

•Secure Digital High-Capacity (SDHC) card
•Secure Digital eXtended-Capacity (SDXC) card
•MultiMediaCard (MMC)
For details, refer to “Using a flash media card” on page 38.
Note: Your computer does not support the Content Protection for Recordable Media (CPRM) feature for SD cards.
2 |
Combo audio jack |
To listen to the sound from your computer, connect a headphone or a headset that has a 3.5 mm 4-pole plug to the combo audio jack.
Notes:
•If you are using a headset with a function switch, for example, a headset for an iPhone mobile digital device, do not press this switch while using the headset. If you press it, the headset microphone will be disabled, and the microphones on the computer will be enabled instead.
•The combo audio jack does not support a conventional microphone.
3 |
Mini DisplayPort connector |
Use the Mini DisplayPort connector to connect your computer to a compatible projector, external monitor, or high-definition television.
Your computer might come with a Mini DisplayPort to VGA adapter. Use the adapter to connect your computer to a compatible digital audio device or video monitor such as a high-definition television.
4 |
USB 3.0 connector |
The Universal Serial Bus (USB) 3.0 connector is used for connecting devices compatible with a USB interface, such as a USB printer or a digital camera.
Note: When you attach a USB cable to the connector, ensure that the USB mark is facing upward. Otherwise the connector might be damaged.
5 |
Security keyhole |
Purchase a security cable lock that fits this keyhole to lock your computer to a stationary object to protect your computer from theft.
4 User Guide
Left-side view
|
|
ac power connector |
|
|
Always On USB connector |
|
1 |
|
3 |
||
|
|
|
|
|
|
|
|
Fan louvers |
|
|
Wireless radio switch |
|
2 |
|
4 |
||
|
|
|
|
|
|
1 |
ac power connector |
Connect the ac power adapter to the ac power connector to provide ac power to the computer and charge the battery.
2 |
Fan louvers |
The internal fan and louvers enable air to circulate in the computer and cool the central processor.
Note: To avoid impeding airflow, do not place any obstacle in front of the fan.
3 |
Always On USB connector |
By default, the Always On USB connector enables you to charge some mobile digital devices and smartphones when your computer is in sleep or hibernation mode.
If you want to charge these devices when your computer is turned off, do the following:
1.Connect the computer to an ac power supply.
2.Go to ThinkPad Setup and enable Always On USB Charge in off mode. For more information, see “Config menu” on page 70.
3.Do one of the following:
•For Windows 7: Start the Power Manager program and click the Global Power Settings tab. Then select the Enable Always On USB check box.
•For Windows 8: Press the Windows key to go to the Start screen. Click Lenovo Settings Power. Then select the Enable when the computer is off check box.
4 |
Wireless radio switch |
Use this switch to quickly turn on or turn off all wireless connections.
Chapter 1. Product overview 5
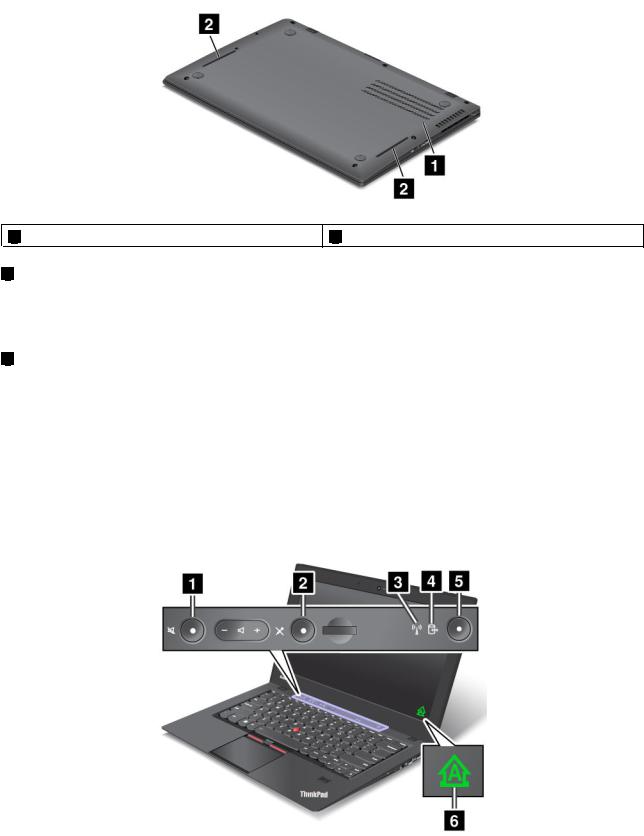
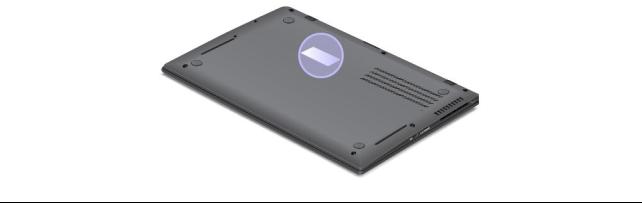
Bottom view
1 |
Emergency reset hole |
2 |
Speakers |
1 |
Emergency reset hole |
|
|
If your computer stops responding and you cannot turn it off by pressing the power button, remove the ac power adapter and reset the computer by inserting a needle or a straightened paper clip into the emergency reset hole to turn off the computer.
2 |
Speakers |
For details, refer to “Volume and mute buttons” on page 20.
Status indicators
The status indicators show the current status of your computer.
System status indicators
Your computer has system status indicators. The following illustrations show the location and the meaning of each indicator.
Note: Your computer might have slight variations from the following illustrations.
6 User Guide
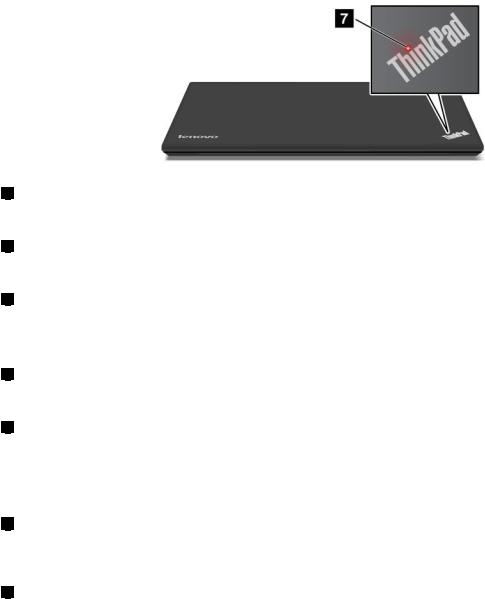
1 |
Speaker mute indicator |
When the indicator is on in red, the speaker mute mode is enabled.
2 |
Microphone mute indicator |
When the indicator is on in red, the microphone mute mode is enabled.
3 |
Wireless LAN/WAN/Bluetooth status indicator |
•Green: The wireless LAN, WAN, Bluetooth feature is on.
•Off: Wireless network devices are disabled or the wireless radio is turned off.
4 |
Device access status indicator |
When the indicator is on, the small form factor solid-state drive is reading or writing data.
5 |
Power-on status indicator |
•On: The computer is on.
•Blinking: The computer is in sleep mode.
•Off: The computer is off.
6 |
Caps Lock indicator |
When the indicator is on, the Caps Lock mode is enabled. You can type all alphabetic characters (A-Z) in upper case without pressing the Shift key.
7 |
Illuminated dot in the ThinkPad logo (on some models) |
The illuminated dot in the ThinkPad logo functions as a system status indicator.
•Red: The computer is on.
•Fast blinking red: The computer is turning off.
•Slow blinking red: The computer is in sleep mode.
•Off: The computer is off.
Power status indicators
The computer has status indicators that show the power mode (sleep, hibernation, or normal), ac power status, and battery status. The following shows the locations and the meaning of the indicators:
The following illustration shows the locations of the ac power status indicator.
Chapter 1. Product overview 7
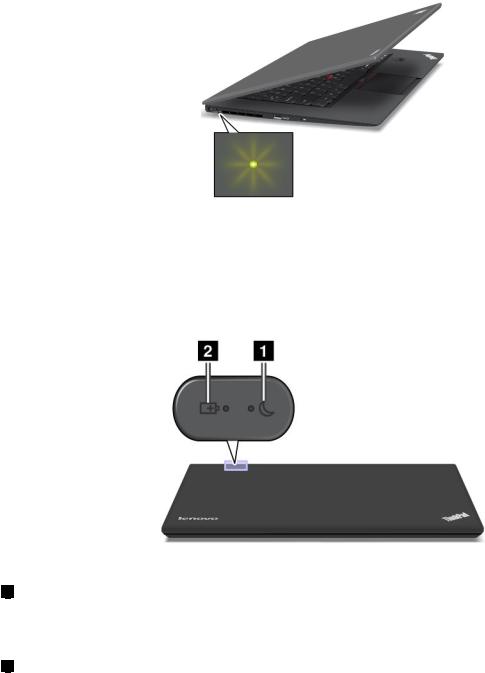
•Green: The ac power adapter is connected.
•Off: The ac power adapter is not connected.
The following figure shows the locations of the sleep mode status indicator and the battery status indicator.
Note: Your computer might have slight variations from the following illustration.
1Sleep status indicator (on some models)
•Green: The computer is in sleep mode.
•Blinking green: The computer is entering sleep or hibernation mode, or is resuming normal operation.
2Battery status indicator (on some models)
•Green: The battery charge level is 20% or more.
•Orange: The battery charge level is between 5% and 20%.
•Fast blinking orange: The battery charge level is 5% or less, or the battery is charging.
•Slow blinking orange: The battery is being charged. When the charge level reaches 20%, the blinking color changes to green.
•Slow blinking green: The battery charge level is between 20% and 80%, and charging is continuing. When the battery charge level reaches 80%, the battery status indicator stops blinking, but the charging might continue until the battery is 100% charged.
•Quick blinking orange: An error has occurred with the battery.
•Off: The battery is detached or the computer is powered off.
8 User Guide
Note: If the computer is operating on battery power, the battery status indicator does not work while the computer is turned off or is in sleep mode or hibernation mode.
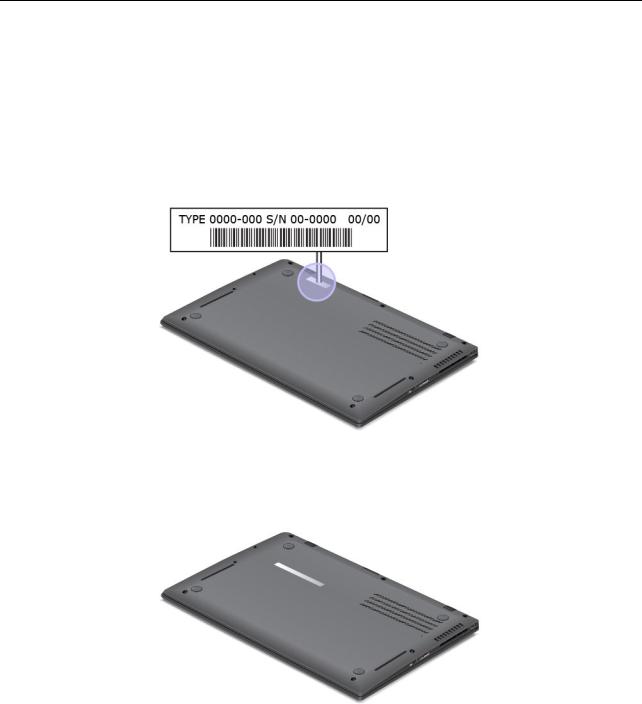
Locating important product information
This section provides information to help you locate your machine type and model label, FCC ID and IC Certification label, and the Microsoft® Certificate of Authenticity (COA) label.
Machine type and model label
The machine type and model label identifies your computer. If you contact Lenovo for help, the machine type and model number will help support technicians to identify your computer and provide the highest level of service.
You can find the machine type and model of your computer on the label as shown below:
FCC ID and IC Certification number label
You can find the FCC ID and IC Certification numbers for the installed transmitter cards on the bottom of your computer as shown below.
Certificate of Authenticity label
The Microsoft Certificate of Authenticity label for the preinstalled operating system is attached. Printed on this label are the product ID and the product key information for your computer. Record this information and keep it in a safe place. You might need these numbers to start your computer or reinstall the operating system.
Chapter 1. Product overview 9
Note: The Certificate of Authenticity label applies only to computers preinstalled with the Windows 7 operating system.
The Windows Certificate of Authenticity label of your computer is shown as below:
Features
Processor
•To view the processor information of your computer, do the following:
–For Windows 7: Click Start, right-click Computer. Then click Properties.
–For Windows 8: From the desktop, move the cursor to the top-right or bottom-right corner of the screen to display the charms. Then click Settings PC info.
Memory
• Double data rate 3 low voltage (DDR3L) synchronous dynamic random access memory (SDRAM)
Storage device
• Small form factor solid-state drive
Display
The color display uses Thin Film Transistor (TFT) technology.
•Size: 14 inches (355 mm)
•LCD resolution: up to 1600-by-900
•Brightness control
•Camera
•Digital dual array microphones
•Multi-touch screen (on some models)
Keyboard
•6-row full size backlit keyboard
•UltraNav pointing device (TrackPoint pointing device and touch pad)
•Fn key function
•Black button
•Volume control buttons
10 User Guide

•Speaker mute button
•Microphone mute button
Interface
•External monitor connector (Mini DisplayPort connector)
•Combo audio jack
•One USB 3.0 connector
•One Always on USB connector
•4-in-1 media card reader
Wireless features
•Integrated wireless LAN
•Integrated Bluetooth (on some models)
•Integrated wireless WAN (on some models)
Security features
• Fingerprint reader (on some models)
Specifications
Size
•Width: 13.03 inches (331 mm)
•Depth: 8.90 inches (226 mm)
•Height:
–Models with a multi-touch screen: 0.82 inches (20.85 mm)
–Models without a multi-touch screen: 0.31 to 0.68 inches (8.0 to 17.3 mm)
Heat output
• 65 W (222 Btu/hr) maximum or 90 W (307 Btu/hr) maximum (depending on the model)
Power source (ac power adapter)
•Sine-wave input at 50 to 60 Hz
•Input rating of ac adapter: 100 to 240 V ac, 50 to 60 Hz
Battery life
•For the percentage of remaining battery power, check the battery status icon in the Windows notification area.
Operating environment
This section provides information about your computer operating environment.
Environment:
•Maximum altitude without pressurization: 3048 m (10 000 ft)
•Temperature
Chapter 1. Product overview 11

–At altitudes up to 2438 m (8000 ft)
–Operating: 5.0°C to 35.0°C (41°F to 95°F)
–Storage: 5.0°C to 43.0°C (41°F to 109°F)
–At altitudes above 2438 m (8000 ft)
–Maximum temperature when operating under the unpressurized condition: 31.3°C (88°F)
Note: When you charge the battery pack, its temperature must be at least 10°C (50°F).
•Relative humidity:
–Operating: 8% to 80%
–Storage: 5% to 95%
If possible, place your computer in a well-ventilated and dry area without direct exposure to sunshine.
Keep electrical appliances such as an electric fan, radio, air conditioner, and microwave oven away from your computer because the strong magnetic fields generated by these appliances can damage the monitor and data on the solid-state drive.
Do not place any beverages on top of or beside the computer or other attached devices. If liquid is spilled on or in the computer or an attached device, a short circuit or other damage might occur.
Do not eat or smoke over your keyboard. Particles that fall into your keyboard can cause damage.
Lenovo programs
Your computer comes with Lenovo programs to help you work more easily and securely. Depending on the Windows operating system preinstalled, the programs might vary.
To learn more about the programs and other computing solutions offered by Lenovo, go to http://www.lenovo.com/support
Accessing Lenovo programs on the Windows 7 operating system
On the Windows 7 operating system, you can access ThinkVantage programs from the Lenovo ThinkVantage Tools program or from Control Panel.
•Accessing programs from the Lenovo ThinkVantage Tools program
Click Start All Programs Lenovo ThinkVantage Tools. Double-click a program icon to access the application.
Note: If a program icon in the Lenovo ThinkVantage Tools application navigation window is dimmed, it indicates that you need to install the application manually. To install the application manually, double-click the application icon. Then, follow the instructions on the screen. When the installation process completes, the application icon will be activated.
Table 1. Programs in the Lenovo ThinkVantage Tools program
Program |
Icon name |
|
|
Access Connections™ |
Internet Connection |
|
|
Communications Utility |
Web Conferencing |
|
|
Fingerprint Software |
Fingerprint Reader |
|
|
Lenovo Solution Center |
System Health and Diagnostics |
|
|
12 User Guide
Table 1. Programs in the Lenovo ThinkVantage Tools program (continued)
Program |
Icon name |
|
|
Mobile Broadband Connect |
3G Mobile Broadband |
|
|
Password Manager |
Password Vault |
|
|
Power Manager |
Power Controls |
|
|
Recovery Media |
Factory Recovery Disks |
|
|
Rescue and Recovery |
Enhanced Backup and Restore |
|
|
SimpleTap |
SimpleTap |
|
|
System Update |
Update and Drivers |
|
|
Note: Depending on your computer model, some of the programs might not be available.
•Accessing programs from Control Panel
Click Start Control Panel. Depending on the application you want to access, click the corresponding section and then click the corresponding green text.
Note: If you do not find the application you need in Control Panel, open the Lenovo ThinkVantage Tools application navigation window and double-click the dimmed icon to install the application you need. Then, follow the instructions on the screen. When the installation process completes, the application icon will be activated, and you can find the application in Control Panel.
The programs and the corresponding sections and green texts in Control Panel are listed in the following table.
Table 2. Programs in Control Panel
Program |
Control Panel section |
Green text in Control Panel |
|
|
|
Access Connections |
Network and Internet |
Lenovo - Internet Connection |
|
|
|
Communications Utility |
Hardware and Sound |
Lenovo - Web Conferencing |
|
|
|
Fingerprint Software |
System and Security |
Lenovo - Fingerprint Reader |
|
Hardware and Sound |
or |
|
|
Lenovo - Notebook Fingerprint |
|
|
Reader |
|
|
|
Lenovo Solution Center |
System and Security |
Lenovo - System Health and |
|
|
Diagnostics |
|
|
|
Message Center Plus |
Programs |
Messages from Lenovo |
|
|
|
Mobile Broadband Connect |
Network and Internet |
Lenovo - 3G Mobile Broadband |
|
|
|
Password Manager |
System and Security |
Lenovo - Password Vault |
|
User Accounts and Family Safety |
|
|
|
|
Power Manager |
Hardware and Sound |
Lenovo - Power Controls |
|
System and Security |
|
|
|
|
Recovery Media |
System and Security |
Lenovo - Factory Recovery Disks |
|
|
|
SimpleTap |
Programs |
Lenovo - SimpleTap |
|
|
|
System Update |
System and Security |
Lenovo - Update and Drivers |
|
|
|
Rescue and Recovery |
System and Security |
Lenovo - Enhanced Backup and |
|
|
Restore |
|
|
|
Note: Depending on your computer model, some of the programs might not be available.
Chapter 1. Product overview 13
Accessing Lenovo programs on the Windows 8 operating system
If your computer is preinstalled with the Windows 8 operating system, you can access Lenovo programs by pressing the Windows key to go to the Start screen, and then click a Lenovo program to launch it. If you cannot find the program you need, move the cursor to the bottom right corner of the screen to bring up the charms. Then click the Search charm to search for the desired program.
Your computer supports the following Lenovo programs:
•Fingerprint Software
•Lenovo Companion
•Lenovo Settings
•Lenovo Mobile Access
•Lenovo Solution Center
•Lenovo Support
•Lenovo ThinkVantage Tools
•Password Manager
•System Update
For an introduction to these programs, see “An introduction to Lenovo programs” on page 14.
An introduction to Lenovo programs
This topic provides a brief introduction to some Lenovo programs.
Note: Depending on your computer model, some of the programs might not be available.
•Access Connections
The Access Connections program is a connectivity assistant program for creating and managing location profiles. Each location profile stores all the network and Internet configuration settings needed for connecting to a network infrastructure from a specific location such as a home or an office.
By switching between location profiles as you move your computer from place to place, you can quickly and easily connect to a network with no need to reconfigure your settings manually and restart the computer each time.
•Client Security Solution
The Client Security Solution program protects your computer by securing client data and deflecting security breach attempts. It also can help manage your passwords, recover a forgotten password, monitor security settings on your computer, and suggest how to enhance your computer security.
•Communications Utility
Use the Communications Utility program to configure settings for the camera and audio devices.
•Fingerprint Software
If your system comes with a fingerprint reader, the Fingerprint Software program enables you to enroll your fingerprint and associate it with your Windows password. As a result, the fingerprint authentication can replace your password and enable simple and secure user access.
•GPS Enabler
If the PCI Express Mini Card installed in your computer supports GPS, your computer can receive signals from GPS satellites and determine its location. If your computer is connected to the Internet, you can find your location on a real-time map provided by Google Maps or Microsoft Bing™ Maps.
•Lenovo Companion
14 User Guide
Loading...