


Lenovo H505S, 31502552, 10093, H520S, 10107 User Manual
...Machine type: 10093/2561/4746 [H520s] 10107/3230 [H505s]
H5s Series
User Guide
Version 2.0 |
2012.08 |
31502552

Important Safety Information
Before using this manual, it is important that you read and understand all of the related safety information for this product. Refer to the Safety and Warranty Guide that you received with this product for the latest safety information. Reading and understanding this safety information reduces the risk of personal injury or product damage.
The interface and functions shown in this User Guide are provided for reference only and may differ from actual product appearance. Product design and specifications may be changed without notice.
Danger: Be aware of extremely hazardous or potentially lethal situations.
Attention: Be aware of possible damage to programs, devices, or data.
Note: Pay attention to this important information.
© Copyright Lenovo 2012. All rights reserved.
LIMITED AND RESTRICTED RIGHTS NOTICE: If data or software is delivered pursuant a General Services Administration “GSA” contract, use, reproduction, or disclosure is subject to restrictions set forth in Contract No. GS-35F-05925.
Contents
Important Safety Information |
|
Using the Computer Hardware.................................................. |
1 |
Front view of the chassis............................................................................. |
2 |
Rear view of the chassis............................................................................. |
3 |
Connecting your computer......................................................................... |
5 |
5.1 Audio configuration instructions............................................................ |
7 |
Connecting the power cord........................................................................ |
8 |
How to play Blu-ray Discs (selected models only)........................................ |
9 |
Wired keyboard (selected models only)....................................................... |
9 |
Connecting to the Internet........................................................................ |
10 |
Using Windows 8....................................................................... |
11 |
Switching between the main Windows 8 interfaces................................... |
12 |
The Charms Bar....................................................................................... |
12 |
Shutting down the computer..................................................................... |
12 |
Switching between apps........................................................................... |
12 |
Closing an app.......................................................................................... |
13 |
Opening other system programs............................................................... |
13 |
Windows Help and Support...................................................................... |
13 |
Using the Rescue System........................................................ |
15 |
OneKey Recovery..................................................................................... |
16 |
Driver and Application Installation.............................................................. |
17 |
Troubleshooting and Confirming Setup.................................. |
19 |
Troubleshooting Display Problems............................................................ |
20 |
Troubleshooting Audio Problems............................................................... |
21 |
Troubleshooting Software Problems.......................................................... |
22 |
Contents i
Troubleshooting Problems with Optical Drives and Hard Disks |
..................23 |
Special considerations for troubleshooting Windows................................. |
24 |
Windows Help and Support...................................................................... |
24 |
BIOS setup utility...................................................................................... |
25 |
Performing Daily Maintenance Tasks......................................................... |
25 |
Hardware Replacement Guide................................................. |
27 |
Locations.................................................................................................. |
30 |
Replacing hardware.................................................................................. |
35 |
Appendix.................................................................................... |
45 |
Declaration............................................................................................... |
45 |
Trademarks............................................................................................... |
46 |
Energy Star Statement.............................................................................. |
47 |
Enabling ErP compliance mode................................................................ |
48 |
ii Contents

Using the Computer Hardware
This chapter contains the following topics:
Introduction to the computer hardware Information on computer connections
Note: The descriptions in this chapter might be different from what you see on your computer, depending on the computer model and configuration.
User Guide 1
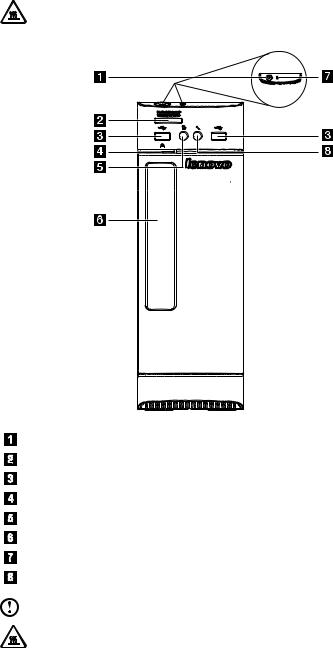
Front view of the chassis
Attention: Be careful not to block any air vents on the computer. Blocked air vents can cause overheating.
Power button
Memory card reader (selected models only)
USB connectors
Optical drive eject button
Headphone connector
Optical Drive (selected models only)
Hard disk drive indicator
Microphone connector
Note: This computer only can be placed in a vertical position.
Attention: Do not insert 3-inch discs into the optical drive.
2 User Guide

Rear view of the chassis
(If the rear view configuration shown in this chapter is different from the rear of your computer, please refer to the rear of your computer.)
Lenovo H505s
On-board VGA connector
WiFi antenna (selected models only)
HDMI connector (selected models only)
USB 2.0 connectors
USB 3.0 connectors
Ethernet connector
Audio connectors
Power connector
Expansion card slot
User Guide 3

Lenovo H520s
USB connectors
WiFi antenna (selected models only) HDMI connector (selected models only) On-board VGA connector
Ethernet connector Audio connectors
PCI Express X 16 graphics adapter slot (some models are equipped with a graphics card)
PCI Express X 1 adapter slot (some models are equipped with USB 3.0 or TV tuner card)
Power connector
Voltage selection switch (selected models only)
Note: If your model has two VGA monitor connectors, be sure to use the connector on the graphics adapter.
4 User Guide
Attention: Do not open the WiFi antenna cover.
Connecting your computer
Use the following information when connecting your computer.
•Look for the small connector icons on the back of your computer. Match the connectors to the icons.
•If your computer cables and connector panel have color-coded connectors, match the color of the cable end with the color of the connector.
Note: Your computer may not have all of the connectors described in this section.
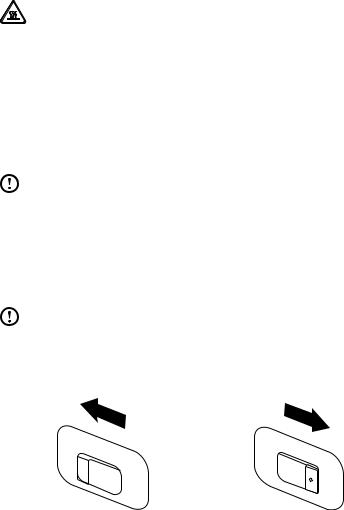
Check the position of the voltage-selection switch on the rear of the computer. Use a ballpoint pen to slide the switch if necessary.
Note: Some computers do not have a voltage switch. These computers control voltage automatically.
•If the voltage supply range is 100-127 V AC, set the switch to 115 V.
•If the voltage supply range is 200-240 V AC, set the switch to 230 V.
 115
115
230
User Guide 5
Basic connector instructions
Connector |
Description |
|
|
Microphone |
Use this connector to attach a microphone to your |
|
computer when you want to record sound or if you |
|
use speech-recognition software. |
|
|
Headphone |
Use this connector to attach headphones to your |
|
computer when you want to listen to music or |
|
other sounds without disturbing anyone. |
|
|
Audio line-in connector |
Used to receive audio signals from an external |
|
audio device, such as a stereo system. When |
|
you attach an external audio device, a cable is |
|
connected between the audio line-out connector |
|
of the device and the audio line-in connector of |
|
the computer. |
|
|
Audio line-out connector |
Used to send audio signals from the computer |
|
to external devices, such as powered stereo |
|
speakers (speakers with built-in amplifiers), |
|
headphones, multimedia keyboards, or the audio |
|
line-in connector on a stereo system or other |
|
external recording device. |
|
|
USB connector |
Use this connector to attach a device that requires |
|
a USB connection. |
|
|
Ethernet connector |
Use this connector to attach the computer to an |
|
Ethernet-type local area network. |
|
|
VGA connector |
Used to attach a VGA monitor or other devices |
|
that use a VGA monitor connector. |
|
|
DVI connector |
Used to attach a DVI monitor or other devices that |
|
use a DVI monitor connector. |
|
|
HDMI connector (optional) |
Connects to the HDMI connector on your display |
|
or TV. |
|
|
TV-Tuner connector (optional) |
Only supported on systems with an optional TV |
|
tuner card. |
|
|
Note: If your computer is equipped with a wireless keyboard or mouse, follow the installation instructions for those devices.
6 User Guide
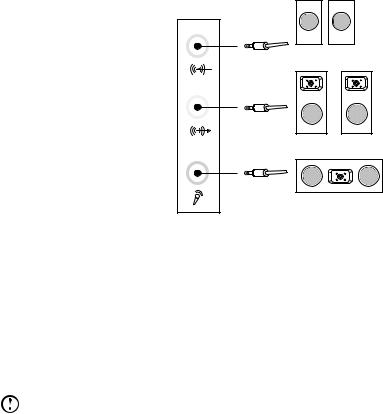
5.1 Audio configuration instructions
(These instructions are only for models whose motherboard supports audio transformation from 2.0 stereo sound to 5.1 surround sound.)
This model of computer supports the transformation of stereo sound into 5.1 surround sound.
Use the following guides when connecting to the 5.1 surround audio device:
Blue line-in connector
Surround
Green line-out connector
Front channel
Pink Mic-in connector
Center-LEF
The configurations are as followings:
1.Right click the Sound icon in system property bar and select Sounds option to setup the sounds in the pop-up dialog box.
2.Select a playback device from the Playback dialog box, then click the Configure button to configure it.
3.Select 5.1 surround from audio channels in the pop-up Speaker setup dialog box to proceed with the speaker setup by following the prompts.
4.5.1 surround sound can be used once this configuration procedure is complete.
Note: If the audio configuration interfaces above are different from those on your computer, you may use the above steps as a reference to
configure the 5.1 surround sound audio device system in your actual audio configuration interface and read the electronic Help information for further assistance.
User Guide 7
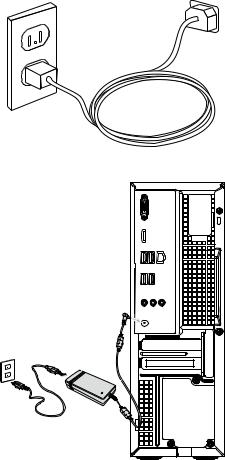
Connecting the power cord
Some models are equipped with Power Adapter.
8 User Guide
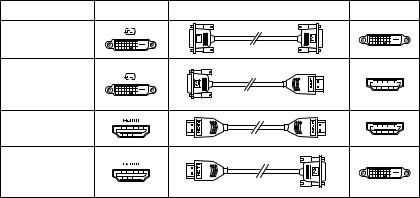
How to play Blu-ray Discs (selected models only)
Check the connectors available on your computer and display and select an appropriate cable according to the table below. Other types of cables do not meet the requirements of the Blu-ray standard.
You need to purchase the cable separately if the computer is not equipped with the corresponding cable.
This table will help you to identify the connectors on your computer and display.
Connection Type Computer |
Cable |
Display |
DVI to DVI |
|
|
(DVI cable) |
|
|
DVI to HDMI |
|
|
(DVI-HDMI |
|
|
cable) |
|
|
|
|
|
HDMI to HDMI |
|
|
(HDMI cable) |
|
|
HDMI to DVI |
|
|
(HDMI-DVI |
|
|
cable) |
||
|
Wired keyboard (selected models only)
LVT —— After entering Windows, press this key to launch the LVT (Lenovo Vantage Technology) program, Lenovo’s pre-loaded Home PC software. In addition to its own functions, the LVT program will allow you to start other Windows compatible software specially configured to run on this model of computer.
F2 —— Your computer has the Lenovo Rescue System installed. To learn more about this program, repeatedly press and release the F2 key once turning on the computer until the Lenovo Rescue System opens.
User Guide 9

Connecting to the Internet
To connect to the Internet, you’ll need a contract with an Internet Service Provider (ISP) and some hardware.
IPSs and ISP offerings vary by country. Contact your ISP for offerings available in your country.
Your computer is designed to support a wireless (selected models only) or wired network that connects your computer to other devices.
Wired network connection
For wired networks, connect one end of an Ethernet cable (purchased separately) to the Ethernet connector on your computer, and then connect the other end to the network router or broadband modem. Consult your ISP for detailed setup instructions.
Note: Broadband modem and router installation procedures vary depending on the manufacturer. Follow the manufacturer’s instructions.
Wireless network connection
For wireless networks, you can use the built-in wireless LAN antenna to access your wireless home network.
To connect your computer to the wireless network:
1.Swipe in from the right edge of the screen, then tap Settings.
(If you are using a mouse, point to the top right or bottom right corner of the screen, then click Settings.)
2.Tap or click the network icon  , then select the name of your router. Tap or
click Connect, then follow the steps on the screen.
Test the wireless network by opening your Web browser and accessing any Web site.
10 User Guide
Using Windows 8
This chapter contains the following topics:
Switching between the main Windows 8 interfaces
The Charms Bar
Shutting down the computer
Switching between apps
Closing an app
Opening other system programs
Windows Help and Support
 Attention: The Windows 8 operating system is provided by Microsoft Corporation. Please use it in accordance with the End User License Agreement (EULA) between you and Microsoft. For any question related to the operating system, please contact Microsoft directly.
User Guide 11
 Loading...