


3139
Table of contents
 Loading...
Lenovo 3139, 3349, 3246, 5450, 5384 User Manual
...
ThinkCentre
UserGuide
MachineTypes:3029,3054,3139,3219,3246,3282,3349,3421,
3544,3652,5384,5450,5474,5498,5554,5852,6232,and6590


ThinkCentre
UserGuide
MachineTypes:3029,3054,3139,3219,3246,3282,3349,3421,
3544,3652,5384,5450,5474,5498,5554,5852,6232,and6590

Note
Beforeusingthisinformationandtheproductitsupports,besuretoreadandunderstandtheThinkCentre
SafetyandWarrantyGuideandAppendixA“Notices”onpage63.
FirstEdition(October2010)
©CopyrightLenovo2010.
LENOVOproducts,data,computersoftware,andserviceshavebeendevelopedexclusivelyatprivateexpenseandare
soldtogovernmentalentitiesascommercialitemsasdenedby48C.F.R.2.101withlimitedandrestrictedrightsto
use,reproductionanddisclosure.
LIMITEDANDRESTRICTEDRIGHTSNOTICE:Ifproducts,data,computersoftware,orservicesaredeliveredpursuant
aGeneralServicesAdministration“GSA ”contract,use,reproduction,ordisclosureissubjecttorestrictionssetforth
inContractNo.GS-35F-05925.

Contents
Importantsafetyinformation.....vii
Chapter1.Productoverview......1
Features..................1
Specications................3
Softwareoverview..............4
SoftwareprovidedbyLenovo........4
AdobeReader..............6
Antivirussoftware.............6
Locations..................6
Locatingconnectorsonthefrontofyour
computer................6
Locatingconnectorsontherearofyour
computer................7
Locatingcomponents...........9
Locatingpartsonthesystemboard....10
Locatinginternaldrives.........11
Chapter2.Installingorreplacing
hardware...............13
Handlingstatic-sensitivedevices.......13
Installingorreplacinghardware........13
Installingexternaloptions........13
Removingthecomputercover.......14
Removingandreinstallingthefrontbezel..15
InstallingorreplacingaPCIcard......15
Installingorreplacingamemorymodule...18
Installingorreplacingtheopticaldrive...20
Replacingthebattery..........22
Replacingthepowersupplyassembly...24
Replacingtheheatsinkandfanassembly..25
Replacingtheprimaryharddiskdrive....26
Replacingthesecondaryharddiskdrive...29
Replacingthefrontfanassembly.....31
Replacingtherearfanassembly......32
ReplacingthefrontaudioandUSB
assembly...............34
Replacingtheinternalspeaker.......35
Replacingthekeyboardormouse.....37
Completingthepartsreplacement.....38
Installingsecurityfeatures..........39
Integratedcablelock..........39
Padlock...............40
Passwordprotection..........41
Erasinglostorforgottenpasswords(clearing
CMOS)................41
Chapter3.Recoveryinformation...43
Creatingandusingrecoverymedia......43
Creatingrecoverymedia.........43
Usingrecoverymedia..........44
Performingbackupandrecoveryoperations...44
Performingabackupoperation......44
Performingarecoveryoperation......45
UsingtheRescueandRecoveryworkspace...45
Creatingandusingarescuemedium......46
Creatingarescuemedium........46
Usingarescuemedium.........47
Installingorreinstallingdevicedrivers.....47
Solvingrecoveryproblems..........48
Chapter4.UsingtheSetupUtility
program................49
StartingtheSetupUtilityprogram.......49
Viewingandchangingsettings........49
Usingpasswords..............49
Passwordconsiderations.........49
Power-OnPassword..........50
AdministratorPassword.........50
HardDiskPassword...........50
Setting,changing,anddeletingapassword.50
Enablingordisablingadevice........50
Selectingastartupdevice..........51
Selectingatemporarystartupdevice....51
Selectingorchangingthestartupdevice
sequence...............51
ExitingfromtheSetupUtilityprogram.....51
Chapter5.Updatingsystem
programs...............53
Usingsystemprograms...........53
Updating(ashing)theBIOSfromadisc....53
Updating(ashing)theBIOSfromyouroperating
system..................54
RecoveringfromaPOST/BIOSupdatefailure..54
Chapter6.Troubleshootingand
diagnostics..............55
Basictroubleshooting............55
Diagnosticprograms............56
LenovoThinkVantageToolbox.......56
PC-DoctorforRescueandRecovery....57
PC-DoctorforDOS...........57
Cleaninganopticalmouse..........58
©CopyrightLenovo2010
v

Chapter7.Gettinginformation,help,
andservice..............59
Informationresources............59
OnlineBooksfolder...........59
LenovoThinkVantageTools........59
ThinkVantageProductivityCenter.....59
LenovoWelcome............60
AccessHelp..............60
SafetyandWarranty...........60
LenovoWebsite(http://www.lenovo.com)..60
Helpandservice..............61
Usingthedocumentationanddiagnostic
programs...............61
Callingforservice............61
Usingotherservices..........62
Purchasingadditionalservices......62
AppendixA.Notices.........63
Televisionoutputnotice...........64
EuropeanconformanceCEmark.......64
Trademarks................64
Index..................65
viThinkCentreUserGuide

Importantsafetyinformation
CAUTION:
Beforeusingthismanual,besuretoreadandunderstandalltherelatedsafetyinformationforthis
product.RefertotheThinkCentreSafetyandWarrantyGuidethatyoureceivedwiththisproductfor
thelatestsafetyinformation.Readingandunderstandingthissafetyinformationreducestheriskof
personalinjuryandordamagetoyourproduct.
IfyounolongerhaveacopyoftheThinkCentreSafetyandWarrantyGuide,youcanobtainaPortable
DocumentFormat(PDF)versionfromtheLenovo
®
SupportWebsiteat:
http://www.lenovo.com/support
©CopyrightLenovo2010
vii

viiiThinkCentreUserGuide

Chapter1.Productoverview
Thischapterdescribesthecomputerfeatures,specications,preinstalledsoftwareprograms,andpart
andconnectorlocations.
Features
Thissectionprovidesinformationaboutthecomputerfeatures.
Systeminformation
Thefollowinginformationcoversavarietyofmodels.Forinformationaboutyourspecicmodel,usethe
SetupUtilityprogram.SeeChapter4“UsingtheSetupUtilityprogram”onpage49
.
Microprocessor
Yourcomputercomeswithoneofthefollowingmicroprocessors(internalcachesizevariesbymodeltype):
•Intel
®
Core™i3microprocessor
•IntelCorei5microprocessor
•IntelCorei7microprocessor
•IntelPentium
®
microprocessor
Memory
•Supportsuptofourdoubledatarate3dualinlinememorymodules(DDR3DIMMs)
Internaldrives
•Opticaldrive
•SerialAdvancedTechnologyAttachment(SATA)harddiskdrive(availableinsomemodels)
Videosubsystem
•IntegratedgraphicscardforaVideoGraphicsArray(VGA)connectorandaDisplayPortconnector(not
applicableonsomemodels)
•PeripheralComponentInterconnect(PCI)Expressx16graphicscardslotonthesystemboardfora
discretegraphicscard
Audiosubsystem
•Integratedhigh-denition(HD)audio
•Audioline-inconnector,audioline-outconnector,andmicrophoneconnectorontherearpanel
•Microphoneconnectorandheadphoneconnectoronthefrontpanel
•Internalspeaker(installedinsomemodels)
Connectivity
•100/1000MbpsintegratedEthernetcontroller
•PCIFaxmodem(somemodels)
Systemmanagementfeatures
©CopyrightLenovo2010
1

•Abilitytostorepower-onself-test(POST)hardwaretestresults
•Automaticpower-onstartup
•DesktopManagementInterface(DMI)
•IntelActiveManagementTechnology(AMT)(availableonsomemodels)
•IntelMatrixStorageManager
•PrebootExecutionEnvironment(PXE)
•SecureManagedClient(SMC)(somemodels)
•SystemManagement(SM)BasicInput/OutputSystem(BIOS)andSMsoftware
•WakeonLAN
•WakeonRing
•WindowsManagementInstrumentation(WMI)
Input/Output(I/O)features
•9-pinserialport(onestandardandoneoptional)
•EightUniversalSerialBus(USB)connectors(twoonthefrontpanelandsixontherearpanel)
•OneEthernetconnector
•OneDisplayPortconnector(notapplicableonsomemodels)
•OneVGAmonitorconnector(notapplicableonsomemodels)
•OnePersonalSystem/2
®
(PS/2
®
)keyboardconnector(optional)
•OnePS/2mouseconnector(optional)
•Threeaudioconnectorsontherearpanel(audioline-inconnector,audioline-outconnector,and
microphoneconnector)
•T woaudioconnectorsonthefrontpanel(microphoneconnectorandheadphoneconnector)
Formoreinformation,see“Locatingconnectorsonthefrontofyourcomputer”onpage6
and“Locating
connectorsontherearofyourcomputer”onpage7.
Expansion
•T woharddiskdrivebays(onestandardandoneoptional)
•T woopticaldrivebays
•T woPCIcardslots
•OnePCIExpressx1cardslot
•OnePCIExpressx16graphicscardslot
Powersupply
Yourcomputercomeswithoneofthefollowingpowersupplies:
•280-wattpowersupplywithmanualvoltage-selectionswitch
•280-wattauto-sensingpowersupply
•320-wattauto-sensingpowersupply
Securityfeatures
•Computrace
•Coverpresenceswitch(alsocalledintrusionswitch)
2ThinkCentreUserGuide

•Enablingordisablingadevice
•EnablingordisablingUSBconnectorsindividually
•Harddiskdrivepassword
•Keyboardwithngerprintreader(shippedwithsomemodels)
•Power-onpassword(POP),administratorpassword,andharddiskdrivepasswordtodeterunauthorized
useofyourcomputer
•Startupsequencecontrol
•Startupwithoutkeyboardormouse
•Supportforanintegratedcablelock(Kensingtonlock)
•Supportforapadlock
•T rustedPlatformModule(TPM)
Preinstalledsoftwareprograms
Yourcomputerispreinstalledwithsomesoftwareprogramstohelpyouworkmoreeasilyandsecurely.For
moreinformation,see“Softwareoverview”onpage4
.
Preinstalledoperatingsystem
Yourcomputerispreinstalledwithoneofthefollowingoperatingsystems:
•Microsoft
®
Windows
®
7
•MicrosoftWindowsVista
®
Operatingsystem(s),certiedortestedforcompatibility
1
(variesbymodeltype)
•Linux
®
Specications
Thissectionliststhephysicalspecicationsforyourcomputer.
1.Theoperatingsystem(s)listedherearebeingcertiedortestedforcompatibilityatthetimethispublicationgoesto
press.AdditionaloperatingsystemsmightbeidentiedbyLenovoascompatiblewithyourcomputerfollowingthe
publicationofthismanual.Thislistissubjecttochange.T odetermineifanoperatingsystemhasbeencertiedor
testedforcompatibility,checktheWebsiteoftheoperatingsystemvendor.
Chapter1.Productoverview3

Dimensions
Width:175mm(6.89inches)
Height:402mm(15.83inches)
Depth:440mm(17.32inches)
Weight
Maximumcongurationasshipped:11kg(24.25lbs)
Environment
•Airtemperature:
Operating:10°Cto35°C(50°Fto95°F)
Non-operating:-40°Cto60°C(-40°Fto140°F)
Non-operating:-10°Cto60°C(14°Fto140°F)(withoutpackage)
•Humidity:
Operating:20%to80%(non-condensing)
Non-operating:20%to90%(non-condensing)
•Altitude:
Operating:-50to10000ft(-15.2to3048m)
Non-operating:-50to35000ft(-15.2to10668m)
Electricalinput
•Inputvoltage:
–Lowrange:
Minimum:100Vac
Maximum:127Vac
Inputfrequencyrange:50to60Hz
Voltage-selectionswitchsetting:115Vac
–Highrange:
Minimum:200Vac
Maximum:240Vac
Inputfrequencyrange:50to60Hz
Voltage-selectionswitchsetting:230Vac
Softwareoverview
Thissectiondescribesthesoftwarepreinstalledonthecomputersthathaveaninternalharddiskdrive
andanoperatingsystemfromLenovo.
SoftwareprovidedbyLenovo
ThefollowingsoftwareprogramsareprovidedbyLenovotohelpyouimproveproductivityandreducethe
costassociatedwithmaintainingyourcomputer.Softwareprogramsprovidedwithyourcomputermight
varydependingonyourcomputermodeltypeandpreinstalledoperatingsystem.
LenovoThinkVantageT ools
TheLenovoThinkVantage
®
Toolsprogramguidesyoutoahostofinformationsourcesandprovideseasy
accesstovarioustoolstohelpyouworkmoreeasilyandsecurely.Formoreinformation,see“Lenovo
ThinkVantageTools”onpage59
.
4ThinkCentreUserGuide

Note:TheLenovoThinkVantageToolsprogramisonlyavailableoncomputerswiththeWindows7operating
systemfromLenovo.
ThinkVantageProductivityCenter
TheThinkVantageProductivityCenterprogramguidesyoutoahostofinformationandtoolstohelpyouset
up,understand,maintain,andenhanceyourcomputer.
Note:TheThinkVantageProductivityCenterprogramisonlyavailableoncomputerspreinstalledwith
theWindowsVistaoperatingsystemfromLenovo.
LenovoWelcome
TheLenovoWelcomeprogramintroducesyoutosomeinnovativebuilt-infeaturesofLenovoandguidesyou
throughafewimportantsetuptaskstohelpyoumakethemostofyourcomputer.
ThinkVantageRescueandRecovery
TheThinkVantageRescueandRecovery
®
programisaonebuttonrecoveryandrestoresolutionthat
includesasetofselfrecoverytoolstohelpusersdiagnosecomputerproblems,gethelp,andrecoverfrom
systemcrashesquickly,eveniftheprimaryoperatingsystemwillnotstart.
ThinkVantageClientSecuritySolution
TheThinkVantageClientSecuritySolutionprogramisavailableonselectLenovocomputers.Ithelpsprotect
yourinformation,includingvitalsecurityinformationlikepasswords,encryptionkeys,andelectronic
credentials,whileguardingagainstunauthorizeduseraccesstodata.
Note:TheThinkVantageClientSecuritySolutionprogramisonlyavailableoncomputerspreinstalledwith
theWindowsVistaoperatingsystemfromLenovo.
PasswordManager
ThePasswordManagerprogramhelpsyouautomaticallycaptureandllinauthenticationinformationfor
WindowsapplicationsandWebsites.
Note:ThePasswordManagerprogramisonlyavailableoncomputerspreinstalledwiththeWindows7
operatingsystemfromLenovo.
PowerManager
ThePowerManagerprogramprovidesconvenient,exible,andcompletepowermanagementforyour
ThinkCentre
®
computer.ByusingthePowerManagerprogram,youcanadjustyourpowersettingsto
achievethebestbalancebetweensystemperformanceandpowersaving.
ProductRecovery
TheProductRecoveryprogramenablesyoutorestorethecontentsoftheharddiskdrivetothefactory
defaultsettings.
FingerprintSoftware
Theintegratedngerprintreaderprovidedonsomekeyboardsenablesyoutoenrollyourngerprintand
associateitwithyourpower-onpassword,harddiskdrivepassword,andWindowspassword.Asaresult,
ngerprintauthenticationcanreplacepasswordsandenablesimpleandsecureuseraccess.Angerprint
readerkeyboardisavailablewithselectcomputersorcanbepurchasedforcomputersthatsupportthis
option.
Chapter1.Productoverview5

LenovoThinkVantageT oolbox
TheLenovoThinkVantageT oolboxprogramhelpsyoumaintainyourcomputer,improvecomputingsecurity,
diagnosecomputerproblems,getfamiliarwiththeinnovativetechnologiesprovidedbyLenovo,andgetmore
informationaboutyourcomputer.See“LenovoThinkVantageToolbox”onpage56
fordetailedinformation.
PC-DoctorforRescueandRecovery
ThePC-DoctorforRescueandRecoverydiagnosticprogramispreinstalledonyourharddiskdrive.Itis
partoftheRescueandRecoveryworkspaceoneachLenovocomputertodiagnosehardwareproblems
andreportoperating-system-controlledsettingsthatcancausehardwarefailures.UsethePC-Doctorfor
RescueandRecoverydiagnosticprogramifyouareunabletostarttheWindowsoperatingsystem.See
“PC-DoctorforRescueandRecovery”onpage57
formoreinformation.
AdobeReader
TheAdobeReaderprogramisatoolusedtoview,print,andsearchPDFdocuments.
See“OnlineBooksfolder”onpage59formoreinformationaboutaccessingtheonlinebooksandthe
LenovoWebsite.
Antivirussoftware
Yourcomputercomeswithantivirussoftwarethatyoucanusetodetectandeliminateviruses.Lenovo
providesafullversionofantivirussoftwareonyourharddiskdrivewithafree30-daysubscription.After30
days,youmustrenewthelicensetocontinuereceivingtheantivirusprogramupdates.
Locations
Locatingconnectorsonthefrontofyourcomputer
Frontconnectorlocationsshowsthelocationsoftheconnectorsonthefrontofyourcomputer.
6ThinkCentreUserGuide
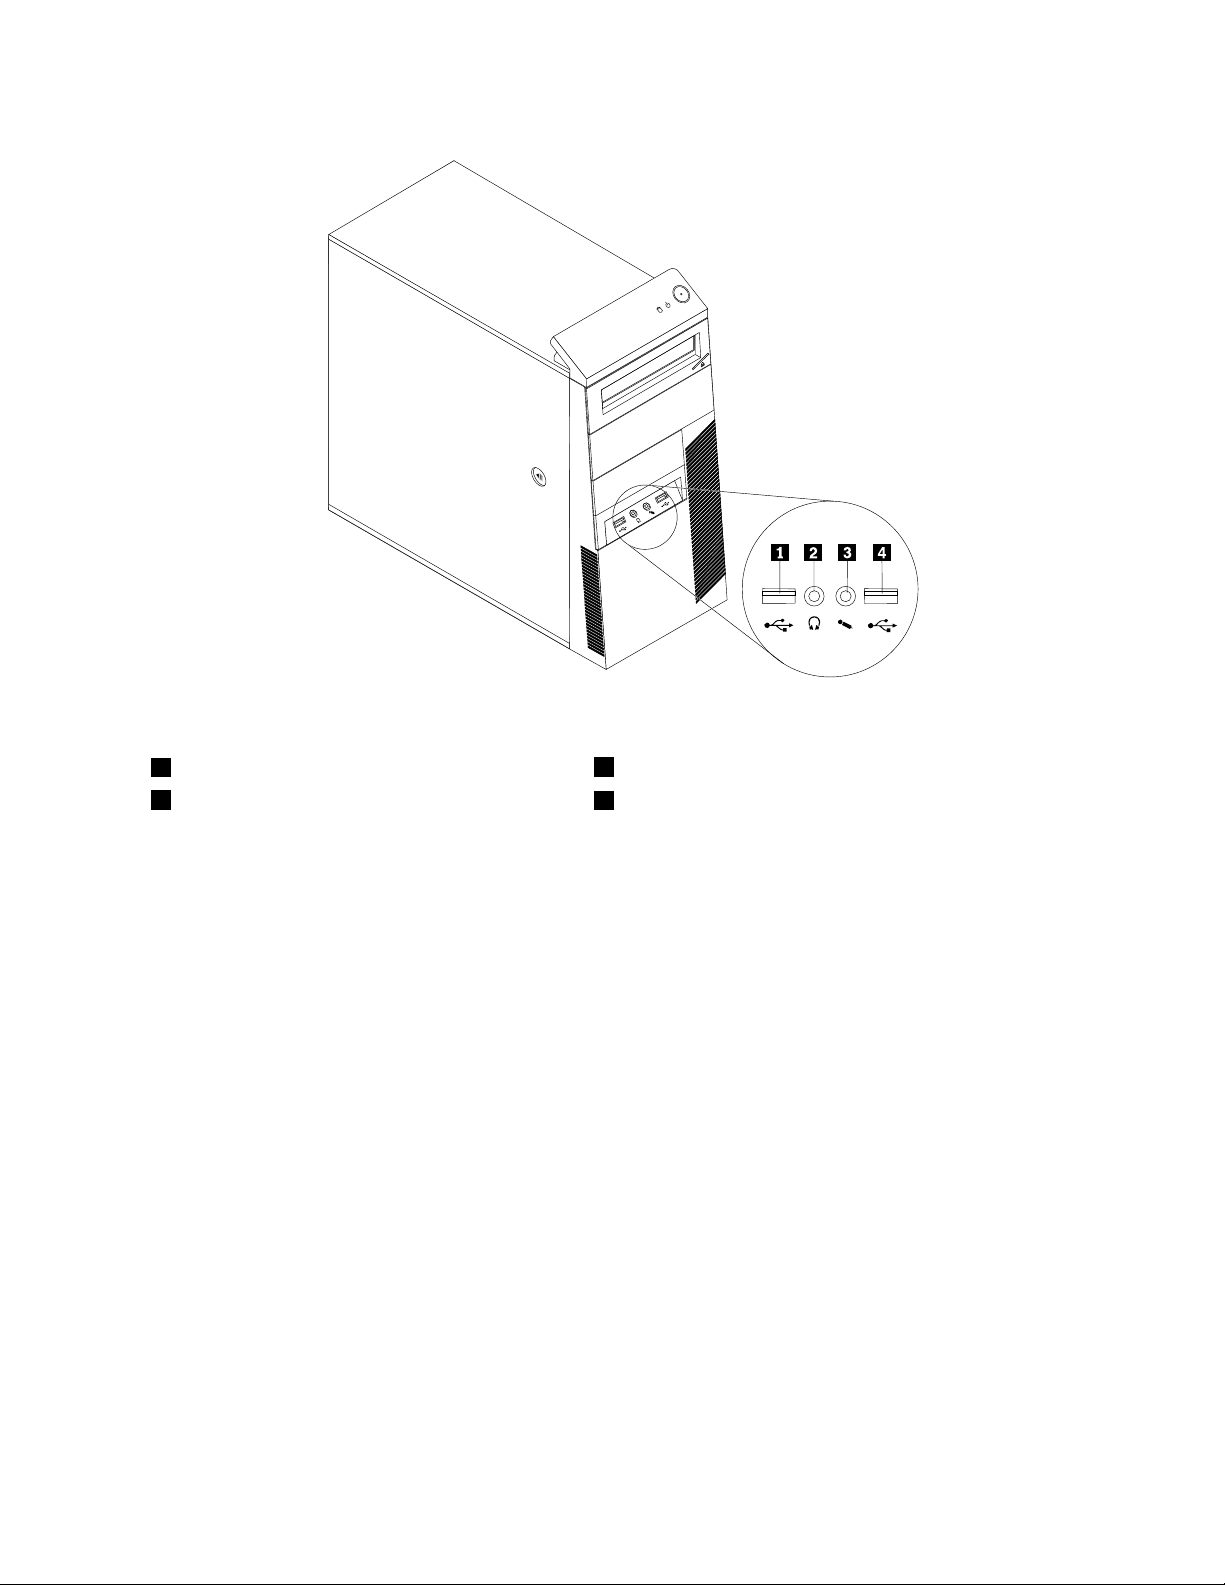
Figure1.Frontconnectorlocations
1USBconnector
3Microphoneconnector
2Headphoneconnector
4USBconnector
Locatingconnectorsontherearofyourcomputer
Rearconnectorlocationsshowsthelocationsoftheconnectorsontherearofyourcomputer.Some
connectorsontherearofyourcomputerarecolor-codedtohelpyoudeterminewheretoconnectthe
cablesonyourcomputer.
Chapter1.Productoverview7
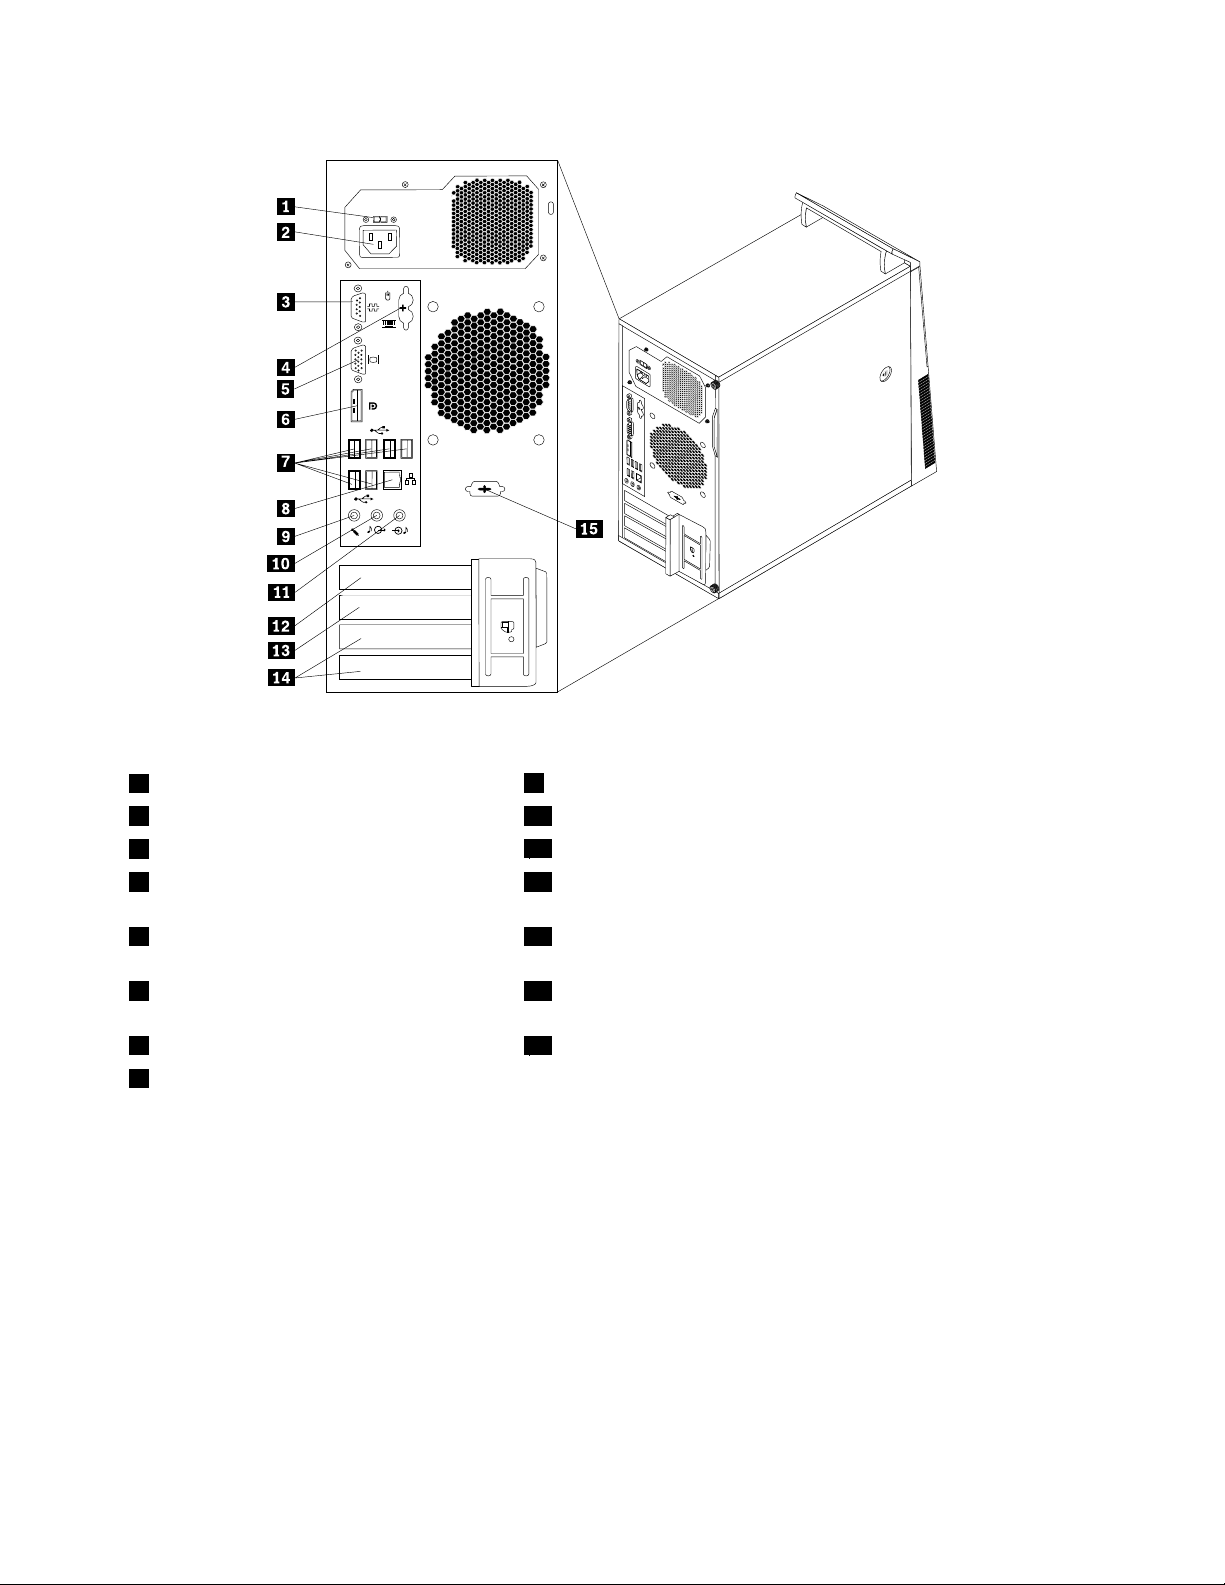
Figure2.Rearconnectorlocations
1Voltage-selectionswitch(somemodels)
9Microphoneconnector
2Powercordconnector10Audioline-outconnector
3Serialport
11Audioline-inconnector
4PS/2keyboardandmouseconnectors
(optional)
12PCIExpressx16graphicscardslot
5VGAmonitorconnector(notapplicableon
somemodels)
13PCIExpressx1cardslot
6DisplayPortconnector(notapplicableon
somemodels)
14PCIcardslots(2)
7USBconnectors(6)15Optionalserialport
8Ethernetconnector
ConnectorDescription
Audioline-inconnector
Usedtoreceiveaudiosignalsfromanexternalaudiodevice,suchasastereo
system.Whenyouattachanexternalaudiodevice,acableisconnectedbetween
theaudioline-outconnectorofthedeviceandtheaudioline-inconnectorofthe
computer.
Audioline-outconnector
Usedtosendaudiosignalsfromthecomputertoexternaldevices,suchaspowered
stereospeakers(speakerswithbuilt-inampliers),headphones,multimedia
keyboards,ortheaudioline-inconnectoronastereosystemorotherexternal
recordingdevice.
DisplayPortconnector
Usedtoattachahigh-performancemonitor,adirect-drivemonitor,orotherdevices
thatuseaDisplayPortconnector.
8ThinkCentreUserGuide
ConnectorDescription
Ethernetconnector
UsedtoattachanEthernetcableforalocalareanetwork(LAN).
Note:TooperatethecomputerwithinFCCClassBlimits,useaCategory5Ethernet
cable.
Microphoneconnector
Usedtoattachamicrophonetoyourcomputerwhenyouwanttorecordsoundorif
youusespeech-recognitionsoftware.
PS/2keyboardconnector
(optional)
UsedtoattachakeyboardthatusesaPS/2keyboardconnector.
PS/2mouseconnector
(optional)
Usedtoattachamouse,atrackball,orotherpointingdevicesthatuseaPS/2
mouseconnector.
Serialport
Usedtoattachanexternalmodem,aserialprinter,orotherdevicesthatusea
9-pinserialport.
USBconnectorUsedtoattachadevicethatrequiresaUSBconnector,suchasaUSBkeyboard,a
USBmouse,aUSBscanner,oraUSBprinter.IfyouhavemorethaneightUSB
devices,youcanpurchaseaUSBhub,whichyoucanusetoconnectadditional
USBdevices.
VGAmonitorconnectorUsedtoattachaVGAmonitororotherdevicesthatuseaVGAmonitorconnector.
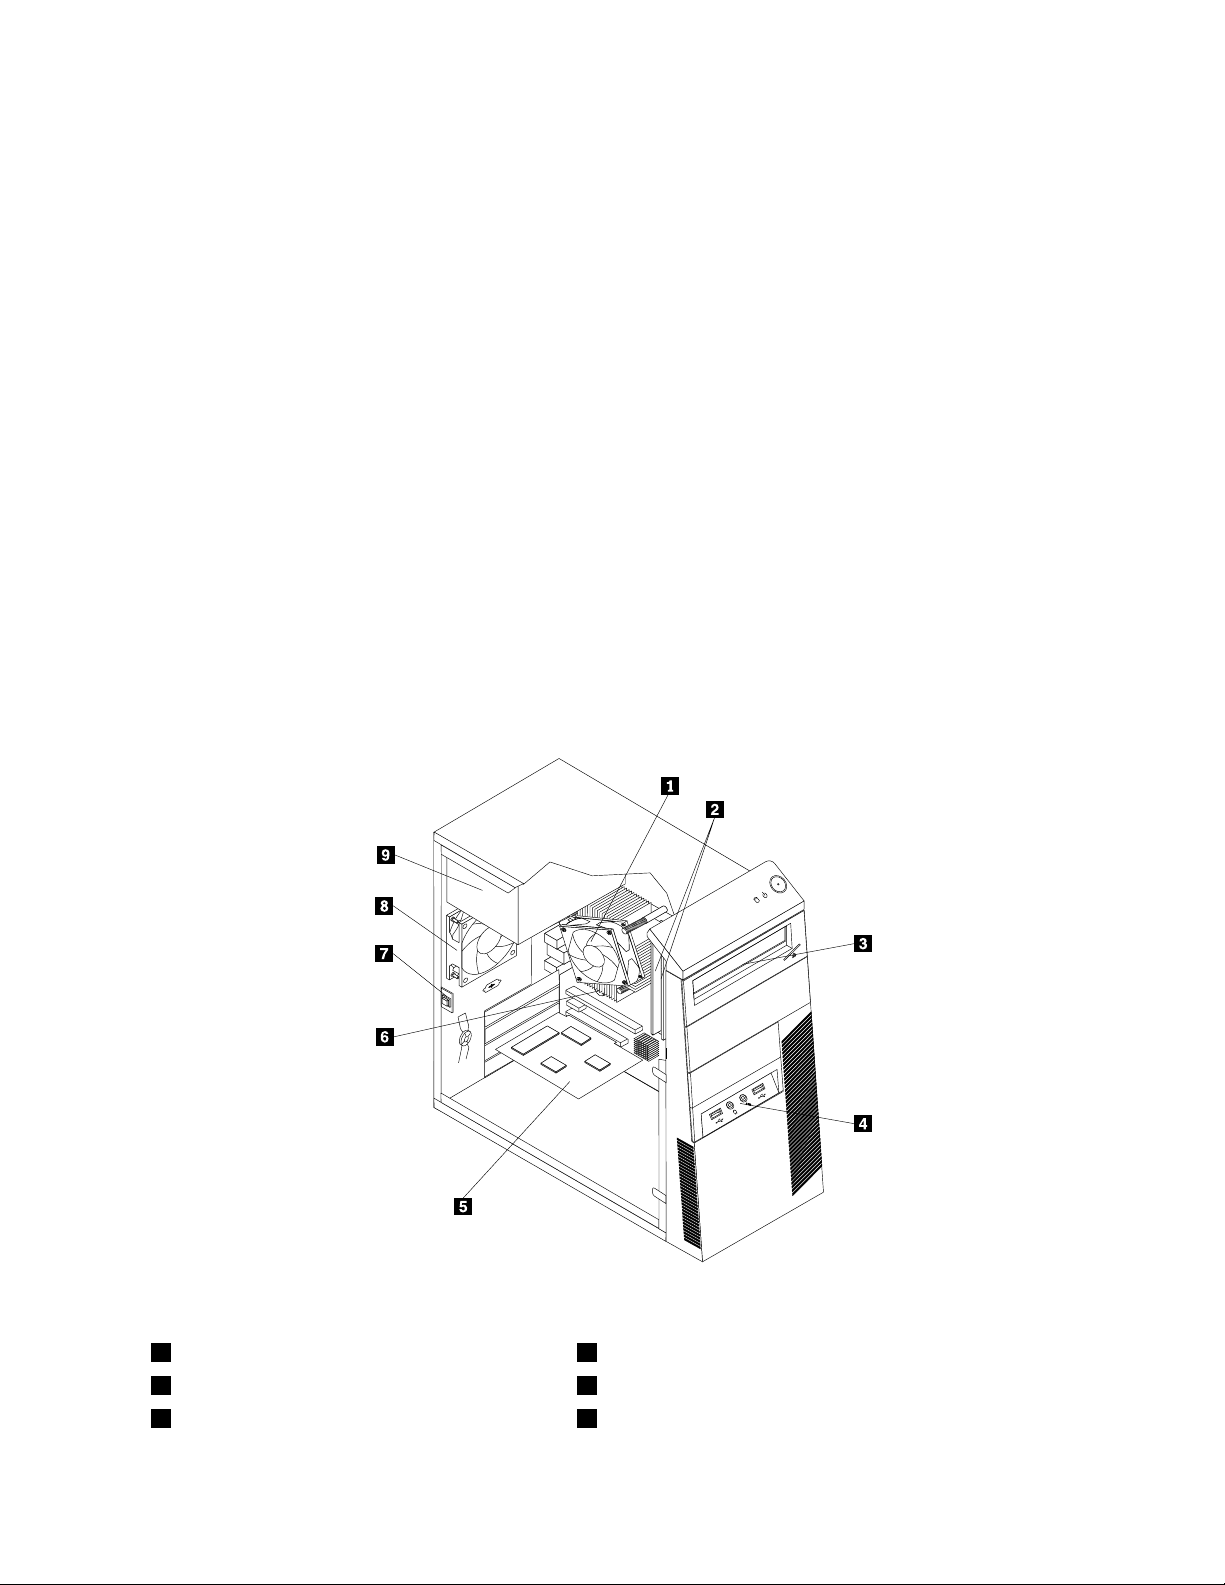
Locatingcomponents
Figure3“Componentlocations”onpage9showsthelocationsofthevariouscomponentsinyourcomputer.
Toremovethecomputercover,see“Removingthecomputercover”onpage14
.
Figure3.Componentlocations
1Heatsinkandfanassembly
6Battery
2Memorymodules
7Coverpresenceswitch(alsocalledintrusionswitch)
3Opticaldrive
8Rearfanassembly
Chapter1.Productoverview9
4FrontaudioandUSBassembly
9Powersupplyassembly
5PCIcard(installedinsomemodels)
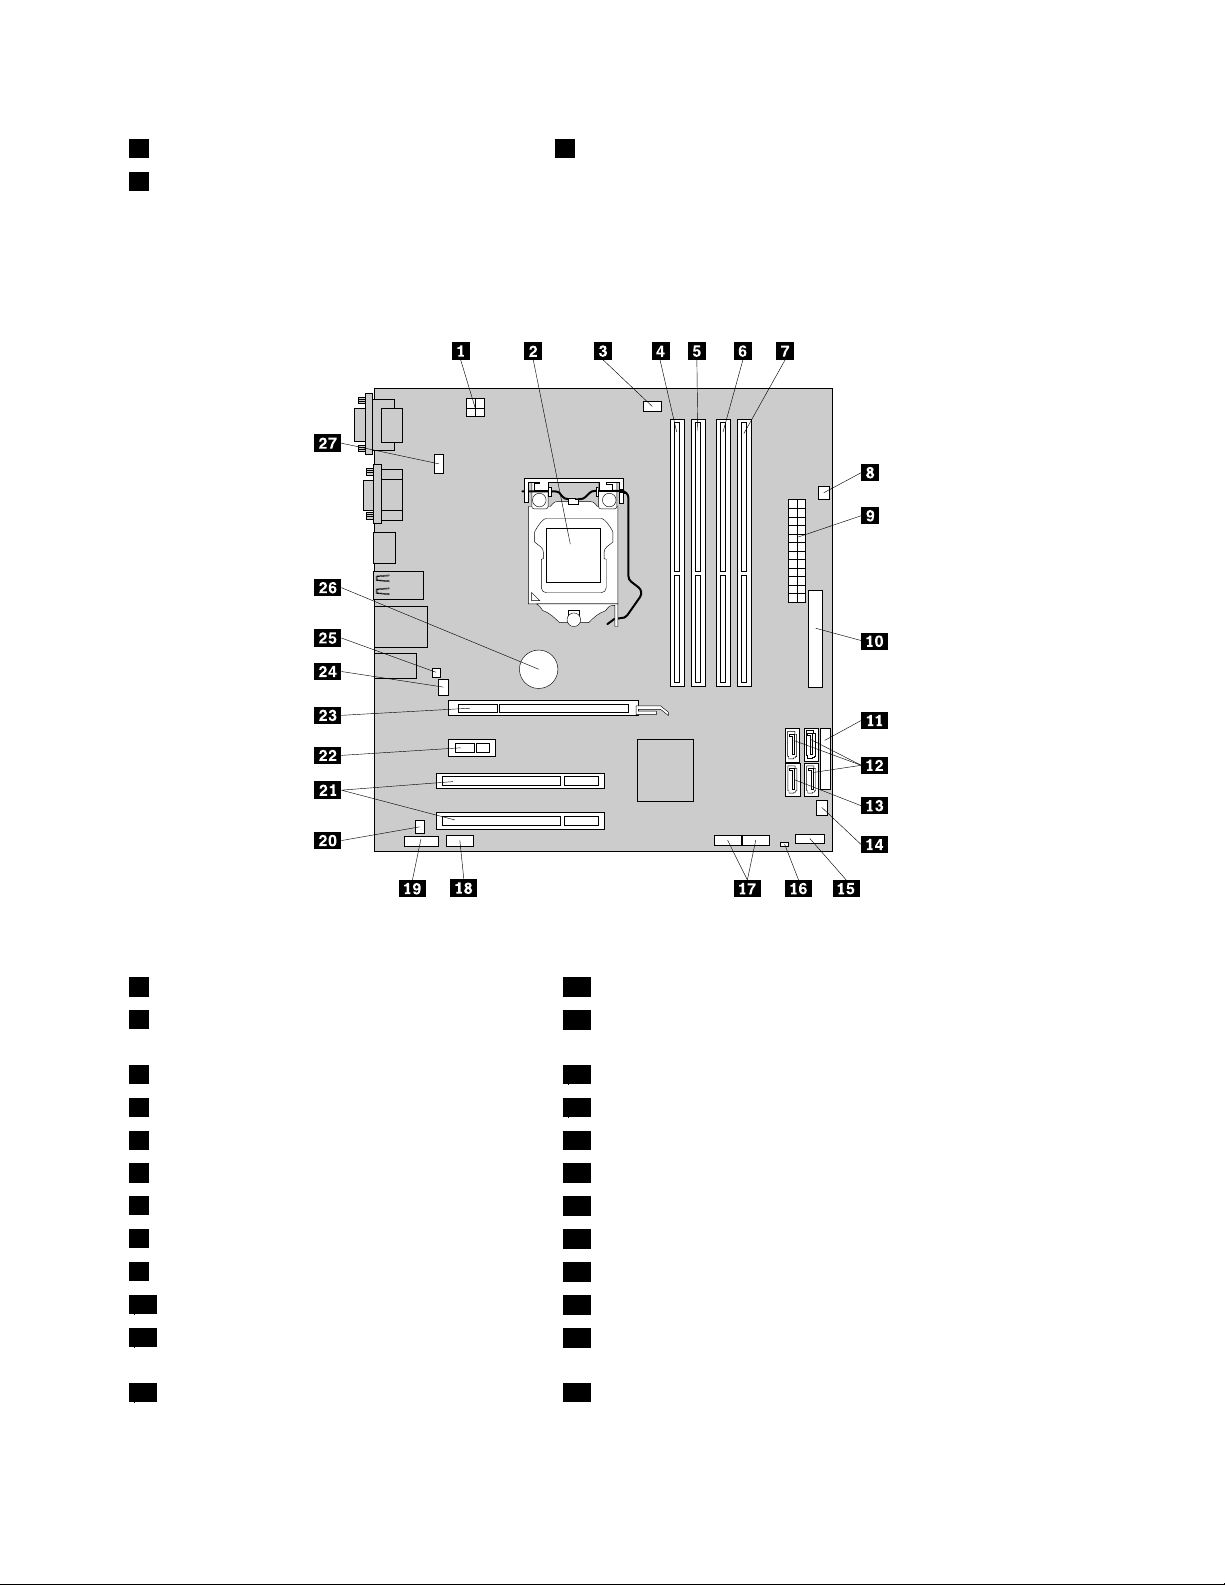
Locatingpartsonthesystemboard
Figure4“Systemboardpartslocations”onpage10showsthelocationsofthepartsonthesystemboard.
Figure4.Systemboardpartslocations
14-pinpowerconnector15Frontpanelconnector
2Microprocessor
16ClearCMOS(ComplementaryMetalOxideSemiconductor)
/Recoveryjumper
3Microprocessorfanconnector
17FrontUSBconnectors(2)
4Memoryslot2
18Serial(COM2)connector
5Memoryslot119Frontaudioconnector
6Memoryslot420Internalspeakerconnector
7Memoryslot3
21PCIcardslots(2)
8Thermalsensorconnector
22PCIExpressx1cardslot
924-pinpowerconnector
23PCIExpressx16graphicscardslot
10Diskettedriveconnector
24Systemfanconnector
11Parallelconnector
25Coverpresenceswitchconnector(Intrusionswitch
connector)
12SA TAconnectors(3)
26Battery
10ThinkCentreUserGuide
13eSA TAconnector27PS/2keyboardandmouseconnector
14Powerfanconnector
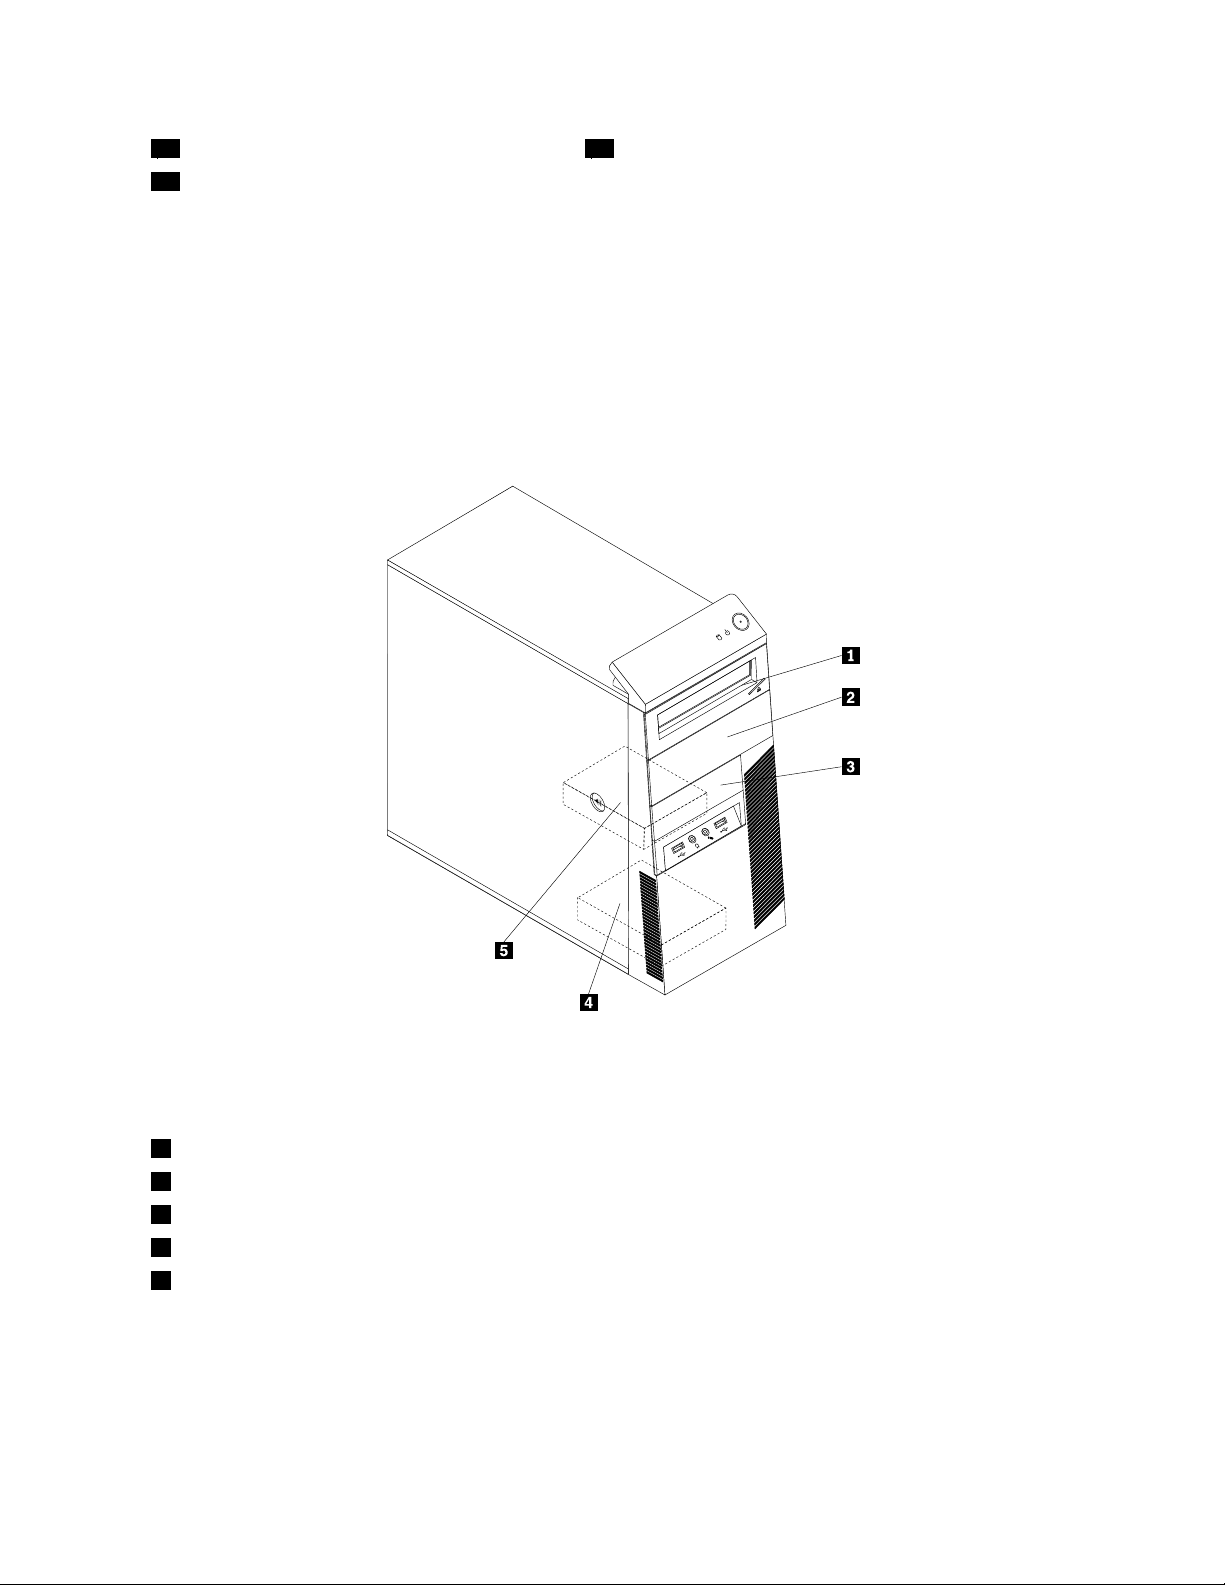
Locatinginternaldrives
Internaldrivesaredevicesthatyourcomputerusestoreadandstoredata.Youcanadddrivestoyour
computertoincreasestoragecapacityandenableyourcomputertoreadothertypesofmedia.Y our
computercomeswiththefollowingfactory-installeddrives:
•ASerialAdvancedTechnologyAttachmentopticaldriveinbay1
•A3.5-inchSAT Aharddiskdriveinbay5(installedinsomemodels)
Internaldrivesareinstalledinbays.Inthismanual,thebaysarereferredtoasbay1,bay2,andsoon.Figure
5“Drivebaylocations”onpage11
showsthelocationsofthedrivebays.
Figure5.Drivebaylocations
Thefollowinglistdescribesthetypeandsizeofthedrivethatyoucaninstallineachbay:
1Bay1-Maximumheight:43.0mm(1.7inches)Opticaldrive
2Bay2-Maximumheight:43.0mm(1.7inches)Opticaldrive
3Bay3-Maximumheight:25.8mm(1.0inch)
3.5-inchcardreader
4Bay4-Maximumheight:25.8mm(1.0inch)3.5-inchsecondarySATAharddiskdrive
5Bay5-Maximumheight:25.8mm(1.0inch)3.5-inchprimarySATAharddiskdrive
Chapter1.Productoverview11

12ThinkCentreUserGuide

Chapter2.Installingorreplacinghardware
Thischapterprovidesinstructionsonhowtoinstallorreplacehardwareforyourcomputer.
Handlingstatic-sensitivedevices
Donotopenthestatic-protectivepackagecontainingthenewpartuntilthedefectiveparthasbeenremoved
fromthecomputerandyouarereadytoinstallthenewpart.Staticelectricity,althoughharmlesstoyou,can
seriouslydamagecomputercomponentsandparts.
Whenyouhandlepartsandothercomputercomponents,taketheseprecautionstoavoidstatic-electricity
damage:
•Limityourmovement.Movementcancausestaticelectricitytobuilduparoundyou.
•Alwayshandlepartsandothercomputercomponentscarefully.HandlePCIcards,memorymodules,
systemboards,andmicroprocessorsbytheedges.Nevertouchanyexposedcircuitry.
•Preventothersfromtouchingthepartsandothercomputercomponents.
•Beforeyoureplaceanewpart,touchthestatic-protectivepackagecontainingtheparttoametal
expansion-slotcoverorotherunpaintedmetalsurfaceonthecomputerforatleasttwoseconds.This
reducesstaticelectricityinthepackageandyourbody.
•Whenpossible,removethenewpartfromthestatic-protectivepackaging,andinstallitdirectlyinthe
computerwithoutsettingthepartdown.Whenthisisnotpossible,placethestatic-protectivepackage
thatthepartcameinonasmooth,levelsurfaceandplacethepartonit.
•Donotplacethepartonthecomputercoverorothermetalsurface.
Installingorreplacinghardware
Thissectionprovidesinstructionsonhowtoinstallorreplacehardwareforyourcomputer.Youcanexpand
thecapabilitiesofyourcomputerandmaintainyourcomputerbyinstallingorreplacinghardware.
Attention:
Donotopenyourcomputerorattemptanyrepairbeforereadingandunderstandingthe“Importantsafetyinformation”
intheThinkCentreSafetyandWarrantyGuidethatcamewithyourcomputer.T oobtainacopyoftheThinkCentre
SafetyandWarrantyGuide,goto:
http://www.lenovo.com/support
Notes:
1.UseonlycomputerpartsprovidedbyLenovo.
2.Wheninstallingorreplacinganoption,usetheappropriateinstructionsinthissectionalongwiththe
instructionsthatcomewiththeoption.
Installingexternaloptions
Youcanconnectexternaloptionstoyourcomputer,suchasexternalspeakers,aprinter,orascanner.For
someexternaloptions,youmustinstalladditionalsoftwareinadditiontomakingthephysicalconnection.
Wheninstallinganexternaloption,see“Locatingconnectorsonthefrontofyourcomputer”onpage6and
“Locatingconnectorsontherearofyourcomputer”onpage7
toidentifytherequiredconnector.Then,
usetheinstructionsthatcomewiththeoptiontohelpyoumaketheconnectionandinstallanysoftware
ordevicedriversthatarerequiredfortheoption.
©CopyrightLenovo2010
13
Removingthecomputercover
Attention:
Donotopenyourcomputerorattemptanyrepairbeforereadingandunderstandingthe“Importantsafetyinformation”
intheThinkCentreSafetyandWarrantyGuidethatcamewithyourcomputer.T oobtainacopyoftheThinkCentre
SafetyandWarrantyGuide,goto:
http://www.lenovo.com/support
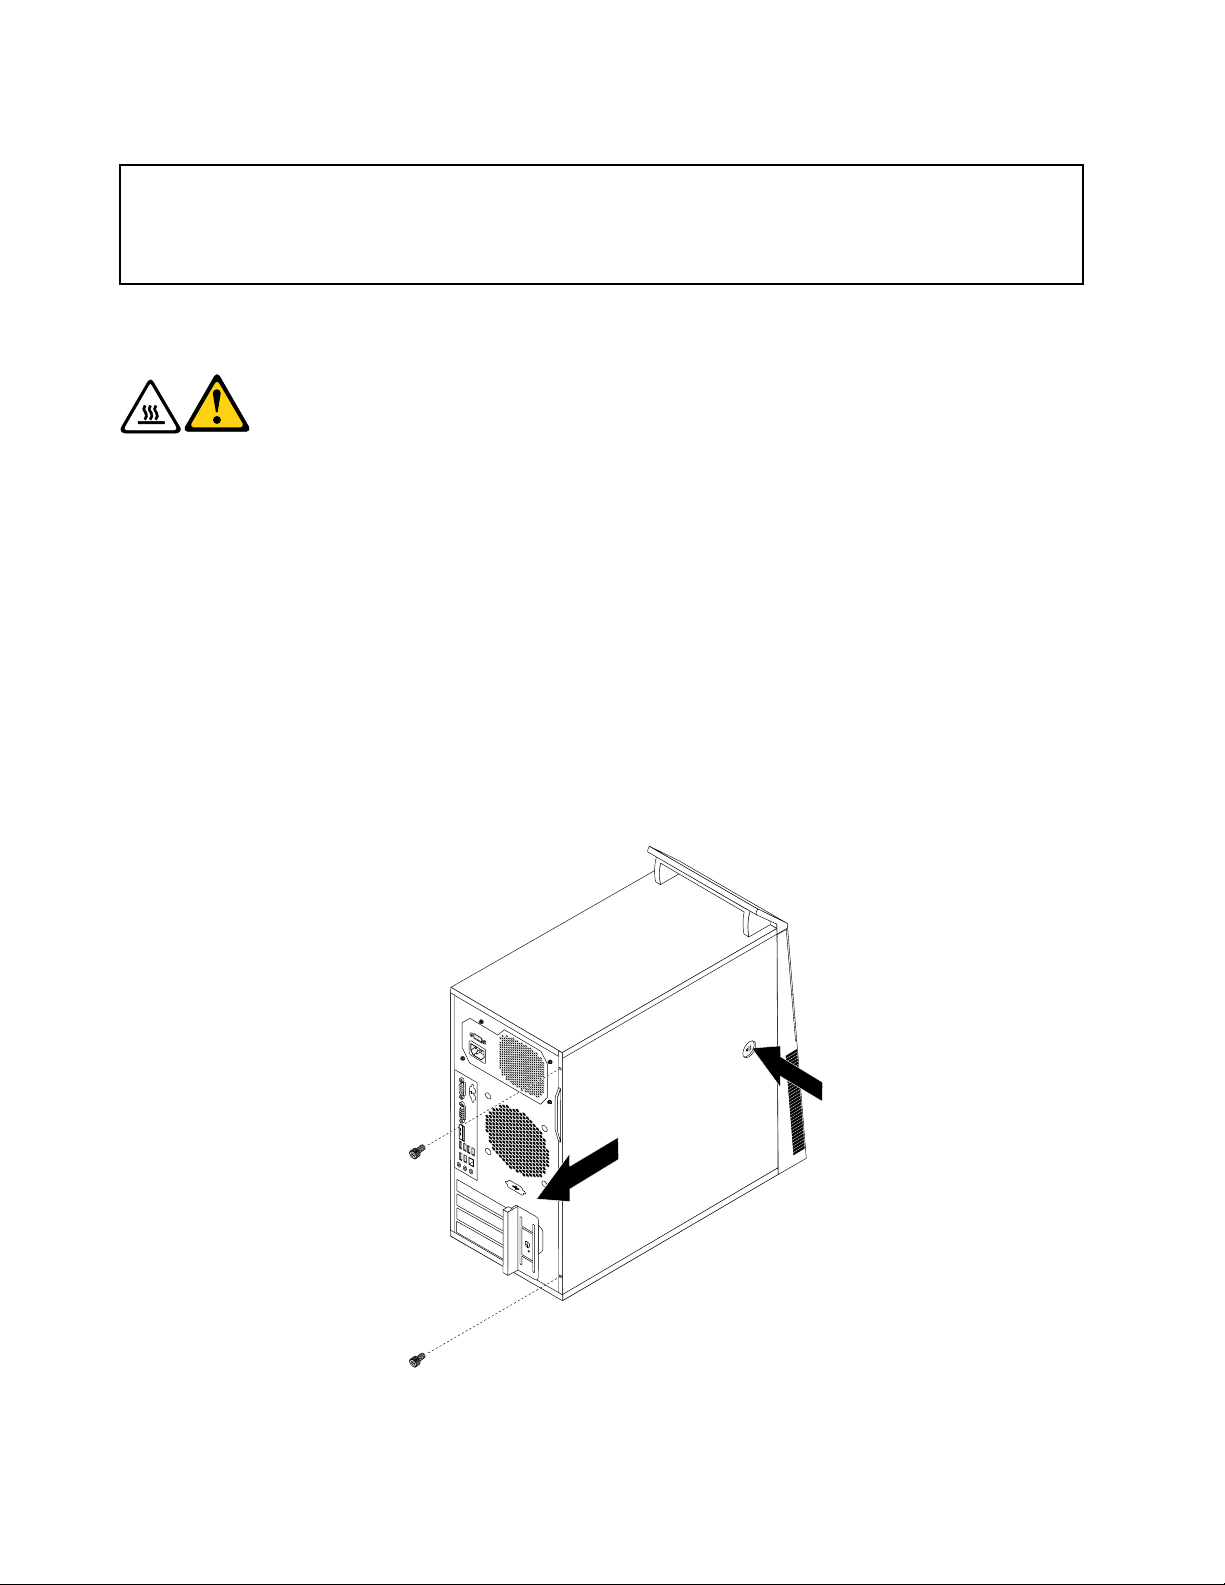
Thissectionprovidesinstructionsonhowtoremovethecomputercover.
CAUTION:
Turnoffthecomputerandwaitthreetoveminutestoletthecomputercoolbefore
removingthecomputercover.
Toremovethecomputercover,dothefollowing:
1.Removeanymediafromthedrivesandturnoffallattacheddevicesandthecomputer.
2.Disconnectallpowercordsfromelectricaloutlets.
3.Disconnectthepowercords,Input/Outputcables,andanyothercablesthatareconnectedtothe
computer.See“Locatingconnectorsonthefrontofyourcomputer”onpage6and“Locatingconnectors
ontherearofyourcomputer”onpage7.
4.Removeanylockingdevicethatsecuresthecomputercover,suchasapadlockoranintegratedcable
lock.See“Integratedcablelock”onpage39and“Padlock”onpage40.
5.Removeanythumbscrewsthatsecurethecomputercover.
6.Pressthecover-releasebuttononthesideofthecomputerandslidethecovertotherearofthe
computertoremovethecover.
Figure6.Removingthecomputercover
14ThinkCentreUserGuide
Removingandreinstallingthefrontbezel
Attention:
Donotopenyourcomputerorattemptanyrepairbeforereadingandunderstandingthe“Importantsafetyinformation”
intheThinkCentreSafetyandWarrantyGuidethatcamewithyourcomputer.T oobtainacopyoftheThinkCentre
SafetyandWarrantyGuide,goto:
http://www.lenovo.com/support
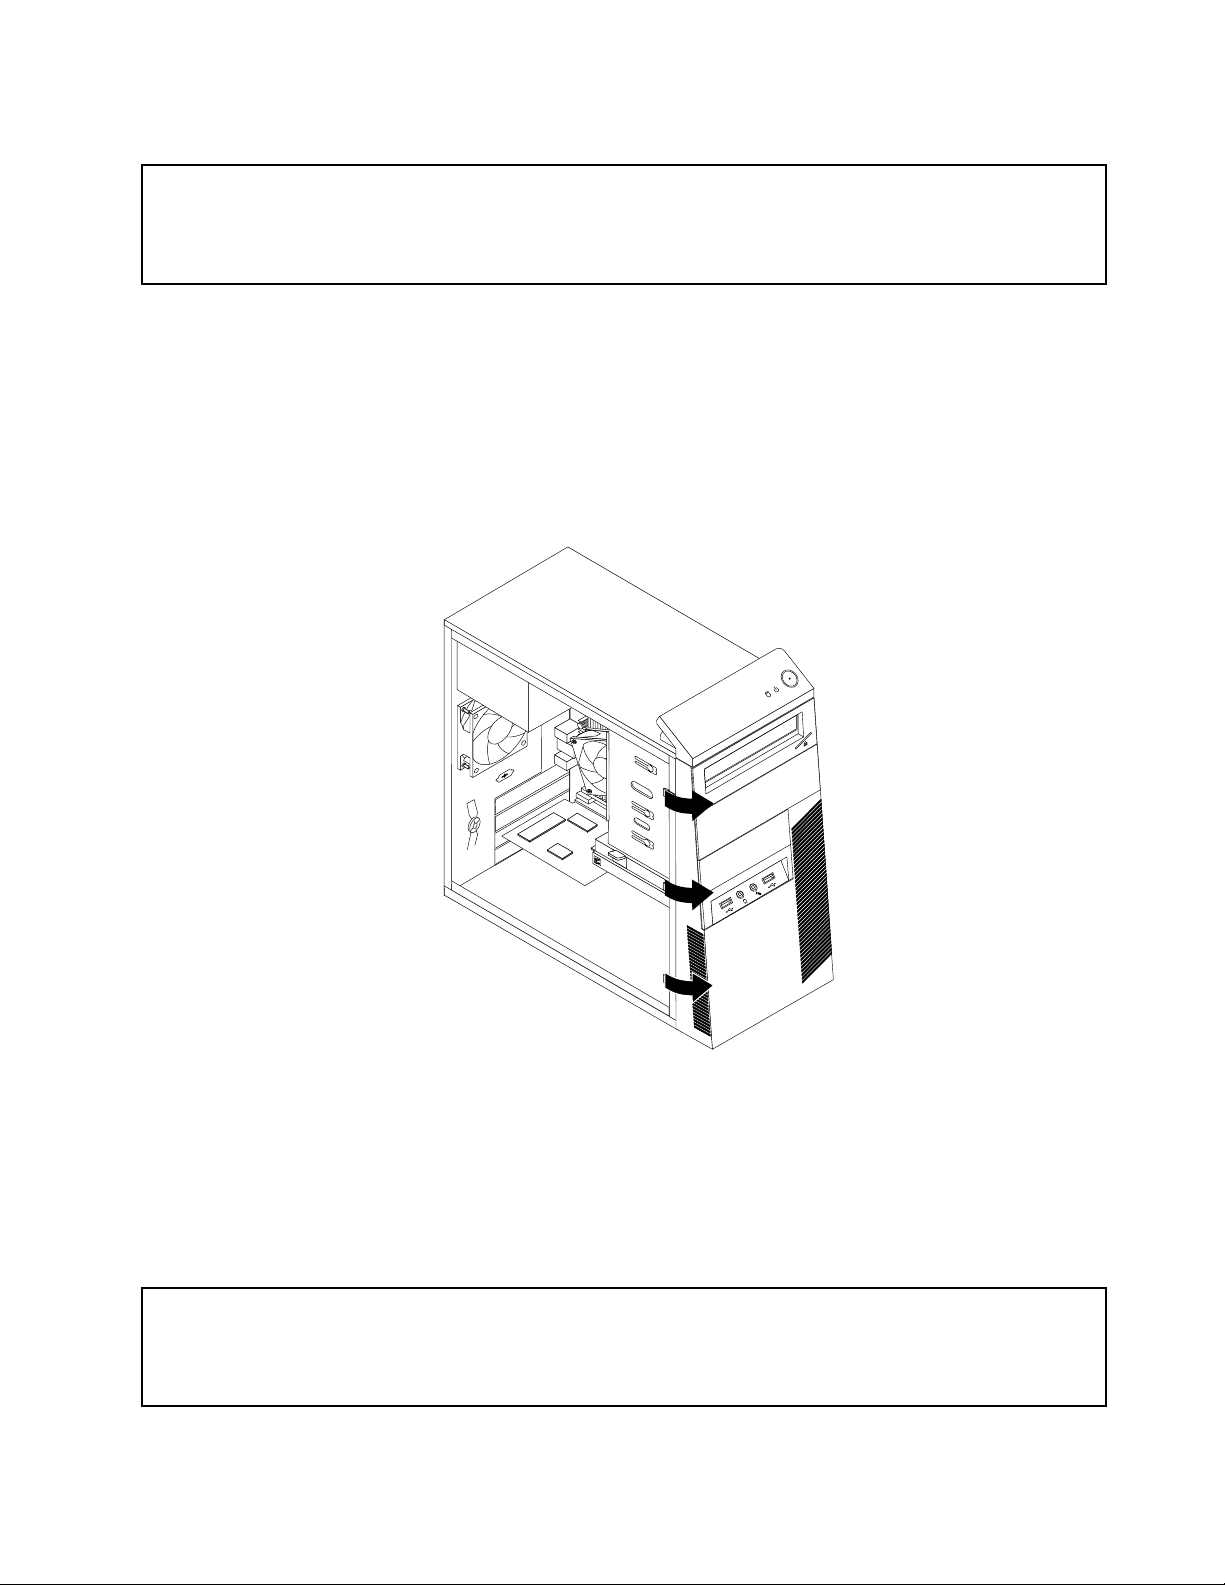
Thissectionprovidesinstructionsonhowtoremoveandreinstallthefrontbezel.
Toremoveandreinstallthefrontbezel,dothefollowing:
1.Turnoffthecomputeranddisconnectallpowercordsfromelectricaloutlets.
2.Removethecomputercover.See“Removingthecomputercover”onpage14.
3.Removethefrontbezelbyreleasingthethreeplastictabsontheleftsideandpivotingthefrontbezel
outward.
Figure7.Removingthefrontbezel
4.Toreinstallthefrontbezel,alignthethreeplastictabsontherightsideofthefrontbezelwiththe
correspondingholesinthechassis,thenpivotthefrontbezelinwardsuntilitsnapsintopositionon
theleftside.
5.Tocompletetheinstallation,goto“Completingthepartsreplacement”onpage38.
InstallingorreplacingaPCIcard
Attention:
Donotopenyourcomputerorattemptanyrepairbeforereadingandunderstandingthe“Importantsafetyinformation”
intheThinkCentreSafetyandWarrantyGuidethatcamewithyourcomputer.T oobtainacopyoftheThinkCentre
SafetyandWarrantyGuide,goto:
http://www.lenovo.com/support
Chapter2.Installingorreplacinghardware15
ThissectionprovidesinstructionsonhowtoinstallorreplaceaPCIcard.Y ourcomputerhastwostandard
PCIcardslots,onePCIExpressx1cardslot,andonePCIExpressx16graphicscardslot.
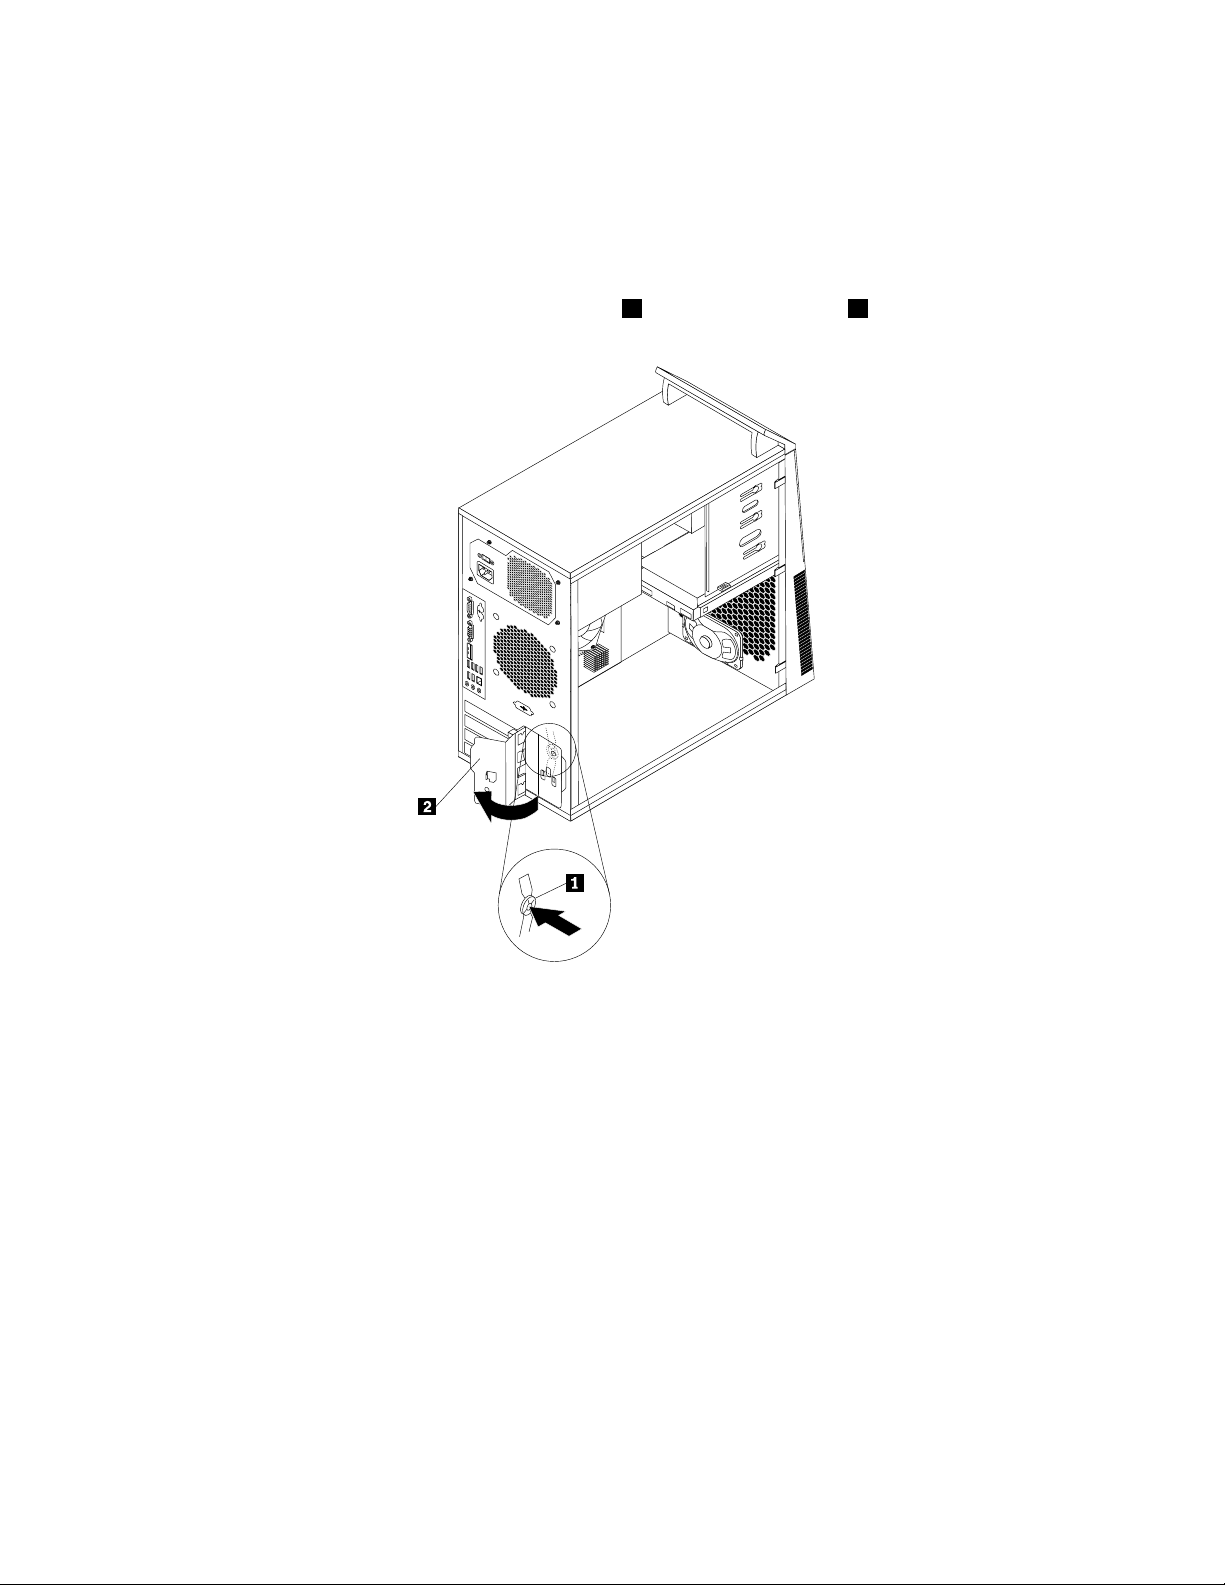
ToinstallorreplaceaPCIcard,dothefollowing:
1.Turnoffthecomputeranddisconnectallpowercordsfromelectricaloutlets.
2.Removethecomputercover.See“Removingthecomputercover”onpage14.
3.Attherearofthecomputer,pressthereleasebutton1toopenthecardlatch2.
Figure8.OpeningthePCIcardlatch
4.IfyouareinstallingaPCIcard,removetheappropriatemetalslotcover.IfyouarereplacinganoldPCI
card,grasptheoldcardthatiscurrentlyinstalledandgentlypullitoutoftheslot.
16ThinkCentreUserGuide
Loading...