


Lenovo Notebook Computer User Guide
Chapter 1 Welcome
This user guide provides the hardware and software information of the LENOVO® Portable Computer which you use.
The computer is a complicated equipment. Read through the whole guide before your first begin to use it. Especially if you are a new user of computers or you’re new to portable computing. Don’t worry if you are still confused about some part of the guide. Keep this guide as a reference when you are using your computer, or call our agent for help.
Pay attention to the caution and safty messages in this guide and the safety messages in the preface.
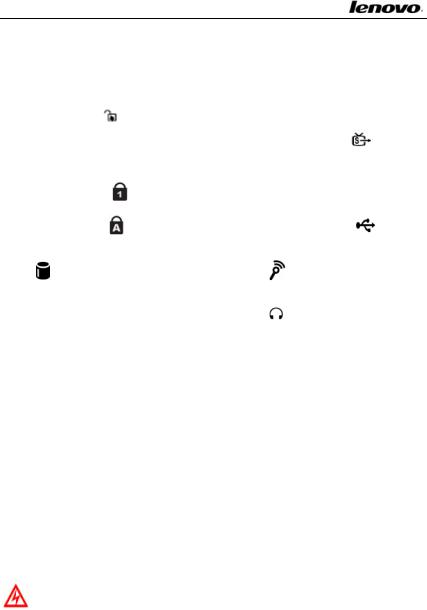
In the guide, some useful icons are applied to catch your attention. There are:
Hint: Helpful pointers and tricks to get more from your notebook
 Note: To help you note and avoid possible damage to your notebookʹs hardware or software, or loss of your work
 Caution: Point out possible damage to property, personal injury or death
Pay your attention to the caution and safety messages in this guide
and the safety messages in the preface.
 Note: 1. Do not plug in and/or remove any computer component while using the computer (except USB, PCMCIA and/or CD ROM devices which support PnP Plug and play Technology).
1

Lenovo Notebook Computer User Guide
2. The computer has adopted many new hardware components. The user must install the drivers by following the guide’s instruction to get the best computer performance.
Thank you for your purchase of the LENOVO 3000 Y400 series notebook computer. This powerful and flexible notebook computer is designed to provide long term, reliable, and high computing performance.
This chapter specifies the various components of your computer. Be familiar with each component before you start operating this notebook.
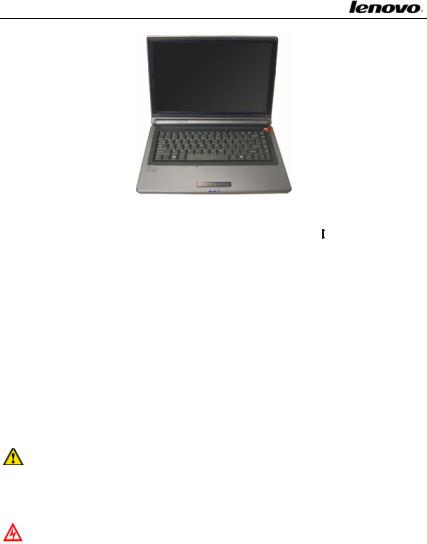
1.1 Quick tour for your computer
This section guides you through the locations for controls and ports on your computer:
∙ Front view with the Display open, right side view, left side view
2

Lenovo Notebook Computer User Guide
1 |
Security keyhole |
|
17 |
Battery |
|
2 |
|
|
|
Wireless&Bluetooth |
|
|
Power Jack |
|
18 |
Enable |
/ Disable |
|
|
|
|
Button |
|
3 |
Fan Louvers |
|
19 |
Mute Button |
|
4 |
LAN Port Modem |
Jack |
20 |
Novo Button |
|
|
|
|
|||
|
|
|
|
|
|
5 |
USB Ports x1 |
|
21 |
Power Switch |
|
6 |
IEEE 1394 Port |
|
22 |
Audio |
Volume status |
|
|
|
|
LED Indicator |
|
7 |
SD/MS/MMC Card Port |
|
23 |
Shuttle |
|
8 |
PC Card Port |
|
24 |
Built in Microphone |
|
3
Lenovo Notebook Computer User Guide
9 |
Hidden Touchpad status |
25 |
Hidden Touchpad |
||
|
LED Indicator |
|
|||
|
|
|
|
|
|
10 |
Hidden Touchpad |
|
|
|
|
|
Enable/Disable |
LED |
26 |
Touchpad Button |
|
|
Indicator |
|
|
|
|
11 |
Keyboard |
|
27 |
S VideoPort |
|
12 |
Subwoofer |
|
28 |
Optical Media Drive |
|
13 |
NUM Lock |
|
29 |
ODD disk |
Reject |
|
|
Button |
|
||
|
|
|
|
|
|
14 |
Caps Lock |
|
30 |
USB Ports x2 |
|
15 |
HDD/ODD LED |
Indicator |
31 |
Microphone in |
Jack |
|
|
|
|
|
|
|
|
|
|
|
|
16 |
Display |
|
32 |
Headphone out |
Jack |
|
|
|
|
|
|
1.1.1Security keyhole 
Your computer comes with a security keyhole. You can purchase a security cable and lock to fit this keyhole. The security cable’s instruction tells you how to use it.
 Hint: Before you buy the security cable, make sure it fits your computer’s security lock slot.
1.1.2Power jack 
Use this connector to attach the AC adapter to your notebook to
provide power and charge the battery.
Caution: Use only the AC adaptor that comes with the
4
Lenovo Notebook Computer User Guide
computer. Using the wrong adaptor might damage your computer.
Caution: The AC adaptor can automatically adjust to any voltage from 100 to 240 volts, as well as a frequency of either 50 or 60 hertz, thus enabling you to use the computer in almost any region. The Power Jack and power cord jack might vary in different countries and/or regions. Make sure that the AC adaptor is correctly connected to the power source. A wrong connection can damage your computer and result in a fire accident.
1.1.3Fan louvers
The internal Fan Louvers enable air to circulate in the computer and
cool the Central Processor.
Hint: Your notebook switches on the fan when the Central Processor becomes hot. The operation of the fan might cause some noises, which is a normal situation.
Caution: To avoid compromising ventilation, do not place any obstacle in front of the fan.
1.1.4LAN port, Modem jack 
1.1.4.1LAN port
The RJ 45 network jack allows you to connect your computer to a
local area network (LAN).
5
Lenovo Notebook Computer User Guide
Note: Be careful not to plug the telephone line into the slightly larger network connector. The telephone line uses higher voltage than the LAN cable; it might damage your computer.
1.1.4.2Modem jack
The Modem jack allows you to connect your notebook to a
telephone line with a standard RJ 11 connector.
Note: Never connect the Modem jack to a digital line. The
high current of a digital line might damage the Modem.
1.1.5USB ports x1 
Use Universal Serial Bus (USB) connectors to connect USB interface compatible devices, such as a printer or digital camera. The USB ports comply with USB2.0 standards, which enable data transfer speeds 40 times faster than the USB 1.1 standards. (The ports also support USB 1.1.)
Hint: The USB device supports PnP (Plug and Play) technology. That means you can install and remove the USB device when your computer is on.
Caution: Do not install or remove the USB device while the compter is starting or shutting down.
6

Lenovo Notebook Computer User Guide
1.1.6IEEE 1394 port 
Use the IEEE1394 connector to connect devices that are compatible with the IEEE1394 interface, such as digital video cameras and external hard disk drives.
1.1.7SD/MS/MMC card port
The slot lets you easily transfer data from other digital device, such as DV, digital camera; DV and PDA that use flash memory. You can install an SD Card, a MultiMedia Card or a Memory Stick in the 3 in 1 Digital Media Reader.
1.1.8PC card port 
Your computer has the Type II PC Card slot. You can insert a PC Card in the slot. See “Using PC Card” for details.
1.1.9Hidden Touchpad status LED indicator
This LED Indicator hints you that the Touchpad is in use or not. When it is in use, the LED is on.
1.1.10Hidden Touchpad Enable/Disable LED indicator
This LED Indicator indicates the Hidden Touchpad function status. When the LED is on, it indicates the Touchpad and Touchpad button function have been enabled. When the LED is off, it indicates the Touchpad and Touchpad button function have been disabled.
1.1.11Keyboard
Standard 86 key keyboard (Embedded numeric keypad and
7

Lenovo Notebook Computer User Guide
function keys. They can be combined with [Fn] key to achieve some shortcut functional applications). See “Using Keyboard” for details.
1.1.12Subwoofer
This computer is equiped with a 2.0 Watts subwoofer. This can provide you an exciting audio experience, making you feel like being surrounded in a home theatre.
1.1.13NUM Lock 
If the Num Lock LED is lit, the numeric keypad is on. To enable or disable the keypad, press and hold the Fn key, then press the NumLk key.
1.1.14Caps Lock 
If the LED is lit, the uppercase letter function is enabled. You can enter all alphabetic characters (A Z) in uppercase without pressing the Shift key.To enable or disable Caps Lock mode, press the CapsLk key.
1.1.15HDD/ODD LED indicator 
Use a hard disk drive or an optional drive to read or write data. When this indicator is blinking, do not put the computer into standby mode, and do not remove the device from the bay or turn off the computer.
1.1.16Display
The computer uses a 14.1ʺ wide thin film transistor (TFT) full color display that supports up to 1280 horizontal x 800 vertical pixels and
8
Lenovo Notebook Computer User Guide
32 bit color.
1.1.17Battery
With a charged battery installed, you can use your notebook without connecting it to an electrical outlet. For more details, see”Using Battery”.
Note: Do not press the computer too hard while you are trying to release the battery pack. It might damage your computer.
1.1.18Wireless & Bluetooth Enable/Disable button
Pressing Wireless & Bluetooth button can enable/disable both of the
wireless and Bluetooth function.
Hint: Wireless LAN and Bluetooth are options to marketing requirements. It will extend the operating time of battery if the wireless or Bluetooth function is disabled.
Caution: Do not use the wireless communication function in the hospital or nearby any electronic medical equipment! The radio waves of the wireless card might cause the electronic medical equipment out of function and result in serious accident.
Caution: Do not use the wireless communication function on the plane! The radio waves of the wireless card might cause the electronic equipments out of function and result in serious accident.
Caution: Avoid interfering with other electronic equipment when you enable the wireless communication function! The
9

Lenovo Notebook Computer User Guide
radio waves of the wireless card might cause other electronic equipment out of function and result in serious accident.
1.1.19Mute button 
The Mute button enables you to quickly mute the sound from your computer.
1.1.20Novo button 
By default, the Novo Key is the Onekey Recovery key. It is used to activate the “Onekey Recovery” application. When the computer is powered off, press the Novo Key to enter into the system recovery application. You can recover, backup or uninstall the system through the application. See < OneKey Recovery 4.6 User Guide > in Lenovo Drivers CD for details.
Caution: Make sure you have already backed up the data on the hard drive. The system recovery will reformat the hard drive and restore it to factory settings.
If your operation system has installed the “EnergyCut” software, you can quickly lunch the EnergyCut program under the working operating system such as WinXP or other more advanced opertating system
1.1.21Power switch 
Use the power switch to turn on the computer. To turn off your computer, use the Start > Shutdown option. The power switch can also be programmed to shut down the computer or put it into standby or hibernation.
10
Lenovo Notebook Computer User Guide
Hint: If your computer stops responding, and you can’t turn it off, then press and hold the Power Switch for more than 4 seconds. If the system still can’t be powered off, then remove the AC adapter and the battery.
1.1.22Audio volume status LED indicator
The six Volume status LED indicators indicate the audio volume adjust status. Use the Shuttle or [Fn] + [→][←] to adjust the audio
volume.
1.1.23Shuttle
OK |
Up/Down |
11
Lenovo Notebook Computer User Guide
Click to move up cursor
 Long press to fastmove
Double click to move rightside cursor
 Click to move up cursor
Long press to fast move
Double click to move leftside cursor
Click to enter into menu and then click OK
Long press to quickly return to main menu; in the main window, long press to exit Shuttle Center media software.
Double click to return to main menu from secondary menu; in main window, double click is of no effect.
Interaction under Windows operating system:
a.If Lenovo Shuttle Center is installed on your Notebook
∙Press OK to run Lenovo Shuttle Center application
∙Press Up and Down button to control
b.If Lenovo Shuttle Center is not installed on your Notebook
∙Press Up and Down button to control the volume
∙Press OK to run Windows Media Player
1.1.24Built in microphone
The built in microphone captures sound and voice when it is used
with an application program capable of handling audio.
12

Lenovo Notebook Computer User Guide
1.1.25Hidden Touchpad
The Touchpad works like a mouse: Move your fingertip across the Touchpad to move the pointer. See “Using the Touchpad” for details.
1.1.26Touchpad button
The Touchpad buttons provide functions similar to those of mouse buttons. See “Using the Touchpad” for details.
1.1.27S Video port 
Support external display device through S video, like the TV set or other devices which has the S video port.
1.1.28Optical media drive
The optical media drive provides a way to transfer data between your computer and CD/DVD media. Depending on the features provided with your computer, you can play CD, VCD and DVD media on your computer. If your computer has a CD RW or DVD±RW Device, you can burn the digital data to CD or DVD media.
Hint: Optical media drives might vary with your computer model. When the optical media drive is operating, the CD/DVD spins at a very high speed in the drive. Sometime it makes some noise, but it is not necessarily a malfunction.
See “Using optical media drive” for details.
1.1.29ODD disk Reject button
13
Lenovo Notebook Computer User Guide
Use ODD disk Reject button to eject the ODD disk or ODD tray. See “Using Optical Media Drive” for details.
1.1.30USB ports x2 
Use these ports to connect up to two USB devices, such as a mouse, a full size external keyboard, or a printer. The USB ports comply with USB2.0 standards, which enable data transfer speeds 40 times faster than the USB 1.1 standards. (The ports also support USB 1.1.)
Hint: The USB device supports PnP (Plug and Play) technology. That means you can install and remove the USB device when your computer is on.
Caution: Do not install or remove the USB device while the computer is starting or shutting down.
1.1.31Microphone in jack 
Enables a microphone connection for audio input.
1.1.32Headphone out jack 
Enables a headphone or external connection for audio output. When you connect the headphone or other devices, internal speakers are automatically disabled.
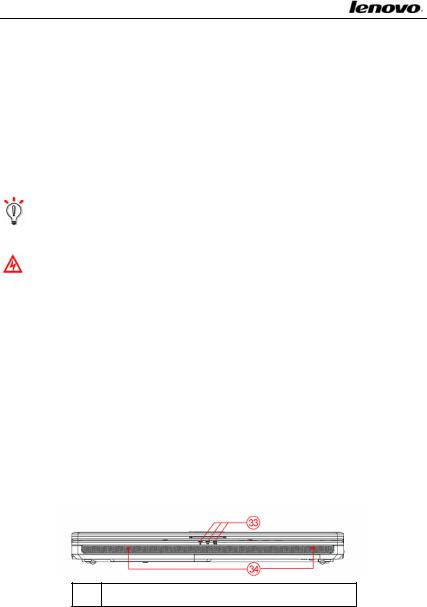
zFront view with the display closed
33 System and Power Status Indicators
14

Lenovo Notebook Computer User Guide
34Build in Stereo Speakers
1.1.33System and power status indicators
Your computer has system and power status indicators: Power on status, Standby status; Battery status, and Wireless/Bluetooth status.
1.1.33.1 Power on status 
The Power LED shows the following stauses:
zBlue: The computer is on and ready to use.
zFading in/out blue: The computer is in Standby mode;
The indicator is off when the computer is powered off or in Hibernation mode.
1.1.33.2Battery status 
The computer is operating on battery power. The battery LED status is:
zBlinking amber: The battery is low power.
The computer is operating on external power. The battery status includes:
zBlue: The battery has more than 95% charge. Amber: The battery is being charged;
1.1.33.3Wireless/Bluetooth status 
The Wireless/Bluetooth LED shows the wireless and bluethoth statuses,
zAmber: Bluetooth is enabled
zBlue: Wireless is enabled
zAmber+Blue: Bluetooth and Wireless both are enabled Wireless status:
15
Lenovo Notebook Computer User Guide
zBlue blinks once every 5 seconds: The wireless feature is on, but not connected to network.
zBlue on: The wireless feature is on, and already connected to network, the radio link is ready for use
zFlashing blue: Data is being transmitted.
Bluetooth status:
zAmber on: The Bluetooth feature is on, and the radio link is ready for use.
zFlashing amber: Data is being transmitted.
1.1.34Build in stereo speakers
Use the two 1.5 Watts stereo speakers to output clear stereo sound.
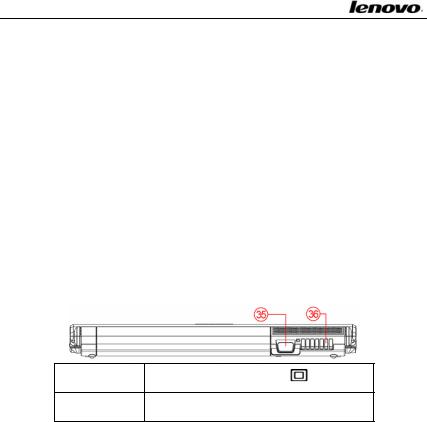
zBack view
35 |
Monitor Connector |
36Fan Louvers
1.1.35Monitor connector
Use this port to connect an external monitor or a projector with your computer to display information. See “Connecting to External Display Device” for details.
1.1.36Fan louvers
The internal Fan Louvers enable air to circulate in the computer and
16
Lenovo Notebook Computer User Guide
cool the Graphics Processor.
Hint: Your notebook switches on the fan when the Graphics Processor becomes hot. The operation of the fan might cause some noises, which is a normal situation.
Caution: To protect your notebook from damage or fire, avoid inserting objects into the air vents and blocking air flow.
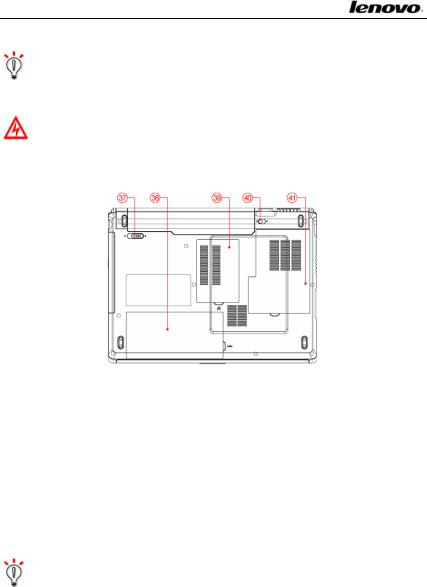
zBottom view
37 |
Battery Release Latch |
38 |
Hard Disk/Wirelss CardCover |
39 |
Memory Module Cover |
40 |
Battery Lock/Unlock Latch |
41 |
CPU FAN Cover |
1.1.37Battery Release latch
Slide the latch across to release the battery pack for removal.
Hint: To release the battery pack you should first unlock the battery Lock/Unlock latch.
17
Lenovo Notebook Computer User Guide
1.1.38Hard disk/wireless card cover
This cover protects the hard disk and Wireless Card.
Caution: Do not remove or change the hard disk or wireless Card by yourself. If you need to remove or change the hard disk or wireless card, bring your computer to one of our service centres. The professional technician who has been qualified by Lenovo will help you. Because of compatibility, Lenovo does not guarantee all hard disks and wireless cards are compatible with your computer.
1.1.39Memory module cover
This cover protects the memory modules.
Hint: Do not insert a different model of memory module. It might drop the computer performance, and even damage the motherboard.
Caution: This cover is designed for memory expansion convenience, but do not install additional memory modules by yourself. If you need to install additional memory modules, bring your computer to one of our service centres. The professional technician who has been qualified by Lenovo will help you. Because of memory compatibility, Lenovo does not guarantee all memory modules are compatible with your computer.
1.1.40Battery Lock/Unlock latch
The battery Lock/Unlock latch secures the battery pack. Slide to the Unlock position to install or release the battery pack. After installing the battery pack, slide it to the Lock position to prevent battery pack
18
Lenovo Notebook Computer User Guide
from unexpected releasing.
To load and release the battery pack, follow the following steps:
∙ Installing battery pack
1.Slide the battery Lock/Unlock latch to the Unlock position
2.Insert the battery pack horizontally into the main frame until you hear a “click” sound.
3.Slide the Battery Lock/Unlock Latch to the Lock position to
restore the Battery Release Latch.
∙ Releasing battery pack
1.Shut down the computer
2.Close the display panel and turn over the computer.
3.Slide the Battery Lock/Unlock Latch to the Unlock position to remove the battery pack by pulling the battery pack horizontally out of the main frame.
1.1.41CPU fan cover
This cover protects CPU and thermal module.
Caution: Do not change the CPU by yourself. If you need to change the CPU, bring it to one of our agents, the professional technician who has been qualified by Lenovo will help you.
1.2 Turn on/off the power
1.2.1Open/close the LCD display panel
19
Lenovo Notebook Computer User Guide
Hold and lift up the display panel slowly with both hands to the
best view angle for you. Press the Power Switch  to turn on the
computer, then the Power Indicator glows yellow.
To close the display panel, hold the middle top side and close the panel slowly with your both hand until the LCD display panel engages with the main frame
1.2.2Starting up for the first time
Because the battery is not charged, when you turn on your computer for first time, you have to connect the AC adaptor to the computer.
Note: If there’s no external power source connected and the battery is low, probably you cannot power on the system. In this case, you need to plug an AC adapter for power supply.
Caution: Wrong AC adaptor might damage your computer. Instructions to connect the AC adaptor and turn on the computer:
1.Place the computer on a flat and clean surface;
2.Connect the power cord to the computer;
20
 Loading...