


Lenovo 3363, 08871BU, 08872CU, 08873BU, 08881AU User Manual
...Machine type: 10097/2566 [B340] 10099/2568 [B540] 10101/3363 [B540p] 10098/2567 [B345] 10100/4749 [B545]
Lenovo
IdeaCentre B3/B5 Series
User Guide
Version 1.0 |
2012.02 |
31501557

Important Safety Information
Before using this manual, it is important that you read and understand all of the related safety information for this product. Refer to the Safety and Warranty Guide that you received with this product for the latest safety information. Reading and understanding this safety information reduces the risk of personal injury or damage to your product.
The interface and functions shown in this User Guide are provided for reference only and may differ from actual product appearance. Product design and specifications may be changed without notice.
Danger: Be aware of extremely hazardous or potentially lethal situations.
Attention: Be aware of possible damage to programs, devices, or data.
Note: Pay attention to this important information.
© Copyright Lenovo 2012. All rights reserved.
LIMITED AND RESTRICTED RIGHTS NOTICE: If data or software is delivered pursuant a General Services Administration “GSA” contract, use, reproduction, or disclosure is subject to restrictions set forth in Contract No. GS-35F-05925.
© 2012. Lenovo
Contents
Important Safety Information |
|
|
Chapter 1 Using the Computer Hardware............................... |
1 |
|
1.1 |
Front view of the computer....................................................... |
2 |
1.2 |
Left and right view of the computer.......................................... |
3 |
1.3 |
Rear view of the computer....................................................... |
4 |
1.4 |
TV button instructions (selected models only)........................... |
5 |
1.5 |
Computer stand....................................................................... |
6 |
1.6 |
Connecting your computer....................................................... |
7 |
1.7 |
Important information about using the computer...................... |
8 |
1.8 |
Wired keyboard (selected models only).................................. |
10 |
Chapter 2 Touch screen user instruction.............................. |
11 |
|
2.1 |
Touch Screen Calibration....................................................... |
12 |
2.2 |
User Gesture Instructions for the Touch screen...................... |
12 |
2.3 |
Attentions when using the Touch Screen................................ |
20 |
Chapter 3 Using the Onekey TV (selected models only)..... |
23 |
|
3.1 |
Guide to the remote control (selected models only)................ |
25 |
3.2 |
Onekey TV Instructions (ASTC model) (selected models |
|
|
only)....................................................................................... |
28 |
3.3 |
Onekey TV Instructions (DVB-T model) (selected models |
|
|
only)....................................................................................... |
30 |
3.4 |
Onekey TV Instructions (ATV model) (selected models only).... |
33 |
Chapter 4 Using the Rescue System..................................... |
35 |
|
4.1 |
OneKey Recovery.................................................................. |
36 |
4.2 |
Driver and Application Installation........................................... |
36 |
4.3 |
System Setup........................................................................ |
37 |
Contents 1
4.4 |
System Backup...................................................................... |
38 |
4.5 |
System Recovery................................................................... |
38 |
4.6 |
Create Recovery Disc............................................................. |
38 |
Chapter 5 Troubleshooting and Confirming Setup.............. |
39 |
|
5.1 |
Troubleshooting Display Problems.......................................... |
40 |
5.2 |
Troubleshooting Audio Problems............................................ |
41 |
5.3 |
Troubleshooting Software Problems....................................... |
41 |
5.4 |
Troubleshooting Problems with Optical Drives and Hard |
|
|
Disks...................................................................................... |
42 |
5.5 |
Special considerations for troubleshooting Windows.............. |
43 |
5.6 |
Performing Daily Maintenance Tasks...................................... |
44 |
Chapter 6 Hardware Replacement Guide............................. |
45 |
|
6.1 |
Overview................................................................................ |
46 |
6.2 |
Replacing hardware............................................................... |
49 |
Appendix...................................................................................... |
60 |
|
Energy Star Statement................................................................. |
61 |
|
2 Contents

Chapter Using the Computer Hardware
This chapter contains the following topics:
ØIntroduction to the computer hardware
ØInformation on computer connections
Note: The descriptions in this chapter might be different from what you see on your computer, depending on the computer models and configurations.
1
2
3
4
5
6
User Guide 1
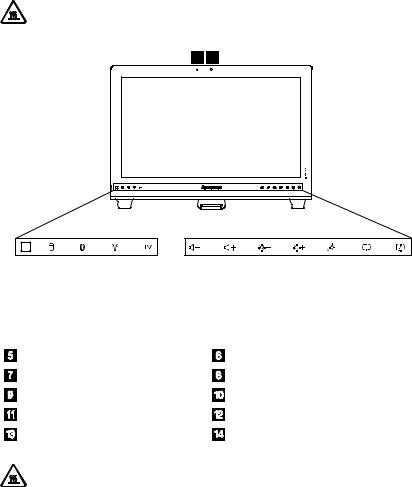
1.1 Front view of the computer
Attention: Be careful not to block any air vents on the computer. Blocked air vents can cause overheating.
1 2
|
|
3 |
|
4 |
|
5 |
|
6 |
|
7 |
|
8 |
|
|
9 |
|
10 |
|
11 |
|
12 |
|
13 |
|
14 |
|
|
|
Built-in microphone area |
|
|
|
|
Camera |
|
|
|
|
|
|
|
||||||||||
|
|
|
|
|
|
|
|
|
|
|
|
|
|
||||||||||||
|
|
|
Built-in IR Emitter(do not block) |
|
|
|
|
Hard Disk Drive Indicator |
|
|
|||||||||||||||
|
|
|
|
|
|
|
|
|
|||||||||||||||||
|
|
|
(selected models only) |
|
|
|
|
|
|
|
|
|
|
|
|
|
|
|
|
||||||
|
|
|
Bluetooth status indicator |
|
|
|
|
WIFI status indicator |
|
|
|
||||||||||||||
|
|
|
TV indicator |
|
|
|
|
|
|
|
|
Volume down |
|
|
|
|
|
||||||||
|
|
|
Volume up |
|
|
|
|
|
|
|
|
Brightness down |
|
|
|
||||||||||
|
|
|
Brightness up |
|
|
|
|
|
|
|
|
Novo Vision button |
|
|
|
||||||||||
|
|
|
PC mode / HDMI-in / AV-in switch |
|
Monitor On/Off |
|
|
|
|
|
|||||||||||||||
Attention: The effective range of the Built-in IR Emitter is 10 feet (3m).
2 User Guide
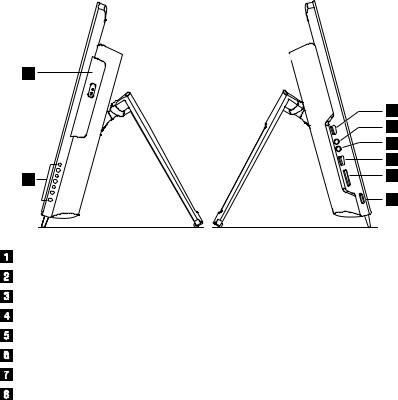
1.2 Left and right view of the computer
1
|
3 |
|
4 |
|
5 |
|
6 |
2 |
7 |
|
8 |
Optical drive
TV buttons (selected models only)
USB connector
Headphone port
Microphone port
USB connector
Memory card reader
Power button
User Guide 3

1.3 Rear view of the computer
8
7
8
6
1
|
|
|
|
|
|
|
|
|
|
|
|
|
|
|
|
|
|
|
|
|
|
|
|
|
|
|
|
|
|
|
|
|
|
|
|
|
|
|
|
|
|
|
|
|
2 |
|
|
|
|
|
|
|
|
|
|
|
5 |
||
3 |
4 |
|||||||||||||
|
|
|
|
|
|
|
||||||||
Ethernet port
USB connectors
HDMI-out connector
HDMI-in connector (selected models only)
AV-IN connectors (selected models only)
TV tuner ports (selected models only)
Power connector
Air vents (do not block)
4 User Guide
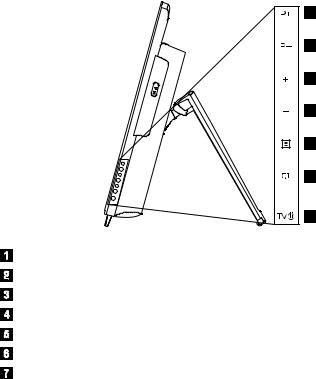
1.4 TV button instructions (selected models only)
1
2
3
4
5
6
7
Channel up
Channel down
Volume up
Volume down
TV mode menu button
Signal source selection button
TV power On/Off
User Guide 5
1.5 Computer stand
Use the stand to position the display to your preference. It can be rotated between 15º and 40º from the vertical.
Attention:
1.The computer stand must remain installed at all times to ensure maximum system stability.
2.Make sure the angle of the computer is at least 15 degrees from the vertical; otherwise the computer will be unstable and could fall over.
6 User Guide

1.6 Connecting your computer
Note: Your computer may not have all of the connectors described in this section.
1.6.1 Basic connector instructions
Connector |
Description |
|
|
Microphone |
Use this connector to attach a microphone to your |
|
computer when you want to record sound or if you use |
|
speech-recognition software. |
|
|
Headphone |
Use this connector to attach headphones to your |
|
computer when you want to listen to music or other |
|
sounds without disturbing anyone. |
|
|
USB connector |
Use this connector to attach a device that requires a |
|
USB connection. |
|
|
Ethernet connector |
Use this connector to attach the computer to an |
|
Ethernet-type local area network. |
|
|
HDMI connector |
Connects to the HDMI connector on your display or TV. |
(optional) |
|
|
|
TV-Tuner connector |
Connects to an external antenna to view programs |
(optional) |
using the optional TV tuner card. |
|
|
AV-in connector |
Connects to the composite audio and video |
(optional) |
connectors on your video device. |
|
|
Note: If your computer is equipped with a wireless keyboard or mouse, follow the installation instructions for those devices.
User Guide 7
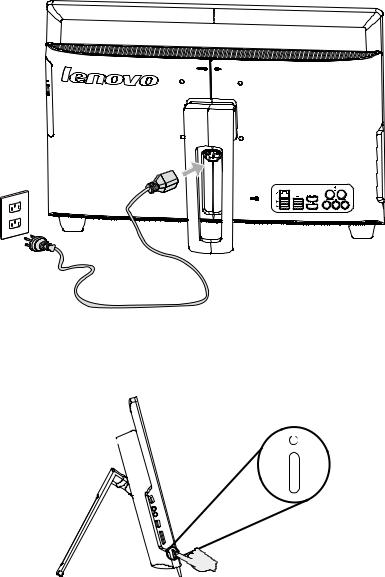
1.6.2 Connecting the power cord
Connect the power cord properly to grounded electrical outlets.
1.7 Important information about using the computer
Press the power button on the side of the computer to turn on the computer.
8 User Guide

Note: The buttons at the bottom of the screen are touch buttons. When you touch these, the indicator lights turn on.
Hold the computer tightly when you carry it.
User Guide 9
1.8 Wired keyboard (selected models only)
LVT —— After entering Windows, press this key to launch the LVT (Lenovo Vantage Technology) program, Lenovo’s pre-loaded Home PC software. In addition to its own functions, the LVT program will allow you to start other Windows compatible software, specially configured to run on this model of computer.
F2 —— Your computer has the Lenovo Rescue System installed. To learn more about this program, repeatedly press and release the F2 key once turning on the computer until the Lenovo Rescue System open.
10 User Guide
Chapter Touch screen user instruction
This chapter contains the following topics:
Touch Screen Calibration
User Gesture Instructions for the Touch screen
Attentions when using the Touch Screen
Attention: Only some selected models are equipped with touch screens.
1
2
3
4
5
6
User Guide 11

The monitor has touch capability due to a touch-sensitive screen installed. A touch screen is an input device just like a mouse or a keyboard, and the user’s hand transmits position information via the touch screen to the computer. With this technology, you only need to touch the pictures or words on the computer display lightly with your finger, and the computer will react.
2.1 Touch Screen Calibration
Prior to first use or whenever the touch screen reacts in a different place where you are touching it, start the calibration program. The procedure is as follows:
1.In Windows 7, Select “Start” – “Control Panel”.
2.In Control Panel, select “Hardware and Sound”.
3.In “Hardware and Sound” window, select “Tablet PC Settings”.
4.In “Tablet PC Settings” dialogue, click “Calibrate” button.
2.2 User Gesture Instructions for the Touch screen
The Touch screen supports single touch and rotational movements, enlargement and reduction multi-touch operations, and the user can transmit position information to the computer via touch. The touch screen uses a very low pressure movement recognition method, which only needs the finger to move lightly on the computer display screen or make a simple hand gesture to be detected by the main computer processor.
2.2.1 Basic Hand Gestures
1. Single Click / Double Click
For the item selected on the touch screen, touch it one or two times with finger, to perform a single click or double click operation. This is similar to the action performed by clicking the mouse left button.
12 User Guide
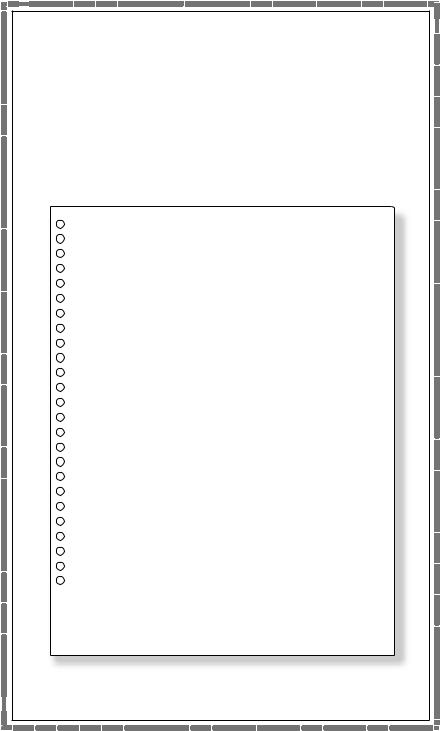
2. Single Finger Right Click
For the item selected on the touch screen, press and hold your finger on the screen until a circle appears. After lifting your finger from the touch screen, a menu bar will pop up, completing the single finger right click operation. This is similar to the action performed by clicking the mouse right button.
User Guide 13
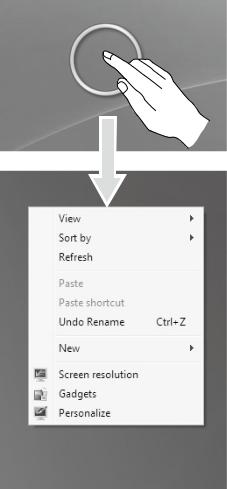
3. Double Finger Right Click
First touch a finger to the screen to select the desired item and hold it there, then touch another finger anywhere nearby on the screen and quickly lift it up again, to complete a double finger right click operation. The area where the first finger is placed can be used to show the right-click menu or perform related operations.
1 2
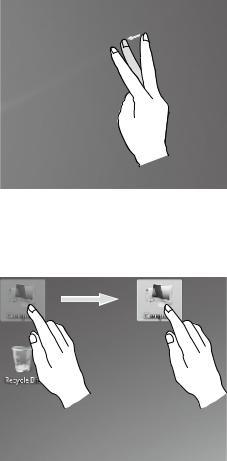
4. Dragging Movement
First touch your finger on the desired item on the screen and hold it there, then make a dragging movement. This is similar to the click and drag movement you can make with a mouse.
14 User Guide

5. High Speed Slide
If you touch the screen with a single finger and slide it a short distance horizontally (about 5 cm), then quickly lift it up again, this is called a High Speed Slide, and the screen will show the “Forward” or “Back” icon.
In the default situation, a high speed horizontal sliding movement will execute a forward or back operation. For example: Forward and Back operations for the IE browser; or Previous and Next slide operations in Windows Photo Viewer slideshow mode.
about 5 FP
6. Rolling Movement
When you move your finger one time vertically (or horizontally) on the touch screen, this is called a Rolling Operation. For example: This operation is similar to moving the scroll wheel on the top of a mouse, and produces the same results as the scroll wheel interface does.
User Guide 15
7. Zoom Operation
Touch two fingers lightly on the desired item on the touch screen, then keeping both fingers on the screen, change the distance between them. By increasing (or decreasing) the distance, you can perform a zoom out (or zoom in) operation. For example: you can enlarge or reduce the picture size in Windows Photo Viewer.
8. Rotation Operation
Use two figures to touch the desired item on the touch screen, then rotate them in the desired direction. For example: you can rotate the picture which is being displayed in Windows Photo Viewer.
16 User Guide
 Loading...