


Not For Resale – Free Download at http://homepage.ntlworld.com/joechan/manuals
FULL INSTRUCTIONS
This Instruction Book
contains everything you should know about the LEICA M 2. At first practice handling the camera without a film. Carry on
until you know all the steps by heart without needing to refer to this manual. You will
get the hang of it quicker than you thought possible - handling the LEICA is much simpler than reading about it.

Not For Resale – Free Download at http://homepage.ntlworld.com/joechan/manuals
Hold the
First of all get used to holding the LEICA correctly. This is most important for quick and reliable shooting, and for high quality, pin-sharp pictures.
Grip the camera so that it rests in the palms of both hands. The right thumb rests lightly against the transport lever (2), while the right index finger just touches the release button (1). Use the left hand to focus the lens (9). Keep your eye as close as possible to the finder eyepiece (18). Support the camera firmly against the forehead: the camera, your head, and your hands should form a rigid unit. The purpose of all this is to give the LEICA a solid support during exposure. This will avoid camera shake and yield negatives with that ultra-sharp definition characteristic of LEICA pictures.
2

Not For Resale – Free Download at http://homepage.ntlworld.com/joechan/manuals
LEICA Correctly
Try exposing at first with a shutter speed of 1/60 second or faster. After some practice you'll find yourself able to use slower speeds without shaking the camera during exposure. If you find it more convenient you can, of course, equally well use your left eye for viewing and focusing.
To switch from horizontal to vertical pictures, turn the LEICA upright. The grip of the hands does not change appreciably: hold the camera in much the same way as for horizontal shots. Alternatively, you can bring the right hand down for vertical shots, and release the shutter with the thumb. In this case hold the LEICA so that the tip of the thumb lies against the release button, and the fingers press against the camera from the bottom. Use the left hand to focus the lens. Rest the upper part of the camera against your forehead. With this hold you can release really smoothly.
Whether taking vertical or horizontal shots, you do not have to take the eye from the finder - a useful point with picture sequences, for the LEICA controls are all ideally located for ease of operation.
3
Not For Resale – Free Download at http://homepage.ntlworld.com/joechan/manuals
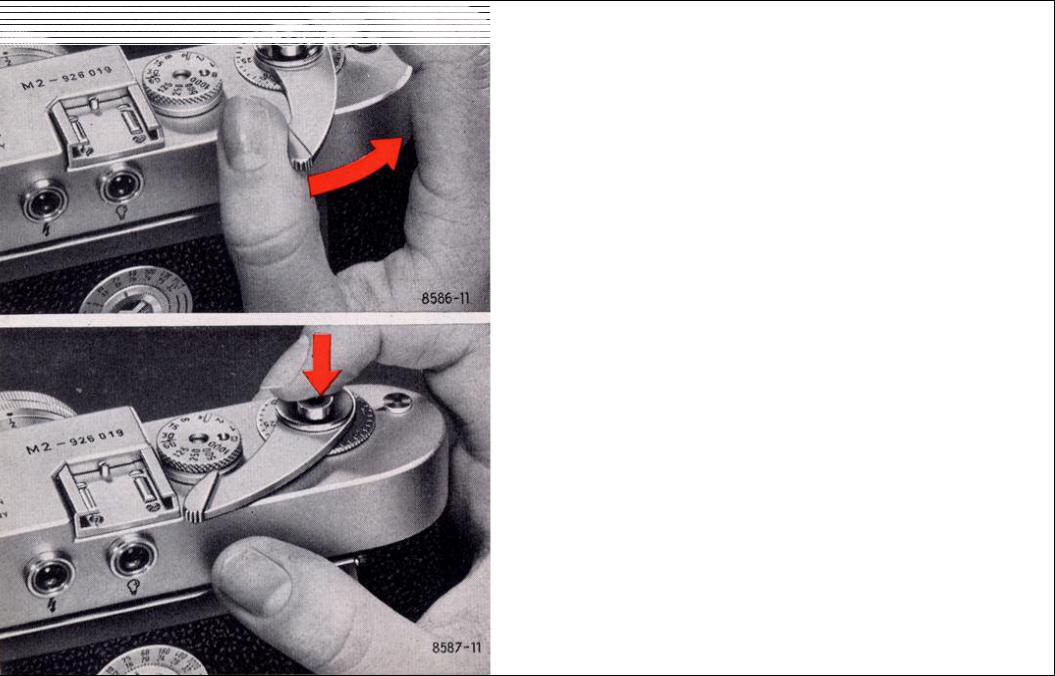
The Film Transport Lever (2)
Push the transport lever fully to the right with your right thumb. Alternatively, work it with a number of short strokes until it locks. Either way, this movement tensions the focal plane shutter of the LEICA and advances the film by one frame.
You cannot accidentally advance more than one frame at a time or make an exposure before the film has been properly advanced. Accidental double-exposures are impossible.
The Release Button (1)
Press the release button gently with the right index finger. Never jab it! You will hear the click as the shutter runs down. This exposes the film in the camera.
After each exposure lift your finger off the release button. This frees the mechanism so that you can operate the transport lever.
4
Not For Resale – Free Download at http://homepage.ntlworld.com/joechan/manuals
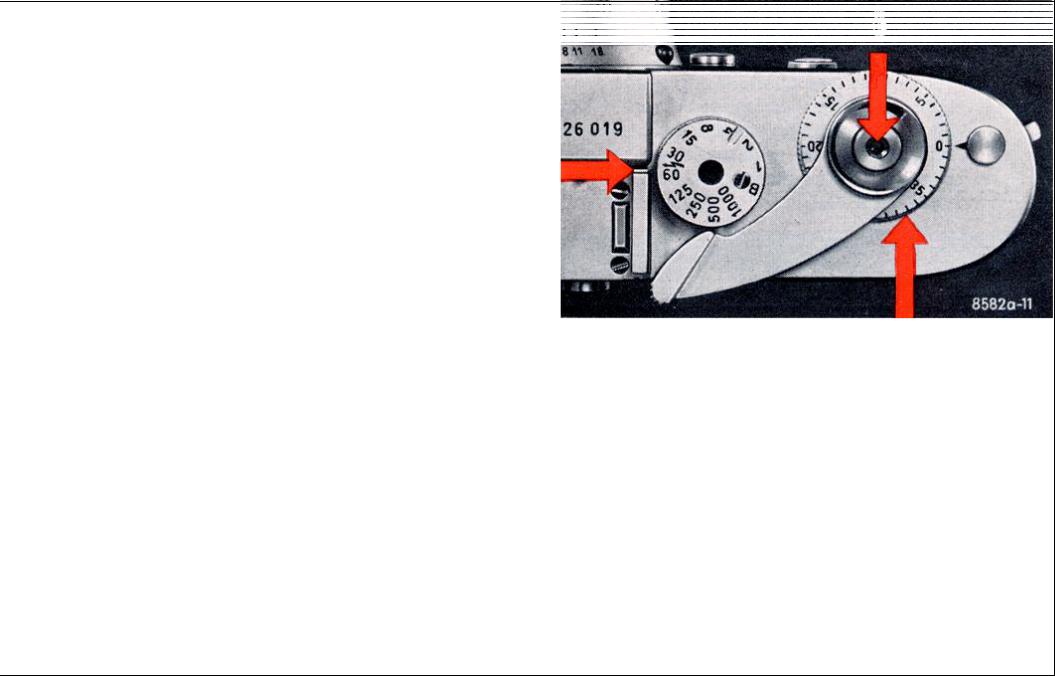
Setting the Shutter Speed (3)
The numbers on the shutter speed dial indicate
fractions of a second. For example, 1000 is 1/1000 second, 125 is 1/125 second, 4 is 1/4 second, and 1 is 1/1, or one full second. The dial engages at
each speed; you read the setting next to the small index line on the accessory shoe. When set to B, the shutter remains open as long as the release button is depressed. The red symbol of a lightning flash indicates a shutter speed of
second for synchronizing electronic flash. Intermediate shutter speeds can also be set within the range of 1 to 1/8 second, between 1/15 and 1/30 second, and between 1/60 and 1/1000 sec.
The shutter release button will take a standard locking cable-release for time exposures.
Use a tripod for these.
The shutter speed dial can be coupled with the LEICAMETER exposure meters.
(See separate meter instructions.)
The Film Counter (17)
automatically indicates the number of frames exposed. When loading a new film set the counter disc to No. 0 (see also page 23).
5
Not For Resale – Free Download at http://homepage.ntlworld.com/joechan/manuals
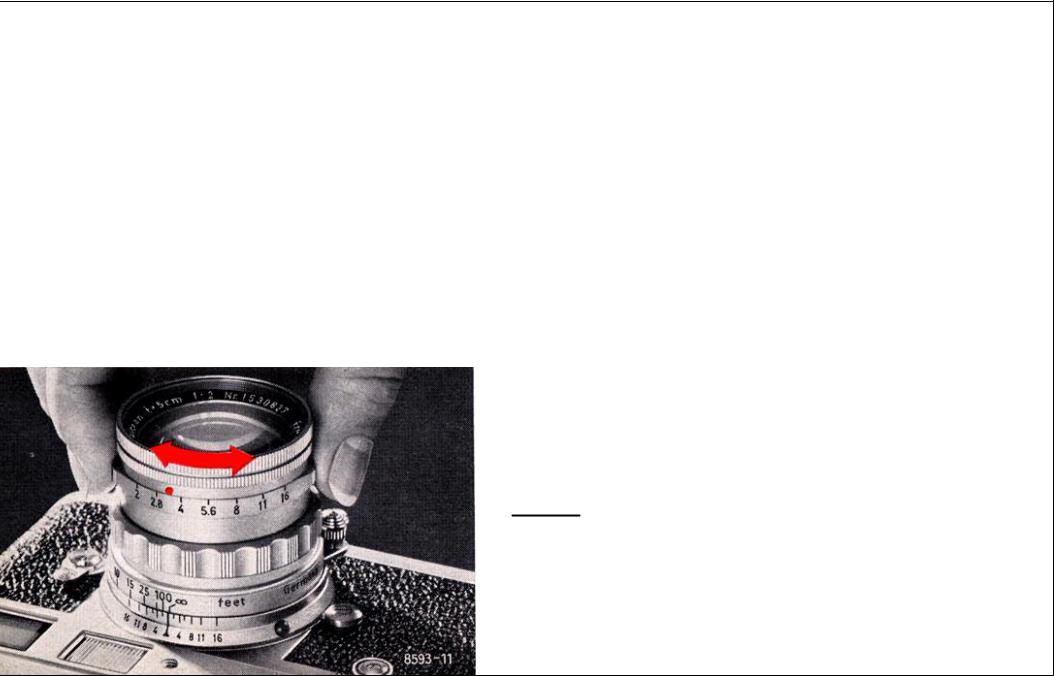
The Lens Aperture (11)
Turning the lens aperture ring opens or closes the iris diaphragm. This may easily be observed by looking into the front of the lens. Like the pupil of your eye which opens or closes to adapt itself to weaker or stronger light, the lens diaphragm is used to regulate the amount of light reaching the film. To cut down very bright light we "stop down" to a small lens aperture. In very dim light, on the other hand, we "open up" to a larger lens aperture which transmits more light to the film.
The aperture f/numbers (stops 1.4 — 2 — 2.8 — 4 — 5.6 — 8 — 11 — 16 — 22 — 32*) follow an internationally recognized scale. This scale has been designed in such a way that closing down the aperture one stop cuts the light passing through the lens to one half. Conversely, opening up one stop doubles the amount of light that will reach the film. One aperture interval on the lens corresponds to one shutter speed interval on the shutter speed selector
dial.
Remember: The larger the f/number, the smaller the aperture.
* The length of this scale depends on the lens type
6
Not For Resale – Free Download at http://homepage.ntlworld.com/joechan/manuals
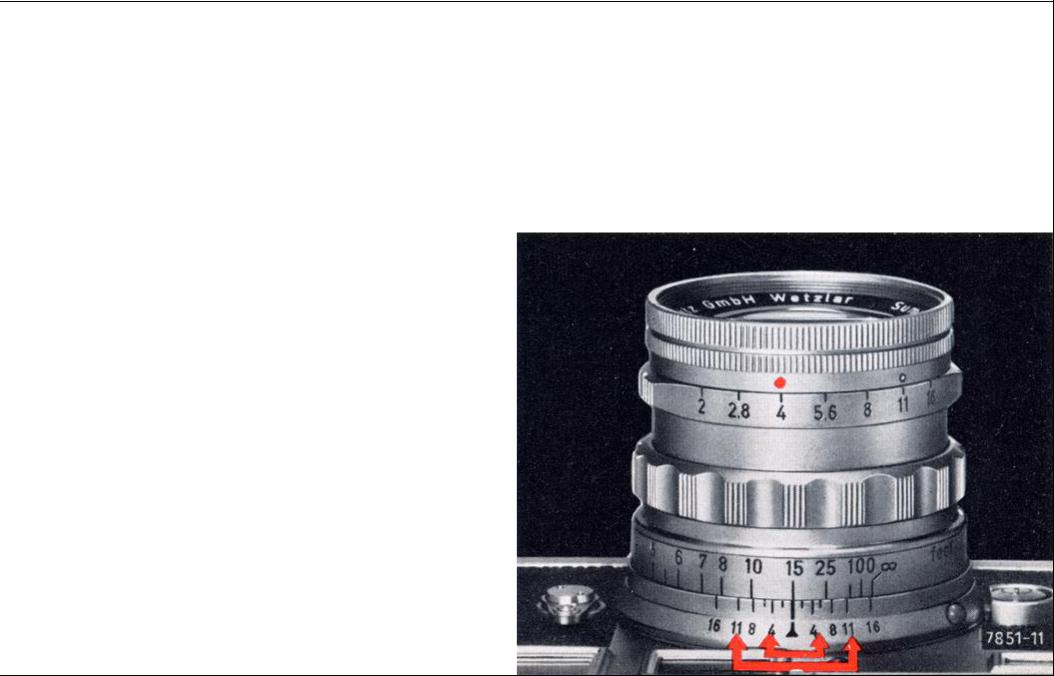
The Depth of Field Scale (8)
The sharpest parts of the image correspond to objects at the exact distance (in a plane parallel to the film) at which the lens is focused. This maximum sharpness gradually falls off in front of, and behind, the focused distance. There is, however, a certain zone of acceptable sharpness, known as the "depth of field." Its extent depends on the subject distance, the focal length of the lens, and the lens aperture used. Stopping
down increases the zone of sharpness, while the full aperture of highspeed lenses yields only limited depth of field.
The depth-of-field scale of every LEICA lens shows what depth you have available. At any aperture two index lines of the same aperture number indicate the limits of the sharp zone. If for instance (see illustration) you have set the 50mm Summicron f/2 lens to 15 feet, the available depth of field with an aperture of f/4 extends from about 121/2 to 20 feet. If, however, you stop down to f/11, the depth ranges from about 9 to 40 feet.
The depth of field can also be estimated with the rangefinder (see page 13).
7

Not For Resale – Free Download at http://homepage.ntlworld.com/joechan/manuals
The brilliant viewfinder field frames
of the LEICA M 2 automatically frame the subjects covered by the lens in use. The frames correspond to focal lengths of 35mm, 50mm, and 90mm. As the LEICA has an optical direct-vision finder, you see the subject all the time — even at the instant of exposure.The film records everything within the bright-line-frame.
The brilliant frame is coupled to the focusing movement, and automatically shifts to compensate for parallax errors over the entire focusing range. Shots with "cut-off" heads or feet are therefore a thing of the past!
This is what you see through the LEICA M 2's combined range-viewfinder when a 50mm lens is used.
8

Not For Resale – Free Download at http://homepage.ntlworld.com/joechan/manuals
9
 Loading...