


L2EVSE30
Electric Vehicle (EV) Charging Station
Station de chargement pour véhicules électriques
Estación de carga de vehículo eléctrico (EV)
USER GUIDE / GUIDE DE L’UTILISATEUR /
GUÍA DE USUARIO
Pour obtenir des informations techniques supplémentaires ou spécifiques à une application, appelez au 800-223-4185 ou visitez notre site Internet www. legrand.us/PassAndSeymour. Nous sommes impatients de mettre notre expertise à votre service.
Distribué par :
designed to be better.™
For additional technical or application-specific information, call 800-223-4185 or visit our website at www.legrand.us/PassAndSeymour. We’re eager to put our expertise to work for you.
Distributed by:
©2013 Legrand 341055 11/13
P.O. Box 4822
Syracuse, NY 13221-4822 800-776-4035 www.legrand.us/PassandSeymour
Legrand Canada
570 Applewood Crescent
Vaughan, ON, L4K 4B4
Phone: 905.738.9195, Fax: 905.738.9721 www.legrand.ca
designed to be better.™ |
www.legrand.us |
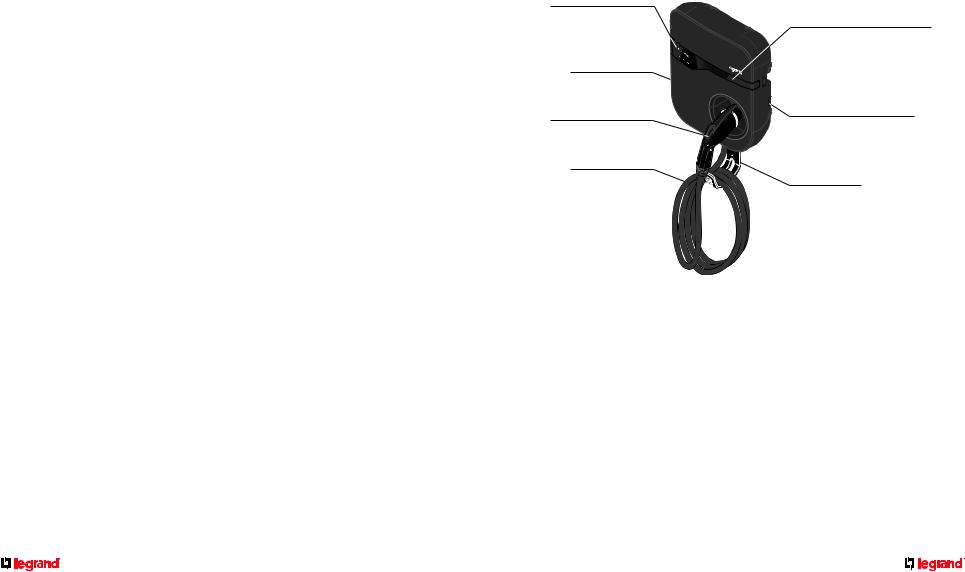
Table of Contents
Warnings and Notes . . . . . . . . . . . . . . . . . . . . . . . . . 1
EV Charging Station Mechanical Overview . . . . . . . . . . . . . . . . 2
Quick Start . . . . . . . . . . . . . . . . . . . . . . . . . . . . 2, 3
Status Indicator Display . . . . . . . . . . . . . . . . . . . . . . . 3
Delay Timer Indicator Flow . . . . . . . . . . . . . . . . . . . . . . 4
Features . . . . . . . . . . . . . . . . . . . . . . . . . . . . . . 5
Specifications . . . . . . . . . . . . . . . . . . . . . . . . . . . . 5
Limited One Year Warranty . . . . . . . . . . . . . . . . . . . . . . 6
Warnings and Notes
Read and understand all instructions before using charging station. The L2EVSE30 Charging Station should be connected to a 40A 208/240VAC, 60Hz grounded branch circuit.
Warning: Improper wiring of any electrical device can cause serious injury or death. These devices must be installed only by an electrician or other qualified person in accordance with all appropriate codes and standards. If you are not sure about any part of these instructions, consult a qualified electrician.
Warning: Shock, fire property damage, personal injury or death may occur if the charging station is not installed or used in accordance with the instructions and users guide.
Warning: There are no user-serviceable parts contained in this product. Any attempt to service this product may result in shock, fire, property damage, personal injury or death.
If you have any questions about the use of this product, contact your Legrand technical representative at: 800-223-4185.
INSTRUCTIONS PERTAINING TO THE RISK OF ELECTRIC SHOCK
This product should be supervised when used around children. Do not put fingers into the electric vehicle connector.
Do not use this product if the flexible power cord or EV cable is frayed, have broken insulation, or any other signs of damage.
Do not use this product if the enclosure or the EV connector is broken, cracked, open or show any other indication of damage.
CAUTION: To reduce the risk of fire, connect only to a circuit provided with 40 amperes maximum branch circuit overcurrent protection in accordance with the National Electrical Code, ANSI/NFPA 70.
User Guide instructions in French begin on page 7. User Guide instructions in Spanish begin on page 13.
1
EV Charging Station Mechanical Overview
The charging station is compliant with SAE J1772, and applicable for vehicles fitted with the standard SAE J1772 vehicle charge port and charging systems. The charging station (Figure 1) is comprised of a Charge Connector (a), a NEMA 3R rated enclosure (b), with a status indicator display (c), with a charge cable (d), with a cable hook (e).
The charging station is intended to be hardwired to a dedicated 40A 208/240VAC 60Hz grounded supply circuit by a licensed electrical installer. Installation permits may be required depending on the local codes.
Charge Delay Buttons
NEMA 3R Rated
Enclosure (b)
Charge Connector (a)
• SAEJ1772 compliant
Charge Cable (d)
Status Indicator (c)
•Ready (Green LED on)
•Charging (Green LED flashes)
•Fault (Red LED on)
AC Charger Power Switch
Cable Hook (e)
Figure 1
Quick Start
1.Turn on the AC Charger Power Switch located on the right side of the charger.
2.Check to see if your charging station is ready to charge by reviewing the indicator light located in the front panel. Review indicator display status on page 3 of the User Guide.
A solid green light indicates the station is ready to charge. A flashing green light indicates charging in progress.
A solid red light indicates that the charger is faulty. Stop using the charger and contact a service technician.
A flashing red light indicates the charger is recovering from a minor failure. Stop using the charger until the light turns solid green.
If the indicator lights on your charging station do not match the description above please consult the indicator display status section of the User Guide.
2

Quick Start (continued)
3.If your charging station is ready to charge, connect the charge connector to the vehicle’s charge port receptacle. While the vehicle is connected, the charge status indicator light will flash. Once the vehicle has been fully charged, the charging will automatically stop. If necessary, charging may be stopped before the vehicle is completely charged.
4.To stop charging, disconnect the vehicle plug and place it back in the charging station (Figure 2).
Figure 2
The charging station is equipped with a delayed start option that allows the startup of the charging to be delayed so the vehicle can be charged during off-peak hours. Select desired delay time by pressing the delay timing button. Change time by pressing again. Press stop button to cancel delay. Remove and re-insert charge plug into vehicle to restart charge sequence (see delay indicator chart on page 4).
Status Indicator Display
The charging station has a status indicator display as shown below.
FRONT PANEL LED BEHAVIOR |
DESCRIPTION |
DEFINITION |
||
|
|
|
|
|
|
|
|
|
Power is off. |
|
|
|
Off |
Use the switch on the side of the charger |
|
|
|
|
to turn on the power. |
|
|
|
|
|
|
|
|
|
Charger is turned on. |
|
|
|
Solid on |
Connect the charging cable to start |
|
|
|
|
charging. |
|
|
|
|
|
|
|
|
Flashing |
Charging in process |
|
|
|
||
|
|
|
|
|
|
|
|
Solid on |
Charger is faulty. |
|
|
|
Please stop using the charger and |
|
|
|
|
|
immediately contact Legrand tech support. |
|
|
|
|
|
|
|
|
Flashing on |
Charger is recovering from a minor failure. |
|
|
|
Please stop using the charger until the |
|
|
|
|
|
LED turns solid green. |
|
|
|
|
|
3
Delay Timer Indicator Flow
FRONT PANEL DELAY TIMER LED BEHAVIOR |
DESCRIPTION |
DEFINITION |
|
|
|
|
|
|
|
|
|
|
|
|
|
|
|
|
|
|
|
|
4 LEDs off |
Delay Timer is not enabled. |
|
2HR |
|
4HR |
|
6HR |
|
8HR |
|
|
||||||||||||
|
|
|
|
|
|
|
|
|
|
! |
|
|
|
|
|
|
|
|
4 LEDs flashing on |
The charger is ready and the |
|
|
|
|
|
|
|
|
|
|
|
|
|
|
|
|
|
|
|
|
|
||
|
|
|
|
|
|
|
|
|
|
|
|
|
|
|
|
|
|
|
|
||
|
2HR |
|
4HR |
|
6HR |
|
8HR |
delay timer can be set. |
|||||||||||||
|
|
|
|
|
|||||||||||||||||
|
|
|
|
|
|
||||||||||||||||
|
|
|
|
|
|
|
|
|
|
|
|
|
|
|
|
|
|
|
|
|
|
|
|
|
|
|
|
|
|
|
|
|
|
|
|
|
|
|
|
|
|
2HR LED solid on |
Delay Timer is set to 2 hours |
|
2HR |
|
4HR |
|
6HR |
|
8HR |
|
|
||||||||||||
|
|
|
|
|
|
|
|
|
|
|
|
|
|
|
|
|
|
|
|
|
|
|
|
|
|
|
|
|
|
|
|
|
|
|
|
|
|
|
|
|
|
2HR and 4HR |
Delay Timer is set to 4 hours |
|
|
|
|
|
|
|
|
|
|
|
|
|
|
|
|
|
|
|
|
LEDs solid on |
|
|
2HR |
|
4HR |
|
6HR |
|
8HR |
|
|||||||||||||
|
|
|
|
|
|
||||||||||||||||
|
|
|
|
|
|
|
|
|
|
|
|
|
|
|
|
|
|
|
|
|
|
|
|
|
|
|
|
|
|
|
|
|
|
|
|
|
|
|
|
|
|
2HR, 4HR, and |
Delay Timer is set to 6 hours |
|
|
|
|
|
|
|
|
|
|
|
|
|
|
|
|
|
|
|
|
6HR LEDs solid on |
|
|
2HR |
|
4HR |
|
6HR |
|
8HR |
|
|||||||||||||
|
|
|
|
|
|
||||||||||||||||
|
|
|
|
|
|
|
|
|
|
|
|
|
|
|
|
|
|
|
|
|
|
|
|
|
|
|
|
|
|
|
|
|
|
|
|
|
|
|
|
|
|
2HR, 4HR, 6HR, |
|
|
|
|
|
|
|
|
|
|
|
|
|
|
|
|
|
|
|
|
|
and 8HR LEDs |
Delay Timer is set to 8 hours |
|
2HR |
|
4HR |
|
6HR |
|
8HR |
solid on |
|
||||||||||||
|
|
|
|
|
|
|
|
|
|
|
|
|
|
|
|
|
|
|
|
|
|
|
|
|
|
|
|
|
|
|
|
|
|
|
|
|
|
|
|
|
|
2HR LED flashing |
Delay charging is enabled. |
|
|
|
|
|
|
|
|
|
|
|
|
|
|
|
|
|
|
|
|
||
|
|
|
|
|
|
|
|
|
|
|
|
|
|
|
|
|
|
|
|
Current delay time is less than 2 |
|
|
|
|
|
|
|
|
|
|
|
|
|
|
|
|
|
|
|
|
|
on |
|
|
2HR |
|
4HR |
|
6HR |
|
8HR |
|
hours. |
||||||||||||
|
|
|
|
|
|
|
|
|
|
|
|
|
|
|
|
|
|
|
|
|
|
|
|
|
|
|
|
|
|
|
|
|
|
|
|
|
|
|
|
|
|
2HR LED solid on |
Delay charging is enabled. |
|
|
|
|
|
|
|
|
|
|
|
|
|
|
|
|
|
|
|
|
||
|
|
|
|
|
|
|
|
|
|
|
|
|
|
|
|
|
|
|
|
||
|
|
|
|
|
|
|
|
|
|
|
|
|
|
|
|
|
|
|
|
and 4HR LED |
Current delay time is 2 - 4 hours. |
|
|
|
|
|
|
|
|
|
|
|
|
|
|
|
|
|
|
|
|
||
|
2HR |
|
4HR |
|
6HR |
|
8HR |
flashing on |
|||||||||||||
|
|
|
|
|
|||||||||||||||||
|
|
|
|
|
|
|
|
|
|
|
|
|
|
|
|
|
|
|
|
|
|
|
|
|
|
|
|
|
|
|
|
|
|
|
|
|
|
|
|
|
|
2HR and 4HR |
Delay charging is enabled. |
|
|
|
|
|
|
|
|
|
|
|
|
|
|
|
|
|
|
|
|
||
|
|
|
|
|
|
|
|
|
|
|
|
|
|
|
|
|
|
|
|
LEDs solid on, |
|
|
2HR |
|
4HR |
|
6HR |
|
8HR |
6HR LED flashing |
Current delay time is 4 - 6 hours. |
||||||||||||
|
|
|
|
on |
|
||||||||||||||||
|
|
|
|
|
|
|
|
|
|
|
|
|
|
|
|
|
|
|
|
|
|
|
|
|
|
|
|
|
|
|
|
|
|
|
|
|
|
|
|
|
|
2HR, 4HR, and |
Delay charging is enabled. |
|
|
|
|
|
|
|
|
|
|
|
|
|
|
|
|
|
|
|
|
||
|
|
|
|
|
|
|
|
|
|
|
|
|
|
|
|
|
|
|
|
6HR LEDs solid |
|
|
2HR |
|
4HR |
|
6HR |
|
8HR |
on, 8HR LED |
Current delay time is 6 - 8 hours. |
||||||||||||
|
|
|
|
flashing on |
|
||||||||||||||||
4
 Loading...