


XG-20

XG-20
Instruction Manual
1.0 Introduction
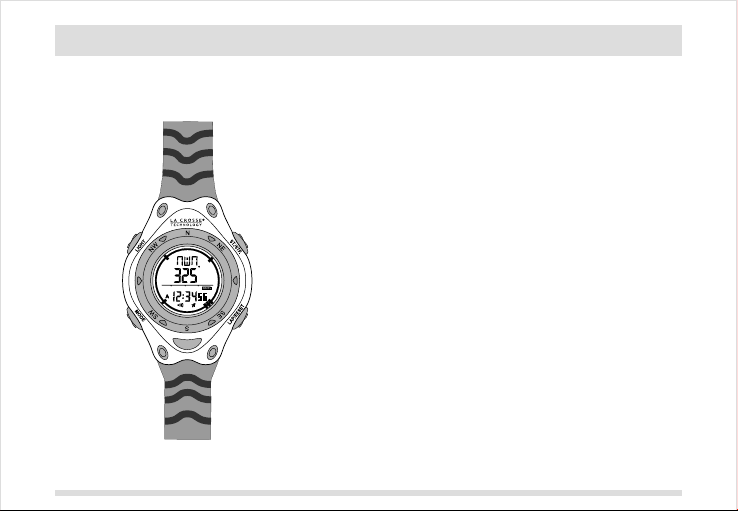
Thanks for your purchase of the XG-20.
XG-20 features electronic sensors that measures
Your
the compass directions.
Your
XG-20 provides directions to you at the time
while you are hiking, climbing and doing other
activities.
Your XG-20
countdown timer, dual time and
Your
outdoor activities, in order to utilize the features of your
watch, it is advisable to read the following instructions:
-
Read the instruction before you use the XG-20.
- Avoid exposing your XG-20 to extreme
- Avoid rough uses or severe impacts to your
-
- Clean your XG-20 with a soft cloth occasionally to
- Keep your XG-20 away from magnets or
- Store your XG-20 in a dry place when it is not in use.
also includes normal time, daily alarm,
XG-20
conditions for an unreasonable time.
XG-20
.
Do not open the XG-20's case unless a
certified service agency because your XG-20
contains precise electronic sensor and
increase the life of your watch.
appliances which contain magnetic objects such as
mobile phones, speakers and motors.
chronograph.
is carefully designed and produced for
components.
outdoor
2 4
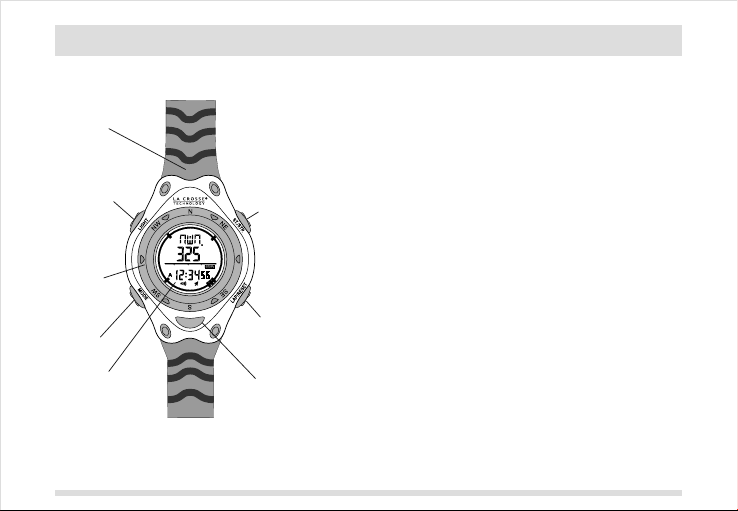
2.0 Parts and Its Functions
pu strap
light
button
besel
mode
button
display
start/stop
button
compass
light
button
Mode Button
- To select between various modes: Current Time, Alarm
Time, Chronograph, Lap Memory Recall, Countdown
Timer and Dual Time Mode.
- Press and hold for 2 seconds to change to the setting
displays in various modes.
- To select among items to be set during the setting
sequence.
- To select between normal compass bearing and
backward bearing display in Compass Mode.
Start/Stop Button
- To start/stop the timer/chronograph.
- To lock/unlock the compass bearing.
- To increase the number during setting sequences.
- To review the lap memories by forward reviewing
Compass Button
- To select between Current Time and Compass Mode.
- To decrease the number during setting sequences.
- To select Lap/reset function in Chronograph Mode.
- To reset the timer in Countdown Timer Mode.
Light Button
- Press once to turn on the EL back light for about 3
seconds.
- Press and hold for 2 seconds to enable/disable auto
light. If auto light is enabled, pressing any button will
turn on the back light for about 3 seconds.
3
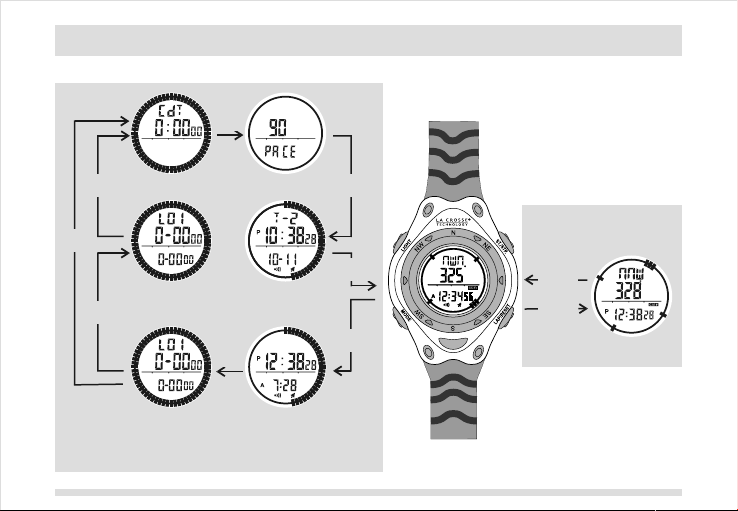
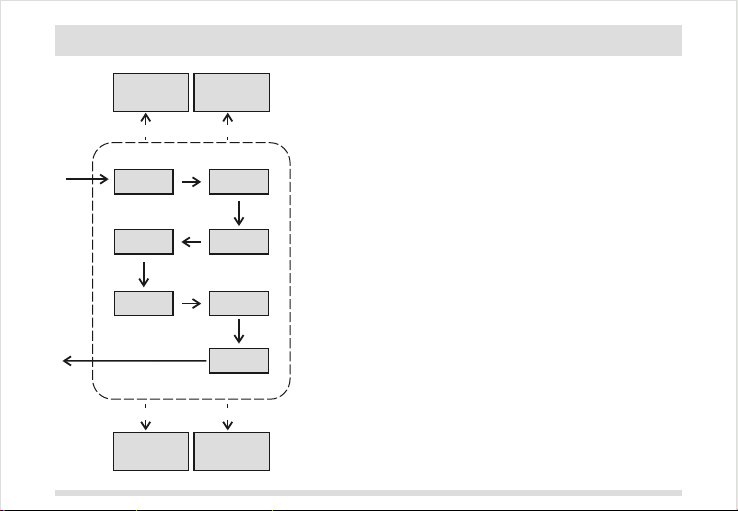
3.0 Major Function Modes
mode
button
mode
Countdown
button
Timer Mode
*1
mode
button
mode
button
Remarks1:
If the chronograph is running, the Lap Memory Recall Mode will be reserved for the lap
memory recording, hence it can not be reviewed during this period of time.
REC
CH
Lap Memory
Recall Mode
CH
Chronograph
Mode
mode
button
Pacer Mode
Dual Time Mode
AL
Alarm Mode
mode
button
TM
mode
button
mode
button
Current Time Mode
compass
button
compass
button
Compass Mode
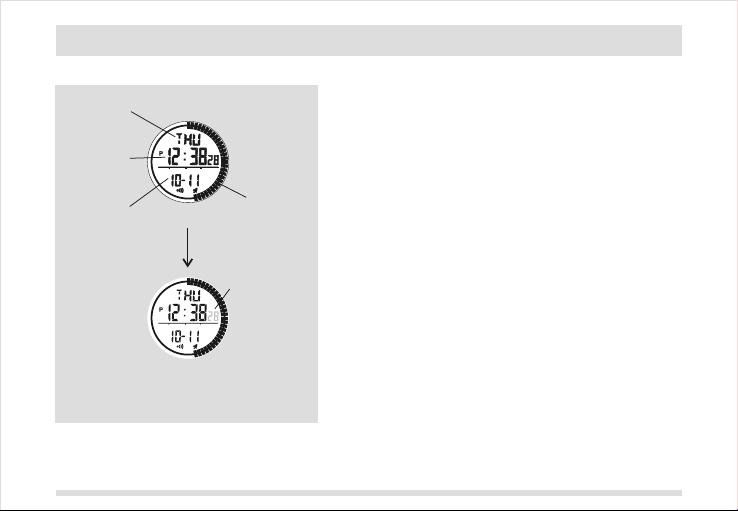
4.0 Current Time Mode - Current Time & Calendar
Current Time Mode
day of week
current time
(hour:minute
second)
Calendar
(month-day)
TM
Current Time Mode
hold
mode
Current Time Setting Mode
Current Time Setting
TM
digits have been
selected (flashing)
analog
second
- The 1st row of the display shows the day of week.
- The 2nd row of the display shows the current time:
hour, minute and second.
- The 3rd row of the display shows the calendar: month,
day.
- The indicators around the display show the current time
in 1 second resolution.
5
4.1 Current Time Mode - Setting Current Time & Calendar
Increase
the number
start/stop button
hold
mode
second
year
mode
button
day
Current Time Setting Sequence
compass button
decrease
the number
Current Time Setting Sequence
a higher speed
hold start/stop
mode
button
mode
button
mode
button
mode
button
a higher speed
increase the
number at
minute
hour
month
12/24
hour format
hold compass
decrease the
number at
mode
button
mode
button
To Set the Current Time and Date
- To set the current time and the date, press and
hold the [mode] button for 2 seconds to change the
display from the Current Time Mode to Current Time
Setting Mode.
- The second digits flash on the display because they are
being selected.
The Setting Procedures
- Press [mode] button to change the selections following the
Current Time Setting Sequence shown on the left.
- If the digits are flashing, press the [start/stop] button to
increase the number; hold the [start/stop] button
to change the number at a higher speed. Press the
[compass] button to decrease the number; hold
the [compass] button to change the number at a higher
speed.
- While 12/24 hour format setting is selected, press
the [start/stop] or [compass] button once to select between
12 or 24 hour format.
- After you set the current time, calendar and 12/24 hour
format, press the [mode] button to exit the Current Time
Setting Sequence.
- If no key-stoke has been activated for 30 seconds, the
setting display will return to Current Time Mode.
6
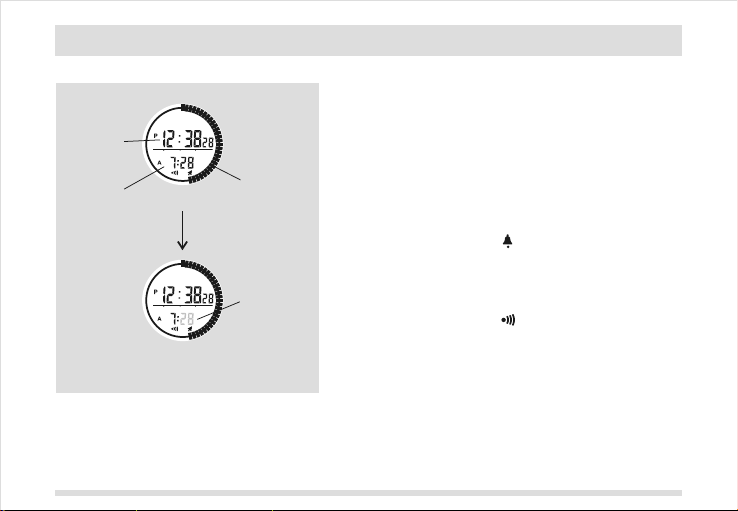
5.0 Alarm Time Mode - Setting the Alarm and Chime On/Off
Alarm Time Mode
- The 2nd row of the display shows the current time:
hour, minute and second.
current time
(hour: minute,
second)
alarm time
(hour-minute)
AL
Alarm Time Mode
hold
mode
AL
Alarm Time Setting Mode
Alarm Time Setting
analog
second
digits have been
selected
(flashing)
- The 3rd row of the display shows the alarm time: hour,
minute.
- The indicators around the display show the
current time in 1 second resolution.
To Set the Chime ON/OFF
- Press the [compass] button to change the ON/OFF status
of the hourly chime, in the Alarm Time Mode.
- When the chime indicator is shown (chime ON), the
XG-20
beeps every hour on the hour
To Set the Alarm ON/OFF
- Press the [start/stop] button to change the ON/OFF
status of the alarm, in the Alarm Time Mode.
- When the alarm indicator is shown (alarm ON), the
sounds at the pre-set alarm time every day.
XG-20
.
7
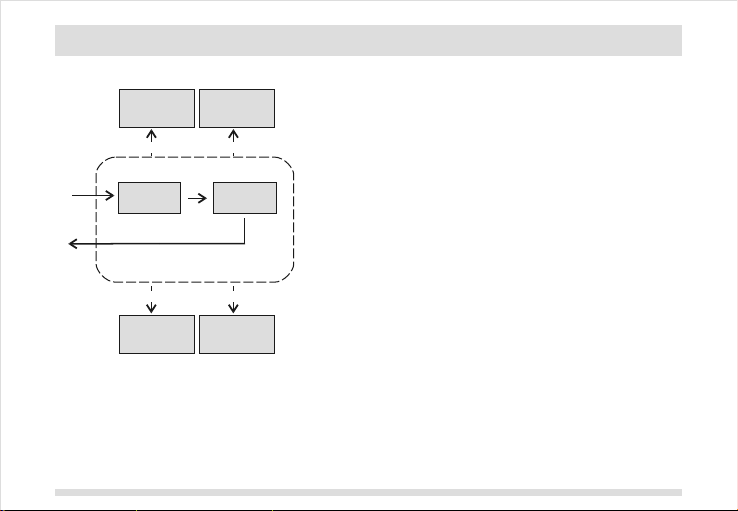
5.1 Alarm Time Mode - Setting the Alarm Time
To Set the Alarm Time
Increase
the number
start/stop button
hold
mode
minute
Alarm Time Setting Sequence
compass button
decrease
the number
Alarm Time Setting Sequence
a higher speed
hold start/stop
mode
button
mode
button
a higher speed
increase the
number at
hour
hold compass
decrease the
number at
- Press and hold the [mode] button for 2 seconds to change
from Alarm Time Mode to Alarm Time Setting Mode.
- The minute digits flash on the display because it is being
selected.
The Setting Procedures
- Press [mode] button to change the selection following the
Alarm Time Setting Sequence shown on the left.
- If the digits are flashing, press the [start/stop] button to
increase the number; hold the [start/stop] button
to change the number at a higher speed. Press the
[compass] button to decrease the number; hold the
[compass] button to change the number at a higher speed.
- After you set the alarm time, press the [mode] button to
exit the setting sequence.
- If no key-stoke has been activated for 30 seconds, the
setting display will auto return to Alarm Time Mode.
8
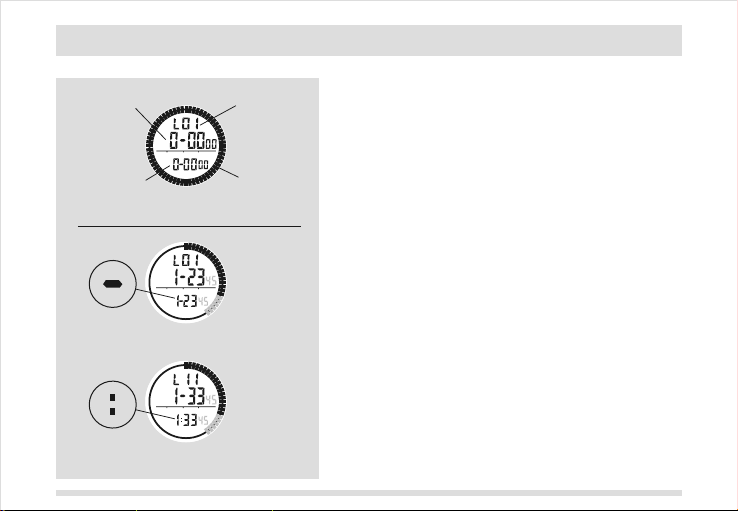
6.0 Chronograph Mode - Chronograph 'All Zero' Mode
Chronograph Mode
lap time
accumulative
'elaspsed' time
'hyphen'
separator
'colon'
separator
CH
Chronograph
'all zero' Mode
CH
CH
lap number
1/10 second
Chronograph Mode
(chronograph time is
not longer than 1 hour)
Chronograph Mode
(Chronograph time is
longer than 1 hour)
- The Chronograph measures elapsed times and lap times.
- The display shows the 'All Zeros' Mode if the
chronograph has been selected the first time or the
chronograph has been reset.
- The 1st row of the display shows the current lap number
of the chronograph.
- The 2nd row of the display shows the lap time: minute,
second and 1/100 second.
- The 3rd row of the display shows the accumulated
running time: minute, second and 1/100 second.
NOTE: if the accumulated time is long than 1 hour, the display
shows chronograph time in hour, minute and second instead
of minute, second and 1/100 second.
- The indicators around the display shows the
chronograph time in 1/10 second.
NOTE: The maximum counting range of the chronograph is 9
hours 59 minutes and 59 seconds, hence the chronograph
will count continuously until it counts to that value or the
[start/stop] button is pressed.

9
6.1 Chronograph Mode - Start/Stop the Chronograph
To Start/Stop the Chronograph
- When the chronograph is stopped, press the [start/stop]
button once to start the chronograph; press the
[start/stop] button once again to stop the chronograph.
- The elapsed time between the two 'start/stop'
keystrokes will be shown on 3rd row of the
display.
- Repeat the above steps to get the
accumulated time the chronograph is running.
*
To Reset the Chronograph
-To record a new set of elapsed time, press and hold
the [compass] button for 2 seconds to reset the
chronograph to 'All Zeros' display when the
chronograph is stopped.
NOTE: If you reset the chronograph, the lap memory will be
reset at the same time.
hold
compass
CH
start/stop
CH
start/stop
start/stop
Chronograph
'all zero' Mode
Chronograph
'Running' Mode
lap time
accumulative
'elapsed' time
lap number
CH
1/10 second
Chronograph
'Stop' Mode
10
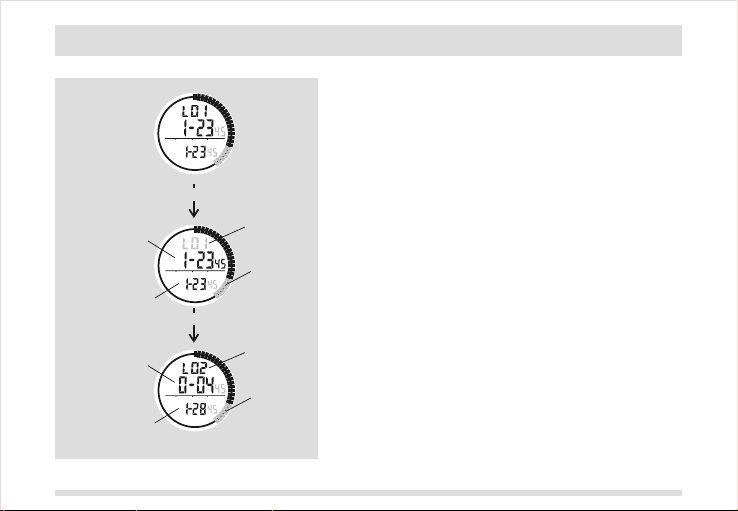
6.2 Chronograph Mode - Record Lap Time
To Record Lap Memory
- The Chronograph Mode allows you to record
lap memory (maximum 42 lap memories).
- Press the [compass] button once to record the lap
memory while the chronograph is running.
- The lap number will be flashing on the 1st row of the
display.
- The lap time is displayed on the 2nd row of
the display for 5 seconds, then it shows the 'elapse' time
since the [compass] button has been pressed.
- The accumulated 'elapse' time will be displayed on the 3rd
row of the display.
-While the lap number and lap time are displaying, the
chronograph keeps running.
- Repeat the steps mentioned above to get another set of
lap memory.
To Reset Lap Memory
- Press and hold the [compass] button for 2 seconds to reset
the lap memory in the Chronograph Mode while the
chronograph was stopped.
lap time
accumulative
'elapsed' time
'elaspe' time
since the
[ ] button
compass
has been pressed
accumulative
'elapsed' time
CH
compass
CH
5 seconds
CH
Chronograph
'Running' Mode
lap number
1/10 second
Chronograph
'Lap' Mode
lap number
1/10 second
Chronograph
'Running' Mode
 Loading...