


WT-8029U
RADIO-CONTROLLED SOLAR CLOCK
INSTRUCTION MANUAL
Contents
Languages Page
__________________________________________
English |
2 |
French |
18 |
Spanish |
36 |
1
TABLE OF CONTENTS
Topic |
Page |
Features |
3 |
Battery Installation |
3 |
Setting Up |
5 |
Atomic time - WWVB Radio Controlled Time |
5 |
Function keys |
6 |
LCD Screen |
7 |
Manual Settings |
7 |
Alarm setting and snooze |
11 |
Mounting |
12 |
Care and maintenance |
14 |
Specifications |
15 |
Warranty |
16 |
FEATURES:
RADIO-CONTROLLED SOLAR CLOCK:
LCD1 |
display |
LCD2 |
display |
Solar |
panel |
Wall Mount |
Location |
Function keys |
Battery cover |
Foldable |
stands |
2
WWVB Radio controlled time with manual time setting
Time display: hour, minute, second
12/24h time format display
Alarm setting with snooze function
Calendar display
Weekday display (4 languages to choose from: English, Spanish, French, German)
Time zone setting
Daylight savings time ON/OFF option (DST)
Solar mode setting
Indoor temperature display in ºF/ ºC selectable
Indoor humidity display in RH%
Primary Alkaline battery or rechargeable Alkaline battery selection
Low battery indicator
Wall mount or freestanding
TO INSTALL / REPLACE BATTERY
The solar clock can use either the included 1 x alkaline rechargeable battery (charged by solar panel) or 1 x AA alkaline battery (non-rechargeable; not included).
INITIAL SETUP
It is very important to follow these steps:
1.First, remove the label covering over the battery compartment on the back.
2.Open the battery compartment, and MAKE SURE that the battery switch is in the BATTERY position (not the SOLAR position).
Battery switch in the BATTERY position
3.Now locate the battery insulator tab, and gently pull to remove it.
4.Slide the battery switch to the SOLAR position
5.Battery switch in the SOLAR position
6.Continue to section titled “Setup After Changing/Installing the Battery”
3
TO INSTALL / REPLACE BATTERY
The included alkaline rechargeable battery should provide you with many years of service. If your battery needs to be replaced, we suggest you use a fully charged AA Alkaline.
Rechargeable batteries should be fully charged before inserting into clock. Alkaline rechargeable batteries are recommended.
If you choose to use a non-rechargeable battery, the battery switch MUST be moved to the BATTERY position (not the SOLAR position). In this position, the solar cells do not charge the battery.
REGARDLESS OF THE TYPE OF BATTERY INSTALLED, THE BATTERY SWITCH MUST BE IN THE BATTERY POSITION WHEN THE BATTERY IS INSERTED.
If a rechargeable battery is used, the Battery switch should be moved to the SOLAR position AFTER it is has been inserted.
To use the included rechargeable Alkaline battery
(charged by solar panel):
1.It is important to allow sufficient light to reach the solar panel while activating the solar clock. Make sure the lights are on in the setup room and the solar panel is facing a 60W light bulb or brighter - do not cover with hands or other objects.
2.Replace battery cover
3.Remove the black protective foil on the solar panel.
DO NOT SET THE CLOCK.
To use a non-rechargeable Alkaline battery:
1.Remove the included rechargeable AA battery from the compartment.
2.Use the switch to select the alkaline battery (see below).
4
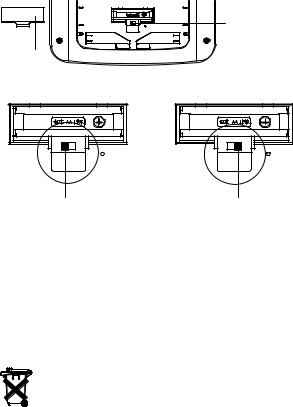
|
Use switch to |
|
select which |
|
type of battery |
|
will be used |
Battery |
before |
inserting the |
|
compartment |
battery into |
cover |
the |
|
compartment |
Primary Alkaline |
Rechargeable Alkaline |
battery switch position |
battery switch position |
3.Insert 1 x AA Alkaline battery into the compartment, observing the correct polarity (see marking inside battery compartment.
4.Replace battery cover
DO NOT SET THE CLOCK.
Note: For best performance, batteries should be replaced at least once every 2 years to maintain the best running accuracy. Ensure that the batteries used are new and the correct size.
Please help in the preservation of the environment and return used batteries to an authorized depot.
SETUP AFTER CHANGING/REPLACING THE BATTERY
1.After powering up the solar clock, all LCD segments will light up briefly and it will show the time (12:00), indoor temperature, date, and indoor humidity.
5
2.Next the WWVB time code reception will automatically start. This reception typically takes 10 minutes in good conditions. If after 10 minutes the WWVB time has not been received, use the “SET” key to enter the set-up mode to manually set the Time, Time Zone and Date (see manual settings below). The clock will continue to search for WWVB each hour between 12am and 6am. When the clock has successfully connected with WWVB, it will override the manually set time and date.
Note: When changing the battery:
1.Be careful that it does not spring free from the contacts.
2.Press any button 20 times with the battery removed.
3.Always wait at least 10 minutes after removing battery before re-inserting; otherwise start up problems may occur.
WWVB RADIO CONTROLLED TIME
The NIST radio station, WWVB, is located in Ft. Collins, Colorado and transmits the exact time signal continuously throughout the United States at 60 kHz. The signal can be received up to 2,000 miles away through the internal antenna in the atomic clock. However, due to the nature of the Earth’s Ionosphere, reception is very limited during daylight hours. The atomic clock will search for a signal every night when reception is best. The WWVB radio station derives its signal from the NIST atomic clock in Boulder, Colorado. A team of atomic physicists continually measures every second of every day to an accuracy of ten billionths of a second a day. These physicists have created an international standard, measuring a second as 9,192,631,770 vibrations of a Cesium 133 atom in a vacuum. This atomic clock regulates the WWVB transmitter.
After 15 minutes the WWVB tower icon in the clock display will start flashing in the top center of the LCD. This indicates the clock has detected a radio signal and is trying to receive it. When the time code is received, the WWVB tower becomes permanently lit and the time will be displayed.
6
 Loading...