


Instruction manual  Mode d’emploi
GB/F
|
Introduction |
Introduction |
|
Preperations of |
Camera |
Préparatifs |
d’appareil photo |
Basic |
Operations |
Démarches de |
base |
Shooting |
Technique |
Technique de |
prise de vue |
s / m
p
Please purchase “Secure Digital (SD) Memory Cards” or “Multi-Media Cards*” (MMC) for use with this camera. These cards are referred to in these User’s Manuals as “Memory Cards.”
*MultiMediaCard is a registered trademark of Infineon Technologies AG (Germany), licensed to MMCA (MultiMediaCard Association).
Faites l’acquisition de “Cartes Mémoire Secure Digital” (SD) ou de “Cartes MultiMedia*” (MMC) que vous utiliserez dans cet appareil. Dans le présent manuel, ces cartes sont appelées “Cartes Mémoire”.
*MultiMedia Card est une marque déposée de Infineon Technologies AG (Allemagne),
accordée sous licence à MMCA (MultiMediaCard Association).
|
SET UP |
Appendix |
Annexe |
ENGLISH
FRANÇAIS
Introduction
Introduction
Thank you for purchasing this Kyocera product.
The KYOCERA Finecam L4 and Finecam L3 are digital cameras equipped with a 3x optical zoom lens for high performance and high quality digital still photography.
For the operation of the camera, please read this User’s Manual carefully and follow its instructions to assure proper use.
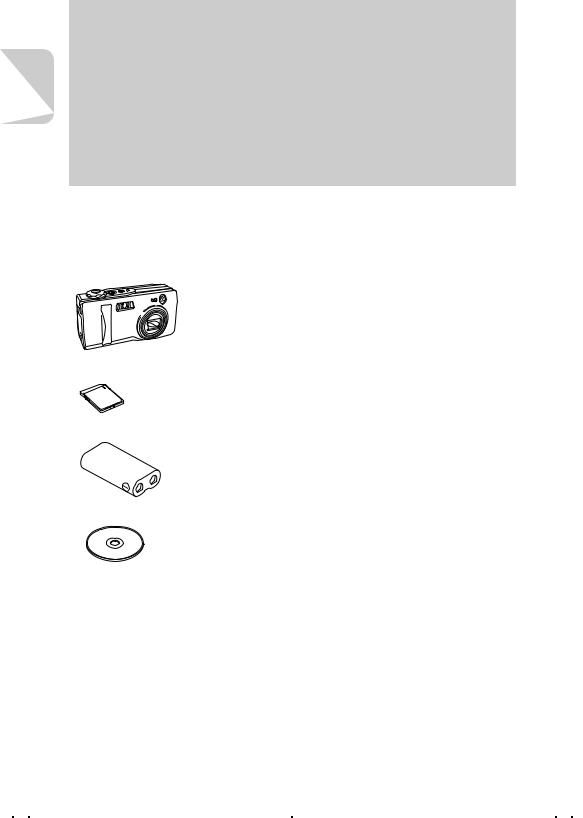
Check the Contents
Make sure all the items below are included in the box.
Digital camera “Finecam L4” or “Finecam L3”
Memory card (SD Memory Card) (page 14)
●User’s Guide (this book)
●Quick Start Guide
●USB cable (for the connection to PC) (page 31)
●Hand strap (page 13)
Lithium battery pack (CR-V3) (page 14)
CD-ROM
(for the driver software)
2

Introduction
How to Use this Manual
The section “Introduction” contains important information regarding the camera and this User’s Manual as well as precautions on handling the camera.
The section “Preparation of Camera” contains instructions on what to do before using the camera.
The section “Basic Operations” describes basic operations of the digital camera such as shooting, viewing, and erasing images. If you use a digital camera for the first time, read these sections carefully in order to learn how to use it properly.
The section “Shooting Technique” describes how to bring the camera into focus or how to take a picture using the viewfinder in order to use this camera perfectly.
The section “Using the Camera “s” Mode and Movie “m” Mode Functions” contains information on using functions which are set before shooting images. Such functions include the flash and exposure compensation. This section is intended for those who have understood the basic operations of the camera and have become used to shooting operations.
The section “Using Playback “p” Mode Functions” describes how to use functions used for viewing images as well as functions that allow simple image processing such as resizing images and rotating images by 90°.
The section “Using Setup “SET UP” Mode Functions” describes functions, such as specifying the memory card format and setting the date. These functions may be used infrequently, but are otherwise useful and important.
The section “Appendix” contains a troubleshooting guide for solving problems with the camera and camera specifications.
zThe digital camera is referred to in this User’s Manual as “camera”.
*Before You Begin... This camera is an electronic device which uses a high-performance IC. The heat emitted from the IC may make the camera warm during use. It is not a failure.
Introduction
3

Introduction
Contents |
|
Introduction............................................................................. |
2 |
Check the Contents.................................................................................. |
2 |
How to Use this Manual ........................................................................... |
3 |
Handling Precautions ............................................................................... |
8 |
Functions of this Camera ....................................................................... |
11 |
Camera........................................................................................................... |
11 |
System Around the Camera ........................................................................... |
12 |
Names of Parts ...................................................................................... |
13 |
■ Attaching the Hand Strap............................................................................ |
13 |
Preparation of Camera ......................................................... |
14 |
1 Loading the Memory Card and Inserting the Battery Pack............................. |
14 |
Removing the memory card ........................................................................... |
15 |
Write Protect Switch (SD Memory Cards only) .............................................. |
15 |
The AA batteries may also be used. .............................................................. |
15 |
2 Turning the Power ON.................................................................................... |
16 |
■ Battery indicator and replacing time............................................................ |
16 |
3 Setting the Date and Time.............................................................................. |
16 |
Basic Operations .................................................................. |
18 |
Taking a Picture (Shooting Still Images) ................................................ |
18 |
Holding the Camera Steady ........................................................................... |
20 |
LED Displays after Shooting .......................................................................... |
20 |
Shutter Release Button Half-way Down ......................................................... |
20 |
Using (+) and (–) buttons................................................................................ |
21 |
Let’s Shoot Movies too........................................................................... |
22 |
Checking the Pictures (Playback of Images) ......................................... |
23 |
Checking Image Information .......................................................................... |
24 |
Movie Display ................................................................................................. |
24 |
Display during Movie Playback ...................................................................... |
24 |
Erasing Unwanted Images ..................................................................... |
25 |
Using the directional keypad and execute button........................................... |
26 |
When the Memory Card is Full............................................................... |
27 |
Connecting to a PC................................................................................ |
28 |
Installing the USB Driver ................................................................................ |
29 |
Connecting the USB Cable to your PC .......................................................... |
31 |
Viewing the Images on Your PC .................................................................... |
33 |
Printing Digital Images with a Dedicated Printer .................................... |
38 |
Shooting Technique ............................................................. |
41 |
Shooting Images Using Focus Lock....................................................... |
41 |
Subjects that are Hard to Bring Into Focus .................................................... |
42 |
Shooting Images Using Zoom (optical zoom and digital zoom) ............. |
42 |
Saving Power by Shooting Images Using the Viewfinder ...................... |
43 |
How to Use the Display Button .............................................................. |
44 |
4

|
|
|
|
Introduction |
|
|
|
|
|
|
|
Using the Camera “s” Mode and Movie “m” Mode |
|
||||
Functions ............................................................................ |
45 |
||||
Using Flash Functions............................................................................ |
45 |
||||
|
|
|
|
What is red-eye phenomenon? ...................................................................... |
47 |
[ |
|
|
|
] Macro and Landscape Photography.......................................... |
48 |
|
|
|
|
Avoiding Camera Shake................................................................................. |
49 |
|
|
|
|
What is Parallax? ........................................................................................... |
49 |
[t] Using the Self-Timer ........................................................................ |
50 |
||||
[ |
|
|
|
] Selecting Image Dimensions (Pixels) |
51 |
|
|||||
|
|||||
[ |
|
|
|
......................................] Setting Image Quality (File Compression) |
52 |
|
|
|
|
Recording Capacity Based on Image Dimensions (Pixels) and Quality......... |
53 |
|
|
|
|
Guidelines for selecting image dimensions (pixels) and quality ..................... |
53 |
[ |
|
|
|
] Exposure Compensation ................................................................ |
54 |
|
|
|
|
Guidelines for using exposure compensation ................................................ |
54 |
[WB] White Balance Setting ................................................................... |
55 |
||||
[sM]/[mM] [COLOR MODE] — Selecting Color, B/W or Sepia Mode.. 56
[sM][CHROMA] — Changing the Contrast........................................... |
57 |
[sM][SHARPNESS] — Sharpening the Outline.................................... |
58 |
[sM]/[mM][WB PRESET] — Setting White Balance Manually ............. |
59 |
[sM][AE MODE] — Selecting the Exposure Mode ............................... |
60 |
[sM]/[mM][FOCUSING] — Selecting the Focus Mode ........................ |
61 |
[sM][LONG EXP.] — Slowing the Shutter Speed................................. |
63 |
[sM][ISO] — Changing ISO Sensitivity to Shoot Subjects ................... |
64 |
[sM][METERING] — Selecting the Area to be Exposed ...................... |
65 |
[sM][DIGITAL ZOOM] — Using Digital Zoom or Not............................ |
66 |
Using Playback “p” Mode Functions ................................ |
67 |
[MULTI] Multiple Image Playback .......................................................... |
67 |
[PROTECT] Protecting Images from being Erased................................ |
70 |
[ERASE] Erasing Individual Images....................................................... |
70 |
[ERASE ALL] Erasing All Images........................................................... |
71 |
[RESIZE] Resizing and Trimming Images.............................................. |
72 |
[ROTATE] Rotating Images ................................................................... |
74 |
[AUTO PLAY] Automatic Playback ........................................................ |
75 |
[PRINT] Digital Print Order Format (DPOF) Setting............................... |
76 |
A Useful Way to Erase Images Using the Protect and |
|
All Erase Functions ..................................................................................... |
79 |
Introduction
5

Introduction
Introduction |
|
Using Setup “SET UP” Mode Functions............................. |
80 |
[BRIGHT CNTRL] Setting Brightness of the LCD Monitor ..................... |
80 |
[INSERT DATE] Setting to Write the Date in the Image ........................ |
81 |
[FORMAT] Formatting the Memory Card ............................................... |
82 |
[POWER SAVE] Saving Power by Turning Power Off Automatically .... |
82 |
[MODE LOCK] Preserving the Mode Settings ....................................... |
84 |
[BEEP] Turning ON or OFF the [Electronic] focusing beeps and |
|
shutter release sound ...................................................................... |
84 |
[CUSTOM SET.] Setting a function to the (+) and (–) button................. |
85 |
[COLOR SELECT] Setting the Color of Menu Display........................... |
88 |
[START SCREEN] Selecting the Startup Screen................................... |
89 |
[REC REVIEW] Reviewing the Image Just after Shooting..................... |
90 |
[LANGUAGE] Selecting the Display Language...................................... |
90 |
[FILE NO.] Resetting the File Number to 0001 ...................................... |
91 |
[MODE RESET] Restoring Default Settings of Functions ...................... |
92 |
Appendix ............................................................................... |
93 |
Troubleshooting ..................................................................................... |
93 |
List of Menus and Icons Displayed on the LCD Monitor ........................ |
96 |
LED Indication and Camera Status........................................................ |
99 |
List of Menu modes that can be locked and default settings ............... |
101 |
Optional Accessories ........................................................................... |
102 |
Pay attention to your selection of [LONG EXP.] and [ISO]. ................. |
103 |
Specifications ....................................................................................... |
104 |
6

Introduction
FCC COMPLIANCE STATEMENT FOR AMERICAN USERS
DIGITAL STILL CAMERA CONTAX Tvs DIGITAL
Tested To Comply With FCC Standards
FOR HOME OR OFFICE USE
FCC Statement
This device complies with Part 15 of the FCC Rules. Operation is subject to the following two conditions:
(1)This device may not cause harmful interference, and (2) this device must accept any interference received, including interference that may cause undesired operation.
NOTE
This equipment has been tested and found to comply with the limits for a Class B digital device, pursuant to Part 15 of the FCC Rules. These limits are designed to provide reasonable protection against harmful interference in a residential installation.
This equipment generates, uses and can radiate radio frequency energy and, if not installed and used in accordance with the instructions, may cause harmful interference to radio communications. However, there is no guarantee that interference will not occur in a particular installation. If this equipment does cause harmful interference to radio or television reception, which can be determined by turning the equipment off and on, the user is encouraged to try to correct the interference by one or more of the following measures:
●Change the direction of the radio or TV antenna. Move the equipment or the radio or TV. For example, if the equipment is to the right of the TV, move it to the left of the TV. Or, move the equipment farther away from the radio or TV.
●Plug the equipment into a different outlet. Do not plug your radio or TV into the same circuit as your equipment.
●Ensure that all expansion slots (on the back or side of the equipment) are covered. Also, ensure that all metal retaining brackets are tightly attached to the equipment.
●If these suggestions do not help, consult your equipment dealer or experienced radio/TV technician for help.
CAUTION
If you modify the camera in any way, without getting approval from KYOCERA CORPORATION, your camera may violate FCC regulations. Violation of FCC regulations may cause the FCC to void your right to use the modified camera.
Shielded cables must be used for this equipment to comply with the relevant FCC regulation.
For customers in Canada CAUTION
This Class B digital apparatus complies with Canadian ICES-003.
Cet appareil numerique de la classe B est conforme à la norme NMB-003 du Canada
Introduction
7
Introduction
Introduction |
Make sure to read this page carefully. |
|
|
Caution and Warning Symbols
These Operating Instructions feature the following caution and warning symbols to indicate items of special importance. Be sure to read the contents of these warnings carefully, and use the features correctly.
This symbol indicates procedures which have a high likelihood of resulting in death or
serious personal injury if not followed properly.
DANGER
 This symbol indicates handling procedures which may result in death or personal injury WARNING if not followed properly.
This symbol indicates procedures which may result in injury to the user, or physical
damage to the product if not followed properly.
CAUTION
Handling Precautions
<Precautions for Operating the Camera>
●If camera or batteries become hot, emit smoke or a burning smell, or display other abnormal symptoms, remove them from the camera immediately to prevent fire. When handling the batteries, take precautions to avoid being burned.
●Never attempt to disassemble or modify the camera, since you may receive a severe electric shock.
●Do not operate the electronic flash at close proximity to a person's eyes (especially
those of an infant), since eye damage may result.
WARNING ● Do not look through the camera directly at the sun or other strong light source, since your eyesight may be damaged.
●Do not attempt to take pictures while driving or walking, particularly when looking through the viewfinder or at the LCD monitor, since you may cause an accident.
●When taking pictures, remain aware of your surroundings and what is happening around you.
●Clean the camera well after using it at the beach or other locations subject to large concentrations of sand or dust. Salt air may promote corrosion of metal components and damage or short circuits in electronic parts, causing the camera to emit smoke or catch fire. Sand inside the camera may result in internal damage and operating malfunctions.
●If the camera is brought quickly from a cold place to a warm room, condensation may
form on the lens and internal parts. Such condensation may result in damage or short circuits in electronic parts, causing the camera to emit smoke or catch fire. Whenever
CAUTION possible, avoid subjecting the camera to sudden changes in temperature, and if condensation occurs, turn off the camera power quickly and leave it off until all condensation is gone.
●This camera is a precision electronic instrument, and should be protected from impacts and falls that might cause damage to internal parts or the shorting of circuitry.
●When taking the camera overseas or using it to record important events, check its operating condition and take test pictures beforehand to confirm proper operation.
●This camera is not designed to be waterproof, and cannot be used in the rain or under water. If the camera should inadvertently be exposed to water, it should be taken quickly to a Kyocera/Yashica Service Center for inspection.
●Fingerprints or smudges on the camera’s lens or light sensors may adversely affect the precision of the camera. If soiling occurs, use a piece of clean chamois or commercially available lens tissue to gently wipe away the smudge. Do not apply excessive pressure or touch the lens with any rough material. An air blower or lens brush may be used to remove loose dust or dirt from the lens.
●Clean the camera body by wiping with soft cloth. Never use benzene, thinner, or other volatile solvents or cleansers, since such substances will damage the body materials.
●Do not remove the Memory Cards while the card access LED is flashing.
8
|
Make sure to read this page carefully. |
Introduction |
|
|
|
|
|
Introduction |
|
● |
Interference may occur in recorded or played back images when the camera is used in areas subject to |
|||
|
||||
|
strong electromagnetic interference (e.g., near a television set or stereo speakers). |
|
|
|
● Do not direct the camera lens directly toward the sun when shooting, since the CCD element may be |
|
|||
|
damaged. |
|
|
|
● |
Dropping the camera may cause damage to internal parts even though the camera may appear |
|
||
|
superficially undamaged. Always take the camera to a Kyocera/Yashica Service Center for inspection if it is |
|
||
|
dropped. |
|
|
|
● Do not attempt to touch the insides of the memory card slot, since damage or malfunction may result.
Microcomputer Protection Circuit:
This camera incorporates a safety circuit to protect its microcomputer against strong external static electricity. Though rarely, it may fail to function because this safety circuit has come into action.
In this case, turn off the camera’s power, remove the batteries, reload them and use the camera again.
For best performance, we recommend the use of genuine Kyocera accessories. Kyocera is not responsible for any accidents or damage caused by the use of accessories made by other manufacturers or fashioned by the user.
Photographs taken of professional performances, exhibitions, displays, or copyrighted materials may be used only for your own personal enjoyment, and only with the consent of the copyright holders. Other use may constitute violation of applicable copyright laws. Be aware that some performances, exhibitions, or displays may impose restrictions on photographic or other recording even when the purpose of such recordings are personal enjoyment.
Test Photos and Warranties
Make it a practice to take test shots before beginning any important photography session, in order to confirm that images are being recorded properly. Kyocera will not be held responsible for failure of photographs to be recorded or transmitted to a computer as the result of any defects in recording media (Memory Cards).
<Storing the Camera>
|
● Store the camera in a well-ventilated location, avoiding damp or dusty areas, drawers |
|
|
or boxes containing mothballs, or in laboratories or other locations where chemicals |
|
CAUTION |
are handled. Exposure to such chemical fumes can result in damage to the camera's |
|
circuitry, resulting in short circuits and causing the camera to emit smoke or catch fire. |
||
|
||
|
|
●Do not place the camera in places that may be exposed to high temperatures for extended periods of time (the beach in summer, a closed car under bright sun, etc.). Such high temperatures may cause adverse affects or damage to the camera, batteries, or memory cards.
●Remove the batteries before storing the camera for extended periods of time, to prevent battery leakage and resulting damage.
<LCD Monitor>
●Strongly rubbing or pressing against the LCD monitor screen can cause damage or other malfunctions. If dirt or dust adheres to the surface, use a blower brush to remove the dirt. In the event of severe soiling, wipe gently with a soft cloth or chamois.
In addition, never use organic solvent such as benzin or thinner.
●If the LCD monitor should become broken, take precautions to prevent personal injury
from glass fragments.
CAUTION ● If the LCD monitor breaks and its liquid contacts your skin, quickly wipe away any remaining liquid and wash the skin with soap and water. If the liquid should enter the eyes, wash with clean running water for at least 15 minutes, then seek medical attention immediately.
●Due to the innate characteristics of LCD panels, a few pixels may appear permanently lighted or may not light at all. This is not a malfunction, and does not affect the recorded image in any way.
●The LCD monitor may appear difficult to see in some outdoor lighting situations.
9
Introduction
Introduction |
Make sure to read this page carefully. |
|
|
<Precautions for Handling Batteries>
●Battery performance will be reduced temporarily in low temperatures. If you are shooting in cold weather, keep the camera warm inside your jacket and take it out only when needed. Battery performance reduced by cold temperature will return to normal under normal temperature conditions.
●If the “+” and “–” poles of the battery are soiled with sweat or grease, poor contact will result. Wipe both poles clean with a dry cloth before use.
●Bring spare battery with you, if you are going on a long trip.
●The camera does not operate if the battery is loaded with “+” and “–” ends wrong.
● Do not touch the poles with a conductive object such as metal tweezers. Failure to do
so will not only shorten the battery life but also cause a short circuit. It is danger.
CAUTION
●Insulate the used battery by taping the contacts when dumping it. Otherwise, it might explode or catch fire if it contact with other metals.
●Be sure to follow the following items. Otherwise, the battery will explode, causing a fire, an injury or dirty surroundings.
1Do not use the batteries that were not designed for this camera.
WARNING |
2Do not load the battery with “+” and “–” ends wrong. |
3Do not throw the battery into a fire, and do not short-circuit charge, disassemble or |
|
|
heat the battery. |
4Never charge the alkaline, lithium and nickel batteries.
●Keep the battery out of reach of children. If they should swallow the battery, the battery might be broken to damage the stomach or bowels. Immediately consult your doctor.
*Lithium battery pack = Manganese dioxide lithium battery pack(CR-V3).
●The SD logo is a registered trademark.
●Microsoft and Windows are registered trademarks of Microsoft Corporation in the United States and/or other countries.
●Macintosh, Mac OS, QuickTime, and the QuickTime logo are registered trademarks of Apple Computer, Inc.
●PRINT Image Matching is trademark of Seiko Epson Corporation. The PRINT Image Matching logo is a trademark of Seiko Epson Corporation.
●Kodak and EasyShare are the registered trademark of Eastman Kodak Company.
●Eastman Kodak Company, Rochester, NY 14650
●USB DIRECT-PRINT is trademark of Seiko Epson Corporation.
●All other corporate and brand names are the registered trademarks or trademarks of their respective owners.
PRINT Image Matching
This product supports PRINT Image Matching II. When used in combination, PRINT Image Matching II enabled digital still cameras, printers and software help photographers to produce images more faithful to their intentions.
USB DIRECT-PRINT
●This digital camera supports the USB DIRECT-PRINT function and can directly be connected to the printer supporting the USB DIRECT-PRINT by a USB cable. After that, you can select an image on the monitor of the digital camera and operate the monitor to start printing.
10
Introduction
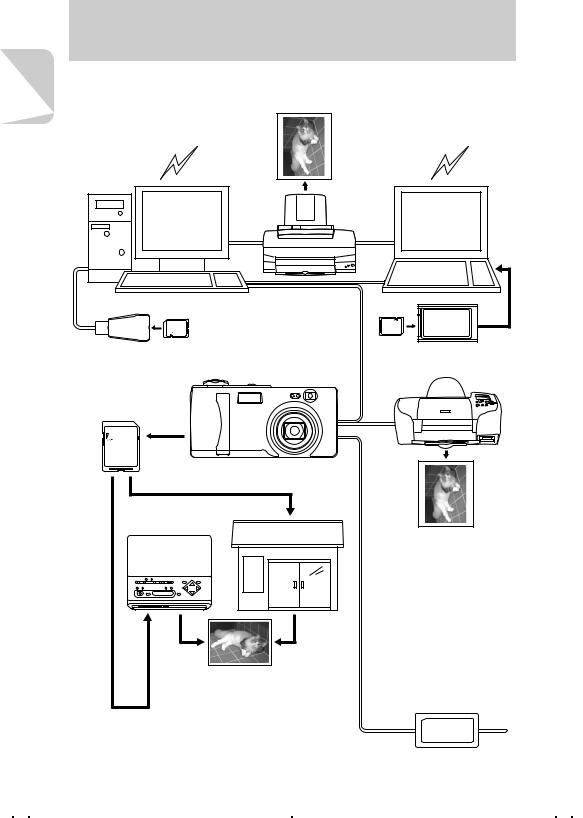
Functions of this Camera
Shooting |
Playback |
|
DISP.
MENU
Introduction
Connecting to a PC
Connect the camera to a PC using the supplied USB cable. Depending on the operating system, you need to install the USB driver. In this case, install the USB driver first, then connect the camera to a PC. Otherwise, you cannot install the USB driver correctly. For details, refer to page 28.
Digital Print |
|
Printer |
|
|
|
||||
|
|
|
|
|
|
|
|
|
|
|
|
|
|
|
|
|
|
|
|
|
|
|
|
|
|
|
|
|
|
|
|
|
|
|
|
|
|
|
|
|
|
|
|
|
|
|
|
|
|
|
|
|
|
|
|
|
|
|
|
Saving images on the hard disk drive or CD-R
Saving images as background on the desktop
Photo lab
*You can e-mail digital images or take the memory card to a photo lab for printing just as ordinary films. Ask about services at the photo lab.
Sending images by e-mail
Editing images using imageediting software
11
Introduction
Introduction
System Around the Camera
|
Printer |
PC |
Notebook PC |
USB cable (supplied)
Card reader
Digital camera
Memory card (supplied)
Finecam L3 Finecam L4
Printer |
Photo lab |
|
Digital print
Card adapter
USB DIRECT-PRINT
*This function is supported only by the EPSON PM860PT Printer.
Note that the function is not supported by the other manufacturers and other models made by EPSON.
*This printer is not available in some regions. For the details, contact your local EPSON service support.
AC adapter (Not included)
12
Introduction
Names of Parts
1Mode select dial (page 16)
2Shutter release button (page 19)
3Speaker
4POWER button (page 16)
5Self-timer LED (red) (page 99)
6Light sensor
7Viewfinder
8Connector cover
9USB connector (page 31)
0Power supply input socket ALens/lens cover
BFlash (page 45)
CFront illumination(page 99)
DCaution LED (red) (page 100) EStandby LED (green) (page 100) FViewfinder (page 43)
GLCD monitor (page 96) HDirectional keypad (Up/Down/Left/
Right) (page 26) Ie button (page 26)
JMENU button (page 25) KDISP. button (page 44) LZoom buttons ( wide-angle,
 telephoto) (page 42)
MMemory card access LED (orange) (page 100)
NStrap lug
OMemory card door (page 14) PTripod socket
Q(+) button/(–) button RBattery cover (page 14) SBattery cover release lever
■ Attaching the Hand Strap
Attach the supplied hand strap as shown.
Introduction
13
of Preparation
Camera
Preparation of Camera
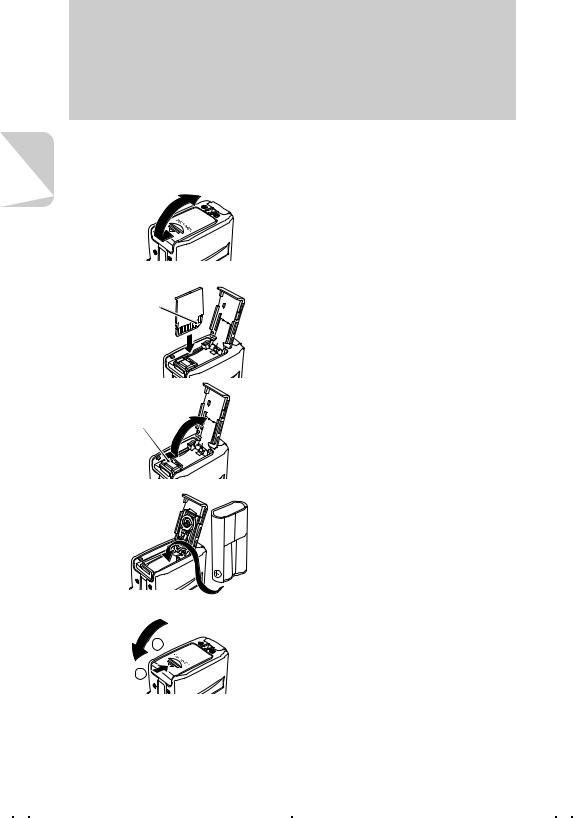
1Loading the Memory Card and Inserting the Battery Pack
1 |
Open the memory card door. |
|
Slide the memory card door and open it. |
2
Clipped edge
3
Battery cover release lever
4
5
1
2
Insert the memory card.
Make sure the label side is toward the LCD monitor side.
Slide in the card until it stops with a secure click.
●Do not attach a seal, etc. on the memory card. If you do so, you may not be able to remove the memory card.
Open the battery cover.
Put your finger on the battery pack cover release lever and slide it to open the battery pack cover.
Insert the supplied lithium battery pack (CR-V3).
Make sure of the direction of the + and - of the battery.
Close the card cover and the battery cover.
1Close the card cover. (Then the battery pack cover closes at the same time.)
2Slide the card cover and lock it.
14

Preparation of Camera
Removing the memory card
Push the memory card once so that the card comes out. Then pull out the card.
Camera
Preparation of
Write Protect Switch (SD Memory Cards only)
Write protect switch
Slide down to lock.
SD Memory Cards are provided with a write protect switch.
When this switch is moved downward, further recording on the card is disable and any images and data already on the card are protected.
While the card is write-protected, shooting or erasing images are disabled and the
WRITE PROTECT
“WRITE PROTECT” will be displayed on the LCD monitor.
The AA batteries may also be used.
You can also use 2 nickel metal hydride rechargeable battery and 2AA nickel batteries other than the supplied lithium battery pack (CR-V3).
● In comparison with the supplied CR-V3, the recording capacity and playback time will be shortened by using the batteries above.
● Manganese batteries have low electric capacity to use for the camera. If they should be used, their state may improperly be detected, causing malfunction of the camera.
15
of Preparation
Camera
Preparation of Camera
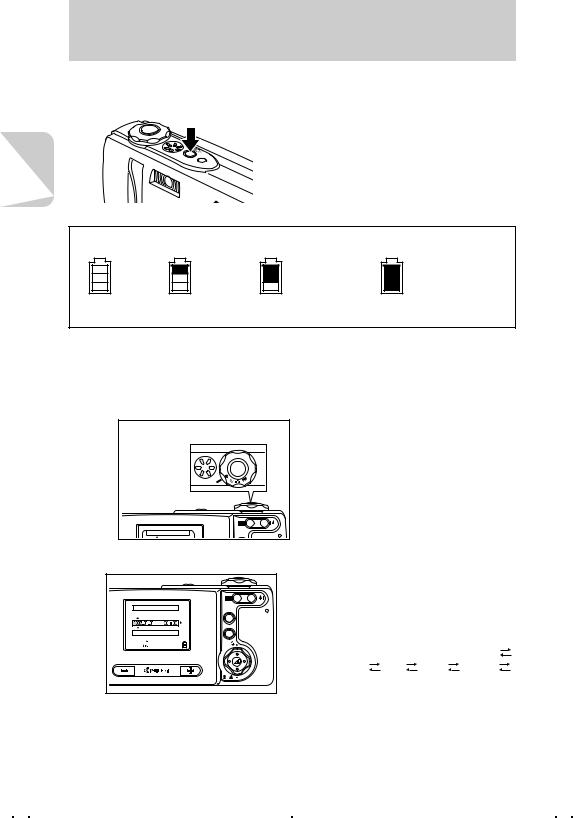
2 Turning the Power ON
Press the POWER button.
● The picture you take with this camera can be set as the startup screen. (page 89)
■ Battery indicator and replacing time |
|
||
Fully |
Half |
Remaining |
The camera cannot |
charged |
consumed |
power is low. |
be operated. |
|
|
Replace the |
Replace the battery |
|
|
battery pack |
pack. |
|
|
soon. |
|
3 Setting the Date and Time
If the camera has been left for a long time without a battery pack, the date and time will be reset. When you replace the battery pack with a new one, make sure that the date and time are correct.
1 |
|
|
|
E |
S |
|
T |
|
|
U |
|
|
P |
|
SET UP(1/3) |
|
DISP. |
|
|
|
Set the mode select dial to “SET UP”.
The setup menu is displayed.
2 Set the date and time.
|
|
1 Press Down on the directional keypad to |
|||
|
|
select [DATE], then press Right on the |
|||
|
|
directional keypad. |
|
|
|
DATE/TIME ADJUSTMENT |
DISP. |
2 Use the directional keypad to set the |
|||
|
MENU |
date and time. |
|
|
|
Y.M.D |
|
● Press Left or Right on the directional |
|||
OK |
|
||||
CANCEL |
|
keypad to move the cursor to Year |
|||
|
|
||||
|
|
Month |
Day |
Hour |
Minute |
|
|
Display format*. |
|
|
|
|
|
● Press Up or Down on the directional |
|||
|
|
keypad to change each value and the |
|||
|
|
display format. |
|
|
|
|
|
For Display format of date, see |
|||
|
|
page 17. |
|
|
|
16
Preparation of Camera
3 |
|
|
SET UP(1/3) |
DISP. |
|
|
|
|
BRIGHT CNTRL |
STANDARD |
|
DATE |
2003.02.01 |
MENU |
INSERT DATE |
NO DATE |
|
FORMAT |
EXECUTE |
|
POWER SAVE |
3MIN. |
|
When the setting is completed, press the e button.
Camera
Preparation of
Date and time must be set.
When a picture is taken, the digital camera saves image data to the memory card with its date and time information. As shooting date and time are saved, it is practical to organize image data in an album, etc. on your PC.
Display format of date
Format |
Example |
|
|
Y.M.D |
2003.07.21 |
|
|
M.D.Y |
07.21.2003 |
|
|
D.M.Y |
21.07.2003 |
|
|
You can select the display format (order of year, month and date). There are 3 types. When [INSERT DATE] is set to “ON”, the date is shown in the format which was selected in the date setting. (page 81)
17
Basic
Operations
Basic Operations
(For First-time Digital Camera Users) Shoot imagesRView imagesRErase unwanted images These are the basic operations of a digital camera.
Please learn how to use this digital camera by shooting some trial images first. In addition, try to enjoy the special functions for the digital camera. For example, process images using the PC or print the digital image.
Taking a Picture (Shooting Still Images)
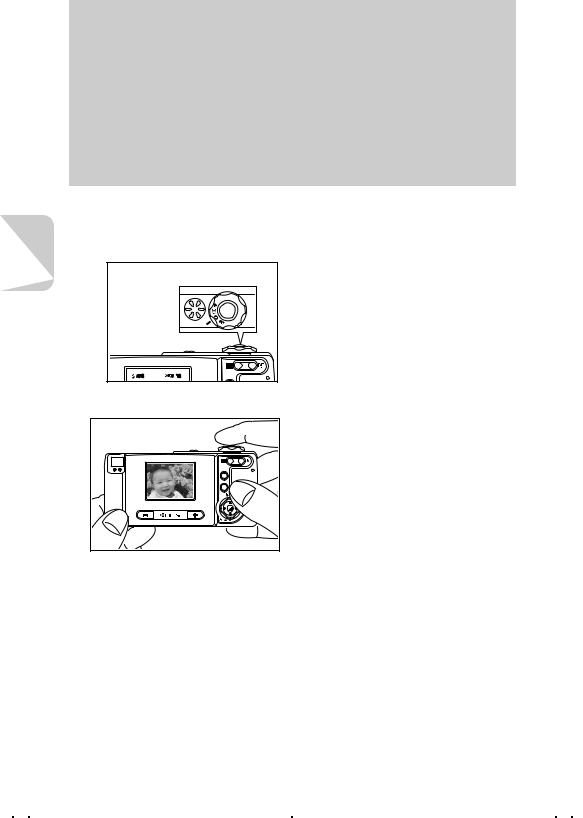
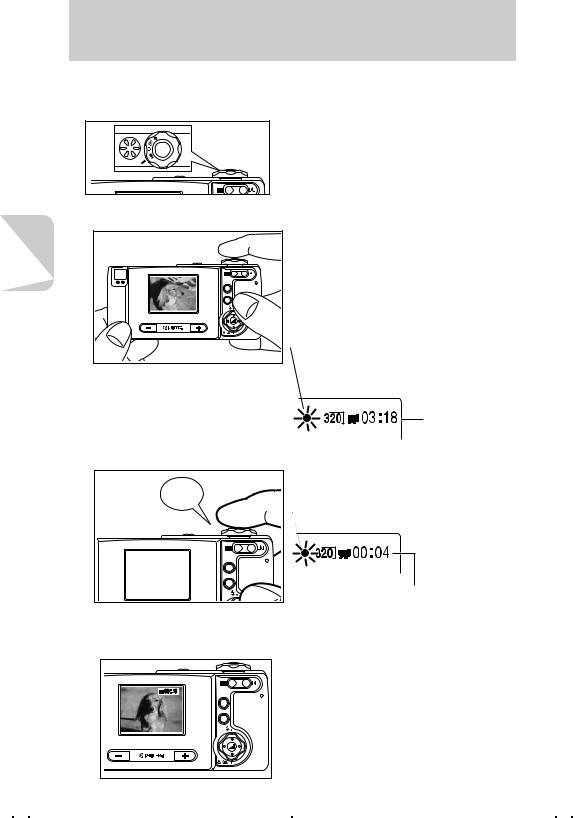
1 Setting the Mode to “s” Camera Mode
|
TES |
P |
U |
|
|
|
DISP. |
Set the mode select dial to “s” then press the “POWER” power button to turn on the camera's power.
After the start screen is displayed, the date is shown for approximately 3 seconds.
Make sure that the date is correct.
2 Compose your picture for the subject.
Compose your picture while watching on the LCD monitor.
● Take care of camera shake. See also:
For “Camera shake” see page 49.
“Holding the Camera Steady” (page 20) “Saving Power by Shooting Images Using the
Viewfinder” (page 43)
Press the “
 ” button to enlarge the subject and the “
 ” button to reduce the size of the subject.
“Shooting Images Using Zoom (optical zoom and digital zoom)” (page 42)
18
Basic Operations
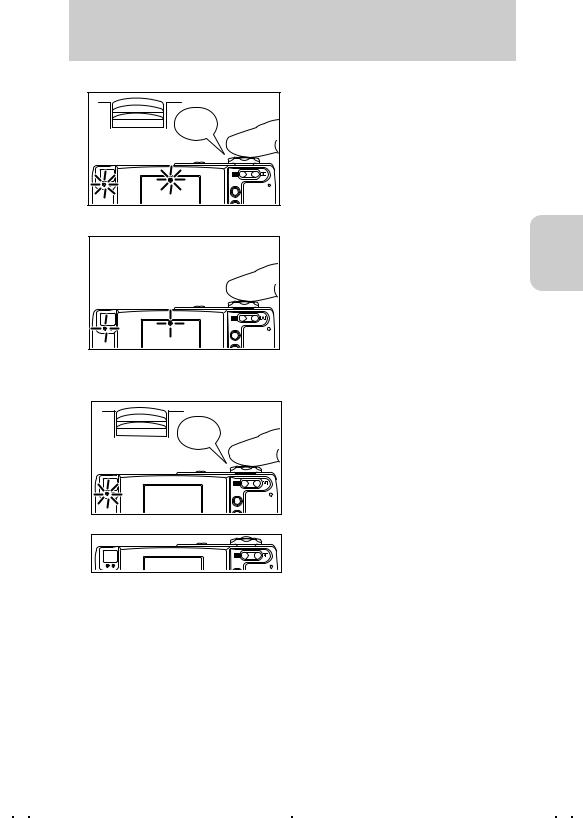
3 Check the exposure and bring the camera into focus.
“Beep” |
Lightly depress the shutter release button halfway to set exposure and focus.
Pressing the shutter release button halfway down (page 20.)
When exposure and the focus are properly set: The electronic beep is heard and the standby LED and focus mark come on.
When exposure and focus are not set:
The standby LED and focus mark are flashing and no electronic beep is heard.
● Repress the shutter release button halfway down or use the focus lock to set exposure
and focus properly.
● If the focus should improperly be set, the shutter is released to take a picture.
Operations
Basic
4 Take a picture.
“Beep” |
DISP. |
Fully depress on the shutter release button to take the picture; the shutter sound is heard and recording of the image begins.
When the standby LED goes off, the shooting is completed.
19
Basic
Operations
Basic Operations
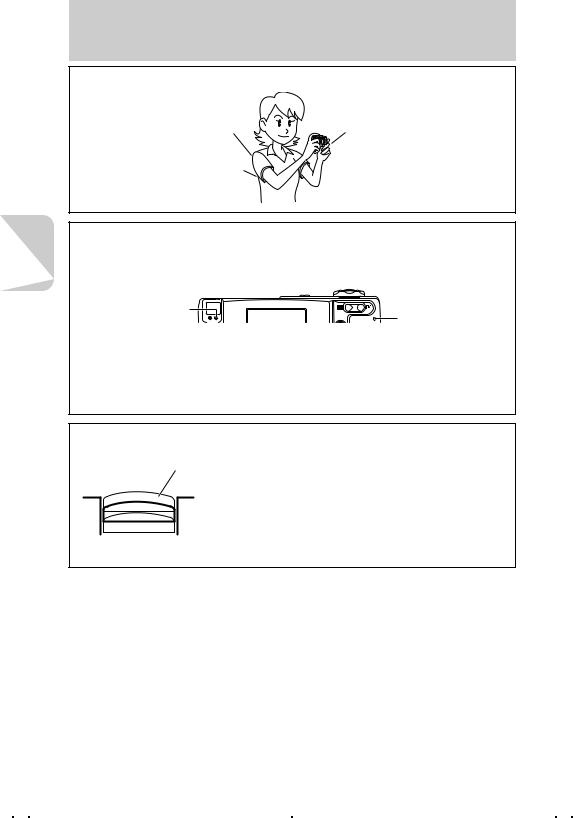
Holding the Camera Steady
Relax your shoulders.
Hold your elbows close to your body.
Use both hands to hold the camera.
Be careful that the lens, flash, light sensor and viewfinder are not covered by your hand or fingers.
LED Displays after Shooting
When the caution LED and card access LED flash after shooting, the messages to be noted are as follows:
For the LED display, see page 99
Alarm LED (Red) |
|
Card Access LED |
|
(Orange) |
|
|
DISP. |
If the card access LED flashes after shooting, the images are being recorded into the memory card.
Do not open the memory card door or remove the memory card. Doing so may cause damage to the data. (You can take pictures while LEDs flash after shooting.)
If the caution LED flashes after shooting, the flash is being charged. Wait until the caution LED goes before taking the next picture.
Shutter Release Button Half-way Down
Not pressed
 Half-pressed
 Fully depressed (for recording an image)
When the shutter release button is pressed, it will stop partway in its travel. In this semi-depressed position, the camera sets exposure and focus for shooting. When the shutter release button is fully depressed, the picture is taken and recorded.
20
Basic Operations
Using (+) and (–) buttons
DISP. |
MENU |
The (+) and (–) buttons are used as follows:
●Using these buttons in camera or movie modes, the brightness on the LCD monitor can be changed (Brightness range: 9 levels). The brightness on the LCD monitor can easily be controlled just before shooting.
darker |
brighter |
(default)
You can also use the settings for handling the [EX COMP] or [W BALANCE] in addition to [LCD BRIGHT]. For details, refer to [CUSTOM SET.] in the Setup modes. (page 85)
●By pressing these buttons on [Multiple Image Display] in Playback modes or in Setup modes, the pages on the display can be turned over.
<[Multiple Image Display] in Playback modes>
(+) button
(–) button
* Press the Right or Left button on the directional keypad to move the image one by one.
Operations
Basic
21
Basic
Operations
22
Basic Operations
Let’s Shoot Movies too
1 Set the Mode to “m” movie mode.
PU T |
ES |
Set the mode select dial to “m”, then press the POWER button to turn on the camera power.
2Compose your picture and bring it into focus.
1 Compose your picture while watching the LCD monitor.
 2 Press the shutter release button
halfway to bring the subject into focus.
● The camera controls the exposure in recording according to the surrounding brightness.
● Focusing mark (green): Lights when the subject is brought into focus. (While the mark flashes the subject isn’t brought into focus but recording can be performed.)
|
Remaining |
|
seconds for |
|
recording |
3 Take a picture. |
|
|
Depress the shutter release button |
“Beep” |
fully to begin recording. |
|
● Focusing mark (red): Lights while the moving |
|
picture is recorded. |
|
DISP. |
|
Remaining seconds are displayed. |
|
(0 to 30 seconds for 320x240 size, |
|
0 to 120 seconds for 160x120 size) |
4
DISP. |
MENU |
The movie recording ends automatically after 30 or 120 seconds.
●The zoom button can be used before recording, but it is disabled during recording.
●To stop recording before 30 seconds have elapsed, press the shutter release button.
●When [PIXELS] is set to “160x120”, you can record a max. 120 seconds movie.
Basic Operations
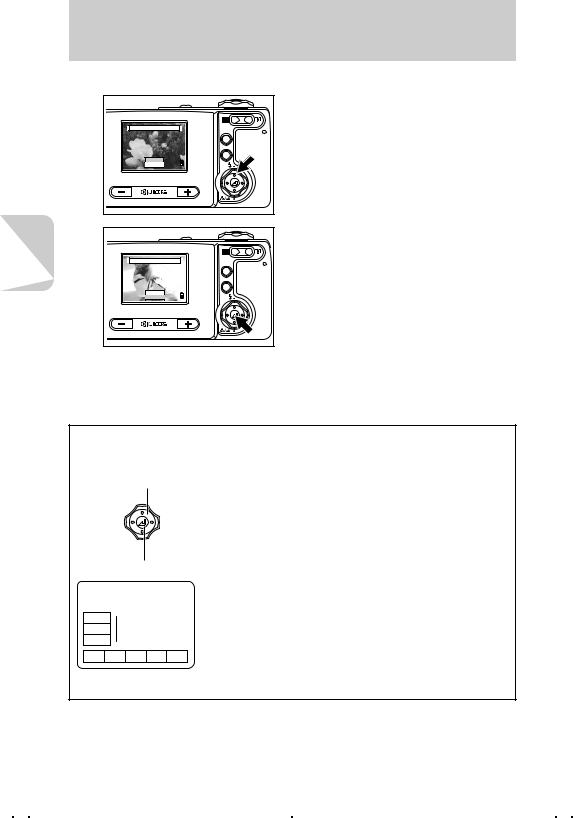
Checking the Pictures (Playback of Images)
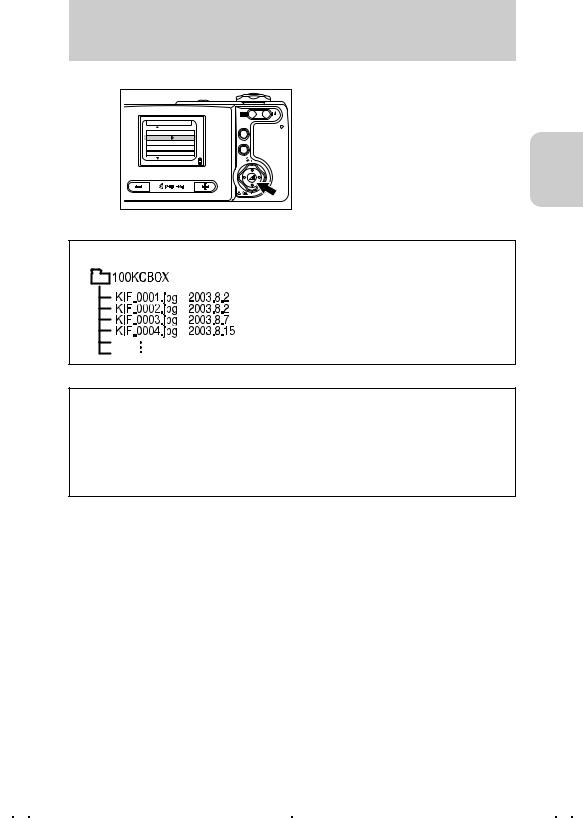
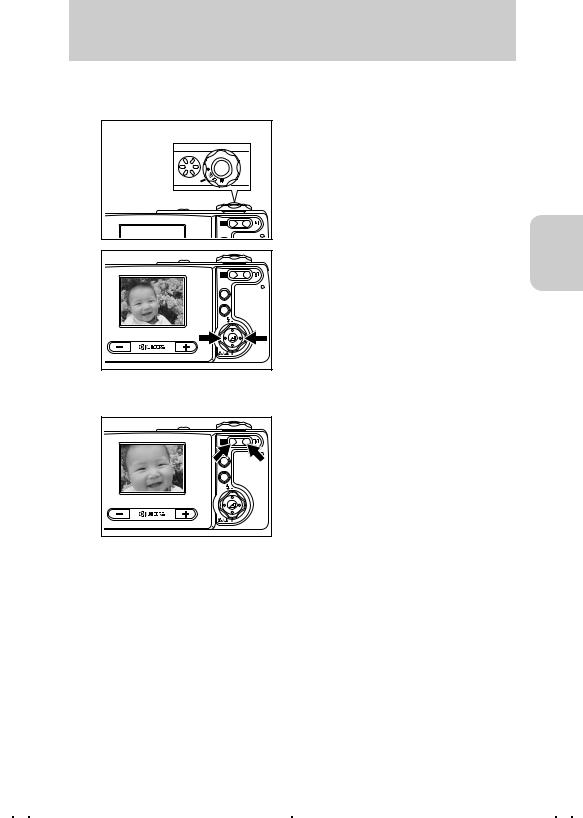
Set the Mode to “p” playback mode.
|
|
S |
|
T |
E |
U |
|
|
|
|
|
P |
|
|
|
|
DISP. |
DISP. |
MENU |
Set the mode select dial to “p” and turn on the camera power.
The image that you have taken is displayed on the LCD monitor.
You can check the recorded image by pressing Right or Left on the directional keypad.
Press Right: Forward direction Press Left: Reverse direction
●You can also check the recorded image by pressing + or – button.
Press +: Forward direction
Press –: Reverse direction
Playing Back a Still Picture
DISP. |
MENU |
To enlarge or contract the image, press the zoom button.

 Press the telephoto button to enlarge the image.
 Press the wide button to contract the image (to the original size).
●After the image is enlarged, use the directional keypad to move the screen to the part of the image you wish to view.
●To move the next recorded image, resize the image to the original size.
Operations
Basic
23
Basic
Operations
Basic Operations
Checking Image Information
You can check information such as aperture value, picture quality and shutter speed used for shooting.
Press the display button.
The information will be displayed.
|
INFORMATION |
Protect status |
||
Folder name and file name |
File size |
|||
|
|
|||
Image quality setting |
|
|
Pixels |
|
Shutter speed |
|
|
||
|
|
Exposure compensation |
||
Aperture |
0 PCS |
— |
||
DPOF setting contents: |
||||
Date of shooting |
|
|
||
|
|
number of prints and date imprint |
||
|
|
|
||
|
|
|
ON/OFF |
|
●By pressing Right or Left on the directional keypad, the images can be viewed in either forward of reverse direction.
●To delete the information, repress the display button.
Playing Back a Movie
Movie Display
1Press the e button to start playback of the movie.
Display during Movie Playback
2Pressing Right or Left on the directional keypad once pauses the picture and starts forward frame advance playback. Each
time you press, a frame advances in forward direction. 3Press the e button to stop playback.
24
Basic Operations
Erasing Unwanted Images
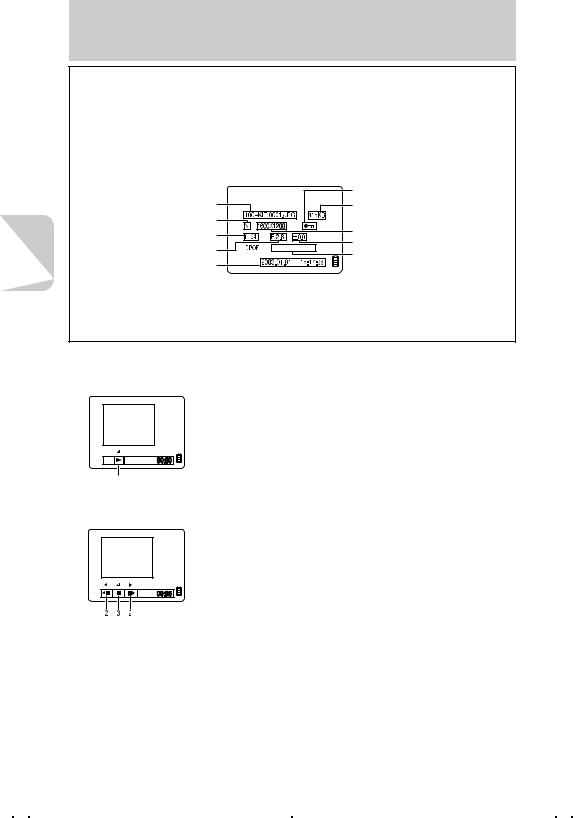
1Set the Mode to “p” playback mode and select “  ” erase.
1 Set the mode select dial to “p” and turn on the camera power.
2 Press the MENU button.
DISP.
The menu icons for the playback mode are
MENU
displayed.
MULTI
Operations
Basic
3 Press Right on the directional keypad to select [ERASE].
4 Press the e button.
DISP.
MENU
ERASE
ERASE IMAGE? |
DISP. |
MENU |
EXECUTE |
CANCEL |
2 Select the image you want to erase.
Press Right or Left on the directional keypad to display the image to be erased. ● As an example, erase the displayed image.
25
Basic Operations
3 Delete the image.
ERASE IMAGE? |
DISP. |
MENU |
EXECUTE |
CANCEL |
Operations |
Basic |
ERASE IMAGE? |
|
|
DISP. |
|
|
MENU |
|
|
EXECUTE |
|
|
CANCEL |
1Press Up on the directional keypad to select [EXECUTE].
2 Press the e button to erase the image.
When an image is erased, the next image recorded on the card will be displayed.
To erase other images, repeat steps 2 and 3.
●A protected image cannot be erased. See page 70.
4 Complete the operation.
Press the MENU button to exit the operation.
Using the directional keypad and execute button
To select the item from the menu icon or menu, use the directional keypad and execute button.
Directional keypad
In this manual, we call the center section as “execute button” and its surrounding area “directional keypad”.
Execute button
 Up
Up
 Down
Down
To select the menu, press Up, Down, Right or Left on the directional keypad and select the item. After that, press the execute button to set it.
Left
 Right
Right
26
Basic Operations
When the Memory Card is Full
If it becomes impossible to record any further images on the memory card due to lower memory capacity,
MEMORY CARD FULL the message “MEMORY CARD FULL” is displayed on the LCD monitor.
It is necessary to either replace the memory card with a new one or to save images to a PC and erase some of the images currently on the memory card.
Use the supplied PC cable to save images to a PC. For details, see page 28.
Also, there are two ways to erase all images on a memory card: “Erase all” and “Format”. For details on the “Erase all” function, see page 71. For details on the “Format” function, see page 82.
Operations
Basic
27
Basic
Operations
Basic Operations
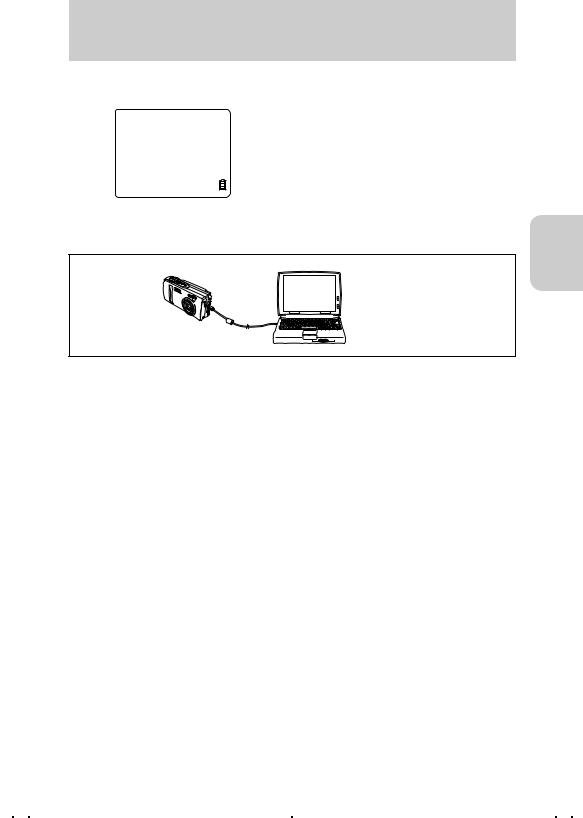
Connecting to a PC
If you connect the camera to a PC, the images shot can be viewed, copied, processed and sent by e-mail.
First check your PC environment or operating system.
If the operating system you are using is Windows 98/98SE or Mac OS 8.6
Install the USB driver, then connect the camera and the PC
 Caution:
Be sure to install the USB driver before connecting the camera to the PC with the USB cable. Otherwise, the driver cannot be installed properly. If you have connected the USB cable first, see "Uninstalling the USB Driver and Remedies" on page 36 and take an appropriate remedy to your problem.
If the operating system you are using is Windows Me, Windows 2000, Windows XP*1, Mac OS 9.0 to 9.2 or Mac OS 10.0 to 10.2*2
*1: Windows 2000 should be Professional version and Windows XP should be Home Edition or Professional version.
*2: For the Mac OS, the OS X server should be excluded.
Connect the camera to your PC
● You don’t need to install the USB driver.
*If the operating system you are using is not one of the above, or if it is one of the above, but is updated from a previous version, correct behavior is not guaranteed.
In addition, any PC requires the following installation.
●PC with a USB port (for connection)
●CD-ROM drive (for installing software)
28
Basic Operations
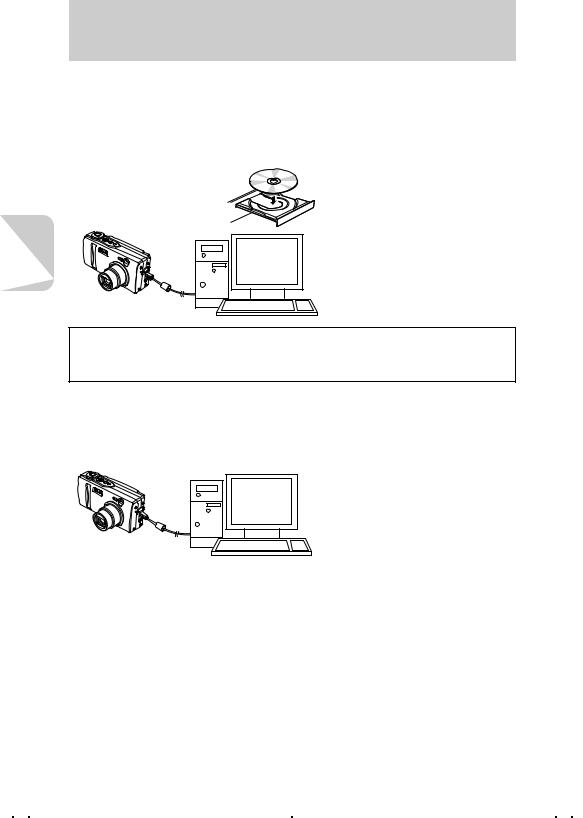
Installing the USB Driver
The USB driver is included in the CD-ROM supplied with the camera.
1Turn on the PC and start Windows or Mac.
2Put the supplied CD-ROM into the CD-ROM drive on your PC or Mac.
For Windows 98 and Windows 98 SE users
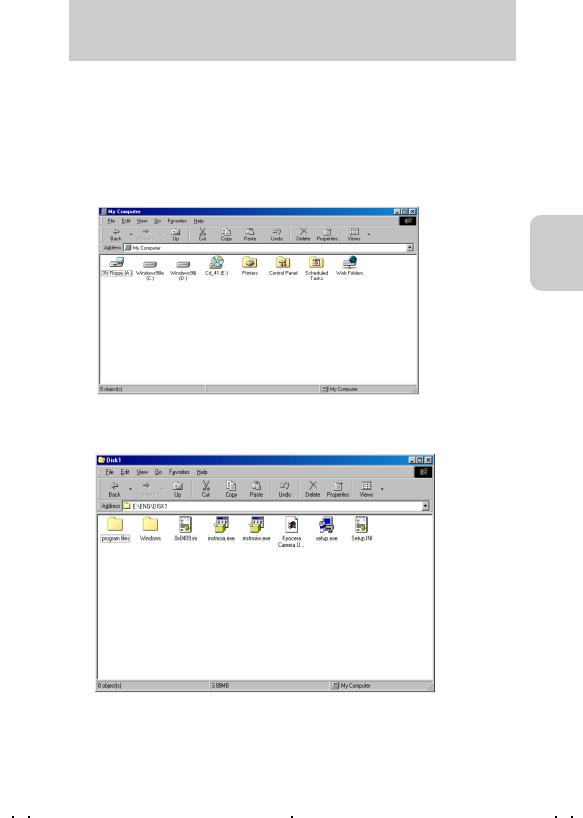
1In the [My Computer] window, double-click the [Cd_41(D:)] or [Cd_40(D:)] folder to open it.
● The alphabetical letter (D:) may vary with the PC you are using.
Operations
Basic
2 Double-click the [Eng] folder, then the [Disk1] folder to open it. Double-click the [ Setup.exe] file to start installations. Follow the instruction and install the driver.
29
Basic Operations
3When a message “InstallShield Wizard Completed” is displayed, click “Finish” to stop the Wizard. After that, restart the computer.
Basic
Operations
 Caution:
If you failed in installation, uninstall the USB driver following the procedure shown in page 37 and reinstall it.
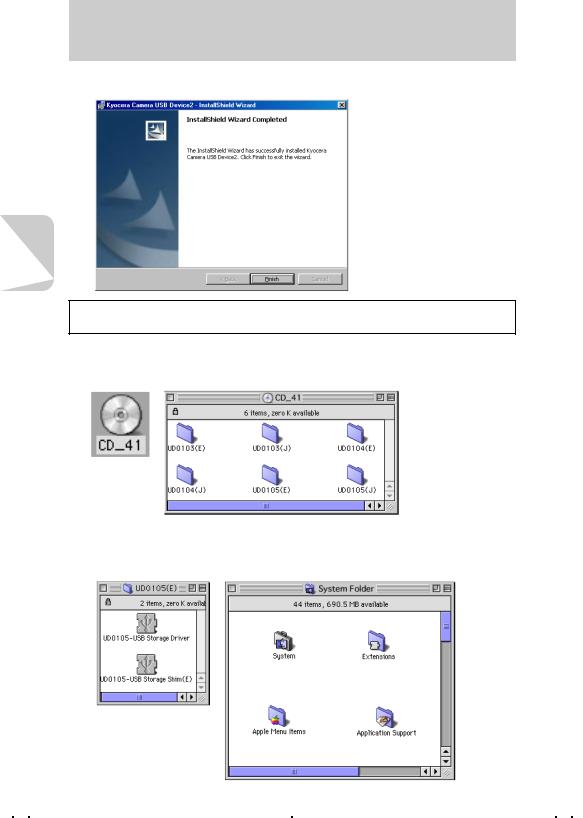
For Mac OS 8.6 users
1Double-click the CD-ROM icon [CD_41] or [CD_40] displayed on the screen to open the CD-ROM window.
2Double-click the [UD0105 (E)] folder to open it, then copy the following files to the folder [Extensions] in the system folder.
*UD0105-USB Storage Driver
*UD0105-USB Storage Shim (E)
30
 Loading...