


 Loading...
KYOCERA DuraPro
User Guide

Table of Contents |
|
Phone Basics ................................................................................................ |
7 |
Battery and Charger ..................................................................................... |
7 |
Battery Capacity ...................................................................................... |
7 |
Install the Battery..................................................................................... |
7 |
Charge the Battery.................................................................................... |
8 |
Remove the Battery .................................................................................. |
8 |
Turn Your Phone On and Off ........................................................................... |
8 |
Phone Overview.......................................................................................... |
9 |
Key Functions.......................................................................................... |
9 |
Navigate Through the Menus .......................................................................... |
11 |
View the Display Screen ............................................................................... |
12 |
Display Your Phone Number ........................................................................... |
15 |
Text Entry .................................................................................................. |
16 |
Select a Text Input Mode .............................................................................. |
16 |
T9 Text Input ............................................................................................ |
16 |
ABC Mode ................................................................................................ |
17 |
Set Text Entry Options ................................................................................. |
17 |
Simple Data Exchange.................................................................................. |
18 |
Phone Calls & Settings .................................................................................... |
20 |
Make Phone Calls ....................................................................................... |
20 |
Call Using the Phone Keypad ....................................................................... |
20 |
Call With the Phone Closed......................................................................... |
20 |
Call from History ..................................................................................... |
20 |
Call from Contacts ................................................................................... |
21 |
Call Using the Plus (+) Code ........................................................................ |
21 |
Call Using a Speed Dial Number.................................................................... |
21 |
Call Using Abbreviated Dialing Features .......................................................... |
22 |
Call a Phone Number with Pauses ................................................................. |
22 |
Call a Phone Number in a Message ................................................................ |
23 |
Call Emergency Numbers............................................................................ |
23 |
Receive Phone Calls .................................................................................... |
24 |
TOC |
i |
End Phone Calls ......................................................................................... |
26 |
Missed Call Notification ................................................................................ |
26 |
Voicemail ................................................................................................ |
27 |
Set Up Voicemail ..................................................................................... |
27 |
Voicemail Notification............................................................................... |
27 |
New Voicemail Message Alerts ..................................................................... |
27 |
Retrieve Your Voicemail Messages................................................................. |
28 |
Phone Call Options ..................................................................................... |
28 |
Caller ID ............................................................................................... |
28 |
Call Waiting ........................................................................................... |
29 |
3-Way Calling ......................................................................................... |
29 |
Call Forwarding....................................................................................... |
29 |
Phone Call Settings ..................................................................................... |
30 |
Call Answer Mode .................................................................................... |
30 |
Auto-Answer Mode ................................................................................... |
30 |
Alert Notification .................................................................................... |
30 |
Airplane Mode ........................................................................................ |
30 |
TTY Use................................................................................................ |
31 |
Hearing Aid Device Compatibility.................................................................. |
32 |
History ...................................................................................................... |
33 |
View History ............................................................................................. |
33 |
The History List....................................................................................... |
33 |
History Icons .......................................................................................... |
33 |
History Thread........................................................................................ |
33 |
History Details ........................................................................................ |
34 |
History Options.......................................................................................... |
34 |
Make a Call From History .............................................................................. |
34 |
Save the Information in Your History ................................................................ |
34 |
Save a Number from History........................................................................ |
35 |
Make a New Group Entry from History ............................................................ |
35 |
Delete History ........................................................................................... |
35 |
Contacts .................................................................................................... |
37 |
About Contacts.......................................................................................... |
37 |
TOC |
ii |
View Contacts ........................................................................................... |
|
37 |
The Contacts List..................................................................................... |
|
37 |
Contacts Details ...................................................................................... |
|
37 |
View History from Contacts ........................................................................ |
|
37 |
Create a New Contacts Entry ......................................................................... |
|
38 |
Create a Personal Entry ............................................................................. |
|
38 |
Create a Group Entry ................................................................................ |
|
38 |
Save a Number Using the Phone Keypad.......................................................... |
|
39 |
Edit a Contacts Entry................................................................................... |
|
39 |
Edit a Contacts Entry ................................................................................ |
|
39 |
Delete a Contacts Entry ............................................................................. |
|
39 |
Add a Number to a Personal Entry................................................................. |
|
40 |
Assign a Ringer to a Personal Entry................................................................ |
|
40 |
Assign a Picture to a Personal Entry............................................................... |
|
40 |
Add Members to a Group Entry..................................................................... |
|
41 |
Remove Members from a Group Entry ............................................................ |
|
41 |
Find Contacts Entries .................................................................................. |
|
41 |
Find an Entry from Contacts........................................................................ |
|
41 |
Find an Entry Using the Phone Keypad............................................................ |
|
42 |
Use Contacts Information in Other Applications ................................................... |
42 |
|
Assign Speed Dial Numbers ............................................................................ |
|
43 |
Secret Contacts Entries ................................................................................ |
|
43 |
Messaging ................................................................................................... |
|
44 |
Text Messaging and Multimedia Messaging .......................................................... |
|
44 |
Compose Messages ................................................................................... |
|
44 |
Access Messages ...................................................................................... |
|
45 |
Threaded Messaging ................................................................................. |
|
45 |
Email ..................................................................................................... |
|
47 |
Calendar & Tools .......................................................................................... |
|
48 |
Calendar ................................................................................................. |
|
48 |
Add an Event to the Calendar ...................................................................... |
|
48 |
Add a To Do List Item to the Calendar ............................................................ |
|
49 |
Calendar Alerts ....................................................................................... |
|
49 |
TOC |
iii |
|
View Events ........................................................................................... |
49 |
Delete Events ......................................................................................... |
50 |
Alarm ..................................................................................................... |
50 |
Bluetooth ................................................................................................ |
51 |
Turn Bluetooth On and Off ......................................................................... |
51 |
Make Your Phone Discoverable..................................................................... |
51 |
Bluetooth Menu....................................................................................... |
52 |
Pair Bluetooth Devices .............................................................................. |
53 |
View the Trusted Devices List...................................................................... |
53 |
Send Items via Bluetooth ........................................................................... |
54 |
microSD Card ............................................................................................ |
54 |
Insert or Remove the microSD Card ............................................................... |
54 |
microSD Card Settings ............................................................................... |
56 |
microSD Card Folders................................................................................ |
57 |
File Manager .......................................................................................... |
57 |
Connect Your Phone to Your Computer ........................................................... |
59 |
Voice Services ........................................................................................... |
60 |
Automatic Speech Recognition (ASR) ............................................................. |
60 |
Manage Voice Memos ................................................................................ |
63 |
Calculator................................................................................................ |
65 |
World Clock.............................................................................................. |
66 |
Countdown Timer....................................................................................... |
66 |
Stopwatch................................................................................................ |
66 |
Camera...................................................................................................... |
67 |
Take Pictures............................................................................................ |
67 |
Take a Picture ........................................................................................ |
67 |
Assign Pictures........................................................................................ |
67 |
Camera Mode Options ............................................................................... |
68 |
Camera Settings ...................................................................................... |
70 |
Record Videos ........................................................................................... |
70 |
Record a Video ....................................................................................... |
70 |
Camcorder Mode Options ........................................................................... |
71 |
Camcorder Settings .................................................................................. |
72 |
TOC |
iv |
Store Pictures and Videos ............................................................................. |
|
72 |
Set Storage Options.................................................................................. |
|
72 |
In Phone Folder....................................................................................... |
|
72 |
On Memory Card Folder ............................................................................. |
|
73 |
In Phone and Memory Card Folder Options....................................................... |
|
73 |
Review Pictures and Videos in the Assigned Media Folder ..................................... |
74 |
|
Send Pictures and Videos .............................................................................. |
|
74 |
Send Pictures and Videos Using the Messaging Feature ........................................ |
74 |
|
Send Pictures and Videos Using the Bluetooth Feature ........................................ |
75 |
|
Print Pictures............................................................................................ |
|
75 |
Print Pictures From Your Phone.................................................................... |
|
75 |
Digital Print Order Format (DPOF)................................................................. |
|
77 |
Web and Data .............................................................................................. |
|
79 |
Data Services ............................................................................................ |
|
79 |
Launch a Web Connection .......................................................................... |
|
79 |
Data Connection Status and Indicators ........................................................... |
|
79 |
Browser................................................................................................... |
|
79 |
Learn to Navigate the Web ......................................................................... |
|
79 |
Browser Menu......................................................................................... |
|
81 |
GPS Navigation............................................................................................. |
|
84 |
Settings ..................................................................................................... |
|
86 |
Display Settings ......................................................................................... |
|
86 |
Change the Screen Saver (Wallpaper)............................................................. |
|
86 |
Change the Brightness............................................................................... |
|
86 |
Change the Backlight Settings...................................................................... |
|
86 |
Set the Notification Pop-up......................................................................... |
|
86 |
Select a Picture ID ................................................................................... |
|
87 |
Power Save Mode..................................................................................... |
|
87 |
Change the Clock/Calendar Display ............................................................... |
|
87 |
Set a Custom Greeting .............................................................................. |
|
87 |
Change the Phone’s Menu Style.................................................................... |
|
87 |
Change the Font Size ................................................................................ |
|
88 |
Display Language ..................................................................................... |
|
88 |
TOC |
v |
|
Volume Settings......................................................................................... |
88 |
Adjust the Phone’s Volume Settings .............................................................. |
88 |
Silence All ............................................................................................. |
89 |
Ringer Settings .......................................................................................... |
89 |
Ringers................................................................................................. |
89 |
Set Up Voice Guide .................................................................................. |
90 |
Select a Vibration Pattern .......................................................................... |
90 |
Messaging Settings ...................................................................................... |
90 |
Set Clear Alerts Icon................................................................................. |
90 |
Set a Callback Number .............................................................................. |
90 |
Add a Customized Signature........................................................................ |
90 |
Manage Preset Messages ............................................................................ |
91 |
Message Alerts ........................................................................................ |
91 |
Wireless Emergency Alerts.......................................................................... |
91 |
Long Message Reassembly .......................................................................... |
92 |
Phone Setup Options ................................................................................... |
92 |
Navigation Key Shortcuts ........................................................................... |
92 |
Hot Key ................................................................................................ |
92 |
Keyguard .............................................................................................. |
93 |
Headset Mode......................................................................................... |
93 |
Roaming .................................................................................................. |
93 |
Roaming on Other Networks........................................................................ |
93 |
Roaming Settings ..................................................................................... |
94 |
Security Settings ........................................................................................ |
94 |
Lock Your Phone ..................................................................................... |
94 |
Limit Use .............................................................................................. |
95 |
Delete Phone Content ............................................................................... |
97 |
Reset Your Phone and Phone Content............................................................. |
97 |
Security Features for Data Services ............................................................... |
98 |
Copyrights .................................................................................................. |
99 |
Index ....................................................................................................... |
100 |
TOC |
vi |

Phone Basics
Tip: Phone Software Upgrades - Updates to your phone’s software may become available from time to time. U.S. Cellular will automatically upload critical updates to your phone. You can also use the menu to check for and download updates. Press  > Tools > Update Phone > Update Firmware to search for and download available updates.
Battery and Charger
Warning: Use only U.S. Cellular-approved or Kyocera-approved batteries and chargers with your phone. The failure to use a USCC-approved or Kyocera-approved battery and charger may increase the risk that your phone will overheat, catch fire, or explode, resulting in serious bodily injury, death, or property damage.
Battery Capacity
Your phone is equipped with a Lithium Ion (Li-Ion) battery. It allows you to recharge your battery before it is fully drained.
For a quick check of your battery level, glance at the battery charge indicator located in the upper right corner of your phone’s display screen. When there are approximately five minutes of talk time left, the battery icon ( ) turns red and the phone sounds a warning tone.
After an additional five minutes or so, the phone sounds a warning tone three times and then turns off.
Note: Long backlight settings, searching for service, vibrate mode, browser use, and other variables may reduce the battery’s talk and standby times.
Tip: Watch your phone’s battery level indicator and charge the battery before it runs out of power.
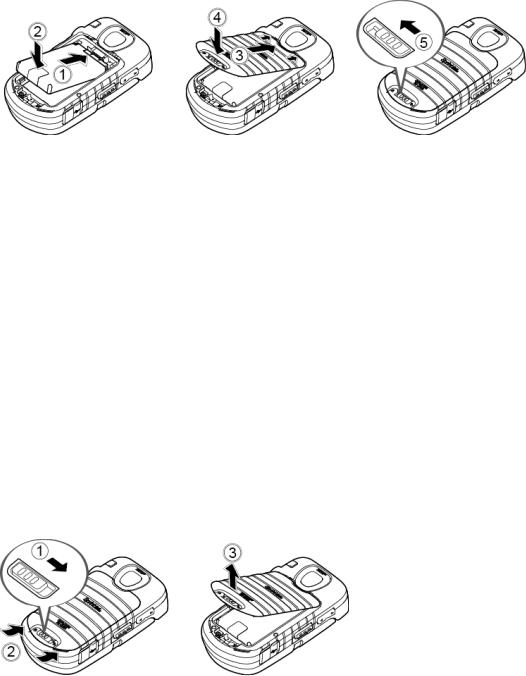
Install the Battery
1.Insert the battery into the battery compartment, making sure the connectors align (  ). Gently press down to secure the battery (
 ).
).
2.Align the tabs of the battery cover with the slots ( ) and press the battery cover down until it snaps into place (
 ).
).
3.Slide the battery cover release latch to the locked position ( ).
).
Phone Basics |
7 |
Charge the Battery
1.Plug the USB connector into the charger/accessory jack on the lower left side of your phone.
2.Plug the AC adapter into an electrical outlet.
Note: Your phone’s battery should have enough charge for your phone to turn on and find a signal, set up your voicemail, and make a call. You should fully charge your battery as soon as possible.
Remove the Battery
1.Make sure the power is off so that you don’t lose any stored numbers or messages.
2.Slide the battery cover release latch to the right to unlock the cover ( ).
).
3.Slide your thumbnail or a coin under the slot on either side of the phone ( ) and pop off the cover (
 ).
).
4.Remove the battery and replace the cover. See Install the Battery.
Warning: Do not handle a damaged or leaking Li-Ion battery as you can be burned.
Turn Your Phone On and Off
Turn Your Phone On
► Open the phone and press  .
.
Phone Basics |
8 |

Turn Your Phone Off
►Open the phone and press and hold  for two seconds until you see the poweringdown animation on the main screen.
Your screen remains blank while your phone is off (unless the battery is charging).
Phone Overview
Key Functions
●Earpiece lets you hear the caller and automated prompts.
●Main Screen displays all the information needed to operate your phone, such as the call status, the Contacts list, the date and time, and the signal and battery strength.
Phone Basics |
9 |
●Softkeys let you select softkey actions or menu items corresponding to the bottom left and right lines on the main screen while the phone is open.
●Navigation Key lets you scroll through the phone’s menu options.
●MENU/OK Key lets you access the phone’s menus and selects the highlighted choice when navigating through a menu.
●Camera Key lets you activate the camera or video mode and take pictures and videos with the phone open.
●TALK Key allows you to place or receive calls, answer Call Waiting, use 3-Way Calling, or activate Automatic Speech Recognition (ASR).
●SPEAKER Key lets you place or receive calls in speakerphone mode or turn the speakerphone on and off during a call.
●Microphone allows other callers to hear you clearly when you are speaking to them.
●BACK Key deletes characters from the display in text input mode. When in a menu, pressing it returns you to the previous menu. This key also allows you to return to the previous screen in a data session.
●END/POWER Key lets you turn the phone on or off, end a call, or cancel your input and return to standby mode.
●Keypad lets you enter numbers, letters, and characters, and perform functions.
●Internal Antenna facilitates reception and transmission. To maximize performance, do not touch the bottom portion of your phone where the internal antenna is located while using the phone.
●Call List Button lets you display the recent call history or end a call.
●External Speaker Button lets you place or receive calls in speakerphone mode, turn the speakerphone on and off during a call, activate Automatic Speech Recognition (ASR), or unlock the keyguard.
●Volume Button allows you to adjust the ringer volume in standby mode or the voice volume during a call.
●Speaker lets you hear the different ringers and sounds. The speaker also lets you hear the caller’s voice in speakerphone mode.
●Hot Key launches the Voice Memo recording, and also functions as a one touch key to launch either Calendar, Bluetooth, Alarm, or Web. See Hot Key.
●Outer Screen displays the information such as the call status, the date and time, and the signal and battery strength.
Phone Basics |
10 |
●Charger/Accessory Jack allows you to connect a compatible charging cable or USB data cable (not included).
●LED Indicator shows your phone’s status at a glance.
●Camera Lens, as part of the built-in camera, lets you take pictures and videos.
●Flash allows you to take pictures in low light situations.
●Headset Jack allows you to plug in an optional headset for convenient, hands-free conversations.
Note: The Headset Jack is a 2.5 mm jack and some accessories, such as headsets, may require the use of a 3.5 mm adapter (included in the box with your phone). When using the adapter, connect your headset and the adapter first.
Note: The turbo buttons on a headset are not supported when the headset is connected using the 3.5mm adapter.
●microSD Card Slot (internal) lets you use the microSD memory card to expand the memory of your phone. The microSD compartment is behind the battery. See Insert or Remove the microSD Card.
●Battery Cover Release Latch opens the battery cover to replace the battery.
CAUTION! Inserting an accessory into the incorrect jack may damage the phone.
Note: Be sure all ports and cover are properly sealed to retain water resistance.
Navigate Through the Menus
The navigation key on your phone lets you scroll through onscreen items. To navigate through a menu, press the navigation key up or down.
Many menus feature a scroll bar on the right to help you keep track of your position in the menu.
Select Menu Items
As you navigate through the menu, menu options are highlighted. Select any option by highlighting it and pressing  . If the option is numbered, you can select it by pressing the corresponding number on the phone’s keypad.
For example, to view the Icon Glossary screen:
1.Press  to access the main menu.
2.Select Settings by highlighting it and pressing  .
.
3.Select Phone Info by highlighting it and pressing  .
.
Phone Basics |
11 |

4. Select Icon Glossary by highlighting it and pressing  .
.
For the purposes of this guide, the above steps condense into:
► Press  > Settings > Phone Info > Icon Glossary.
Back Up Within a Menu
To go to the previous menu:
► Press  .
.
To return to standby mode:
► Press  .
.
View the Display Screen
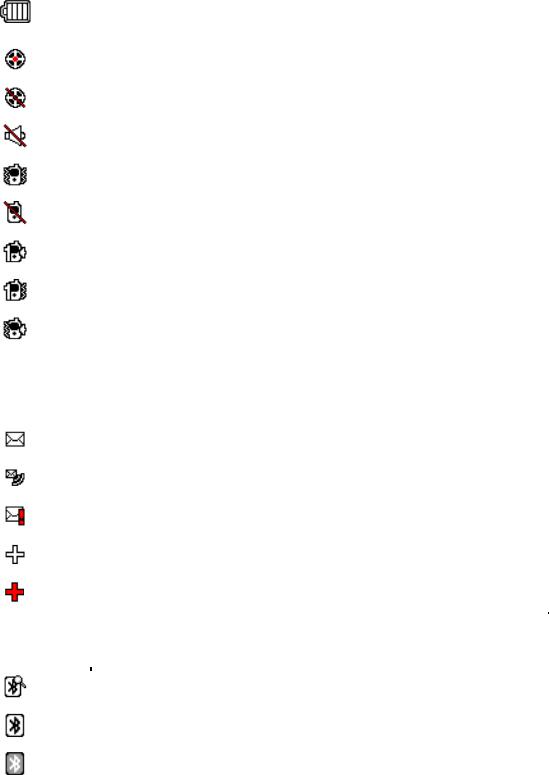
The status bar at the top of your phone’s display screen provides information about your phone’s status and options. The following tables identify the symbols you’ll see on your phone’s display screen.
Tip: To view a list of your phone’s icons and descriptions, from the main menu select
Settings > Phone Info > Icon Glossary.
|
Service Icon |
|
|
Description |
|
|
|
|
|
||
|
|
|
|
Signal Strength - Your phone’s current signal strength. (More bars |
|
|
|
|
|
= stronger signal.) |
|
|
|
|
|
|
|
|
|
|
|
No Service - Your phone cannot find a usable signal. |
|
|
|
|
|
|
|
|
|
|
|
Data Services 3G – Your phone is connected to the 3G data |
|
|
|
|
|
service. |
|
|
|
|
|
|
|
|
|
|
|
Data Services 1x – Your phone is connected to the 1X data |
|
|
|
|
|
service. |
|
|
|
|
|
|
|
|
|
|
|
Roaming - Your phone is “roaming” off the home network. |
|
|
|
|
|
|
|
|
|
|
|
Data Service Available - Data service is available. When active, |
|
|
|
|
|
the icon is animated. |
|
|
|
|
|
|
|
|
|
|
|
Data Service Dormant - Data service is currently dormant. |
|
|
|
|
|
|
|
|
|
|
|
Data Service Unavailable - Data service is currently unavailable. |
|
|
|
|
|
|
|
Phone Basics |
12 |
|
Status Icon |
|
|
Description |
|
|
|
|
|
||
|
|
|
|
|
|
|
|
|
|
Battery - Your phone’s current battery charge level. (The icon to |
|
|
|
|
|
the left shows the battery is fully charged.) The icon is animated |
|
|
|
|
|
while the battery is charging. |
|
|
|
|
|
|
|
|
|
|
|
Location On - Your phone’s location feature is on and available |
|
|
|
|
|
for location-based services such as GPS Navigation. |
|
|
|
|
|
|
|
|
|
|
|
Location Off - Your phone’s location feature is off. Your location |
|
|
|
|
|
is available only for 911. |
|
|
|
|
|
|
|
|
|
|
|
Silence All - Your phone’s sound is turned off. |
|
|
|
|
|
|
|
|
|
|
|
Vibrate All - Your phone’s sound is turned off but vibrate is turned |
|
|
|
|
|
on. |
|
|
|
|
|
|
|
|
|
|
|
Ringer Off - Your phone’s ringer is turned off. |
|
|
|
|
|
|
|
|
|
|
|
1 Beep - A beep sounds when you receive an incoming call, a |
|
|
|
|
|
message, etc. |
|
|
|
|
|
|
|
|
|
|
|
1 Beep and Vibrate - 1 Beep and vibrate are set. |
|
|
|
|
|
|
|
|
|
|
|
Ringer and Vibrate - The volume level is set to between 1 and 8 |
|
|
|
|
|
and vibrate is turned on. |
|
|
|
|
|
|
|
|
|
|
|
|
|
|
Messaging and |
|
|
Description |
|
|
|
|
|
||
|
Alert Icon |
|
|
|
|
|
|
|
|
|
|
|
|
|
|
New Messages - You have one or more new messages waiting. |
|
|
|
|
|
|
|
|
|
|
|
New Voicemail - You have one or more new voicemail messages |
|
|
|
|
|
waiting. |
|
|
|
|
|
|
|
|
|
|
|
Urgent Messages - You have one or more new urgent messages |
|
|
|
|
|
waiting. |
|
|
|
|
|
|
|
|
|
|
|
Multiple Alerts - You have different kinds of alerts waiting. |
|
|
|
|
|
|
|
|
|
|
|
Urgent Multiple Alerts - You have different kinds of alerts |
|
|
|
|
|
(including urgent messages) waiting. |
|
|
|
|
|
|
|
|
Bluetooth Icon |
|
|
Description |
|
|
|
|
|
Visible - Your phone is discoverable by (visible to) other Bluetooth |
|
|
|
|
|
devices. |
|
|
|
|
|
|
|
|
|
|
|
Connected - Your phone is connected to a Bluetooth device. |
|
|
|
|
|
|
|
|
|
|
|
Enabled - Your phone’s Bluetooth feature is enabled. |
|
|
|
|
|
|
|
Phone Basics |
13 |
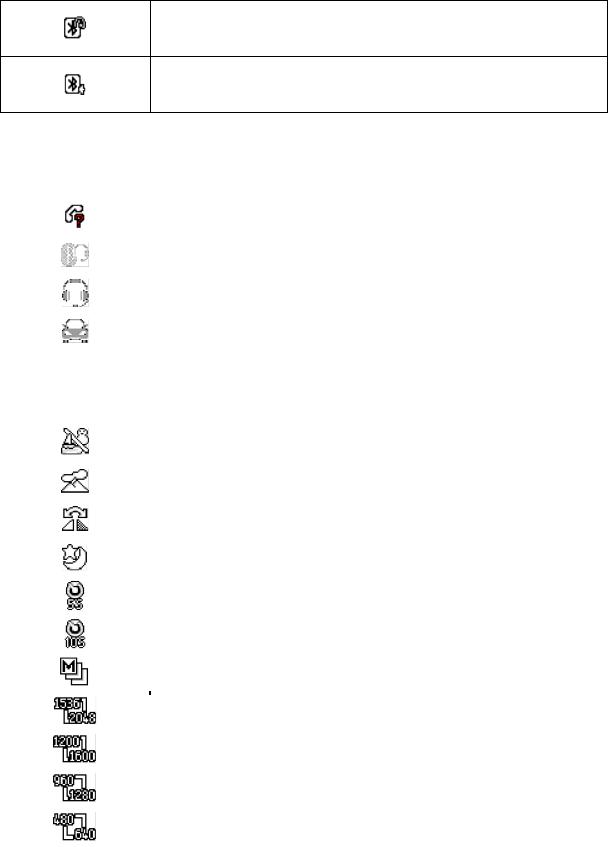
Connected via HFP - Your phone is connected to or communicating with a Bluetooth device via Hands-free Profile (HFP).
Connected via A2DP - Your phone is connected to or communicating with a Bluetooth device via Advanced Audio Distribution Profile (A2DP).
Note: The above icons will blink while your phone is communicating with a Bluetooth device.
|
|
|
|
|
|
|
Voice Call Icon |
|
|
Description |
|
|
|
|
|
Missed Call - You have one or more missed voice calls. |
|
|
|
|
|
|
|
|
|
|
|
Bluetooth Device - A call is in progress using a Bluetooth device. |
|
|
|
|
|
|
|
|
|
|
|
Headset - A call is in progress using an optional wired headset. |
|
|
|
|
|
|
|
|
|
|
|
Car Kit - A call is in progress using an optional car kit device. |
|
|
|
|
|
|
|
|
|
|
|
|
|
|
Camera and Video |
|
|
Description |
|
|
|
|
|
||
|
Icon |
|
|
|
|
|
|
|
|
|
|
|
|
|
|
Beach/Snow Mode - The picture/video mode is set to |
|
|
|
|
|
Beach/Snow. |
|
|
|
|
|
|
|
|
|
|
|
Scenery Mode - The picture/video mode is set to Scenery. |
|
|
|
|
|
|
|
|
|
|
|
Mirror Image Mode - The picture/video mode is set to Mirror |
|
|
|
|
|
Image. |
|
|
|
|
|
|
|
|
|
|
|
Night/Dark Mode - The picture/video mode is set to Night/Dark. |
|
|
|
|
|
|
|
|
|
|
|
Self-Timer (5 Seconds) - The self-timer is set to 5 seconds. |
|
|
|
|
|
|
|
|
|
|
|
Self-Timer (10 Seconds) - The self-timer is set to 10 seconds. |
|
|
|
|
|
|
|
|
|
|
|
Multiple Shots - The multiple shots function is enabled. |
|
|
|
|
|
|
|
|
|
|
|
Camera Resolution (3.2M) - The camera is set to 3.2-megapixel |
|
|
|
|
|
resolution (1536x2048). |
|
|
|
|
|
|
|
|
|
|
|
Camera Resolution (2.0M) - The camera is set to 2-megapixel |
|
|
|
|
|
resolution (1200x1600). |
|
|
|
|
|
|
|
|
|
|
|
Camera Resolution (1.3M) - The camera is set to 1.3-megapixel |
|
|
|
|
|
resolution (960x1280). |
|
|
|
|
|
|
|
|
|
|
|
Camera Resolution (0.3M) - The camera is set to 0.3-megapixel |
|
|
|
|
|
resolution (480x640). |
|
|
Phone Basics |
14 |
|
||
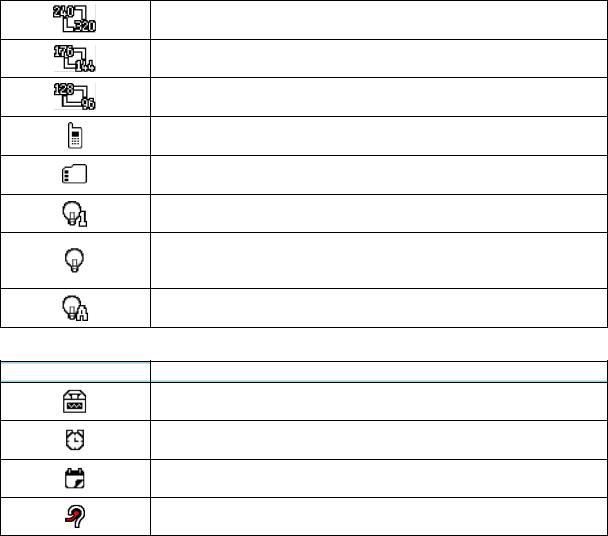
Camera Resolution (0.1M) - The camera is set to 0.1-megapixel resolution (240x320).
Video Resolution (QCIF) - The video resolution is set to QCIF
(176x144).
Video Resolution (Sub-QCIF) - The video resolution is set to Sub-
QCIF (128x96).
Saving to Phone - Your phone is saving a picture or video to the phone memory.
Saving to Memory Card - Your phone is saving a picture or video to the memory card.
Camera Flash On This Shot - The camera flash is enabled only for the current shot.
Camera Flash Always On or Video Light On - The camera flash is always enabled in camera mode, or the video light is on in camcorder mode.
Automatic Camera Flash - The camera flash will be enabled when needed.
|
|
Other Icon |
Description |
TTY - Your phone is connected to a TTY device.
Alarm - An alarm or countdown is set.
Calendar - You have event notifications.
HAC Enabled - Your phone’s HAC (hearing aid compatibility) setting is enabled.
Display Your Phone Number
You can display your phone number and other information about your phone and account.
► Press  > Settings > Phone Info > Phone#.
Phone Basics |
15 |

Text Entry
Select a Text Input Mode
Your phone provides convenient ways to enter letters, numbers, and symbols whenever you are prompted to enter text.
1.From a screen where you can enter text, press OPTIONS (right softkey) to change the text mode. (If you are in the message entry screen, press OPTIONS [right softkey] >
Text Mode.)
2.Select one of the following options:
Abc to enter characters by using the alphabet mode. See ABC Mode.
T9Word to enter text using a predictive text system that reduces the number of key presses required while entering a word.
123 to enter numeric characters.
Symbols to enter symbols.
Smileys to enter smile icons.
Emoticons to enter “emoticons.” (This is available, for example, when composing a message or when editing a Schedule or To Do description in Calendar.)
Paste List to paste copied or cut text (if applicable).
Web Shortcuts to enter Web shortcuts (for example, www., http://, or .com).
Text Options to display the text entry options menu (if applicable). See Set Text Entry Options.
Tip: When entering text, press  to change the capitalization style as Abc > ABC > abc (ABC mode), or as T9Word > T9WORD > T9word (T9Word mode). The selected style is displayed in the bottom-right corner of the screen, above the right softkey label (if applicable).
T9 Text Input
T9 Text Input lets you enter text by pressing keys just once per letter. To select the T9Word mode when entering text, see Select a Text Input Mode.
T9 Text Input uses an intuitive word database to analyze the letters you enter and create a suitable word. (The word may change as you type.)
1. Select the T9Word text input mode.
Text Entry |
16 |
2.Press the corresponding keys once per letter to enter a word. (For example, to enter
the word “Bill,” press 


 .) (If you make a mistake, press
  to erase a single character. Press and hold
  to erase an entire word.)
If the word you want is not displayed after you have entered all the letters, press the navigation key to scroll through additional word selections. To accept a word and insert a space, press  .
.
Add a Word to the T9 Database
If a word you want to enter is not displayed in a T9 word choice list when you are using T9 Input, add it to the database.
1.While you are in T9Word mode, enter a letter. (A word choice list opens.)
2.Scroll down the list and select <Add Word>.
3.Enter a word and press SAVE (left softkey). The word will appear as an option the next time you scroll through options during T9 Text Input.
For more information about T9 Text Input, visit the Nuance website at nuance.com/t9/.
ABC Mode
In Abc mode, also known as multi-tap entry, you press keys one, two, three, or four times to enter the letters you see on the keypad.
By default, the first letter of a sentence is capitalized and the following letters are lowercased. To switch between lowercase and uppercase, press the  key. After a character is entered, the cursor automatically advances to the next space after two seconds or when you enter a character on a different key.
1.Select the Abc text input mode. See Select a Text Input Mode.
2.Press the corresponding key repeatedly until the correct letter appears. For example, to enter “Abc,” press  once for “a,” twice for “b,” and three times for “c.”
Set Text Entry Options
The text entry options menu allows you to specify a suitable feature during the text entry process. Note that some of the options are applicable to T9Word mode only.
1.When entering text, press OPTIONS (right softkey) > Text Options.
– or –
Press  > Settings > Text Entry.
Text Entry |
17 |
2.Highlight an option and press  .
.
Word Complete to suggest possible words based on letters you have entered.
Next Word Complete to automatically display the word that may follow the current text input.
Phrase Complete to set the phone to predict possible phrases after one word with a space is entered.
Word Scan to allow the predictive text input system to recognize words by searching Contacts.
Word Choice List to select whether to display the word choice list.
Input Language to select the language to enter (English or Spanish).
My Words to edit or delete custom words you have added to the predictive text database.
 Add Word to store words that you frequently use.
Select Text to select text for copying, cutting or adding (if applicable).
Delete All to delete all text (if applicable).
Help to view the T9 instructions.
Simple Data Exchange
This feature makes it easy to select certain information in a message or email message and automatically save it or use it in a related application.
Simple Data Exchange works with these types of information:
●Email addresses
●Phone numbers
●Web addresses (URLs)
Email Address Options
►Highlight an email address, press  , and then select an option:
Send Message > Message or Email. The selected messaging application will open and the email address will appear as the message’s recipient.
Share > Message or Email. The selected messaging application will open and the email address will appear in the message body.
Text Entry |
18 |
Save to Contacts to save the email address in Contacts.
Contact Details to display the Contacts entry if the email address is already saved in Contacts.
Phone Number Options
►Highlight a phone number, press  , and then select an option:
Call to call the phone number.
Prepend to prepend a number to the phone number.
Send Message to send a message to the phone number. The messaging application will open and the phone number will appear in the To: field.
Share > Message or Email. The selected messaging application will open and the phone number will appear in the message body.
Save to Contacts to save the phone number in Contacts.
Contact Details to display the Contacts entry if the phone number is already saved in Contacts.
Web Address (URL) Options
►Highlight a Web address (URL), press  , and select an option:
Browse to open the browser to the Web page.
Share > Message or Email. The selected messaging application will open and the Web address will appear in the message body.
Save to Contacts to save the Web address in Contacts.
Text Entry |
19 |
Phone Calls & Settings
Make Phone Calls
Call Using the Phone Keypad
The most “traditional” way to place a call is by using the phone’s keypad.
1.Enter a phone number from standby mode. (If you make a mistake while dialing, press  to erase the numbers.)
2.Press  ,
,  , or the external speaker button.
3.Press  when you are finished.
Call With the Phone Closed
You can make a phone call using Automatic Speech Recognition (ASR) with the phone closed. It also works with the phone open. See Automatic Speech Recognition (ASR).
1.Press and hold the external speaker button to unlock the keyguard if the buttons are locked. See Keyguard.
2.Press and hold the external speaker button to activate ASR.
3.Follow the voice prompts. Say “Call” and the name of an entry saved in your Contacts or a phone number. See Make a Voice Call Using ASR.
The call will be made in speakerphone mode unless you have a headset connected to the phone.
4.Press the call list button when you are finished.
Tip: You can redial your most recent call using the Recent History list. Press the call list button to display the list and select the entry you want to call.
Call from History
Place a call to the numbers in your History.
1.Press  > History.
– or –
Press  or the call list button in standby mode.
2. Highlight an entry and press  .
.
Tip: To redial your last outgoing call, press  twice.
Phone Calls & Settings |
20 |
Note: You cannot make calls from History to entries identified as No Caller ID, Private (Restricted ID), or Unavailable ID.
Call from Contacts
Place a call to the numbers stored in your Contacts.
1.From standby mode, press CONTACTS (right softkey).
2.Highlight the entry you want to call.
3.Press  to dial the entry’s default phone number.
– or –
To dial another number from the same entry, press  to select the entry, highlight a number, and then press
  .
.
Call Using the Plus (+) Code
When placing international calls, use Plus Code Dialing to automatically enter the international access code for your location (for example, 011 for international calls made from the U.S.).
1.Press and hold  to display “+” on your phone screen.
2.Enter the country code and phone number, and then press  . (The phone automatically prepends the access code for international dialing, followed by the country code and phone number.)
Call Using a Speed Dial Number
You can store up to 98 numbers in your phone’s speed dial memory to make contacting friends and family easier.
You must have already assigned a speed dial number to an existing phone number. See Assign Speed Dial Numbers.
To use speed dial for locations 2-9:
►From standby mode, press and hold the appropriate key for approximately two seconds. To use speed dial for locations 10-99:
►From standby mode, enter a two-digit speed dial number, and then press  .
.
The display confirms that the number has been dialed when it shows “Connecting...”
Phone Calls & Settings |
21 |
Call Using Abbreviated Dialing Features
Abbreviated Dialing is similar to speed dialing. You can use either of the following abbreviated dialing features.
●Contacts Match - Retrieve any number saved in your Contacts by entering four or more digits of any part of the number.
●Prepend - Prepend the first five or six digits (for example, the area code and prefix) to any four or five digits you enter.
To activate the Prepend feature:
1.Press  > Settings > Others > Call Setup > Abbrev. Dial.
2.Select Prepend > On.
3.Enter a fiveor six-digit number and press  .
.
To place a call using Abbreviated Dialing:
1.Enter the four or more digits of any part of a Contacts entry’s phone number to use the Contacts Match feature.
– or –
Enter the last four or five digits of the number to use the Prepend feature.
Note: Contacts Match will not retrieve numbers if you enter 911 or reserved three-digit service numbers such as 411 or 611.
2.Press  to call the displayed number. (If there are two or more matched numbers in your Contacts, a list is displayed. Highlight the name or the phone number you want to call, and then press
  to place a call.)
Call a Phone Number with Pauses
You can dial or save phone numbers with pauses for use with automated systems, such as voicemail or credit card billing numbers.
There are two types of pauses available on your phone:
●Hard Pause sends the next set of numbers when you press SEND TONES (left softkey).
●2-Sec. Pause automatically sends the next set of numbers after two seconds.
Note: You can have multiple pauses in a phone number and combine two-second and hard pauses.
To dial or save phone numbers with pauses:
Phone Calls & Settings |
22 |
1.Enter all or part of a number.
2.Press OPTIONS (right softkey) > Hard Pause or 2-Sec. Pause.
3.Enter additional numbers.
4.Press  to dial the number.
– or –
Press OPTIONS (right softkey) > Save. (You can save to a new or existing Contacts entry.)
Note: When dialing a number with a hard pause, press SEND TONES (left softkey) to send the next set of numbers.
Call a Phone Number in a Message
You can place a call to a number that appears in a message.
1.In standby mode, press MESSAGING (left softkey) > Messages.
2.Select a message with the number you want to call.
3.Select the number and select Call.
For more information on utilizing the information in a message, see Simple Data Exchange.
Call Emergency Numbers
You can place calls to 911 even if your phone is locked or your account is restricted.
► Press 


 .
.
Note: After you have placed an emergency call, your phone automatically enters Emergency mode.
During an emergency call, press OPTIONS (right softkey) to display your options. Highlight an option and press  .
.
●Transfer Audio to switch the call to an external device (if applicable).
●Contacts to show the Contacts list.
●Voice Memo to record the other party’s voice.
●Phone Info to display information about your phone.
Tip: Press MY PHONE# (left softkey) to display your phone number during an emergency call.
Phone Calls & Settings |
23 |
To exit emergency mode:
1.Press  to end a 911 call.
2.Press 
 .
.
Enhanced 911 (E911) Information
This phone features an embedded Global Positioning System (GPS) chip necessary for utilizing E911 emergency location services where available.
When you place an emergency 911 call, the GPS feature of your phone seeks information to calculate your approximate location. Depending on several variables, including availability and access to satellite signals, it may take up to 30 seconds or more to determine and report your approximate location.
Important: Always report your location to the 911 operator when placing an emergency call. Some designated emergency call takers, known as Public Safety Answering Points (PSAPs) may not be equipped to receive GPS location information from your phone.
Receive Phone Calls
You can select the most convenient way to respond to a call.
Your phone notifies you of incoming calls in the following ways:
●The phone rings or vibrates.
●The LED indicator flashes.
●The backlight illuminates.
●The screen displays an incoming call message.
If the incoming call is from a number stored in your Contacts, the entry’s name is displayed. The caller’s phone number may also be displayed, if available.
Note: If your phone is turned off, all calls automatically go to voicemail.
Note: Your phone will answer an incoming call by opening the phone by default. To change the setting, see Call Answer Mode.
Answer an Incoming Call with the Phone Open
►Press  to answer an incoming call. (Depending on your settings, you may also answer incoming calls by pressing other keys. See Call Answer Mode.)
Phone Calls & Settings |
24 |
Answer an Incoming Call with the Phone Closed
►When your phone rings or vibrates, press the external speaker button. (The call will be answered in speakerphone mode.)
– or –
Open the phone to use the earpiece. See Call Answer Mode.
Answer an Incoming Call in Speakerphone Mode
► Press  or the external speaker button.
Mute the Ringer and Stop the Vibration
►Select Silence on the screen.
– or –
Press  , the hot key, or the volume button up or down.
Send an Incoming Call to Voicemail
► Select Send to Voicemail on the screen.
Reject an Incoming Call
►Press  or the call list button.
– or –
Press and hold  .
.
Reject an Incoming Call and Send a Message
► Select Ignore with Text.
In-call Options
Pressing OPTIONS (right softkey) during a call displays a list of available in-call features. To select an option, highlight the option and press  .
.
●Transfer Audio to switch the call to a Bluetooth device (if applicable).
●Save to save the current call’s phone number in your Contacts.
●Contact Details to display information about the caller stored in your Contacts.
●Main Menu to display the phone’s main menu.
Phone Calls & Settings |
25 |
●3-Way Call to open a call with two other parties.
●Contacts to display your Contacts list.
●Voice Memo to record the other party’s voice.
●Phone Info to display information about your phone. Further options may also be available.
►Press MUTE/UNMUTE (left softkey) to mute/unmute the microphone.
►Press the volume button up or down to adjust the receiver volume.
►Press  or the external speaker button to turn the speaker on. Press again to turn it off.
Warning: Because of higher volume levels, do not place the phone near your ear during speakerphone use.
End Phone Calls
There are two ways to disconnect a call.
►Press  .
.
– or –
Press the call list button.
After you have finished your call, the phone will display the caller’s name (if already in your
Contacts), phone number (if available), and the duration of the call. Pressing OPTIONS (right softkey) will display the Recent History options. See History Options for details.
Missed Call Notification
When an incoming call is not answered, your screen displays the Missed Call log. Press  to dial the phone number.
To display a Missed Alerts entry from standby mode:
1.Press  > Missed Alerts.
2.Highlight the entry you wish to view and press  .
.
Phone Calls & Settings |
26 |
Voicemail
Set Up Voicemail
You should set up your Voicemail and personal greeting as soon as your phone is activated. Always use a password to protect against unauthorized access.
1.Press and hold  in standby mode to dial your voicemail number.
2.Follow the system prompts to:
Create your password.
Record your name announcement.
Record your greeting.
Important: Voicemail Password – It is strongly recommended that you create a password when setting up your voicemail to protect against unauthorized access. Without a password, anyone who has access to your phone is able to access your voicemail messages.
Voicemail Notification
There are several ways your phone alerts you to a new message.
You will be notified of a new voicemail:
●By displaying a message on the screen.
●By sounding the assigned ringer type.
●By displaying  at the top of the screen.
New Voicemail Message Alerts
When you receive a new voicemail message, your phone alerts you and prompts you to call your voicemail.
To call your voicemail from the notification screen:
1.Press  .
.
2.Enter your voicemail password if prompted.
3.Follow the voice prompts to listen to and manage your voicemail messages. To set the frequency of new message alerts:
1. Press  > Settings > Others > Alerts > Repeated Tone > Voicemail.
Phone Calls & Settings |
27 |
2. Select Single Tone (once only) or Repeated Tone (once every minute).
Retrieve Your Voicemail Messages
You can review your messages directly from your wireless phone or from any other touch-tone phone.
Use Your Phone to Access Your Messages
1.Press and hold  .
.
–or –
In standby mode, press MESSAGING (left softkey) > Voicemail.
2.Enter your voicemail password if prompted.
3.Follow the voice prompts to listen to and manage your voicemail messages.
Note: You are charged for airtime minutes when you are accessing your voicemail from your wireless phone.
Use Another Phone to Access Messages
1.Dial your wireless phone number.
2.When your voicemail answers, press the asterisk key (*).
3.Enter your password.
Tip: When you call into voicemail, you first hear the header information (date, time, and sender information) for the message. To skip directly to the message, press  during the header.
Phone Call Options
Caller ID
Caller ID identifies a caller before you answer the phone by displaying the number of the incoming call. If you do not want your number displayed when you make a call, follow these steps.
1.Enter 

 .
.
2.Enter the number you want to call.
3.Press  .
.
Phone Calls & Settings |
28 |
Call Waiting
When you’re on a call, Call Waiting alerts you to incoming calls by sounding a beep. Your phone’s screen informs you that another call is coming in and displays the caller’s phone number (if available).
To respond to an incoming call while you’re on a call:
►Press  . (This puts the first caller on hold and answers the second call.) To switch back to the first caller:
►Press  again.
Tip: For those calls where you don’t want to be interrupted, you can temporarily disable
Call Waiting by pressing 

 before placing your call. Call Waiting is automatically reactivated once you end the call.
3-Way Calling
With 3-Way Calling, you can talk to two people at the same time. When using this feature, the normal airtime rates will be charged for each of the two calls.
1.Enter a number and press  .
.
2.Once you have established the connection, press  . (This puts the first caller on hold.)
3.Select Contacts, Recent History, or Enter Phone#.
4.Select a number from your Contacts or Recent History, or enter a number directly, and then press  .
.
5.When you’re connected to the second party, press  again to begin your 3-way call.
If one of the people you called hangs up during your call, you and the remaining caller stay connected. If you initiated the call and are the first to hang up, all callers are disconnected.
Call Forwarding
Call Forwarding lets you forward all your incoming calls to another phone number—even when your phone is turned off. You can continue to make calls from your phone when you have activated Call Forwarding.
To activate Call Forwarding:
1.Enter 

 .
.
2.Enter the area code and phone number to which you want your calls forwarded.
Phone Calls & Settings |
29 |
Loading...