


CUP320


The lightning flash with the arrowhead symbol, within an equilateral
triangle is intended to alert the user to the presence of uninsulated
"dangerous voltage" within the product's enclosure that may be of
sufficient magnitude to constitute a risk of electric shock to persons.
The exclamation point within an equilateral triangle is intended
to alert the user to the presence of important operating and
maintenance (servicing) instructions in the literature
accompanying the product.
CAUTION
RISK OF ELECTRIC SHOCK
DO NOT OPEN
REFER SERVICING TO QUALIFIED SERVICE PERSONNEL.
NO USER SERVICEABLE PARTS INSIDE.
DO NOT REMOVE THE COVER.
CAUTION: TO REDUCE THE RISK OF ELECTRIC SHOCK,
IMPORTANT SAFETY & INSTALLATION INSTRUCTIONS
INSTRUCTIONS PERTAINING TO THE RISK OF FIRE ELECTRIC SHOCK , OR INJURY TO PERSONS
WARNING: When using electric products, basic precautions should
always be followed, including the following:
1. Read all the Safety and Installation Instructions and Explanation
of Graphic Symbols before using the product.
2. This product must be grounded. If it should malfunction or
break down, grounding provides a path of least resistance for
electric current to reduce the risk of electric shock. This product
is equipped with a power supply cord having an equipment-
grounding conductor and a grounding plug. The plug must be
plugged into an appropriate outlet which is properly installed and
grounded in accordance with all local codes and ordinances.
DANGER: Improper connection of the equipment-grounding
conductor can result in a risk of electric shock. Do not modify the
adaptor which defeats the function of the equipment-grounding
conductor. If you are in doubt as to whether the product is properly
3. Do not use this product near water Ð for example, near a bathtub,
washbowl, kitchen sink, in a wet basement, or near a swimming
pool, or the like.
4. This product should only be used with a stand or cart that is
recommended by the manufacturer.
5.
speakers or headphones, may be capable of producing sound
levels that could cause permanent hearing loss. Do not operate
for a long period of time at a high volume level or a level that is
uncomfortable. If you experience any hearing loss or ringing in
the ears, you should consult an audiologist.
6. This product should be located so that its location or position
does not interfere with its proper ventilation.
7. The product should be located away from heat sources such as
radiators, heat registers, or other products that produce heat.
8. The product should be connected to a power supply only of the
type described in the operating instructions or as marked on the
product.
9. This product may be equipped with a polarized line plug (one
blade wider than the other). This is a safety feature. If you are
unable to insert the plug into the outlet, contact an electrician to
replace your obsolete outlet. Do not defeat the safety purpose of
the plug.
10. The power supply cord of the product should be unplugged
from the outlet when left unused for a long period of time. When
unplugging the power supply cord, do not pull on the cord, but
grasp it by the plug.
11. Care should be taken so that objects do not fall and liquids are
not spilled into the enclosure through openings.
12.
when:
A. The power supply cord or the plug has been damaged;
B. Objects have fallen, or liquid has been spilled into the
product;
C. The product has been exposed to rain;
D. The product does not appear to be operating normally or
exhibits a marked change in performance;
E. The product has been dropped, or the enclosure damaged.
13. Do not attempt to service the product beyond that described in
the user maintenance instructions. All other servicing should be
14. WARNING: Do not place objects on the product’s power supply
cord, or place the product in a position where anyone could trip
over, walk on, or roll anything over cords of any type. Do not
allow the product to rest on or be installed over cords of any type.
hazard and/or personal injury.
RADIO AND TELEVISION INTERFERENCE
WARNING:
approved by Young Chang could void your authority to operate the
instrument.
IMPORTANT: When connecting this product to accessories and/or
other equipment use only high quality shielded cables.
NOTE: This instrument has been tested and found to comply with the
limits for a Class B digital device, pursuant to Part 15 of the FCC Rules.
These limits are designed to provide reasonable protection against
harmful interference in a residential installation. This instrument
generates, uses, and can radiate radio frequency energy and, if not
installed and used in accordance with the instructions, may cause
harmful interference to radio communications. However, there is no
guarantee that interference will not occur in a particular installation. If
this instrument does cause harmful interference to radio or television
reception, which can be determined by turning the instrument off and
on, the user is encouraged to try to correct the interference by one or
more of the following measures:
• Reorient or relocate the receiving antenna.
• Increase the separation between the instrument and the receiver.
• Connect the instrument into an outlet on a circuit other than the
one to which the receiver is connected.
• If necessary consult your dealer or an experienced radio/television
technician for additional suggestions.
The normal function of this product may be disturbed by strong electro
magnetic interference. If so, simply reset the product to resume normal
operation by following the instruction manual. In case the function
could not resume, please use the product in another location.
NOTICE
This apparatus does not exceed the Class B limits for radio noise
emissions from digital apparatus set out in the Radio Interference
Regulations of the Canadian Department of Communications.
AVIS
Le present appareil numerique n’emet pas de bruits radioelectriques
depassant les limites applicables aux appareils numeriques de la
class B prescrites dans le Reglement sur le brouillage radioelectrique
edicte par le ministere des Communications du Canada.
SAVE THESE INSTRUCTIONS
IMPORTANT SAFETY INSTRUCTIONS
1) Read these instructions.
2) Keep these instructions.
3) Heed all warnings.
4) Follow all instructions.
5) Do not use this apparatus near water.
6) Clean only with dry cloth.
7) Do not block any of the ventilation openings. Install in accordance with the manufacturer’s
instructions.
8) Do not install near any heat sources such as radiators, heat registers, stoves, or other apparatus
Allow adequate ventilation for the power adapter. Do not
hide it under a carpet or behind a curtain or place it in an enclosed space where heat buildup can
occur. Do not defeat the safety purpose of the polarized or grounding-type plug. A polarized plug
has two blades with one wider than the other. A grounding type plug has two blades and a third
grounding prong. The wide blade or the third prong are provided for your safety. If the provided
9) Protect the power cord from being walked on or pinched, particularly at plugs, convenience
receptacles, and the point where they exit from the apparatus.
10)
11)
or sold with the apparatus. When a cart is used, use caution when moving the cart/
apparatus combination to avoid injury from tip-over.
12) Unplug this apparatus during lightning storms or when unused for long periods of
time.
13)
damaged in any way, such as power-supply cord or plug is damaged, liquid has been spilled or objects
have fallen into the apparatus, the apparatus has been exposed to rain or moisture, does not operate
normally, or has been dropped.
Warning:
such as vases, are placed on the equipment.
To completely disconnect this equipment from the AC Mains, disconnect the power supply cord plug
from the AC receptacle.

Kurzweil International Contacts
-
tive.
Customers Outside the US:
HDC Young Chang Co., LTD.
US Customers:
American Music & Sound
925 Broadbeck Dr #220
Newbury Park, CA 91320
Tel: 800-431-2609
Fax: 818-597-0411
Email: info@americanmusicandsound.com
South Korea
Tel: +82 32 570 1000
www.ycpiano.co.kr
www.youngchang.com
www.kurzweil.com
support@kurzweil.com
www.facebook.com/kurzweilmusicsystems/
www.twitter.com/KurzweilMusic
www.youtube.com/user/KurzweilTutorials
196, Bongsu-daero, Seo-gu,
Incheon, Korea

Table of Contents
Introduction 1
Primary Features
CUP310 Carton Contents
Assembly Instructions
Power Connection
MP3 - Aux In
Volume
Headphone Jacks
Quick Start
Overview 5
Input/Output Panel
Control Panel Display, Buttons and Controls
Operation
Selecting a Program
Selecting a Program with the Keyboard
Play/Pause/Stop Metronome or Rhythm Pattern
Selecting Demo Songs
Rhythm Pattern
Metronome
Tempo
Rhythm Vol
Metro Vol
Tap Tempo
Using Layer Mode
Using Split Mode
Using Dual Mode
Selecting and Playing a Song
Recording a Song
Punch-in Recording
Tempo, Rec.Rthm, and Rhythm Vol
Selecting Metronome and Rhythm Settings
Erasing a Song
Selecting Settings
Touch
Tune
Reverb Lvl (Reverb Level)
Local Ctrl (Local Control)
AutoPwr (Auto Power Off)
Version
Hard Reset? (Restoring Factory Defaults)
Program Mode 9
Demo Mode
10
Metronome/Rhythm Mode
11
Layer/Split/Dual Mode
13
Song Mode
15
Settings Mode
17

About MIDI
MIDI Channels
MIDI In and Out Ports
USB MIDI Connection
MIDI Implementation Chart
Demo Song List
Program List
Specifications
MIDI
19
System Mode (Boot Loader)
20
Appendix
21
page 1
Introduction
Primary Features
● CUP310 : 88-Note fully-weighted hammer-action keyboard with 3-point velocity sensor
CUP320 : 88-Note Graded hammer-action Wood keyboard with 3-point velocity sensor
● Dual 25-watt amplifiers with 4-speaker, stereo sound system
● 2 Gigabyte Sound ROM from the Forte SE featuring German and Japanese Grand Piano, Harpsichord, Clav,
73 Tine EP and Celeste
● 88 expressive sounds with 69 Rhythm Patterns
● 128 X 64 monochrome LCD screen
● Built-in sustain pedal (with half damper function), sostenuto pedal and soft pedal
● Kurzweil String Resonance (KSR) to simulate sympathetic string resonance for acoustic piano sounds
● Layer Mode (Layer two instrument sounds across the keyboard)
● Split Mode (Split two instrument sounds across the keyboard)
● Dual Mode (Split-keyboard dual 44-Key operation ideal for duets or piano lessons)
● Adjustable keyboard sensitivity
● Performance Recorder (10 song capacity with punch-in recording)
● Adjustable reverb effect, as well as preset effects from the Forte SE
● 51 Built In Demo Songs
● Stereo RCA Audio Input and Output Jacks
● Stereo 1/8" audio input (for playing backing tracks from a smart-phone or similar device)
● Two 1/4” Headphone Jacks
● Standard MIDI In and Out ports
● “Plug & Play” USB MIDI
Congratulations on your purchase of the Kurzweil CUP310. You are certain to enjoy many hours exploring
the variety of features as well as the beautiful preset Programs.
Andante CUP310 Carton Contents
● CUP310 instrument (main cabinet)
● DC power adapter, with AC power cord
● Warranty Card
● CUP310 User’s Manual (this manual)
● Hardware:
If you are missing any of the above, please contact your Kurzweil dealer.
It is always a good idea to save the CUP310 cartons, in case they are needed for shipment.
Follow the procedure on the following pages to assemble the CUP310.
Part Name Q ’ ty
1 EA
1 EA
1 EA
1 EA
1 EA
① Keyboard
② Side panel of stand (Left)
③ Side panel of stand (Right)
④ Pedal box
⑤ Rear panel
Part Name
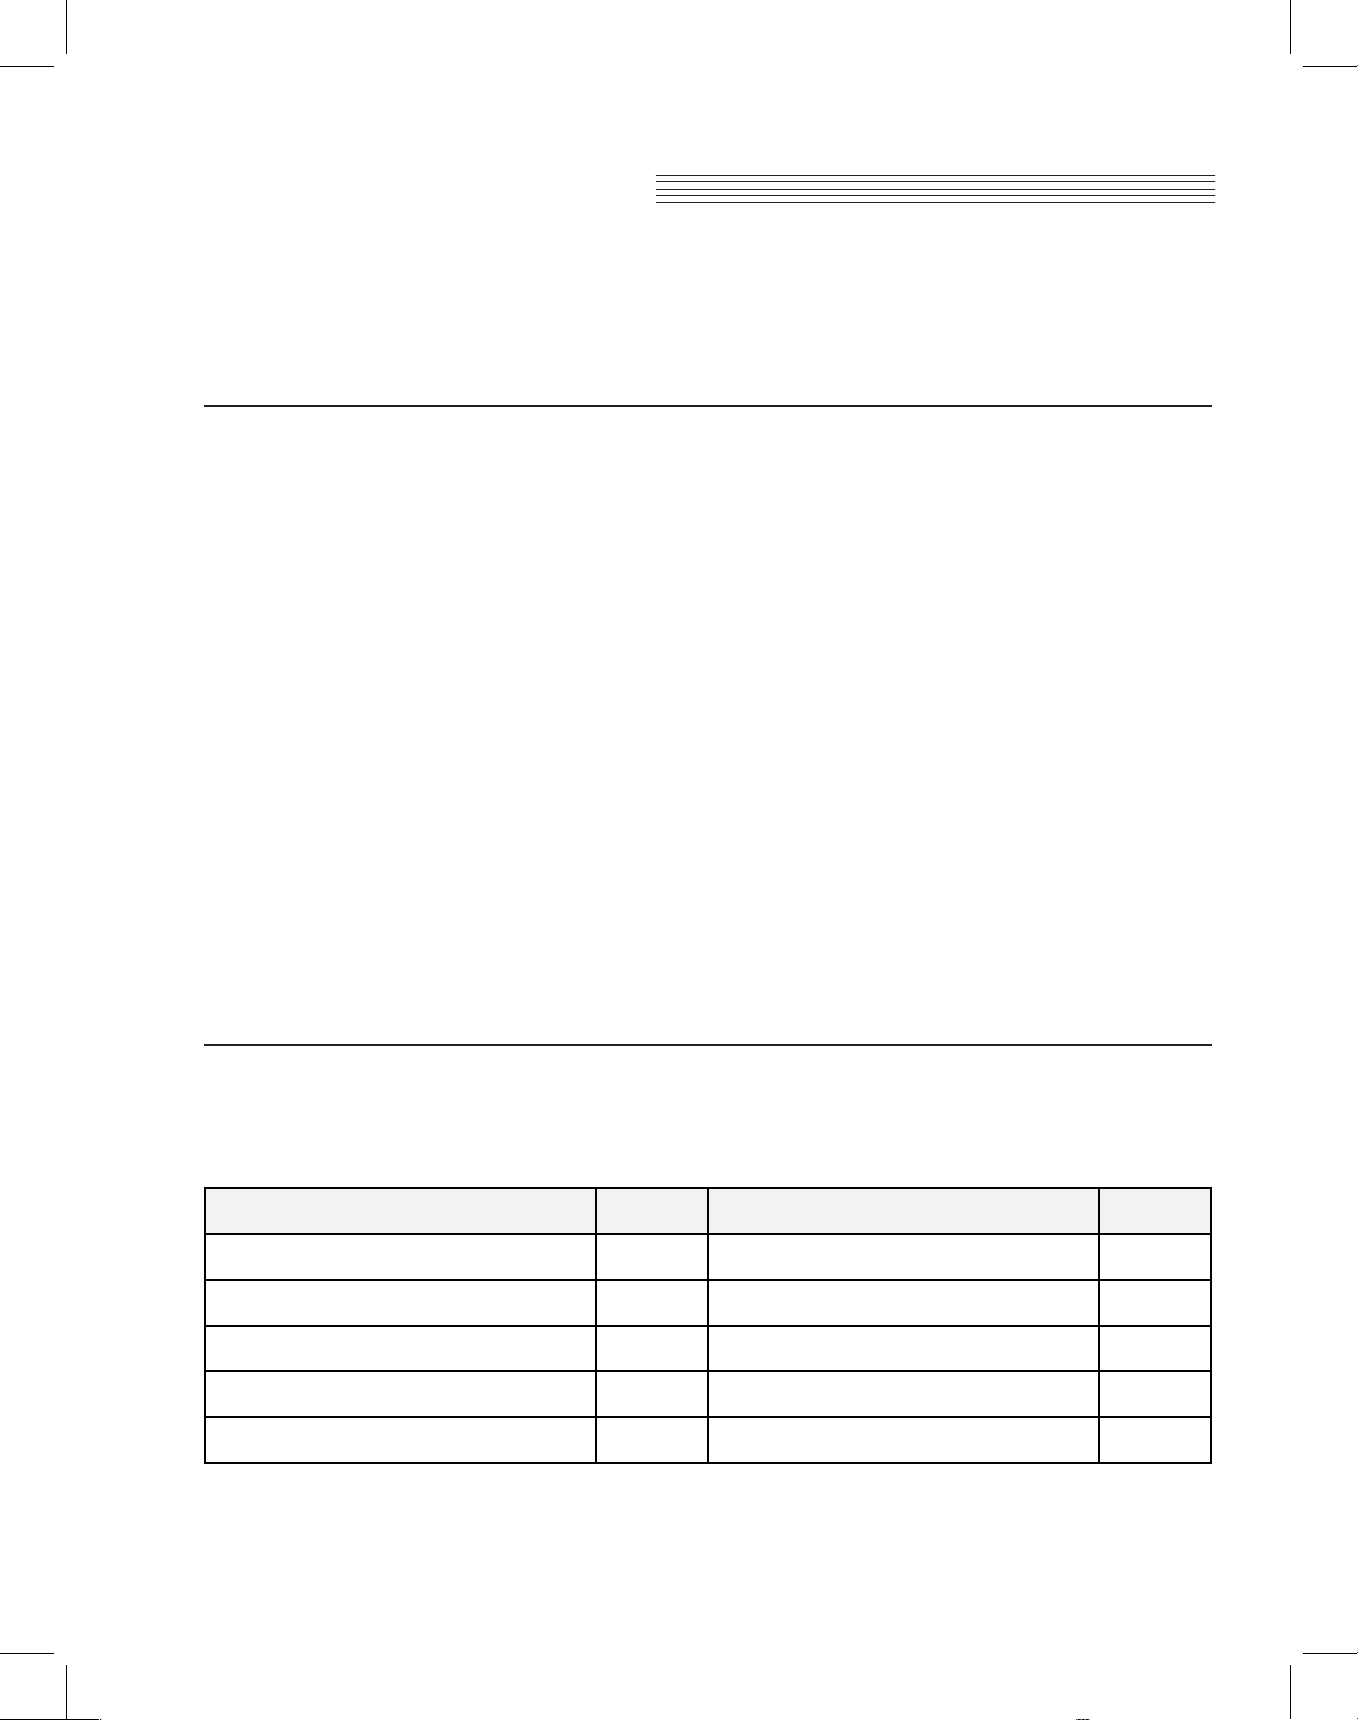
⑥ Screws for side panel and keyboard (25mm)
⑦ Screws for side panel and pedal box (25mm)
⑧ Screws for side panel and rear panel
⑨ Screws for rear panel and pedal box
⑩ Cord holder
Q ’ ty
4 EA
4 EA
4 EA
6 EA
2 EA
This manual introduces CUP310, 320. However, collectively, it is introduced as CUP310.
Assembly Instructions
page 2
Introduction
In addition to the main piano cabinet, your instrument comes with a stand requiring assembly, using the parts shown
below. Two people may be needed to complete the assembly, as the stand must first rest on the floor and then the
instrument must be securely attached on top of it.
Step 1:
Place the stand parts on a carpeted floor or blanket.
Use the four long bolts to attach the pedal unit to the
side panels.
Use the four shorter screws to attach the back panel
to brackets, as shown below.
Step 2:
Move the stand into an upright position and then place
the instrument upon it. To avoid possible damage, don’t
let the weight of the body rest on the stand until it is
properly aligned and secured with the six screws as
shown. Rotate the pedal adjuster until it comes in firm
contact with the floor surface. If the adjuster is not in firm
contact with the floor, the pedal will wobble and cause
malfunctions.
⑧
⑦
⑨
⑥
⑨
page 3
Introduction
.
Power Connection
A DC power adapter supplies the CUP310’s power. Connect the power adapter to the DC receptacle on the rear panel
of the CUP310. Then connect the power cord to an AC outlet.
If the power adapter is damaged or lost, contact your Kurzweil dealer to order a replacement.
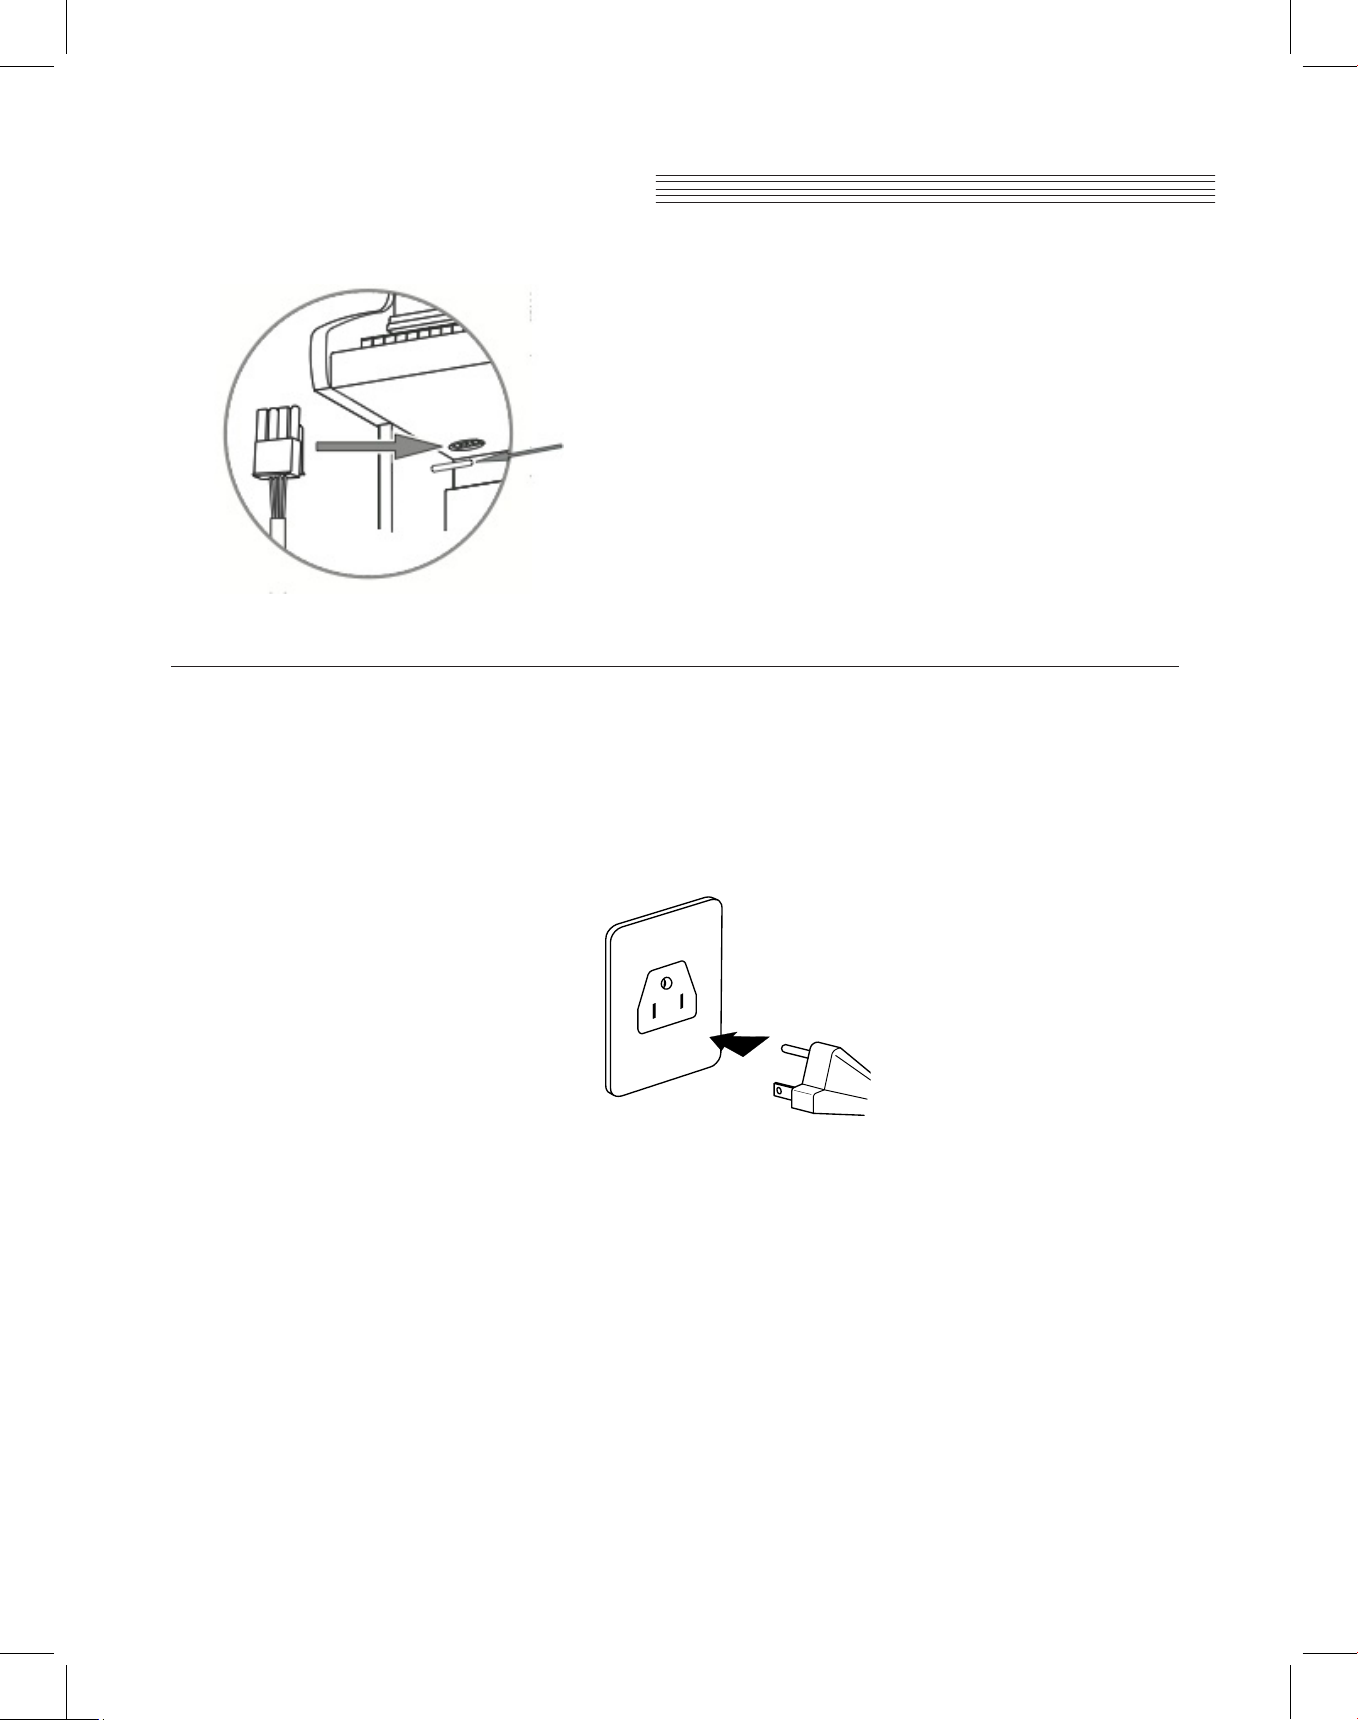
The AC plug shape will vary depending on location of use. After the CUP310 is set up, turn the power on.
While the unit is performing its power-up routine some of the front panel buttons will flash. After a couple of seconds,
the LCD screen will display the first Piano Program. The CUP310 is now ready to play. Use the Quick Start instructions on the
following pages for the basic steps to change Programs or play one of the Demo Songs.
CAUTION: Use only the DC power adapter supplied with the CUP310 / 320.
Connecting the wrong DC power adapter could damage the instrument.
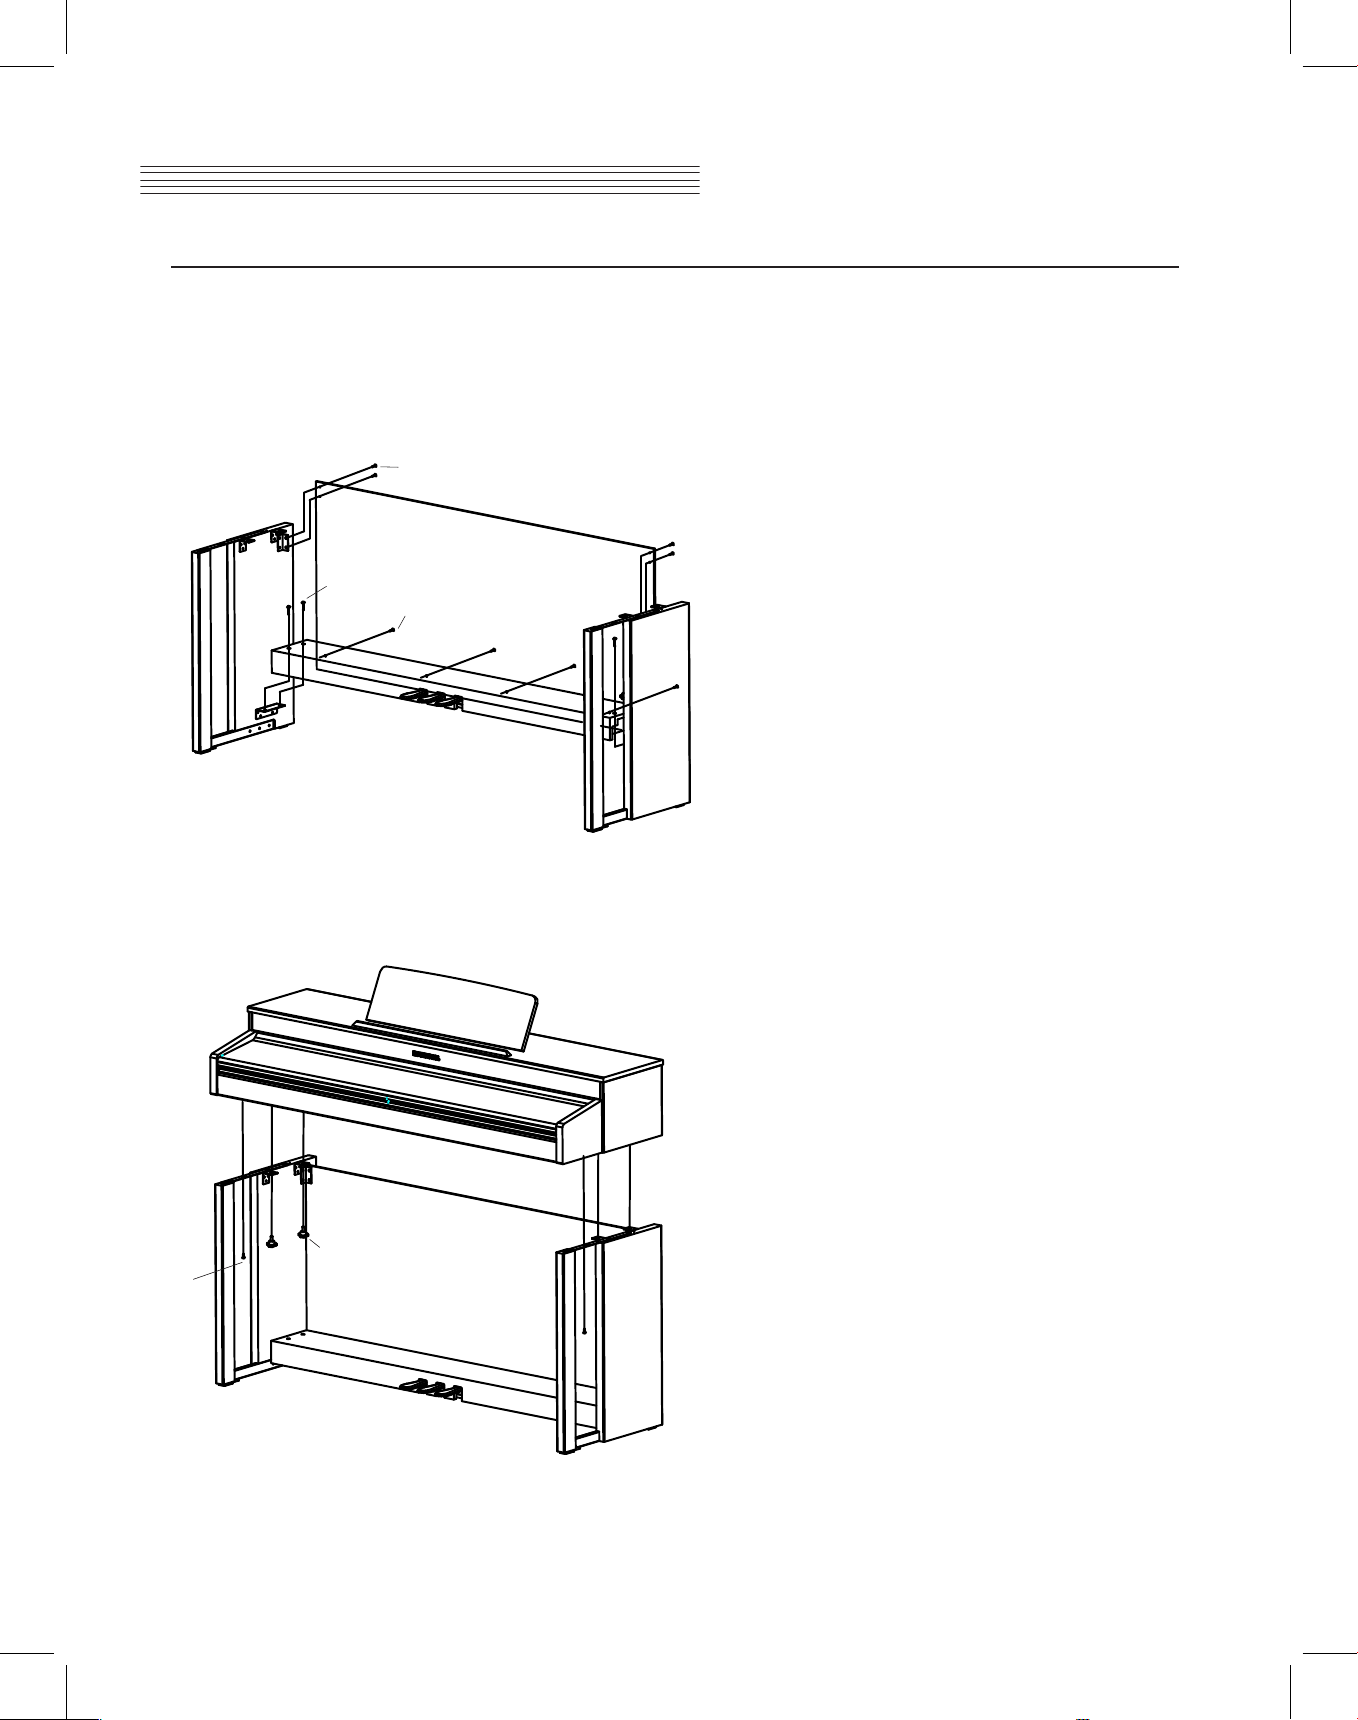
Step 3:
Insert the pedal cable connector into the pedal jack
located on the bottom of the keyboard.
Be sure that the connector is inserted in the correct
orientation. Make sure that the cable clamp fastens to
the pedal cable.
The AC plug shape will vary
depending on location of use

page 4
Introduction
Quick Start
Playing the Programs:
1. Turn on the power.
2. The Piano CATEGORY button LED is lit and the first Program (Piano) is ready to play.
3. There are a number of different Programs available. Press a CATEGORY button, then press the LEFT
or RIGHT navigation button to step through the available Programs in the selected category.
Playing a Demo Song:
1. Press the RECORD and PLAY/PAUSE buttons simultaneously to enter Demo Mode
2. The first demo song immediately plays.
When the current demo song finishes, the next song begins playing.
3. Press the LEFT or RIGHT navigation button to select the previous or next song.
4. You can also press PLAY/PAUSE and STOP buttons to start and stop the current demo.
5. To exit Demo Mode, press the EXIT button.
Volume
Before turning on the CUP310, it’s always a good idea to
set the volume at its minimum setting (all the way to the
left). For a generally comfortable level of volume while
playing, set the knob at its middle position.
The Volume Control is located on the right end of the
keyboard. Turn this knob from left to right (clock- wise) to
increase the volume. This adjusts the CUP310 speaker
and headphone audio volume. The Volume control does
not affect the volume of the sound coming from external
sources through the Audio In jacks on the rear panel.
Headphone Jacks
The CUP310 has two 1/4” stereo headphone jacks
located below the keyboard on the left end of the
cabinet.
Plugging in headphones provides privacy during
practice. Each jack operates the same so multiple
people can play and hear the music together. When
headphones are connected the CUP310’s speakers are
silent.
MP3 - Aux In
Connects an external audio source to the CUP310
sound system.
 Loading...