


User’s guide
EEB 9800.0
072588 IC1

For your information... |
Warranty |
Be sure to read the information in this manual carefully before you use your oven. You’ll find important information about safety and how to use, maintain and service your appliance to ensure a long service life. If you experience any problems, first be sure to read the chapter titled, “What to do if trouble occurs...”. Usually it's easy to solve minor problems yourself and avoid unnecessary service costs.
Please keep this manual in a safe place and pass it on to future owners for their information and safety.
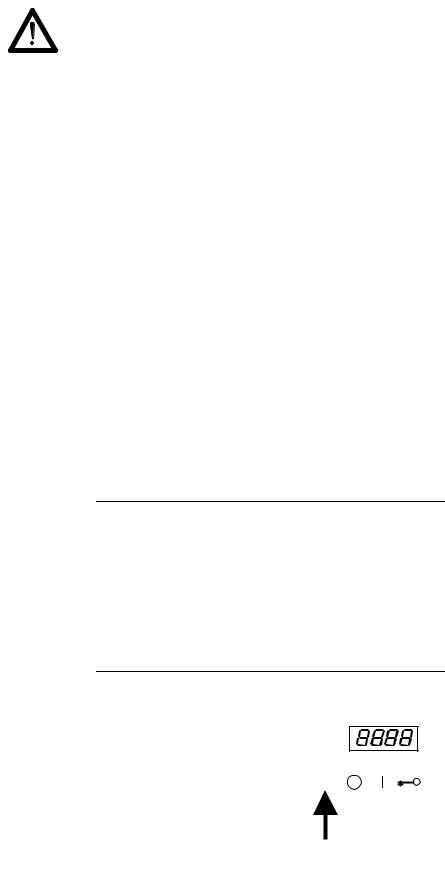
The following symbols are used in this operating manual:
=The warning triangle will alert you about possible health risks or things that can cause potential damage to your appliance.
Φ You'll find useful hints and information when you see this symbol.
This warranty is extended to the original purchaser and succeeding owners for products purchased for ordinary home use. It does not cover its use in commercial situations. Should the appliance be sold by the original purchaser during the warranty period, the new owner will continue to be protected until the expiration date of the original purchaser's warranty period. Save your dated receipt or other evidence of the installation/occupancy date. Proof of original purchase date is needed to obtain service under warranty. The warranty applies even if the owner should move during the warranty period.
KÜPPERSBUSCH does not assume any responsibility for consequential or incidental damages. This warranty provides you with certain legal rights. You may also have other rights which may vary from state to state.
What Is Covered
For one full year from the date of the original purchase, we will provide parts, service and labor in your home to repair or replace any part of the oven that fails because of a defect in materials or workmanship. This service is provided free of charge. All warranty service will be provided by an authorized technician during normal business hours.
What Isn't Covered
1.Service by an unauthorized agency will not be reimbursed. Likewise, the warranty doesn't cover any damage or repairs due to service performed by an unauthorized agency, or by the use of unauthorized parts.
2.Service visits to teach you how to use the appliance.
3.Service visits to correct the installation. You are responsible for providing electrical wiring and other connecting facilities.
4.Reset circuit breakers or replace home fuses.
5.Damage resulting from accident, alteration, misuse, improper installation, abuse or installation not in accordance with local electrical codes, or improper storage of the appliance.
6.Repairs due to other than normal household use.
For technical information and/or replacement parts, please contact the
Küppersbusch Customer Care line at
1-800-459-0844
For the most efficient assistance, please have the Model and Serial numbers for the appliance available.
2 |
EEB 9800.0 USA |
Contents
For your information... . . . . . . . . . . . . . . . . . . . . . . . . . . . . . . 2 Warranty . . . . . . . . . . . . . . . . . . . . . . . . . . . . . . . . . . . . . . . 2 Contents. . . . . . . . . . . . . . . . . . . . . . . . . . . . . . . . . . . . . . . . 3 Safety instructions. . . . . . . . . . . . . . . . . . . . . . . . . . . . . . . . . 4 Before using the appliance for the first time . . . . . . . . . . . . . . . 4
Disposing of the packaging and the old appliance
Setting the clock |
|
Initial cleaning |
|
Your appliance at a glance . . . . . . . . . . . . . . . . . . . . . . . . . |
5 |
The control panel - sensor keys and displays . . . . . . . . . . . . . . |
6 |
General information on your oven . . . . . . . . . . . . . . . . . . . . . . |
7 |
General Information |
|
Oven trays |
|
Rack levels |
|
Telescopic glide-out shelves (acc.-no. 601) |
|
Turning the oven light on and off |
|
Using your oven . . . . . . . . . . . . . . . . . . . . . . . . . . . . . . . . . . 8
General Information
Explanation of the colored symbols. Switching on the oven
Selecting a roasting programe Selecting a baking programe Select the heating programe Altering the cooking temperature Altering / Setting the cooking time Setting the finish time
Automatic turn-on and shut-off
Change automatic weight d / weight system Switching the oven off
Resuming interrupted programes Blend in the actual oven temperature
Additional functions . . . . . . . . . . . . . . . . . . . . . . . . . . . . . . . . 9
Rapid heating J Memory function M / N
Roasting . . . . . . . . . . . . . . . . . . . . . . . . . . . . . . . . . . . . . . . 10
Selecting a programe Turning the roast Roasting on the oven rack Roasting in a pan
Roast using the heating programes Some instructions on roasting programes Overview of roasting programes
Guideline values for roasting using the heating programes
Roasting thermometer and core temperature function . . . . . . . 12
Correct roasting thermometer insertion Using the roasting thermometer Setting the core temperature function Setting delayed cooking begin Recommended core temperatures
Baking . . . . . . . . . . . . . . . . . . . . . . . . . . . . . . . . . . . . . . . . 13
Selecting a programe Baking programe overview
Baking with heating programes Baking pizza
Notes on the table: “Guidelines for baking” Guidelines for baking
Grilling
Guidelines for grilling Defrosting and proving L Preserving
Overview of heating programes . . . . . . . . . . . . . . . . . . . . . . . 17 The minute minder t . . . . . . . . . . . . . . . . . . . . . . . . . . . . . 17 The child safety lock h . . . . . . . . . . . . . . . . . . . . . . . . . . . . 17
Activating / deactivating the child safety lock
Setting optional functions . . . . . . . . . . . . . . . . . . . . . . . . . . . 18
Overview of optional functions
1.Select language
2.Activate “Optional functions” selection menu 3a. Memory functions 1 and 2
3b. Eco function ON / OFF
3c. Maximum cooking time
4.End selection mode
How to use the telescopic glide-out shelves (acc.-no. 601) . . . . 19
Inserting the oven trays correctly Pulling out the trays
Pushing in the trays
Shelf levels, cooking times and temperatures Special accessories
Cleaning and Care . . . . . . . . . . . . . . . . . . . . . . . . . . . . . . . . 20
For all surfaces Remove caking
Information about the cleaning scraper The use of oven sprays - information Enamel
Stainless steel Glass Aluminium Door sealing Knobs
Removing and installing the oven door Removing and installing the side racks Folding heating element down/up
Unscrewing/reinstalling the individual telescopic glide-out shelves (acc.-no. 601)
Regenerating the ökotherm® catalyst
What to do if trouble occurs.... . . . . . . . . . . . . . . . . . . . . . . . |
22 |
Replacing a halogen bulb Replacing the door sealing
After Sales Service . . . . . . . . . . . . . . . . . . . . . . . . . . . . . . . 23 Rating Label . . . . . . . . . . . . . . . . . . . . . . . . . . . . . . . . . . . . 24
EEB 9800.0 USA |
3 |
Safety instructions
■Be sure your appliance is properly installed and grounded by a qualified technician.
■Check after installation that the fastening screws are securely seated and that the appliance cannot be moved.
■KÜPPERSBUSCH built-in ovens may only be connected to the corresponding KÜPPERSBUSCH built-in cook tops by a qualified and authorized technician. Only qualified personnel should perform installations and repairs on electrical appliances. Do not repair or replace any part of the appliance unless specifically recommended in this manual. Do not put your safety at risk.
■Do not operate the appliance until it has been properly installed within cabinetry.
■Do not leave children alone! Children should not be left alone or unattended in area where appliance is in use. They should never be allowed to sit or stand on any part of the appliance.
■The surfaces of the oven door and the appliance are hot when in operation. Do not let children in, on or around the appliance or its controls!
■Never use your appliance for warming or heating the room.
■Make sure connection cables for electrical devices are not jammed in the oven door.
■WARNING! Never use steam and/or pressure cleaning machines to clean the oven! This can damage the unit and increase the risk of personal injury.
■The appliance is intended for residential use only. Use for any other purpose is at the owner’s risk and could be dangerous. The manufacturer cannot be held responsible for damage caused by improper use of this appliance.
■When performing repairs and replacing oven light bulbs, be sure to disconnect the power supply by either removing the plug or manually “tripping” the circuit breaker.
■Do not store objects in your oven that could become a hazard if the oven is unintentionally turned on.
■CAUTION! Items of interest to children should not be stored in cabinets above a cooktop. A child can be seriously injured by climbing on a cooktop to reach items.
■Do not heat unopened food containers. Build-up of pressure may cause container to burst and result in injury.
■Heat resistant oven mitts/gloves are recommended when placing items in the oven, turning them, or removing them from the oven. The top heating element and oven racks can become very hot and cause burns, even though they are dark in color.
■Use only dry potholders. Moist or damp potholders on hot surfaces may result in burns from steam. Do not let potholder touch hot heating elements. Do not use a towel or other bulky cloth.
■Always place oven racks in desired location while oven is cool. If rack must be moved while oven is hot, do not let potholder contact hot heating element in the oven.
■Be careful when opening the oven door when the oven is hot. Don't position yourself directly in front of the oven door. Allow hot air or steam to escape before placing or removing food.
■Wear proper apparel. Loose-fitting or hanging garments should not be stored in an oven or near surface units.
4
■Do not use water on grease fires. Smother fire or flame or use dry chemical or foam-type extinguisher.
■The oven door must close well. In the event of damage to the hinges or to the glass pane, do not use the appliance until it's been repaired and checked by a qualified professional.
■If the door sealing is damaged, it must be replaced. The oven must not be used with damaged door sealing.
■Keep the oven vent ducts unobstructed.
■Always be sure to close the oven door completely.
■Keep a distance of at least 5 cm (2 inches) from the grill and top heat.
■Only use the original roasting thermometer.
■Do not jam the cable of the roasting thermometer in the oven door.
■Take roasting thermometer out of the oven when not being used.
■Keep it at a distance of at least 5 cm (2 inches) from the grill and top heat.
Before using the appliance for the first time
Disposing of the packaging and the old appliance
Be sure to dispose of the transport packaging properly. Disposal should not have a negative impact on the environment. Recycling the packaging saves raw materials and reduces the amount of waste.
Be sure to dispose of your old appliance properly, as well. Even if it can no longer be used, it still contains useful materials. Before discarding an old appliance, disconnect the power cord and remove the door to prevent it from becoming a hazard.
Setting the clock
The clock must be set before the oven is used and whenever power has been disconnected to the appliance. The display in such cases is ”0.00”.
– Touch the surface next to the OFF-key e on the left until it blinks and <set time> is displayed.
– Set the current time using the knob.
– Confirm with j
Initial cleaning
–Remove labels, accessories and packaging from the oven.
–Clean the appliance before preparing food for the first time. Clean the drip pan, oven rack etc. with a damp cloth and a solution of warm water and a non-abrasive detergent. Dry the interior with a soft cloth.
–Heating the oven
Close the oven door.
Heat up the oven with top heat/bottom heat C at 480 °F / 250 °C for 60 minutes.
Make sure that the room is well ventilated.
EEB 9800.0 USA

Your appliance at a glance
1 Oven door
2 Rack levels
3 Hot air fan
4 Fold-down grill (top heat and grill)
5 Socket for roasting thermometer
6Control panel
An overview of the control panel is given on page 6.
Accessories supplied:
Oven Rack
2 Baking tray (enamel)
Drip pan (enamel)
Roasting thermometer
Accessories available:
Maxi Pizza stone (acc. no. 146)
Telescopic glide-out shelves (acc. no. 601)
for the telescopic glide-out shelves:
Oven rack, depressed, e.g. for large poultry (acc. no. 752)
Glass drip pan, for use with accessory item 752 (acc. no. 753)
EEB 9800.0 USA |
5 |
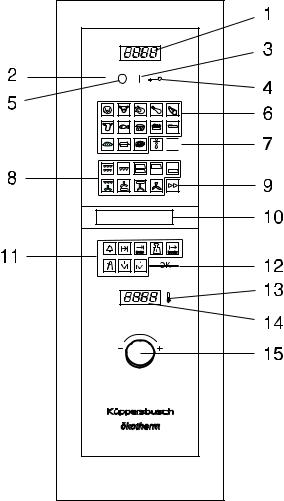
The control panel - sensor keys and displays
All oven functions are controlled from this panel.
ΦAll the sensor fields are simultaneously sensor keys that react to even the lightest touch.
ΦThe knob can be retracted by gently turning it and returned to its original position by turning the other way. It is can be turned either way.
1 |
|
Time display |
clock. |
|
|
|
|
2 |
|
Time key |
for setting the time. |
|
|
(invisible) |
|
|
|
|
|
3 |
ii |
ON-key |
switches the oven on (standby mode). |
|
|
|
|
4 |
h |
Children's safety key |
for activating / de-activating the child lock |
|
|
|
h, see page 17, for information on using |
|
|
|
the additional functions, see page 18. |
|
|
|
|
5 |
e |
OFF-key |
switches the oven off. |
|
|
|
|
6 / |
|
Programmes and functions |
are both display symbols and sensor keys |
8 |
|
(symbols / sensor keys) |
with which to select programmes or |
|
|
|
functions. |
|
|
|
|
6 |
|
Keys roasting programme |
basic programes for roasting meat and fish. |
|
|
|
See page 11 for an overview. |
|
|
Keys baking programmes |
basic programes for baking cakes and |
|
|
|
pizza. See page 13 for an overview. |
|
|
|
|
7 |
|
Key defrosting |
programme “Defrosting and proving L”, |
|
|
|
see page 16. |
|
|
|
|
8 |
|
Keys heating programes |
displays and sensors for the various heating |
|
|
|
means. See page 17 for an overview. |
|
|
|
|
9 |
|
Key rapid heating |
additional function, see page 9. |
|
|
|
|
10 |
|
Text display |
shows information on the next step, current |
|
|
|
settings and other details. |
|
|
|
|
11 |
t |
Key minute minder |
for setting the minute minder, see page 17. |
|
u |
Key cooking time |
for setting the cooking time, see page 8. |
|
n |
Key finish time |
for setting the finish time, see page 8. |
|
d |
Automatic weight system |
for adjusting the system weight d, see |
|
|
key |
page 9. |
|
r |
Key core temperature |
for setting the core temperature see |
|
|
function. |
“Roasting thermometer and core |
|
|
|
temperature function” on page 12. |
|
m |
Key cooking begin |
for setting cooking begin by using core |
|
|
|
temperature function. |
|
|
|
|
12 |
j |
OK-key |
for confirming input. |
|
|
|
|
13 |
g |
Actual temperature |
displays a brief text giving current baking |
|
|
selection key |
oven temperature. |
|
|
|
|
14 |
|
Temperature display |
indicates the set oven temperature. |
|
|
|
|
15 |
|
Knob |
for changing all variable values. |
|
|
|
|
6 |
EEB 9800.0 USA |
General information on your oven
General Information |
|
Telescopic glide-out shelves (acc.-no. 601) |
=Please note the safety instructions on page 4!
=Attention! Risk of overheating! Do not cover the bottom of the oven with aluminum foil, or place any kind of pot or pan directly on it. This can
cause heat to build up and it can damage the enamel.
ΦWhen the oven is in use, it becomes hot. In order to cool the housing, the cooling fan is switched on as soon as the housing heats up. The
cooling fan continues to run until the housing has cooled down - even after the appliance has been switched off. The fan noises are normal.
ΦIf you are preparing a dish with alcohol or yeast as an ingredient, and are using Hot air convection, Intensive hot air convection or Pizza Mode,
there will be a noticeable vinegar odor. If you find the odor disturbing, use Top/Bottom Heat or another alternate mode.
Oven trays
ΦIf you use telescopic glide-out shelves (acc. no. 601) please note the instructions on page 19.
Baking trays:
■Lift slightly when removing.
Place the baking trays back into the over, with the sloping edge pointing toward the oven door.
■Push the drip pan and baking tray with the two slots right at the back into the oven.
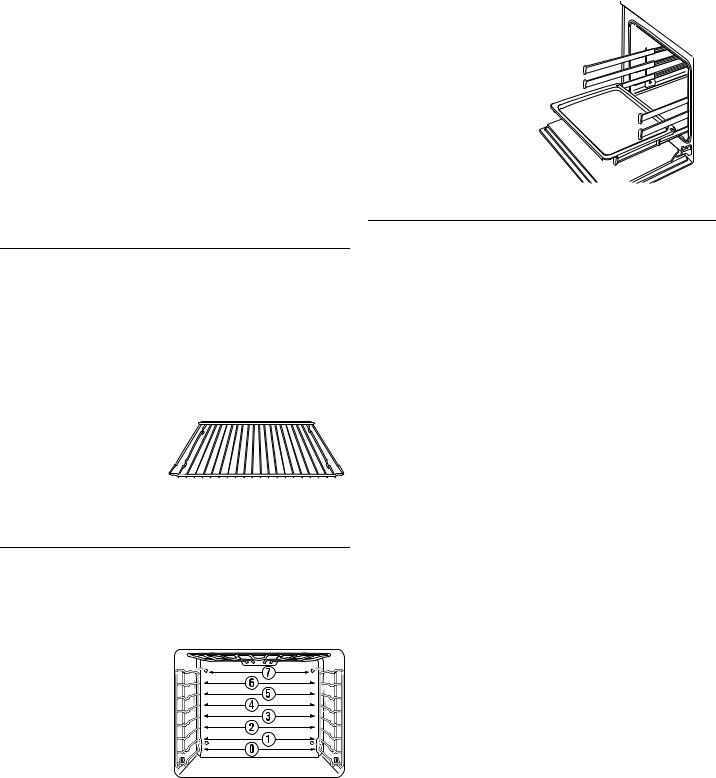
Oven rack:
■Make sure the catches of the racks always point toward the back (away from you).
These are oven rails that are available as accessories. They replace the side racks and make it easier to work in a hot oven. Trays or oven racks are placed on the glide-out shelves. They can be pulled out separately and independently of each other. If your oven is fitted with glide-out shelves, please read the instructions on page 19.
Turning the oven light on and off
If the knob is in the depressed position, the lighting is OFF.
–Press it in to have it extend fully. This turns the lighting ON.
To turn if OFF again, depress the knob.
The lighting is independent of oven operation. The light can also be turned off while the oven is in use. This will save energy and increase the life of the halogen lamps.
Rack levels
ΦIf you use telescopic glide-out shelves (acc. no. 601) please note the instructions on page 19.
There are eight levels in the side racks. The rack levels are numbered from 0 to 7 from the bottom up. For example, the drip pan can be inserted into rack level 0.
Side racks:
Rack level 0 is the lowest possible level.
EEB 9800.0 USA |
7 |

Using your oven
General Information
ΦA safety cut-out prevents the oven being accidentally left on for extended periods. Once the maximum cooking time set has expired, the oven turns
off if operation has been continuous. If you want to use the oven for longer, you will have to switch it on again for the remaining time. Please see “Setting optional functions” on page 18 for how to set maximum cooking time.
ΦAfter a few minutes operation, the knob is secured against unintentional use. It must first be turned before it is re-activated and settings can be
re-adjusted.
ΦIn some programes, the fan turns ON and OFF. This is intentional.
Only baking programes Bread Z and fruit cake X:
–Select the sub-programe desired with the knob and confirm your choice by touching j.
Only baking programes Bread Z:
–Set the weight of the material to be cooked with the knob. This setting governs cooking time and temperature.
–If you wish, change the predefined cooking time and cooking temperature.
–Now start the programe by touching j.
All other baking programes:
–If you wish, change the predefined cooking time and cooking temperature.
–Now start the programe by touching j.
Explanation of the colored symbols. |
|
Select the heating programe |
|
|
|
Color |
Means |
|
|
green symbol |
can be selected |
|
|
red symbol |
is active |
|
|
red / green symbol |
has to be set now |
|
|
orange symbol |
is active but has been modified |
|
|
ΦNot all programes and functions can be combined with one another. Those that cannot be so combined cannot be selected, i.e. do not
illuminate.
Φ-<...>+ in the text display means: values can be changed using the knob.
Switching on the oven
– Touch the sensor keyi.
The programe symbols illuminate green. The oven is ready for use and the text display shows <select programe OK>.
– Select a programe.
ΦIf you do not select a programe within 10 seconds, the oven will switch off again.
Selecting a roasting programe
The oven is switched on, the text display shows <select programe ok>.
–Touch the sensor key with the symbol for the programe you wish to select. The symbol illuminates red and the ”automatic weight system” blinks green / red.
–Set the weight of the material to be cooked with the knob. This setting governs cooking time and temperature.
–If you wish, change the predefined cooking time and cooking temperature.
–Now start the programe by touching j.
Selecting a baking programe
The oven is switched on, the text display shows <select programe ok>.
–Touch the sensor key with the symbol for the programe you wish to select. The symbol lights up red.
The oven is switched on, the text display shows <select programe ok>.
–Heating programes:
Touch the sensor key with the symbol for the programe you wish to select.
–If you wish, change the predefined cooking temperature.
–Cooking duration and end are not pre-set but can be input. (See ”Altering / Setting the cooking time” and ”Setting the finish time”).
–Now start the programe by touching j.
Altering the cooking temperature
Cooking temperature is pre-set in all programes and shown on the temperature display.
When you select a baking and roasting programe, you can only alter the cooking temperature within certain limits. The heating programes’ temperature is in the range 32 °F / 0 °C (no temperature setting) to 555 °F / 290 °C and freely selectable.
– Altering the cooking temperature: Turn knob.
Altering / Setting the cooking time
Cooking duration in the baking and frying programes is pre-set but changeable. No cooking duration is pre-set in the heating programes.
–Touch the sensor key u: The text display shows, for example, <Cooking time ok>.
–This time can be changed with the knob as desired.
–Confirm with j.
Setting the finish time
Cooking completion is the moment the oven is turned off.
ΦYou can combine the cooking duration u and the cooking completion n. See ”Automatic turn-on and shut-off”.
– Touch the sensor key n: The display shows <set end of cook time ok> or if the duration has already been chosen e.g. <end of cooking 13.24>.
–This time can be changed with the knob as desired.
–Confirm the modification with j.
8 |
EEB 9800.0 USA |
 Loading...