


Information
Power Parts
69029096140
08. 2010 |
3.211.677en |
*3211677en*
www.ktm.com

DEUTSCH
2
Danke, dass Sie sich für KTM Power Parts entschlossen haben.
Alle unsere Produkte wurden nach den höchsten Standards entwickelt und gefertigt, unter Verwendung der besten verfügbaren Materialien.
KTM Power Parts sind rennerprobt und gewährleisten ultimative Performance.
KTM KANN NICHT VERANTWORTLICH GEMACHT WERDEN FÜR FALSCHE MONTAGE ODER VERWENDUNG DIESES PRODUKTS. Bitte befolgen Sie die Montageanleitung. Fachmännische Beratung und korrekte Installation der KTM PowerParts durch einen autorisierten KTM Händler sind unerlässlich, um das Optimum an Sicherheit und Funktionalität zu gewährleisten.
Danke.
ENGLISH
2
Thank you for choosing KTM Power Parts!
All of our products are designed and built to the highest standards using the finest materials available. KTM Power Parts are race proven to offer the ultimate in performance.
KTM WILL NOT BE HELD LIABLE FOR IMPROPER INSTALLATION OR USE OF THIS PRODUCT. Please follow all instructions provided. Professional advice and proper installation of the KTM PowerParts by an authorized KTM dealer are essential to provide maximum safety and functions.
Thank you.
ITALIANO
2
Grazie per aver deciso di acquistare un prodotto KTM Power Parts.
Tutti i nostri prodotti sono stati sviluppati e realizzati secondo i massimi standard e con l'impiego dei migliori materiali disponibili. Le KTM Power Parts sono collaudate nelle competizioni ed assicurano altissime prestazioni.
KTM NON PUÒ ESSERE RESA RESPONSABILE PER UN MONTAGGIO O USO IMPROPRIO DI QUESTO PRODOTTO. Per favore osservate le istruzioni nel manuale d'uso. Al fine di garantire la massima sicurezza e il corretto funzionamento, è indispensabile farsi consigliare da persone esperte e competenti e far eseguire l'installazione delle KTM PowerPart presso i concessionari KTM autorizzati.
Grazie.
FRANCAIS
2
Nous vous remercions d'avoir choisi KTM Power Parts.
Tous nos produits ont été développés et réalisés selon les plus hauts standards et en utilisant les meilleurs matériaux disponibles. Les Power Parts de KTM ont fait leurs preuves en compétition et garantissent les meilleures performances.
LA RESPONSABILITÉ DE KTM NE SAURAIT ÊTRE ENGAGÉE EN CAS D'ERREUR DANS LE MONTAGE OU L'UTILISATION DE CE PRODUIT. Il convient de respecter les instructions de montage.
Le conseil spécialisé et l'installation dans les règles de l'art des PowerParts KTM par un concessionnaire KTM agréé sont indispensables pour assurer un maximum de sécurité et de fonctionnalité.
Merci.
ESPANOL
Gracias por haberse decidido por el Power Parts KTM.
Todos nuestros productos han sido desarrollados y producidos según los estándares más altos utilizando los mejores materiales disponibles.
Las KTM Power Parts están probadas en competencia y garantizan un óptimo rendimiento.
NO SE PUEDE HACER RESPONSABLE A LA KTM POR UN MONTAJE O UN USO INCORRECTO DE ESTE PRODUCTO. Le rogamos seguir las instrucciones para el montaje.
A fin de garantizar la máxima seguridad y un funcionamiento correcto es imprescindible acudir a un concesionario autorizado de KTM para obtener el mejor asesoramiento técnico e instalar correctamente las KTM PowerParts.
Gracias.
2

User Setting Tool
Installationsund Bedienungsanleitung
Chapter 1 System description
1. Functional overview
The User Setting Tool (UST) enables you to adjust your vehicle's injection quantity and ignition timing (KTM only) to your needs (setup function). Data from the ECU can be recorded as well (data recording function).
NOTE HUSABERG:
The User Setting Tool can only change settings relating to the injection rate. The ignition curve can only be changed via the Map Select switch. Changing the injection rate can only improve rideability and has NO influence on engine power.
- Setup function
This function can be used to change the data of the ECU and load them into the ECU.
The available settings are:
-Changing the injection rate over the entire area
-Changing the injection rate at individual load points
-Acceleration enrichment
-Changing the ignition curve (KTM only)
All of these settings can also be saved as a "KSD" file and, if necessary, written back into the ECU.
In this way, the optimal setting can be determined for every operating condition or route and used again when necessary.
- Data recording function
This function can be used to record data from the ECU, such as speed, throttle valve position, manifold air pressure, etc., and to display and analyze them via the software on the computer. These data can be saved as a "ULD" file.
2. Safety instructions
This manual will provide you with an overview of the installation, use, functions and specifications of the User Setting Tool (UST).
NOTE:
This product was developed for racing operation only.
Under NO circumstances can KTM be held responsible for any damage to the vehicle or PC that arises while using the tool.
-Read the manual carefully before using the UST.
-Keep the manual in a safe place.
-Duplication of the manual, in its entirety or in part, is prohibited without prior written permission.
-These instructions describe the state of the product at the time of printing. Minor deviations from these instructions due to continued development cannot be excluded. If you have any questions, please contact your KTM or Husaberg dealer.
-KTM cannot be held responsible for a loss of data that occurs due to hardware faults, malfunctions or other reasons.
-KTM cannot guarantee that the specifications of the product meet your particular requirements.
-KTM reserves the right to make changes to these instructions at any time and without notification.
ENGLISH 3
3.System requirements
NOTE:
Please note that certain minimum PC requirements are necessary for optimal performance of the UST.
ENGLISH
Minimum requirements: |
|
Operating system (OS) |
Windows XP (Home Edition oder Professional Edition) with Service Pack 2 or higher |
|
Windows Vista (Home Basic Edition) |
|
Windows Vista (Home Premium Edition) |
|
Windows Vista (Ultimate Edition) |
OS languages |
Japanese, English, German, French, Spanish and Italian |
|
If the OS language is Japanese, the software language of the UST will also be Japanese. |
|
If the OS language is not Japanese, the software language of the UST will be English. |
CPU |
CPU with Intel PentiumM or later |
HDD Kapazität |
Required OS memory 5 GB or more |
Speicherkapazität |
Required OS memory 512 MB or more |
Bildschirmauflösung |
1024×768 pixels or more |
USB |
USB 2.0 |
NOTE: |
|
4The HDD/memory capacity depends on the various environmental influences and operating conditions.
Windows XP/ Windows Vista are registered trademarks of the Microsoft Corporation USA. PentiumM is a registered trademark of the U.S. Intel Corporation.
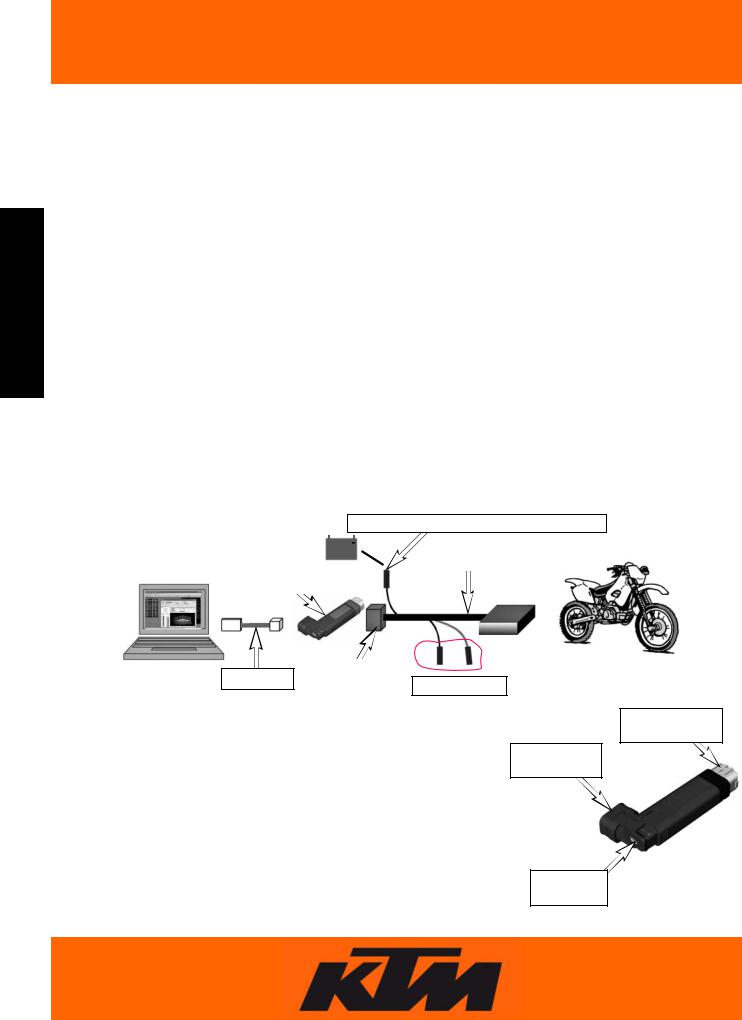
4. Component description
Vacant connector for external battery connection
Vehicle
PC |
Diagnosis cable |
|
|
|
UST-Adapter
ECU
USB cable |
Diagnosis |
|
connector |
Ignition on/off |
|
|
|
Connection for diagnosis cable
Protection for USB MiniB port
NOTE:
For connecting the cable and the UST adapter, see the Parts Installation Manual. (supplied with the UST)
Port for USB
MiniB
Chapter 2 Software installation
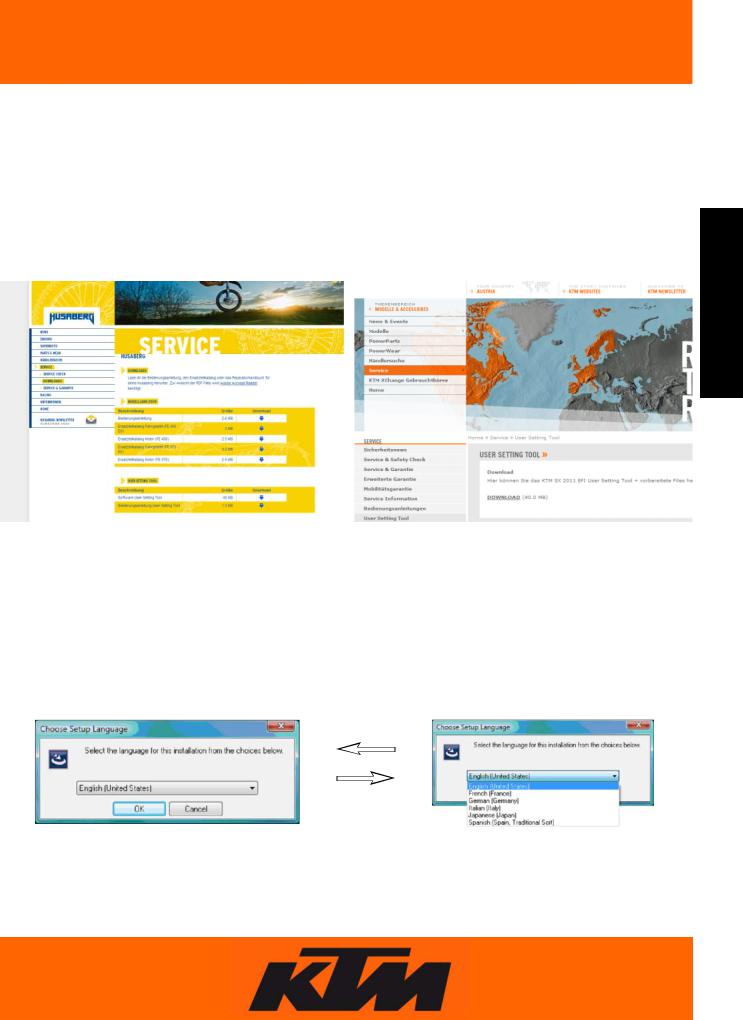
1.Downloading software
Download the “KTM UserSettingTool.zip” file from www.husaberg.com (Service -> Downloads) for Husaberg and from www.ktm.at (Service -> User Setting Tool) for KTM. Save it on your PC. Unpack the file. It contains two folders.
-KTMUserSettingToolVerX.X.X.X.(*1).exe
-Driver directory
*1 The version number is generated and substituted in for X.X.X.X.
NOTE:
The respective homepages contain finished mappings (for example, softer, more aggressive, for optional power components, etc.). These can likewise be downloaded and flashed (loaded) onto the respective ECU using the UST. They are updated and expanded sporadically.
We therefore recommend checking the download area occasionally for new mappings and software.
2.Installing UST under Windows Vista/XP
-Start the "KTM UserSettingToolVerX.X.X.X.exe":
-Select the language of the operating system for the installation and click on "OK".
ENGLISH 5
NOTE:
If the operating system does not run with one of the suggested languages, English is used by default. The language that is selected here has nothing to do with the software language. For the software language, you can only choose between Japanese and English.

ENGLISH 6
-Preparations for installation are started.
-The welcome window opens. Confirm this with "Next".
-Select the installation directory.
Confirm the directory with "Next". You can also select a different directory. To do so, select "Change...", select the directory and click on "Next".
-Install the program.
After the preparations for the installation are completed, start the installation with "Install". If you would like to make changes to your settings (directory,...), you can return to the required window with "Back".
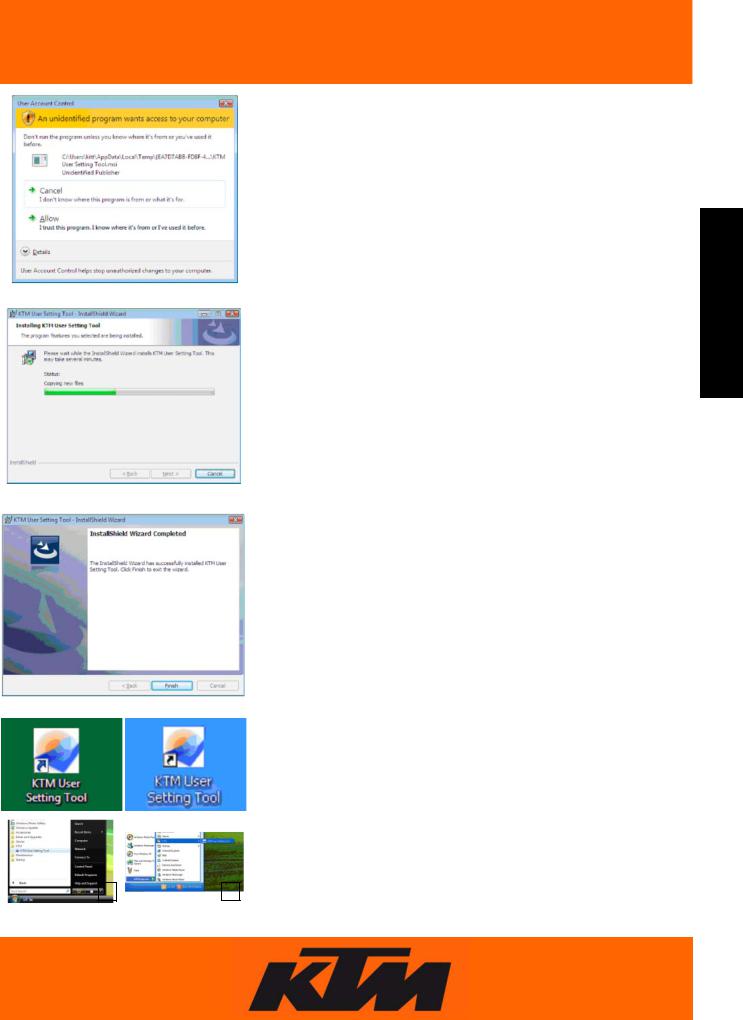
- The User Account Control window opens (Windows Vista only). Select "Allow" to continue the installation.
-The installation window opens.
ENGLISH 7
-Finish the installation.
After the installation is finished, another window opens. Confirm it with "Finish".
-Check the shortcuts.
After the installation is finished, check the shortcuts on the desktop and in the start menu.
Windows Vista (1)
Windows XP (2)
|
1 |
|
2 |
|
|
|
|
|
|
|
|
|
|
|
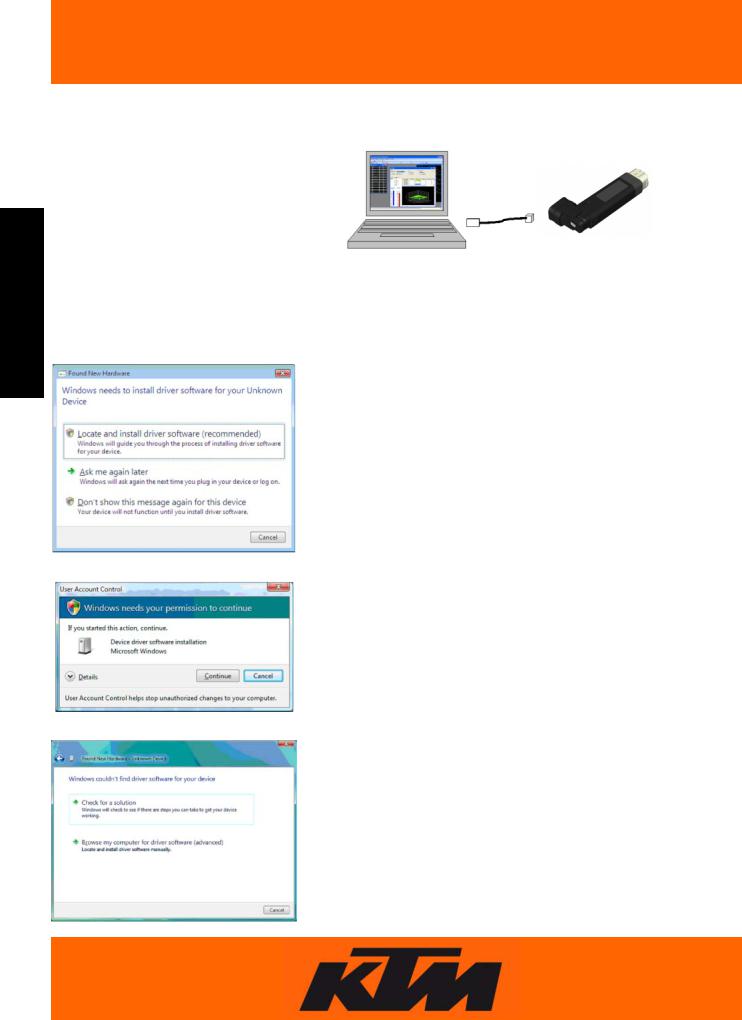
3.Installing the drivers
To be able to use the UST adapter, you must first install the appropriate driver.
ENGLISH 8
-Select a USB port that you wish to use with the UST adapter in the future.
NOTE:
The UST adapter only functions with the USB port with which it was installed.
-Connect the UST adapter with the PC using the USB cable included.
-Installation under Windows Vista
- The "Found New Hardware" window appears. Select "Locate and install driver software (recommended)"
- The User Account Control window opens. Select "Continue" to proceed with the installation.
-Another window opens.
Select "Browse my computer for driver software (advanced)".
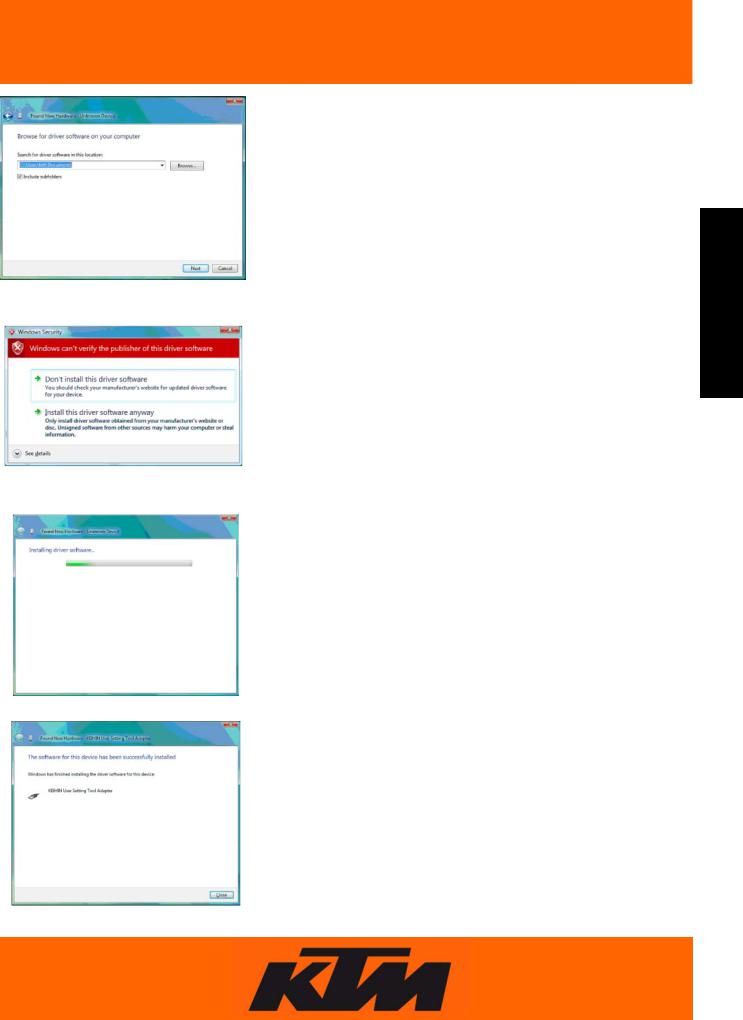
-Select the directory that contains the driver.
Click on "Browse..." and select the directory that contains the driver that you downloaded from www.husaberg.com . Select the right driver for your operating system, e.g.: "D:\Driver\Win2000_XP" and click on "Next".
- The Windows Security window opens.
Select "Install this driver software anyway".
ENGLISH 9
-The driver software is installed.
-New hardware was found.
After installation, the new hardware is detected.You can now "Close" the window to finish the installation.

ENGLISH 10
-Installation under Windows XP
-The "Found New Hardware" window appears. Select "No, not this time" and click on "Next".
-Select "Install from a list or specific location (Advanced)" and click on "Next.
- Select "Search for the best driver in the locations" and "Include this location in the search:" and click on "Browse"; select the directory that contains the driver that you downloaded from www.husaberg.com. Select the correct driver for your operating system, e.g.: "D:\Driver\Win2000_XP", and click on "Next".
- The Hardware Installation window opens.
Confirm with "Continue Anyway".
-New hardware was found.
After installation, the new hardware is detected.
You can now complete the installation by clicking on"Finish".
- Detection of the "KEIHIN User Setting Tool Adapter"
Check whether the adapter has been detected.
Chapter 3 Screen configuration
1.Main window of the KTM User Setting Tool.
Select under "View(V)".
-“Fuel Correction(F)”.
The fuel injection rate can be controlled in this window.
-“IG Correction(G)” (KTM only).
The ignition curve can be adjusted in this window.
ENGLISH 11
 Loading...