


Medidor de Humedad de Grano
Operators manual

EN
COMPONENTS
1 TESTER
2 BATTERY DOOR
3 USB DOOR
4 USB CABLE
5 CARRYING CASE
2
Operation
1
2
3
5
4
A - Test Cell
B - Display
C - Keyboard
D - Cap
E - Pressure-indicator Screw
D
A
C
B
E

EN
Operation
3
OPERATING CONDITIONS
Test cell and grain MUST be free of any condensation
or surface moisture. Moisture on grain or in test cell will
cause high readings. Very hot or cool grain will pick up
moisture when it warms or cools.
Because grains are irregularly shaped and may not always
pack the same way in the test cell, minor variations in
readings may occur. To enhance accuracy, always take
three (3) successive readings of the total sample being
tested and average the results. Empty and refill the tester
with new grain fromthe sample between each test.
The tester is most accurate when grain and tester
are between 16˚C and 32˚C. For best results, grain
temperature should not be below 4˚C or above 43˚C.
Condensation on the grain or test cell is best avoided by having the tester and grain at
the same temperature.
SCREEN AND KEYBOARD
BUTTON FUNCTIONS
A -
Power button is used to turn the tester on or o
B - Back arrow is used to go back to the previous menu. When the back arrow is
used any changes made in a previous menu will not be saved.
C -
Up arrow is used to scroll up through a list of menu items or increment a value
D - Forward arrow is used in some menus to advance to the next item
E - Down arrow is used to scroll down through a list of menu items or decrement a
value
F - Enter button is used to select a menu item or accept and save changes made in a
menu
A B C D
E F

EN
MENU SCREENS
A - The name of the menu that is currently displayed
B - The list of menu items to select from
C - The button bar indicates which buttons are active in the menu
GRAIN RESULTS SCREEN
A - Name of the grain tested
B - Current moisture result
C - Temperature of the grain
D - Averaged moisture result
E - Number of tests averaged
MOISTURE TESTING PROCEDURE
1. Remove cap and inspect test cell to be sure that it is clean and empty.
2. Press the “POWER” button to turn on tester.
3. When the grain to be tested has been selected by using the “UP OR DOWN”
buttons, fill the test cell even to the top.Use finger to level grain inthe test cell.
4. Replace cap and tighten until pressure-indicator screw is flushwith the top of cap.
5. Press the “ENTER” button to start measuring. Once the test is complete the
moisture %, temperature and the average moisture will be displayed.
6. Once a test has been taken empty the test cell.
NOTE: For best results always take at least three tests and use the average of the
results as the grain samples moisture.
4
Operation
A
B
C
D
A
B
C
Big Font
Small Font
E
EN
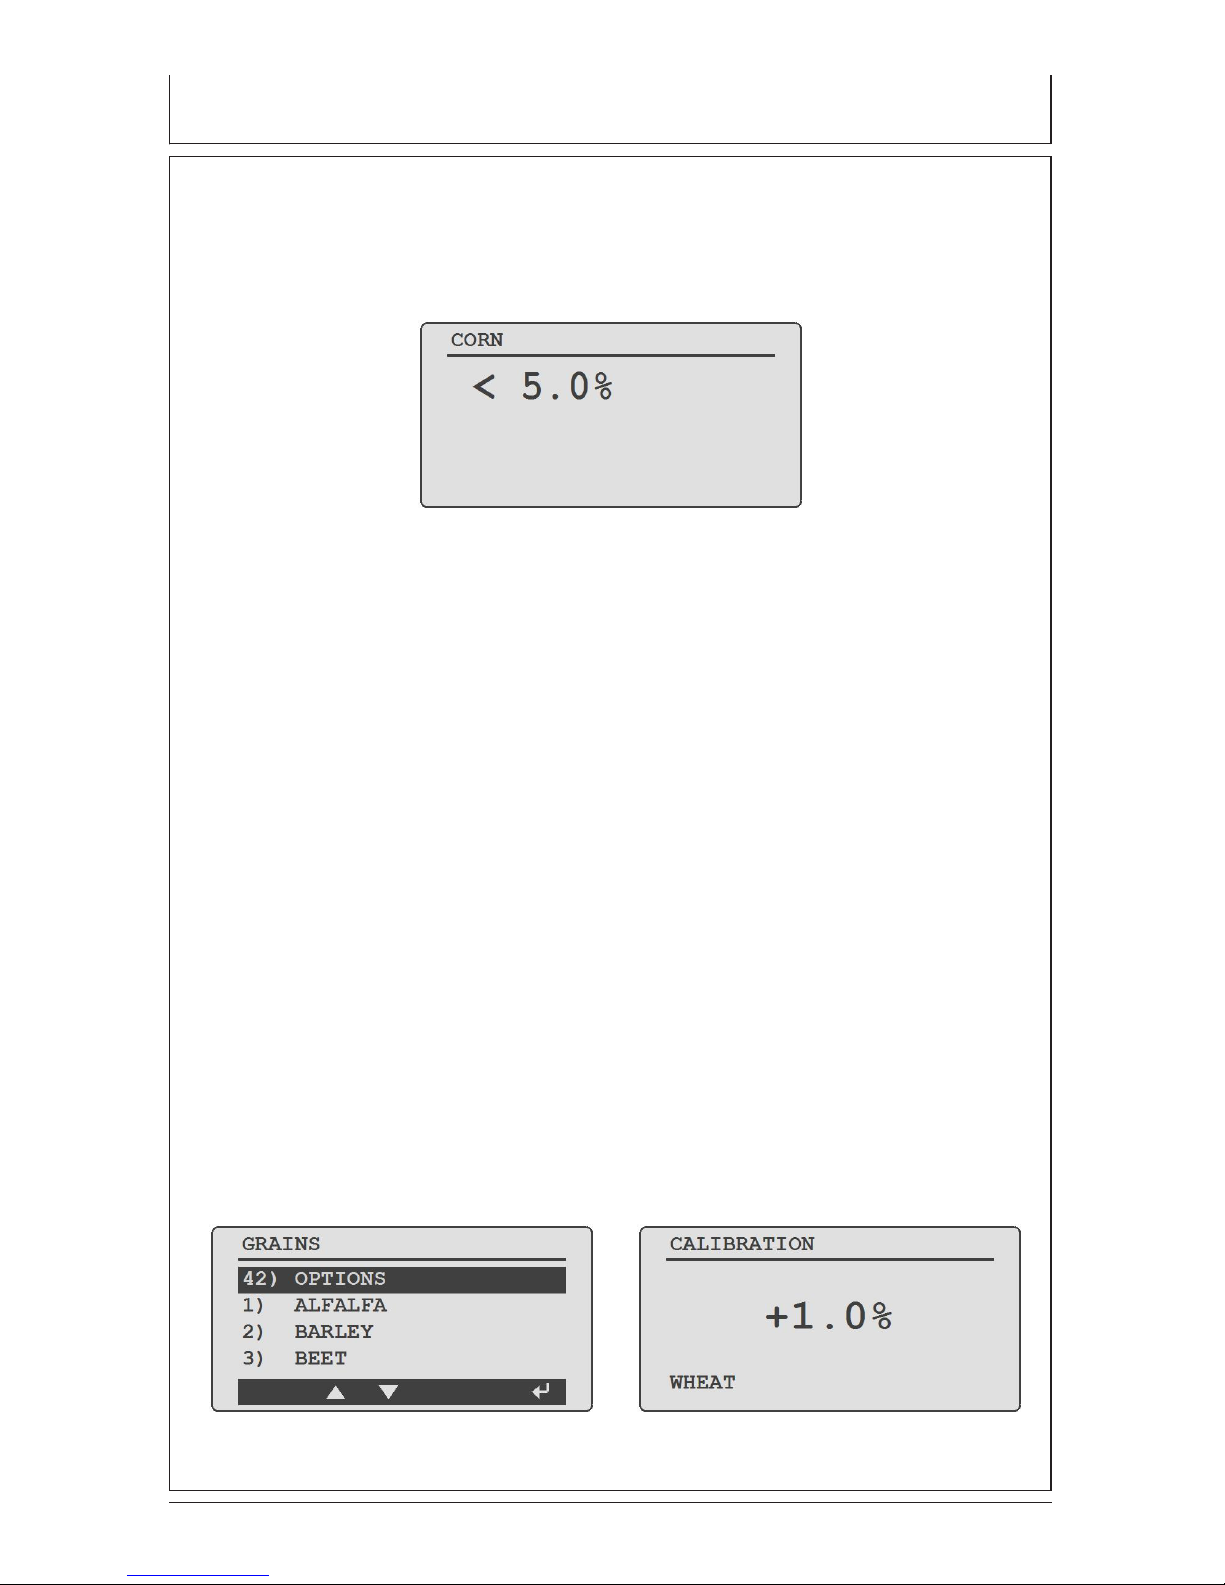
TESTING GRAINS THAT ARE ABOVE OR BELOW THE LIMITS
If the grain being tested in the tester is above or below the grains calibration limits
the tester will display a < (less than) or > (greater than) symbol followed by the tested
grain’s upper or lower moisture limit.
DISPLAYING THE AVERAGED MOISTURE RESULTS
1. Each time a moisture test is taken the averaged moisture result is automatically
displayed along with the current moisture and temperature.
2. The averaged results are stored for each individual grain, so when switching
between grains there is no need to clear the averaging results as the tester
calculates the average for each grain individually.
3. The tester by default will display the averaged results of the last selected number
of tests performed on the tested grain. (The default is the average of the last 3
tests)
FUNCTIONS AND SETTINGS
Settings can be checked and changed in options menu.Navigate to options in grain
menu with arrow buttons and select with enter button. Following settings are found in
options menu.
GRAIN OFFSET /CALIBRATION
Each grain can be individually adjusted by 5 % in increments of 0.1% to match the
results of an elevator tester.
Choose grain with right side arrow button. Adjust the oset with up/down buttons.
Save oset with enter button.
Operation
5

EN
Operation
6
CLEAR AVERAGE
In Clear average option choose between current grain or all grains and press enter.
Trash can will be displayed to confirm that your averages have been cleared
SELECT THE NUMBER OF TESTS TO AVERAGE
The tester can automatically average 3, 6 or 9 tests. (default is 3). Choose by pressing
enter.
LANGUAGE
Select preered language.
TEMPERATURE
Select preferred temperature units (Celsius or Fahrenheit). Choose by pressing enter.

EN
Operation
7
AUTO SHUTOFF
The tester can automatically turn o in 30 seconds, 1 minute or 5 minutes. Choose
preered time by pressing enter.
DISPLAYING THE SOFTWARE VERSION OF THE TESTER
Software version is shown in Version section of options. Choose by pressing enter
and software version will then be displayed for a few seconds.
BACKLIGHT
The display and keypad backlight can be turned on or o. Choose by pressing enter.
SELECT A DIFFERENT FONT SIZE
The tester has two dierent font sizes: standard and large to allow for easier viewing.
Choose by pressing enter.

EN
Operation
8
BATTERY
Battery level can be checked. Replace battery if battery level is low.
The tester is powered with two 9 volt alkaline batteries. The left battery (A) powers the
backlight circuit. The right battery (B) powers the system.
The tester will display a percentage of battery life left in both
the system and backlight batteries.
The tester system functions will operate if no backlight
battery is installed or if it is low.
NOTE: When you first turn on the tester if the systembattery
is at or below 5% the tester will automatically flash the
battery life on the display to let you know thebattery needs
to be replaced. If the backlight battery is fresh and the
system battery needs replacing, the backlight battery can
be used to operate the system by moving it to the system
battery location.
LCD CONTRAST
The tester’s display contrast can be adjusted from 50% to 100%. Adjust the contrast
with the up/down buttons and confirm with ente.
PERSONALIZING AND UPDATING THE TESTER
1. The tester is equipped with a USB port and when connected to a computer
will allow diagnostics and updates to its software and grain calibrations.
2. Visit our website to use your USB port for personalization (adding user
name), grain scale, firmware and diagnostic updates
A
B

EN
Troubleshooting
9
SYMPTOM A: Unit does not power up or loses power
occasionally (or backlighting does not operate.)
SOLUTION 1: Press ON-OFF button for shorter time. Do
NOT hold button down.
SOLUTION 2: Check batteries for 0% or higher. Replace
as necessary.
SOLUTION 3: Battery contacts may be making poor contact. Remove batteries and pull metal contacts (A) up from
bottom of compartment and above height of plastic knob
using needle-nose pliers.
SYMPTOM B: Unit is inaccurate.
SOLUTION 1: Temperature of the grain and unit may be more than 11˚C dierent.
SOLUTION 2: If grain is at an extreme temperature, let grain settle to reach room
temperature. Retest grain.
SOLUTION 3: Grain and/or test cell may have developed surface moisture from rapid
change in temperature of the grain sample. Allow grain and tester to stabi-lize near
room temperature. Inspect for visible moisture on grain and inside test cell. Dry the test
cell with a soft cloth or a blow dryer if necessary. Retest grain.
SOLUTION 4: If the tester displays SYSTEM BATTERY LOW, the test results may be
inaccurate. Replace battery.
SOLUTION 5: Unit may need to be re-calibrated by factory.
SYMPTOM C: Unit reads MOISTURE BELOW LIMIT or MOISTURE ABOVE LIMIT.
SOLUTION 1: Grain may be too wet or dry to test.
SYMPTOM D: Unit reads ERROR (---).
SOLUTION 1: Electronic failure. Return to your Dealer for repair or replacement or
contact manufacturer.
ERROR MESSAGES
Symbol Definition
ERROR (---) Tester is in need of service
NOTE: Contact manufacturer if an ERROR message occurs.
CLEANING THE TESTER
Remove cap and wipe out inside of the tester with a dry paper towel.
NOTE: Grain may become lodged in threads of cap and should be removed with a
small blade screwdriver.

EN
10
Service
WARRANTY
This product has a warranty valid for one (1) year from the date of purchase. The
warranty covers the materials and workmanship.
To claim the warranty, the customer should return the defected product to the
Manufacturer, re seller or the nearest Service Partner at the customer’s own expense.
The warranty claim must be accompanied with the description of the fault, copy of the
sales receipt and customer’s contact information.
The manufacturer / Service Partner will repair or replace the defected product and
return it as soon as possible.
The warranty does not cover any damages that are caused by incorrect or careless
use of the product, installation that does not correspond to the provided instructions
and other damages which may arise due to causes beyond the control of the
manufacturer.
The liability of KRAMP is limited to the price of the product at a maximum. KRAMP
does not accept any responsibility for any direct, indirect or consequential damages
that are caused by the use of the product or the fact that the product could not be
used.

 Loading...