


Contents |
|
1. Introduction --------------------- |
3 |
Main features ---------------------------- |
3 |
Printing conventions in this manual ---------- |
3 |
Important things to learn ------------- |
4 |
Front and rear panel --------------------------- |
4 |
The modes of the AX1500G ------------------ |
7 |
Effect channels of the AX1500G ------------- |
7 |
2. Playing the AX1500G -------- |
8 |
Example connections------------------- |
8 |
Play mode -------------------------------- |
8 |
Adjusting the master level --------------------- |
8 |
Selecting a program ---------------------------- |
8 |
Switching between effect channels ----------- |
9 |
Bypass and mute -------------------------------- |
9 |
Auto tuner ----------------------------------------- |
9 |
Metronome --------------------------------------- |
9 |
Expression pedal ------------------------------ |
10 |
Individual mode ------------------------ |
10 |
Phrase Trainer mode ------------------ |
11 |
3. Editing -------------------------- |
12 |
Editing effects --------------------------- |
12 |
Setting the noise |
|
reduction and program levels ------ |
13 |
Modifying program names ---------- |
13 |
Writing programs---------------------- |
13 |
4. Appendices -------------------- 14 |
Adjusting the expression pedal) ---- |
14 |
Restoring the user |
|
programs to the factory settings --- |
14 |
Troubleshooting ------------------------ |
15 |
Main specifications -------------------- |
15 |
Effect parameters ---------------------- |
16 |
DRIVE-AMP effects block -------------------- |
16 |
CABINET effect block ------------------------- |
17 |
MODULATION effect block ------------------ |
18 |
PEDAL effect block ---------------------------- |
20 |
AMBIENCE effect block ---------------------- |
22 |
Preset Program List -------------------- |
23 |
E 1

Precautions
Location
Using the unit in the following locations can result in a malfunction.
•In direct sunlight
•Locations of extreme temperature or humidity
•Excessively dusty or dirty locations
•Locations of excessive vibration
Power supply
Please connect the designated AC adaptor to an AC outlet of the correct voltage. Do not connect it to an AC outlet of voltage other than that for which your unit is intended.
Interference with other electrical devices
This product contains a microcomputer. Radios and televisions placed nearby may experience reception interference. Operate this unit at a suitable distance from radios and televisions.
Handling
To avoid breakage, do not apply excessive force to the switches or controls.
Care
If the exterior becomes dirty, wipe it with a clean, dry cloth. Do not use liquid cleaners such as benzene or thinner, or cleaning compounds or flammable polishes.
Keep this manual
After reading this manual, please keep it for later reference.
Keeping foreign matter out of your equipment
•Never set any container with liquid in it near this equipment. If liquid gets into the equipment, it could cause a breakdown, fire, or electrical shock.
•Be careful not to let metal objects get into the equipment. If something does slip into the equipment, unplug
the AC adaptor from the wall outlet. Then contact your nearest Korg dealer or the store where the
equipment was purchased.
THE FCC REGULATION WARNING (for U.S.A.)
This equipment has been tested and found to comply with the limits for a Class B digital device, pursuant to Part 15 of the FCC Rules. These limits are designed to provide reasonable protection against harmful interference in a residential installation. This equipment generates, uses, and can radiate radio frequency energy and, if not installed and used in accordance with the instructions, may cause harmful interference to radio communications. However, there is no guarantee that interference will not occur in a particular installation. If this equipment does cause harmful interference to radio or television reception, which can be determined by turning the equipment off and on, the user is encouraged to try to correct the interference by one or more of the following measures:
•Reorient or relocate the receiving antenna.
•Increase the separation between the equipment and receiver.
•Connect the equipment into an outlet on a circuit different from that to which the receiver is connected.
•Consult the dealer or an experienced radio/TV technician for help.
Unauthorized changes or modification to this system can void the user’s authority to operate this equipment.
CE mark for European Harmonized Standards
CE mark which is attached to our company’s products of AC mains operated apparatus until December 31, 1996 means it conforms to EMC Directive (89/336/EEC) and CE mark Directive (93/68/EEC). And, CE mark which is attached after January 1, 1997 means it conforms to EMC Directive (89/336/EEC), CE mark Directive (93/68/EEC) and Low Voltage Directive (73/23/EEC).
Also, CE mark which is attached to our company’s products of Battery operated apparatus means it conforms to EMC Directive (89/336/EEC) and CE mark Directive (93/68/EEC).
2
1. Introduction
Thank you for purchasing the ToneWorks AX1500G Modeling Signal Processor.
In order to enjoy your AX1500G to the fullest, please read this manual carefully, to ensure maximum performance. Please keep this manual for future reference.
Main features
• Korg’s |
modeling technology provides detailed and powerful modeling sounds. |
•56 types of modeling effect variations are built-in, and a maximum of eight types of effect can be used simultaneously.
•48 preset programs (3 x 16 banks) and 48 rewritable user programs (3 x 16 banks) are built-in.
•You can switch between effect channels (A, B) to change the combination of the drive amp effect and the cabinet effect without switching programs.
•Use the effect block select knobs to instantly switch the effects for each of the five effect blocks (DRIVE-AMP, CABINET, MODULATION, PEDAL, AMBIENCE).
•You can use the expression pedal to control eleven types of pedal effects in realtime.
•In individual mode you can use foot switches to turn each effect on/off independently.
•The Sample & Play function lets you record a phrase that you play (for a maximum of 8 seconds), and then operate the pedal to play back the phrase.
•The built-in Phrase Trainer function lets you record sound from an audio device or a guitar performance (maximum 16 seconds), and play it back at a slower speed without changing the pitch.
•A metronome is built in for practicing convenience.
•Built in tuner mute function for on stage tuning.
•An AUX IN jack is provided so that you can play along with a connected audio device.
•Use the auto chromatic tuner to tune your instrument when the AX1500G is bypassed or muted.
•The LCD (liquid crystal display) features an intuitive visual interface.
•The LCD is backlit for easy visibility even in dark locations.
What is |
? |
(Resonant structure and Electronic circuit Modeling System) is KORG's proprietary sound modeling technology which precisely reproduces the complex character and nature of both acoustic and electric instruments as well as electronic circuits in real world environments.
emulates a wide variety of sound generation characteristics including instrument bodies, speakers & cabinets, acoustic fields, microphones, vacuum tubes, transistors, etc.
Printing conventions in this manual
The |
logo indicates operating cautions, and |
indicates useful advice. |
LCD screens printed in this manual are only for purposes of illustration, and may not match the actual display on your AX1500G.
1. Introduction
3
1. Introduction 


Important things to learn
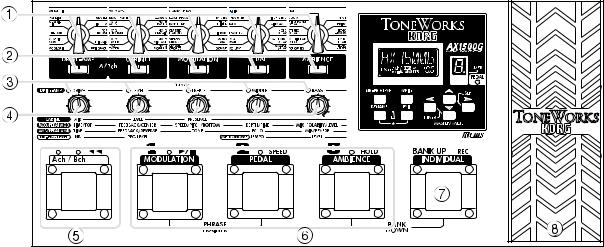
Front and rear panel
Front panel
1Effect select knobs
These knobs select the effect model used in each effect block.
2Effect block select switches
(DRIVE-AMP, CABINET, MODULATION, PEDAL, AMBIENCE)
Press these switches to turn each effect block on/off or to edit it. The switch LED will be lit (on), dark (off), or blinking (edit).
3Value LEDs
These LEDs will light to indicate the value knobs that can be used for the selected effect model. From the left, they correspond to value knobs 1—5.
4Value knobs
When editing, rotate these knobs to modify the value of the parameter assigned to each knob. From the left, these are value knobs 1—5.
When not editing, these knobs control the parameters of the effect that is assigned to the DRIVE-AMP effect by the selected program. (Refer to p.12, “Quick editing for the DRIVE-AMP effect block.”)
5Effect channel switch, channel LED
This changes the effect channel of the currently selected program. The LEDs located above the switch will light correspondingly (channel A is green, channel B is red).
6Program switches, program LEDs
These switches select programs. The program LEDs (1, 2, 3) located above the switches will light correspondingly. In Individual mode, these switches turn each effect on/off individually.
7Bank switch
Each time this switch is pressed, the bank number will increase by one. The bank number will decrease by one if you simultaneously press the bank switch and program switch 3.
8Expression pedal
This pedal controls the effect that is selected from the PEDAL effect block.
4
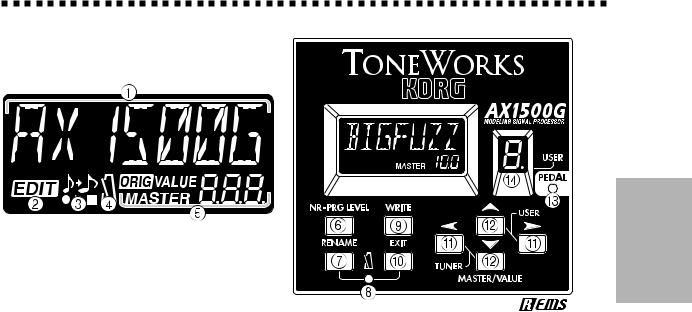
LCD and control panel
1 Name display
This shows the program name, effect name, or parameter name, as appropriate for each operation.
2Edit icon
This will light if the selected program has been edited. It will blink if the program is currently being edited.
3Phrase trainer icon
This will blink when you are in Phrase Trainer mode.
4Metronome icon
This will light when the metronome is on. It will blink while the metronome tempo or level is being adjusted.
5MASTER/VALUE display
This shows the master level and parameter values. When the parameter value matches the value that is written in the program, the ORIG (original icon) will light.
6NR-PRG LEVEL switch
Use this switch to adjust the amount of noise reduction or the level of each program.
7RENAME switch
Use this switch to change the name of a program.
8Metronome LED
This LED will blink in time with the metronome tempo.
9WRITE switch
Use this switch to save an edited program.
0EXIT switch
From any function, you can press this to return to Play mode.
ACursor switches (  ,
,  )
)
Use these switches to select the parameter that you wish to edit, or when modifying the name of a program.
BMASTER/VALUE switches (▲, ▼)
Use these switches to change the master level or the value of a parameter.
CPedal LED
This indicates the on/off status and type of the pedal effect, and the recording status when the Sample & Play function is used.
DBank number display
This shows the bank number of the selected program. When a user program is selected, a decimal point “.” located at the lower right of the bank number will light.
1. Introduction
5
1. Introduction 


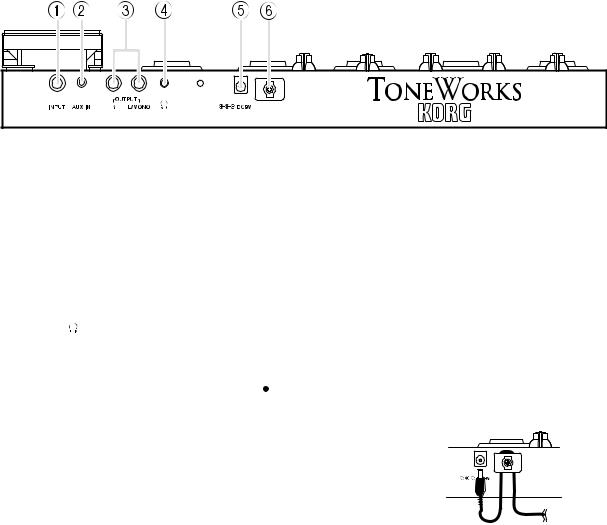
Rear panel
1INPUT jack
Connect your guitar to this jack.
2AUX IN jack (stereo mini 1/8th inch connector)
Connect the output (AUX OUT: analog) of your audio device to this jack.
3OUTPUT jacks (L/MONO, R)
Connect these jacks to your guitar amp or mixer etc. For mono connections, use the L/MONO jack.
4: PHONE jack (stereo mini)
Connect a set of headphones to this jack.
5DC 9V
Connect the included AC adapter ( ) here.
When the adapter is connected, the power will automatically be turned on.
6 Cable hook
Fasten the cable of the AC adapter around this hook. When taking the cable off the hook, avoid pulling the cable with excessive force.
6
The modes of the AX1500G
The AX1500G has three modes: Play mode, Individual mode, and Phrase Trainer mode.
Play mode is the mode in which you can select a program and play it. When the power is first turned on, you will always be in this mode. You can select from a total of 96 programs that use high-quality effect models: 48 preset programs, and 48 user programs that allow you to freely edit the settings to create your own sounds. In addition, you can switch between effect channels A and B within each program.
With the factory settings, the user programs contain the same data as the preset programs.
Individual mode the mode in which you can use the foot switches (the program switches and expression pedal switch) to individually turn each effect block on/off as you play. In this mode you can switch between effect channels A and B, but cannot switch between programs.
Use Play mode to select programs.
In Phrase Trainer mode, a phrase from an audio device (ie., CD or DAT) connected to the AUX IN jack or a guitar connected to the INPUT jack can be recorded and looped (played back repeatedly). You can practice by playing along with the repeating loop. As you can fix the pitch and slow down the playback speed, the phrase trainer mode is convenient for learning or practicing difficult phrases.
When you enter this mode, the MODULATION, PEDAL, and AMBIENCE effect blocks will automatically be turned off. In this mode it is not possible to switch programs or effect channels.
Play mode |
|
|
|
Hold down the |
|
Individual mode |
||||
|
|
|
bank switch for |
|
||||||
á Select programs (48 preset, 48 user) |
|
á Use the program switches to turn |
||||||||
one second |
|
|||||||||
|
|
|
|
|
|
|
each effect block on/off |
|||
á Select effect channnel |
|
|
|
|
|
|
|
|||
|
|
|
|
|
|
|
||||
|
|
|
|
|
|
|
|
|||
á Edit the program |
|
|
|
|
|
|
|
á Select effect channnel |
||
|
|
|
|
|
|
|
á Edit the program |
|||
|
|
|
|
|
|
|
Press the |
|
||
|
|
|
|
|
|
|
|
|
||
Hold down program switches |
|
|
|
|
bank switch* |
|
||||
1 and 2 together for one second |
|
|
|
|
|
|
|
|
||
Press either program |
|
|||||||||
|
|
|
|
|||||||
|
|
|
switches 1 and 2 simultaneously * |
|
||||||
|
|
|
|
|
|
|
|
|
|
|
Phrase Trainer mode |
|
|
|
|
* When you press the EXIT switch |
|||||
Record and play back a phrase from guitar or |
|
|||||||||
|
you will always return to Play mode. |
|||||||||
CD etc. |
|
|
|
|
||||||
|
|
|
|
|
|
|
|
|||
|
|
|
|
|
|
|
|
|
|
|
In Play mode and Individual mode, you can use the effect select knobs etc. to edit the effects, adjust the noise reduction and program level, and modify the program name etc.
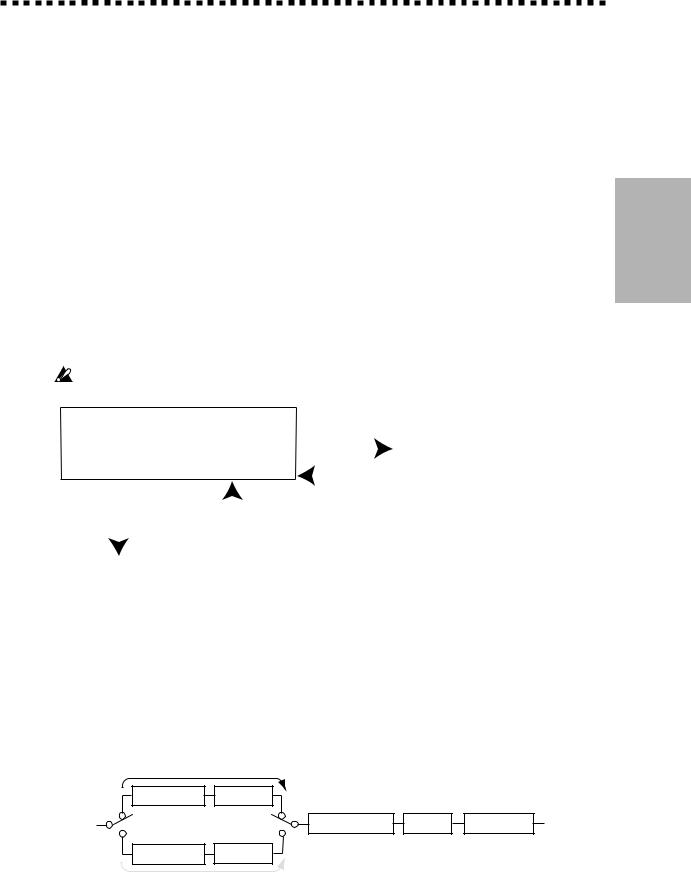
Effect channels of the AX1500G
The AX1500G provides an effect channel switch that lets you switch between two effect channels (A and B) within each program.
Each channel consists of a drive amp effect and a cabinet effect (see the diagram below).
Channel A
DRIVE-AMP |
CABINET |
A |
A |
INPUT |
MODULATION PEDAL AMBIENCE OUTPUT |
B |
B |
DRIVE-AMP |
CABINET |
Channel B
This allows you to switch between rhythm and lead sounds within a single program as if you were changing the channel of a guitar amp, or to differentiate between sounds intended for direct output to a mixer using the cabinet effect or for output to your guitar amp.
1. Introduction
7
2. Playing the AX1500G 


2. Playing the AX1500G
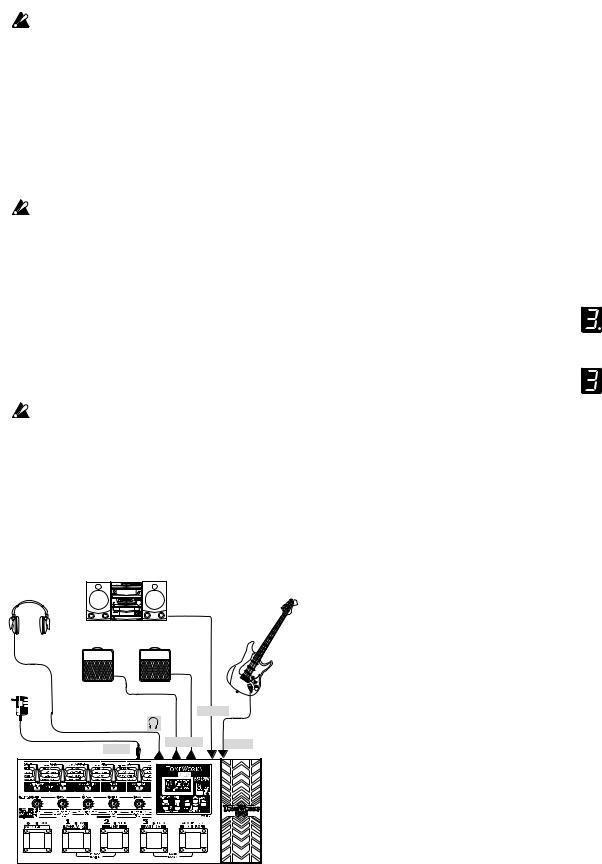
Example connections
The power must be off when you make connections. Unintentional operation may damage your speakers, or cause malfunctions.
Play mode
When you turn on the power, the AX1500G will always enter Play mode, and will be set to the program and master level setting that were last selected when the power was turned off.
Adjusting the master level
1.Connect your cables from the OUTPUT jacks of the AX1500G to your guitar amp or mixer etc.
If you are using a mono connection, connect the L/ MONO jack. In order to take full advantage of the AX1500G’s sound, we recommend that you use stereo connections.
2.If you wish to use headphones, plug them into the PHONE jack.
The output from the OUTPUT jacks will be turned off when headphones are plugged in.
3.Connect your guitar to the INPUT jack.
4.If you wish to use the AUX IN jack, connect an external audio device to it. Use the controls of the connected device to adjust the volume.
5.Connect the included AC adapter to the DC 9V jack, and plug the AC adapter into an AC outlet. When you plug it in, the power will come on automatically, and the name display will indicate the program name.
Wrap the AC adapter cable around the cable hook. When removing the cable from the hook, be careful not to pull the cable with excessive force.
6.When you have finished making connections, turn on the power of your guitar amp or mixer etc. Play your guitar, and check whether connections have been made correctly. Adjust the master level of the AX1500G and the gain or fader controls of your guitar amp or mixer to set an appropriate volume level.
Headphones |
Audio device |
|
|
|
|
|
Stereo-mini |
|
|
|
Guitar |
Guitar amp etc. |
|
|
Mono phone plug |
|
|
|
AUX IN |
|
Stereo-mini |
mono |
|
|
|
|
Included AC adapter |
OUTPUT |
INPUT |
DC9V |
|
|
8
The MASTER/VALUE display will show the master level immediately after the power is turned on, a program is selected, and after the EXIT switch is pressed.
When the master level is shown, you can use the MASTER/VALUE switches (▲, ▼) to adjust the master level.
Selecting a program
You can select from 48 preset programs and 48 user programs.
User and preset programs are each organized into 16 banks, with three programs in each bank. The currently selected bank is shown by the bank
number display, and the program is
shown by the program LEDs. To switch between user and preset programs, simultaneously press MASTER/VALUE
switch (▲) and cursor switch (®). When a user program is selected, a decimal point “.” located at the lower right of the bank number display will light.
To select a program in the same bank
Press a program switch 1—3 to select the desired program. The program LED of the selected program will light, and the name display will indicate the program name.
To select a program from a different bank
Press the bank switch to select the desired bank. (The bank number display will blink.) The banks will cycle in the order 0, 1, 2, ...9, A, b, C, d, E, F, 0, 1, 2...
•Each time you press the bank switch, the bank number display will increase by one.
•Each time you simultaneously press the bank switch and program switch 3, the bank number display will decrease by one.
When the desired bank number appears, press program switch 1,2 or 3 to select the desired program. (The bank number display will change from blinking to lit.)
Checking the effect blocks used by a program
Not every program uses all of the effect blocks. When you select a program, the LED of each effect block that are used will light. The LEDs of effect blocks that are unused will be dark.
 Loading...