


Editor Guide
Editor-Handbuch Manuale dell’Editor
E F G I 1

ENGLISH

2 – Table Of Contents |
Table Of Contents
Introduction . . . . . . . . . . . . . . . . . . . . . . . . . . . . . . . . . . . . . . . . . . . . . 4
Welcome! . . . . . . . . . . . . . . . . . . . . . . . . . . . . . . . . . . . . . . . . . . . . . . . . . . . . . . . . . . . . . 4 Turn your SV-1 on . . . . . . . . . . . . . . . . . . . . . . . . . . . . . . . . . . . . . . . . . . . . . . . . . . . . . 4 Editing workflow . . . . . . . . . . . . . . . . . . . . . . . . . . . . . . . . . . . . . . . . . . . . . . . . . . . . . . . 5
Installing the software . . . . . . . . . . . . . . . . . . . . . . . . . . . . . . . . . . . . 6
The software that comes with your SV-1 . . . . . . . . . . . . . . . . . . . . . . . . . . . . . . . . . . . 6 System Requirements . . . . . . . . . . . . . . . . . . . . . . . . . . . . . . . . . . . . . . . . . . . . . . . . . . . 6 Connecting your SV-1 via USB . . . . . . . . . . . . . . . . . . . . . . . . . . . . . . . . . . . . . . . . . . . 6 Installing the KORG USB-MIDI Driver . . . . . . . . . . . . . . . . . . . . . . . . . . . . . . . . . . . . 7 Installing the SV-1 Editor . . . . . . . . . . . . . . . . . . . . . . . . . . . . . . . . . . . . . . . . . . . . . . . . 7
Running the SV-1 Editor . . . . . . . . . . . . . . . . . . . . . . . . . . . . . . . . . . 11
Launching the SV-1 Editor . . . . . . . . . . . . . . . . . . . . . . . . . . . . . . . . . . . . . . . . . . . . . . 11
Getting to know the SV-1 Editor . . . . . . . . . . . . . . . . . . . . . . . . . . . 12
Main screen . . . . . . . . . . . . . . . . . . . . . . . . . . . . . . . . . . . . . . . . . . . . . . . . . . . . . . . . . . 12 Menus . . . . . . . . . . . . . . . . . . . . . . . . . . . . . . . . . . . . . . . . . . . . . . . . . . . . . . . . . . . . . . . 12 Pages . . . . . . . . . . . . . . . . . . . . . . . . . . . . . . . . . . . . . . . . . . . . . . . . . . . . . . . . . . . . . . . . 13 Side drawer . . . . . . . . . . . . . . . . . . . . . . . . . . . . . . . . . . . . . . . . . . . . . . . . . . . . . . . . . . 14 Knobs . . . . . . . . . . . . . . . . . . . . . . . . . . . . . . . . . . . . . . . . . . . . . . . . . . . . . . . . . . . . . . . 14 Compare button . . . . . . . . . . . . . . . . . . . . . . . . . . . . . . . . . . . . . . . . . . . . . . . . . . . . . . 15 Renaming sounds . . . . . . . . . . . . . . . . . . . . . . . . . . . . . . . . . . . . . . . . . . . . . . . . . . . . . 15
Side drawer . . . . . . . . . . . . . . . . . . . . . . . . . . . . . . . . . . . . . . . . . . . . 17
Sounds, Favorite and Scale lists . . . . . . . . . . . . . . . . . . . . . . . . . . . . . . . . . . . . . . . . . . 17 List commands . . . . . . . . . . . . . . . . . . . . . . . . . . . . . . . . . . . . . . . . . . . . . . . . . . . . . . . 19
Main page . . . . . . . . . . . . . . . . . . . . . . . . . . . . . . . . . . . . . . . . . . . . . 21
Effect sections . . . . . . . . . . . . . . . . . . . . . . . . . . . . . . . . . . . . . . . . . . . . . . . . . . . . . . . . 21 Tuning Curve section . . . . . . . . . . . . . . . . . . . . . . . . . . . . . . . . . . . . . . . . . . . . . . . . . . 22 Touch section . . . . . . . . . . . . . . . . . . . . . . . . . . . . . . . . . . . . . . . . . . . . . . . . . . . . . . . . 24 Global section . . . . . . . . . . . . . . . . . . . . . . . . . . . . . . . . . . . . . . . . . . . . . . . . . . . . . . . . 25
The effects in detail . . . . . . . . . . . . . . . . . . . . . . . . . . . . . . . . . . . . . . 27
The effect chain . . . . . . . . . . . . . . . . . . . . . . . . . . . . . . . . . . . . . . . . . . . . . . . . . . . . . . . |
27 |
Equalizer section . . . . . . . . . . . . . . . . . . . . . . . . . . . . . . . . . . . . . . . . . . . . . . . . . . . . . . |
28 |
Pre-FX section . . . . . . . . . . . . . . . . . . . . . . . . . . . . . . . . . . . . . . . . . . . . . . . . . . . . . . . . |
29 |
Amp Model section . . . . . . . . . . . . . . . . . . . . . . . . . . . . . . . . . . . . . . . . . . . . . . . . . . . . |
34 |
Cabinet Model section . . . . . . . . . . . . . . . . . . . . . . . . . . . . . . . . . . . . . . . . . . . . . . . . . |
39 |
Modulation Effects section . . . . . . . . . . . . . . . . . . . . . . . . . . . . . . . . . . . . . . . . . . . . . . |
43 |
Reverb/Delay Effects section . . . . . . . . . . . . . . . . . . . . . . . . . . . . . . . . . . . . . . . . . . . . |
47 |
Total FX section . . . . . . . . . . . . . . . . . . . . . . . . . . . . . . . . . . . . . . . . . . . . . . . . . . . . . . |
51 |

Table Of Contents | – 3
RX Noise page . . . . . . . . . . . . . . . . . . . . . . . . . . . . . . . . . . . . . . . . . . . 53
The RX Noise section . . . . . . . . . . . . . . . . . . . . . . . . . . . . . . . . . . . . . . . . . . . . . . . . . . 53 The EQ section . . . . . . . . . . . . . . . . . . . . . . . . . . . . . . . . . . . . . . . . . . . . . . . . . . . . . . . 54
Backup page . . . . . . . . . . . . . . . . . . . . . . . . . . . . . . . . . . . . . . . . . . . . |
55 |
Overview of the Backup page . . . . . . . . . . . . . . . . . . . . . . . . . . . . . . . . . . . . . . . . . . . . |
55 |
Creating and editing a backup set . . . . . . . . . . . . . . . . . . . . . . . . . . . . . . . . . . . . . . . . |
56 |
Copying data from a backup set to the internal memory . . . . . . . . . . . . . . . . . . . . . |
57 |
Mixing data from two or more backup sets . . . . . . . . . . . . . . . . . . . . . . . . . . . . . . . . |
57 |
Changing the order of the internal sounds . . . . . . . . . . . . . . . . . . . . . . . . . . . . . . . . . |
57 |
The Backup tools . . . . . . . . . . . . . . . . . . . . . . . . . . . . . . . . . . . . . . . . . . . . . . . . . . . . . |
58 |
Menu . . . . . . . . . . . . . . . . . . . . . . . . . . . . . . . . . . . . . . . . . . . . . . . . . . 60
File menu . . . . . . . . . . . . . . . . . . . . . . . . . . . . . . . . . . . . . . . . . . . . . . . . . . . . . . . . . . . . 60 Edit menu . . . . . . . . . . . . . . . . . . . . . . . . . . . . . . . . . . . . . . . . . . . . . . . . . . . . . . . . . . . 61 Option menu . . . . . . . . . . . . . . . . . . . . . . . . . . . . . . . . . . . . . . . . . . . . . . . . . . . . . . . . . 62 About menu . . . . . . . . . . . . . . . . . . . . . . . . . . . . . . . . . . . . . . . . . . . . . . . . . . . . . . . . . 63
Appendix . . . . . . . . . . . . . . . . . . . . . . . . . . . . . . . . . . . . . . . . . . . . . . . 64
Factory sounds . . . . . . . . . . . . . . . . . . . . . . . . . . . . . . . . . . . . . . . . . . . . . . . . . . . . . . . 64 Keyboard shortcuts . . . . . . . . . . . . . . . . . . . . . . . . . . . . . . . . . . . . . . . . . . . . . . . . . . . . 67 What is saved where . . . . . . . . . . . . . . . . . . . . . . . . . . . . . . . . . . . . . . . . . . . . . . . . . . . 67
English

4 – Introduction | Welcome!
Introduction
WELCOME!
Thank you for using the Korg SV-1 Editor for the SV-1 Stage Vintage Piano. While we were very careful in keeping the editing capabilities of the piano itself at a minimum, to make it clean and easy to use, we don’t want to prevent you from making your own sounds. Enter the SV-1 Editor: a graphic user interface for your SV-1, providing full access to all parameters. When finished editing, your sounds and favorite settings can be written to the SV-1 or to a file on your computer. The SV-1 Editor file format is the same in Windows and Mac OS X, so you can effortlessly transfer the files between these platforms. The SV-1 Editor is a useful librarian for managing all your sounds and settings.
So, by using the SV-1 Editor you can comfortably view and edit all sound parameters and general settings of your SV-1. With it, you can:
•edit existing sounds (including favorites)
•create and edit tuning scales
•create libraries of sounds, to be exchanged with other SV-1 users
•combine sounds from different libraries
•change the order of sounds
•replace sounds you don’t plan to use, with others you like better
TURN YOUR SV-1 ON
For all features of the SV-1 Editor to work, the SV-1 must be connected and turned on before you run the software. Otherwise, only the Backup page will be available to manage your backup sets.
Note that your computer might exit from “sleep” mode when you turn the SV-1 on. This is a normal behaviour, since the USB port is “sensing” the SV-1 returning to an active state.

Introduction | Editing workflow – 5
EDITING WORKFLOW
While it is very easy to understand how to use the SV-1 Editor, and you are free to use the editing procedures that you prefer the best, please carefully follow these steps to connect the SV-1 to a computer and to transfer data between them.
1.Connect your SV-1 to your computer using an USB cable.
2.Turn the SV-1 on.
3.Launch the SV-1 Editor.
4.Wait for the content of the SV-1’s memory to be transferred into the Editor.
Also, you can load data saved on disk (this might be data you edited in the past, or that you download from the web).
5.Go to the Main page and edit your data.
Changes are immediately mirrored to the SV-1, so that you can listen to them when playing the keyboard. However, they are not saved into the SV-1 memory.
6.Click the Write Current Preset in the side drawer to save the changes into the SV-1’s memory.
7.If you want to create a backup set with all the edited data, click the Backup All SV-1 Data button in the side drawer.
A Save dialog appears. Enter a name for the new backup set, choose a place where to save it in the disks, then confirm.
8.Exit from the SV-1 Editor.
9.Disconnect the USB cable.
10.Enjoy your new sounds!
English

6 – Installing the software | The software that comes with your SV-1
Installing the software
THE SOFTWARE THAT COMES WITH YOUR SV-1
Before you start using the SV-1 Editor, you are asked to install some software in your computer. Nothing to worry about! The installers themselves are selfexplanatory, and no malicious data is installed. Your computer will continue to work as well as before, and our software will live peacefully side by side with all other software in your computer.
NOTE: This software can be updated as new versions are released by Korg. You can download the new versions from our web site (www.korg.com).
SYSTEM REQUIREMENTS
To install the SV-1 Editor, you need a personal computer meeting the following specifications:
•PC running under Microsoft® Windows® XP/Vista.
NOTE: By default, each time you run the SV-1 Editor on Vista, a warning appears, asking if you want to actually run it. This is due to the User Account Control security turned on. If you do not want it to appear, go to Control Panel > User Account > Control On or Off, and turn it off. Be warned that this removes a protection against malicious software. For more information about User Account Control, see the relevant information on Microsoft’s web site.
•Mac running under OS X 10.4 (or higher), with either a PowerPC or Intel processor.
•Java Machine version 1.5 (or higher) is required. It is installed as standard on Mac OS X starting from version 10.4, while installation could be required on a PC running Windows. To download the latest version go to www.java.com.
•Minimum video resolution of 1024 × 768 pixel.
CONNECTING YOUR SV-1 VIA USB
Before using the SV-1 Editor, you must connect your SV-1 to a personal computer via a standard USB cable.
Installing the software | Installing the KORG USB-MIDI Driver – 7
INSTALLING THE KORG USB-MIDI DRIVER
Before installing the SV-1 Editor, you must install the KORG USB-MIDI Driver. Please refer to the instructions you can find with the software in the Accessory CD that comes with your SV-1.
INSTALLING THE SV-1 EDITOR
To install the SV-1 Editor, please follow these simple steps. (We are showing screenshots from Windows, but they are functionally the same on the Mac).
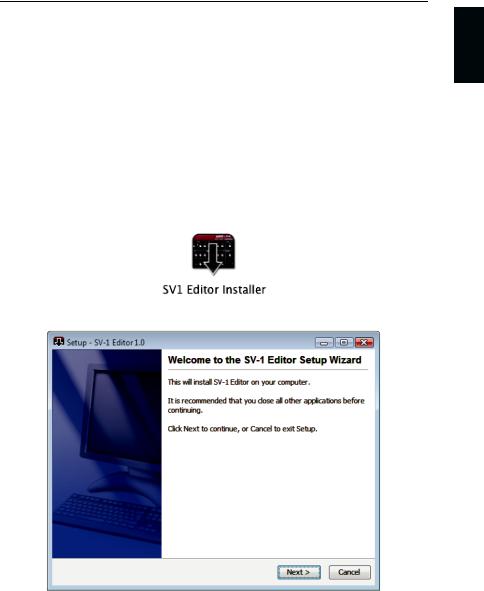
1.Locate the SV-1 Editor Installer in the Accessory CD that comes with your SV-1.
2. A welcome dialog appears. Click Next > to continue, or on Cancel to exit.
English
8 – Installing the software | Installing the SV-1 Editor
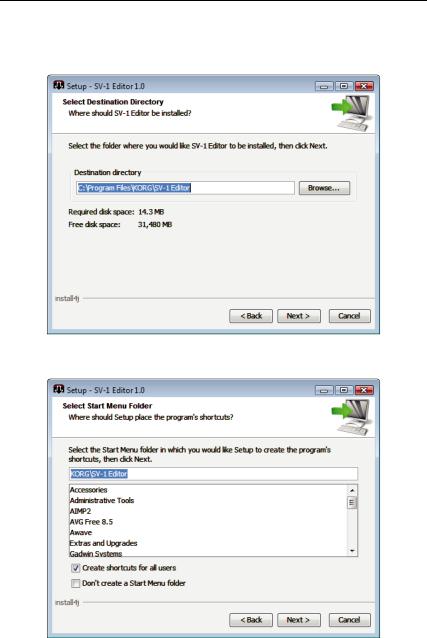
3.A dialog appears, showing you the destination directory (folder) for the SV-1 Editor application. Click Browse to choose a different location, or on Next > to confirm and continue.
4.In Windows, choose a location to determine where to place the SV-1 Editor’s icon in the Start menu.
Installing the software | Installing the SV-1 Editor – 9
5. If you click Cancel to stop the installation procedure, a warning appears. |
English |
|
Click Yes to stop the installation, or No to resume and continue. |
||
|
||
|
|
6.After you click Next >, the needed files are installed. A progress bar shows the process going on.
7.Then you are asked to accept the file association between files with the *.SV1 suffix and the SV-1 Editor. Click Next > to confirm.
10 – Installing the software | Installing the SV-1 Editor
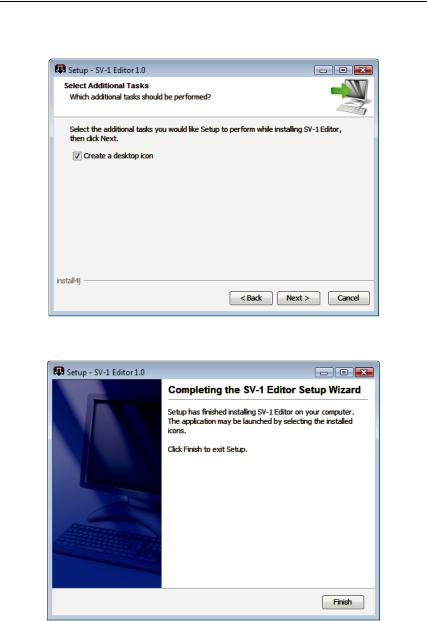
8.You are then asked if you want to create an icon on the desktop. Click Next > to confirm.
9.When done, a confirmation dialog appears. You can click Finish to exit the installer.

Running the SV-1 Editor | Launching the SV-1 Editor – 11
Running the SV-1 Editor
LAUNCHING THE SV-1 EDITOR
Before you can launch the SV-1 Editor, please connect the SV-1 to your computer with a standard USB cable (you can do it with the SV-1 and computer turned on or off). When done, turn both the SV-1 and your computer on. Then, locate the application’s icon into your hard drive, and double click it.
When you launch the SV-1 Editor, the content of the SV-1’s memory is transferred to the Editor. Please wait a few seconds for the transfer to complete.
English
NOTE: If the computer enters the sleep mode, connection with the SV-1 Editor may be interrupted. In this case, please exit and relaunch the SV-1 Editor. We suggest you set your computer to avoid sleeping when working with the SV-1.
12 – Getting to know the SV-1 Editor | Main screen
Getting to know the SV-1 Editor
MAIN SCREEN
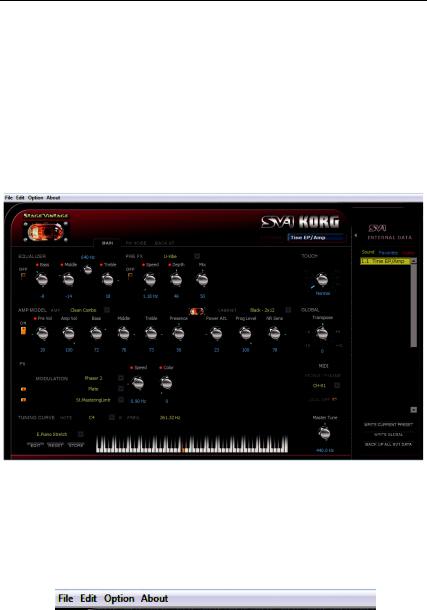
When you run the SV-1 Editor, you can see the main screen, as in the following illustration. Note that this window cannot be resized.
The layout is very clean, and you can easily identify the various logical sections described below.
MENUS
Use menus from the top menubar to find commands to manage your data on disk, transmit data to the SV-1, or set the application’s preferences.

Getting to know the SV-1 Editor | Pages – 13
PAGES
There are three pages to choose from, and you access them by using the corresponding tabs on top of the editing area:
The pages are:
•The Main page, where you can edit the selected sound or the global settings.
•The RX Noise page, where you can adjust the volume and equalization of the RX Noises in the sound in edit (assuming it includes this feature). This page is only available when the selected sound contains RX Noises.
•The Backup page, where you can exchange data with your SV-1, as well as manage libraries of sounds.
NOTE: Not all pages are available if the SV-1 is not turned on. Please turn your SV-1 on before launching the SV-1 Editor.
English

14 – Getting to know the SV-1 Editor | Side drawer
SIDE DRAWER
All editing happens on the selected sound. Please select it in the lists appearing in the side drawer you can access on the right of the screen.
KNOBS
Use the knobs to edit the value of the corresponding parameter. Click a knob, then drag up to increase the value, down to decrease it.
When a knob is selected, it becomes orange. While in this status, you can also use the Up or Right, and the Down or Left arrows in your computer’s keyboard to change the value with more precision.
Double click a knob to recall the default value of the corresponding parameter. This is like pressing a knob on the SV-1’s control panel.
Getting to know the SV-1 Editor | Compare button – 15
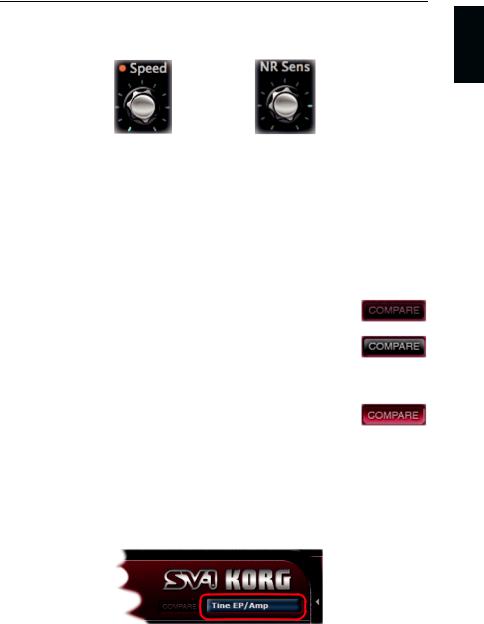
When a knob replicates a knob on the control panel of the SV-1, a red dot appears over it.
English
Replicates a control |
Knob not available on |
panel’s knob |
the control panel |
NOTE: The name of a parameter may be different than the name of the real knob on the SV-1’s control panel.
COMPARE BUTTON
You can use the COMPARE button to listen to the original sound, to compare it with the edited sound.
•When no parameter has been edited, the button is greyed out and therefore not available.
•When one or more parameters have been edited, the button becomes solid and available. SV-1 can detect the status of a parameter. If you move the knobs to the original value of the parameters, the button is greyed out again and not available.
•If you click the button to momentarily recall the original settings, the button “lightens up” in red. In this situation, you can listen to the original sound, and can do no editing. Click the COMPARE button again to return to the edited preset.
RENAMING SOUNDS
The name of the selected sound always appear in the top right corner of the editor.

16 – Getting to know the SV-1 Editor | Renaming sounds
Double click the name to open the Rename and Save dialog:
To recall this dialog, in the Edit menu you can find a Rename command (shortcut Ctrl-R on Windows,  -R on the Mac).

Side drawer | Sounds, Favorite and Scale lists – 17
Side drawer
The side drawer mirrors the internal memory of the SV-1. This is like the Sound and Favorites sections of the SV-1’s control panel, with the addition of a list of the various Tuning Scales.
SOUNDS, FAVORITE AND SCALE LISTS
Each list is where you can select a sound, a favorite, or a scale to edit. Also, you can access three commands to save the current changes to the SV-1’s memory after editing.
English
18 – Side drawer | Sounds, Favorite and Scale lists
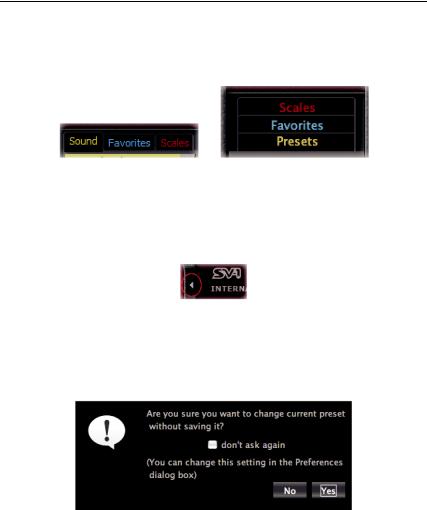
SELECTING A LIST
Click the relevant label on top of this section to view the corresponding list. (Please note that this area appears slightly different on the PC or Mac).
on the PC |
on the Mac |
MAKING THE SIDE DRAWER APPEAR OR DISAPPEAR
To make the drawer appear or disappear, click the small arrow next to the top left side of the drawer:
Note that the drawer always reappears when launching the Editor again.
WHEN SELECTING A DIFFERENT SOUND…
When you choose a different sound, and there are unsaved changes, a message warns you that changes will be lost:
Click No to review your changes, or Yes to delete them and select a different preset.
NOTE: You can make this dialog appear or not, by checking the “don’t ask again” checkbox. Also, you can set this behavior in the Preferences (see page 62).
Side drawer | List commands – 19
LIST COMMANDS
At the bottom of the side drawer there are three buttons, you can use to save your changes to the SV-1 data.
English
WARNING: When saving changes with these commands, all corresponding data in your SV-1’s memory is deleted and overwritten. While you can later restore your original data, be careful not to overwrite personal data you have never backed up.
WRITE CURRENT PRESET
Click this button to save the changes you made to the current sound or favorite (the one selected in the list) into the SV-1’s memory. For simplicity’s sake, we call them both “preset”.
WRITE GLOBAL
Click this button to save the changes to the global parameters (i.e., MIDI Channel and Master Tune) into the SV-1’s memory. Transpose and Local Off are not saved, and will be reset when turning the SV-1 off.
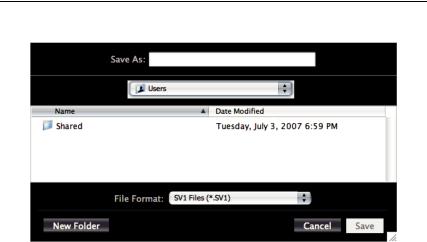
BACKUP ALL SV-1 DATA
Click this button to get all data from the SV-1’s memory, and save them to disk as a backup set (a file with the *.SV1 extension). This is useful to preserve all edited sounds on your computer’s disk for archival and future use.
20 – Side drawer | List commands
1. Click this command. A Save dialog appears:
2.Assign a name to the new backup set.
3.Choose a location where to save it.
4.Click Save to confirm, or on Cancel to exit without saving.
Main page | Effect sections – 21
Main page
The Main page is where you can edit the selected sound and global settings.
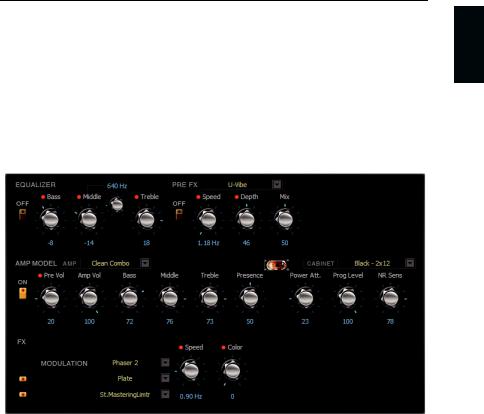
EFFECT SECTIONS
All the effects’s parameters can be accessed from the center area of the main screen. All effect parameters are described in great detail starting from page 28.
This is like the various effect sections on the control panel of the SV-1. However, more parameters are available in the Editor.
The edited effects can be saved into each sound or favorite inside the SV-1’s memory, by clicking the Write Current Preset button in the side drawer.
English
22 – Main page | Tuning Curve section
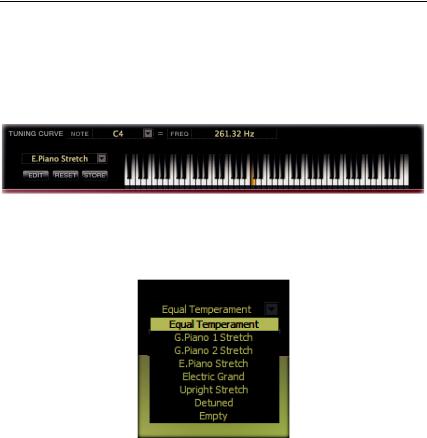
TUNING CURVE SECTION
SV-1 comes with several preset scales or “tuning curves”, that you can apply to your sound as an alternative to the standard Equal tuning. Alternative scales reproduce the original tuning chosen by the original keyboard manufacturers, to better suit the sound of their instruments.
SELECTING A TUNING SCALE
You can select a scale from the pop-up menu on the left of the keyboard diagram:
The selected tuning curve can be saved into each sound or favorite inside the SV- 1’s memory, by clicking the Write Current Preset button in the side drawer.
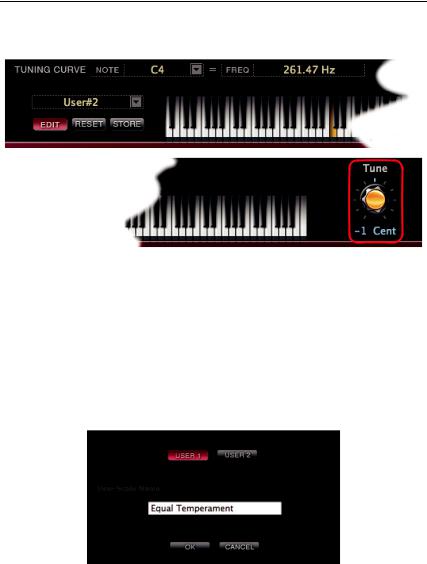
EDITING A USER SCALE
You can edit each tuning curve, and save them into either of the two available User scales supplied. User scales can then be reached from the Scale list in the side drawer.
1.Select a scale to edit from the pop-up menu on the left of the keyboard diagram (as seen above).
Main page | Tuning Curve section – 23
2. Click the EDIT button to access editing. The Master Tune knob changes to |
English |
|
the Tune knob: |
||
|
||
|
|
3.Click a key to be edited (or choose it from the NOTE pop-up menu).
4.Adjust the note tuning in cents (1 cent = 1/100 of a semitone) with the Tune knob.
5.Repeat the above for each note you want to edit.
6.Click the EDIT button to exit editing without saving the changes. Changes will still be there when you enter editing again.
7.Click the RESET button if you want to delete all changes to the edited scale.
8.Click the STORE button to save all changes into one of the two User scales. The Save Scale dialog appears:
Choose either User scale (User 1 or User 2), and assign it a name. Then click OK to confirm saving, or on Cancel to exit the save procedure without saving.
At the end, the new scale will appear in the Scale list in the side drawer.

24 – Main page | Touch section
TOUCH SECTION
This is where you can choose one of the eight available touch curves for the keyboard, adjusting the keyboard sensitivity.
Setting |
Touch curve |
Note |
|
|
|
N |
Normal |
Normal piano touch. |
|
|
|
S1 |
Soft 1 |
Loud notes can be produced even by playing lightly. |
S2 |
Soft 2 |
|
|
|
|
M1 |
Medium 1 |
Loud notes can be produced by playing normally. |
|
|
|
M2 |
Medium 2 |
|
H1 |
Hard 1 |
Loud notes can be produced only by playing very hard. |
|
|
|
H2 |
Hard 2 |
|
|
|
|
F |
Fixed |
Fixed dynamic. To program the desired dynamic, you must enter |
|
|
the value in the box over the knob. |
|
|
|
The selected touch curve can be saved into each sound or favorite inside the SV-1’s memory, by clicking the Write Current Preset button in the side drawer.
Main page | Global section – 25
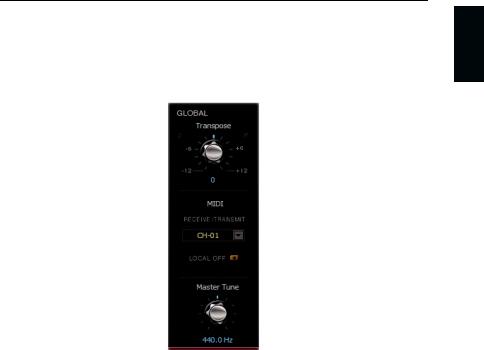
GLOBAL SECTION
This is where you can edit some general parameters, like the transpose, MIDI channel for sending and receiving control data, and master tuning, as well as turning the Local Off mode on or off.
Transpose and Local Off are always reset when turning the instrument off. The MIDI channel and Master Tune values are permanently saved as global settings in the SV-1 by clicking the Write Global button.
TRANSPOSE
Use this knob to globally transpose the SV-1. Useful to play difficult keys. This is always reset when turning the instrument off.
MIDI CHANNEL
Here you can specify the MIDI channel over which SV-1 transmits and receives data. The selected channel can be saved as a global setting by clicking the Write Global button in the side drawer.
English

26 – Main page | Global section
LOCAL OFF
When the LED indicator is off, SV-1 can play its own sounds from the keyboard, and send MIDI data to a computer. When it is on (Local Off function activated), SV-1 can send MIDI data to a computer, but you cannot use its keyboard to play its own sounds directly. Notes will have to be bounced back by the computer, via the “MIDI Echo” or “MIDI Thru” function. This is useful to avoid double notes when connected to a computer.
This is always reset when turning the instrument off.
MASTER TUNE
This knob globally adjusts the fine tuning of the instrument, to match tuning of another instrument you will play with.
The selected tuning can be saved as a global setting by clicking the Write Global button in the side drawer.
The effects in detail | The effect chain – 27
The effects in detail
The effect sections is the core of your sound. They are like the effect section on your SV-1’s control panel.
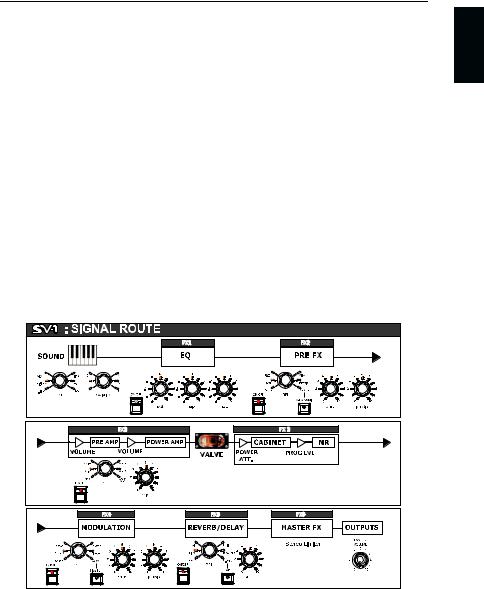
THE EFFECT CHAIN
The EQ and pedal effect are placed before the amp model and cabinet, and the modulation and reverb/delay are placed after the cabinet model. Finally, a limiter takes care of dynamics.
The reason that modulation, delay, echo and reverb effects are placed after the amp – rather than before it, as with a “stompbox” – is that they sound better and more realistic. For example, the reverb emulates the sound created by a room or hall. So, logic dictates that if we’re going to add it to our sound, the closer to the end of the signal chain we put it, the more “real” and natural it’s going to sound. The same is true for delay and modulation effects – they’re going to sound more natural if added near the end of your signal path, not at its beginning.
English
The effect chain cannot be modified. However, each section can be individually turned on or off. Use the ON button next to each effect to turn the corresponding section on or off.
28 – The effects in detail | Equalizer section
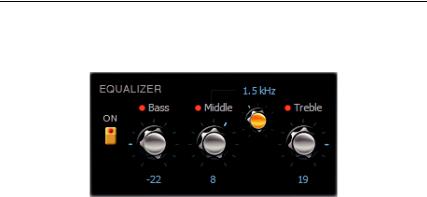
EQUALIZER SECTION
This is a semi-parametric EQ, placed before the Pre-FX (i.e., the “stompbox”).
Parameter |
Values |
Notes |
|
|
|
Bass |
-36…36 |
Adjusts the bass frequencies gain (in a range of |
|
|
±18dB). |
|
|
|
Middle (Gain) |
-36…36 |
Adjusts the middle frequencies gain (in a range of |
|
|
±18dB). |
|
|
|
Middle (Freq) |
100Hz…10.0kHz |
Sets the frequency of the middle band. |
|
|
|
Treble |
-36…36 |
Adjusts the treble frequencies gain (in a range of |
|
|
±18dB). |
|
|
|
 Loading...