


Software Instruction Manual

Thank you for purchasing the Minolta Dimâge Scan Multi II. The Dimâge Scan Multi II is a multiple format film scanner capable of scanning medium-format, 35mm, 16mm, and sleeved APS film. With the optional APS adapter, advanced photo system film in the cassette can also be scanned.
This manual has been designed to help you understand the operation of your scanner. To realize all the benefits of your scanner, please read this manual and the accompanying hardware manual thoroughly.
The instructions in this manual assume you have a working knowledge of the operating system for your computer (Macintosh OS, Windows® 95, Windows® 98, Windows® 2000, or Windows® NT) and its conventions. Familiarity with the mouse and standard operating system menus and commands is necessary before operating the Dimâge Scan Multi II software.
This manual does not instruct in the:
•basic use of personal computers.
•use of Window® 95, Windows® 98, Windows® 2000, Windows® NT, or Mac OS.
•use of Adobe Photoshop, Paint Shop Pro, or Corel PHOTO-PAINT.
The examples in this manual use Windows software. The appearance of some screens may differ from the examples when using Windows NT or the Macintosh operating system.
•This manual may not be copied in part or whole without prior written permission from Minolta Co., Ltd. © 2000 Minolta Co., Ltd.
•Every necessary caution has been taken to ensure the accuracy of this instruction manual. Please contact us if you have any questions, find any errors, or notice missing information.
•Minolta is not responsible for loss, damage, or other results occurring during the operation of this product.
•Microsoft, Windows® , Windows 95® , Windows 98® , Windows 2000® , and Windows NT® are registered trademarks of the Microsoft Corporation.
• Macintosh™, Apple ® , and Power Macintosh® are registered trademarks of Apple Computer, Inc.
•Adobe® and Photoshop™ are registered trademarks of Adobe Systems Incorporated.
•Digital ROC2™, Digital ROC™, and Digital GEM™ are trademarks of Applied Science Fiction in U. S. A.
•Other corporate and product names are the trademarks and registered trademarks of their respective companies.
–2 –

TABLE OF CONTENTS
SYSTEM REQUIREMENTS – PC/AT . . . . . . . . . . . . . . . . . . . . . . . . . . . . . . . . . .7 SYSTEM REQUIREMENTS – MACINTOSH . . . . . . . . . . . . . . . . . . . . . . . . . . . . .8 INSTALL THE SOFTWARE . . . . . . . . . . . . . . . . . . . . . . . . . . . . . . . . . . . . . . . . .9
WINDOWS 95/98/98SE/2000/NT4.0 . . . . . . . . . . . . . . . . . . . . . . . . . . . . . . . . . . . . . . . . . . . . . . . . . . . . . . . |
. .9 |
MACINTOSH . . . . . . . . . . . . . . . . . . . . . . . . . . . . . . . . . . . . . . . . . . . . . . . . . . . . . . . . . . . . . . . . . . . . . . . . . |
.12 |
INSTALL THE PLUG-IN – MACINTOSH . . . . . . . . . . . . . . . . . . . . . . . . . . . . . . . . . . . . . . . . . . . . . . . . . . . . |
.14 |
STARTING UP THE SOFTWARE – WINDOWS . . . . . . . . . . . . . . . . . . . . . . . . |
.15 |
WINDOWS 95/98/98SE/2000/NT . . . . . . . . . . . . . . . . . . . . . . . . . . . . . . . . . . . . . . . . . . . . . . . . . . . . . . . . . . |
.15 |
STARTING UP THE SOFTWARE – MACINTOSH . . . . . . . . . . . . . . . . . . . . . . |
.17 |
THE FLOW CHART TO PRESCAN . . . . . . . . . . . . . . . . . . . . . . . . . . . . . . . . . . |
18 |
MAIN WINDOW . . . . . . . . . . . . . . . . . . . . . . . . . . . . . . . . . . . . . . . . . . . . . . . . . |
19 |
MAIN WINDOW – NAMES OF PARTS . . . . . . . . . . . . . . . . . . . . . . . . . . . . . . . . . . . . . . . . . . . . . . . . . . . . . . .19 SELECTING THE FILM FORMAT . . . . . . . . . . . . . . . . . . . . . . . . . . . . . . . . . . . . . . . . . . . . . . . . . . . . . . . . . .20 SELECTING THE FILM TYPE . . . . . . . . . . . . . . . . . . . . . . . . . . . . . . . . . . . . . . . . . . . . . . . . . . . . . . . . . . . . .21
INDEX SCAN . . . . . . . . . . . . . . . . . . . . . . . . . . . . . . . . . . . . . . . . . . . . . . . . . . .22
INDEX WINDOW – NAMES OF PARTS . . . . . . . . . . . . . . . . . . . . . . . . . . . . . . . . . . . . . . . . . . . . . . . . . . . . . .22 MAKING AN INDEX SCAN . . . . . . . . . . . . . . . . . . . . . . . . . . . . . . . . . . . . . . . . . . . . . . . . . . . . . . . . . . . . . . .23 SELECTING INDEX IMAGE . . . . . . . . . . . . . . . . . . . . . . . . . . . . . . . . . . . . . . . . . . . . . . . . . . . . . . . . . . . . . .24 SELECTING FRAMES . . . . . . . . . . . . . . . . . . . . . . . . . . . . . . . . . . . . . . . . . . . . . . . . . . . . . . . . . . . . . . . . . .24 ROTATING THE INDEX FRAMES . . . . . . . . . . . . . . . . . . . . . . . . . . . . . . . . . . . . . . . . . . . . . . . . . . . . . . . . . .25 FLIPPING THE INDEX FRAMES . . . . . . . . . . . . . . . . . . . . . . . . . . . . . . . . . . . . . . . . . . . . . . . . . . . . . . . . . . .25 MAGNIFYING THE INDEX IMAGE . . . . . . . . . . . . . . . . . . . . . . . . . . . . . . . . . . . . . . . . . . . . . . . . . . . . . . . . .26 REVERSING THE INDEX IMAGE . . . . . . . . . . . . . . . . . . . . . . . . . . . . . . . . . . . . . . . . . . . . . . . . . . . . . . . . . .27 SAVING AFTER LINING UP THE INDEX SCAN IMAGES . . . . . . . . . . . . . . . . . . . . . . . . . . . . . . . . . . . . . . . .28 SAVING THE INDEX SCAN IMAGES AS AN INDEX FILE . . . . . . . . . . . . . . . . . . . . . . . . . . . . . . . . . . . . . . . .30 LOADING THE INDEX SCAN IMAGES SAVED AS THE INDEX FILE . . . . . . . . . . . . . . . . . . . . . . . . . . . . . . .31
PRESCAN . . . . . . . . . . . . . . . . . . . . . . . . . . . . . . . . . . . . . . . . . . . . . . . . . . . . .32
MAKING A PRESCAN . . . . . . . . . . . . . . . . . . . . . . . . . . . . . . . . . . . . . . . . . . . . . . . . . . . . . . . . . . . . . . . . . .32 PRESCAN TAB – NAMES OF PARTS . . . . . . . . . . . . . . . . . . . . . . . . . . . . . . . . . . . . . . . . . . . . . . . . . . . . . . .33 ROTATING THE PRESCAN IMAGE . . . . . . . . . . . . . . . . . . . . . . . . . . . . . . . . . . . . . . . . . . . . . . . . . . . . . . . . .34 FLIPPING THE PRESCAN IMAGE . . . . . . . . . . . . . . . . . . . . . . . . . . . . . . . . . . . . . . . . . . . . . . . . . . . . . . . . .34 FULL-SCREEN VIEW . . . . . . . . . . . . . . . . . . . . . . . . . . . . . . . . . . . . . . . . . . . . . . . . . . . . . . . . . . . . . . . . . . .35 MAGNIFYING OR REDUCING THE VIEW . . . . . . . . . . . . . . . . . . . . . . . . . . . . . . . . . . . . . . . . . . . . . . . . . . .36 SCROLLING THE VIEW . . . . . . . . . . . . . . . . . . . . . . . . . . . . . . . . . . . . . . . . . . . . . . . . . . . . . . . . . . . . . . . . .37 AUTO EXPOSURE LOCK . . . . . . . . . . . . . . . . . . . . . . . . . . . . . . . . . . . . . . . . . . . . . . . . . . . . . . . . . . . . . . . .38 AE AREA LOCK . . . . . . . . . . . . . . . . . . . . . . . . . . . . . . . . . . . . . . . . . . . . . . . . . . . . . . . . . . . . . . . . . . . . . . .39 FOCUS . . . . . . . . . . . . . . . . . . . . . . . . . . . . . . . . . . . . . . . . . . . . . . . . . . . . . . . . . . . . . . . . . . . . . . . . . . . . . .40 POINT AF . . . . . . . . . . . . . . . . . . . . . . . . . . . . . . . . . . . . . . . . . . . . . . . . . . . . . . . . . . . . . . . . . . . . . . . . . . . .40 MANUAL FOCUS . . . . . . . . . . . . . . . . . . . . . . . . . . . . . . . . . . . . . . . . . . . . . . . . . . . . . . . . . . . . . . . . . . . . . .41 AUTO CROPPING . . . . . . . . . . . . . . . . . . . . . . . . . . . . . . . . . . . . . . . . . . . . . . . . . . . . . . . . . . . . . . . . . . . . .42 MANUAL CROPPING . . . . . . . . . . . . . . . . . . . . . . . . . . . . . . . . . . . . . . . . . . . . . . . . . . . . . . . . . . . . . . . . . . .43 APS FORMATS; C, H, AND P . . . . . . . . . . . . . . . . . . . . . . . . . . . . . . . . . . . . . . . . . . . . . . . . . . . . . . . . . . . . .45 DISPLAYING FRAME NUMBER . . . . . . . . . . . . . . . . . . . . . . . . . . . . . . . . . . . . . . . . . . . . . . . . . . . . . . . . . . .46 RGB/CMY INFO . . . . . . . . . . . . . . . . . . . . . . . . . . . . . . . . . . . . . . . . . . . . . . . . . . . . . . . . . . . . . . . . . . . . . . .46
– 3 –

TABLE OF CONTENTS
IMAGE CORRECTION . . . . . . . . . . . . . . . . . . . . . . . . . . . . . . . . . . . . . . . . . . . .47
PRESCAN TAB – NAMES OF PARTS . . . . . . . . . . . . . . . . . . . . . . . . . . . . . . . . . . . . . . . . . . . . . . . . . . . . . . |
.47 |
TONE CURVES AND HISTOGRAM . . . . . . . . . . . . . . . . . . . . . . . . . . . . . . . . . . . . . . . . . . . . . . . . . . . . . . . |
.48 |
CORRECTING THE TONE CURVES . . . . . . . . . . . . . . . . . . . . . . . . . . . . . . . . . . . . . . . . . . . . . . . . . . . . . . . |
.49 |
TONE CURVES BY FREEHAND . . . . . . . . . . . . . . . . . . . . . . . . . . . . . . . . . . . . . . . . . . . . . . . . . . . . . . . . . . |
.50 |
SPECIFYING THE BLACK, WHITE OR GRAY POINT . . . . . . . . . . . . . . . . . . . . . . . . . . . . . . . . . . . . . . . . . . |
.51 |
CORRECTING THE HISTOGRAM . . . . . . . . . . . . . . . . . . . . . . . . . . . . . . . . . . . . . . . . . . . . . . . . . . . . . . . . . |
.54 |
CORRECTING THE HISTOGRAM – AUTO SETTING . . . . . . . . . . . . . . . . . . . . . . . . . . . . . . . . . . . . . . . . . . |
.54 |
CORRECTING THE HISTOGRAM – EACH R, G, B CHANNEL . . . . . . . . . . . . . . . . . . . . . . . . . . . . . . . . . . . |
.55 |
CORRECTING THE HISTOGRAM – RESET . . . . . . . . . . . . . . . . . . . . . . . . . . . . . . . . . . . . . . . . . . . . . . . . . |
.55 |
CORRECTING BRIGHTNESS/CONTRAST/COLOR BALANCE . . . . . . . . . . . . . . . . . . . . . . . . . . . . . . . . . . . |
.56 |
CORRECTING BRIGHTNESS/CONTRAST/COLOR BALANCE – AUTO SETTING . . . . . . . . . . . . . . . . . . . . |
.57 |
CORRECTING BRIGHTNESS/CONTRAST/COLOR BALANCE – RESET . . . . . . . . . . . . . . . . . . . . . . . . . . . |
.57 |
CORRECTING HUE/SATURATION/LIGHTNESS . . . . . . . . . . . . . . . . . . . . . . . . . . . . . . . . . . . . . . . . . . . . . . |
.58 |
CORRECTING HUE/SATURATION/LIGHTNESS – AUTO SETTING . . . . . . . . . . . . . . . . . . . . . . . . . . . . . . . |
.59 |
CORRECTING HUE/SATURATION/LIGHTNESS – RESET . . . . . . . . . . . . . . . . . . . . . . . . . . . . . . . . . . . . . . |
.59 |
VARIATION CORRECTION . . . . . . . . . . . . . . . . . . . . . . . . . . . . . . . . . . . . . . . . . . . . . . . . . . . . . . . . . . . . . . |
.60 |
VARIATION CORRECTION – COLOR BALANCE . . . . . . . . . . . . . . . . . . . . . . . . . . . . . . . . . . . . . . . . . . . . . |
.61 |
VARIATION CORRECTION – BRIGHTNESS & CONTRAST CORRECTION . . . . . . . . . . . . . . . . . . . . . . . . . |
.62 |
VARIATION CORRECTION – SATURATION CORRECTION . . . . . . . . . . . . . . . . . . . . . . . . . . . . . . . . . . . . . |
.63 |
CANCELLING THE IMAGE CORRECTION . . . . . . . . . . . . . . . . . . . . . . . . . . . . . . . . . . . . . . . . . . . . . . . . . . |
.64 |
REDO THE CORRECTION . . . . . . . . . . . . . . . . . . . . . . . . . . . . . . . . . . . . . . . . . . . . . . . . . . . . . . . . . . . . . . |
.64 |
DELETING THE IMAGE CORRECTION (DELETING ALL THE IMAGE CORRECTIONS) . . . . . . . . . . . . . . . |
.64 |
SNAPSHOT . . . . . . . . . . . . . . . . . . . . . . . . . . . . . . . . . . . . . . . . . . . . . . . . . . . . . . . . . . . . . . . . . . . . . . . . . |
.65 |
IMAGE CORRECTION JOB . . . . . . . . . . . . . . . . . . . . . . . . . . . . . . . . . . . . . . . . . . . . . . . . . . . . . . . . . . . . . |
.66 |
IMAGE CORRECTION JOB – SAVING IMAGE CORRECTION JOB . . . . . . . . . . . . . . . . . . . . . . . . . . . . . . . |
.66 |
IMAGE CORRECTION JOB – LOADING IMAGE CORRECTION JOB . . . . . . . . . . . . . . . . . . . . . . . . . . . . . . |
.67 |
CHECKING THE CORRECTION RESULT WHILE LINING UP IMAGES . . . . . . . . . . . . . . . . . . . . . . . . . . . . . |
.68 |
FULL-SCREEN VIEWING THE POST-CORRECTION IMAGE . . . . . . . . . . . . . . . . . . . . . . . . . . . . . . . . . . . . |
.68 |
DIGITAL ROC/GEM . . . . . . . . . . . . . . . . . . . . . . . . . . . . . . . . . . . . . . . . . . . . . . |
69 |
DIGITAL ROC . . . . . . . . . . . . . . . . . . . . . . . . . . . . . . . . . . . . . . . . . . . . . . . . . . . . . . . . . . . . . . . . . . . . . . . . |
.69 |
DIGITAL GEM . . . . . . . . . . . . . . . . . . . . . . . . . . . . . . . . . . . . . . . . . . . . . . . . . . . . . . . . . . . . . . . . . . . . . . . . |
.70 |
THE FLOW CHART TO THE FINAL SCAN . . . . . . . . . . . . . . . . . . . . . . . . . . . . |
74 |
JOB . . . . . . . . . . . . . . . . . . . . . . . . . . . . . . . . . . . . . . . . . . . . . . . . . . . . . . . . . . |
75 |
LOADING A JOB . . . . . . . . . . . . . . . . . . . . . . . . . . . . . . . . . . . . . . . . . . . . . . . . . . . . . . . . . . . . . . . . . . . . . . .76 CATEGORIES . . . . . . . . . . . . . . . . . . . . . . . . . . . . . . . . . . . . . . . . . . . . . . . . . . . . . . . . . . . . . . . . . . . . . . . . .77
FINAL SCAN . . . . . . . . . . . . . . . . . . . . . . . . . . . . . . . . . . . . . . . . . . . . . . . . . . .78
– 4 –

TABLE OF CONTENTS
SCAN SETTINGS WINDOW . . . . . . . . . . . . . . . . . . . . . . . . . . . . . . . . . . . . . . . |
80 |
SCAN SETTINGS WINDOW – NAMES OF PARTS . . . . . . . . . . . . . . . . . . . . . . . . . . . . . . . . . . . . . . . . . . . . .80 REGARDING THE SETTING ITEMS OF THE SCAN SETTINGS WINDOW . . . . . . . . . . . . . . . . . . . . . . . . . . .81 EXAMPLE OF THE SCAN SETTING – WHEN DISPLAYING IN A MONITOR . . . . . . . . . . . . . . . . . . . . . . . . .84 EXAMPLE OF THE SCAN SETTING – WHEN PRINTING A SCANNED IMAGE . . . . . . . . . . . . . . . . . . . . . . .85 REGISTERING A JOB . . . . . . . . . . . . . . . . . . . . . . . . . . . . . . . . . . . . . . . . . . . . . . . . . . . . . . . . . . . . . . . . . .86 DELETING A JOB . . . . . . . . . . . . . . . . . . . . . . . . . . . . . . . . . . . . . . . . . . . . . . . . . . . . . . . . . . . . . . . . . . . . . .87
SETTING THE PREFERENCES . . . . . . . . . . . . . . . . . . . . . . . . . . . . . . . . . . . . .88
THE DISPLAY IN THE PREFERENCES WINDOW . . . . . . . . . . . . . . . . . . . . . . . . . . . . . . . . . . . . . . . . . . . . |
.88 |
REGARDING THE SETTING ITEMS OF THE PREFERENCES WINDOW . . . . . . . . . . . . . . . . . . . . . . . . . . . . |
89 |
COLOR MATCHING . . . . . . . . . . . . . . . . . . . . . . . . . . . . . . . . . . . . . . . . . . . . . . . . . . . . . . . . . . . . . . . . . . . . |
92 |
COLOR MATCHING – THE SETTING OF OUTPUT COLOR IMAGE . . . . . . . . . . . . . . . . . . . . . . . . . . . . . . . . |
92 |
REGARDING OUTPUT COLOR SPACE SETTINGS AVAILABLE . . . . . . . . . . . . . . . . . . . . . . . . . . . . . . . . . . |
93 |
COLOR MATCHING – THE SETTING OF ICC PROFILE . . . . . . . . . . . . . . . . . . . . . . . . . . . . . . . . . . . . . . . . . |
95 |
NAVIGATION . . . . . . . . . . . . . . . . . . . . . . . . . . . . . . . . . . . . . . . . . . . . . . . . . . .96
THE AUTOMATIC OPERATION BY THE NAVIGATION FUNCTION . . . . . . . . . . . . . . . . . . . . . . . . . . . . . . . . .98 INPUTTING THE NAME OF NAVIGATION SET AND SAVING IT . . . . . . . . . . . . . . . . . . . . . . . . . . . . . . . . . .100 SELECTING A NAVIGATION SET . . . . . . . . . . . . . . . . . . . . . . . . . . . . . . . . . . . . . . . . . . . . . . . . . . . . . . . . .100 DELETING A NAVIGATION SET . . . . . . . . . . . . . . . . . . . . . . . . . . . . . . . . . . . . . . . . . . . . . . . . . . . . . . . . . .101
SLIDE FEEDER (OPTIONAL ACCESSORY) . . . . . . . . . . . . . . . . . . . . . . . . . . |
102 |
LOADING TIME – WINDOWS . . . . . . . . . . . . . . . . . . . . . . . . . . . . . . . . . . . . . |
.104 |
LOADING TIME – MACINTOSH . . . . . . . . . . . . . . . . . . . . . . . . . . . . . . . . . . . |
.105 |
JOB FILE LIST – 35 MM . . . . . . . . . . . . . . . . . . . . . . . . . . . . . . . . . . . . . . . . |
.106 |
JOB FILE LIST – 6 X 4.5 . . . . . . . . . . . . . . . . . . . . . . . . . . . . . . . . . . . . . . . . |
.108 |
JOB FILE LIST – 6 X 6 . . . . . . . . . . . . . . . . . . . . . . . . . . . . . . . . . . . . . . . . . |
.110 |
JOB FILE LIST – 6 X 7 . . . . . . . . . . . . . . . . . . . . . . . . . . . . . . . . . . . . . . . . . |
.112 |
JOB FILE LIST – 6 X 8 . . . . . . . . . . . . . . . . . . . . . . . . . . . . . . . . . . . . . . . . . |
.114 |
JOB FILE LIST – 6 X 9 . . . . . . . . . . . . . . . . . . . . . . . . . . . . . . . . . . . . . . . . . |
.116 |
JOB FILE LIST – APS . . . . . . . . . . . . . . . . . . . . . . . . . . . . . . . . . . . . . . . . . . |
.118 |
JOB FILE LIST – 16 MM . . . . . . . . . . . . . . . . . . . . . . . . . . . . . . . . . . . . . . . . |
.120 |
JOB FILE LIST – CENTER AREA 2820 . . . . . . . . . . . . . . . . . . . . . . . . . . . . |
.122 |
– 5 –

SOFTWARE REGISTRATION
Please register this software before using it.
You will receive technical support, as well as software upgrade and product information once this software is registered. Complete and return the enclosed Product & Software Registration form after detaching it from the Warranty. No postage is necessary.
•The information provided in the questionnaire will only be used for Minolta customer service and product research & development. The information you provide will be kept private and confidential.
The Dimage Scan Multi II and the supplied software are not designed for use with sepia color film. However, if you intend to use sepia color film, select Color Negative in the film type (p.xx). After the final scan, retouch the saved image using the image editing application so that a sepia tone is reproduced.
Also, when scanning sepia color film with an APS cassette, [The film type cannot be selected.] appears if the Auto Detect (color) is selected in the film type. In this case, select Color Negative and perform the final scan. After the final scan, retouch the saved image using the image editing application so that a sepia tone is reproduced.
– 6 –

SYSTEM REQUIREMENTS – PC/AT
CPU: IBM PC/AT compatible with an Intel Pentium processor 90 MHz or above.
• Support cannot be provided for custom or home built machines.
Pentium III Processor is recommended when loading with 16 bit or using the Digital ROC/GEM functions.
Orerating System: Windows® 95 (inc. OSR2), Windows® 98 (inc. Second Edition), Windows® 2000 Professional, Windows® NT 4.0
Memory: A minimum of 32 MB (megabytes) of RAM.
A minimum of 512 MB when loading with 16 bit and using the Digital ROC/GEM functions.
Hard Disk Space: About 600 MB or more of available hard disk space.
About 2 GB or more of available hard disk space when loading with 16 bit and using the Digital ROC/GEM functions. (About 3 GB or more is recommended.)
Monitor: Minimum VGA (640 x 480) monitor capable of displaying High Color (16 bit) is required. XGA (1024 x 768) or larger is recommended.
CD-ROM Drive: Necessary (when installing the software.)
Recommended SCSI Board:
Adaptec AHA-1510B, AHA-1520B, AHA-1540CP, AHA-2910B, AHA-2910C,
AHA-2920C, AHA-2940, AHA-2940U/W/AU/UW/U2W, SCSI Card
19160/29160/29160N, AVA-2902E/2903B/2906
Other: Photoshop Ver. 3.0.5, Ver.4.0.1, Ver. 5.0.2, Ver. 5.5, Photoshop 5.0 LE, Paint Shop Pro Ver. 6, Corel PHOTO-PAINT Ver. 9* have been fully tested for use with the TWAIN driver software.
*Corel Scan is not recommended.
– 7 –

SYSTEM REQUIREMENTS – MACINTOSH
CPU: Power PC, Power Macintosh G3, Blue & White Power Macintosh G3 and Power Macintosh G4
(Except for 68 K Macintosh and Mac OS compatible unit)
Power Macintosh G4 is recommended when loading with 16 bit and using the Digital ROC/GEM functions.
Operation System: Mac OS 7.5.3 to 9.0.4
Memory: A minimum of 32 MB (megabytes) application RAM in addition to the requirements for the Mac OS.
256 MB or more when loading with 16 bit and using the Digital ROC/GEM functions.
Hard Disk Space: About 600 MB or more of available hard disk space.
About 2 GB or more of available hard disk space when loading with 16 bit and using the Digital ROC/GEM functions. (About 3 GB or more is recommended.)
Monitor: Minimum 13 (640 x 480) inch monitor capable of displaying at least 32,000 Colors.
19 inch(1024 x 768) or larger is recommended.
CD-ROM Drive: Necessary (when installing the software.)
Recommended SCSI Board:
With a Power Macintosh and Power Macintosh G3 The standard built-in SCSI board
Connecting to the extension board inserted into the PCI bus/NuBus is not available.)
With a Blue & White Power Macintosh G3*, Power Macintosh G4
Adaptec PowerDomain 2940UW/U2W, PowerDomain 2930U, SCSI Card 2906, and AVA-2903B
* Some models in the Blue & White Power Macintosh G3 series use the Ultra2 Wide SCSI board as the standard built-in SCSI board, however, connecting the Dimage Scan Multi II to the standard built-in SCSI board is not recommended. The connecting capacity may be limited and the full capabilities of the PC may not be usable due to the specifications of the standard built-in SCSI board.
When using the model which has the standard built-in SCSI board, insert the recommended SCSI board as described above in the open slot without detaching the standard built-in SCSI board and then connect the Dimage Scan Multi II to the SCSI connctor on the inserted SCSI board.
Other: Adobe PhotoShop Ver. 4.0.1, Ver. 5.0.2, Ver. 5.5 and Adobe Photoshop 5.0 LE have been fully tested for use with the plug-in software.
– 8 –
INSTALL THE SOFTWARE
To use the Dimage Scan Multi II, install the software by following the procedure below.
CAUTION – Before installing
•Make sure that the Damage Scan Multi II is connected to your PC correctly. For connecting the Dimage Scan Multi II to the PC, refer to the hardware instruction manual.
•The antivirus system extensions may conflict with the operation of this installer. Remove or disable any extensions before launching this installer and replace or re-enable them when installations are complete.
WINDOWS 95/98/98SE/2000/NT4.0
These installation instructions assume drive C or D is the CD-ROM drive or the startup disk drive respectively.
1Turn on the Dimâge Scan Multi II.
2Turn on the PC and start up Windows.
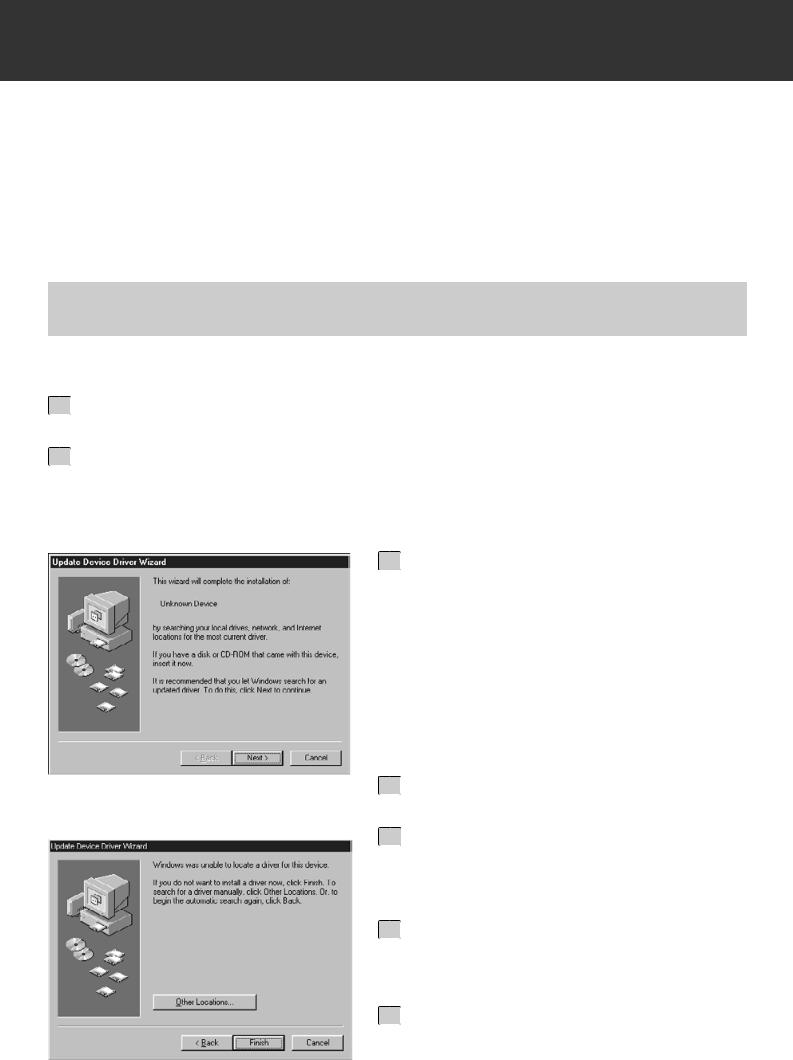
• The“[New Hardware Found” window will appear.
FOR WINDOWS 2000/NT4.0
3Select “Do not install a driver.” and click on [OK].
•This dialog box may appear several times. Repeat step 3 until the dialog box no longer appears.
FOR WINDOWS 95 RELEASE 2 (OSR2)
• The 2 dialog boxes shown on the left will appear.
3a Click on [Next >] in the first dialog box.
3b Click on [Finish] in the second dialog box.
FOR WINDOWS 98
3Click on [Next >] until [Finish] appears and Click on [Finish] at last.
4Insert the Dimâge Scan Multi II CDROM into the CD-ROM drive.
– 9 –
INSTALL THE SOFTWARE
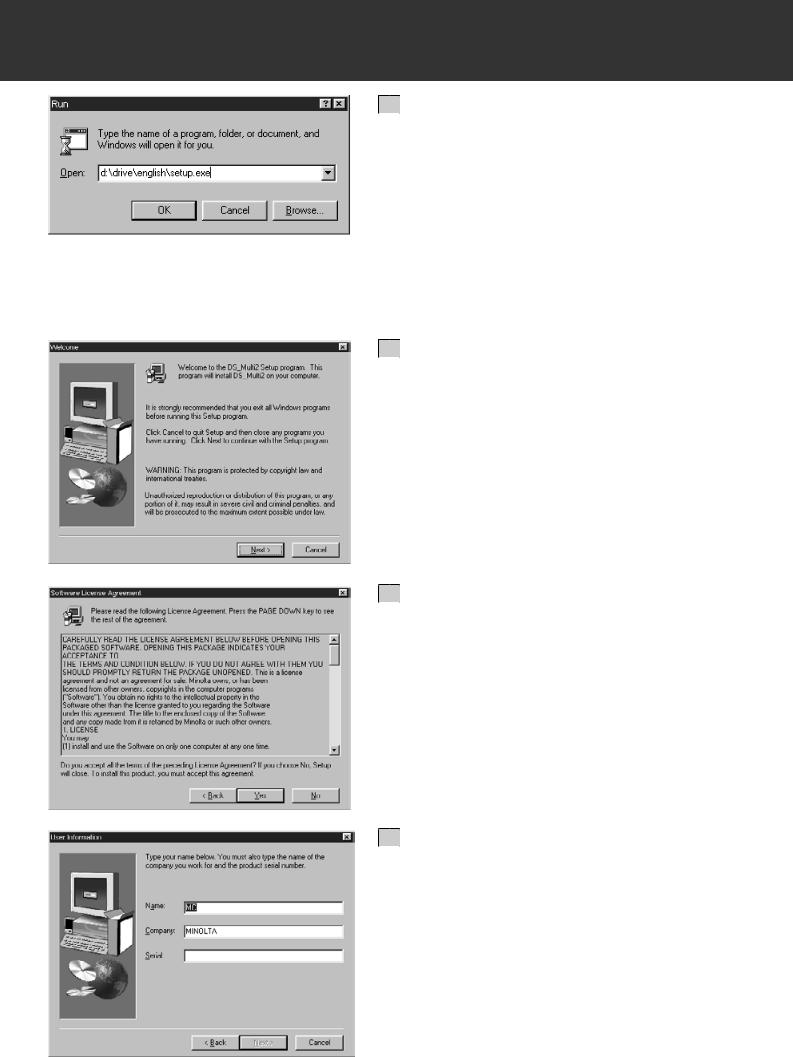
5From the START button, select Run…
When the Run dialog box appears, enter D:driver\english\setup.exe from the Open drop-down list, then click on [OK].
•The following dialog box will appear.
6Click on [Next >].
•The Software License Agreement will appear.
7After reading the agreement, if you accept it, click on [Yes].
•The [Serial Number Input] dialog box will appear.
If you do not accept, click on [No]. Setup will be cancelled.
8Enter your name, company name and the serial number described on the CD-ROM case and click on [Next >].
•The Choose Destination Location dialog box will appear.
•Take care to type them correctly, otherwise, [Next >] cannot be clicked.
– 10 –
INSTALL THE SOFTWARE
9To install the software into the directory in the default setting ;C:\Program Files\DS_Multi II, click on [Next >].
•The “Setup Type” dialog box will appear.
•To select another destination directory, click on [Browse…] and select the directory. Click on [OK].
10Select the setup type and click on [Next >].
•Normally, select “Typical” When the DS Multi II Utility software is not used, select [TWAIN File].
•When [Next >] is clicked on, the [Select Program Folder] dialog box appears.
11The name of the program folder in which program icons will be added is displayed. Confirm the name and click on [Next >].
•Setup will begin.
•When setup is complete, the “Setup is complete and Minolta Dimage Scan Multi ver.2.0 is now installed!” dialog box appears.
12Make sure that the message “Yes, I want to restart my computer now.” is checkmarked and click on [Finish].
•Your computer is restarted.
– 11 –
INSTALL THE SOFTWARE
MACINTOSH
1Turn on the Dimâge Scan Multi II.
2Turn on the PC and start up the Mac OS.
3After the desk-top window is displayed, insert the Dimage Scan Multi II CD-ROM into the CD-ROM drive.
4Double-click on the Dimage Scan Multi II CD-ROM icon.
5Double-click on the Driver folder and English folder.
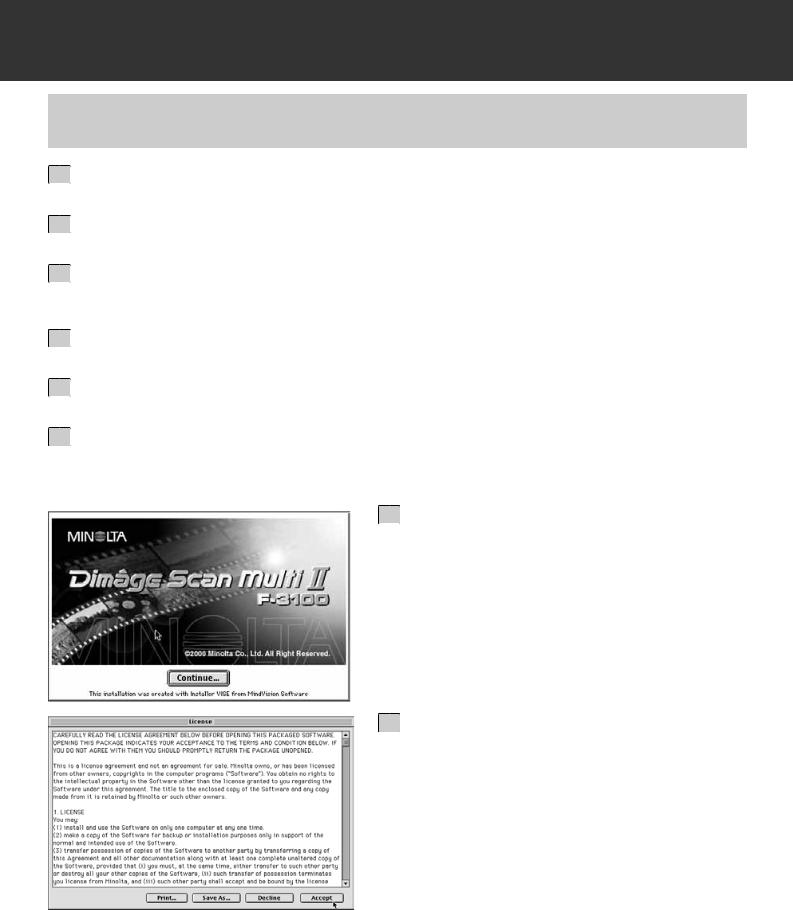
6Double-click on the DS Multi II Installer icon.
• The install screen will appear.
7Click on [Continue…].
• The user License Agreement will appear.
8After reading the agreement, if you accept it, click on [Accept].
• The Easy Install dailog box will appear.
When [Print…] is clicked, the user License
Agreement can be printed.
When [Save As…] is clicked, the content of the License Agreement is saved as a text file.
If you do not accept the user License Agreement, click on [Decline]. The installation will be cancelled.
– 12 –
INSTALL THE SOFTWARE
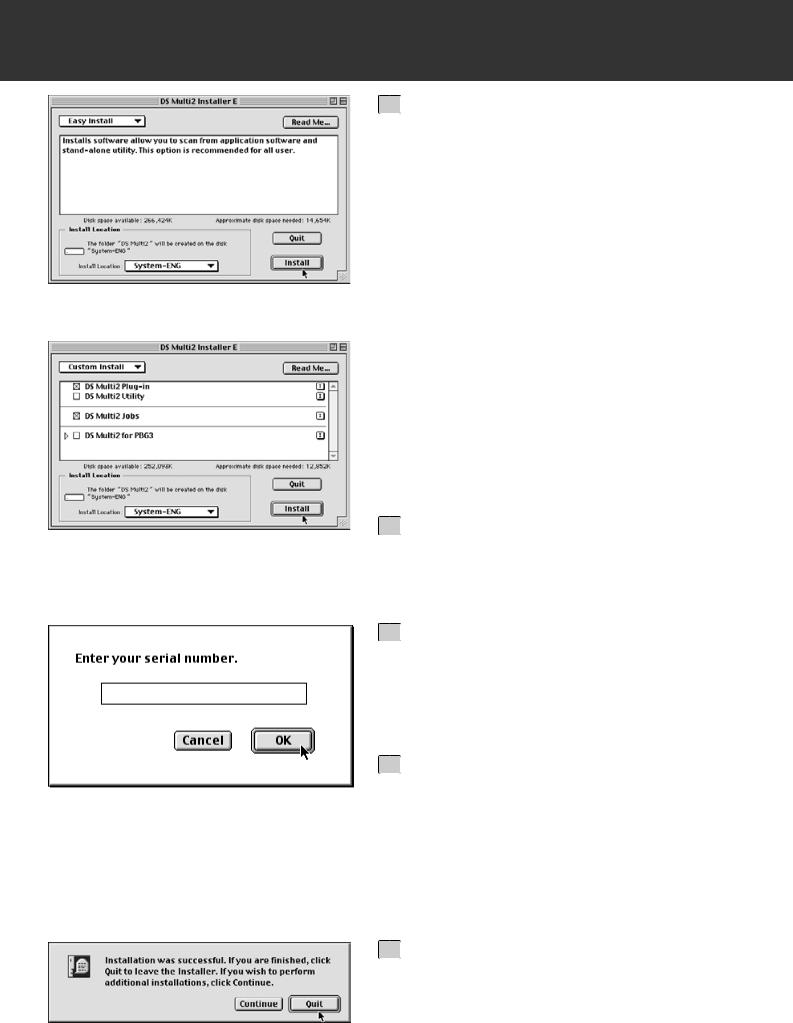
9Confirm the install location of the software displayed in Install Location.
To change the location
•Select Install Lacation from the Install Location pull-down menu and specify the folder or make a new folder.
When Easy Install is selected, all the folders are installed.
When installing either the DS Multi Plug-in or the DS Multi Utility, select the Custom Install.
1Select Custom Install from the [Install Select] pull-down menu.
2Click on the checkbox of the file to be installed.
10 Click on [Install].
•The [Enter your serial number] dialog box will appear.
11 Enter the serial number described on the back of the CD-ROM case.
• Type it correctly.
12 Click on [OK].
•The installation will begin. Follow the procedure displayed in the window.
•When the installation is complete, a message appears informing you installation was successful.
13 Click on [Quit].
– 13 –
INSTALL THE SOFTWARE
INSTALL THE PLUG-IN – MACINTOSH
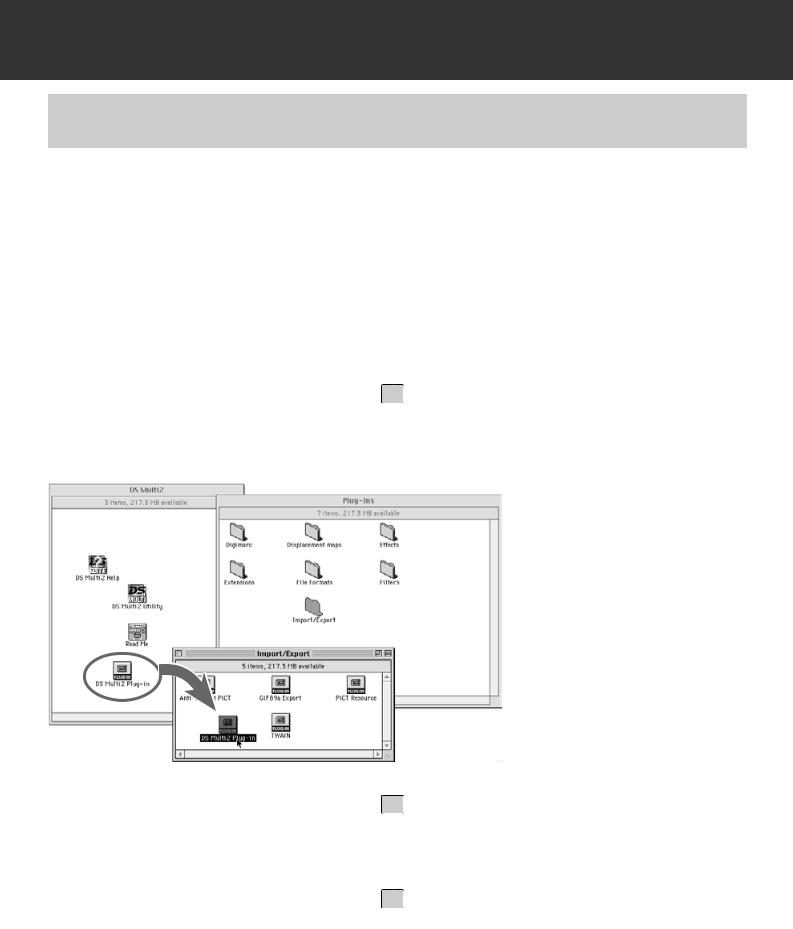
Once the installation procedure is complete, move the DS Multi Plug-in from the Dimage Scan Multi folder to the appropriate folder for the host application.
You can use the DS Multi II Plug-in when Adobe Photoshop is functioning.
As this DS Multi Plug-in cannot be installed automatically, install this Plug-in by performing the following procedure after the installation is complete.
When using only the DS Multi Utility without activating the DS Multi Plug-in, the installation is not necessary.
1 Adobe Photoshop is functioning, quit it.
2Open the Adobe Photoshop folder, and open the Photoshop Plug-ins folder.
3Drag and drop the DS Multi II Plug-in folder in the DS Multi II folder into the Plug-in’s Import/Export folder.
– 14 –
STARTING UP THE SOFTWARE – WINDOWS
WINDOWS 95/98/98SE/2000/NT4.0
STARTING UP THE TWAIN DRIVER
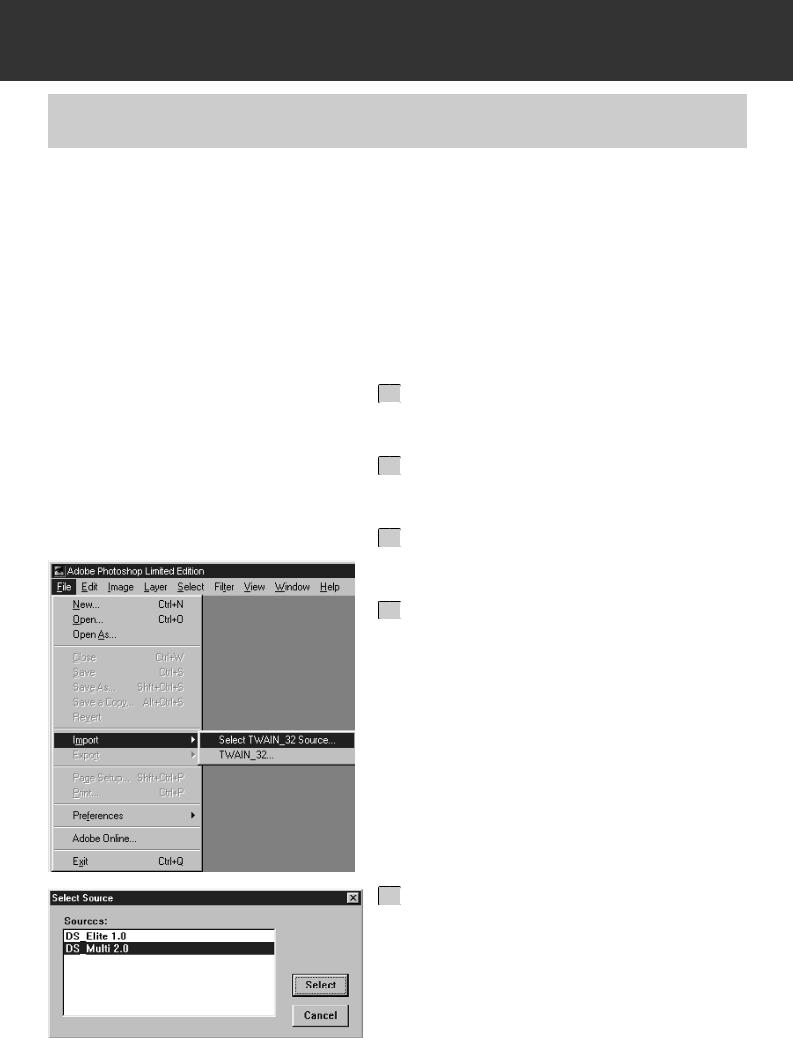
This uses Adobe Photoshop 5.0LE as an example. The commands and displays may vary among applications. For details, refer to the instruction manual of the image editing software you use.
1Turn on the Dimage Scan Multi II.
2Turn on the PC and start up Windows.
3Start up Adobe Photoshop LE.
4Select File -> Import -> Select TWAIN_32 Source… .
•The [Select TWAIN Source] dialog box appears.
5Select DS Multi 2.0 from the Source list, then click on Select.
– 15 –
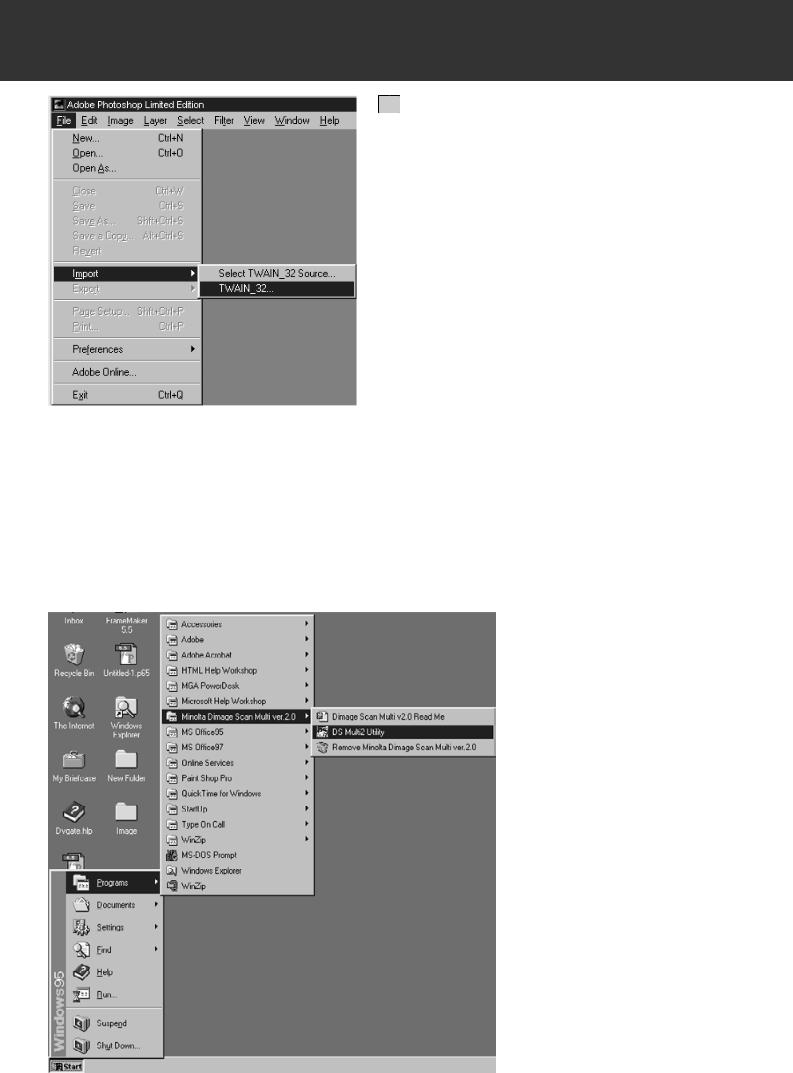
STATING UP THE SOFTWARE – WINDOWS
6 Select File -> Import -> TWAIN_32.
STARTING UP THE UTILITY SOFTWARE
When you intend to scan and save images only, use the DS Multi II Utility software.
After performing step 1 and 2 on page 15, select Start -> Programs -> Minolta Dimage Scan Multi ver.2.0 -> DS Multi II Utility.
• The software will function and the Main window (p.19) will appear.
– 16 –
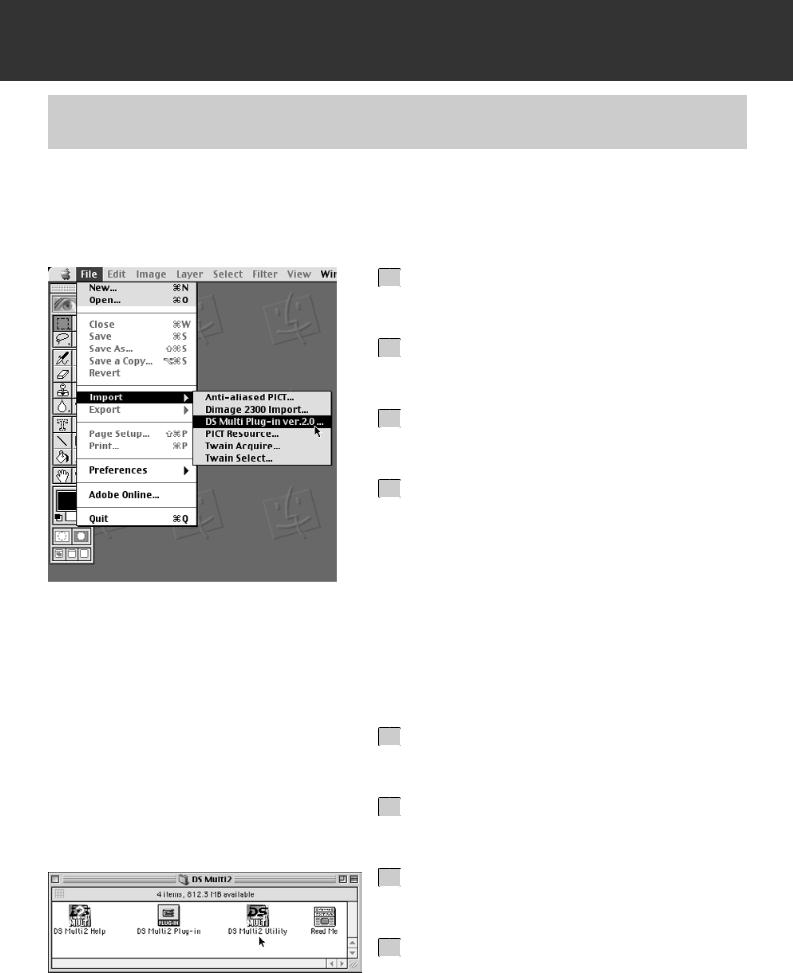
STATING UP THE SOFTWARE – MACINTOSH
MACINTOSH
STARTING UP THE Adobe Photoshop PLUG-IN
This instruction assumes that the DS Multi II folder is installed in the Plug-ins Import/Export folder of Adobe Photoshop 5.0 LE. For the installation of the DS Multi II Plug-in, see page 14.
1Turn on the Dimage Scan MultI II.
2Turn on the PC and start up Mac OS.
3Start up Adobe Photoshop LE.
4Select File -> Import -> DS Multi Plugin ver. 2.0….
•The software will function and the Main window (p.19) will appear.
STARTING UP THE UTILITY SOFTWARE
When you intend to scan and save images only, use the DS Multi ii Utility software.
1Turn on the Dimage Scan Multi II.
2Turn on the PC and start up Mac OS.
3Double-click on the DS Multi II folder.
4Double-click on the DS Multi II Utility icon.
•The software will function and the Main window (p.19) will appear.
– 17 –
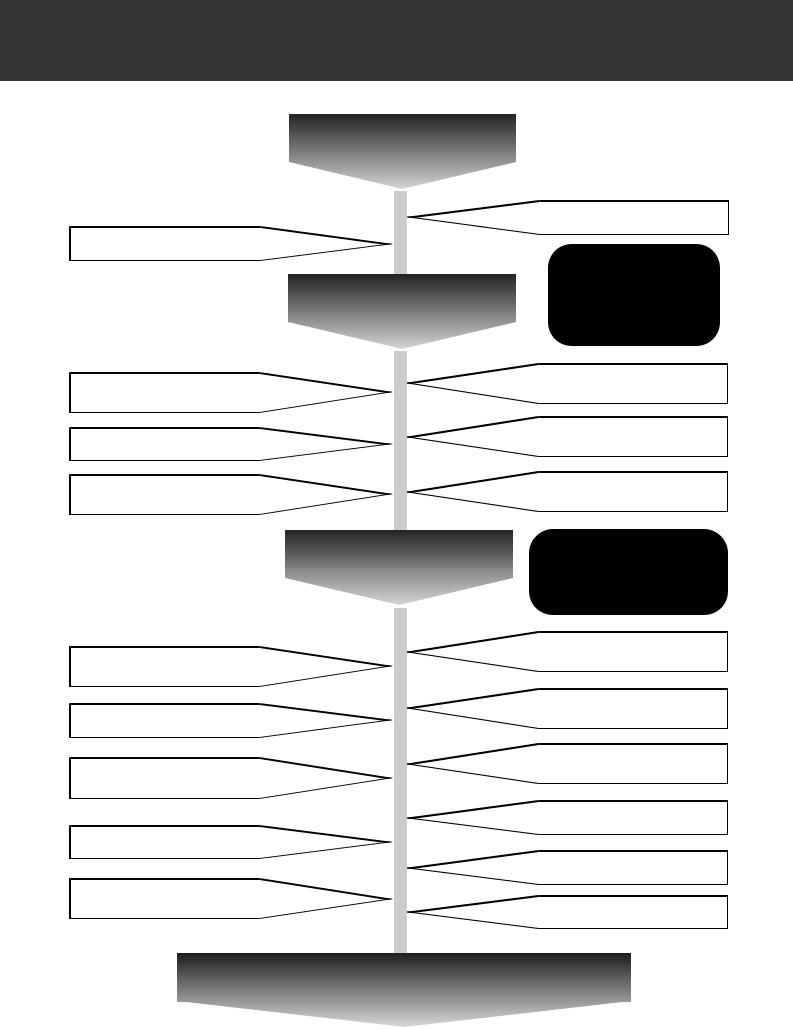
THE FLOW CHART TO PRESCAN
Main Window
Selecting the Film Type (p.21)
Index Scan
Magnififying the Index Image (p.26)
Selecting Frames (p.24)
Saving the Index Scan Images (p.30)
Prescan
Full-Screen View (p.35)
Scrolling Prescan Images (p.37)
Auto Cropping/Manual Cropping (p.42 to 44)
Manual Focus (p.41)
Changing CHP Cropping Area (p.45)
Selecting the Film Format (p.20)
When using the Slide Mount Holder, 35 mm Film Holder or APS adapter (optional accessory)
Rotating/Flipping Index Frames (p.25)
Reversing the Frame Order (p.27)
Saving after Lining Up the Index Scan Images (p.28)
When using Medium Format Film Holder, Universal Film Holder (optional accessory) or Slide Feeder (optional accessory)
Rotating/Flipping Prescan Images (p.34)
Magnifying/Reducing Prescan
Images (p.36)
AE Area/AE Area Lock (p.38 to 39)
Point Auto Focus (p.40)
Displaying RGB/CMY (p.46)
Displaying Frame Number (p.46)
To the Image Correction Window (p.47)
– 18 –
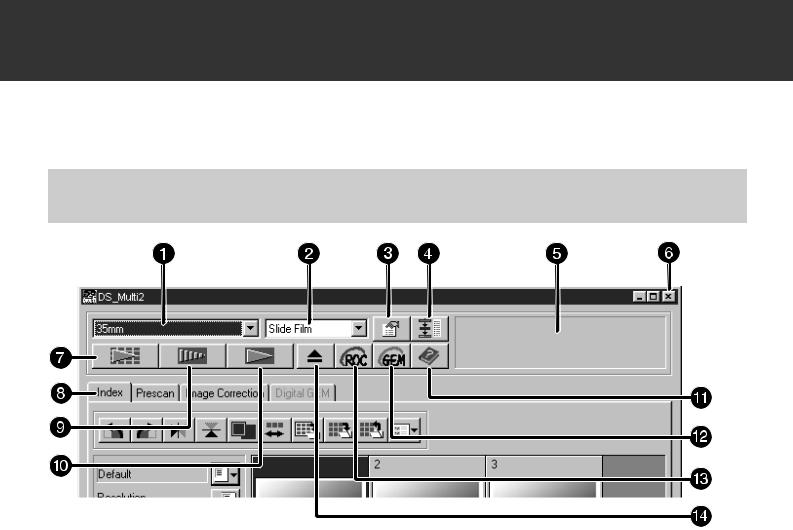
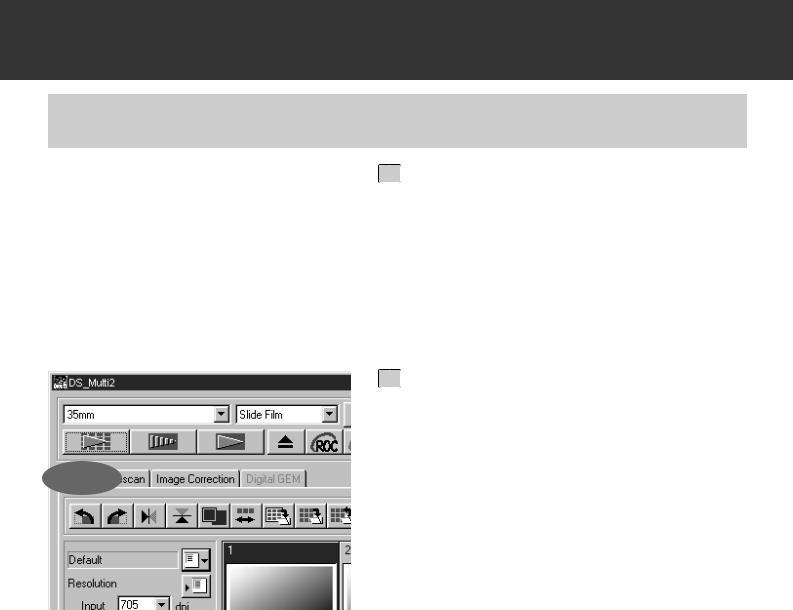
MAIN WINDOW
The Main Window appears when you launch the software. This is the main window for the Dimâge Scan Multi II software.
MAIN WINDOW – NAMES OF PARTS
 Film Format list box
 Film Type list box
 Preferences button
 Navigation button
 Status bar
 Closing button (The upper left side of the window on Macintosh)
 Index Scan button
 Tab (Switching the Tab of the Index Scan/ Prescan/Image Correction/Digital GEM Window)
 Prescan button
 Scan button
 Help button
 Digital GEM button
 Digital ROC button
 Eject button
– 19 –
MAIN WINDOW
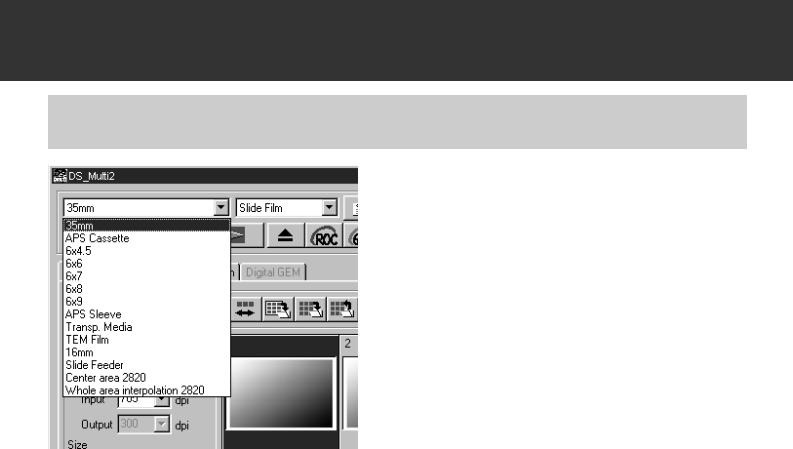
SELECTING THE FILM FORMAT
In the Main window, select the film format from the drop-down list.
•The Index window (p.22) will appear if 35mm or APS Cassette is selected.
•The Prescan window will (p.33) appear if a Medium-Format Film Size (6x4.5, 6x6, 6x7, 6x8, 6x9), APS Sleeve, Transparent Media, TEM Film, 16 mm, Center Area 2820 or Whole Area Interpolation 2820 is selected.
•The following list shows the film formats and appropriate holders for scanning.
FILM FORMAT |
HOLDER |
|
|
|
|
35mm |
35mm Film Holder FH-M1 (sleeved film)/Slide Mount Holder SH-M2 (mounted slides) |
|
|
|
|
APS Cassette |
APS Adapter AD-100* |
|
|
|
|
6x4.5, 6x6, 6x7, |
Medium Format Film Holder MH-M1 and the mask corresponding to each film size, or Universal |
|
6x8, 6x9 |
Holder UH-M1* and Wide Universal Mask WM-M1* |
|
|
|
|
APS Sleeve |
Medium Format Film Holder MH-M1 and APS mask |
|
|
|
|
Transp. Media |
Slide Mount Holder SH-M2, or Universal Holder UH-M1* and Wide Universal Mask WM-M1* |
|
|
|
|
TEM Film |
Medium Format Film Holder MH-M1 and the mask corresponding to each film size, or Universal |
|
Holder UH-M1* and Wide Universal Mask WM-M1* |
||
|
||
|
|
|
16mm |
Medium Format Film Holder MH-M1 and 16mm mask |
|
|
|
|
Slide Feeder |
Slide Feeder SC-100* |
|
|
|
|
Center area 2820/ |
Medium Format Film Holder MH-M1 and the mask corresponding to each film size, or Universal |
|
Whole area interpo- |
||
Holder UH-M1* and Wide Universal Mask WM-M1* |
||
lation 2820 |
||
|
||
|
|
* shows optional accessories.
– 20 –
MAIN WINDOW
SELECTING THE FILM TYPE
In the Main window, select the type of film from the drop-down list.
•The film type options differ according to the the film format currently selected.
FILM FORMATS |
FILM TYPES |
|
|
|
|
35mm, Medium-format films, APS Sleeve, |
Color Negative, Color Positive, B&W Negative, B&W Positive |
|
16mm, Slide Feeder |
||
|
||
|
|
|
APS Cassette |
Auto Detect (colour), Color Negative, Color Positive |
|
|
|
|
Transparent Media |
Special (colour), Color Negative, Color Positive, B&W Negative, |
|
B&W Positive |
||
|
||
|
|
|
TEM film |
Special (B&W), Color Negative, Color Positive, B&W Negative, |
|
B&W Positive |
||
|
||
|
|
|
Center Area 2820/ |
Special (colour), Special (B&W), Color Negative, Color Positive, |
|
Whole Area interpolation 2820 |
B&W Negative, B&W Positive |
|
|
|
Auto Detect (APS Cassette)
The APS cassette has a built-in disk in which data such as the film sensitivity (ISO), the number of film or the type of film, etc. is recorded. When selecting the [Auto Detect], the scanner detects the information and specifies the film type automatically.
Special (Color/B&W)
The transparent media or TEM film differs from ordinary camera film in characteristics such as transparency rate, etc. When selecting [Special], the scanner specifies the film type according to the characteristics of the transparent media or TEM film.
– 21 –
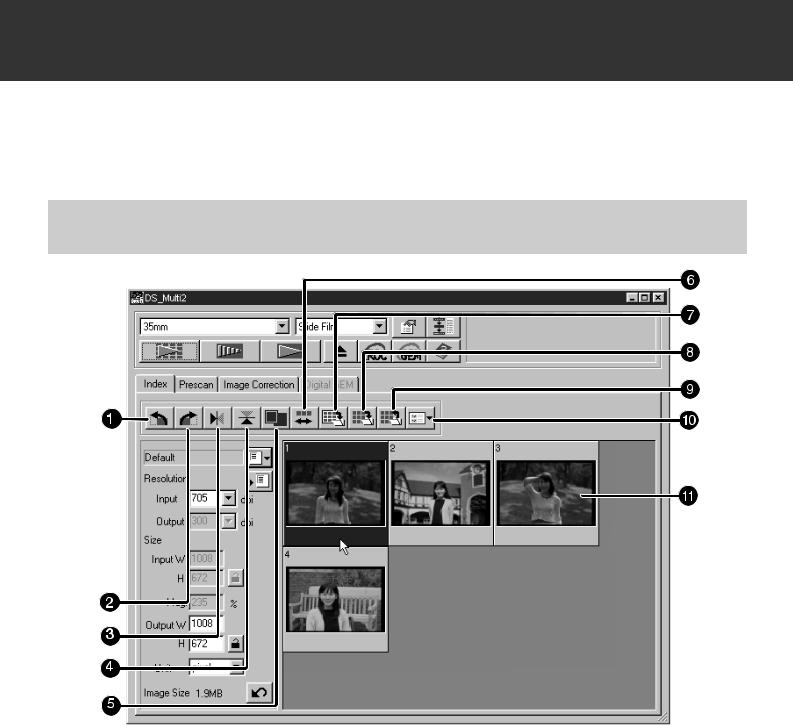
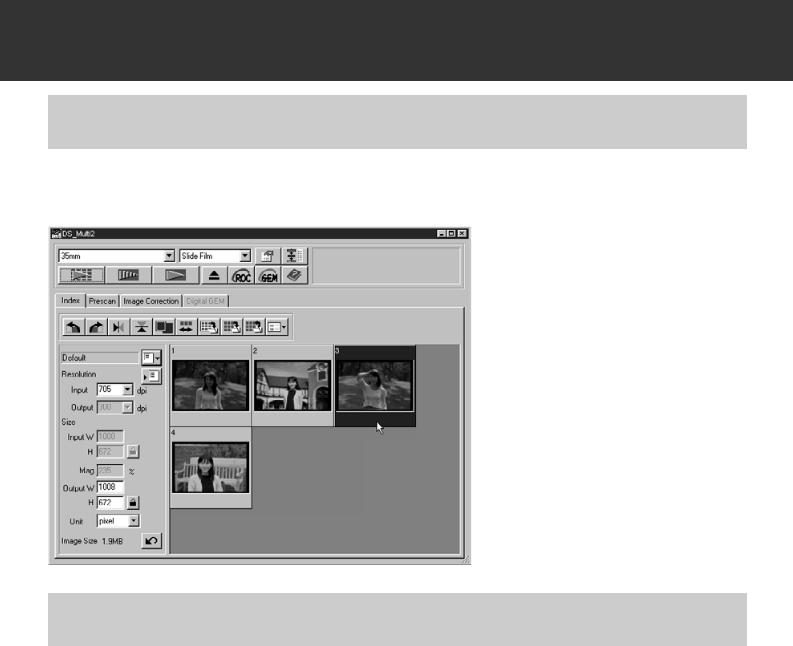
INDEX SCAN
When [35 mm]or [APS Cassette] is selected in the film format, the Index tab in the Main window is activated. (The Index window is displayed in the front.) When the index scan is performed, the index images of all frames set in a Slide Mount Holder SH-M2, 35 mm Film Holder FH-M1 or an APS adapter (optional accessory) are displayed in the Index window.
INDEX WINDOW – NAME OF PARTS
 Rotate Left button
 Rotate Right button
 Flip Horizontal button
 Flip Vertical button
 Index Image Magnifying Display button
 Reverse frame order button
 Save Index Image button
 Save Index Scan button
 Index Load button
 Image Correction Job Load button
 Index images
– 22 –
INDEX SCAN
MAKING AN INDEX SCAN
1Insert the film holder into the scanner as instructed by the hardware manual.
•Index scans can only be performed when using the 35mm film holder, slide mount holder, or optional APS adapter.
2Click on  in the Main window.
•All frames will be scanned and appear in the Index window in the order in which the frames are scanned.
•When using the 35mm film holder, the frames are scanned in the following order: 1, 2, 4, 3, 5, 6. This is not a malfunction but for. The index images are displayed in the order of 1, 2, 3, 4, 5, 6.
•There are two modes of the index scan; [High-Speed Scan] and [High-Quality Scan]. These modes can be switched in the Preferences. The default setting (after installing the software) is [High-Speed Scan].
•To cancel the index scan halfway:
Windows |
Press the Esc key. |
Macintosh |
Press Command and the period key simultaneously. |
•To delete all index images displayed in the Main window: When the Index window is activated (displayed in the front),
Windows |
Press Ctrl, Shift, and R simultaneously. |
Macintosh |
Press Command, Shift and R simultaneously. |
– 23 –
INDEX SCAN
SELECTING INDEX IMAGE
Index frame can be selected by clicking on the desired frame. The selected frame can be rotated in 90° increments either clockwise or counterclockwise or flipped horizontally or vertically (p.25) . Moreover, that can be also prescanned by clicking on the Prescan button (p.32).
SELECTING FRAMES
To select more than 2 index frames, perform the following procedure when the Index window is displayed.
Windows
•Click on the desired index frames while holding the Ctrl key.
To cancel the selected frame, click on the frame to be cancelled again while holding the Ctrl key.
•To select a sequence of index frames
Example: To select the images from frame numbers 2 to 9
Click on the images of frame numbers 2 and 9 while holding the Shift key.
•To select all the frames, press the Ctrl and A keys simultaneously.
Macintosh
•Click on the desired frames while holding the Commend key.
To cancel the selected frame, click on the frame to be cancelled again while holding the Command key.
•To select a sequence of index frames
Example: To select the images from frame numbers 2 to 9
Click on the images of frame numbers 2 and 9 while holding the Shift key. To select all the frames, press the Command and A keys simultaneously.
–24 –

INDEX SCAN
ROTATING THE INDEX FRAMES
Select the frame (p. 24) to be rotated and click on  or
or  .
.
•Each time the Rotate Left button or Rotate Right button is clicked, the index frame is rotated in 90° increments either clockwise or counterclockwise.
FLIPPING THE INDEX FRAMES
Select the frame (p. 24) to be flipped and click on  or
or  .
.
• To cancel flipping frame, click on the Flip Horizontal button or Flip Vertical button again.
– 25 –
INDEX SCAN
MAGNIFYING THE INDEX IMAGE
When  is clicked, the index image is magnified. When the button is clicked again, the image returns to the previous size.
– 26 –
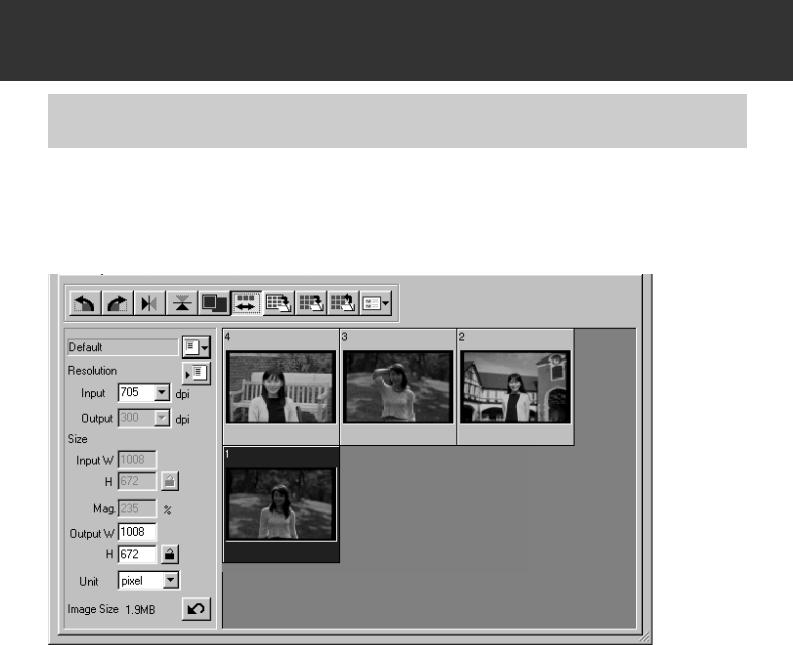
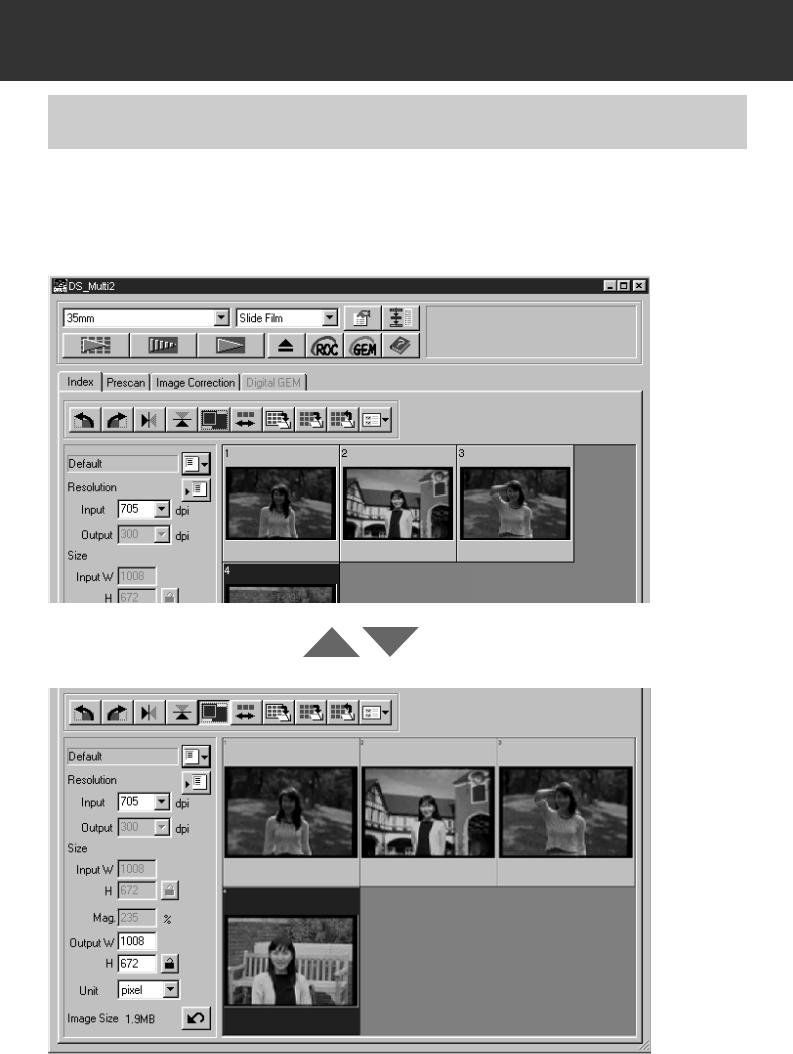
INDEX SCAN
REVERSING THE INDEX IMAGE
Each time  button is clicked, the order of the index frames is switched between reverse order and original order.
– 27 –
INDEX SCAN
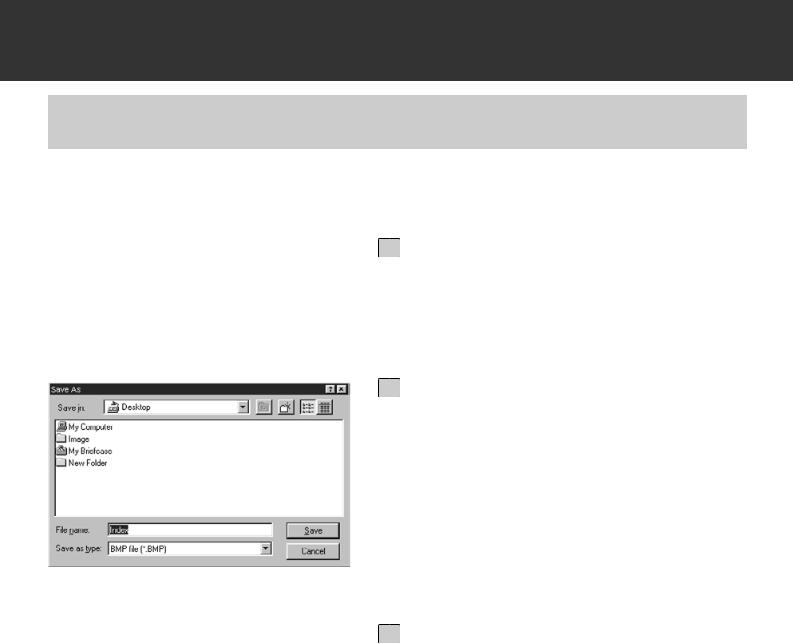
SAVING AFTER LINING UP THE INDEX SCAN IMAGES
The index scan images can be lined up like an album (as shown on the next page) and then saved as an image file.
1Click on Save Index Image button  .
.
•The standard save dialog box for your operating system will appear.
2Select the file type to be saved from the [Save as Type] list box (or the file format pull-down menu).
•Windows: The displayed index scan image can be saved in the Windows® Bitmap (BMP) file format or the JPEG file format.
•Macintosh: The displayed index scan image can be saved in the PICT file format or JPEG file format.
3Enter the desired file name, choose the file destination and then click on Save.
•When the index scan images are displayed, these images are saved regardless of the film set in the scanner.
•When the index images are not displayed, the index images are saved after performing the index scan.
•If there are index images which have not been scanned yet, those images will be scanned and then all index images including those images will be saved.
– 28 –
INDEX SCAN
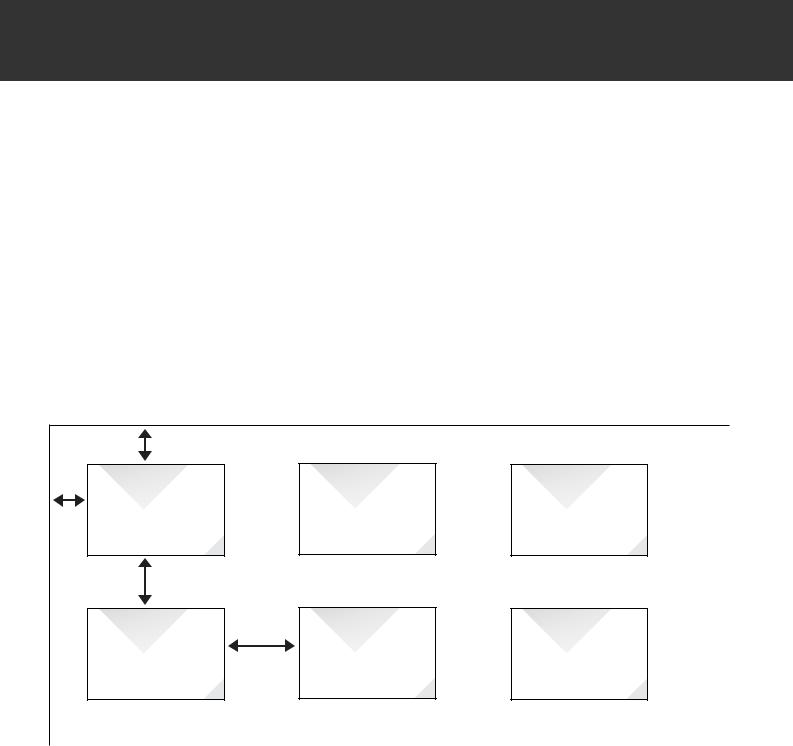
The index scan images are arranged in the image file to be saved as follows
•When there are 4 index frames, the frames are arranged in 4 columns of one line.
When there are more than 6 index frames, the frames are arranged in 6 columns multiplied by the necessary number of lines (for example, when there are 15 index frames, the frames are arranged in 6 columns multiplied by 3 lines.)
•A spacing of 50 pixels is allocated at the top, bottom, right and left sides of the window.
•The horizontal or vertical space between frames is 100 pixels or 70 pixels respectively.
•The output resolution of the image file to be saved is 300 dpi.
|
1 |
50 pixels |
2 |
3 |
|
|
|
||||
pixels |
|
70 pixels |
|
|
|
50 |
7 |
8 |
9 |
||
|
|||||
|
|
100 |
|
|
|
|
|
pixels |
|
|
– 29 –
INDEX SCAN
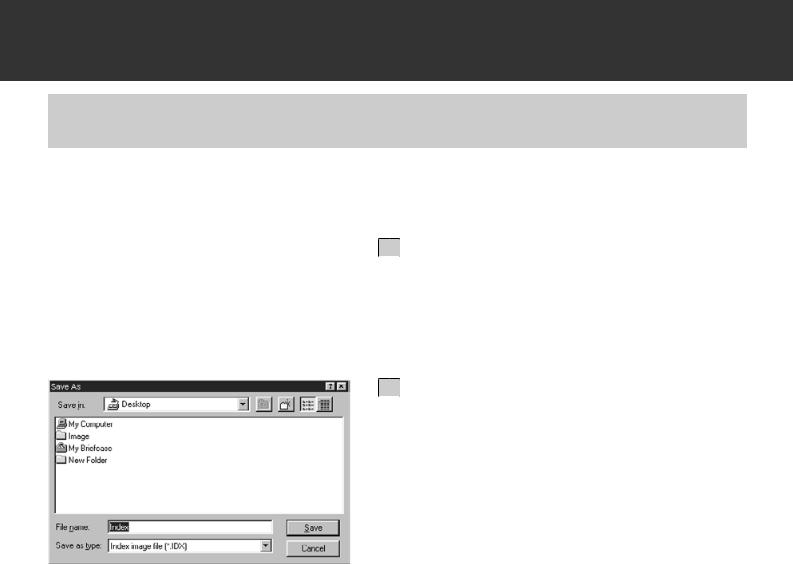
SAVING THE INDEX SCAN IMAGES AS AN INDEX FILE
The index images can also be saved as an index file using the original file format of this software.
1Click on Save Index Scan button  .
.
•The standard save dialog box for your operating system will appear.
2Enter the desired file name, choose the file destination, then click on Save.
•File types other than the Index Image file (*.idx) cannot be selected in the [Save as Type] list box (or the file format pull-down menu).
•When the index scan images are displayed, these images are saved regardless of the film set in the scanner.
•When the index images are not displayed, the index images are saved after performing the index scan.
•If there are index images which have not been scanned yet, those images will be scanned and then all index images including those images will be saved.
•The index image file is saved in the original format of this software.
– 30 –
 Loading...