


DiMAGE E500
INSTRUCTION MANUAL
Konica Minolta Customer Support:
www.konicaminoltasupport.com
Konica Minolta Photo World:
www.konicaminoltaphotoworld.com
Become a member of Konica Minolta Photo World today,
free of charge, and enter the fascinating world of Konica Minolta photography.
© 2005 Konica Minolta Photo Imaging, Inc. under the Berne Convention
and the Universal Copyright Convention.

EN-1
This mark on your camera certifies that this camera meets the requirements of the EU
(European Union) concerning interference causing equipment regulations. CE stands for
Conformité Européenne (European Conformity).
FCC Compliance Statement
Declaration on Conformity
Responsible Party: Konica Minolta Photo Imaging U.S.A. Inc.
Address: 725 Darlington Avenue, Mahwah, NJ 07430
This device complies with Part 15 of the FCC Rules. Operation is subject to the following two conditions:
(1) This device may not cause harmful interference, and (2) this device must accept any interference
received, including interference that may cause undesired operation. Changes or modifications not
approved by the party responsible for compliance could void the user’s authority to operate the equipment.
This equipment has been tested and found to comply with the limits for a Class B digital device, pursuant
to Part 15 of the FCC Rules. These limits are designed to provide reasonable protection against harmful
interference in a residential installation.
This equipment generates, uses and can radiate radio frequency energy and, if not installed and used
in accordance with the instructions, may cause harmful interference to radio communications. However,
there is no guarantee that interference will not occur in a particular installation. If this equipment does
cause harmful interference to radio or television reception, which can be determined by turning the
equipment off and on, the user is encouraged to try to correct the interference by one or more of the
following measures:
Reorient or relocate the receiving antenna.
Increase the separation between the equipment and the receiver.
Connect the equipment to an outlet on a circuit different from that to which the receiver is connected.
Consult the dealer or an experienced radio/TV technician for help.
Do not remove the ferrite cores from the cables.
This Class B digital apparatus complies with Canadian ICES-003.

EN-2
READ THIS FIRST
Trademark Information
Konica Minolta is a trademark of Konica Minolta Holdings, Inc.
DiMAGE is a trademark of Konica Minolta Photo Imaging, Inc.
Microsoft
®
and Windows
®
are U.S. registered trademarks of Microsoft Corporation.
Pentium
®
is a registered trademark of Intel Corporation.
Macintosh is a trademark of Apple Computer, Inc.
SD
TM
is a trademark.
Photo Explorer and Photo Express are trademarks.
Other names and products may be trademarks or registered trademarks of their respective owners.
Product Information
Product design and specifications are subject to change without notice. This includes primary product
specifications, software, software drivers, and user’s manual. This User Manual is a general reference
guide for the product.
The product and accessories that come with your digital camera may be different from those described
in this manual. This is due to the fact that different retailers often specify slightly different product
inclusions and accessories to suit their market requirements, customer demographics, and geographical
preferences. Products very often vary between retailers especially with accessories such as batteries,
chargers, AC adapters, memory cards, cables, carrying cases/pouches, and language support.
Occasionally a retailer will specify a unique product color, appearance, and internal memory capacity.
Contact your dealer for precise product definition and included accessories.
The illustrations in this manual are for the purpose of explanation and may differ from the actual
design of your digital camera.
The manufacturer assumes no liability for any errors or discrepancies in this user manual.
EN-3
FOR PROPER AND SAFE USE
Read and understand all warnings and cautions before using this product.
Warnings
Using batteries improperly can cause them to leak harmful solutions, overheat, or explode which may
damage property or cause personal injury. Do not ignore the following warnings.
Only use the batteries specified in this instruction manual.
Do not install the batteries with the polarity (+/-) reversed.
Do not use batteries which show wear or damage.
Do not expose batteries to fire, high temperatures, water, or moisture.
Do not attempt to recharge, short, or disassemble batteries.
Do not store batteries near or in metallic products.
Do not mix batteries of different types, brands, ages, or charge levels.
When recharging rechargeable batteries, only use the recommended charger.
Do not use leaking batteries. If fluid from the batteries enters your eye, immediately rinse the eye with
plenty of fresh water and contact a doctor. If fluid from the batteries makes contact with your skin or
clothing, wash the area thoroughly with water.
Tape over battery contacts to avoid short-circuiting during disposal; always follow local regulations for
battery disposal.
Use only the specified AC adapter within the voltage range indicated on the adapter unit. An
inappropriate adapter or current may cause damage or injury through fire or electric shock.
Do not disassemble this product. Electric shock may cause injury if a high voltage circuit inside the
product is touched.
Immediately remove the batteries or unplug the AC adapter and discontinue use if the camera is
dropped or subjected to an impact in which the interior, especially the flash unit, is exposed. The flash
has a high voltage circuit which may cause an electric shock resulting in injury. The continued use of
a damaged product or part may cause injuries or fire.

EN-4
Keep batteries or small parts that could be swallowed away from infants. Contact a doctor immediately
if an object is swallowed.
Store this product out of reach of children. Be careful when around children not to harm them with the
product or parts.
Do not fire the flash directly into the eyes. It may damage eyesight.
Do not fire the flash at vehicle operators. It may cause a distraction or temporary blindness which may
lead to an accident.
Do not use the monitor while operating a vehicle or walking. It may result in injury or an accident.
Do not use this product in a humid environment, or operate this product with wet hands. If liquid
enters the product, immediately remove the batteries or unplug the AC adapter and discontinue use.
The continued use of a product exposed to liquids may cause damage or injury through fire or electric
shock.
Do not use the product near inflammable gases or liquids such as gasoline, benzine, or paint thinner.
Do not use inflammable products such as alcohol, benzine, or paint thinner to clean the product. The
use of inflammable cleaners and solvents may cause an explosion or fire.
When unplugging the AC adapter, do not pull on the power cord. Hold the adapter unit when
removing it from an outlet.
Do not damage, twist, modify, heat, or place heavy objects on the AC adapter cord. A damaged cord
may cause damage or injury through fire or electric shock.
If the product emits a strange odor, heat, or smoke, discontinue use. Immediately remove the
batteries taking care not to burn yourself as the batteries become hot with use. The continued use of
a damaged product or part may cause injuries or fire.
Take the product to a Konica Minolta Service Facility when repairs are required.
Handling the cord on this product may expose you to lead, a chemical known to the State of California
to cause cancer, and birth defects or other reproductive harm. Wash hands after handling.
EN-5
CAUTION
Do not use or store the product in a hot or humid environment such as the glove compartment or trunk
of a car. It may damage the product and batteries which may result in burns or injuries caused by
heat, fire, explosion, or leaking battery fluid.
If batteries are leaking, discontinue use of the product.
The lens retracts when the camera is turned off. Touching the lens barrel while it is retracting may
cause injury.
The camera temperature rises with extended periods of use. Care should be taken to avoid burns.
Burns may result if the memory card or batteries are removed immediately after extended periods of
use. Turn the camera off and wait for it to cool.
Do not fire the flash while it is in contact with people or objects. The flash unit discharges a large
amount of energy which may cause burns.
Do not apply pressure to the LCD monitor. A damaged monitor may cause injury, and the liquid from
the monitor may cause inflammation. If liquid from the monitor makes contact with skin, wash the area
with fresh water. If liquid from the monitor comes in contact with the eyes, immediately rinse the eyes
with plenty of water and contact a doctor.
When using the AC adapter, insert the plug securely into the electrical outlet.
Do not use if the AC adapter cord is damaged.
Do not cover the AC adapter. A fire may result.
Do not obstruct access to the AC adapter; this can hinder the unplugging of the unit in emergencies.
Unplug the AC adapter when cleaning or when the product is not in use.

EN-6
CONTENTS
INTRODUCTION ................................................ 8
Package Contents............................................ 9
GETTING TO KNOW YOUR CAMERA.............. 10
Front View...................................................... 10
Rear View......................................................... 11
Mode Dial ...................................................... 12
LCD Monitor Information..................................... 13
PREPARING THE CAMERA............................. 15
Installing the Batteries ..................................... 15
Using the AC Power Adapter
(Optional Accessory)........................................16
Inserting and Removing an SD Memory Card
(Optional Accessory)........................................17
GETTING STARTED........................................... 19
Turning the Power On/Off ................................. 19
Choosing the Screen Language......................... 19
Setting the Date and Time ................................20
Formatting an SD Memory Card or Internal
Memory............................................................ 21
Using the LCD Monitor....................................... 22
PHOTOGRAPHY MODE................................... 23
Shooting Images - The Basics..........................23
Setting Image Resolution and Quality ................ 24
Using the Zoom Function................................... 25
Using the Flash............................................... 26
Using the Self-Timer......................................... 27
Adjusting the Exposure (EV Compensation)......... 28
Setting White Balance...................................... 29
USING THE MODE DIAL.................................... 30
Auto Mode......................................................30
Program Mode ............................................... 30
Portrait Mode.................................................. 31
Landscape Mode.............................................. 31
Sport Mode.....................................................32
Night Mode..................................................... 32
ADVANCED SHOOTING................................... 33
Burst.............................................................. 33
Auto Exposure Bracketing (AEB) ...................... 34
Selecting the Metering Mode ............................. 35
EN-7
PLAYBACK MODE - THE BASICS..................... 36
Viewing Images ............................................... 36
Magnifying Images .......................................... 37
Thumbnail Display .......................................... 38
Slideshow Display ........................................... 39
Resizing an Image ........................................... 40
VIDEO MODE.................................................... 41
Recording Video Clips ...................................... 41
Playing Back Video Clips ................................. 42
PLAYBACK MODE – ADVANCED FEATURES...43
Playing Back Still Images/Video Clips on TV ........ 43
Deleting Images/Video Clips.............................. 44
Protecting Images/Video Clips ........................... 45
Setting the DPOF............................................. 46
Connecting to a PictBridge Compliant Printer
(Optional Function).......................................... 48
TRANSFERRING FILES FROM YOUR DIGITAL
CAMERA TO COMPUTER.................................52
Step 1: Install the USB driver .........................53
Step 2: Connect the digital camera to your
computer...........................................54
Step 3: Download images or video clips............55
EDITING SOFTWARE INSTALLATION..............56
Installing Photo Explorer....................................56
Installing Photo Express....................................57
USING THE DIGITAL CAMERA AS A PC CAMERA...58
Step 1: Install the PC camera driver..................58
Step 2: Connect the digital camera to your
computer.............................................59
Step 3:
MENU OPTIONS...............................................60
Camera Menu.................................................... 60
Video Menu ................................................... 64
Playback Menu............................................... 65
Setup Menu.................................................... 67
CONNECTING THE DIGITAL CAMERA TO
OTHER DEVICES............................................. 70
SPECIFICATIONS............................................ 71
APPENDIX........................................................ 72
CARE AND STORAGE.....................................73
Run your application software
(i.e. Windows NetMeeting)....................59

EN-8
INTRODUCTION
Thank you for purchasing the new digital camera!
Equipped with a 5.0 Megapixels CCD sensor, your camera delivers good quality, 2560 x 1920 resolution
images. Other features provided by the camera include the following:
5.0 Megapixels
A high-resolution CCD sensor provides 5.0
megapixels for good quality of images.
Auto flash
An auto flash sensor automatically detects
the shooting (lighting) conditions and
determines whether the flash should be used.
2.0” LTPS color image LCD monitor
Optical zoom: 1x~3x
Digital zoom: 1x~4x
12MB internal (built-in) memory
Images can be captured without using a
memory card.
Support for SD memory card for memory
expansion
You may wish to expand the memory capacity
(up to 512MB capacity) by using an additional
memory card.
USB connection (USB 2.0 Full Speed compliant)
Still images or video clips that you have
recorded can be downloaded to your computer
using the USB cable (A USB driver is required
for Win 98 and Win98SE).
DPOF functionality
DPOF can be used to print your images on a
DPOF compatible printer by simply inserting
the memory card.
PictBridge support
You can connect the camera directly to printer
that supports PictBridge and perform image
selection and printing using the camera monitor
screen and controls.
Provided editing software: Photo Explorer /
Photo Express
You can enhance and retouch your images on
your computer by using the provided editing
software.
EN-9
Package Contents
Carefully unpack your kit box and ensure that you have the following items. In the event that any item is
missing or if you find any mismatch or damage, promptly contact your dealer.
Common Product Components:
Konica Minolta DiMAGE E500 Digital Still Camera
Hand Strap
USB Cable
AV Cable
Batteries
Camera Case
CD-ROM
Please contact your local camera dealer or the Konica Minolta distributor in your area.
EN-10
GETTING TO KNOW YOUR CAMERA
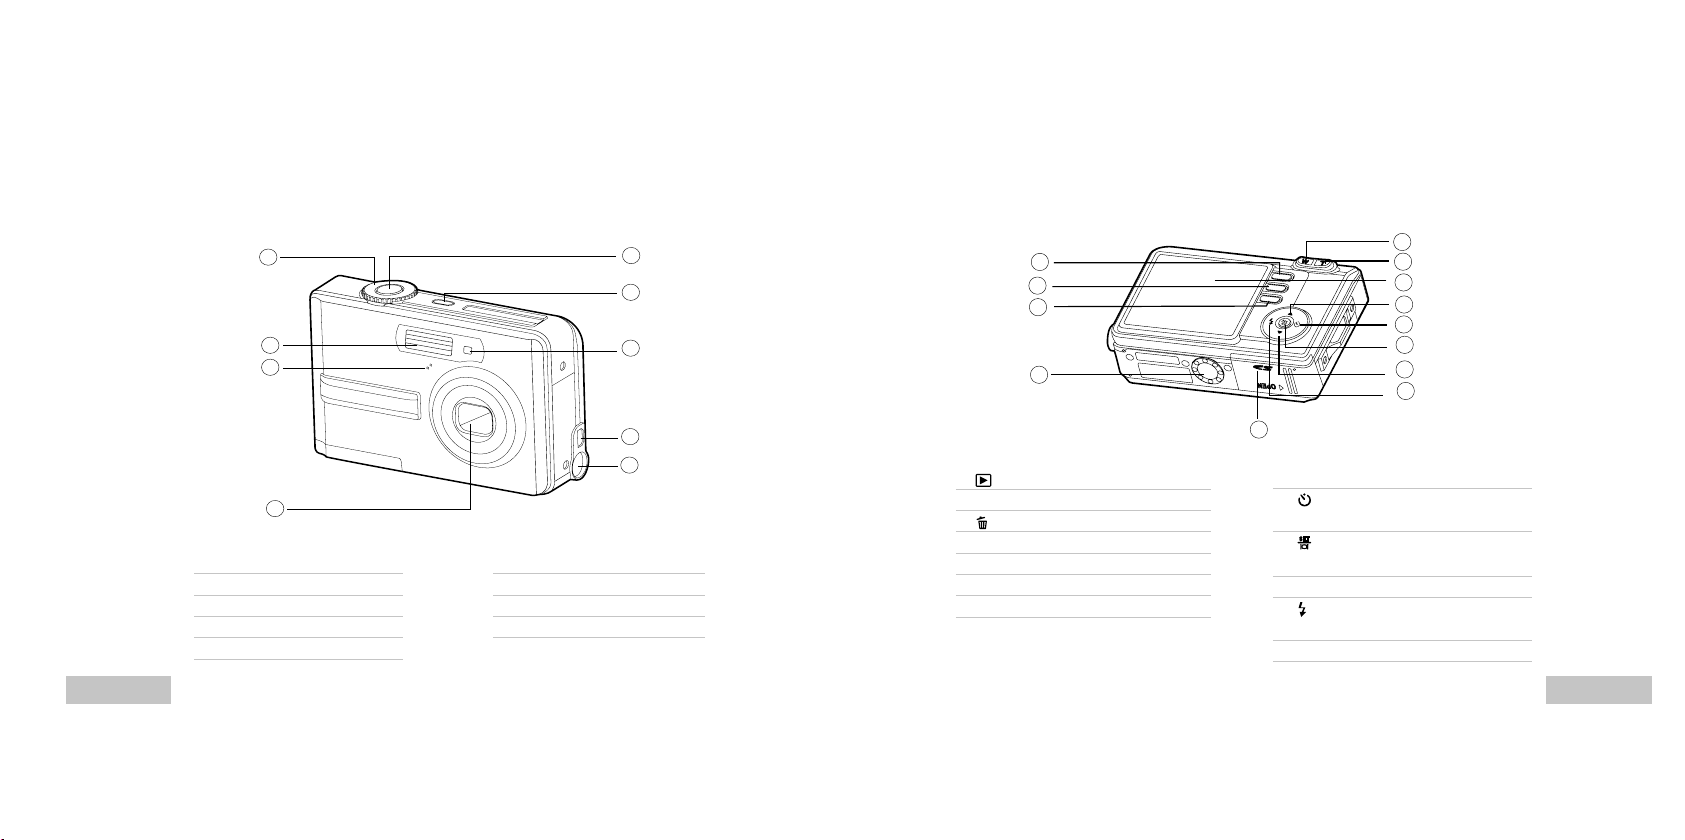
Front View
8
7
6
5
2
3
4
1
9
1. Mode dial
2. Flash
3. Microphone
4. Lens
5. Shutter button
6. ON/OFF Power button
7. Self-timer LED
8. PC (USB) / AV Out terminal
9. DC in 3V terminal
EN-11
1
2
3
4
5
6
7
8
9
10
11
12
13
Rear View
1. Playback button
2. MENU Menu button
3. Delete button
4. Tripod socket
5. W Zoom out (wide-angle) button
6. T Zoom in (telephoto) button
7. LCD monitor
8. S Arrow button (Up)
9.
Self-timer button
Arrow button (Right)
10.
OK button
Display button
11. T Arrow button (Down)
12.
Flash button
Arrow button (Left)
13. Battery / SD card cover
EN-12
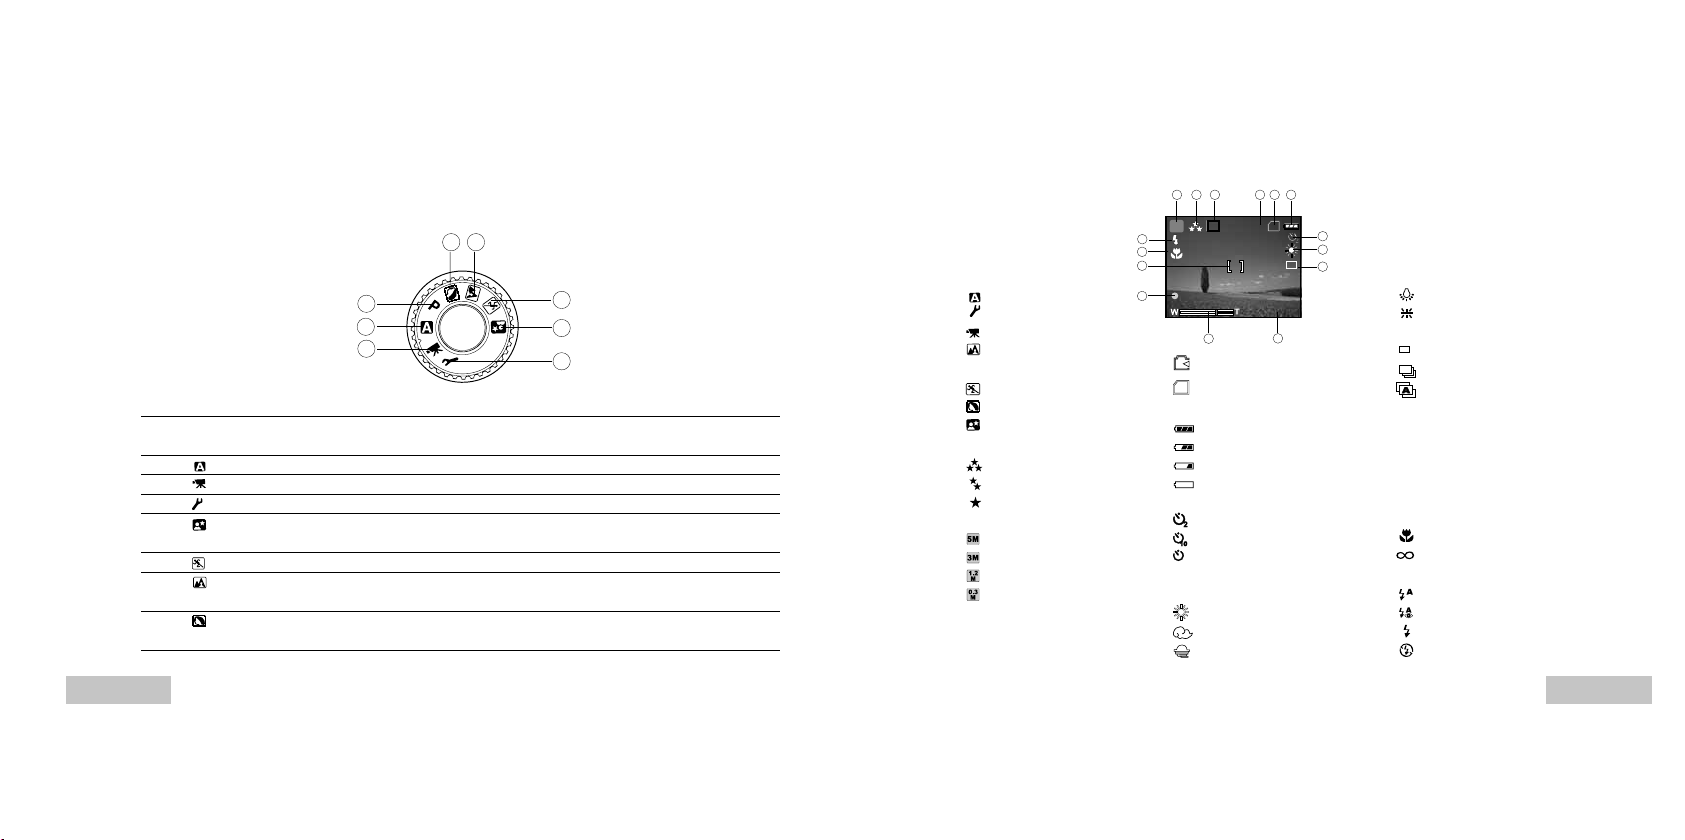
Mode Dial
You can select from seven shooting modes and setup mode according to shooting conditions to achieve
the desired effect.
Mode Description
1. P Program Select this mode to permit the shutter speed and aperture
to be set automatically.
2. Auto Select this mode to adjust point-and-shoot action.
3. Video Select this mode to record video clips.
4. Setup Select this mode to adjust the camera settings.
5.
Night Select this option to take photographs of people against a
dusk or night-time background.
6. Sport Use this mode to shoot fast moving objects.
7.
Landscape Use this mode to take photographs of distant scenery or
landscapes.
8.
Portrait Select this mode to make people stand out with the
background out-of-focus.
1
2
3
4
5
6
78
EN-13
LCD Monitor Information
Camera Mode
1. Mode indication
[ ] Auto Mode
[
] Setup Mode
[
] Video Mode
[
] Landscape Mode
[ P ] Program Mode
[
] Sport Mode
[
] Portrait Mode
[
] Night Mode
2. Image quality
[
] FINE
[
] NORMAL
[
] ECONOMY
3. Image size
[
] 2560 x 1920
[
] 2048 x 1536
[
] 1280 x 960
[
] 640 x 480
4. Possible number of shots
5. Internal memory/SD memory
card indicator
[
] Status of internal memory
[
SD
] Status of SD memory card
6. Remaining battery status
[
] Full battery power
[
] Medium battery power
[
] Low battery power
[
] No battery power
7. Self-timer mode
[
] 2 sec. delay
[
] 10 sec. delay
[
10+2
] 10+2 sec. delay
8. White balance
AUTO
[
] DAYLIGHT
[
] CLOUDY
[
] SUNSET
[
] TUNGSTEN
[
] FLUORESCENT
9. Capture mode indicator
[
X1
] SINGLE
[
] BURST
[
] AEB
10. Date
11. Zoom state
12. Flash charging/Image processing
indicator (blinking re d)
13. Focus area
14. Focus indicator
AUTO
[
] MACRO
[
] INFINITY
15. Flash mode
[
] Auto Flash
[
] Red Eye Reduction
[
] Forced Flash
[
] No Flash
3M
8
SD
14.01.2005
1.5x
P
21 3 4 5 6
7
8
9
1011
13
15
14
X1
12
EN-14
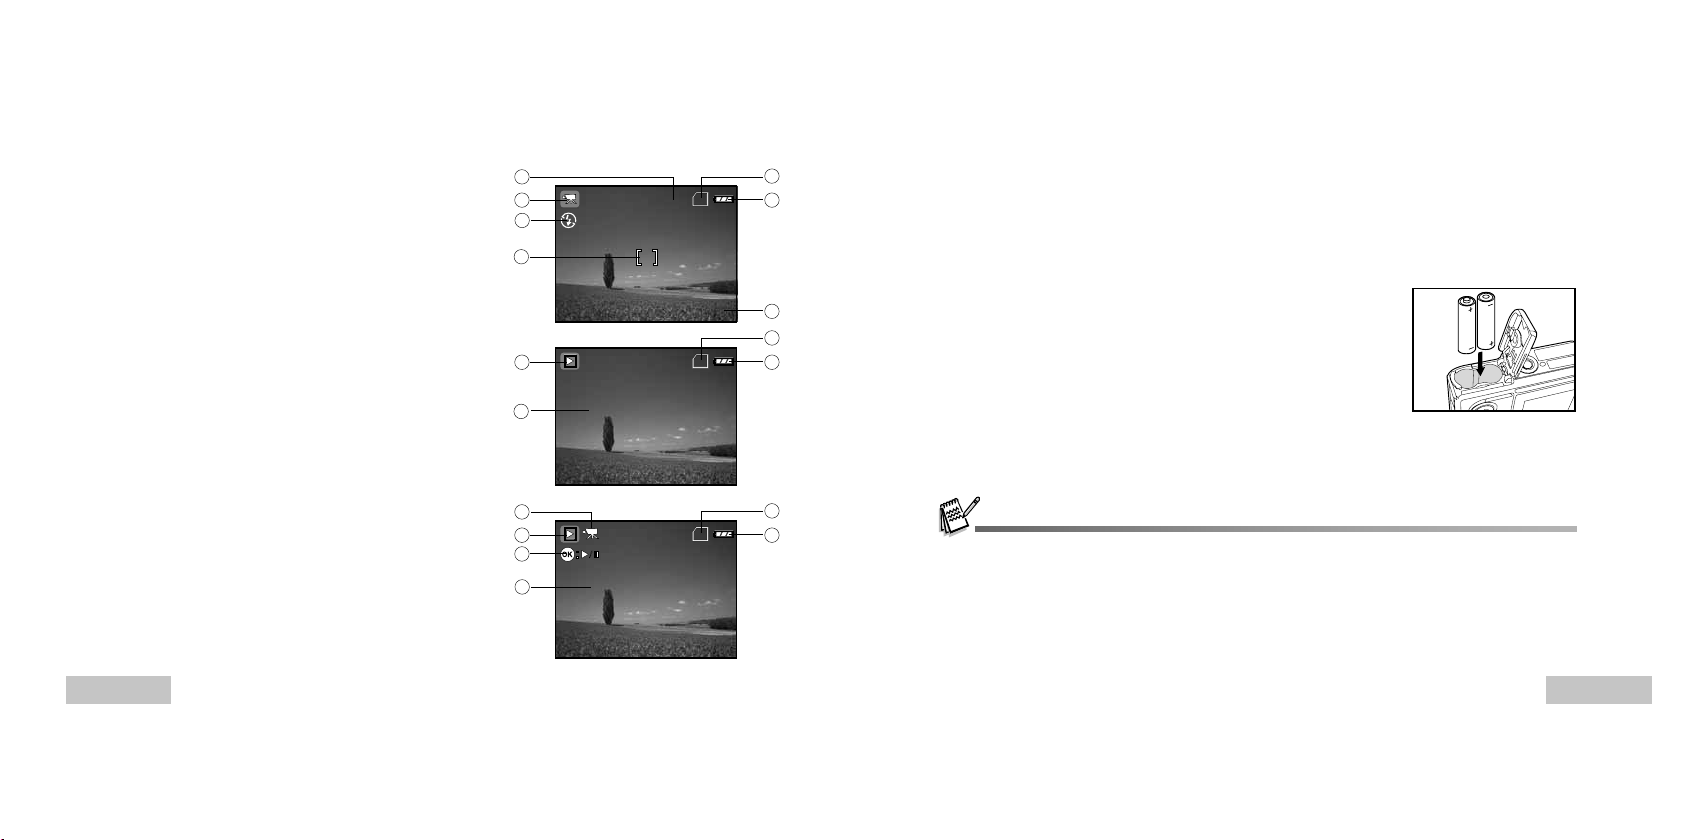
Video Mode
1. Video mode
2. Recordable movie time available
3. SD memory card indicator (if present)
4. Battery power indicator
5. Date
6. Focus area
7. Flash mode
Image Playback
1. Playback mode
2. SD memory card indicator (if present)
3. Battery power indicator
4. Playback information
Video Playback
1. Playback mode
2. Video mode
3. SD memory card indicator (if present)
4. Battery power indicator
5. Playback indicator
6. Playback information
00:33
SD
1
2
3
4
6
14.01.2005
7
5
SD
1
2
3
100-0001
SIZE
EV.
01. 04. '04
1280X960
+1.7
05:22
1
4
SD
1
3
4
5
2
100-0001
SIZE
EV.
01. 04. '04
320X240
0.0
05:22
1
6
EN-15
PREPARING THE CAMERA
Installing the Batteries
You can use 2 AA size batteries to power the camera. Make sure that the power of the digital camera is
off before inserting or removing the batteries.
1. Make sure the camera is turned off.
2. Open the battery cover.
3. Insert the batteries in the correct orientation as shown in the
illustration.
4. Close the battery cover.
To remove the batteries, turn the camera off before removing
batteries and hold the camera with the battery cover facing
upward, then open the battery cover.
Be careful not to drop the batteries when opening or closing the battery cover.
EN-16
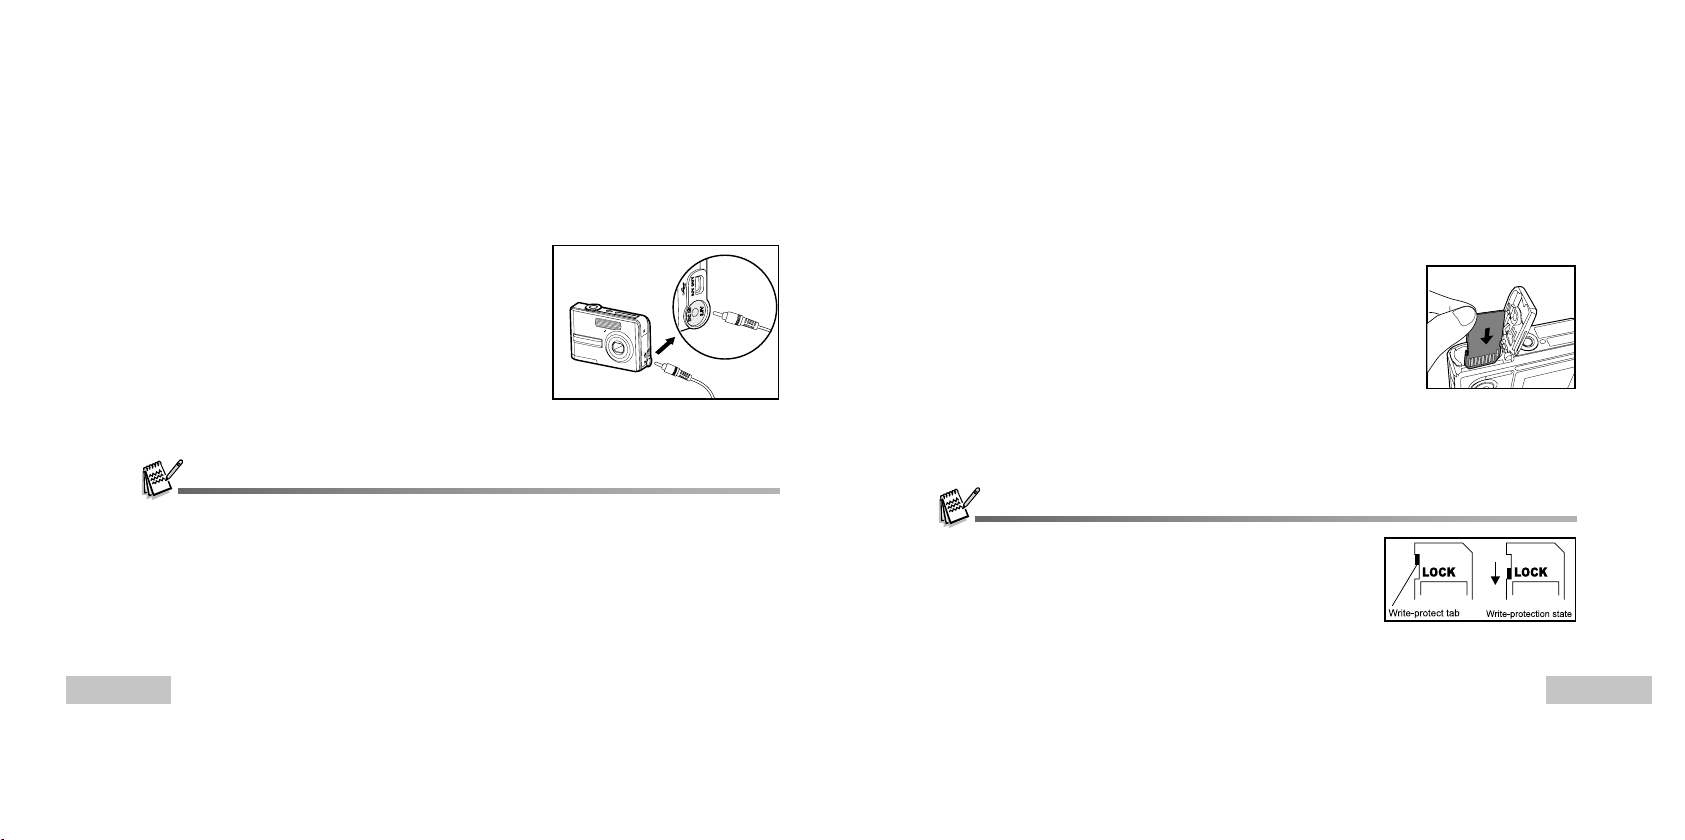
Using the AC Power Adapter (Optional Accessory)
Use of the AC power adapter is recommended if you intend to use the LCD monitor for a long time or
connect the camera to a PC.
1. Make sure your camera is turned off.
2. Connect one end of the AC power adapter to the
camera jack labeled "DC IN 3.0V".
3. Connect the other end to an electrical outlet.
Make sure to use only the AC power adapter specified for the camera. Damage caused by the use of an incorrect
adapter is not covered under the warranty.
To prevent unexpected auto power off resulting from no battery power left during the process of transferring your
images to the computer, use the AC power adapter as a power supply.
The AC power adapter can only be used to power the camera. Batteries cannot be charged inside the camera.
EN-17
Inserting and Removing an SD Memory Card (Optional Accessory)
The digital camera comes with 12MB of internal memory, allowing you to store captured still images or
video clips in the digital camera. Moreover, you can also expand the memory capacity by using an SD
(Secure Digital) memory card so that you can store more files.
1. Make sure your camera is turned off before inserting or removing
a memory card.
2. Open the SD memory card cover.
3. Insert an SD memory card in the correct orientation as shown in
the illustration.
4. Close the SD memory card cover.
To remove the SD memory card, make sure the camera is
turned off. Press lightly on the edge of the memory card and
it will eject.
Be sure to format an SD memory card with this digital camera before
using it. Refer to the section in the manual titled “Formatting an SD
Memory Card or Internal Memory” for further details.
To prevent valuable data from being accidentally erased from an SD card,
you can slide the write protect tab (on the side of the SD memory card)
to “LOCK”.
To save, edit, or erase data on an SD memory card, you must unlock the card.
EN-18
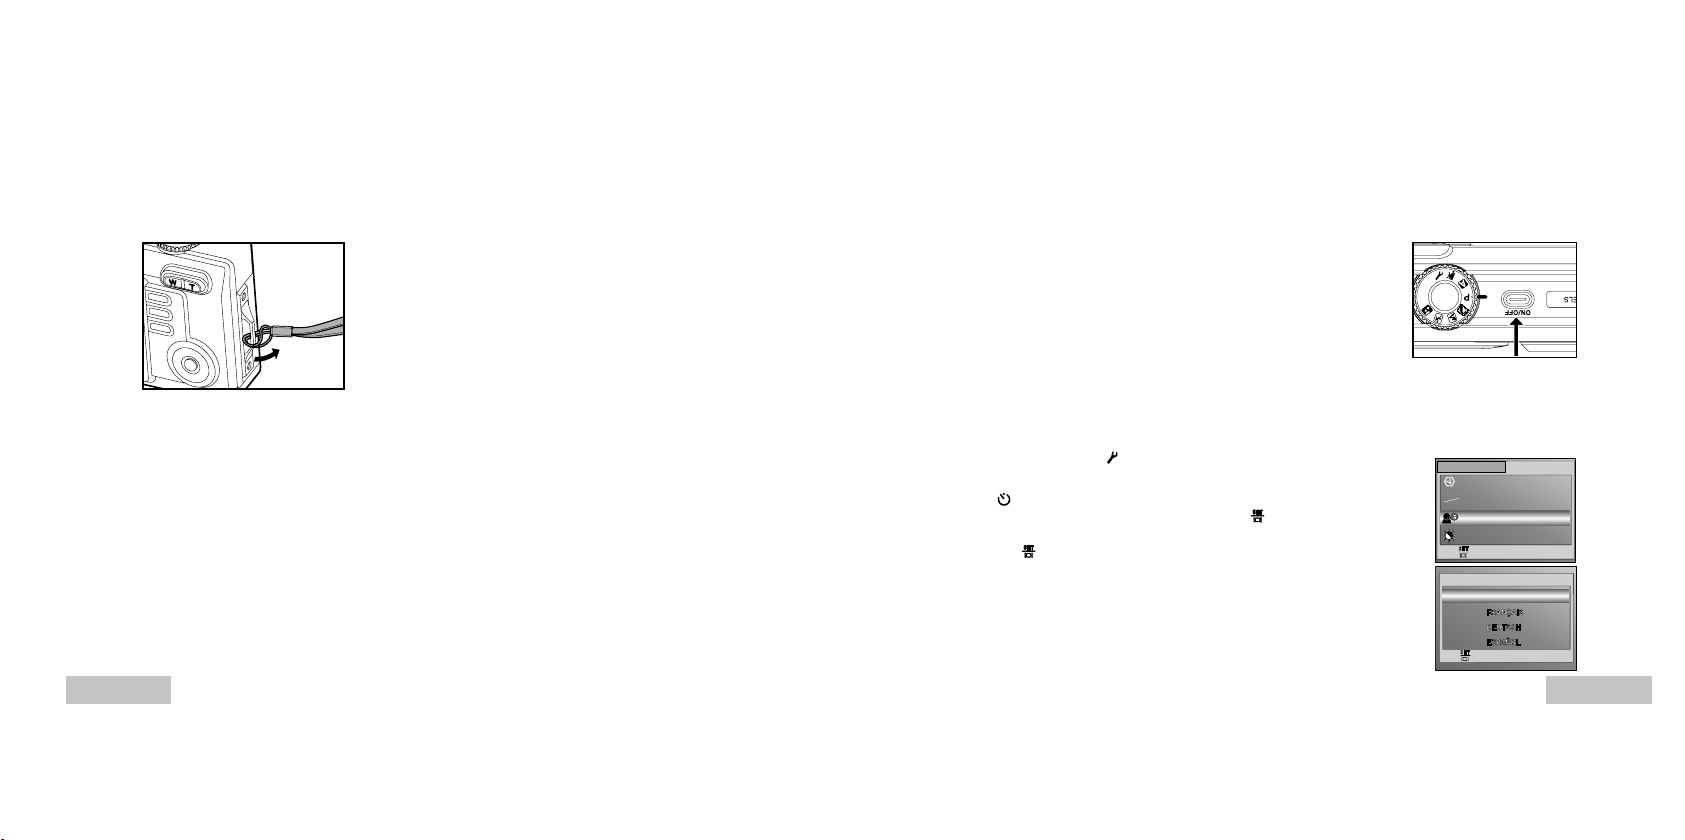
Attaching the Camera Strap
Attach the strap as shown in the illustration.
EN-19
GETTING STARTED
Turning the Power On/Off
Press the ON/OFF button until the digital camera turns on.
To turn the power off, press the ON/OFF button again.
Choosing the Screen Language
When the camera is turned on for the first time, a language-selection screen will be displayed in the
monitor. Follow the steps below to choose the desired language.
1. Rotate the mode dial to
and turn your camera on by pressing
the ON/OFF button.
2. Press
to select the [CUSTOM] menu.
3. Use T to select [LANGUAGE], then press the
button.
4. Use S or T to select the language you want.
5. Press the
button to confirm.
BASIC
CUSTOM
SET :
DATE & TIME
TV
LANGUAGE
LCD BRIGHTNESS
Y/M/D
NTSC
ENGLISH
NTSC
PAL
Y/M/D
3 / 5
SET :
1 / 7
LANGUAGE
ENGLISH
EN-20
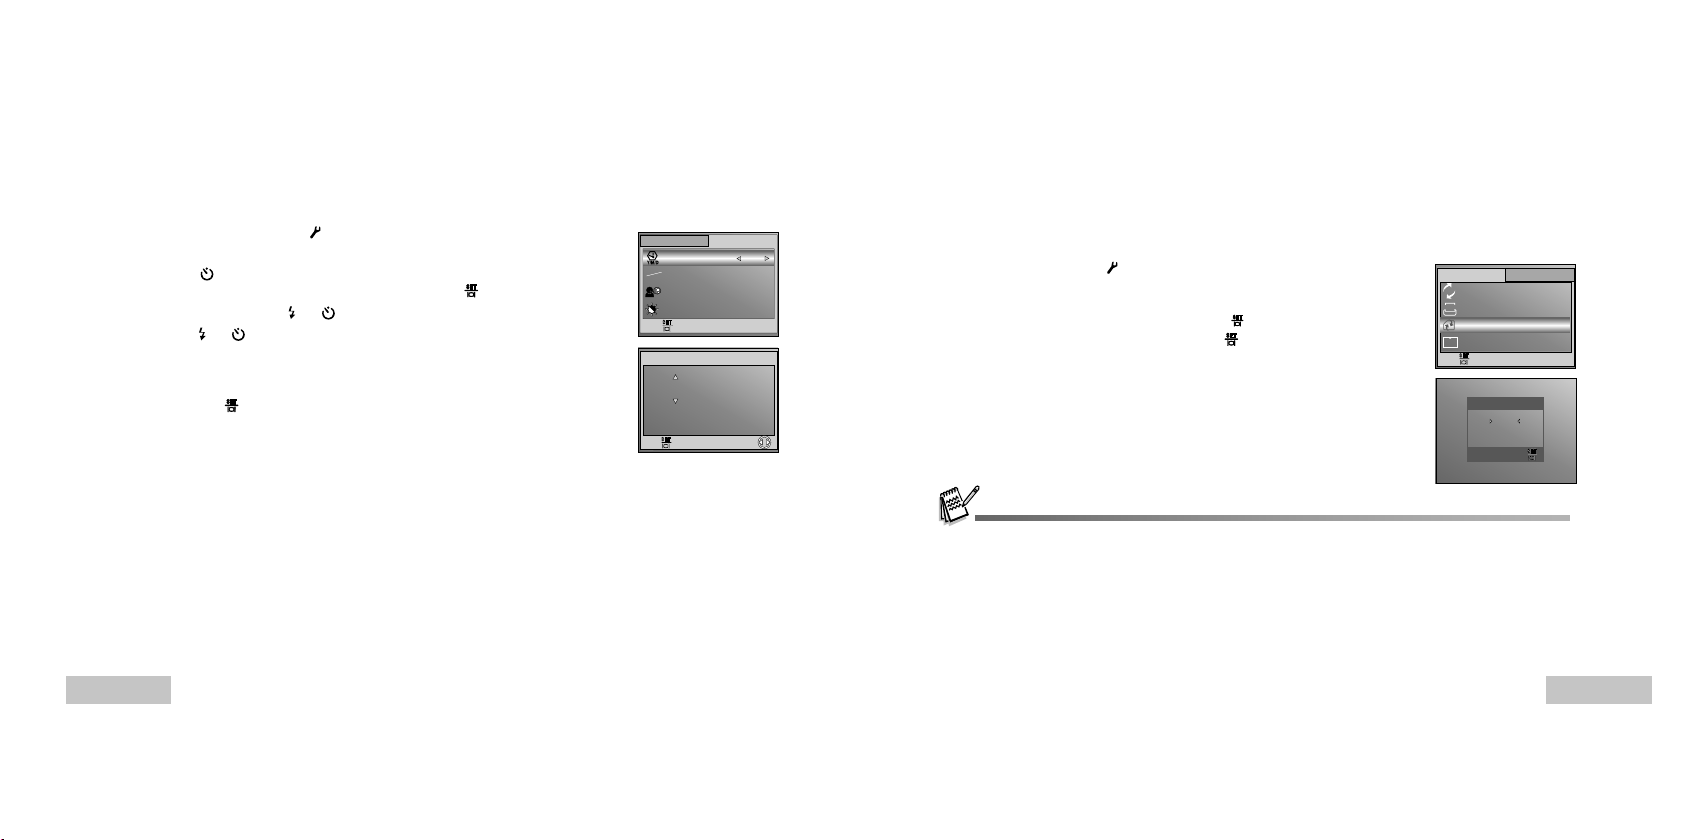
Setting the Date and Time
Follow the steps below to set the date display style, current date and time.
1. Rotate the mode dial to
and turn your camera on by pressing
the ON/OFF button.
2. Press
to select the [CUSTOM] menu.
3. Use T to select [DATE & TIME], then press the button.
You may press
or to switch the date types.
4. Press
or to select Year, Month, Day and Time fields.
To increase a value, press S .
To decrease a value, press T .
The time is displayed in 24-hours format.
5. Press the
button after all fields are set.
BASIC
CUSTOM
SET :
DATE & TIME
TV
LANGUAGE
LCD BRIGHTNESS
D/M/Y
NTSC
ENGLISH
NTSC
PAL
1 / 5
SET :
DATE & TIME
/ 10 / 2004
10
00 : 00
SELECT :
EN-21
Formatting an SD Memory Card or Internal Memory
The term “Formatting” means preparing an “SD Memory Card” to record images; this process is also called
“initialization”. This utility formats the internal memory (or memory card) and erases all stored images and
data.
1. Rotate the mode dial to
and turn your camera on by pressing
the ON/OFF button.
The [BASIC] menu is displayed.
2. Use T to select [FORMAT], then press the
button.
3. Use S or T to select [YES], then press the
button to confirm.
When you format an SD memory card, be aware that all data of which will be permanently erased. Protected
images are also erased.
To format the internal memory, do not insert a memory card into the camera. Otherwise, you will format the
memory card.
Formatting is an irreversible action and data cannot be recovered at a later time.
An SD memory card having any problem cannot be properly formatted.
SET :
FORMAT
YES
NO
BASIC
CUSTOM
SET :
7 / 8
RESET NUMBER
DATE IMPRINT
FORMAT
QUICK VIEW
ON
1
DATE
OFF
QUICK
VIEW
 Loading...