


3
KOMPERNASS GMBH · BURGSTRASSE 21 · D-44867 BOCHUM www.kompernass.com
ID-Nr.: KH4421-03/08-V2
CORDLESS HAND-HELD
VACUUM CLEANER
KH 4421
CORDLESS HAND-HELD VACUUM CLEANER
Operating instructions
AKKUKÄYTTÖINEN RIKKAIMURI
Käyttöohje
BATTERIDRIVEN HANDDAMMSUGARE
Bruksanvisning
BATTERIDREVEN HÅNDSTØVSUGER
Betjeningsvejledning
OPPLADBAR HÅNDSTØVSUGER
Bruksanvisning
EΠΑΝΑΦΟΡΤΙΖΟΜΕΝΗ ΗΛΕΚΤΡΙΚΗ ΣΚΟΥΠΑ ΧΕΙΡΟΣ Οδηγίες χρήσης
AKKU-HANDSTAUBSAUGER
Bedienungsanleitung
KH 4421
o
i
w
e
r
102 mm
u
t
y

CONTENT |
PAGE |
Intended Usage |
2 |
Delivery Contents |
2 |
Technical Data |
2 |
Important Safety Instructions |
2 |
Before the First Use |
3 |
Charging |
3 |
Mounting the Wall Bracket |
4 |
Assembly |
4 |
Operation |
4 |
Cleaning |
5 |
Changing and cleaning the dust filter |
...........................................................................................5 |
Disposal |
5 |
Warranty & Service |
6 |
Importer |
6 |
Read the operating instructions carefully before using the appliance for the first time and preserve this booklet for later reference. Pass the manual on to whomsoever might acquire the appliance at a later date.
- 1 -
CORDLESS HAND-HELD VACUUM CLEANER
KH 4421
Intended Usage
This hand vacuum cleaner may only be used for the vacuuming of dry surfaces and dry materials. People or animals may not be vacuumed with this appliance. Any other usage or changes to the appliance are improper use and may result in considerable danger of injury. The manufacturer accepts no liability for damages that result from improper use of the appliance or are caused by incorrect operation of it. The appliance is not intended for commercial use.
Delivery Contents
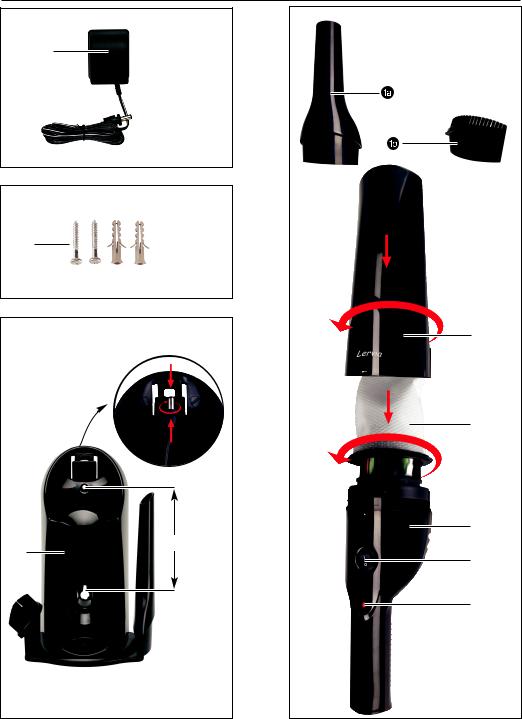
 Crevice tool
 Upholstery brush 2 Dust collector 3 Dust filter
4 Motor unit
5 ON/OFF switch
6 Charge indicator light
7 Charging station / wall bracket
8 Screws / plugs for wall installation
9 Power adapter
NOTE:
The cordless hand vacuum cleaner model KH 4421 is delivered with uncharged batteries. The batteries must be charged for 24 hours before the first use.
Technical Data
Power adapter |
|
Input voltage: |
230 V ~ 50 Hz |
Output voltage: |
Direct current (DC), 9V / 150 mA |
Batteries: |
3 x 1,2 V Ni-MH batteries / |
|
2200 mAh |
Important Safety Instructions
To avoid a life-threatening electric shock:
•Do not charge or use the appliance outdoors.
•Never use the hand vacuum cleaner if the cable, plug or casing are damaged.
•To minimise potentially fatal risks, arrange for defective power plugs or power cables to be replaced as soon as possible by qualified technicians or our Customer Service Department.
•Send defective appliances to the appropriate service centre or have repairs performed only by a qualified workshop. Under no circumstances should you open the appliance yourself. Manipulations made by persons other than qualified technicians could represent a health hazard.
•Before switching the hand vacuum cleaner on, make certain that the mains voltage corresponds to the voltage indicated in the technical data for the appliance.
•Never touch the power supply or the appliance with wet or damp hands.
•Do not use the power adapter with an extension cord; connect the power adapter directly to a power socket.
•Do not use the hand vacuum cleaner for vacuuming up liquids.
- 2 -
To avoid the risk of injury:
•Do not change any accessories while the appliance is switched on.
•Do not use the hand vacuum cleaner for vacuuming up sharp objects or glass shards.
•Never vacuum up burning matches, glowing ashes or cigarette butts.
•Do not use the hand vacuum cleaner for vacuuming up chemical products, stone dust, gypsum, cement or similar particles.
•This hand vacuum cleaner is only suitable for use on dry surfaces. The appliance is not suitable for foam, water, flammable and explosive substances or other liquids.
•Always store the appliance indoors. To prevent accidents, keep the appliance in a dry location when not in use.
•Under extreme conditions, leaks in the battery cells may occur. In the event that battery fluid comes into contact with skin or eyes, the affected area must be rinsed off with water immediately. Contact a physician.
To conduct yourself safely:
•Use only accessory parts recommended by the manufacturer.
•Do not allow individuals (including children) to use the appliance whose physical, sensorial or mental abilities or lack of experience and knowledge hinder their safe usage of it if they have not previously been supervised or instructed in its correct usage. Tell children about the appliance and its potential dangers so that they do not play with it.
•The cable of the charging station may not be used for other purposes. Never carry the charging station or the power adapter by the cable. Do not pull on the cable when you want to move the appliance.
•Always grip the power plug to disconnect the appliance from the power supply.
•Always be sure to keep the hand vacuum cleaner away from heating elements, ovens or other heated appliances and surfaces.
•Always make certain that the ventilation slits are open. A blocked ventilation circuit can result in overheating and damage to the appliance.
•This product contains rechargeable Ni-MH batteries. Do not thow the batteries into a fire and do not subject them to high temperatures. There is a risk of explosion!
•Take special care when using the hand vacuum cleaner on stairs.
•Do not use the hand vacuum cleaner without the dust filter inserted.
•Do not use the power adapter for a different product and do not attempt to charge this appliance with a different charging station. Only use the charging station supplied with this appliance.
Before the First Use
1.The cordless hand vacuum cleaner is powered by rechargeable Ni-MH batteries. Before using the cordless hand vacuum cleaner for the first time, the batteries must be charged for at least 24 hours.
2.The batteries reach their full capacity after a charging time of 24 hours. Only place the appliance back in the charging station 7 once the vacuum power becomes noticeably weaker.
Charging
1.Insert the round plug of the power supply into the back of the charging station 7. Lock the plug by turning it anti-clockwise.
2.Place the charging station 7 next to a power socket and plug the power adapter in.
- 3 -
The charging station can optionally be mounted on a wall with the supplied screws and plugs i (see Chapter „Mounting the wall bracket“). Vertical screw spacing 102 mm, screw diameter 3,5 mm. The borehole has to fit for plug diameter 5 mm.
You can store the crevice tool  and the upholstery brush
  in the slots on the charging station 7.
3.Place the hand vacuum cleaner in the charging station 7.The charge indicator light 6 lights up red and the charging process begins.
Mounting the Wall Bracket
1.Bore two holes with a spacing of ca. 102 mm. Using the wall bracket 7 to mark the boreholes ensures the correct spacing.
2.Push the plugs 8 into the boreholes and screw in the lower screw 8 until ca. 3mm is protruding.
3.Place the wall bracket 7 on the lower screw.
4.Guide the upper screw 8 through the wall brakket 7 and into the borehole, then screw it in.
5.Tighten both screws 8 down.
NOTE:
Make certain that the on/off switch 5 is in position "0" before starting the charging process.
Important:
•Once the charging process is completed, the appliance automatically switches to the charge maintenance function. However, in order to avoid possible damage to the batteries, do not leave the appliance constantly connected to the charging station .
•Only place the appliance back on the charging station u once the vacuum power becomes noticeably weaker.
Assembly
 NOTE:
NOTE:
Make certain that the dust filter 3 is always inserted before using the appliance.
1.To open the dust collector 2, turn the dust collector 2 and pull it off the motor unit 4. Make certain that the dust filter 3 is inserted and put the dust collector 2 back on. Turn the
dust collector 2 until the arrow symbol points to the dot 

 on the motor unit 4.
2.Should the crevice tool  or the upholstery brush
  be required, insert them into the suction opening of the dust collector 2.
Important information about the battery
In the event of a defective battery, please contact our service centre directly. Please refer to the guarantee card for the Authorized Service Outlet in your country.
Operation
1.Remove the hand vacuum cleaner from the charging station 7. Using the supplied plugs and screws 8 the charging station 7 can optionally be mounted on the wall.
2.To switch the appliance on, move the on/off switch 5 to the position "I".
3.After use place the on/off switch 5 into position “O“.
4.The crevice tool  is used to clean narrow, hard-to-reach areas.
- 4 -
5.The upholstery brush  is used to clean sofas, car seats and other cushioned items.
To remove the upholstery brush  from the hand vacuum cleaner, press both of the lateral lugs on the tool forward simultaneously.
Put the assembled hand vacuum cleaner in the charging station u and start the charging process when the vacuum power is noticeably weaker.
Cleaning
Changing and cleaning the dust filter
To achieve the best results, empty the dust collector 2 and clean the dust filter 3 after every use.
1.To open the dust collector 2, turn the dust collector 2 and pull it off the motor unit 4.
2.To remove the dust filter 3 from the motor unit, turn it and pull it off the motor unit 4.
3.Empty the dust collector 2.
4.Clean the dust filter 3 in cold water and wait until it is completely dry before putting it back on the motor unit 4. Do not dry it with hot airstream.
5.Place the dust filter 3 on the motor unit 4. Turn the dust filter 3 to attach it. Never use the hand vacuum cleaner without the dust filter 3 inserted.
6.Put the dust collector 2 back on. Turn the dust
collector 2 until the arrow symbol points to the dot 

 on the motor unit 4.
Important!
The suction opening must always be open and unblocked. Blockages lead to overheating and damage to the motor.
Disposal
Do not dispose of the appliance in your normal domestic waste. This product is subject to the European guideline 2002/96/EC.
Dispose of the appliance through an approved disposal centre or at your community waste facility. Observe the currently applicable regulations.
In case of doubt, please contact your waste disposal centre.
Battery disposal!
Batteries may not be disposed of with normal domestic waste. All consumers are statutorily obliged to dispose of batteries at the collection point in their community/district or with the original supplier. The purpose of this obligation is to ensure that batteries can be disposed of in an environmentally friendly manner. Only dispose of batteries when they are fully discharged.
Dispose of all packaging materials in an environmentally responsible manner.
- 5 -
Warranty & Service |
|
Importer |
|
The warranty for this appliance is for 3 years from |
|
KOMPERNASS GMBH |
|
the date of purchase. This appliance has been |
|
BURGSTRASSE 21 |
|
manufactured with care and meticulously examined |
|
44867 BOCHUM, GERMANY |
|
before delivery. Please retain your receipt as proof |
|
|
|
of purchase date. Should a claim need to be made |
|
www.kompernass.com |
|
under the warranty, please make contact by tele- |
|
|
|
phone with our service department. Only in this |
|
|
|
way can a post-free despatch for your goods be as- |
|
|
|
sured. |
|
|
|
The warranty covers ONLY claims for material and |
|
|
|
maufacturing defects, not for wearing or consuma- |
|
|
|
ble or for damage to fragile components. This pro- |
|
|
|
duct is for private use only and is not intended for |
|
|
|
commercial applications. |
|
|
|
The warranty will become void in the event of abusi- |
|
|
|
ve and improper handling, use of force and internal |
|
|
|
tampering not carried or approved by our authori- |
|
|
|
zed service branch. Your statutory rights are not |
|
|
|
restricted in any way by this warranty. |
|
|
|
|
DES Ltd |
|
|
Units 14-15 |
|
|
|
Bilston Industrial Estate |
|
|
|
Oxford Street |
|
|
|
Bilston |
|
|
|
WV14 7EG |
|
|
|
Tel.: 0870/787-6177 |
|
|
|
Fax: 0870/787-6168 |
|
|
|
e-mail: support.uk@kompernass.com |
|
|
|
|
Irish Connection |
|
|
Harbour view |
|
|
|
Howth |
|
|
|
Co. Dublin |
|
|
|
Tel: |
00353 (0) 87 99 62 077 |
|
|
Fax: 00353 18398056 |
|
|
|
e-mail: support.ie@kompernass.com |
|
|
|
- 6 -

SISÄLLYSLUETTELO |
SIVU |
Määräystenmukainen käyttö |
8 |
Toimituksen piiriin kuuluvat osat |
8 |
Tekniset tiedot |
8 |
Tärkeitä turvallisuustietoja |
8 |
Ennen ensimmäistä käyttöä |
9 |
Lataaminen |
10 |
Seinätelineen asentaminen |
10 |
Kokoaminen |
10 |
Käyttö |
11 |
Puhdistus |
11 |
Pölysuodattimen vaihtaminen ja puhdistaminen |
........................................................................11 |
Hävittäminen |
11 |
Takuu & huolto |
12 |
Maahantuoja |
12 |
Säilytä käsikirja myöhempää käyttöä varten. Jos myyt laitteen, anna käsikirja uudelle omistajalle!
- 7 -
AKKUKÄYTTÖINEN RIKKAIMURI KH 4421
Määräystenmukainen käyttö
Rikkaimuria saa käyttää vain kuivilla pinnoilla. Sillä saa imuroida vain kuivia roskia. Rikkaimurilla ei saa imuroida ihmisiä tai eläimiä. Laitteen muu käyttö tai muuntaminen ei ole määräysten mukaista ja voi aiheuttaa huomattavan tapaturmavaaran. Valmistaja ei vastaa vahingoista, jotka aiheutuvat määräysten vastaisesta tai väärästä käytöstä. Laite on tarkoitettu ainoastaan kotitalouskäyttöön.
Toimituksen piiriin kuuluvat osat
 Rakosuutin
 Verhoiluharja
wPölysäiliö e Pölysuodatin
r Moottorilohko y Virtakytkin
wLatauksen merkkivalo u Latauslaite/seinäteline
i Ruuvit ja tulpat seinäkiinnitykseen o Verkkolaite
OHJE:
Langaton, akkukäyttöinen rikkaimuri, malli KH 4421, toimitetaan tyhjien akkujen kanssa. Akkuja on ladattava 24 tuntia ennen laitteen ensimmäistä käyttökertaa.
Tekniset tiedot
Verkkolaite |
|
Tulojännite: |
230 V ~ 50 Hz |
Lähtöjännite: |
Tasavirta (DC), 9 V/150 mA |
Akut: |
3 x 1,2 V Ni-MH-akut / 2200 mAh |
Tärkeitä turvallisuustietoja
Hengenvaarallisen sähköiskun välttämiseksi:
•Älä lataa tai käytä laitetta ulkotiloissa.
•Älä käytä rikkaimuria, jos johto, pistoke tai kotelo ovat vaurioituneita.
•Anna viallinen verkkopistoke tai verkkojohto välittömästi valtuutetun ammattihenkilön tai huoltopisteen vaihdettavaksi, jotta vaaratilanteilta vältyttäisiin.
•Jos laitteessa on vikoja, lähetä laite korjattavaksi vastaavaan huoltopis-teeseen tai jätä korjaukset ammattikorjaamon tehtäväksi. Älä missään tapauksessa avaa laitteen koteloa itse. Jonkin muun kuin valtuutetun huoltopisteen tekemät toimenpiteet saattavat vaarantaa ihmisten terveyden.
•Tarkista ennen rikkaimurin käynnistämistä, että verkkojännite vastaa laitteen teknisiin tietoihin kirjattua jännitettä.
•Älä tartu verkkolaitteeseen tai laitteeseen, jos kätesi ovat märät.
•Älä käytä verkkolaitetta jatkojohdon kanssa. Liitä verkkolaite suoraan pistorasiaan.
•Älä imuroi rikkaimurilla nesteitä.
- 8 -
Tapaturmien välttäminen
•Älä vaihda lisälaitteita, kun laite on käynnissä.
•Älä imuroi rikkaimurilla teräviä roskia tai lasinsiruja.
•Älä koskaan imuroi palavia tulitikkuja, tuhkaa, jossa on hiiltä, tai tupakantumppeja.
•Älä imuroi rikkaimurilla kemiallisia tuotteita, kivipölyä, kipsiä, sementtiä tai muita vastaavia aineita.
•Tämä rikkaimuri sopii ainoastaan kuivien pintojen imuroimiseen. Laite ei sovellu vaahdon, veden, syttyvän tai räjähtävän aineen eikä muiden nesteiden imuroimiseen.
•Säilytä laitetta aina sisätiloissa. Vältä tapaturmia säilyttämällä laitetta käytön jälkeen kuivassa paikassa.
•Ääriolosuhteissa akkupesässä saattaa esiintyä vuotoja. Jos vuotava neste pääsee kosketuksiin ihon tai silmien kanssa, kyseinen kohta on huuhdeltava välittömästi puhtaalla vedellä. Hakeudu lääkäriin.
•Tuote sisältää ladattavat Ni-MH-akut. Älä heitä akkuja tuleen äläkä altista niitä korkeille lämpötiloille. Räjähdysvaara!
•Ole varovainen, kun käytät rikkaimuria portaissa.
•Älä käytä rikkaimuria ilman pölysuodatinta.
•Älä käytä verkkolaitetta muissa tuotteissa äläkä yritä ladata laitetta toisessa latauslaitteessa. Käytä vain tämän laitteen mukana toimitettua latauslaitetta.
Ennen ensimmäistä käyttöä
1.Langaton akkukäyttöinen rikkaimuri toimii ladattavilla Ni-MH-akuilla. Akkuja on ladattava vähintään 24 tuntia ennen rikkaimurin ensimmäistä käyttökertaa.
2.Akkujen täysi latausteho saavutetaan 24 tunnin latausajan jälkeen. Aseta laite latauslaitteeseen u vasta, kun imuteho on heikentynyt tuntuvasti.
Näin toimit turvallisesti:
•Käytä ainoastaan valmistajan hyväksymiä lisäosia.
•Älä anna laitetta sellaisten henkilöiden (mukaan lukien lapset) käyttöön, joiden fyysiset, aistilliset tai henkiset kyvyt tai kokemuksen ja tiedon puute estävät heitä käyttämästä laitetta turvallisesti, jollei heitä ole aikaisemmin valvottu tai opastettu laitteen käytössä. Selvitä lapsille laite ja sen vaarat, jotta he eivät leikkisi laitteella.
•Johtoa ja latauslaitetta ei saa käyttää muihin tarkoituksiin. Älä koskaan nos-ta lataustai verkkolaitetta johdosta. Älä siirrä laitetta vetämällä sitä johdosta.
•Irrota laite virtalähteestä aina pistokkeesta vetämällä.
•Varmista, että rikkaimuria ei aseteta suoraan lämmityslaitteen, uunien tai muiden kuumien laitteiden tai pintojen päälle.
•Varmista, että tuuletusaukot eivät ole peitettynä. Jos tuuletusaukot on peitettynä, laite saattaa ylikuumeta ja vaurioitua.
- 9 -
Lataaminen |
|
Seinätelineen asentaminen |
1.Aseta verkkolaitteen liitin latauslaitteen u takaosaan. Kiinnitä liitin kiertämällä sitä vastapäivään.
2.Aseta latauslaite u pistorasian läheisyyteen ja kiinnitä virtajohdon pistoke pistorasiaan.
Latauslaite voidaan kiinnittää myös mukana toimitettujen ruuvien ja tulppien i avulla seinään. (Katso luku „Seinätelineen asennus“) Ruuvien pystysuora etäisyys 102 mm, ruuvien läpimitta 3,5 mm.
Voit säilyttää rakosuutinta  ja harjasuutinta
  latausaseman u koloissa.
3.Aseta rikkaimuri latauslaitteeseen u. Latauksen merkkivalo y palaa punaisena ja lataus käynnistyy.
OHJE:
Varmista, että virtakytkin t on asennossa 0, ennen kuin aloitat lataamisen.
Tärkeää:
•Kun lataus on päättynyt, laite siirtyy automaattisesti tilaan, jossa varaus
säilyy (hoitotoiminto). Älä silti säilytä laitetta pitkiä aikoja latauslaitteessa, muuten akut saattavat vaurioitua.
•Aseta laite latauslaitteeseen u vasta sitten, kun imuteho on heikentynyt tuntuvasti.
Tärkeitä ohjeita akusta
Jos akut ovat vaurioituneet, käänny suoraan huoltopisteemme puoleen. Maassasi toimivat huoltopisteet löydät takuukortista.
1.Poraa seinään kaksi reikää n. 102 mm:n etäisyydelle toisistaan. Käytä seinätelinettä u reikien piirtämiseen: Näin etäisyys on laskettu oikein.
2.Työnnä tulppa i reikiin, ruuvaa alempi ruuvi i seinään ja jätä n. 3 mm esiin.
3.Työnnä seinäteline u alempaan ruuviin.
4.Vie ylempi ruuvi i seinätelineen u läpi reikään ja kierrä se sisään.
5.Kiristä molemmat ruuvit i.
Kokoaminen
OHJE:
Varmista, että pölysuodatin e on asennettu, ennen kuin käytät konetta.
1.Voit avata pölysäiliön w kääntämällä pölysäiliötä w myötäpäivään ja irrottamalla sen moottorilohkosta r. Varmista, että pölysuodatin e on paikallaan ja kiinnitä pölysäiliö w takaisin paik-
alleen. Käännä pölysäiliötä w vastapäivään, kunnes nuolimerkki osoittaa pisteeseen 

 , joka on moottorilohkossa r.
2.Kun rakosuutinta  tai verhoiluharjaa
  tarvitaan, aseta se pölysäiliön w imuaukkoon.
- 10 -
Käyttö
1.Irrota rikkaimuri latauslaitteesta u. Latauslaite u voidaan halutessa asentaa mukana toimitettujen ruuvien ja tulppien i avulla seinään.
2.Käynnistä laite asettamalla virtakytkin t asentoon I.
3.Aseta käytön jälkeen virtakatkaisin t asentoon „O“.
4.Voit käyttää rakosuutinta  , kun imuroit ahtaita paikkoja, joihin on vaikea yltää.
5.Verhoiluharjaa  käytetään sohvien, autonistuinten tai muiden verhoiltujen esineiden puhdistukseen.
Verhoiluharja  irrotetaan jälleen käsi-imurista painamalla molempia sivuilla sijaitsevia tappeja samanaikaisesti eteenpäin.
Aseta koottu rikkaimuri latauslaitteeseen u ja aloita lataus, jos imuteho on heikentynyt tuntuvasti.
Puhdistus
Pölysuodattimen vaihtaminen ja puhdistaminen
Saavutat parhaan imurointituloksen, kun tyhjennät pölysäiliön w ja puhdistat pölysuodattimen e jokaisen käyttökerran jälkeen.
1.Voit avata pölysäiliön w kääntämällä pölysäiliötä w myötäpäivään ja irrottamalla sen moottorilohkosta r.
2.Irrota pölysuodatin e moottoriloh-kosta kääntämällä sitä vastapäivään ja vetämällä sitä moottorilohkosta r.
3.Tyhjennä pölysäiliö w.
4.Huuhtele pölysuodatin e kylmällä
vedellä ja odota, kunnes suodatin on täysin kuiva. Aseta se sitten paikalleen moottorilohkon r päälle.
5.Aseta pölysuodatin e moottorilohkon r päälle. Kiinnitä pölysuodatin e kääntämällä sitä vastapäivään. Älä koskaan käytä rikkaimuria ilman pölysuodatinta e.
6.Aseta pölysuodatin w takaisin paikalleen.
Käännä pölysäiliötä w vastapäivään, kunnes nuolimerkki osoittaa pisteeseen 

 , joka on moottorilohkossa r.
Huomaa:
Imuaukkoa ei saa missään tapauksessa peittää eikä tukkia. Tukokset johtavat moottorin ylikuumenemiseen ja vaurioitumiseen.
Hävittäminen
Älä missään tapauksessa heitä laitetta tavallisen talousjätteen sekaan. Tämä tuote on yhdenmukainen EU-direktiivin 2002/96/EY kanssa.
Anna laite hyväksytyn jätehuoltoyrityksen tai kunnallisen jätelaitoksen hävitettäväksi. Noudata voimassa olevia määräyksiä. Epäselvissä tilanteissa ota yhteyttä paikalliseen jätehuoltoviranomaiseen.
Paristot
Älä missään tapauksessa heitä paristoja tavallisen kotitalousjätteen joukkoon.
Paristot saattavat sisältää myrkkyjä, jotka vahingoittavat ympäristöä. Hävitä paristot siksi ehdottomasti voimassa olevien lakisääteisten määräysten mukaisesti.
Hävitä kaikki pakkausmateriaalit ympäristöystävällisesti.
- 11 -
Takuu & huolto
Laitteen takuu on 3 vuotta ostopäivästä. Laite on valmistettu huolellisesti ja tarkistettu tarkasti ennen toimitusta. Säilytä ostokuitti todisteeksi takuun voimassaolosta. Ota takuutapauksessa puhelimitse yhteyttä huoltopisteeseesi. Vain näin voidaan taata tuotteesi maksuton lähettäminen huoltoon.
Takuu koskee ainoastaan materiaalija valmistusvirheitä, ei kuitenkaan kuluvia osia tai herkästi vaurioituvien osien, esim. kytkinten tai akkujen vaurioita. Tuote on tarkoitettu ainoastaan yksityiseen, ei kaupalliseen käyttöön.
Väärä tai asiaton käyttö, väkivallan käyttö ja muiden kuin valtuutetun huoltopisteen suorittamat korjaukset aiheuttavat takuun raukeamisen. Tämä takuu ei rajoita kuluttajan lakisääteisiä oikeuksia.
Kompernass Service Suomi
Petäjäksentie 19 FIN - 26100 Rauma Tel.: 02 822 28 87
Fax: 010 293 02 63
e-mail: support.fi@kompernass.com
Maahantuoja
KOMPERNASS GMBH BURGSTRASSE 21
44867 BOCHUM, GERMANY
www.kompernass.com
- 12 -
 Loading...