


Kohler K-8741T, K-8767T, K-11184T, K-8753T, K-8709T User Manual
...
ODEON
INSTALLATION INSTRUCTIONS

 P/S-
P/S-


VITREOUS CHINA P/S-TRAP TOILET
P-TRAP 180mm K-8711T S-TRAP 255mm K-8753T
S-TRAP 305mm K-8766T
BEFORE YOU BEGIN
Please read these instructions carefully to familiarize yourself with the required tools, materials, and installation sequences. Follow the sections that pertain to your particular installation . This will help you avoid costly mistakes. In addition to proper installation, read all operating and safety instructions.
All information in these instructions is based upon the latest product information available at the time of publication. Kohler China reserves the right to make changes in product characteristics, packaging, or availability at any time withoutnotice.
These instructions contain important care, cleaning, and warranty information-please leave instructions for the consumer.


 ,
,


ORDERING INFORMATION
Odeon P-trap 180mm Toilet


 K-8711T Includes seat


 K-8741T-* Includes Bowl


 K-8709T Includes Tank


 K-8710T Odeon
 S-trap 255mm Toilet


 K-8753T Includes seat


 K-8741T-* Includes Bowl


 K-11184T Includes Tank


 K-8710T Odeon S-trap 305mm Toilet


 K-8766T Includes seat


 K-8741T-* Includes Bowl


 K-8767T Includes Tank


 K-8710T
Service parts
Fill valve


 K-82984-B Mounting Plate Assy


 K-1004142 Flush Valve Assy


 K-1004139
180mm |
K-8711T |
|
K-8741T-* |
|
K-8709T |
|
K-8710T |
255mm |
K-8753T |
|
K-8741T-* |
|
K-11184T |
|
K-8710T |
305mm |
K-8766T |
|
K-8741T-* |
|
K-8767T |
|
K-8710T |
K-82984-B
K-1004142
K-1004139
NOTES
Observe all local plumbing and building codes. |
|
|
Shut off the water supply. |
|
|
Seat post holes are on 155mm (6-1/8") centers. |
|
155mm(6-1/8") |
Passageways is 60mm (2-3/8"). |
|
60mm(2-3/8") |
Water depth from rim is 245mm (9-5/8") |
|
245mm(9-5/8") |
Ensure that the new drain and shut-off valve have the |
|
|
correct roughing-in dimensions. See Fig.#1. |
|
1 |
Be very careful while working with vitreous china products. |
|
|
Vitreous china can break or chip if the bolts or nuts are |
|
|
overtightened, or if carelessly handled. |
|
|
Carefully inspect the new fixture for any sign of damage. |
|
|
Fixture dimensions are nominal and conform to tolerances |
|
|
established by ASME Standards (A112. 19.2M). |
|
ASME(A112. 19.2M) |
|
|
528137 |
|
|
|
|
, 2004 |
1037406-T01-A |
-1- |
Copyright Kohler China Ltd., 2004 |
|
|
|
||
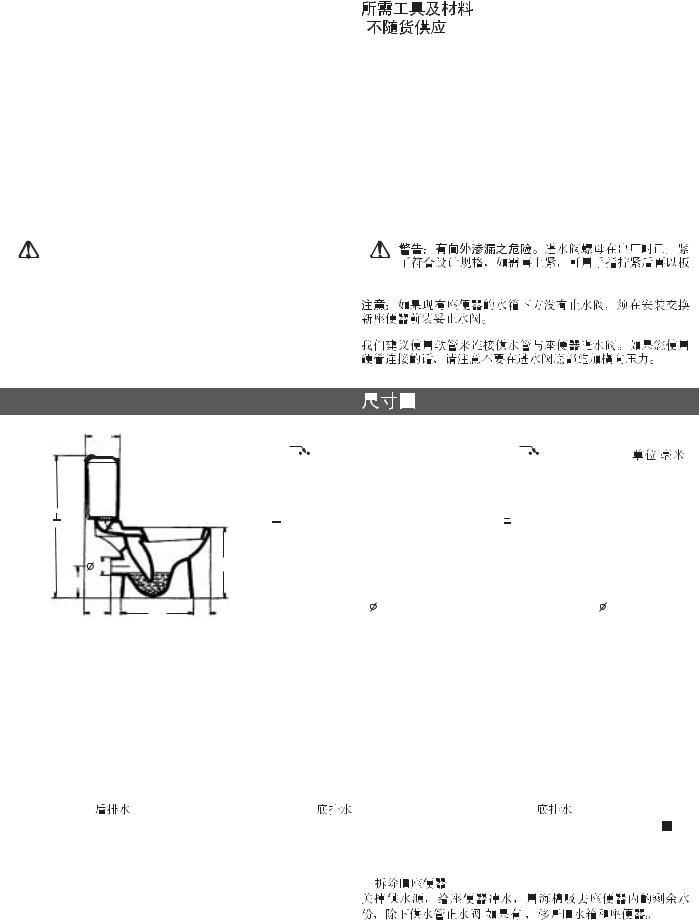
TOOLS AND MATERIALS REQUIRED |
|
|
(Not supplied) |
( |
) |
254mm adjustable wrench
Metal file (file cut)
Tape measure
Tubing cutter
Level
Hacksaw
Putty knife
Screwdriver
Straight pipe coupling
Connection packing
Toilet supply shut-off valve, 10mm (3/8") recommended
WARNING: Risk of external leakage. The fill valve nut has been factory-tightened, wrench tighten 1/4 turn past finger tight.
NOTICE: If no shut-off valve exists, install a shut-off valve below the tank before installing the new toilet.
Flexible hose are recommended to connect the supply line to the fill valve. If you use a rigid connection, take care not to apply side forces to the bottom of the fill valve.
ROUGHING-IN
254mm


 10mm(3/8")

 1/4
1/4
|
204 |
|
|
|
|
|
|
|
|
|
|
204 |
|
|
|
|
|
|
|
|
|
|
|
|
204 |
|
|
|
|
|
Unit:mm |
|||||
|
|
|
|
|
|
|
|
|
|
|
|
|
|
|
|
|
|
|
|
|
||||||||||||||||
|
|
|
|
|
|
|
|
|
|
|
25 |
|
|
|
|
|
|
|
|
|
|
|
|
|
|
20 |
|
|
|
|
|
|
|
|
||
|
|
|
|
|
|
|
|
|
|
|
|
|
|
|
|
|
|
|
|
|
|
|
|
|
|
|
|
|
|
|
|
|
: |
|||
777 |
10 |
|
|
|
|
|
|
|
785 |
10 |
|
|
|
|
|
|
|
|
|
|
|
|
|
776 |
10 |
|
|
|
|
|
|
|
|
|||
|
|
|
|
|
|
|
|
|
|
|
|
|
|
|
|
|
|
|
|
|
|
|
|
|
|
|
|
|||||||||
|
|
|
|
|
|
|
|
|
|
|
|
|
|
|
|
|
|
|
|
|
|
|
|
|
|
|
|
|
||||||||
|
102 |
|
|
|
|
388 |
|
|
|
|
|
|
|
|
|
|
|
|
|
|
|
394 |
|
|
|
|
|
|
|
|
|
|
392 |
|||
|
178 |
|
|
|
|
|
|
|
|
|
|
|
|
|
|
|
|
|
|
|
|
|
|
|
|
|
|
|
|
|
|
|
|
|
|
|
|
|
|
|
|
|
|
|
|
|
|
|
|
|
|
|
|
|
|
|
|
|
|
|
|
|
|
|
|
|
|
|
|
|
|
||
|
159 |
|
|
396 |
90 |
|
255 |
|
|
|
|
100 |
|
|
|
305 |
|
|
|
102 |
|
|||||||||||||||
|
|
|
|
|
|
|
|
|
|
|
95 |
|
|
|
|
|
|
93 |
||||||||||||||||||
|
|
|
|
|
|
|
|
|
|
|
|
484 |
|
|
|
|
|
|
|
|
474 |
|
||||||||||||||
|
|
|
|
|
|
|
|
|
|
|
|
|
|
|
|
|
|
|
|
|
|
|
|
|
|
|
|
|||||||||
|
|
|
|
|
|
|
|
|
|
|
|
|
|
|
|
|
|
|
|
|
|
|
|
|
|
|
736 |
|
|
|
|
|
|
|||
|
|
|
|
|
|
|
|
|
|
|
|
|
|
|
|
|
|
|
|
|
|
|
|
|
||||||||||||
|
|
|
|
|
|
|
|
|
699 |
|
|
|
|
|
|
|
|
|
|
|
|
|||||||||||||||
|
698 |
|
|
|
|
|
|
|
|
|
|
|
|
|||||||||||||||||||||||
|
|
|
|
|
|
|
429 |
|
|
|
|
|
|
|
428 |
|
|
|
|
433 |
|
|||||||||||||||
|
|
|
|
|
|
|
|
|
|
|
|
|
|
|
|
|
|
|
|
|
|
|
|
|
|
|
|
|
|
|||||||
|
|
|
|
|
|
|
|
|
|
|
|
|
|
|
|
|
|
|
|
|
|
|
|
|
|
|
|
|
|
|||||||
|
|
|
|
|
|
|
|
|
|
|
|
|
|
|
|
|
|
|
|
|
|
|
|
|
|
|||||||||||
390 |
|
|
|
|
|
|
337 |
|
390 |
|
|
|
|
|
|
|
|
337 |
|
390 |
|
|
|
|
|
344 |
259 |
|||||||||
|
|
|
|
|
|
|
|
|
|
|
|
|
|
|
|
|
|
|
|
|
||||||||||||||||
|
|
|
|
|
|
|
|
267362 |
|
156 |
158 |
265362 |
155 |
|
162 |
|||||||||||||||||||||
|
158 |
|
166 |
|
|
|||||||||||||||||||||||||||||||
|
|
|
|
|||||||||||||||||||||||||||||||||
|
|
|
|
363 |
||||||||||||||||||||||||||||||||
|
|
|
|
|
|
|
||||||||||||||||||||||||||||||
|
|
|
|
|
|
|
|
|
|
|
|
|
|
|
|
|
|
|
|
|
|
|
|
|
|
|
|
|
|
|
|
|
|
|
|
|
P-trap 8711T |
S-trap 8753T |
S-trap 8766T |
|
|
Fig.#1 |
|
|
1 |
|
|
|
INSTALLATION |
|
|
1. REMOVE EXISTING TOILET |
1. |
|
Turn off water supply. flush the toilet and use a sponge to |
|
|
remove the remaining water from the tank and bowl. |
( |
) |
Disconnect the supply shut-off valve (if present) and remove |
|
|
the old tank and bowl. |
|
|
1037406-T01-A |
-2- |
|
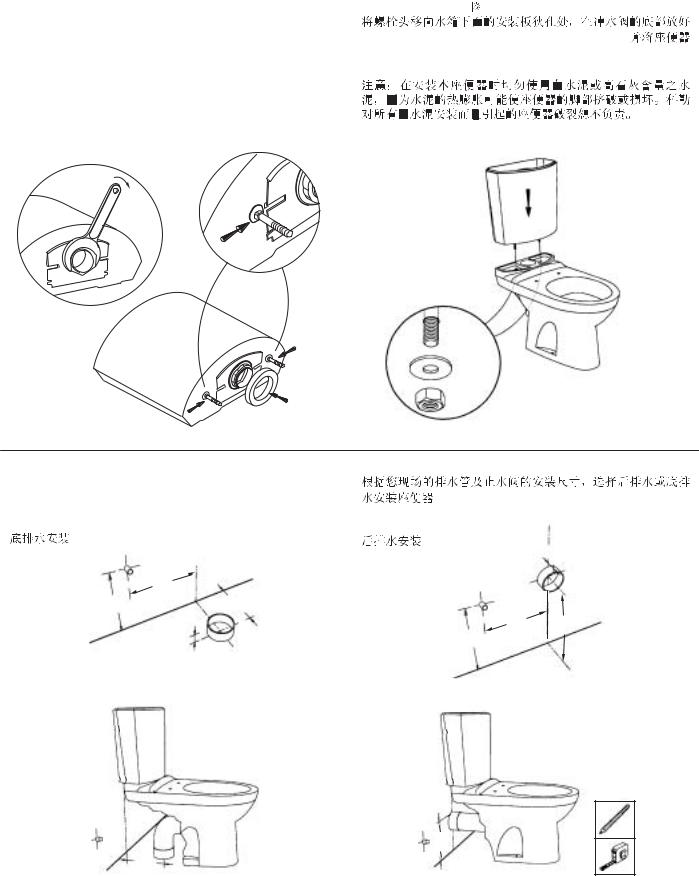
2. ASSEMBLE TANK BOLTS&WASHERS
Slip bolt heads into mounting plate on bottom of tank. Place large foam washer on base of flush valve. See Fig. #2a. Place tank on bowl and attach with nuts and washers from under bowl. See Fig.#2b.
NOTE: Do not use white cement or high lime content cements to install this toilet. The expansion of cement due to a rise in temperature may make the toilet crack or cause damage. Kohler is not responsible for any damage caused by installation with the use of cement.
Fig.#2a
 2a
2a
3. SELECT P-TRAP OR S-TRAP to installation
your toilet according to the drain and shut-off valve's Roughing-in dimensions.
S-trap installation
|
|
0 |
|
0 |
|
|
1 |
|
120 |
|
255/305 |
|
|
50 |
255/305
Fig.#3a
 3a
3a
2. 


 2a
2a 


 2b
2b
Fig.#2b
 2b
2b
3. 


P-trap installation
50
0 |
0 |
10 |
|
|
8 |
120 |
1 |
|
180
Fig.#3b
 3b
3b
1037406-T01-A |
-3- |
 Loading...