


Kohler K-13462, K-1375, K-13453, K-1374, K-13468 User Manual
...Maintenance Guide
Touchless Bathroom Sink Faucet
K-13462, K-13463 |
|
K-13468, K-13469 |
K-13474, K-13475
Français, page “Français-1”
Español, pagina “Español-1”
1124215-5-C
September 22, 2009 |
08 |
EC DECLARATION OF CONFORMITY
Kohler Company
444 Highland Drive, Kohler, WI 53044
Phone 920-457-4441
We declare under our sole responsibility that the product AC models:
Electronic Deck-Mount Lavatory Faucet (Tap) – AC Power
K-13462 |
K-13463 |
K-13468 |
K-13469 |
K-13474 |
K-13475 |
K-13462W |
K-13463W |
K-13468W |
K-13469W |
K-13474W |
K-13475W |
K-13462IN |
K-13463IN |
K-13468IN |
K-13469IN |
K-13474IN |
K-13475IN |
K-13462M |
K-13463M |
K-13468M |
K-13469M |
K-13474M |
K-13475M |
K-13462D |
K-13463D |
K-13468D |
K-13469D |
K-13474D |
K-13475D |
K-13462T |
K-13463T |
K-13468T |
K-13469T |
K-13474T |
K-13475T |
K-E 13462 |
K-E 13463 |
K-E 13468 |
K-E 13469 |
K-E 13474 |
K-E 13475 |
AC Power Supply |
|
|
|
|
|
K-13480 |
K-13481 |
|
|
|
|
to which this declaration relates, are in conformity with the relevant European Community Directive(s):
Electromagnetic Compatibility (EMC) Directive 2004/108/EC
Conformity to this directive is based on compliance with the following harmonized standards:
• EN 61000-6-2: 2005
Electromagnetic Compatibility (EMC) – Radiated Immunity, 80MHz to 1GHz (Test method: IEC 61000-4-3: 2008)
• EN 61000-6-3: 2007
Radiated Emission(Test Method: CISPR 16-2-3): CLASS B
On behalf of Kohler Co.,
Timothy J. Stessman
Codes & Standards Dept.
Kohler Company
|
|
September 22, 2009 |
Signature |
|
Date |
EC Statement
1124215-5-C |
2 |
Kohler Co. |
Care and Cleaning
For best results, keep the following in mind when caring for your KOHLER product:
•Use a mild detergent such as liquid dishwashing soap and warm water for cleaning. Do not use abrasive cleaners that may scratch or dull the surface.
•Carefully read the cleaner product label to ensure the cleaner is safe for use on the material.
•Always test your cleaning solution on an inconspicuous area before applying to the entire surface.
•Do not allow cleaners to sit or soak on the surface.
•Wipe surfaces clean and rinse completely with water immediately after cleaner application. Rinse and dry any overspray that lands on nearby surfaces.
•Use a soft, dampened sponge or cloth. Never use an abrasive material such as a brush or scouring pad to clean surfaces.
For detailed cleaning information and products to consider, visit www.kohler.com/clean. To order Care & Cleaning information, call 1-800-456-4537.
Kohler Co. |
3 |
1124215-5-C |

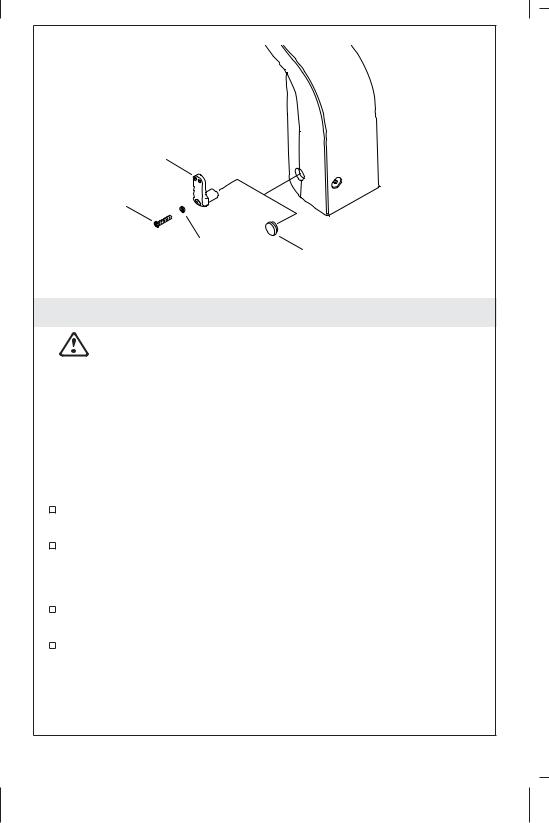
Temperature Lever |
Back of Faucet |
Screw
Temperature
Lever
Body
Screw
Spring
Washer
Disassemble/Reassemble the Faucet
NOTE: Cover the drain with the plastic cap (provided) or towel to avoid losing small parts during this procedure.
Disassemble
For K-13462, K-13468, and K-13474 only, use the 2.5 mm hex wrench provided to remove and retain the screw from the temperature lever. Remove and retain the temperature lever with the spring washer.
Remove and retain the screw from the back of the faucet.
IMPORTANT! Take care to avoid scratching the sensor lens when removing the spout.
Slide the spout forward and off the body.
Reassemble
Slide the spout over the body until the base of the spout is flush against the mounting surface.
Reinstall the screw into the back of the faucet.
1124215-5-C |
4 |
Kohler Co. |
Disassemble/Reassemble the Faucet (cont.)
For K-13462, K-13468, and K-13474 only, reinsert the temperature lever with spring washer into the faucet. Reinstall the screw to secure the temperature lever to the faucet.
If the power was interrupted, wait approximately two minutes to allow the faucet to cycle through the automatic sensing distance.
Kohler Co. |
5 |
1124215-5-C |
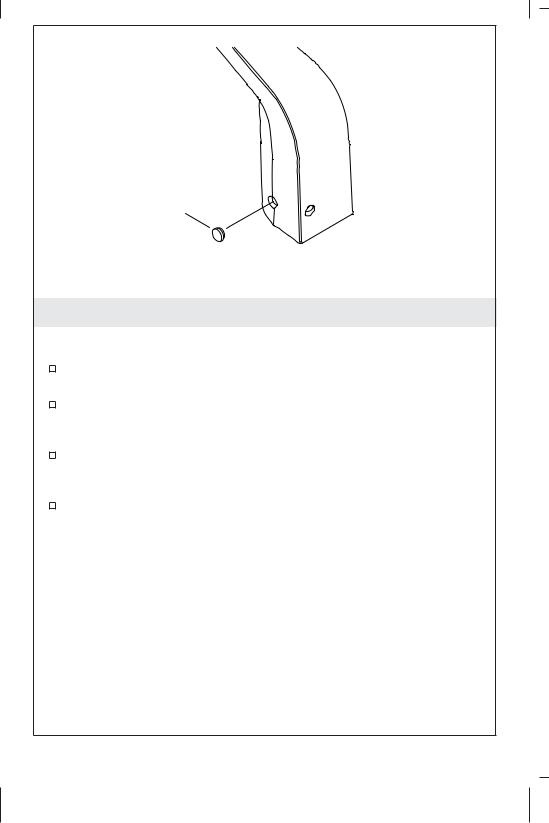
Vandal-Resistant
Plug Button
Remove the Vandal-Resistant Plug
NOTE: Disassemble the faucet following the steps in the ″Disassemble/Reassemble the Faucet″ section.
From inside the faucet body, use a screwdriver to pop out the vandal-resistant plug button.
If you are adjusting the temperature, go to the ″Optional Temperature Limiting Adjustment″ section and follow the instructions.
If you are installing the handle assembly, refer to the illustration in the ″Optional Temperature Limiting Adjustment″ section. Otherwise, reinstall the plug button.
Position the plug button and firmly press into place.
1124215-5-C |
6 |
Kohler Co. |
Handle
Screw
Spring
Washer Vandal-Resistant
Plug Button
Optional Temperature Limiting Adjustment
CAUTION: Risk of personal injury. Scalding may result if the temperature limit is not properly set.
NOTE: The water temperature does not need to be adjusted if the water temperature is below 105°F (41°C).
NOTE: Use a thermometer rated for 120°F (49°C) or greater.
NOTE: When using a tempered water supply, install the vandal-resistant plug button.
Adjust the Water Temperature Limit – Handle Installations
Turn on the water and adjust to full hot by turning the handle toward the back of the faucet until it stops.
Determine the temperature using a thermometer. If the temperature exceeds 105°F (41°C), complete the following steps.
NOTICE: Do not rotate the handle when removing the screw.
Using the 2.5 mm hex wrench provided, remove and retain the handle screw.
Remove and retain the handle with the spring washer.
Kohler Co. |
7 |
1124215-5-C |
Optional Temperature Limiting Adjustment (cont.)
Insert the handle at the desired maximum temperature. If the handle is inserted horizontally: This is the maximum hot temperature, where the water will be the same temperature as the water from the hot water supply. If the handle is inserted vertically (shown): This is the maximum cold temperature, where the water will be the same temperature as the water from the cold water supply.
NOTICE: Do not rotate the handle when reinstalling the screw.
Reinstall the spring washer into the handle, then attach the handle to the faucet.
Secure the handle to the faucet with the screw.
Adjust the Water Temperature Limit – Vandal-Resistant Installations
NOTE: If you install the vandal-resistant plug button, save the handle to adjust the water temperature at a later date.
Using the handle, adjust the water to the desired temperature.
Using the 2.5 mm hex wrench provided, remove and retain the screw, spring washer, and handle.
Position the vandal-resistant plug button and firmly press into place.
1124215-5-C |
8 |
Kohler Co. |

Aerator
Key
Aerator
Using the key provided, remove the aerator from the spout.
If applicable, uncover the drain.
Turn on the main water supply and check for leaks.
Allow the water to run through the spout for about one minute to remove any debris. Check for leaks and adjust as needed.
Temporarily cover the sensors on the faucet or close the water supplies.
Using the key provided, reinstall the aerator to the spout.
Uncover the sensors on the faucet or turn on the water supplies.
Warranty
KOHLER® Electronic Faucets, Valves and Controls
FIVE-YEAR LIMITED WARRANTY
Kohler Co. warrants that its electronic faucets, valves and controls will be free of defects in material and workmanship during normal residential use for five years from the date the product is installed. This warranty applies only to electronic faucets, valves and controls installed in the United States of America, Canada and Mexico (″North America″).
If a defect is found in normal residential use, Kohler Co. will, at its election, repair, provide a replacement part or product, or make appropriate adjustment where Kohler Co.’s inspection discloses any
Kohler Co. |
9 |
1124215-5-C |

Warranty (cont.)
such defect. Damage caused by accident, misuse, or abuse is not covered by this warranty. Improper care and cleaning will void the warranty*. Proof of purchase (original sales receipt) must be provided to Kohler Co. with all warranty claims. Kohler Co. is not responsible for labor charges, installation, or other incidental or consequential costs other than those noted above. In no event shall the liability of Kohler Co. exceed the purchase price of the faucet, valve or control.
If the electronic faucets, valves or controls are used commercially or are installed outside of North America, Kohler Co. warrants that the faucet, valve or control will be free from defects in material and workmanship for one (1) year from the date the product is installed, with all other terms of this warranty applying except duration.
If you believe that you have a warranty claim, contact your Home Center, Dealer, Plumbing Contractor or E-tailer. Please be sure to provide all pertinent information regarding your claim, including a complete description of the problem, the product, model number, the date the product was purchased, from whom the product was purchased and the installation date. Also include your original invoice. For other information, or to obtain the name and address of the service and repair facility nearest you, write Kohler Co., Attn: Customer Care Center, Kohler, Wisconsin 53044 USA, or by calling 1-800-4-KOHLER (1-800-456-4537) from within the USA and Canada, and 001-800-456-4537 from within Mexico, or visit www.kohler.com within the USA, www.ca.kohler.com from within Canada, or www.mx.kohler.com in Mexico.
THE FOREGOING WARRANTIES ARE IN LIEU OF ALL OTHER WARRANTIES, EXPRESS OR IMPLIED, INCLUDING BUT NOT LIMITED TO THE IMPLIED WARRANTIES OF MERCHANTABILITY AND FITNESS FOR A PARTICULAR PURPOSE.
KOHLER CO. AND/OR SELLER DISCLAIM ANY LIABILITY FOR SPECIAL, INCIDENTAL OR CONSEQUENTIAL DAMAGES. Some states/provinces do not allow limitations on how long an implied warranty lasts or the exclusion or limitation of such damages, so these limitations and exclusions may not apply to you. This warranty gives the consumer specific legal rights. You may also have other rights that vary from state/province to state/province. This warranty is to the original consumer purchaser only, and excludes product damage due to installation error, product abuse, or product misuse, whether performed by a contractor, service company, or the consumer.
This is Kohler Co.’s exclusive written warranty.
1124215-5-C |
10 |
Kohler Co. |
Warranty (cont.)
*Never use cleaners containing abrasive cleansers, ammonia, bleach, acids, waxes, alcohol, solvents or other products not recommended for chrome. This will void the warranty.
Troubleshooting
Symptoms |
Probable |
Recommended Action |
|
Causes |
|
1. No water |
A. Filter is |
A. Clean or replace the filter. |
flow. |
plugged. |
|
|
B. Sensor eyes |
B. Wipe the sensor eyes with a |
|
are dirty. |
damp soft cloth. Wipe dry with a |
|
|
dry soft cloth. |
|
C. Water not |
C. Verify that the water supply is |
|
turned on. |
turned on and that pressure is at |
|
|
least 20 psi (137 kPa). |
|
D. Incorrect |
D. Verify that the faucet is mounted |
|
installation. |
as instructed in the installation |
|
|
guide. Ensure that the sensor eyes |
|
|
are above the rim of the sink. Refer |
|
|
to the installation instructions. |
|
E. The aerator |
E. Remove and clean the aerator. |
|
is plugged. |
For calcium/mineral deposits, soak |
|
|
the plastic insert in a 50:50 mix of |
|
|
water and vinegar. Soak only the |
|
|
plastic insert. |
F.Sensor eyes F. Replace the sensor assembly. are scratched.
G.A flex hose G. Check the flex hoses to make
is kinked. |
certain they are not kinked. If a |
|
flex hose is kinked, disconnect it, |
|
straighten, and reconnect. |
H. Power was |
H. Wait 2 minutes after power is |
interrupted. |
restored as the sensor cycles |
|
through the automatic sensing |
|
distance. |
I.Battery life I. Replace the power supply. expired.
J.Bleed hole J. Clean or replace the diaphragm. in diaphragm
is plugged or debris exists on the seal.
Kohler Co. |
11 |
1124215-5-C |
 Loading...